Short. The purpose of ND filters is to reduce the amount of light entering the...


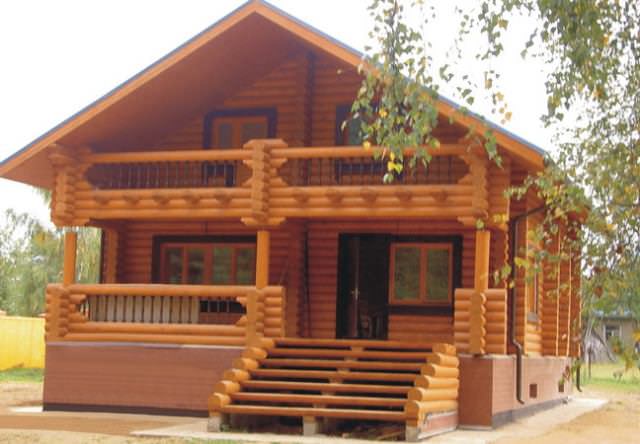
Dacha - it really is inexpensive house for life, and only from a certain time we began to consider it a luxury. In fact, if you remember the old days, then this small houses, which are half or three times smaller than the village ones, but comfortable and cozy for living at any time of the year. Therefore, it makes sense to remember how such housing is built and equipped, and take care of the maximum comfort that is possible thanks to modern technologies and materials.
So, today we are building a small country house in which a small family can live freely. We will not touch on the issue of financial problems and moving to a dacha, but simply study the issue from the perspective of the possibility of living in such a country house of our own free will, but not due to circumstances.
Everyone sets the basic requirements for a country dwelling independently, depending on personal requirements. But today we are talking about how to equip a house comfortably and at the same time economically.
Believe me, it's real!
So, what is a cozy and comfortable cottage for living inexpensively? This is a small house that has everything for cooking and personal hygiene. It is warm in winter and cool in summer. There is some inside Appliances, and on the street, in the very suburban area, there is everything for a simple holiday.
It would also be nice to have several acres of land nearby, where you can plant vegetables and fruits for personal consumption, as well as a couple of small flower beds, say, just for fun.
In fact, a person does not need so much to feel good. That is why we believe that it is possible to do without expensive intelligent systems and automated equipment. However, now you can see for yourself!
In order to reduce the cost of construction as much as possible, but not to get away from its quality, you can choose an inexpensive project. There are enough of them on the Web and even among the housebuilders themselves, who some standard projects just give to their clients. But there is always a way to get a project and not order a house from the builders, it's easy.
You can also independently create a housing project that will be convenient for you personally by location. interior spaces. The main thing, when determining construction materials, is that you have the opportunity to show the project to professionals in order to approve the possibility of construction.

To build an inexpensive country house, you do not need to chase a huge area. Start from the essentials - a couple of rooms, a kitchen, a corridor, a bathroom (if it is inside the house), a small pantry. All this can fit in about 40 square meters. It will be something like an average two-room apartment, which is quite enough for a family.
The premises themselves can be divided by area, as convenient, as long as the project passes approval.
Today, such buildings can be driven out of a wide variety of materials:
Any building material country house it can be expensive and not very expensive, and if you study the market well, then you can even get away from the standard cost by 40-60%. This is so, because the cost has a regional affiliation, and is also aligned by many builders under the "famous" of their company.
The foundation for such a house will really cost a penny. Comparatively, of course. But here it is important not only to reduce the cost of the foundation, but be sure to choose one that suits your residential building.
It is necessary to consider construction materials, roof, sheathing, because all this gives weight to the foundation. But it is also worth turning to the study of the soil, because not everywhere you can fill strip foundation and stop at this option. In some cases, if there are some problems with the soil, it will be necessary to use piles, and this is already an increase in the cost of the process.
Most of the roofing options we studied in a feature article earlier, and you can refer to it at any time to get the information you need.
As for the cost, today it is most advantageous to install slate or corrugated board on the roof.
There are other options, but it is always worth starting not only from savings, but also to calculate in advance the possible service life. In this case, depending on the type of roof, you can pay attention to shingles, ondulin and other types of roofing.
The answer to the question here is very simple - to build housing with your own hands! But if there are no qualifications, and a house is needed in the near future, what to do then? Just look for an inexpensive bricklayer or a team of coven workers who will be ready to inexpensively build a home for you in the country.
Anyone who has not encountered such a question will necessarily assume that this is impossible, but will certainly turn out to be wrong. Just look how many builders today are looking for earnings, and from the construction of your dacha, at least a little, but you can earn. It remains only to determine among the total number of those who offer their candidacy those who will be able to build with high quality and for the price tag you offer!

Today, there are a lot of proposals in dacha cooperatives. There are even absolutely cheap ones, if only a person takes the land, and with it the obligation to pay land fees and pay for water and other indicators of civilization.
It is very good if the site is selected not only by cost, but also by criteria of quality and practicality. The soil, its quality, relief, remoteness from the entrance, microdistrict or city, planting in the country, the ability to build quickly and without problems - all this is very important, but the list of requirements is far from complete. The main thing here is communications: electricity, water, gas, sewerage. Well, when at autonomous substations or even with centralized supply, the main thing is that there is light and water, the rest is simpler.
The place for the construction of a country house should be on a hill so that the building is not affected by surface or ground water. It is advisable to locate the house at a distance from the road, from unnecessary neighbors' views and road dust, and also so that the maximum number of windows faces sunny side, after all, it is very good when it is light inside the dwelling.
Since we will have a building frame type, inexpensive, but very modern, we can not deepen the foundation very much, because it will only be a waste of money. You can choose a simple columnar foundation or a strip foundation. Platforms and filler plates are not needed here, that's for sure.
Under frame house The foundation can be installed independently if there is even the slightest experience in construction. But if a construction team is working on the territory of the dacha, let it be better engaged in this process, since the foundation of the house plays a very serious role.
The frame of a country house is being built quite simply, but strictly according to the project. It is advisable to initially provide for the supply of communications in order to hide them in the thickness of the floor and walls. Also, pay attention to the need for structures such as a cellar, because it can always be under the house itself.
The installation of the frame takes place in conjunction with the installation of the truss system on the roof. If the roof of the house is on its own project, other options are possible.

Now we need to make sure that the arrangement does not work out more expensive than construction. We will not work with the interior today, as well as with accessories and decor, but we will definitely take care of ensuring comfort inside.
In terms of home improvement, all issues should be resolved with maximum practicality!
Naturally, the easiest way to provide a house with electricity is to make wiring from the central line. But there are always support options. Of course, they can take the budget in a negative direction, but they still need to be remembered.
Electricity can be generated solar panels. In this case, it will be necessary to spend money only on the purchase and installation. Further, you will receive electricity almost free of charge, however, in small quantities.
Who said that it is very expensive to provide high-quality sewerage on the site? It's just that we are accustomed to working with septic tanks and leads to irrigation fields, which costs decently in the complex. You can always approach the issue from the other side and, for example, build a cesspool from a used brick or just one concrete ring. Of course, you will sometimes have to call a car to service such a local treatment plant, but you can always reduce costs by purchasing special additives for septic tanks. These are the bacteria that will help ensure that all the drains decompose and minimize the cost of cleaning the cesspool.
Plumbing in a summer cottage is good, but if it is not there, a few tanks will save the situation. One can be placed outside, for summer use, and the second on the roof of the house, so that inside you can wash dishes, take a shower, and so on.
If we talk about the cost of these types of provision, then centralized water supply is always more convenient and cheaper. You pay the standard tariff for the meter and do not worry about the delivery of water, its purification.
It is very important that the house is warm, and there is also an oven on which you can cook. It can be a single design, for example, a modern cooking stove, which will also heat the home in winter.
Just an ordinary potbelly stove, a cast-iron stove, which is installed in any room of a country house. If not, you can build a stone oven, however, the services of a stove-maker here can seriously hit your pocket.

We chose an inexpensive, but decent and high-quality site, built a simple modern house using frame technology. Here we have almost a standard, but if we count in terms of area and inexpensive construction of a house, then here we are already seriously saving.
We also immediately remove expensive septic tanks, stoves, electrical appliances for heating from the budget. This gives us the opportunity not only not to spend money immediately, but also not to throw away money for the maintenance of such devices and systems. Of course, there are solutions that are much more practical than a potbelly stove or water tanks, but our task was to prove that life in the country can be comfortable and inexpensive. It seems to us that we did it, especially if, after the construction and arrangement of the house, you also put in order and make the entire summer cottage more convenient.
We will not argue, not everyone will live in the country, and even in conditions to which we are not quite accustomed. But now you will have a separate private house, albeit small, which is a valuable property. But in the summer it's all the best place for relax!
How to build a country house with your own hands
Here is a bunch of starting material. These are 9 concrete blocks, 4 cubes of wood - mostly 6 meter boards 5x10, but there are also 10x10 and three 10x15 - for the base. There are ordinary edged boards. Delivered April 28, 2007. 
We started on the morning of April 29th. They dug holes for the blocks, filled them with sand and put them there. concrete blocks. Foundations were laid on the blocks. 
The site is of course with a slope, therefore, in order to comply with horizontal lines, we artificially increase some blocks in height in such a simple way. 
All base beams are laid on blocks, 5x10 boards are stuffed on top - these are the lower logs of the black floor. All sides, including diagonals, are level. 
They put nailed on the logs and trimmed the boards of the subfloor. In theory, they had to be processed from below, for example, by mining. But we did not do this due to its absence. 
On top of the black floor boards, we spread waterproofing (in our case, Izospan D). On it, in accordance with the drawing, logs of the white floor were placed at a certain distance - they are placed on the end. On top of the log along the edges, boards of the so-called. bottom harness. The logs of the white floor take on the main load of the weight of the house (and transfer it to the base). 
Corner posts 10x10 were placed at the corners of the lower trim, aligned with a plumb line and fixed with temporary jibs. Beams of the upper trim were placed on top of them. Then, between the upper and lower strapping, they began to insert wall racks - exactly on top of the lag of the white floor. 
By the end of the first day of construction, we put all the racks in place, and put the logs on top for the floor of the second floor. So that the house does not stagger, they strengthened the corners with such jibs. You could also insert a couple of these in the center of each "long" side of the wall for reliability ... 
On the second day of construction (April 30), we threw boards on the logs of the second floor (the future floor of the 2nd floor) and spent half a day making rafter legs (leaned against the back of the house in the photo). After that, they were lifted with the help of 2 people, on the 2nd floor they were received by two more, put on the ends of the lag and held. The third person installed the stack on a plumb line and nailed it with temporary braces to ... anything (floor boards, walls). 
And so we put them one by one. I will note one feature of the frame - the rafters were placed on the logs, and did not hang from them. And since the logs were taken out of the walls by 50 cm, they formed a visor. 
By the end of the second day, the frame was completely ready. The rafters are installed and fixed between themselves and the house with jibs. 
It can be seen that all the load-bearing elements are aligned with the lower lags - racks, upper lags, rafters. 
20 days of work in the city have passed, and now on May 20 I came to the field to continue construction. He began to cover the waterproofing (Izospan D) on the rafters, pressing it to the rafters with thin strips. On top of the slats began to fill the crate. To get 7 meters (offsets of 50 cm on the sides) I had to put two pieces - 5 and 2 m. The joints of the boards went up the roof in checkerboard pattern(1st "purlin" - joint on the left, 2nd - joint on the right, etc.). At first I set the distance between the purlins at random, and only then did I find out about the special sizes for a metal-type roof. 
That's how it was in the beginning. 
...and so it was in the end. The crate took 2 days of work. On June 2, I brought a roof - a metal tile. Carried on two passenger cars from Moscow (150 kg per roof). 
For a day of work together, we managed to finish one roof slope. Of course, I did it for the first time - it turned out a little crooked. But how even the second slope turned out! The roof was fixed with special self-tapping screws (bought together with the roof). 
I spent almost a month and a half on business trips. I arrived to continue construction only on July 14th. I brought a white floor and lining (6m) on a truck for external wall cladding. I put the white floor inside the house upside down (so that the front side does not darken and that it dries). 
I inserted the windows into the places pre-designated for them - onto the mounting foam. I put a window sill under the window frame. 
On the second floor, I normally laid and nailed the floor boards. Pre-leaving the hatch for the stairs. 
On the pediment he placed vertical wall studs. I had to figuratively cut them under the inclined rafter boards. 
The next day, they put windproofing on the wall (Izospan A). They didn’t think for a long time - they just wrapped the house a couple of times with a roll, and then cut out holes for the windows and the door with a knife. 
On top of the wind insulation, they began to sheathe the walls with clapboard. We started from the most difficult places - from the back wall. The lining was not sawn, it was sewn entirely (6m), then cut off at the ends. Sewed with naturally galvanized nails. 
After the first floor was sheathed (1.5 days), work continued with the gables. Pieces of vapor barrier were figuratively cut out. Also figuratively had to cut out the lining for sheathing. 
Here I will especially pay attention to the gap that appeared between the upper strapping and the floor of the 2nd floor. This gap is the height of the remote logs. Although they are hemmed from below, forming a visor on the street, it still BLOWS VERY STRONGLY into this gap. And it blows both on the first and on the second floor. It must be closed. This will be shown next. 
A few days passed, and they brought me a heater ordered in advance in Pushkino. I basically chose a material like "stone wool" - slabs based on basalt fiber. Further, from the whole variety of these plates, I chose Rocklight made in Ryazan (the cheapest). The package consists of 10 boards with dimensions 1200x600x50 mm. One package is 0.432 m3. To insulate the whole house (1st and 2nd floor), I need 10 cubic meters. In short, I brought 24 of these packs. 

External work has ended, internal work has begun. Started by insulating the floor. The slabs were cut with a knife and placed between the joists of the first floor. Two plates. 

After laying one row of insulation, I covered it with a vapor barrier (Izospan B) with a bend on the walls. After that, he moved the floor boards to this place, freeing up the next space for insulation. 
Pleasant little things that are difficult to reach - the insertion of glass into the windows, do-it-yourself moldings-cornices from the windows. 
I made the door myself. An analogy with walls is a frame, insulation inside, steam and wind insulation, sheathing on both sides with clapboard. Under the lining of the outer (street) side, I put a galvanized sheet of iron. This should make it harder to cut down the door with an ax :) 
After the floor was insulated, I started laying white floor boards on top. The technology is simple - the first board is placed, nailed into the protruding spike at an angle. Then the second board is placed (the thorn of the first board enters the groove of the second) and is sewn with force to the first board - to minimize the gaps between the boards. For myself, I decided that 1mm is acceptable, but I tried to reduce it to nothing. To do this, in several places such brackets were driven into the logs. Then wedges were driven between the bracket and the board, which supported the board and reduced the gaps. After this, the board was nailed, the wedges and the bracket were removed. Of course, some boards "a little" dried out, and turned into "screws" ... I had to suffer especially with them. 
A third of the floor has been laid. 
To protect against moisture and the sun, I decided to paint the walls with a special impregnation. Chose "Pinotex". First I painted with a colorless layer, and then with a color scheme (color). The store said that colorless in itself does not protect anything, it protects only with color. The thing is quite poisonous - in the house, after painting the walls, it is impossible to stay for a week. 
Finally, I got to sealing the cracks in the ceiling, which were mentioned earlier. Everything was decided quite simply - a piece of lining was cut along the width of the next slot, nailed to the upper lining of the wall sheathing (for this it was necessary to remove the floor on the second floor in this place), closing the gap. From the inside, a piece of vapor barrier was inserted (not blown through) and fixed with bars along the logs (ceilings). 
This is what it looks like from the second floor. I had to remove a couple of floor boards to make it convenient to work. 
After the floor was laid, I proceeded to insulate the walls. The technology is the same as with the floor. Previously, I only inserted additional crossbars between the uprights - I'm going to sheathe the clapboard vertically from the inside. 
A vapor barrier (Izospan V) is also laid on top of the insulation here. It is fixed with brackets using a special construction stapler. Wherever possible, overlaps are made along the edges. 
The cornice protects the window and part of the wall from water flowing from the pediment. And grilles protect the whole house from thieves. So far, this, alas, is a necessary measure - in winter there is no one on the fields, but there were "cases". 
No sooner had the last gratings been screwed on than the snow began to fall. It happened exactly on Pokrov, October 14th. 
This is what the house looked like on October 14, 2007. In total, I spent probably a month on the construction. He did it alone if possible, but on difficult things, of course, he called for help (framework, rafters, lathing, roofing, sheathing). At the moment, the entire first floor has been insulated, except for the shelf - I have not had time to finish it yet. The inside has not yet been sheathed with clapboard. So far spent ~ 80 thousand rubles. And there's more to do... 
Literally a few days before the New Year 2008, he insulated the ceiling. Now the entire first floor is insulated. Practice has shown that with 4.2 kW of gas heating, the temperature rises to 20 degrees in half an hour (outside -7) and is maintained at +17 with constant heating of 1.2 kW. 
After acquisition suburban area for giving necessarily becomes topical issue about how to build a country house with your own hands. Well, to build it yourself is quite possible, unless, of course, a huge “palace” is conceived, requiring the involvement of construction equipment and a team of professionals.

Usually compact buildings are chosen for summer cottages, but, nevertheless, the house must have everything necessary for rest - rooms, kitchen, veranda. The latter will become a favorite place for an evening pastime all family. It is very important to make the country house cozy and comfortable, so you need to think through all the nuances of its arrangement.
The optimal material for summer cottage construction is wood, and the principle of construction is a frame structure.
Of course, the first thing that will need to be done is to decide on the place and size of the building, draw up a project, and plan further work.
The size of the future home largely depends on the area of \u200b\u200bthe summer cottage, the number of family members and the material capabilities of the owners. If you plan correctly, draw up a successful project and choose an inexpensive but high-quality material for construction, you can save space, money and time.

In any case, the first steps are drafting
Most often, a country house has a size of 5.0 × 6.0 or 4.0 × 6.0 m. Buildings of a larger area are erected much less frequently, and, mainly, in those cases when they are planned to be operated year-round. But this is more likely to be not a country house, but a full-fledged country house.
The layout of the location of the house may have to be carried out on the basis of requirements that may be established by the board of the gardening partnership, therefore, when purchasing, you need to find out about such nuances in advance. Most often, the following distances are required:
Usually, the highest is chosen for the installation of a country house. place in the area where water will not collect when snow melts or from heavy rains. High humidity under the house will never benefit any building material, but it will always negatively affect the overall strength and durability of the structure.
Most often, the following technologies for its construction are chosen for the construction of country houses: frame-panel construction, log cabins, walls made of blocks or bricks.
For summer cottages, projects of one-story houses with closed or open verandas, or terraces. Often the building has attic space, used to store garden tools and other things that seem unnecessary in everyday life, but which can always come in handy in the country. However, it also happens that in some projects there are no attic floor beams at all, and then the roof slopes also play the role of a ceiling.

If the family is large, and the area of \u200b\u200bthe plot is not as large as we would like, then you can plan a two-story house that takes up very little space at the base. In this case, the first floor can be given over to the living room, terrace and kitchen, and on the second floor - to arrange cozy sleeping places for the whole family.

Not necessarily erect in a country house full second floor, since the attic superstructure can perfectly fulfill its role. Having finished it with natural materials, you can create a wonderful healthy country atmosphere there.
Country houses are mainly used in the warm season, starting with the arrival of spring and ending in autumn. Therefore, they do not require enhanced insulation of walls and roofs, but devices for space heating should still be provided - in case of cold nights or a drop in temperature during unstable weather. Usually, electrical appliances are used as heaters, for example, convectors or infrared film emitters, but sometimes owners even prefer to install fireplaces or cast-iron heating and cooking stoves.
By the way, if the construction of a real fireplace or a brick oven is planned, then they must be included in the draft project.
There are ready-made options country houses, sold as a set in unassembled form, which you just need to deliver to the site and assemble. Any such set of parts must be accompanied detailed instructions, which set out the procedure for carrying out work, the main technological methods and connection diagrams of individual elements and assemblies.

For land owner, who has basic construction skills, it will not be difficult to assemble such a country house on your own. The main advantage of this option can be called the fact that often the kit already includes everything necessary for the electrical network of the building, for its ventilation system, and even for the installation of water supply.
Having decided on a rough plan for the future house, you need to choose the material for its construction. Not only the type of the building itself will depend on this choice, but also the comfort of staying in it, as well as the costs of its construction.

However, wooden houses have always been built, and many of them have stood for centuries. Today, special fire-retardant impregnations are on sale, which significantly reduce the risk of fire in wooden buildings. And in general - the most important thing here is not the material, but the human factor - it is the neglect of the elementary requirements of fire safety by people in the vast majority of cases that causes a fire.


This option can be called optimal, since the foundation of moisture-resistant materials will create optimal conditions for the construction of wood walls, thus becoming a reliable foundation for the house.
It is this last option that is worth considering, since it is the most popular of all types of country houses.
If there is no desire to mess with the calculations, then it is better to purchase a team finished model a house that has a certain area, for which it will only be necessary to prepare a place.
In all other cases, you will need to purchase building materials. Their type, size, volume, total number - all depending on the size of the planned building, which is determined by the project.
foundation material
For any type of foundation you will need the following materials:
- sand, gravel, cement;
- third-rate board and timber for formwork;
- brick or concrete blocks;
- waterproofing material (roofing material);
- expanded clay of the middle fraction.
Wall and roof material
Since wood was chosen for the construction of walls, then, based on this, other materials will be selected:
- bars and boards of different sizes, depending on the design parameters;
- fasteners - nails, screws, bolts, studs;
- corners different configuration, metal plates - for fastening knots;
- insulation - mineral wool, ecowool or expanded clay;
- to cover the roof, it is better to choose a light material - ondulin or corrugated board.
After the installation site of the future house is determined, the materials are purchased, you can proceed to the arrangement of the foundation. True, to begin with, you still have to decide on its type.
Even when building such a small and light building as a wooden country house, you can’t do without a foundation. In the case under consideration, one of two types is ideally suited for this purpose - this is a columnar and strip foundation. Which one to choose depends on the preferences of the builder.

How to build correctly, you can find out with all the details by following this link to the corresponding page of our portal.

However, the strip foundation is still very popular among individual developers. This option is convenient in that it allows you to make a basement under the house, however, for this, the foundation walls will have to be raised above the soil surface by 700 ÷ 800 mm. described in detail in the article, which can be found on our portal by clicking on the link provided.
If a columnar foundation is chosen, then it is recommended to remove the top layer of soil by 150 ÷ 200 mm from the site, which will be located under the house and around it by 500 ÷ 600 mm. Then fill in the resulting pit with a layer of sand of 30 ÷ 40 mm, which should be compacted. A layer is laid on top of the sand cushion medium fraction crushed stone and is also compacted, and the remaining space must be covered with expanded clay of the middle fraction. All these procedures are done so that small rodents cannot get close to the house. They do not tolerate expanded clay (especially small ones), as it contains a large number of dust and has a loose surface.

Expanded clay of fine fraction - an excellent remedy for rodents
To protect the house from the penetration of large rodents or other uninvited guests from the animal world, it is advisable to close the space under the house with a metal mesh with cells no larger than 10 mm.

For a country house optimal choice- frame construction
The frame house can be placed both on a columnar and on a strip foundation. Construction always starts from the foundation, which must be securely waterproofed two or three layers of laid roofing material.

For the floor to be reliable, it is necessary to take for the frame quality bars desired section. If funds allow, it is better to choose wooden elements not along the “lower limit” of dimensions, but by laying a certain margin in their cross section.
The table shows the optimal dimensions of the beam for frame house:


Another option is to lift the frame directly in place. For example, if a house is being built on its own, without assistants, then it will be very difficult to lift the finished frame from the shade alone to the height of the strapping, set it evenly and temporarily, until it is finally fixed, fix it. And this means that each of the bars will have to be set separately.
The bars are fixed to the lower harness with the help of powerful corners that are able to keep them in a vertical position. It is best to use not nails, but a self-tapping screw for fastening - the difference in price is not so significant, but the quality and reliability of the assembly is incomparably higher.

Then, when the upper strapping bar is installed and fixed on all other vertical racks, the section with the window opening is fixed in the place left for it.


The installation of the floor can be carried out immediately after the outer wall cladding, but only if the roof is covered with a roof on the same day. It is highly undesirable for a freshly laid floor covering to get wet if it suddenly rains at night. Therefore, it is better to solve the issue with the roof first, and then calmly deal with all other construction activities inside the house.
A few words need to be said about the types of truss systems, since, moving on to the construction of the roof, you need to have a general idea about this, to know which design is better to choose.
Rafter systems are of two types - hanging and layered.
Hanging system
The hanging truss system is distinguished by the fact that it is arranged only on external load-bearing walls and does not have other supports. It is perfect for erecting over a small country house. In order to ease the burden on wooden walls and on the foundation, hanging rafters are fastened with a puff.

Myself hanging structure consists of a transverse beam, which also performs an overlapping function, and can simultaneously be a frame for filing the ceiling, as well as rafter legs that form the roof slopes.
Layered system
The layered system is installed if the house, in addition to external walls, has internal capital partitions that will become additional points of support. Such a scheme can also be used in the construction of the roof of a country house, if it has large area and its rooms are separated by walls built on foundations.

With this system, the load on the load-bearing side walls becomes weaker, so fewer retaining elements can be used. She's great for attic structures to be used as living quarters.

An important structural element - floor beams
The beams are laid exactly above the vertical posts of the wall frame. In order for them to fit snugly on the upper strapping belt, grooves are cut at their edges. The size of the grooves can be calculated based on the formula shown in the figure.

Beams are attached to frame structure walls with nails or self-tapping screws, and in addition they are sometimes fixed on both sides with metal corners.
Having completed the installation of the overlapping beams, you can proceed to building the roof truss system. For safety reasons, temporary boarding is laid on the floor beams to ensure the comfort of moving along the attic plane during the installation of rafters.

The roof truss system can be mounted using a different sequence of fixing its elements:
The cross section of the beams or logs used for the rafter legs must be strictly maintained - depending on the rafter length between two fulcrum, and depending on the step between adjacent pairs of rafters
| Maximum allowable length rafter leg (in mm) | Rafter spacing (in mm) | |||||||
|---|---|---|---|---|---|---|---|---|
| 1100 | 1400 | 1750 | 2100 | |||||
| Section of the rafter leg (in mm) | ||||||||
| bars with a section | logs Ø | bars with a section | logs Ø | bars with a section | logs Ø | bars with a section | logs Ø | |
| up to 3000 | 80×100 | 100 | 80×100 | 130 | 90×100 | 150 | 90×160 | 160 |
| up to 3600 | 80×130 | 130 | 80×160 | 160 | 80×180 | 180 | 90×180 | 180 |
| up to 4300 | 80×160 | 160 | 80×180 | 180 | 90×180 | 180 | 100×200 | 200 |
| up to 5000 | 80×180 | 180 | 80×200 | 200 | 100×200 | 200 | - | - |
| up to 5800 | 80×200 | 200 | 100×200 | 200 | - | - | - | - |
| up to 6500 | 100×200 | 200 | 120×220 | 240 | - | - | - | - |
It should be noted that the rafter attachment point in its lower part will depend on the angle at which they are fastened on the ridge and how long they are.
If the rafter is long enough and protrudes beyond the bearing walls, then a notch is cut out on it, with which it will be installed on the strapping beam (). An example of such a cut is shown in the picture:

If the rafter ends at the edge of the load-bearing wall, then its lower edge is cut off at a right angle with respect to the Mauerlat, and the leg itself can be fixed on it using a special mounting plate, sliding support, corner, bracket, nails or long self-tapping screws.

If the house is very small, then after fixing the rafters on the strapping, tying them with a ridge beam or board, you most likely will not have to install additional retaining elements.
Detailed information about the exact one can be obtained from a special publication of our portal by clicking on the recommended link:
For the installation of additional, reinforcing elements of the truss system, the material can be selected in accordance with the recommendations indicated in the table:
Fasteners for rafters
After the rafters and additional elements form the roof slopes, you can proceed to the installation of the subsystem for roofing.
The film is laid perpendicular to the rafters, starting from the lower, eaves of the roof. The overlap between two adjacent strips must be at least 200 mm.

If, however, a soft roof is chosen to cover the roof, then instead of the laths of the lathing, the slopes are covered with a continuous one - with plywood, and then with waterproofing sheets of roofing material, which is overlapped by 150 ÷ 200 mm and glued together with bituminous mastic. Another option is to use soft bituminous decorative tiles, which are laid using a similar technology.
Some types of roofing materials have a strictly specified installation scheme in the direction, which cannot be changed. This must be indicated in the instructions attached to them.
Also, for any type of sheet roofing materials, the amount of overlap in the direction of the slope (usually 150 ÷ 200 mm), and the number of waves (relief protrusions) in the horizontal direction, along the roof, is determined.


For lining along the perimeter of the gable triangle, a special profile is fixed, into which panels prepared and cut at the right angle will be installed. Installation is usually carried out symmetrically - from the middle rack to one and then the other side - then the skin will turn out to be even and neat.

By the way, to mount the lining, besides, you can horizontally, herringbone or come up with a more complex pattern.
Detailed information about the technology can be found in the article posted on our website by clicking on link.
Now, having finished the external roofing and being sure that the rain will no longer get inside the country house, you can proceed to the installation of windows and doors, insulation, flooring and wall cladding.

Then, after checking the correct installation, the frames are attached to the wall frame with metal strips. The remaining gaps between the frame and frame bars are filled with mounting foam. After it dries, the excess is cut off, and platbands are installed around the windows on the outside of the wall, which will close the unsightly appearance of the gaps and give accuracy general view house.

The door is best installed as a block - together with the frame and leaf
Exposing the door frame, if necessary, to achieve a clear vertical position, enclose wedges (inserts) from wooden slats. The door frame is fixed to the frame in the same way as window frames, using metal strips, and the gap is filled with mounting foam.
Having installed windows and doors in all, you can proceed to the installation of the floor.

To begin with, the temporary flooring from the boards (if there was one) is removed from the lower frame, and then you need to install the subfloor.


With the floor - finished!
Thermal insulation materials
When the floor is completely ready, the walls of the house are insulated and sheathed from the inside. If the building will be used only in the warm season, then the insulation will still not hurt - it will work as an insulator of the premises from heating in extreme heat. Therefore, it is recommended to lay a thermal insulation layer not only in the walls, but also in ceiling, and if it is absent - place the insulation on the inner slopes of the roof.


That is why mineral wool is most often used as a heater - after dense laying between the racks, it will straighten out, completely filling the entire space. The material is usually selected so that the thickness of the mats and the thickness of the frame posts are the same.


If the ceiling is sheathed from the side of the house with drywall or clapboard, then we must not forget that it is impossible to step on it, since the sheathing will not support the weight of a person. It is necessary to move carefully along the floor beams.

The last stages of arranging a country house are installation work on the veranda and on the porch.
If space is left in advance for the veranda on the frame lying on the foundation, then a board is laid on this space to cover the floor (material for open areas is used), a fence is installed and a canopy is mounted.

If the foundation is raised high enough above the ground, then a porch is also attached to it.
Building a country house with your own hands is a completely doable task, but it will be quite difficult to manage without helpers. Therefore, it is best to seek help from a knowledgeable master who has experience in such work, will always give helpful advice and will show how certain nodes are correctly mounted in the construction of the house. You can "mobilize" relatives and friends - it is possible that a knowledgeable person will be among them.
The pleasure of owning your own suburban area is tripled if there is a country house on it. Indeed, in this case, you can not be limited only to seasonal work and cooking barbecue in nature in the warm season. Today, the construction of cottages is gaining momentum. Moreover, “dacha construction” houses are built from a variety of materials: from stone to frames made of timber and panels made of chipboard and fiberboard. And in our material we will consider how to build a country house with our own hands and at the same time perform all the work with maximum productivity and economic benefits.
The construction of dachas is a task no less important than the construction of a residential capital house. Indeed, on how well the installation will be performed (even if it is frame technology) will depend on the durability and strength of the building. Consider some types of materials that are most often used for the installation of country houses, and we will understand what is better to build a temporary hut in the country:

In order to facilitate the construction of a country house did not subsequently bring unpleasant surprises, it is necessary to follow some requirements and recommendations regarding the installation of the house. So, we build a cottage with our own hands, taking into account the following rules / recommendations:
Important: for a country house with your own hands, it is better to choose the highest point on the site. Thus, melt and rain water will not cause trouble. new dacha which we are building. But if the area is very small, and good house want to build, then in this case they give preference two-story house with bedrooms upstairs. On the ground floor, a kitchen and a living room are mounted.
To simplify the construction process as much as possible, we recommend building one-story house in a cottage with a gable roof and a small veranda. And attached below step-by-step instruction performance of work.
Tip: if there is absolutely no desire to mess with construction, then a novice master can simply order a ready-made modular house, which is simply assembled already on the site on a prepared foundation.

For those who do not know how to build a cottage, our step-by-step instructions with detailed description all moments. Will start with the preparation of the foundation. But first let's get everything ready. necessary materials for cottage construction. So, we need:
So, in the recommendation “where to start building a summer house”, the first point is the installation of the foundation. Under the frame house, a lightweight type of basis is suitable - columnar. This version of the foundation device will not only significantly save your money, but will also serve reliable support for construction.
Important: the strip foundation is mounted using the same technology, only in this case it is not necessary to dig holes, but a trench around the perimeter of the house, which we are building.

As soon as the foundation pillars dry out, you can start building the frame of the house. Namely - its lower platform. It is she who will become the launching pad for the walls and roof. Therefore, for the platform, you can take a beam of a larger section - 100x150 mm.
Important: when doing work in the country with our own hands, we do not forget to treat the tree with antiseptics and flame retardants. This will increase the wood's resistance to burning or rotting. Also repels rodents.

Important: the width of the overlap of the film must be at least 20 cm.

It remains to mount windows and doors to the house made. They are installed on special supports made of wood, adjusting and controlling the level of the blocks. All gaps between the frame and frames are foamed with mounting foam. After a day, the excess foam is cut off, and the remaining space is sheathed with drywall or any other building material for further finishing.
Important: it is best to install doors completely with a frame and sashes. Thus, it will be possible to align the bearing opening for the block as much as possible.
The interior decoration of the house can be done with the use of drywall and its subsequent wallpapering. Also on the GCR, you can perform plastering, painting or cladding. And the water brought to the house will make your stay in it even more comfortable. It will be pleasant and convenient to be here at any time of the year. A house built using this technology will stand for 30 years or more. Now it remains to announce to relatives and friends about the invitation to a fragrant barbecue.
By the way, if you don’t know how much it costs to build a frame house, then we hasten to inform you that such a building, taking into account the purchase of all materials, will cost about 10 thousand USD. If you don’t know what to build from, and want to make a house from improvised materials that remained on the site, then such a house will cost 1.5 times cheaper.
After work week and the bustle of the city I want to relax in the bosom of nature, breathe fresh air. The ideal option is a small summer cottage with a house. Often, dachas are simply called land plots that are distributed to citizens for growing crops. Sooner or later, the owner of such a plot has a desire to have a house where you can relax after work in the beds, spend a weekend in nature. Hiring a team is expensive, you can build a simple small summer house yourself.
Thinking about a house in a summer cottage, you should decide whether they will live in it temporarily during the summer season or it is possible to live in it throughout the year. It depends on how much money will go to the construction site. For year-round living, it is necessary to build a capital building with communications and heating. This requires a lot of money and manpower.
If only seasonal accommodation is planned, then you can build a house with your own hands. At first glance, it may seem that this is a complex and difficult task for a person who is far from construction. But, starting to deal with the nuances of construction, it is clear that it is possible to gain construction experience during construction, if there is a desire.
There are several technologies that allow you to easily and quickly build a small country house. The simplest and most cost-effective technology is frame construction. It allows you to build a house yourself without outside help. This is the cheapest option when choosing materials, as used materials can be used. True, they must be of high quality so that the structure lasts a long time. Another plus frame construction is the speed. If you make an effort, then you can build a house for finishing in a season.
On the construction market big choice various materials from which walls can be built. The choice depends on the preferences of the developer, the purpose of the future home and operating conditions. For a country house, you should select inexpensive, easy-to-assemble materials that do not require a solid foundation. Consider several options for such building materials:

You can build a country house from other materials. For example, you can use building materials from a dismantled house if they are in a condition suitable for construction. But when you should correctly calculate all the loads.
It must be remembered that the heavier the walls, the stronger the foundation needs to be made.
Any construction consists of stages and begins with design. Even a simple country house needs a plan and a construction project. In a country house, there must be a kitchen, which can be combined with a living room for the sake of space saving, dividing the rooms with a light partition. If a second floor is planned, then it is better to place bedrooms on it. For a summer cottage good option An additional area for relaxation is the veranda.

After designing, the next steps involve:
Each stage requires certain knowledge and skills. Therefore, before embarking on a particular type of work, you should study the nuances associated with their implementation.
Having decided on the place where the house will be located, you need to spend preparatory work under the foundation. To do this, stumps are uprooted, bushes are removed, the upper fertile layer earth and the surface under the foundation is leveled. Then, using a tape measure and a corner, markings are made for future corners and walls. In place of the corners, pegs are driven in, and threads are stretched between them, limiting the size of the pit. The depth of laying the foundation should be below the freezing depth. Usually a pit is dug to a depth of about a meter.
Since a light foundation is needed, it can be made from railway sleepers. At the bottom of the pit, first of all, a geotextile fabric should be laid - dornite 150. It is used as an additional reinforcing layer, as well as preventing the penetration of capillary moisture to the structures of the house. Next, sand is poured in several layers, each of which is well compacted. A layer of gravel or crushed stone is arranged on top of the sand. At the next stage, sleepers are laid on the concrete layer, which are tied together. Then the structure is poured with concrete.

For small house a concrete strip foundation is suitable. To do this, you need to dig trenches about 50 cm wide around the perimeter of the house and internal walls, install the formwork, lay reinforcement in it and pour concrete. The foundation must stand for about 3-4 weeks for the concrete to gain strength.
More solid, but also more expensive. It can be used if it is planned to build a basement. Blocks in this case will play the role of walls. The ceiling can be made of slabs or a reinforced frame can be arranged, formwork can be built and poured with concrete.
A popular foundation for the lungs frame houses is a columnar foundation. A sufficient diameter of the pillars will be 30 -40 cm. The pillars are either dug into the ground to a depth below the freezing depth, or are installed on solid foundation directly to the ground. Be sure to install corner posts. Intermediate put at a distance of 2-3 m from each other.
The floor is made of tongue-and-groove boards laid on the foundation. First, a draft floor is arranged. Beams are laid along the perimeter of the installed pillars. Then you should install the cross beams on opposite posts. Thus, a subfloor frame is created. Beams can be made of wood, metal, concrete - depending on the financial capabilities and preferences of the developer. A moisture-resistant insulation is laid between the lags, and a flooring. An easier way to install the floor is a concrete screed.
The easiest house to give - a house with frame walls.The technology of building walls is simple:

Simultaneously with the frame of the walls, the frame of the ceiling is made. Beams are installed around the perimeter, and then the device is made cross beams. At the stage of interior decoration, the ceiling is sheathed with plywood, drywall or other finishing material.
For a country house, a simple roof is best suited - shed. But if there is a desire to have a large attic space, which, if desired, can be landscaped and get additional usable area, then you need to mount a gable roof.
A truss system is installed for the roof. It consists of several farms. It is more convenient to assemble individual parts of the roof on the ground using a template. After the individual elements are assembled, they begin to install the rafters and install trusses on them. First, a facade truss is installed. The correctness of the installation is checked by the building level. Then the facade truss is attached with slopes. A similar truss is installed at the opposite end of the roof, and is also temporarily fixed with slopes.
A cord is stretched between the installed extreme trusses, along which all intermediate structures are installed. When all the trusses are installed, their lower ends are stapled to the floor beams. From above the farm is fixed with a ridge beam. The outer part of the roof is covered with a windproof and moisture-proof film, on top of which a counter-lattice is mounted.
The roofing material should be selected before the roof is installed, as the manufacturer of the roofing material specifies which truss system is needed. To avoid problems when working with roofing materials, when buying them, you should take a laying scheme. The roof can be made from ondulin, shingles, slate or any other roofing material that will be most beneficial.
It is important during construction to process all the wooden elements of the house with special chemicals, which protect the tree from decay, fungus, biological effects, increase fire safety.
When the walls and roof are ready, the exterior and interior decoration remains. A budget option facade finishing - painting OSB boards oil paint. Siding is another attractive finishing material. With it, you can give the house a beautiful appearance and choose the color you want. The slats are easily attached to the frame of the house with screws.
For facing the slopes of windows and doors, you can use the remaining sheathing boards. Window openings should be carefully processed with a jigsaw and planer. Window slopes should be sheathed wooden slats 19 mm wide. Facing boards from the outside are nailed to the slopes. If it is necessary to insulate the walls, then it is better to carry it out from the outside so as not to take up the usable area inside the house. Inexpensive and easy to install insulation is mineral wool.
To conduct electricity, you need a waterproof power cable, which is better to run underground. To protect the cable from damage, it must be laid at a depth of at least 60 cm, sprinkled with sand on top with a layer of about 10 cm. To protect the cable from shovels when digging, it is better to put a protective film and bricks on top.
If not great experience electrical work, it is better to entrust the wiring of electricity to specialists.
interior decoration you can create an atmosphere of comfort and peace, where you would like to relax and unwind. Therefore, despite the fact that the dacha is a seasonal habitat, I want it to be cozy and comfortable at home. This is achieved by the interior and furnishings corresponding to the chosen style. Often frame houses are sheathed with clapboard from the inside. For small dacha fit rustic style. Furniture can also be made with your own hands, then the house will be filled with home warmth. The more work you do with your own hands, the cheaper the construction will be.
If you prepare in advance all the materials necessary for the construction of a frame house, then you can build a house on your own in one summer season. Finishing work you can do it gradually, as far as possible, the main thing is to build a box at home and install a roof. The better the work is done, the longer the house will last.
Short. The purpose of ND filters is to reduce the amount of light entering the...

The obligation to pay calculated tax payments arises for various ...

The receipt reflects a lot of useful information: a list of documents that you ...