INSTRUCTIONS AND PROPHECIES OF THE Blessed MOTHER ALIPIA GOLOSEEVSKY, Kyiv...


With all the love of sauna lovers for wood as a traditional material for its construction, this material has a number of disadvantages, the main of which are fire hazard and relatively low durability. From this point of view, brick, being the second most popular structural material, has a number of advantages:
Of course, the brick has drawbacks that somewhat reduce its attractiveness and complicate the construction of a bath:
The main disadvantage of a high-quality brick bath is its higher cost compared to wood, so we can say that it is usually built by non-poor and demanding people. Moreover, the brick is piece material small size, which means that you can build a bath from it according to any, the most unusual projects.
Let's look at a few photo projects of brick baths.
A small bath, which has a size of 9 sq.m., which makes it ideal for small summer cottages. It is quite capable of being built by any owner on their own, without the involvement of specialist masons.
The bath project involves pouring a strip foundation with a depth of 50-60 cm (for non-rocky soils) or to a freezing depth - for heaving ones. The wall can be uniform in 1.5 bricks. The roof truss system is simple, gable, roofing- slate, shingles or metal profile.
Inside there is a rest room and a combined washing-steam room of the same size - about 4 sq.m. - area. The dimensions of the steam room imply the simultaneous presence of 2-3 people in it.
A more spacious and comfortable bath on one floor made of bricks with an area of 20 sq.m. Here we see a separate washing and steam room, the area of \u200b\u200bwhich allows 3-4 people to take bath procedures at the same time. A spacious rest room allows you to place the necessary amount of furniture for a good rest and recovery. Each room, including the steam room, has windows, natural light from which will save energy, and rest in a room with windows is more complete from a psychological point of view. In addition, the windows allow you to ventilate all rooms after using the bath in order to prevent the walls from getting wet.
This project brick bath rather complicated - the owner will need to attract a professional bricklayer, as well as roofing masters, to build the walls. It is enough to make such a volume on your own hard work almost impossible for a non-specialist.

If there is free space and a great desire, this project can be implemented with a terrace instead of a porch, where summer time it will be possible to carry out most relaxation, combining bath procedures with cooking, for example, barbecue. Naturally, for this, a stationary or portable barbecue grill can be provided on the terrace.
This bath project is a real masterpiece of architecture, available for implementation to very few homeowners. It would be more accurate to call such a building a guest house with a swimming pool and a bath - there is everything for a full life in the summer; if the owner provides for normal heating, you can live year-round.

Through the vestibule of the first floor we get into a spacious and well-lit lounge of 22 sq.m. From here you can go to the wardrobe and, undressing, go to the shower (next to which there is a bathroom) and to the steam room. After having taken a steam bath, through the rest room we get into spacious room where the pool is located.

In such a bath complex, one cannot do without a powerful supply and exhaust ventilation system, which, of course, must be designed by a specialist engineer, taking into account all the features of the location of the rooms and their purpose.

The bath project provides for the presence of an attic, while the entrance to attic room located separately from the street. We climb the compact stairs to the second floor, from the platform of which we get through the door to living room large area with windows. A family of two can perfectly accommodate here, especially since the attic is equipped with a bathroom and a small kitchen.
Materials for building a bath: wood, foam block and brick. The erected brick structure is slightly superior to the construction of the thermal conductivity beam, wins in terms of fire safety and service life.
To reduce the cost of the amount of material, special masonry methods are used - voids in the wall. They are compacted with other raw materials. Due to this, the thermal parameters of the structure increase.
Brick as a building material has several advantages:
The place for construction must be dry. If there is a river or other body of water nearby, then the building must be located at least 30 m from the water. At a closer distance, there is a danger of spring flooding.
When erecting, fire safety regulations are taken into account, the distance to any building is at least 12 m (firewood baths) and at least 5 m when heated by an electric or gas boiler.
The brick steam room scheme includes drawings and plans of the facility. They reflect:

Based on the documents, calculations of the entire bath system for stability are made. Schemes are the basis for the implementation of construction work. - standard sizes for a suburban area.
The bath construction project includes a set of engineering and technical documents:
Upon submission of all documents, an estimate is made. It indicates all types of work, the volume and cost of the object. The paper covers the quantity and price of materials.
Construction costs consist of several stages of work:
The base of the bath can be tape and columnar. For it is recommended to use a columnar foundation, it is 10% cheaper. The tape base is used more often because of the ease of installation. The price of a foundation on piles for a small structure is from 30,000 rubles.

The price of brick walls depends on the brand and manufacturer. It is taken into account that the cost of building material varies from region to region. Since the wall is laid in two bricks, the bath from it turns out to be more expensive than from other material.
The average price of red full-bodied raw materials (250x120x65mm) is from 10 rubles apiece. D for a small one-story bath 3x3 m in size, about 5500 bricks will be needed (laying in two bricks). For the construction of one and a half - about 4200 pieces, for laying in one brick - 2800.
Inexpensive roofing - shed roof covered with ruberoid or slate. The price of a soft roll of roofing material is from 270 rubles per roll. For a roof, the minimum number of layers of material is two. The area of a shed roof is calculated from the multiplied length and width of the base. The height of the lift and the length of the overhang are added to the value. The cost of a standard slate sheet is from 180 rubles.

calculation of approximate costs
At the last stage, the laying of communication systems, the oven, insulation and finishing are taken into account. Their minimum price, taking into account the material:
With this in mind, the minimum cost small bath will be in the region of 137,000 rubles.
When building a room with additional rooms, a bath will cost at least one and a half times more. But it can be used instead of brick, reducing costs.

The following requirements must be met:
If the construction is planned with, then it should be borne in mind that the room differs in its location and configuration. The veranda can be glazed. But this incurs additional costs. How a bathhouse with a gazebo and a barbecue may look like is described in detail in this
Arbors for a bath are of the following types:
The construction of the bath begins with laying the foundation. The foundation can be tape and columnar. Its choice is determined by the materials used for the object. Strip foundation - brick, foam blocks and other piece raw materials. Columnar - mostly wood. Rarely used foundation on piles and bored base.
It is erected for a bathhouse located on the ground from forest, garden or swamp soil, as well as for. First, a foundation pit is dug, about 1 m is enough for a bath. Sand 20 cm thick is poured into the trench, it is watered and compacted. The next layer is crushed stone (10 cm), poured cement mixture. From above - again sand. The result is several layers of raw materials.
If the soil is prone to movement, then the depth of the base should be more than 1 m. A polyethylene film is laid on the finished foundation or the surface is poured with a thin layer of concrete (no more than 10 cm). The mixture hardens for about 5 days.
The next step: installation of formwork with a fixed height above the soil surface (30 cm). Reinforcement is being installed and assembled into a frame. Sections are connected by wire. The formwork is filled with concrete, a layer of 20 cm. The mixture is compacted to eliminate voids.
Concrete is poured from a height of no more than 0.5 m. This will prevent the composition from delamination.
The formwork is removed a week later, after the mortar has hardened. The outer walls of the foundation are smeared with mastic for waterproofing, roofing material is laid on top, the sinuses between the base and the soil are covered with clay or sand.
It is erected on the ground with coarse sand, fine gravel or clay. Construction takes place by installing concrete or brick pillars at intervals up to 2 m. The main rule is to ensure the design of the exact vertical position. Post size: 50x50 cm.

A hole is dug for the pillars, if up to 1 m, then without spacers, more than one meter - additional fastenings from boards are needed. The depth should be 30 cm more than the foundation itself, width: from 20 to 40 cm in each direction. A pillow of sand and gravel is laid at the bottom of the pits, it is poured with water and compacted. From above, polyethylene or roofing material is installed.
Formwork is installed in the pits along the walls (the vertical is checked by a plumb line). The foundation is reinforced with longitudinal reinforcement with wire. Its height above the soil is 20 cm. Concrete is poured into the formwork and left until the composition has completely solidified.
Work begins after the completion of the installation of the foundation. The plinth is made of bricks in several rows. The top row is equipped with an auxiliary opening for ventilation. Drain pipe mounted under the base of the structure and displayed at a distance of at least 5 m.

Brick walls are of three types:
An economical option is ring-shaped laying. Installation requires the presence of transverse walls installed every three bricks. The gaps are filled as the septum grows. Compaction of the filler: every 15 cm. The third layer is watered with lime.
It is taken into account that the basement and often the base of the building below the waterproofing is constructed from solid bricks, above the insulation is hollow material. The mixture for construction is kneaded from sand (grain from 1 to 2.5 mm), cement, water and lime.
For the construction of the corners of the bath, a mooring cord is required (a guideline for laying a row). The use of the tool ensures horizontal and straight masonry. In addition, a building angle, level is used. External walls are laid at least one and a half bricks, internal partitions- allowable in one.
over windows and doorways jumpers are installed. When installing them, the horizontal row is observed.
The height of the lintels should be from 6 to 9 rows of masonry, the length should be 1.5 m more than the width of the opening. For lintels, selective bricks are used, which are installed on a mixture of grades of at least 25. The design requires timber formwork. Before laying, a thin layer of cement of 2 cm is applied to it. Reinforcement is inserted into it - steel rods of 6 mm.
The jumper on the formwork is kept up to a day.
The source of heat in the bath can be:
The heater is installed in three ways:
The location is regulated by SNiP 41-01-2003. For correct installation ovens comply with the requirements:

The bath must have fire safety equipment.
The roof is single-pitched and double-pitched. Comprises load-bearing frame. Its elements: roof truss, lathing and roofing. A mauerlat is installed on the brick box of the bath - a wooden beam connecting the structure and the rafter. Mounted to wood rafter system, a crate is laid on top of it.

The design of the truss is determined by the type of floor and roof. For a shed roof, the rafters rest against the walls of the building. The greater the height difference between the walls, the higher the angle of inclination. For a gable structure, a series of successively placed triangles is formed, consisting of rafters and lintels. The highest point is the ridge of the roof. Here a reinforcing crossbar is installed.
The crate is stuffed on top of the structure with different pitches. For roofing material no more than 1 cm, for corrugated board up to 50 cm.
A waterproofing barrier is used to protect the building from moisture. Membrane film is used. A waterproofing layer is installed on the rafter system and covered with a crate. Steam barrier between ceiling insulation and lining. The film is laid with an overlap of 20 cm, the sheets are fastened with construction tape.
Basalt wool is used as a roof insulation.
The ceiling of the bath inside is not insulated with polystyrene foam or polystyrene foam. The materials contain toxic phenol fumes that evaporate during the heating of the room.

At the end of the construction of the roof, they put on it roofing material. Sheathing is carried out with wood or siding. The outside walls are finished with plaster. A metal mesh is attached to the surface, holding the applied mixture.
You can decorate the walls half-timbered style. The base is covered with plaster and painted with light-colored paint. A decorative layout of artificially aged dark-colored parts is applied to the surface. When sheathing from the inside, lining is used. Profiles and rails are attached to the wall with dowels or nails. Foil thermal insulation is laid between the material and the wall.

The necessary communication is carried out in the erected structure. The water supply is supplied with a metal-plastic pipe, it is previously laid under the soil in a protective sheath with insulation. Sewerage is being installed fan pipe from plastic underground. It connects to the common drain manifold of the house.
Electricity is supplied by underground and overhead cable lines. In the absence of special skills, it is better to use the help of professionals.
The construction of a bath is a serious and troublesome business that requires the preparation of a design and permits. A brick structure expands the design possibilities of the building and allows you to diversify the construction projects.
The first mentions of baths are found in historical documents about Ancient Greece. Of course, appearance ancient Greek bath was completely different from modern version, but was based on the same principles: heating the room to high temperatures and creating conditions with high humidity.
The traditional material for the construction of baths is wood. conifers, but this is far from being an axiom. For example, today it is no longer possible to surprise anyone with the appearance of spectacular, modern baths from red brick.
Photo of a brick bath, which is a spectacular addition to a suburban area
Despite the high cost of construction, brick baths are especially popular. Does not stop the builder and long-term heating of the premises in winter period. Additional insulation walls, ceiling and floor will help to smooth out this shortcoming. Construction and operation brick baths has many advantages:
increased fire safety;
building durability;
safety and environmental friendliness of the material;
the ability to create unique projects.
A brick bath looks great and does not need additional exterior decoration.
An important stage in the beginning of any construction is the design of the facility. You can build an excellent brick bath using ready-made standard project or by developing it yourself, taking into account personal needs and preferences.
If the site has limited space, you can get by with the construction of a small 3x4 bath.

Large areas of the site give free flight to the imagination and make it easy to implement a project of any size.

Regardless of size, the bathhouse includes several rooms of different purposes, located under one roof and separated by partitions:
rest room.
The presence and location of other premises are planned at the request of the developer. Depending on the purpose of the building and its size, the number of additional rooms is not limited.

On our website you can get acquainted with the most construction companies presented at the exhibition of houses "Low-rise Country".
Thoughtful interior layout and convenient location necessary elements in the bath facilitates its operation and maintenance. Even small rooms require division into functional zones. This will allow them to be used for their intended purpose.
When equipped front door in the rest room, in winter cold air enters the room and cools it down. This can be avoided by using one of the suggested methods:
construction of an insulated vestibule at the entrance;
device covered veranda;
installation of a capital dividing partition in the rest room.

An example of a project and layout of a brick bath
Brick bath projects include a detailed development of each element:
foundation;
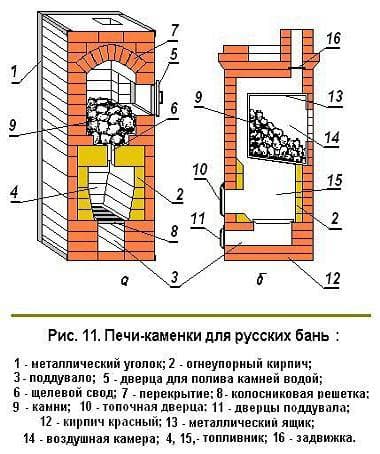
The main object of the bath project is the stove. It should be easy to use and perfectly warm the room. The size of the oven depends on the area of the bath. An equipped place to store a small amount of firewood will greatly facilitate the maintenance of the stove. It is most convenient to have it on the side of the rest room.

Metal ovens, offered by manufacturers in a wide variety of variations, heat up quickly and are easy to install. A metal furnace is most often surrounded by a row of bricks that protect the metal from overheating.
Bath projects large sizes often include the construction of a bathroom, kitchen and other premises. The implementation of such projects is complicated by the heating device, because the rooms must be evenly heated. To do this, install additional heating systems:
gas boilers;
electric heaters;
solid fuel boilers;
convectors.

Installing a combined heating system allows you to use the most affordable way heating baths made of large bricks and regulate costs.
On our website you can find contacts of construction companies that offer. You can directly communicate with representatives by visiting the exhibition of houses "Low-Rise Country".
The bath is a fire hazard, so when choosing a place for its construction, some features must be taken into account.
The distance from neighboring buildings and the boundaries of the site should be more than 12 meters when burning wood and 5 meters when using gas boiler or electric heating.
For the construction of a brick bath, it is better to choose an elevated area that is not cluttered with buildings.
When planning construction on the shore of a reservoir, it is necessary to retreat at least 15 meters from the banks. This will prevent flooding during the spring flood.
The entrance to the bath from the south side will facilitate operation in the winter. This arrangement is especially true for regions with heavy snowfalls. In spring, the south side is cleared of snow much earlier and dries out faster.
If windows are provided in the bath, they are located on the western side.

In order to save money, the bath is often combined with summer kitchen, garage or any other object, installing one blank wall between them.
A brick bath is a building with a fairly large weight, so it requires a solid foundation to be formed. It is laid below the freezing point of the soil. For different regions these indicators are individual and can vary significantly.
Most often for a brick bath choose strip foundation providing a secure base for a heavy object. Despite the high cost and low speed erection, the strip foundation fully ensures the strength and reliability of the building.
Difficult soil, problematic terrain and deep freezing of the soil in winter need pile foundation. Piles are installed at the corners of the bath, piers, and also every two meters.

The construction of a reliable brick bath has its own characteristics and requires the formation of a wooden or metal grillage.
For the construction of baths, red brick is most often used. The construction of walls takes place in accordance with one of the technologies:
laying in 1.5 or 2 bricks, followed by insulation;
the construction of double walls with the laying of a heat-insulating layer.

Masonry of 1.5 bricks has excellent strength. The erection of walls begins from the corner, maintaining a strict perpendicular between them.
Depending on the location of the brick in a row, there are:
spoon rows, which are laid with the long side of the brick along the wall;
bonded rows provide for the location of the brick with the short side across the wall.

A cord is pulled along the future wall for orientation in the horizons, the ends of which are installed between the extreme bricks.
Masonry walls made of bricks have a number of features.
The solution is applied to the entire surface of the brick in a uniform layer.
The brick is leveled on a plane with a trowel handle, removing excess mortar.
A pick hammer is used to split the material.
When laying walls in two bricks, the mortar is applied in in large numbers sufficient for laying both rows.
Broken bricks are not used in piers and dressing stations.
For uniform distribution pressure loads of heavy walls use masonry dressing.
The technology for building walls for a bath in 1.5 bricks can be viewed in the following video:
Cold winters require insulation of a brick bath. External insulation of brick walls is rarely used. This is due to the peculiarities of the operation of the bath in the winter.
Internal insulation allows you to warm up the room much faster in winter. Particular attention is paid to the steam room. Regardless of the outside temperature, the sauna must be heated to at least 60°C.

Photo of a brick bath project after insulation
The construction of the walls of the bath in two rows provides for the laying of an insulating layer between them. Here you can use:
mineral wool;
expanded polystyrene;
You can leave the air gap empty.
As a decorative layer for interior decoration of the bath, you can use wooden lining. It has excellent moisture-resistant qualities, is resistant to temperature extremes and is a safe material for operation.
The lining is attached to wooden frame with a layer of insulation. As a heater, an environmentally friendly material is chosen, which perfectly resists the growth of fungi and bacteria, is resistant to a humid environment and can keep its shape well for many years.

Aluminum foil is used as a vapor barrier for a brick bath. It plays the role of an excellent moisture-proof layer, reflects thermal radiation and does not allow heated air to pass to cold walls.
Traditionally, it is considered that the best bath- from a classic tree, but today it is increasingly giving way to a more alternative option - a brick steam room. This trend is dictated by the many advantages of brick, which make it very attractive for building a bath. But, of course, there are also disadvantages that must be considered. That is why, if you decide to build a brick steam room with your own hands, it will definitely not be superfluous for you to find out the features of the material, as well as get acquainted with phased technology construction and photos - all this will help you most successfully implement your own bath project.
You can’t decide in any way whether you should build a brick steam room or not? The advantages and disadvantages of this material will help to determine.

Country bath made of bricks
If for you the advantages of a brick bath outweigh its disadvantages, we proceed to construction.
The foundation for a brick bath is laid according to the following scheme:
Advice. In order for the crushed stone to grab well, it can be pre-mixed with a small amount of cement mortar.

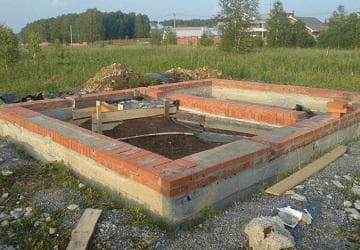
Foundation laying
For the construction of walls, red brick should be used. Required amount It is easy to determine the material: divide the area of the bath box (the total height and total width of the walls multiplied by each other) by the area of \u200b\u200bthe selected brick.
Advice. When calculating, add 5% to the resulting indicator in case there are broken bricks in the batch.
There are two ways to lay bricks:
To bond the bricks, prepare a mortar of cement, lime, sand and water. It should be plastic, but not liquid. The optimal thickness of the solution layer is 10 mm.

The construction of the walls of the bath
After the walls, proceed to the construction of the roof:
When the main construction work is completed, proceed to the hydro and vapor barrier. They can be carried out in two ways: painting and pasting.
The painting option involves covering all the internal surfaces of the bath with various coating materials: bituminous mastics, acrylic suspensions, epoxy resins, rubber gels - all these compounds are able to provide a brick building good protection from moisture.
The pasting method involves covering surfaces with roll or panel insulators. The most commonly used roofing material and foil polyethylene foam. They are either glued to the work surface, or fixed with wooden slats. Seams and corners are sealed with special aluminum tape.
Important! Before using roll or tile insulators, all the cracks of the bath must be covered with bituminous mastic.
You can also combine these two methods - stick roofing material or polyethylene foam directly on the coating material.
After waterproofing, the bath needs to be insulated. Start with the walls:

Bath heater
Warming the floor of the bath can be done as follows:
As for the insulation of the ceiling, here you can use both the already mentioned foam boards, and mineral wool or foil-coated fiberglass:
Important! Before insulating the ceiling, the crate and plywood must be treated with antiseptics.
And now you can start interior decoration steam room.
Thus, building a brick bath with your own hands requires a lot of time and effort, but this is an absolutely feasible task. Follow the instructions, thinking through each stage of construction, and then you can get a full-fledged steam room even without professional help.


Owners country houses have long been able to fully enjoy all the benefits of civilization: water is supplied to the cottages, they are heated with modern boilers, they are equipped with a water heating system and sewerage. Nevertheless, paying tribute to traditions, but rather not wanting to give up the opportunity to get incomparable pleasure from visiting the steam room, they stubbornly continue to build baths. Even if the bath is not being built at the same time as the house, a suitable project is selected over time and construction begins.
The traditional material for the construction of a bath house is wood, it can be a log cabin or a beam. But the desire to equip the bath more comfortably, or even build bath complex, became the reason for the use of materials more practical and modern. Today you can often find a bathhouse made of brick or foam concrete, materials that allow you to build in the house not only a steam room, but also:
The choice of brick as a building material is based on:
Of the negative points to remember:
Nevertheless, the construction of brick walls significantly expands the design possibilities and allows you to diversify the projects of brick baths, especially in terms of their decoration: walls can be lined with ceramics, ceramic granite tiles can be used on floors.

As for the thermal conductivity of a brick, it is much higher than that of wood 0.56 W / (m * C) versus 0.09 W / (m * C), therefore, to ensure heat saving, a large wall thickness and installation will be required additional system thermal insulation. In addition, for warming up brick wall much more time will be required. For example, the walls of a bathhouse built of logs will warm up in a couple of days, a brick house that has cooled down over the winter will give off the cold and dampness accumulated in the walls for several weeks.

In construction, several options for the construction of walls are used. Building a brick bath will require a reasonable choice of one of the options.
However, design a wall thickness of less than 250 mm, i.e. in one brick is not recommended. And the reason here is not in the thermal insulation properties of the brick, but in the need to create reliable bearing structures which will allow the installation of floors and roofs.

As for the cost of construction, a do-it-yourself brick bath, made in accordance with the fourth option, will be cheaper, because. installation of insulation inside the room and its decorative finish will be combined, while the second and third options involve a separate installation of a layer of insulation, which will not eliminate the need for sheathing and decorating the internal surfaces of the walls. Moreover, the technology of building brick walls with internal insulation will have a cost less than the construction of a log house.
The only losing moment will be the need to build a stronger foundation. If the question arose which brick to use for a bath, then the answer is unambiguous - only red, which is different long term service and heat resistance.

There are many different options for planning a bath house and its decoration; finding a suitable one in terms of functionality and cost will not be difficult.

You can opt for a minimalist option, you can build a real complex, including a bath, sauna, shower room, swimming pool, relaxation room and beauty treatments.

Only one, but very important condition- the project must be completed by a specialist, a bath is a room with a high risk of fire.

The depth of laying the foundation should correspond to the depth to which the soil freezes in winter. Used to build the foundation solid brick, at least up to the lower level of waterproofing, then you can use hollow. When planning the dimensions of the building, it should be remembered that the dimensions of the walls must be a multiple of 150 mm if bricks of 24x12x65 or 100 mm are used for bricks of 24x12x88.

During the construction of baths, a strip foundation is also often constructed.
The laying of the walls begins from the corners, laying out several on the adjacent corners - they are connected with a cord, further laying of the wall is oriented towards it. Laying along the mooring cord will make the wall straight, the rows horizontal, with the same thickness of the seams.

The mortar for laying bricks should be prepared in accordance with the norms, and when laying, make sure that it fills the seams to the right extent, depending on whether masonry is being done, tychkovy or spoon rows are laid out. It is also required to observe the correct dressing.
For laying the first row, you can use only high-quality solid bricks. Laying should begin with the bricks of the outer layer. Broken bricks can be used for spoon rows on the inside of the wall. It is not recommended to lay piers, walls, supporting sections and corners from the battlefield. Bricks should be moistened with water before laying, especially at high air temperatures.
The thickness of the internal load-bearing walls should be at least 25 cm, partitions can be laid out in half a brick or a quarter. If the length of the partition laid out in a quarter of a brick is more than one and a half meters, then it will be necessary to reinforce the masonry every three rows.
The locations of doors and windows are arranged in the usual way, using wooden bars or 120th corner, installation wooden structures best done while laying walls.

For plastering works a mortar consisting of 2 parts of sand and 1 cement is used. To give special strength, they practice applying plaster on a metal mesh, which is pulled over nails hammered into masonry joints. The seams on the front surface that will be plastered are filled with mortar to a depth of 10-15 mm, if the wall is not finished, then the seams are filled flush with the wall surface. If an excess solution is applied, it should be removed immediately with a trowel. To give the seams on the surface an aesthetic appearance, first vertical, then horizontal seams are stitched.

Since brick is a material prone to moisture absorption, it is impossible to allow the brick wall to come into contact with the ground. Therefore, the arrangement of a waterproofing system is a must. It is recommended to treat the surface of all walls with bituminous mastic or gluing with roofing material.
To install the insulation, beacons are attached to the walls, forming a gap of about 2-4 cm or wooden slats, for their installation, plugs are laid in the seams. Next, insulation boards made of wood concrete are stuffed onto the rails, mineral wool, lightweight concrete or other insulating materials.

As finishing material for internal walls baths usually used clapboard. You can also sheathe an unprepared wall, while you will have to drive wooden corks into it, which will later be used to fasten planks or metal profile. The space remaining between the brickwork and the lining is filled with tiled insulation, glassine, mineral wool, and tow. If horizontally stuffed boards are used as a finishing material for the walls, then the brick bath can be insulated with expanded clay.

The roof of the bath should be primarily functional - its task is to maximize the steam and heat insulation of the room. By design, the roof can be double-pitched or single-pitched, depending on architectural solution bath house. It makes no sense to complicate the design especially - an excessive number of turrets, bends, complex elements on a small and not tall building will look out of place. In addition, the process of performing the work will become much more complicated.

The roofs constructed on the baths can have a non-attic structure or an attic. When choosing an option, you should consider whether the bath will be used in winter time. A roof with an attic is much warmer, it helps to reduce heat transfer through the ceiling. In addition, the attic can be used to store bath accessories, brooms, etc. If the roof is high enough, you can equip a lounge under it.
For a bath that will be used in the summer, a non-attic design is quite suitable. On the flat roof you can place water containers or equip a fruit sushi. Shed roofs are easier to perform and cheaper in cost.
After deciding on the shape and design of the roof, you should consider the option of its insulation. There are several ways to insulate: laying insulation under the rafters, between them or above them. Most often, they resort to laying thermal insulation between the rafters. To do this, first lay a layer of vapor barrier material. From the bottom, the rafters are hemmed with plywood or board, providing for the presence of voids. It is they who are filled with any of the heat insulators, for example, with basalt wool. When laying thermal insulation, the density should be controlled - otherwise, the so-called. cold bridges. It is better to lay the material in two layers, placing the sheets in a checkerboard pattern.

If the bath house is built from cheap, but practical materials that do not have an entirely attractive appearance, then it is often decided that the bath should be lined with bricks. beautifully executed brickwork on the facade will give the building an attractive and aesthetic appearance.
Since brick is a rather heavy material and significantly increases the load on the foundation, it is more rational to use it as facing material brick tiles - it has a small weight, but everything technological characteristics material she supports. Facing with brick or tile is also often subjected to dilapidated structures that have lost their attractiveness.
INSTRUCTIONS AND PROPHECIES OF THE Blessed MOTHER ALIPIA GOLOSEEVSKY, Kyiv...

Eufillin dropper in ampoules is used to treat pathologies that ...

Among all ointments for the treatment and prevention of joint diseases, the most ...