"The woman is created for a man, not a man for a woman" - such a postulate ...


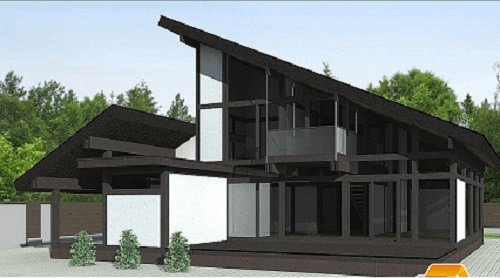
The half-timbered houses are a kind of symbol of the Middle Ages, who included his second birth in the twentieth century. Their architecture invariably affects the uniqueness of the image, the efficiency and thoughtfulness of the constructive scheme. Characteristic feature facades - not hidden behind the trim, but, on the contrary, exposed to show wooden frame. Such vintage streets are very romantic, and modern building is the display of an elite lifestyle, aspiration for freedom and originality.
Actual tendency of elite housing today - a combination openwork wooden elements and large glazed planes:
Thousands of years ago, ancient architects were noticed that the most efficient and economical use Wood - Application It is not for the construction of solid walls, but for the construction spatial carcass From vertical, horizontal and inclined elements, which will serve as a support for the roof. Special popularity has acquired such a scheme in areas characterized by wood deficit. She was known in the ancient Greeks, Romans, Egyptians, the Chinese. In particular, most of the population of Pakistan and India currently lives in such houses.
Interesting! The most ancient frame building from wood, which has survived so far is the temple in Japan, erected from the cedar over 1,300 years ago.

Improving carpentry skill, the accumulation of construction experience, the desire to cheaper housing led in the 20th century to the emergence of the facrarchy technology of building buildings in Germany. Such houses have gained widespread throughout Europe, in particular in its northern regions, from Poland to Brittany. The name of the structural circuit fully displays its essence and comes from the German "FACH" (panel) and "WERK".
Medieval buildings on the Rimberg Square in Frankfurt am Main, Germany:

In Europe, in the Middle Ages, structures were performed from solid wood, and free space The planes of the walls were filled with a mixture of clay with straw, branches and other garbage. Special peculiarity of narrow facades gave a combination of racks, beams and squeaks left in original form, and plastered surfaces. Wealthy citizens could afford to use expensive wooden panels decorated with threads. At the moment, such houses have been preserved, the age of which exceeds 500 years.
Since 1995, the historical part of the German city of Quedlinburg, where more than 1,300 objects of colorful architecture has been preserved, UNESCO is protected:

Interesting! The characteristic feature of old buildings is to hang up the top floors above the bottom. This is due to the abundance in Germany precipitation and strong winds, as well as the narrowness of the streets with the emergence of the first. As a result, the upper floors protect the lower tiers from wetting than the service life extends.

Traditional grades designs performed from modern materials look no less effectively than medieval.
The era of mass individual construction in the 1970s gave a new birth of technology, but already in a rethinking, futuristic form, which the famous German School of Bauhaus played a considerable role. Instead of wood at this time, architects began to apply reinforced concrete and steel. The popularity has acquired large glass planes that have replaced with deaf walls. The invention in a few decades of glued wood allowed the new one to embody old technology Construction. This material is more durable and perfect compared to the traditional timber. At the moment, such houses are very prestigious and popular in Sweden, Switzerland, Germany and many other countries, and the United States and Canada - no exception.
Thanks to the development of technologies and a change in architectural tastes, the style has now acquired new variations:
Tip! Panoramic glazing The owners of cottages are recommended to arrange on the facades facing the courtyard and the garden, or in the case of a significant burden of construction, relative to the street - so you will get a magnificent view outside the window, a feeling of unity with nature and good lighting. Otherwise, some discomfort is possible caused by the need to constantly hold the curtains omitted to protect against prying eyes.

From the house of Kager with showcase windows offers a beautiful view of the surroundings.
The main characteristic of the half-timber is to perform the carrier functions of the frame, while the walls are exclusively for the fencing of the premises. The use of frame-framework technology allows you to simultaneously save building materials and reduce the weight of the construction, which makes it possible to build a lightweight, provision of stability and stiffness of the structure, minimizing construction time.
Bearing elements of walls and roofs are performed from, mainly pine. Racks and horizontal runs form a frame of walls. Diagonal discharges provide rigidity frames and seismic resistance to the structure. The lower strapping bar is attached to the foundation coated with waterproofing layer, by means of anchor bolts. From the side of the floor, thermal insulation is carried out by polystyrene foam.
The inner partitions have a frame structure and are performed from a bar fixed to the bearing elements using frame dowels and is filled with soundproofing material.
The installation of bearing parts is traditionally performed by means of sufficiently complex and accurate compounds - wrinkles, on the "swallow tail", secret thorns and the like. Currently, it is allowed to use metal corners, plates, brackets in particularly responsible fasteners. They are desirable to arrange in places inaccessible to the eye.

Important! All wooden elements to increase the strength indicators and protection against rot and insects must be impregnated special oils. Antipiren treatment significantly reduces the flammability of the material.
Filling the frame cells is carried out after installing window and door blocks. For this purpose, almost any slab materials are used:
A variety of finishing options allows you to create, both strict and elegant facades, for which the blanks are pre-stained with moisture-resistant compositions or choose color lining. Then the material with screws is attached to the cooker. Warm house with mineral Wat. From basalt or quartz fiber.
Outdoor finish options:

The popular solution is currently stained glassware from heat-saving low-emission glass windows based on argon aggregates. They reduce heat loss and, accordingly, heating costs. Most of the glazing is deaf, packets with opening fraumgas are mounted in separate cells. The windows are inserted directly into the frame with a pre-selected quarter.
Interesting! With antiquity, the facades of the half-timbered houses were decorated with overalls:

Facade, decorated with sockets
The wiring of electrical cables and water supply is performed inside the cake of floors. All communications are paved in corrugated hoses. Polyethylene pipelines are used for water supply. In houses, especially stained-in type, practical solution - Device of warm floors. Wiring to rosettes, switches, lighting devices are performed inside partitions. A complex system of forced ventilation is often satisfied.
The roof of the house is traditionally rafter with two or four slopes, but there are also modern architectural solutions with flat roof. A characteristic feature is the lack of a attic and attic, the presence of wide overwhelms that protect the walls from atmospheric precipitation.
Metal tile, ondulin, a variety of species can be used as roof covering soft roof. The use of a large-scale genuine tile or slate is undesirable - they increase the load on the bearing structures. The concept of stained glass glazing can be continued on the part of the roof. Modern technologies offer for this purpose electrochromic translucent fills providing automatic shading and high strength Coatings.

At the moment, the roof may have quite bizarre configurations while maintaining the traditional leveling of levels and a large removal of soles.
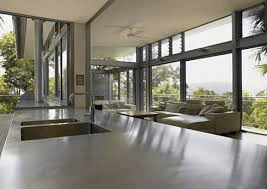
The most common styles of the formation of the inner space of the house correspond to its appearance - These are Country, Provence, Ecosil, Scandinavian, minimalism, which is inherent in the abundance of light, free planning, some asceticism and bright shades. It is less likely to find a classic or postmodernism. Ideally looks an interior in the style of high-tech with its minimalism and an abundance of metal.
Tip! When placing the room, it is not necessary to consider the elements of the frame exclusively as a scenery - the beams can be used to mount the lighting devices, devices of suspended shelves and cabinets, the implementation of other original ideas.
Constructive elements in the interior:

The minimalist bedroom interior is formed by dark ceiling beams, contrasting with light shades of the finish:

The ultra-modern interior in the style of High-tech, built on the contrast:

Overlooking the forest:

Living room option with panorama of the river: 
The tree in the interior sets his stylistry:

The buildings please the eye with accuracy and air product, and from a practical point of view, they are characterized by the convenience of the building process - it is similar to the builder assembling and is performed in short time With minimal labor costs. At the same time, facilities are distinguished by a long service life and strength - three hundred year old buildings are still preserved in a magnificent state.
The advantages of houses include:
The style allows you to implement the most bold architectural ideas, creating spectacular exteriors - light exterior staircases are perfectly combined on facades with structural elements and roof of an unusual configuration:

Unfortunately, humanity did not invent the ideal construction style, but most of the problems in a few centuries of the construction of half-timbered houses were solved. The walls of the Saman were significantly losing the brick buildings in the ability to maintain heat, but at the moment the situation has changed the emergence of new innovative insulation.
Attention! Most thermal insulation materials It is necessary to replace approximately every 25-30 years.
The minuses of technology include:

From cozy country house The first-floor stained glass windows overlook the lawn and the surrounding forest, which makes it possible to feel unity with nature.
Cottage owners reviews are distinguished by variety, but mainly they have a positive or neutral color. The hosts emphasize that to build them, especially projects involving panoramic glazing, preferably outside the city. Such houses are characterized by increased comfort, excellent natural light, soundproofing and heat-saving qualities. But when choosing a variant with large glazed planes, even in the middle lane of Russia, heating costs are 30% higher than during the operation of ordinary buildings.
The reviews separately emphasizes the spaciousness of the rooms and the fact that all communications are hidden in the floor and do not spoil the view of the interior. The universality of the architecture is noted - to issue inner space You can in any relevant modern style. Country, minimalism, hai-tech uses the greatest popularity.
Some wishing to become the owner of the half-timbered cottage scares the high cost of its construction. Then people resort to tricks - the imitation of the style is erected, which costs significantly cheaper.
Reviews also have such inconvenience of buildings that are inherent in all wooden houses. This is the need for a clear observance fire safety and regular processing of structures to protect against mold and insects.
Buildings can be built on ready-made drawings or individual projects. The main complexity of their development is the required maximum detail of all structural elements. For example, if 1000 needs them for the construction of them, each of them should be separately calculated and is drawn. The same applies to all nodes, connections, and so on.
The project of the house "Davinci-Haus" area of \u200b\u200b579 m 2 on the slope and river bank from the company LIDVUD HAUZ LLC is characterized by originality and harmoniously fits into the surrounding landscape:

Interior of the building: 
The interior of the pool overlooking the river: 
Layout of the lower tier with a swimming pool, bar and gym: 
The second tier with a spacious living room: 
Upper tier: 
"Copenhagen" with an area of \u200b\u200b381 m2 with panoramic glazed from the company "Freedomhaus" in the village of Liikola Slub, located in the Leningrad region:

Plan of the 1st floor with the office and the SPA zone:
 Plan 2nd floor with 4 bedrooms and spacious wardrobe:
  The project "Accord 162" area of \u200b\u200b241 m 2, developed by the Finnish company "Lumi Rolar":

1st level with two terraces, veranda and flowing space of a common zone:
 2nd level with second light living room and domestic balcony:
 A mansion of 224 m 2 with partial panoramic filling of the planes with double-glazed windows from the studio "aspmic":

Plan 1 level:

Four-bedroom mansard level plan:
 Project of the company "Good Wood" with an area of \u200b\u200b184 m 2

Launch of the 1st floor:

Planning mansard floor:

Option unusual cottage The area of \u200b\u200b244 m 2 with a flat roof from the Studio "FaShwerk":

Living room - Wooden beams create comfort indoors:

Plan of the 1st floor with spacious terraces and free zones:

Plan of the 2nd floor with a second light living room and gallery:

The Euro-House project of 259.47 m 2 is the development of the studio "Treograd". Dark wood and panoramic glazing harmoniously fit into the forest landscape:
1st floor layout with a garage, two terraces, a common area and an office: 
Planning 2nd floor with two bedrooms and second light above the living room:

One-storey cottage from the company "Modern wooden houses"- painted in white color Wood combined with large glass planes:

Cottage plan with a free flow of a common zone, 4 bedrooms and sauna:

Mansion "Hannover" with an area of \u200b\u200b234 m2 from the company "Intek" with a roof of cement-sand tile:

Plan of the 1st floor with a common zone, garage and a guest room:

Mansard floor plan with 3 bedrooms: 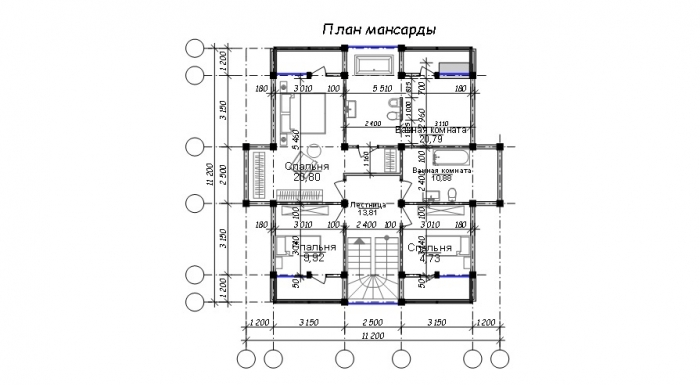
78 m 2 cottage project with wall filling ceramic blocks and tiled roof from the company "Z500":
1st level with shared rooms, cabinet and terrace:

Mansard with 3 bedrooms: 
Historically, such houses in different countries were distinguished depending on the current architectural style during the construction of the national trait. Currently, the most elite option is the presence of panoramic glazing that fills the frame. Comfortable microclimate in the premises is created by the use of modern technical equipment. To fill the walls, traditional brick, concrete blocks, sandwich panels can also be used.
Facrow architecture - approach nonstandarity:
The originality of the "rustic romance" in modern performance:
Cottage castle from childhood fairy tale:
Terraced Facrowing Construction - Optimal Solution for South Regions:
In modern Germany, there are close 2 million buildings of this type. There are several styles of German structures, but their common trend is the desire for the original decor of the facades.
Modern use of structures for bridge in Berlin:
Another interpretation of the step in the high-altitude architecture of Germany:
Option of preserving historical buildings in Kramrburg:
Glazing can reach 60% of the area of \u200b\u200bexternal wallsthat today is a sign of elite construction. This decision "blurs" the borders of the house, contributing to the unity of the person and the surrounding landscape.
Panoramic glazing in modern variation of the house is, first of all, the possibility of mergering the interior and the surrounding landscape, the opportunity for a person feel one whole with the world, without distinguishing himself with him:
For example, being in the house, stay on the shore:
In the forest, too, not bad, despite the fundamentally modern approach to architecture:
Note! Outside the landscape can also be reflected, but your personal life remains hidden from prying eyes: And this office is a half-timbered design with filling in innovative glass windows:
This is the most affordable option This type of cottage, despite the use of modern materials and technologies. Height of one floor, without attic ensures the extreme ease of construction, which allows you to save on the construction of the foundation and the whole building. The area of \u200b\u200bsuch houses not exceeding 100 m 2 makes it easy to place them in small areas and provide comfortable conditions For the life of a family of 3 people.
Cottage "Kova Fahverk" Made in traditional style with a spacious terrace and large windows on the facade illuminating the living room:
Compact house of an unusual form with sunscreen items is ideal for privacy:
 Cottage of 122 m 2 provides comfortable conditions for the family:

Unusual implementation of technology from "wild" logs:
Due to the specifics of constructive solutions, the cost of designing and erection facrifical building Essentially higher than a regular skeleton house. The final amount depends on the complexity of architectural, constructive, engineering parts of the project used by materials. Construction carrier carcass At home costs an average of 300 dollars. The remaining means - filling the wall structures, the construction of partitions, the roof device, finishing work, laying engineering communications.
Important! Price of the construction of the square meter of the Turnkey Cottage domestic production It is about 500-1000 dollars, imported - 1400-2000 dollars.
The choice of the project depends only on your needs, taste preferences and financial capabilities: 
A complete construction time, which can be done at any time of the year, ranges from 3 to 6 months. When the project is fully prepared, the production of the framework in production takes up to 2 weeks, the same amount is its assembly on the site. The rest of the work can be performed in 2 months.
Fakhverk is one of the most complex framework technologies, so the construction of such a building is the most reliable to trust the specialists. Independent construction of the cottage requires serious skills and experience with wooden structures, thorough knowledge of calculating the rigidity of spatial circuits. Negative example There is now under Petersburg - a large number of half-timbers because of the violation of the technology soon we collapsed, although in Europe they are centuries.
Not the most technologically sophisticated option for construction:

Important! In the presence of certain construction skills, it is still possible to build such a structure - in this case it is desirable to use the factory-made kit, manufactured by the project, where all the elements are carefully calculated and are made in accurately compliance with the drawings. As a result, mounting works resemble the designer assembly according to the instructions.
The manufacturer supplies ready-made ready for construction site. wooden designspreviously processed by means of insects and rot and having grooves for connecting parts. When assembling at home, you need to consider the technological sequence of work:
Even such, at first glance, a complex project can be realized in life with your own hands:

The choice of style is a great version of the demonstration of its own originality and at the same time a certain commitment to the classics. It is especially relevant at the present time, when people thanks modern technologies, virtually independent of climatic conditions. Today, extensive opportunities are open to replacing the simple copy of the style with the introduction of new extraordinary elements into it.
The video below is modeled in the dynamics of the assembly order facrifical houseThat allows for a few minutes to understand the essence and features of the construction of the construction.
Despite its simple, uncomplicated, single-table roofs are in demand, rational, especially for country house-building. The roofs with one slope are also massively used to arrange garages, receiving buildings, economic buildings. About how a single roof is erected with your own hands step by step, you will learn below. The multi-sided options for the roofs are complex in design, and a single-table can be made with their own hands, as it is, in fact, the rectangle, which is located in the same plane, does not have bends. For a single bed, by the way, you will leave much less building materials than any other, it will be more resistant to seasonal manifestations (snow, wind, rain).
Construction of a garage with a single roof, photo:
Advantages of a single roof:
 Stock Foto Chicken coop with walking for chickens
 Despite its simplicity, a single roof can be quite creatively beaten in designer decisions. The angle of its slope directly depends on the climatic features of the region where you live. If snow winters are familiar to you, then the degree of inclination should be more (so that the snow slipped better), if your home is located in a windy place, then the bias need to do less. For the same reasons, the inclination of the roof should be sent to the opposite of the facade to the precipitate "leaving" for the house.
The roof is a single-sided aircraft and non-ventilated type. The first option is used for residential buildings, the slope varies from 8 to 25 degrees. In such cases, the air exchange is ensured by the insulating layer and special holes located on the sides of the roof.
 Prostral - garage and canopy
 The non-ventilated option is more often installed on garages, sheds, extensions to the house, the angle of inclination is predominantly small - 3-6 degrees.
The calculation of the schematic drawing of the future house begins with the determination of the desired angle of inclination and a suitable covering material for the roof. Most often, professional flooring, metal profile, rubberoid, tile, slate, metal tile or Ontulin are used for such single-sided structures. Soft tiled or frontal coating is optimally suitable for very small slopes - from 5 to 10 degrees. The slate with a profile is more suitable for the "average" tilt angle indicators - from 20 to 30 degrees. For metal tile, the slope of at least 35 degrees is required.
Choice roofing material It is determined by its ability to interact with atmospheric precipitation and timely remove them from the surface. For example, from slate, professional flooring, roof tiles snow comes down much easier.
To build with your own hands, the roof of a single-table type you will need a standard set. construction tools, necessary building materials. Wood materials (lumber) should be of proper quality with a maximum humidity of 22%. Everything wooden materials It is recommended to predeter antiseptic means (for example, from the "Old Arad").
In addition, you should have fastening details in stock: riglels, struts, sores.
Rigel is a horizontal part that acts as a support for carrying structures, it distributes the load of the rafted to other beams.
The struts are a type of supports that are located in flights provide greater stability of the entire design.
Troops are beams acting in the role of the rafter system.

 Single-line extension to the house
 Single roof, photo:
You must have:
The rafter system will be entirely dependent on the size of the future at home and building materialFrom which the walls were erected. The rafters are always installed on Mauerlat, if the construction is small and the length of the span does not exceed 4.5 meters, then the scheme of the charter system of a single-table roof will be extremely simple. It will consist of the main Mauerlat bar and a rapid support. If there are no small sizes of the structure, and the length of the span is more than 6 meters, then the installation of strengthening subcording legs is simply necessary.
 Scheme of the rafter system
 The rafyled must be installed according to the construction rules, so that several years of operation have not yet been implications. Do not forget about safety rules - install reliable, strong temporary boards, for which you will move during the building process.
 Photo setting rafal
 The workflow provides for the following steps:
Consider the all-making all building process:


 Roof dryer with solid cloth, photo
 After the root, it is placed in the final roofing coating, its installation is made according to individual construction features.
Qualitatively laid, fixed rafters do not bend under weight 70-100 kg. If this fact was discovered when laying, it is necessary to enhance the framework.
Technology laying a "cake" layers can be varied due to certain circumstances, have some additions. Sometimes, for greater reliability, the waterproofing layer is re-layer on top of the insulation. It will not be worse from this, but in all cases should be given special attention Fastening.
Nail wooden elements Designs are best with the help of nails with a flat hat or construction stapler, the step rate should be 15-20 cm.
One of the most important moments It is fixing edge waterproofing material. It is raised under the sinks of the roof, the residual segment should be at least 20 cm, after which they are bubbling with nails or, again, pass the stapler.
It is best to take a wooden rail and sweep it with appropriate nails (with a step of 10-15 cm) - this is the so-called "folk" method of arrangement of a single-bed roof. Thus, you will be sure that the air flows are not penetrated under the waterproofing film, they will not cause large-scale damage in the invasion of strong winds.
 Errors fastening the edges of the roof of the garage, photo
 In the photo above, the edges (overhangs) of the roof were enshrined. For strong wind metal cloth with metal waterproofing filmLike a light cloth, it was easily discarded to the side.
 Garage how tools
 For garages, Saraikers, baths, arbors are most convenient exactly such a type of roof. Single roof design provides a number of advantages for the so-called auxiliary buildings.
 Fastening the rafter frame to the wall of the house
 If we consider an extension step by step, then it will become clear that its roof is adjacent to the wall of the residential structure. Thus, its rafter system is equipped separately from home. The lower ends rafters are located on the front wall of the extension, but the top is attached to the most building. It is very important to ensure the competent connection of the rafter frame of an extension and the main wall of the house. Too hard attachments, too, use it is undesirable, because the speed of shrinkage at home and the attached building can be different. Because of this difference, the cracks of the walls can form.
IN this case The most convenient to put the beams on the brusade frame, which is adjacent to the house (attached to the wall). And the place itself (seam) between the bar and the wall is filled with polyurethane sealant. To lay roofing material on the roof of the extension is needed with a falsestone, as well as to start the junction under the passage of the house. This must be done in order for the then atmospheric precipitation to be sediated through the connection place. It is usually used similar roofing material on the roof of the house and an extension - for aesthetic considerations.
If you decide to build a shed with a single roof, the arrangement of the roofing system will not differ significantly from the above-described construction method.
It happens that sheds are brought from a bar. In such cases, the top of the church acts as Maurolalat. Otherwise, there are no significant differences in the rafter system of single-table roofs of different buildings.
Video, how to quickly make a simple winter charts for horses:
Single garage roof is done by a similar method.
 If the walls of the garage are built out of the brick, then the edges of the beams, the rafting boards are embedded in the niche arranged for this. They are made in advance in the walls and stipulate on the stages of the design of the structure. Wood fragments are recommended to wrap the waterproofing coating before releasing into these niches. In this case, the range of the rafter is 60-70 cm. The front wall of the garage is high. From it there is a slope down to the back of the construction, the entrance gate is located in it. The roof should perform by 30-40 cm from the wall, form a small ot.
Taking note of the above information, it becomes clear that this version of the roof is practical, functional, structurally simple. Single roof, equipped with your own hands, can withstand powerful wind, snow loads. Such a roof will be warm, thanks to a small area for air penetration. If you did everything right, then it will surely serve you not one dozen years.
In this article, I want to tell how a simple single single roof is erected. Why did I call her simple? Just because her rafter farm consists only of rafters. No racks, dysproke, sidelines, etc. there is no. This kind of roof is most often used in the construction of small garages, sometimes baths, various attacks to the house, any economic buildings, etc.
In general, when you read in the literature or the Internet about one-piece roofs, we usually see such a statement - allegedly they are the cheapest, simple in the construction and reliable.
Regarding the cheapness and simplicity - absolutely agree, but at the expense of reliability - is ready to argue.
Of course, I may not live in that climatic zone, but I have never seen for my practice that the roof has two or more rods in a private low-rise building (for example, hip, tent, etc.). All collaps that have ever met were on single-sided roofs. Their cause is almost always snow loads plus the weight of people who work on the roof (for example, throw off the same snow).
So why this happens. I think everything is simple. Often, developers are not very serious and deliberately suitable for the construction of a single-pate roof. Basically, one of three errors is performed, or several minutes:
There is an unacceptable small angle of inclination;
As rafters, boards with an inappropriate cross section are used;
Between the rafters is too big.
How to avoid these errors, we will now understand the example of the construction of a single-piece roof over the garage.
Suppose we have a box of foam concrete blocks with a wall thickness of 30 cm. Its dimensions are listed in Fig. 1.

Picture 1
Having started blocking blocks, we must decide with the angle of inclination of the roof. What should be guided here?
I think many know that for each roofing coating the minimum slope angle is defined, in which it can be used. These values \u200b\u200bare presented in Table 1. Composed on the basis of SNIP II-26-76 * ("Roofs" - the updated version 2010):
Table 1.

I am sure of some of you who have already studied similar tables on the Internet, they will smash a little, seeing such numbers. I want to tell them about a small confusion, which was formed on various construction sites due to the banal inattention of their authors. Often, making up a similar sign, they take numbers from the above-mentioned SNIP II-26-76 *, but do not notice that this document The angles are indicated as a percentage (%), and not in degrees, as we used to measure them from school. I will not explain how to translate interest in degrees. Online this information is (there are both formulas, there are signs). We are in principle no need.
Now another remark. Each manufacturer of any roofing coating (whether metal tile, or bitumen tile, etc.) itself installs the minimum roof inclination angle for its products. It is indicated in the installation instructions. For example, from different manufacturers of metal tiles, you can see the numbers and at 14 °, and at 16 °, and others. Often these numbers are higher than those defined by SNiP and specified in Table 1.
But that's not all. All the figures given above characterize the angle of inclination of the roof, in which this roofing will not be overflowing water between adjacent elements under certain weather conditions. And these conditions in our country are very and very diverse. So snow loads differ significantly in various climatic zones. And the winds may differ in general and within one local settlement, depending on the location of your construction relative to others.
Snow loads affect the possible deflection of the rafting system, in which the geometry of the roofing coating changes. In addition, with a large number of snow, the so-called "snow bag" is often formed on the roof (see Fig. 2):

Figure 2.
Strong wind can also push rainwater through the joints of the roof elements.
I looked at my time various sourcesBut nowhere has not found the specific dependence of the minimum angle of inclination of the roofing coating from climatic conditions in this region. I understand no one and did not take it. All use values \u200b\u200bbased on previous many years of experience. I can say that for single-sided roofs, in the middle lane of Russia, it is usually not recommended to make an angle of inclination of the slope less than 20 °. From this value will be repelled and we.
So, let our garage (Fig. 1) we decided to make an angle of slope of the slope equal to 20 °. We will cover a profile. Now we need to decide which height you need to spread the walls. In this case, a low wall we make 2.4 meters high. This value is selected in each case individually, depending on your personal preferences and features of your construction. The height of the opposite wall is determined by a simple formula:
H V \u003d n + in × Tg α,
where n c is the height of the high wall;
H H - the height of the low wall;
B - the width of the construction (garage);
α - the angle of inclination of the skate.
In our case, H V \u003d 2.4 + 4.8 × TG 20 ° \u003d 4.2 m. (A little rounded to the biggest).
Now you can proceed to the masonry of the garage foot. Please note that the high wall has the last row not laid. Why, it becomes clear later.
STEP 1: Roof construction start with Mauerlat installation. As a Mauerlate, we use the timing of 100x150 mm (Fig. 3). It puts the flush with the inner walls. Note how the inclined wall is posted.


Figure 3.
Also, instead of a bar, you can use two stitched nails 50x150 mm. I wrote about this example in an article about the installation of Mauerlat. There are several ways to fix Mauerlat on the wall. In addition to them, I want to show you another one, which we sometimes use when erecting the roof on gas and foam concrete walls, when the customer does not want to do Aropoyas (Fig. 4):

Figure 4.
A reinforced roofing corner of 90x90 is used here. To the aerated concipe, it is secure with two "GB "dowels with a diameter of 14 mm. They keep them wonderful. Such corners put on Mauerlat about 80-100 cm.
Please note that under Maurylalat it is necessary to put the ruler, so that there is no contact of the tree with aerated concrete and metal. On all subsequent figures, the runneroid is simply not shown, but the presence of it is necessarily.
Step 2: We start setting the rafter. To do this, first of all, we need to decide on their cross section and step between them. In this, we will again help the program described in the article "" Thestropyl system. Calculation of rafters and beams of overlapping "().
I want to clarify again. I am not the author of this program. But I always use it, for the lack of anything else (more or less understandable). In the strength of the roofs that we have already built, I am completely sure. This confidence comes in the construction process when you are climbing on the rafters and when you inspect the rafter system a few years after the construction of the house (I have such opportunities).
The program is certainly not ideal and sometimes you yourself have to do any assumption. Therefore, do not judge strictly. The main thing is that all these assumptions work up to increase the strength of the strength of rafters and beams.
Let's go back to our garage. Choose as an example region - Moscow region. The amount of snow and wind loads will be 196 kg / m 2. Where does this figure be bored, I described in detail in the article (reference above). I think it makes no sense to repeat. By the way, just here I make one assumption in the calculation. In the program, when entering the source data, the value of only the snow load is requested (Fig. 5). There are no graphs for entering wind load at all. Therefore, I simply add it to the snow, although I know that it acts in another direction (snow - from above, wind-side).

Figure 5.
Step rafters We introduced 0.5 meters. The result of the calculation (in the Slim tab.1) is shown in Figure 6. For rafters, the boards selected with a cross section of 50x200 mm. Of course, the step is small, but where to go. If you take it equal to 0.6 meters, then this cross section does not pass. Of course, you can take it as a rafted, for example, a ram 150x100, then the minimum step will change. Here you can already improvise. I used to work with boards or cross section 50x150, or 50x200 mm.

Figure 6.
By the way, in the figure, the distance between the supports (4.2 meters) is the internal width of our garage.
Having determined the cross section, make the marking of the rafter. We take a 50x200 mm board of a suitable length and put it on Mauerlat (see Fig. 7). It should hang from the walls with a margin (we turned 53 cm) so that after the final trimming, the eaves turned out to be width within 40-50 cm.

Figure 7.
Now using either a square or a roulette with a small level we make the markup of the lower and top marks. In this case, we make the width of the width of the Mauerlat - 150 mm. Depth washed to get 48 mm (see Fig.8). Such accurate values \u200b\u200bgives me a program in which I draw a three-dimensional roof model (Google Sketchup). In real work, of course, there will be no such accuracy to a millimeter, but it is not necessary there.
In other articles, when considering the roofs with large slot angles, such a guilt are performed on the basis of not the width of the Mauerlat, and on the basis of the maximum allowable depth of the depth. It is usually 1/3 from the height of the cross section of the rafter. Now we have 1/3 of 200 mm - it is 66 mm. We are placed in this value. And the width of the width of the Mauerlat was not allowed absolutely no.

Figure 8.
So, we got a template for which we make all subsequent rafters and install them (see Fig. 9):

Figure 9.
The extreme rafters do not concern the inclined walls. In the figure above, it can be seen. Clearance about 5 cm.
Step 3: We make and install the eaves of the kills (see Fig. 10):

Figure 10.
We make them from the boards of the same section as rafters. On the inclined wall before installing the mare rolling over the runneroid. In the figure it is not shown.
The sequence here is this. First we put the two extreme kills and stretch between them a lace (see Fig.11):

Figure 11.
Then with a step of about 0.8-1 m setting the rest (see Fig.12).

Figure 12.
Fix the Falkets enough 2 nails (120 mm) clogged into the end through the rafter. The extreme fake can be fixed with roofing corners directly to the inclined wall.
Step 4: We establish end (wind) boards (see Fig. 13):

Figure 13.
Using inch boards 25x200 mm.
Also, we need to lay Mauerlat on a high wall (see Fig. 14). You can do this either aerated concrete or ordinary brick. Again, the tree should be separated from the other material with a layer of rubberoid.

Figure 14.
Step 5: We like the eaves from the bottom. This is done depending on the final roof finish. Eaves either sews completely, or, as in our case, only the belt is made under the subsequent decoration of siding (see Fig.15):

Figure 15.
It is enough to use the boards 25x100 mm as a belt.
Step 6: Now make a doom (see Fig.16):

Figure 16.
The required cross-section of the drying board can be defined in the program that is used to calculate rafters and beams (see Fig. 5). In our example, the boards with a cross section of 25x100 mm are taken, step them is 350 mm. In the figure, we see the inscription - the ability of the doom is provided.
As a base under the professional flooring, which we want to cover this roof, you can use unedged inch boards for savings. But only the so-called "referring board" is needed (see Fig.17):

Figure 17.
The price of such a material is almost 2 times lower than the edged. Only there is one very important remark. Before laying boards to the roof with them, it is necessary to consider the bark. Under it often live larvae bugs (Coroeda), who first eat a bark, and then begged to the wood itself. Get rid of them subsequently quite difficult. Some say that it is generally impossible.
Step 7: Well, the solo system is ready. Now we cut the roof of a professional flooring and we are wearing siding eaves (see Fig.18):

Figure 18.
So we did not insulated single roof. It is clear that such a design is only suitable for cold rooms. If we are going to snap the room, then the roof will need to be insulated. Let's see what additional work is necessary for this.
The first five steps do the same as described above. Then set the plugs for laying the insulation (see Fig.19). We make them out of an inches (a board with a thickness of 25 mm).

Figure 19.
Now lay insulation. From the bottom to the rafters must be laid a vapor barrier film. In the figure, it is not shown.

Those who follow the trends of the changeable fashion in the field of architecture and construction, it is known that now in the trend of the building erected from environmentally friendly materials. These include houses built by half-timbered technology.
The method itself is by no means innovation. Some houses in Europe, built on this technology, have been more than five centuries that once again Confirms reliability of constructive performance.
The basis of the building is the framework that is going from wooden beams. Ship compounds make the design of durable, reliable and stable.
 Wooden elements are arranged diagonally, horizontally and vertically - it turns out like a lattice. The frame cells can be filled with almost any material - clay, mixed with straw, or an unreleased brick applied architect hundred years ago, now fashionably glazing the gaps.
The vintage houses had the walls thin, and they were pretty cold in winter. With the use of modern eco-friendly, this problem is solved: the house pleases not only the attractiveness, but also a comfortable temperature inside.
It gives a large space for the design of the house: it is only possible to choose the appropriate material to fill the cells - a contrast or tone beams.
 The half-timber can be of various sizes: a compact or two-three-storey house of a large area - carrier frame ability is enough to build five floors.
Standard roofing pie It consists of insulation, waterproofing canvases and. Pair and windproof can also be used.
 Usually, developers tend to ensure that the project corresponds to the original old home - that is, it is used as roofing a tile. In addition to clay, on the roofs you can see cement-sand tiles, and the polymer-sandy, and others natural materials, for example, .
High, steep slots, pointed form - specific traits The roofs of the header, and all this so that the precipitate is rolling as soon as possible. On steep slopes it is more difficult to perform installation: each tiled is additionally attached to the crate with special beammers or self-draws.
For top design, you can also use, or. By the way, when this species Construction only originated, the roof was.
 This Western European Fakhverk is found quite rare. But the popularity of the house in the style of high-tech with panoramic glazing is gaining. Maybe part of the roof. You will have to taste to lovers of this style and automatic shading with the help of electrochromic, or smart glasses.
The production technologies of glassware from the time of the appearance of the first half-timbered houses stepped far ahead. And now the heavy-duty tempered makes it possible to admire the stars without leaving own house, and in excess sunlight You can adjust the illumination by pressing the button.
If you want to build an extraordinary, unlike a neighbor house, look at the houses under a single-piece roof. It gives the building originality. In addition, a single roof is the simplest in the device. So simple that it can be done with your own hands.
Single roofs are considered inexpensive and simple in the device themselves. And this is true, especially with a small width of the building. Nevertheless, in our country at home with single-sided roofs there are quite infrequent. For the most part, this is due to the fact that two or four are more familiar to us. scanty roofs - They look more familiar. The second snag is to find a project adapted to our weather. On the western resources There are a lot of projects, but they are designed under a softer climate, as a rule, have large square glazing. Find an architect that competently change the favorite project is very difficult. But if it was still possible, and the harmony of the building was not disturbed, the house turns out very original.
Many scare uneven ceilings in some part of the building. Their, of course, is more difficult to beat than standard, but the result is completely different - the original is 100%. True, this time find a designer who can develop a similar interior on the expanses of our Motherland is very difficult, nevertheless, possibly.
There is another way out - align the ceilings due to the overlap, and the free space under the roof is used as technical buildings. Such options and hosts are implemented very satisfied. Yes, technical premises on in the basement floor, and at the top, but it is no problems with groundwater.
This is perhaps all the minutes or pitfalls that a single roof can bring. There is, however, another moment, which is difficult to name the disadvantage, due to the features of the structure, the roofing material is not visible on such houses from the ground. If the area is smooth, without high drops of heights, bother with the appearance of the roof, it makes no sense. It is better to choose simple in appearance, but high-quality materials, quiet (large plane, with rain noise strongly) and reliable. One of the popular options is a folding roof. It provides due degree of tightness, not very noise. Another option is from modern materials. Such roofs are even quieter, and modern materials can be operated 20-30 years without repair.
The required slope of a single-table roof is organized due to the height of the opposite walls. One wall of the building is significantly higher than the other. This leads to increased consumption of materials for walls, but the rafter system is very simple, especially for the buildings of a small width.

With sufficient bearing ability of the walls, the liner system of a single-piece roof is based on Maurylalat, fixed to the wall. So that the load distribution was more uniform, the top row of the wall masonry is reinforced by the longitudinal reinforcement (for brick walls, from concrete blocks) or on top of the last row, armopoyas is poured (for walls of limestone, sewer). In the case of a wooden or frame structure, the role of Mauerlat usually performs the last crown or upper binding.
With insufficient strength of the building material of the walls, most of the load can be transferred to the overlap. For this, the racks are installed (step - about 1 meter), for which the runs are stacked - long bars walking along the building. On them and rely then rafting legs.

When the Armopoyas was filling or laying the last row, in it, with a step of 80-100 cm, the studs are installed, with which the Mauerlat is then attached to the walls of the building. IN wooden housesIf you do not do armoomas, it is impossible to lay the studs. In this case, it is allowed to install on the pins with a hexagon head. Under the pin, a hole is drilled through Mauerlat, a pair of millimeters less than the diameter of the pin. A metal rod is clogged into it, which attracts a wooden bar to the wall. The connection is delayed using the hex key of the desired size.
Such roofs are especially popular when building yard buildings - Sarai, garages. Just the size of the buildings make it possible to use not very powerful beams, and the beams are required in small quantities. With the width of the structure up to 6 meters, the chalk system of a single-table roof almost does not contain additional reinforcing elements (backups and runs), which is profitable. Also attracts the absence of complex nodes.
For Middle strip Russia for flight up to 5.5 meters take the beams 50-150 mm, up to 4 meters enough 50-100 mm, although it is good, it is necessary to consider snow and wind load specifically in your region, and, based on this, to be determined with the beam parameters .

When the distance between the walls is up to 4.5 meters, a single-table roof consists of two brings in Maurolalat, fixed on the walls, and rafting legs, which are based on Mauerlat. Really very simple design.
With a width of the span from 4.5 meters to 6 meters, it is still required to be licked, fixed on a higher wall at the level of overlapping and a substropsy leg, which rests on the beam in almost the middle. The angle of the slope of this beam depends on the distance between the walls and the level of the Lenzny installation.
More complex stropil systems In a single roof with width of buildings more than 6 meters. In this case, it is optimal if the house is designed so that there is also bearing wallon which racks are based on. With the width of the house to 12 meters, the farms are still simple, the cost of the roofing device is minimal.

For buildings width more than 12 meters, the system becomes more difficult - the subcording feet becomes greater. In addition, the manufacture of beams longer than 6 meters long is expensive. If an increase is required only to the width of the oops of the roof, the beams are frozen along the edges of the lumps. These are pieces of beams of the same section, connected to the beam and fixed on the sides with two wooden lining with a length of at least 60 cm bolted with bolts or nails, allow the use of mounting plates.

If the total length of the beam is obtained more than 8 meters, they are usually spliced. The joints of the joint are additionally enhanced by killing the boards or mounting plates.

Fastening options raftered to Mauerlat: moving fame at the top and tough above right. At the bottom right, the option of the sinks without soles (it is very rarely applied)
There may be questions about the methods of fastening the rafted single roofs to Mauerlat. There are no fundamental differences. Everything also makes a cutout in a rafter foot, which the timber rests in Mauerlat. In order not to suffer with each rafter foot, aligning it to landing, drinking the first, out of a piece of blackboard, thick plywood or bar makes a template, exactly repeating the resulting "drank". All subsequent rafters are flooded before installation. The template is applied to them in the right place, the removal of the required shape and size is fixed.
It was a speech about the hard fastening of the rafter feet to Mauerlat. It is used on all buildings that give a small shrinkage. On wooden houses, this method of fastening cannot be used - the house all the time settles or lifted a bit, which is why there may be a skew. If the roof is fixed rigidly, it can break it. Therefore, when applying a single-table or any other roofing on wooden houses, a sling and mauelalat is used. For this there are so-called "sliding". These are plates, condition from the corners that are attached to Mauerlat and movingly connected with them metal strips that are attached to the rafter foot. There are two such slopes for each rafter.
The block angle of the roof is determined by the totality of the indicators - the wind and snow load and the type of roofing material. First determined with an angle of climatic conditions (depending on the amount of precipitation and wind loads). After watching the minimum recommended bias for the selected type of roofing material (in the table below).
If the desired angle is greater, everything is fine, if less (which happens very rarely) - it increases to the recommended one. Doing the roof with an angle less than the minimum angle recommended by the roofing manufacturer, does not definitely - will flow at the joints. To easier to focus, let's say that for the middle strip of Russia, the recommended slope of a single-table roof is 20 °. But it is advisable to count the number for each region, and even for different arrangements of the construction on the site.
By the way, keep in mind that different manufacturers of the same type of roofing material may require different minimal bias. For example, one brand can be carried out on a roof with a minimum bias of 14 °, another - at 16 °. And this is despite the fact that GOST determines the minimum bias of 6 °.
It is also worth remembering that with a skate up to 12 ° in order to ensure the tightness of any roofing material, it is necessary to miss all the joints of the material with a liquid waterproofing composition (usually - with bitumen mastic, less often - roofing sealant).
To ensure the excavation angle of a single-table roof, it is necessary to raise one of the walls above. As far as I learn, remembering the formula for calculating the rectangular triangle. We find and the length of the rafter feet.

When calculating, do not forget that the length is removed without taking into account the scenes, and they need to protect the walls of the house from precipitation. The minimum sink is 20 cm. But with such a small ledge beyond the building, a single roof of Kutsuza looks outside the building. Therefore, there are usually at least 60 cm on single-storey buildings. On the two-storey, they can be up to 120 cm. In this case, the width of the sink is determined on the basis of aesthetic considerations - the roof should look harmoniously.

The easiest way is to determine how much it is necessary to extend the roof in design programs, allowing the building on the scale and "play" with skes. Everything should be displayed in 3 dimensions (the most popular SCRATCHUP program). Sculpt in Ne. different sizes Svezov, decide which it looks better (this is if there is no project), and then order / do rafters.
Built house in St. Petersburg. The project was not, there was a common idea that is presented in the photo. House made from aerated concrete, finishing - plaster, roof - folding chosen based on the low cost, reliability, ease of installation.

After the walls were kicked out, Armopoians flooded in them, into which studs (Ø 10 mm) were installed through each meter. When concrete in Armopoyas reached the required vanity, the waterproofing layer ("hydroize", cut along the bands of the desired width) was laid on the bitumen mastic. Over the waterproofing, Mauerlat is stacked - the ram 150-150 mm. All lumber, which are used for the roofing device, dry, are processed by protective impregnations, antipirens.

Start mounting a single-table roof - Laying Mauerlat
It is first put in place (lies on the studs, adhered by helpers), pass along, knocking the hammer to the places where the studs are standing. The bar is imprinted by places where the studs stick out. Now the holes are drilled and simply get it on the hairpins.
Since the span is obtained by large, put backups from the bar (150-150 mm), which is laid a run, which will maintain rafting legs.

The roof width is 12 meters away. This is taking into account the deposancy of 1.2 meters from the front side. Therefore, the bars Mauerlat and the run "sticky" beyond the walls of the walls.

At first there were doubts about such a large removal - the extreme right bar hangs 2.2 meters. If this takeaway is reduced, it is bad for the walls, and the appearance will deteriorate. Therefore, everything was decided to leave as it is.

Laying timing
Stacked rafters of two sprocketing boards 200 * 50 mm, with a step of 580 mm. The boards are riveted with nails, in a checker order (at the top below), with a step of 200-250 mm. Hats nails on the right, then on the left, pairwise two tops / from the bottom right, two tops / from the bottom left, etc.). Splicing places of boards are broader on less than 60 cm. The resulting beam is obtained much more reliable than a similar one-piece bar.


Next, a cake of a single-table roof for a given case is such (on the side of the attic - on the street): vapor barrier, stone wool 200 mm, ventuzor (doomlet, counter-doletka), moisture insulation, roofing material. In this case, this is a pure gray color.

The insulation from the inside will be carried out later, and while on top of the rafter, we put the hydro-wind-wind-protecting membrane "Tailer Solid" (vapor-permeable).

The membrane lays down-up, attached brackets from the stapler. The canvas that rolls above enters the already laid 15-20 cm. The junction is punctured by a double-sided tape (bought together with the membrane). Then the planks are stipulated on top of the membrane, they are a doomle for folding roof.

First, the cutter made from the board 25 * 150 mm in a step of 150 mm. After laying, like roof, it was decided to strengthen the crate. For this, there are 100 mm widths for the boards between already laid boards. Now there is a gap of 25 mm between the boards.

Single Roof Disease As a result
Next on the lower fronton, the hooks were bent for. They are nor unmarried, because because of the big length of the fronton, it was decided to make two receiving funnels at a distance of 2.8 meters from the edge. To secure runoff in two sides and made such a relief.

Next, it is necessary to make pieces of metal (paintings) 12 meters long. They are not heavy, but they cannot be bent, because Salazki disappear. For lifting, a temporary "bridge" connecting the earth and roof is constructed. On him and raised sheets.

Next go roofingwhich differ depending on the type of roofing material. In this case, it was necessary to solve the problem of temperature expansion of the material - galvanized steel (poural) when heated / cooled significantly changes its dimensions. To ensure freedom of expansion, fixing the material for the crate is decided for Falts moving clemmers with freedom of movement of 15-20 mm.


After laying the roofing material, the skes are remained, and they are no different.

I need to bring the root "to mind" - to sunmate, but, mostly, it is ready
Well, in the photo below what happened after decoration. Very modern, stylish and unusual.

House with a single-table roof - finishing almost finished
As already talked, it is hard to find interesting projects Residential houses with a single roof. While these buildings are unpopular. Perhaps just because of its originality. This section contains several projects or photos of already built houses. Maybe someone will be useful at least as an idea.


Large windows - beautiful, but irrational in our climate

Multi-level house - an interesting implemented project

This is the prototype of what is located above.

Original house. Under one single-sided roof and house and host construction, and even part - canopy over the courtyard between two buildings


"The woman is created for a man, not a man for a woman" - such a postulate ...

How is HIV on different time segments manifest? The reasons for the development of AIDS is ...

Stomach Cancer: Symptoms, Causes, Treatment of Stomach Cancer is a change in cell type ...