


Khasanzyanova Aisylu Gera Summary of the myth Gera Ludovisi. Sculpture, 5...


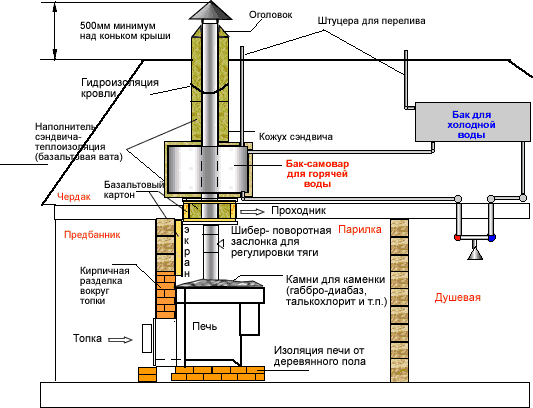
Brick stove periodical action
Let's take a closer look at the construction technique brick stove periodical action (Fig. 22). The firebox of such a furnace is made of refractory bricks and has a slotted vault designed for stone filling. The width of the slots can vary from 5 to 8 cm.
Rice. 22. Brick oven-heater of periodic action: a- without hot water tank; b- with hot water boiler
The furnace must be equipped with chimneys in the form of pits. To give greater strength, it is recommended to finish it with steel corners. The chamber for stones, as a rule, is equipped with two doors.
It is not uncommon for chimneys to be arranged in such a way that they allow flue gases to pass from the area around the duct to the lower part of the stone chamber.
The construction of a massive brick stove-heater should begin with the laying of its foundation. To prevent the furnace from settling and tilting due to moistening or freezing of the soil, the foundation must be deepened by at least 0.5 m. Its transverse dimensions must be larger than the furnace ones by half a brick in each direction, i.e., in general, per brick. The distance from the furnace foundation to the wall foundation must be at least 5 cm, and the gap between them must be filled with sand. The bottom of the pit should be tamped and leveled using a special level. The most suitable foundation is considered to be concrete or rubble concrete. In dry ground, it can be made from bricks using lime, cement or lime-cement mortar.
Master's advice
Used to make lime mortar slaked lime and sifted sand in a ratio of 1: 2 to 1: 3. Cement mortar, in which the ratio of cement and sand is 1: 3, is recommended to be prepared in small portions in order to have time to apply it before setting.
To mix a lime-cement mortar, you will need cement, lime and sand in a ratio of 1: 2: 10.
The foundation surface should be poured with cement mortar, leveled with a lath and covered on top with waterproofing roofing or roofing material in two layers.
The main material for laying such furnaces is ordinary solid brick first grade. It is strictly forbidden to use perforated and silicate bricks, as they quickly collapse. Refractory and refractory bricks are most suitable for laying and lining the furnace firebox. Refractory bricks are used for burning firewood, and refractory (chamotte) bricks are used for burning hard coal, liquid fuel, gas.
The basis of high-quality masonry is to ensure the tightness of the seams. This is necessary so that combustion products do not enter the bath room, which can cause poisoning. carbon monoxide. Masonry seams should be filled with mortar to the full depth. Their thickness should be minimal. If ordinary brick is used, then the joint thickness should not exceed 5 mm, and for refractory and refractory bricks, it should not exceed 3 mm for the entire depth. The solution can be spread by hand, with a trowel it is allowed to spread it only to the floor of the firebox and the bottom of the smoke channels.
It is necessary to ensure the smoothness of the internal surfaces of the furnaces. For this, chipped and hewn bricks have rough edges outward. Every 4-5 rows of masonry, the inner surfaces are rubbed with a damp bast brush or rag.
To masonry next row you can only go after all the bricks of the previous row have been laid. It is recommended that prior to laying on the mortar, it is recommended to make an approximate layout of bricks without mortar.
After the first row is laid, the correct angles should be checked using a special square or cord. After laying the second row at the corners of the oven, it is necessary to arrange guide cords with cut-offs. They should be hung with nails from the ceiling, and wound on nails from below, recessed into the seams between the two lower rows.
When laying bricks, it is important to follow the rules for their dressing: each vertical seam must be covered with a brick located next to it. It is strictly forbidden to bandage the laying of ordinary bricks with the laying of refractory or refractory bricks, since when the temperature rises, they have different expansion.
Furnace appliance doors, valves, grates, stoves and water boxes must be installed during bricklaying. The door frame should be mounted in the masonry using special paws (clamps) made of mild steel strip (hoop iron). The legs must be attached to the frame with rivets. Before fixing in place, the frame should be wrapped with asbestos cord or cloth. If there is no asbestos between the frame of the firebox door and the brickwork, then a gap of 3–4 mm wide must be left around the entire perimeter. This is necessary so that the frame, when heated, cannot push the masonry apart. In order to ensure the strength of the lintel, the door of the firebox must be closed in the “locked” way, that is, when the middle brick is placed with beveled ends on the beveled ends of neighboring bricks. Other doors and damper frames must be fixed to the masonry with wire.
The grate is mounted with slots along the firebox. To expand the lattice between its edges and masonry bricks, it is necessary to leave a gap of at least 5 mm. It must be filled with sand. The same gap should be made between the stove above the firebox and the masonry.
One of the most important parts of the furnace is the firebox. For firewood firewood, its smallest width should be one brick, i.e., be 25 cm, and the minimum height should be 35 cm. The greater the height of the firebox, the better conditions fuel combustion. It is desirable that it be 40–60 cm. In the lower part of the wall, the firebox should be made with a slope towards the grate so that the coals rest on the grate during combustion.
The design of smoke circuits affects the uniformity of heating and the efficiency of the furnace. Their inner surface must be even.
It should not be covered with clay mortar, which quickly falls off and can clog the chimney.
The upper wall of the furnace (roof) consists of three rows of bricks, which are laid flat with dressing. If the vertical seams of the upper walls coincide, they should be covered with pieces of steel sheet.
The pipe for the heater must be mounted, i.e., located on the stove array. In this case, the thickness of the walls of the furnace and pipe, as well as the flow area of the smoke channels and pipes must be at least half a brick. The pipe must be brought to a height of at least 0.5 m from the roof surface. To do this, it is recommended to use cement or mortar, but not clay, as it is easily washed out by rain and condensate that forms inside the pipe.
In order to comply with fire safety, it is necessary to maintain the distance between the brick surface of the furnace and the combustible structure, i.e. wooden parts baths. It should be at least 40 cm if the structure is not protected from fire, and more than 25 cm with the existing protection. If the furnace and the pipe are made of metal, then these distances should be increased to 100 and 70 cm, respectively. Between the brick pipe and wooden elements the roof, you must leave a free distance of at least 10 cm. When using metal or asbestos-cement pipe the nearest wooden parts of the ceiling and roof should be covered with felt, previously impregnated with clay mortar, and additionally sheathed with roofing steel. There should not be a gap between the pipe and the roof, so it should be closed with a galvanized steel apron. On the wooden floor in front of the furnace door, it is recommended to install a metal sheet measuring at least 70 x 50 cm.
Master's advice
Solutions of the following compositions are suitable for plastering the furnace - gypsum: lime: sand (2: 2: 1); clay: lime: sand (1:1:3); clay: cement: sand (1:1:3); clay:sand (1:2). Regardless of the choice of solution, it is recommended to add 0.1–0.2 parts of asbestos to it.
From the book Bath Building Tips the author Khatskevich Yu G From the book How to Build country house author Shepelev Alexander Mikhailovich From the book Construction of a bath and sauna author Shukhman Yuri Ilyich From the book Stoves for baths and saunas with their own hands author Kalyuzhny Sergey Ivanovich From the author's book From the author's book From the author's book From the author's bookBRICK MASONRY Used mainly for laying foundations and walls. It can be 1/2, 1, 1 1/2, 2, 2 1/2, 3 or more bricks thick, or 120, 250, 380, 510, 640, 770 mm, respectively. The thickness of the masonry depends on the purpose of the structure and local climatic conditions. Performed on various
From the author's book6.2. Classical brick Actually, the classic brick stove-heater is considered in the section on designing a bath, since it is proposed to design there, that is, “dance from the stove”. There are many similar constructions in the corresponding literature. masonry
From the author's bookCompact heater Compact heater (Fig. 12) continuous action can be arranged on the basis of the so-called laundry oven. To do this, stones must be loaded into the tank instead of water, and water can be heated in a bucket mounted on stones. Stove-heater
From the author's bookMetal stove combined with a kitchen stove The dimensions of the metal stove combined with a kitchen stove are 40 x 50 cm. During its operation, the temperature in the steam room can be maintained up to 100 °C. These ovens don't require a lot of space to set up.
From the author's bookSmall-sized stove-heater with a top-mounted tank Quite common is a small-sized stove with a water-heating tank (Fig. 15, 16). The volume of the chamber for stones and the capacity of the tank are 40 liters each. The tank is located on the slab next to the stones. Regulation
From the author's bookSmall-sized stove-heater with the bottom placement of the tank small options stoves with a longer furnace and a capacious chamber for stones (50 l). In addition, she has
From the author's bookA stove-heater for small family baths most of with a stone was in washing room(Fig. 19, 20). For building a stove
From the author's bookA stove-heater without a water heater When installing a stove-heater without a water heater (Fig. 21), a metal box or a cast-iron boiler can be used as an impenetrable partition. The stones will heat up very quickly, since its surface is washed by hot
From the author's bookUniversal stove-heater designed by A. Suzdaltsev The universal stove-heater designed by A. Suzdaltsev (Fig. 24) has an internal firebox and a chamber attached to it with filling of stones, fenced off by a cast-iron stove. The water heater is
Single-family saunas heated by wood usually use batch-type brick stoves, in which stones are heated by flue gases passing through them. Such furnaces are about 30% more economical than combined furnaces and allow faster heating of stones to the required temperature. With intensive heating of the furnace, the lower layers of the stone filling can be heated up to 1000-1100 ° C, the upper layers - up to 500-600 ° C. At such temperatures, the soot burns out and the stones remain clean. The only disadvantage of batch furnaces is the need to wait for the complete combustion of the fuel or to remove the remnants of unburned fuel so that carbon monoxide does not enter the bath when the chamber is opened.
Design. On fig. 91 (1) depicted appearance brick stove-heater of reinforced design without a water-heating tank. The firebox is made of refractory bricks and has a slot vault for stone filling. The width of the slots (the distance between the brick arches) is 5-8 cm. upper part chambers for stones with a chimney (not shown in the figure).
In order to improve strength
The furnace is enclosed in a frame made of steel corners. On fig. 91 (2) shows a diagram of a brick stove with a hot water boiler. The stone chamber has two doors. Sometimes chimneys are made that pass flue gases from the space around the boiler to the lower part of the stone chamber.Masonry. The construction of a massive brick stove-heater begins with the construction of its foundation.
Foundation. So that the furnace does not settle and does not tilt due to moisture or freezing of the soil, the foundation is deepened by at least 0.5 m. Its transverse dimensions should be 1 brick more than that of the furnace (half a brick in each direction). The distance from the furnace foundation to the wall foundation is at least 5 cm. The gap between them is filled with sand. The bottom of the pit is rammed and leveled.
Material and solution
for the foundation. The best foundation is concrete or rubble concrete. In dry soil, it can be made of bricks using lime, cement or lime-cement mortar.Mortar
prepared from slaked lime and sifted sand, taken in a ratio of 1:2 to 1:3.
cement mortar(the ratio of cement and sand is usually 1:3) is prepared in small portions in order to have time to use it before setting.
To prepare a lime-cement mortar, take 1-2 hours of lime and 6-16 hours of sand for 1 hour of cement, depending on the brand of cement and the fat content of lime.

foundation surface poured with cement mortar, leveled with a rail and covered with waterproofing, usually roofing felt or roofing material in 2 layers.
Main material for laying furnaces - an ordinary solid brick of the 1st grade. It is not allowed to use perforated and silicate bricks, as they quickly collapse.
For masonry and lining of the firebox kilns are recommended refractory and refractory bricks. Refractory bricks are suitable for burning firewood, refractory (chamotte) - for burning coal, liquid fuel, gas.
Masonry stove made of used bricks. They must be cleaned of mortar and soot. They should be laid with the smoky side inward, otherwise rusty soot spots will come out even through plaster and whitewash.
Before using bricks(except refractory and refractory) are immersed in water for 1-1.5 minutes, since dry brick dehydrates the mortar and reduces its binding capacity.
Mortar for masonry furnace prepared from clay and sand, taken in a ratio of 1:1 to 1:2, depending on the fat content of the clay. Clay should be soaked 1 day before laying. Then water is added to it in such an amount that after mixing a creamy mass is obtained. This mass is filtered through a sieve, the same amount of sand is added and mixed thoroughly. The sand must be sifted through a 1.5 mm sieve. If watery areas (lakes) appear on the surface of the solution, then add sand and mix the mass again. A good mortar does not contain lumps, has a rough surface, does not stick to a shovel and is easily squeezed out of the masonry seam when you press the brick with your hand.
For laying refractory and refractory bricks apply a solution of clay and mountain sand or fireclay.
Masonry seams. The main requirement for masonry is to ensure the tightness of the seams so that even a small amount of combustion products that can lead to carbon monoxide poisoning do not penetrate into the bathhouse. Masonry seams are filled with mortar to the full depth. Their thickness should be minimal: for ordinary bricks no more than 5 mm, for refractory and refractory bricks - no more than 3 mm for the entire depth.
Application of the solution. The solution is spread by hand, with a trowel it can only be put to the bottom of the firebox and the bottom of the smoke channels.
Furnace interiors must be smooth, therefore, chipped and hewn bricks are laid with rough edges outward. Every 4-5 rows of masonry, the inner surfaces are rubbed with a bast brush or a rag ground in water without adding a solution.
The laying of the next row is started only when all the bricks of the previous row are laid. It is advisable to first lay the bricks of each row and fit them to each other, and then put them on the mortar.
Checking the correctness of the seams. After laying the first row, check the correctness of the corners with a square or cord. After laying the 2nd row, guide cords with plumb lines are installed at the corners of the furnace. The cords are hung with nails from the ceiling, and from below they are wound on nails pressed into the seams between the bottom two rows.
Binding of bricks. When laying bricks, it is necessary to strictly follow the rules for ligation of bricks: each vertical seam must be covered with a brick of the upper row. Bandaging of ordinary brickwork with refractory or refractory brickwork is not allowed, as they expand differently with increasing temperature.
Installation of furnace appliances. Furnace instrument doors, valves, grates, stoves, hot water boxes (built-in water tanks) - are installed simultaneously with bricklaying.
The frame of the door is fixed in the masonry by means of paws (clamps) made of mild steel strip (hoop iron). The paws are attached to the frame with rivets. Before installation in place, the frame is wrapped with asbestos cord or cloth. In the absence of asbestos between the frame of the firebox door and the brickwork, a gap of 3-4 mm is left around the entire perimeter so that the frame, when heated, does not push the masonry apart. To ensure the strength of the jumper from above, the door of the firebox is blocked in the “lock” way (the middle brick is placed with beveled ends on the beveled ends of neighboring bricks). Other doors and frames of dampers (latches) are fixed in the masonry with 2 mm wire (the wire is embedded in the masonry).
grate installed with slots along the firebox. A gap of at least 5 mm is left between the edges of the lattice and the masonry bricks to expand the lattice. The gap is filled with sand. The same gap is left between the stove above the firebox and the masonry.
Fuel tank. An important part of the furnace is the firebox. For wood burning, its smallest width is 25 cm (in one brick), the smallest height is 35 cm. With an increase in the height of the firebox, the conditions for burning fuel improve. It is desirable that it be 40-60 cm, depending on the size of the furnace. In the lower part of the wall of the firebox, it is made with a slope towards the grate, so that during combustion, the coals settle on the grate. Under the firebox, they are placed below the frame of the furnace door by at least 1 brick, otherwise coals will fall out when the door is opened. It is desirable to make the bottom of the ash pan also below the blower door.
Flue gas channels. The uniformity of heating, the efficiency of the furnace depend on the design of its smoke circuits - channels for flue gases. Their inner surface should be even and not smeared with clay mortar, which quickly falls off and clogs the chimneys.
Overlapping. The upper wall of the furnace, called the ceiling, consists of three rows of bricks laid flat with a dressing. If the vertical seams of the ceiling coincide, they must be covered with pieces of steel sheet.
Pipe. A pipe for a heater is usually made mounted, that is, on an array of stoves. At the same time, the thickness of the walls of the furnace and the pipe must be at least half a brick, the cross section of the smoke channels and pipes must also be at least half a brick. The pipe is brought to a height of at least 0.5 m from the roof surface using cement or lime mortar (clay mortar is easily washed out by rain and condensate that can form inside the pipe).
fire safety requirements. For fire safety purposes, the distance between the brick surface of the stove and the combustible structure (wooden parts of the bath) must be at least 40 cm if the structure is not protected from fire, and at least 25 cm if such protection is available. If the furnace and pipe are metal, then these distances are increased to 100 and 70 cm, respectively.
Between the brick pipe and the wooden parts of the roof(rafters, lathing, sheathing) there must be a free distance of at least 10 cm. When using a metal or asbestos-cement pipe, the nearest wooden parts of the ceiling and roof must be covered with felt impregnated with clay mortar and upholstered with additional roofing steel. The gap between the pipe and the roof is closed with a galvanized steel apron. A metal sheet measuring at least 70x50 cm is installed on the wooden floor in front of the furnace door.
Construction safety measures. When constructing the oven, care must be taken not to fall or drop bricks or tools. To work on the roof, a horizontal platform is installed for the stove and a box or bucket with a solution. The site must be fenced from the side of the slope and attached to the rafters. If the site is small, then the stove-maker should put on a safety belt tied to a reliable part of the roof. The shackle and eyes of the bucket must be tested for strength.
Stone backfill. The main requirement for backfill stones is that they accumulate well and then give off heat, withstand high temperatures and not crack from water. To do this, they must be dense (with a high specific gravity), homogeneous, evenly heated throughout the mass and have the same coefficient of thermal expansion in all directions. In order not to burst the stove from the inside and not destroy it, the stones must be round in shape and have a smooth surface. All these requirements are met by well-rounded large heavy cobblestones, hardened by the sun and water for millions of years. The most durable stones are from rocks of volcanic origin - basalt, granite, andesite, etc. If there are no such stones, you can use stones from siliceous rocks of non-volcanic origin. They differ in hardness, density, dark color. Collect them from rivers, lakes, bays. Layered stones made of sandstone, limestone and others sedimentary rocks they are not suitable for heaters, as they quickly collapse, clogging the channels for flame, smoke and steam. The strength of the stones and the absence of cracks in them is checked by hitting each other or with a hammer. The size of the stones must be at least 10 cm (larger than the fist of an adult).
For stone furnace backfill siliceous rocks of volcanic origin with sharp translucent edges are not suitable. When splashing water, they split and “shoot”, throwing sharp small pieces that can injure the body for several meters. Other dense stones can also split with ejection of pieces. Therefore, the most dense of them, when laying in the oven from the washing side, must be closed with less dense, best of all bricks.
Stone laying. When laying the largest stones are placed below, smaller ones are placed above. To accelerate heating throughout the entire thickness and facilitate heat transfer when water is supplied, stones are placed mixed with cast-iron chocks or iron (steel) ingots. Cast iron and steel have a higher volumetric heat capacity than rocks and conduct heat well. Chocks or blanks should be placed vertically so that they conduct heat from the bottom up.
Over time, the stones crack and crumble. Therefore, it is necessary to sort out the stones every year, replace the split ones with whole ones, remove the small things that clog the channels between the stones. It is advisable to have a certain supply of stones in the bathhouse so that each time you do not look for them and do not wait for the summer.
Stone substitutes. A good substitute for stones are broken ceramic and porcelain products. They are heat resistant and can withstand sudden changes in temperature. Usually pieces of these materials are small and suitable only for the upper layer of stone backfill. You can also use pieces of brick, best of all burnt brick - iron ore - a deformed shape with melted edges that are unsuitable for masonry.
The firebox is made of refractory bricks and has a slot vault for stone filling. The slot width is 5–8 cm. For. the strength of the furnace is finished with steel corners.
The stone chamber has two doors, often chimneys are made that pass flue gases from the space around the channel to the lower part of the stone chamber.
Foundation. The construction of a massive brick stove-heater begins with the installation of its foundation. So that the furnace does not settle and does not tilt due to moistening or freezing of the soil, the foundation is deepened by at least 0.5 m. Its transverse dimensions should be larger than that of the furnace by 1 brick (half a brick in each direction ). The distance from the foundation of the furnace to the foundation of the wall is at least 5 cm. The gap between them is filled with sand. The bottom of the pit is rammed and leveled.
The best foundation is concrete or rubble concrete. In dry soil, it can be made of bricks using lime, cement or lime-cement mortar.
Lime mortar is prepared from slaked lime and sifted sand, taken in a ratio of 1:2 to 1:3. Cement mortar (the ratio of cement and sand is usually 1: 3) is prepared in small portions in order to have time to use it before setting. To prepare a lime-cement mortar, take 1–2 hours of lime and 6–16 hours of sand for 1 hour of cement, depending on the brand of cement and the fat content of the lime. The surface of the foundation is poured with cement mortar, leveled with a rail and covered with waterproofing, usually roofing felt or roofing material in 2 layers.
Masonry material. The main material for laying furnaces is an ordinary solid brick of the 1st grade.
It is not allowed to use perforated and silicate bricks, as they quickly collapse. Hard-melting and refractory bricks are recommended for laying and lining the furnace firebox. Hard-melting bricks are suitable for burning firewood, refractory (chamotte) - for burning coal, liquid fuel, gas. Often furnaces are built from used bricks. They must be cleaned of mortar and soot. They should be laid with the smoky side inward, otherwise rusty soot spots will come out even through plaster and whitewash. Before use, bricks (except for refractory and refractory ones) are immersed in water for 1–1.5 minutes, since dry brick dehydrates the mortar and reduces its binding capacity.
The mortar for laying the furnace is prepared from clay and sand, taken in a ratio of 1:1 to 1:2, depending on the fat content of the clay. Clay should be soaked 1 day before laying. Then water is added to it in such an amount that, after mixing, a creamy mass is obtained. This mass is filtered through a sieve, the same amount of sand is added and mixed thoroughly. The sand must be passed through a 1.5 mm sieve. If watery areas (lakes) appear on the surface of the solution, then add sand and mix the mass again. A good solution does not contain lumps, has a rough surface, does not stick to a shovel and is easily squeezed out of the masonry seam when you press the brick with your hand. For laying refractory and refractory bricks, a solution of clay and mountain sand or fireclay is used.
Seams. The main requirement for masonry is to ensure the tightness of the seams so that even a small amount of combustion products that can lead to carbon monoxide poisoning do not penetrate into the bathhouse. Masonry seams are filled with mortar to the full depth. Their thickness should be minimal: for ordinary bricks no more than 5 mm, for refractory and refractory bricks - no more than 3 mm for the entire depth. The solution is spread by hand, from the master it can be put only to the bottom of the top-liver and the bottom of the smoke channels.
The inner surfaces of the furnaces must be smooth, therefore, chipped and sledge bricks are laid with rough edges outward. Every 4-5 rows of masonry, the inner surfaces are rubbed with a wash brush or a rag soaked in water without adding a solution.
The laying of the next row is started only when all the bricks of the previous row are laid. It is advisable to first lay the bricks of each row and fit them together, and then put them on the mortar.
Checking the correct angles. After laying the first row, check the correctness of the corners with a square or cord. After laying the 2nd row, guide cords with cut-offs are installed at the corners of the oven. The cords are hung with nails from the ceiling, and from below they are wound on nails pressed into the seams between the bottom two rows.
Binding of bricks. When laying bricks, it is necessary to strictly follow the rules for ligation of bricks: each vertical seam must be covered with a brick of the upper row. Bonding of ordinary brick masonry with refractory or refractory brick masonry is not allowed, as they expand differently with increasing temperature.
Furnace appliances. Furnace instrument doors, valves, grates, stoves, hot water boxes (built-in water tanks) - are installed simultaneously with bricklaying. The frame of the door is fixed in the masonry by means of paws (clamps) made of mild steel strip (hoop iron). The paws are attached to the frame with rivets. Before installation in place, the frame is wrapped with asbestos cord or cloth. In the absence of asbestos, a gap of 3–4 mm wide is left between the frame of the firebox door and the brickwork, so that the frame, when heated, does not push the masonry apart. To ensure the strength of the jumper from above, the door of the firebox is blocked in the “lock” way (the middle brick is placed with beveled ends on the beveled ends of neighboring bricks). Other doors and frames of dampers (latches) are fixed in the masonry with 2 mm wire (the wire is embedded in the masonry).
Grate. The grate is installed with slots along the firebox. A gap of at least 5 mm is left between the edges of the grate and the masonry bricks to expand the grate. The gap is filled with sand. The same gap is left between the stove above the firebox and the masonry.
Fuel tank. An important part of the stove is the top-liver. For wood burning, its smallest width is 25 cm (in one brick), the smallest height is 35 cm. With an increase in the height of the firebox, the conditions for burning fuel improve. It is desirable that it be 40–60 cm, depending on the size of the furnace. In the lower part of the wall of the firebox, they are made with a slope towards the grate, so that during combustion, the coals settle on the grate. Under the firebox, they are located below the frame of the furnace door by at least 1 brick, otherwise coals will fall out when the door is opened. It is desirable to make the bottom of the ash pan also below the blower door.
Smoke circulation. The uniformity of heating and the efficiency of the furnace depend on the design of its smoke circuits - channels for flue gases. Their inner surface should be even and not smeared with clay mortar, which quickly falls off and clogs the chimneys.
Overlapping. The upper wall of the furnace, called the ceiling, consists of three rows of bricks laid flat with dressing. If the vertical seams of the ceiling coincide, they must be covered with pieces of steel sheet.
Pipe. The pipe for the heater is usually made mounted, that is, on the stove array. At the same time, the thickness of the walls of the furnace and the pipe must be at least half a brick, the cross section of the smoke channels and pipes must also be at least half a brick.
The pipe is brought to a height of at least 0.5 m from the roof surface using cement or lime mortar (clay mortar is easily washed out by rain and condensate that can form inside the pipe).
Safety measures at work. When constructing the oven, care must be taken not to fall or drop bricks or tools. To work on the roof, a horizontal platform is installed for the stove and a box or bucket with a solution. The site must be fenced from the side of the slope and attached to the rafters. If the platform is small, then the stove-maker must put on a safety belt tied to a reliable part of the roof. The shackle and eyes of the bucket must be tested for strength.
After completion of construction and drying, the furnace is tested with a trial firebox, which is carried out in the presence of fire authorities. At the same time, an act on the safety of the furnace must be drawn up.
Fire safety measures. For the purposes of fire safety, the distance between the brick surface of the stove and the combustible structure (wooden parts of the bath) must be at least 40 cm if the structure is not protected from fire, and at least 25 cm if such protection is available. If the furnace and the pipe are metal, then these distances are increased to 100 and 70 cm, respectively. There must be a free distance of at least 10 cm between the brick pipe and the wooden parts of the roof (rafters, sheathing, sheathing).
When using a metal or asbestos-cement pipe, the nearest wooden parts of the ceiling and roof must be covered with felt impregnated with clay mortar, and additionally upholstered with roofing steel. The gap between the pipe and the roof is closed with a galvanized steel apron. On a wooden floor in front of the furnace door, a metal sheet with a size of at least 70 × 50 cm is installed.
Plastering. For greater safety and giving a pleasant appearance, the oven is plastered with solutions of the following composition (by volume):
It is desirable to add 0.1–0.2 hours of asbestos to any solution. It should be taken into account that the mortar with gypsum can set in 15-20 minutes.
Preparing for plaster. For plastering, the surface of a completely dried oven is cleaned of clay, the seams are cleared to a depth of 10 mm. It is even better to cover the stove with a grid with cells of at least 15 × 15 mm, attaching it with nails and washers, or wrap it with wire, also attached to the walls of the stove with nails.
The sequence of applying layers and whitewashing. To ensure the thermal expansion of the individual parts of the furnace, it is heated until it warms up well, moistened with water and a continuous layer of plaster is applied. After setting the first layer, a second layer of plaster is applied, then the next one. The total thickness of the layers should be 10–15 mm. Last layer carefully leveled and rubbed. If the plaster is made with lime and has a gray surface, it is not necessary to pour it white. A very dark plaster surface can be whitewashed with a solution of lime and a small amount of clay added so that the painted surface is gray instead of bright white, which will irritate the eyes. Be sure to whitewash the pipe within the attic to make it easier to detect cracks.
Pipe processing. If the pipe is metal or asbestos-cement, then the junction of it with brickwork must be sealed with a waterproof mortar (cement or lime-cement), and the outside of the pipe must be covered with thermal insulation, otherwise in a cooled pipe (at a flue gas temperature below 100 ° C) condensation will form, which impregnates with moisture and destroys the upper bricks of the furnace, reduces draft, and in winter it can lead to the formation of an ice plug in the pipe.
Pipe insulation. Pipe insulation is performed by enclosing it in a casing made of sheet steel. The gap between them with a width of about 5 cm is filled with mineral wool.
Deflector. To improve traction and protect the pipe from precipitation, a deflector is installed on its upper end, which ensures the suction of gases from the pipe with the help of wind.
I must say that although I am a big fan of the sauna, the baths in which the stoves are built, I really like the way described below. Many people love them more, and tolerate them more easily than a sauna (yes, take my wife, for example). Using the method described in the article, a stove was built in the bath and my grandfather - and to be honest, rest after a steam room in such a bath turns out better and you feel better after it. It's probably a matter of tradition anyway.
Brick bath stoves (otherwise called heaters) are of 2 types: periodic and continuous. Traditional, real Russian baths were heated exclusively with stoves periodical action. Previously, in ancient times, they did not have pipes, and they were heated in a black way - that is, the smoke went along the ceiling of the bath. They began to make stoves with chimneys only from the beginning of the 18th century, and even then they began to heat baths on white, that is, as we do now.
Furnaces Periodic action cannot be heated while you are steaming or washing in a bathhouse, because then smoke will also penetrate into the bathhouse along with the steam from the stove. These stoves are heated for three, five or even more hours before going to the bath. Stones heated by an open fire can heat up to 900 ° C, and the steam from such a stove is given off the way connoisseurs of the steam room love - light, non-burning, dry and easily portable.
Continuous heaters, in which cobblestones are placed in insulated metal containers, have appeared relatively recently. The advantage of such stoves is that they can also be heated during bath procedures, and the disadvantage is that the stones separated by the walls of the container from open fire, do not warm up above 600°C. The steam in such heaters turns out to be “raw”, burning the human body.
Fire fighting measures. When installing a periodic heater, it must be remembered that this design is the most fire hazardous of all household stoves. A ton of cobblestone heated to 900 degrees, and brickwork three to four tons, heated to a high temperature, represent a great potential hazard. To avoid trouble, when building a heater, you must follow the rules fire safety. True, there are no special rules for heaters.
Moreover, some bans and restrictions have recently been lifted and baths have been built, as anyone pleases - of immense size, two floors, with chambers of stone filling for two tons, etc. And this, in my opinion, is unacceptable.
The stoves have design differences from other domestic ovens. So, they do not provide descending chimneys and, if the stove is large, “unoccupied” space appears to the left and right of the blower. It is advisable to use it for arranging through niche channels in order to store poker, tongs and other utensils in them. They, among other things, increase the heat-releasing surface of the furnace.
In order for the firebox, which is large in heaters, to get enough air to burn firewood, the blower and the blower door must also be of sufficient size.
For a more free flow of air into the firebox, it is better to lay the grate along the blower. But on sale it is difficult to find grates for the entire length (depth) of the blower, so it is often necessary to lay short grates across the blower.
The firebox and the stone filling chamber are lined with fireclay bricks, which are best placed on a mortar (a solution of fireclay clay and fireclay with special additives) with an indent from the outer walls of the furnace of 8-10 mm. The lining will expand from high temperature, but the gap will protect the outer walls of the furnace from cracking. Instead of fireclay (fireclay "groats"), sand should not be used. It breaks down at high temperatures.
The firebox is arranged so that its height from the grate blows up to the laying of the cobblestone is 8-9 rows of masonry (56-63 cm). It is impossible to reduce this distance by bringing the cobblestone closer to the fire for more intense heating of the stones. In this case, the result will be the opposite.
The fact is that when burning wood, the highest temperature is at the top of the flame. At a short distance, the top of the flame will rest against the cobblestones, the flame temperature will drop on them, and the unburned soot will settle on the surfaces of the stones and in the cracks between them.
One of the problems when arranging large heaters is the arrangement of grates on which the stones are located. From the high temperature and gravity of the cobblestone, the grate is constantly deformed and fails. Even railway rails laid instead of grates can be deformed.
In the heater, instead of grates, it is better to make brick arches (or a vault with holes), on which you can put rail sections. This will create a solid foundation for the stone backfill.
Before laying an arch or vault, notches are made on the prepared formwork on the brick beds for better adhesion. Then the brick is rubbed or washed by briefly immersing it in water. It must be remembered that fireclay bricks should not be heavily wetted.
First, the brick is laid without mortar - for "shooting". When laying on a mortar, the bricks are upset by tapping lightly with a rubber mallet, and the castle one is upset more carefully. The solution should be of medium density.
After an hour and a half, the formwork must be dismantled, and 3-4 bricks should be placed on the arch. As a result, the arch will receive a prestress in order to withstand the loads from the stone backfill in the future. The mortar in the seams between the bricks of such an arch will be dense and durable, and it will last a long time.
If the folded arch is left on the formwork for a week or longer, due to the large shrinkage of the masonry mortar, the solidity of the masonry will be disturbed (clay mortar has a volumetric shrinkage of up to 5%.) Slits invisible to the eye are formed between the bricks of the arch. The longer the arch remains on the formwork, the weaker it will be.
The dimensions of the window for the exit of steam from the stone filling chamber should be such that it is possible, if necessary, to climb through it into the heater to replace cobblestones or grates, as well as for other repairs.
The distance from the rails to the window is made no more than 50 cm (seven rows of masonry). This is due to the fact that the top of the cobblestones should always be at or below the shelf in the steam room. The lower the steam source, the more efficiently it will be used. In addition to the door in the window, it is necessary to install an internal damper. Thanks to her, the wall of the steam room, opposite the window, will heat up less, and heat will be better preserved in the chamber. For more intense heating of the backfill, the walls of the chamber can be lined with sheets of fire-resistant steel. It's expensive and inefficient.
The total height of the chamber is made with the expectation that there are at least four rows between the top of the backfill and the vault (ceilings). At a lower height, it will be difficult to splash water on distant stones. The blocking of the chamber of stone filling is always arranged one or two rows above the lintel of the chamber window. This part of the chamber is a smoke collector - during the kindling of the heater, it will not allow smoke to enter the steam room.
Between the arch and the rows of the main ceiling of the furnace, it is necessary to leave a sedimentary gap in one row of masonry. The gap is also used as a chimney to the chimney, allowing it to be installed on any corner of the furnace.
1 - smoke damper; 2 - stripes and corners; 3 - railway rails R-70 for laying cobblestone on them; 4 - steel tube 050 mm for additional steam or water heating; 5 - furnace door; 6 - blower door; 7 - grate fireboxes; 8 - cobblestone of volcanic origin; 9 - temperature gaps; 10 - through niches-channels for storing pokers, tongs and other small items; 11 - damper of the steam outlet window; 12 - steam outlet door; 13 - ceiling cutting.
The most dangerous place in the steam room in terms of fire is the ceiling around chimney. So that this place does not heat up unnecessarily, the pipe at the point of passage through the ceiling is placed with thicker walls - with a ceiling cut. For heaters, the wall thickness of the pipe here is 38 cm or 25 cm with additional thermal insulation.
The outer dimensions of the pipe cutting are 76 × 76 cm. But at the place where the pipe passes in the ceiling, a large opening is arranged - 86 × 86 cm. Gaps of 5 cm on each side between the brick and the ceiling material are filled with basalt wool or other fireproof material.
Ordinary brick begins to collapse at a temperature of 700 ° C, so it is better to lay the ceiling cutting from fireclay bricks. For greater decorativeness, some details of the furnace (extension at the bottom, skirt, cutting elements) can be made from bricks that differ from the rest in color.
Materials needed to build a stove
brick red | M200 | 1000 pcs. |
fireclay brick | Sh-8 | 450 pcs. |
Chamotte wedge-shaped brick | Sh-55 | 80 pcs. |
Smoke damper | 260×260 mm | 1 PC. |
Steel corner | 65x65x5mm | 14 m |
Steel strip | 50×5 mm | 2.5 m |
Heat-resistant steel tube | 050 mm | 1.5m |
Railway rail | R-70 | 2.5 m |
Furnace door | 280x 250 mm | 1 PC. |
Blower door | 210×250 mm | 1 PC. |
Grid grates | 200×300 mm | 6 pcs. |
Steam damper | Produce locally | 1 PC. |
steam outlet door | Produce locally | 1 PC. |
Chamotte clay | 170 kg |
|
fireclay | 170 kg |
|
Clay, mountain sand | On demand | |
Cobblestone of volcanic origin | 1t |
A bath for a summer resident is not a luxury, but a prime necessity. And if so, she needs a simple, economical and efficient firebox.
Such a " barrel stove» for the bath I made from two metal barrels. As a stove, you need to take a barrel with a capacity of 200 liters, and a second, smaller barrel can be welded to the first and used to heat water. I welded such a barrel with a capacity of 90-100 liters to the stove. But at the same time, he bent one of its walls so that the future water tank would fit well against the wall of the stove.
And in front of the furnace, he cut a hole for a pipe, which he filled with stones to accumulate heat. Cut the pipe to the width of the oven. At one end, he drowned it out and inserted it into the hole in the furnace, and then scalded it along the end. To prevent stones from falling out of the oven, I made a special grate (see fig.).
Then I cut a square hole for the firebox, made a door and a blower. Each summer resident must install the stove in such a way that it is convenient to maintain it and “give it to the park”.
I think that my stove meets such requirements as simplicity, cheapness and reliability. It is especially pleasing that you can go to wash in such a bathhouse literally half an hour after kindling.
Considering dimensions old stove and premises, prepared a drawing new design(see fig.). Partially dismantled the old furnace, leaving only a firebox with an afterburner pipe. The cracks in the masonry were covered with clay.
From sheet steel 10 mm thick, according to the drawing, I welded a rectangular box for the heater and a water tank. In the heater, I cut out the necessary openings for the doors on the side of the steam room (photo 1) and washing (photo 2). as well as holes for the afterburner pipe. In the latter, from the side of the steam room, I cut out a rectangular opening and closed it with a door (see photo 1 p. 1).
I installed the finished heater on the firebox, strung it on a pipe, welded the joints from above and below. Installed a chimney on the stove.
I fixed a water tank on the firebox (photo 3). The walls of the washing department adjacent to the stove were sewn up with tin for fire safety purposes.
For better heat supply to the steam room under the doors of the heater, I drilled nine holes d 20 mm (photo 4). I painted the body of the heater and the tank with heat-resistant silver, and whitened the stove.
When he flooded the stove, the bath measuring 2.3 × 3.3 × 2 m warmed up to readiness in 1.5-2 hours. A 100-liter water tank is heated in the same time to a temperature of 95-100 degrees. To prolong bathing procedures, thanks to a pipe with an afterburner, you can throw firewood at 3 logs per hour.
Three positions for space heating:
A - the doors of the heater in the steam room and in the sink are open - simultaneous heating of two rooms.
B-door of the heater in the steam room is closed, and in the sink is open - more heat in washing department. On the contrary, accelerated heating of the steam room.
B - All doors are closed - heat accumulation mode in the heater.
Two firing modes:
A - with a fully open blower door - the fastest heating of the bath.
B-with the door closed - maintaining heat in the bath, for example, in the summer.
The wide window of the heater in the steam section allows you to safely pour water onto hot stones.
Which oven is best?
The main thing in the bath is the stove-heater. Previously, it was built of brick. Now you can just buy ready-made metal structure. The main thing is to choose the right one among the many options.
All stoves-heaters are divided into three types according to the type of energy carrier used: wood, electric and gas.
Wood
The minimum formation of smoke and the absence of burning, which means that the procedure for taking a bath will be not only useful, but also safe for health.
All models use special elements that eliminate the risk of burns.
Variety of shapes and colors.
Cheaper electric and gas stoves.
Soot accumulates on the stones and must be cleaned regularly.
Electrical
No need for a chimney.
Eco-friendly. Any contamination is excluded.
They have a temperature control and regulation system.
– High energy consumption of 1 kW/1 sq. m.
Both rooms heat up very quickly.
Able to heat water well. A scheme for passing the chimney through a special tank is used.
- The need for a gas pipeline on the site.
Self erection sauna stove- not the easiest, but quite feasible event that requires thorough preparation and a thoughtful approach. After reviewing the information below, you will learn about the important nuances of designing a sauna stove, as well as consider the key stages in the construction of a brick structure.
The sauna stove can have different dimensions, selected mainly in accordance with the area of the serviced premises. Most often, furnaces are built with a base measuring 890x1020 mm (3.5x4 bricks) or 1020x1290 mm (4x5 bricks) and a height without taking into account the chimney 168 cm or 210 cm, respectively. The second option is better suited for steam rooms with increased ceiling height.
The most preferred option for a brick oven for a bath is a model with a water circuit (tank for heating water). It does not make sense to bring many projects - they are almost identical, only the location of the tank for heating water changes. The most popular options are the bottom-tank brick oven and the top-mounted brick sauna stove.
The following images show diagrams of a brick oven with a lower water tank.

Schemes of a brick oven with a lower water tank

Schemes of a brick oven with a lower placement of a water tank (ordering)
The following images clearly demonstrate the design of a brick stove for a bath with a tank at the top.


Before proceeding to the study of further information on the arrangement of the sauna stove, you need to consider and remember the key safety provisions, the violation of which can lead to extremely adverse consequences.
Traditionally, the stove is built near the wall opposite to the shelves in the steam room. The design of the furnace must be created so that between the heating parts of the finished unit and everything that supports combustion, a minimum distance of 30-40 cm is observed. If special protection is provided, for example, from asbestos cardboard, this figure can be reduced to 15-20 cm.

 The use of a heat insulator in the construction of a furnace - an example

A gap must be observed between the flue pipe and the floor/roof elements and that are in contact with it, which is subsequently filled with refractory material. Most often, asbestos is used for protection. From above, said gap with insulation is closed with a steel curly plate.


For additional protection, the floor area in front of the stove is covered sheet metal about 10 mm thick. It will protect the floor material from fire in case coals fall out of the firebox.


The standard option for placing the stove in the bath space is shown in the following image. Here you can also see the order of organization of the water circuit, which can be taken as a basis if the supply of warm water is provided by the furnace unit, as well as the features of connecting and removing the chimney.
Set for self erection brick sauna stove includes the following items:
The issue of choosing a brick for masonry deserves special attention. The strength of this material, first of all, should be higher than ordinary white or red bricks. The ideal option is a fireclay brick with the highest refractory properties.


By key performance characteristics a brick based on fireclay clay is noticeably superior to the closest "brothers", but it costs much more. In view of this, in order to keep the total costs for the construction of a bath stove within reasonable limits, fireclay bricks are used for laying areas that are subject to the most intense heat.

In places warming up to more modest indicators, it is advisable to use a solid red brick, designed to perform the work in question.
For example, from such a brick, you can lay out external walls, chimneys, various decorative elements etc.

Important! You can distinguish solid ceramic bricks by marking in the form of the letter "M" and the accompanying numbers indicating the value of the maximum load per 1 cm2. For laying a brick oven, you should use a material grade of at least M-150.
You can distinguish a real high-quality stove brick by 3 key features.

The laying of brick sauna stoves is traditionally performed on clay mortar. It is best if a kind of clay is used for its preparation, which is the basis of the brick used, i.e. red or chamotte. AT this case brick and masonry will give the same thermal expansion during the heating process, which will ensure the longest possible life of the finished building.
Useful advice! It has been established that the thinner the masonry joint is made, the higher the quality of the furnace will be as a result. However, consideration of this issue also needs to be approached wisely: ideal masonry is obtained with a joint thickness of 0.5 cm. Reducing the value below the mentioned indicator will contribute to a noticeable decrease in the service life of the furnace.
In addition to clay, sand is included in the composition of the solution. It must first be sieved so that material with grains of sand no larger than 1-1.5 mm eventually goes into the solution. The millimeter value is the most preferred. It is also important that the sand does not have silt inclusions and is of a uniform color. For sifting, use sieves of the appropriate fractions.
Separate requirements are also imposed on water, which is also used in the process of preparing masonry mortar. First of all, it must be clean, contain the minimum possible amount of mineral inclusions, and not have a musty smell. It takes about 15-20 liters of water to lay 100 bricks.

Before preparing the solution, the clay must be placed in any suitable container (for example, a large basin), crushed and poured with clean water in such an amount that the result is the most homogeneous mass, not too thick and not very liquid. Thoroughly mix the solution, kneading the resulting lumps. Leave the mixture of clay and water for a day, then strain, and rub the resulting lumps through a sieve.
Sand is added to the prepared solution last. On average, a liter can of sand is added to a bucket of water, but this moment must be carefully controlled, because. the amount of river sand in the solution directly affects the fat content of the latter. In addition, the required amount of sand may vary depending on the initial fat content of the clay. If the masonry mixture is too greasy, the stove may simply collapse during operation. A skinny (non-greasy) solution will not allow you to achieve the right quality adhesion of bricks, as a result of which the scenario already considered will be repeated.
There are several simple ways to determine the fat content of clay in artisanal conditions.

Take 500 g of clay and mix it with water. Mixing is best done by hand, until a mixture is obtained that has a uniform consistency and does not stick to the hands.
Important! For laying a sauna stove, you can only use a solution of medium fat content.
Roll the mixture prepared earlier into a ball the size of a small apple. Lay the molded product on any flat, hard surface and gently press down on it with a plank. Press down slowly enough to fix the formation of cracks.
If the clay ball has disintegrated without cracking, the clay is non-greasy. The appearance of a half-diameter crack indicates that the clay is too oily. In the case of a solution of normal fat content, the crack will take approximately 0.2 of the diameter of the clay ball.


Preparation of furnace mortar - tips
Regardless of the chosen configuration of the brick sauna stove, the procedure for its construction remains identical for all situations: from the foundation to the arrangement of the chimney and finishing. In the following table, you can see important information about each stage of the event under consideration.
| Stage of work | Description |
|---|---|
| There are several types of foundations for a sauna stove. You are offered the most optimal and popular option. Do the following: - mark the site for the future foundation by driving in pegs in the corners and around the perimeter of the base to be equipped, and pulling a rope between them to make it easier to navigate. Select the site dimensions in accordance with the design dimensions of the furnace base; - dig a pit with a depth of about 60 cm. At the same time, expand the lower 10-15 cm in relation to the main part of the pit by 5-10 cm in each direction. After concreting, such a platform from below will provide a higher resistance of the entire structure to ground movements; - fill the lower expanded part of the pit with sand and compact it, spilling it with water for better compaction; - pour a 10-centimeter layer of gravel or broken brick over the sand and tamp it down as well; - mount the formwork along the contours of the pit. To assemble it use wooden planks and screws; - lay the reinforcing mesh in the pit. For its assembly, it is optimal to use steel rods with a diameter of 1-1.2 cm. The rods are tied into a mesh with cells of 15x15 cm. At the intersections, the reinforcement is fastened with knitting wire or special modern clamps, which is more convenient. Between the walls of the pit and the reinforcing mesh, an approximately 5-centimeter gap is maintained. A similar gap must be maintained between the bottom of the pit and the reinforcing mesh. The most convenient way to do this is with the help of special clamps-stands; - pour into the pit concrete mortar, prepared from 1 share of cement (from M400), 3 shares of pure sand, 4-5 shares of gravel and water in an amount corresponding to about half the mass of cement. The concrete is poured in an even layer to such a height that the pouring is approximately 150 mm below the ground surface on the site. Be sure to align the “top” of the fill with a level; - let the filling stand for 3-5 days (preferably 7-10) to gain strength and dismantle the formwork. Fill the resulting voids with compacted fine gravel; - cover the hardened concrete platform with molten bitumen and lay a layer of roofing material on top, carefully leveling it and pressing it to the binder. Then repeat the procedure again. The resulting two-layer waterproofing will provide reliable protection of the brick oven from ground moisture. The previously mentioned 15 cm gap between the upper edge of the foundation and the ground surface will be leveled by means of a starting solid row of bricks. |
| Detailed recommendations for this stage were given earlier. |
| The laying of the bath stove is carried out in accordance with the previously prepared order - the main component of the project of the unit in question. The step-by-step procedure for building a brick oven will be discussed further in the corresponding section. Arrangement additional elements(in this case, it is a chimney, since it will be proposed to make the water tank built-in) depends on the specifics of a particular project and is considered individually in each case. |
| A fully laid out oven cannot be immediately put into permanent operation: the device must be given time to dry. During the drying period, the doors and windows in the room should be open - the stove will dry faster. After 4-5 days after the completion of the laying of the furnace, it can be started to heat with small chips for a maximum of 10-15 minutes daily. The furnace is performed 1 time per day. Escaping condensation indicates that the unit is not yet completely dry. |
| At the request of the owner, can be performed finishing. There are enough options. The most popular are the following: - tiling (clinker, majolica, terracotta or marble). One of the more popular options. Differs in rather low cost and simplicity of implementation; - brick cladding; - stone finishing. Well suited porcelain stoneware, granite, marble or serpentine; - plastering. The primordially Russian method, which is concurrently the most elementary and budgetary; - tiling. A labor-intensive finishing method that allows you to get truly unique design compositions. |
As an example, the procedure for erecting a furnace equipped with a built-in water tank will be considered. The dimensions of the structure at the base are quite impressive - 1020x1290 mm (corresponding to laying 4x5 bricks), height - 2100 mm. At will, the owner can change the dimensions in accordance with the conditions and characteristics of the equipped steam room. The design image of the erected structure is presented below.

Furnace specified constructive dimensions will allow to provide in a space up to 10-14 m2 temperature indicators at the level of about 45-50 degrees during the washing process and up to 100 degrees and above during soaring. One firebox of such a furnace will be enough for up to 10-12 visitors to comfortably take a steam bath and wash thoroughly. The volume of the built-in tank (in the diagram shown on the edge on the right) is about 180 liters.
To improve the quality of heating and placement of stones above the fuel chamber of the furnace, pipes are laid in the amount of 6 pieces (visible next to the water tank) with a diameter of 50 mm. The length of pipes to be laid specifically for this project is 1050 mm. The installed pipes become very hot during the operation of the furnace and continue to transfer thermal energy for some time even after the completion of the furnace.
Above the stones is a double door. Through the opening it closes, water succumbs to the laid cobblestones, due to which steam is formed.
We proceed directly to the study of the design order.
Table. Ordering a brick sauna stove
| Stage of work | Description |
|---|---|
| As noted, it becomes continuous and does not have any significant features. The scheme of directly laying bricks is shown in the image. |
| At this stage, the formation of the ash chamber begins (dimensions and location are shown in the image) and the corresponding door is installed (highlighted in red in the diagram). Important! The dimensions of the hole intended for installing the door must exceed the dimensions of the mounted frame on each side by 5 mm. Fixing this, as well as other doors in the oven, is done as follows: - the asbestos cord is inserted into the prepared hole and smeared with masonry mortar. A cord with a diameter of 0.5 cm will suffice; - on 4 sides, the door frame is equipped with lobes - wire, previously twisted from 3-4 rods 10-12 cm long. 10-centimeter wire cuts with a diameter of about 0.5 cm are attached to the ends; - the prepared structure is inserted into the hole along the masonry and fixed with mortar. The wire embedded in the masonry provides reliable and high-quality fixation of the door. |
| The laying of the ash chamber continues. |
| From refractory bricks (yellow in the diagram), the base of the firebox is laid out and 2 grates are installed. The installation of gratings is carried out in grooves specially cut for this. |
| The formation of the fuel chamber itself begins. The chamber is completely lined with refractory bricks. |
| The fuel chamber door is installed. |
| The laying of the fuel chamber continues. |
| Actions are similar to the 7th row. |
| The combustion chamber door is closed. |
| Quarters of refractory bricks are laid at each of the side walls. Openings are formed between the bricks, the dimensions of which should allow the pipes mentioned earlier to be laid. At the same stage, in the places indicated on the diagram, a place is being prepared for installing a water tank. |
| On the same row, the previously mentioned pipes are laid in the gaps between the quarters of refractory bricks. Holes around pipes are easiest to seal with basalt cardboard. |
| Also on the 10th row, a water tank is being installed. |
| In this and the following images, the water tank is not shown to better show the features of the masonry, although the tank should be present. Previously laid pipes are covered with ordinary (not fireclay) bricks. |
| The furnace array rises higher. |
| Similar to the previous one. |
| Similar to the previous one. |
| Similar to the previous one. |
| Similar to the previous one. |
| Similar to the previous one. |
| Similar to the previous one. |
| Similar to the previous one. This image shows the water tank. The allocated space above the pipes is filled with cobblestone. |
| 2 strips of steel are placed above the water tank (placement and dimensional ratio can be estimated on the diagram) so that it can be covered with bricks. |
| The water tank is closed. The designated space is left free. In the future, water will succumb to the cobblestones through this opening. |
| The construction of the furnace array continues, similarly to the previous row. |
| Similar to the previous one. |
| Similar to the previous one. |
| Similar to the previous one. |
| Laying is carried out similarly to the previous row. The diagram is shown with a door installed for an opening through which water will flow. In general, the installation of this door had to be done earlier - when laying the row marked with red lines. The door was not shown in the diagram in order to better understand the principle of masonry. To cover the door, 2 steel strips are laid on top - the technique is already familiar to you from the previous stages of the work. |
| The door is closed. Preparations for shutting down the furnace begin. The area to be covered is large enough. To successfully cope with this stage of work, it will be necessary to lay 2 steel strips. The thickness of the strips is quite large - about 1 cm. For their laying, recesses are cut out in the bricks (marked in the diagram). Under the strips, it is desirable to put gaskets made of basalt cardboard. |
| The mentioned strips are laid with 1-2 mm gaps (marked in the diagram), due to which the thermal expansion of the metal during the operation of the furnace will be compensated. |
| The oven is closed. At this stage, you need to leave a hole for installing a chimney pipe (marked in the image). On the hole is done seat for installing a smoke damper, which is also seen in the diagram. |
| At the same stage, the smoke damper is installed. |
| Furnace floor construction is in progress. |
| Similar to the previous one. |
| The formation of a chimney pipe begins. |
| Pipe formation continues. Further, laying is carried out in a similar sequence until the pipe is brought to the design height (determined individually, in accordance with the characteristics of a particular room). |
The laying is completed. The principle of operation of such a furnace is extremely simple: when burning fuel, hot gases heat the walls of the furnace and a water boiler installed inside the structure, pass through the laid pipes and stone filling placed on top of them, and then go into the chimney.


Khasanzyanova Aisylu Gera Summary of the myth Gera Ludovisi. Sculpture, 5...

Indians have a calm attitude towards death. The reason is simple. They believe in...

It is known that at the moment of death the soul leaves the physical body. But left...