

If you adhere to proper nutrition, then avocados are probably in ...


A gable roof with an attic is the best solution for creating a reliable structure in a bath that meets all standards. It is functional and right approach can be good decoration. But in order for the gable structure to meet all the tasks set, it is necessary to design it correctly.
In some cases, you can get away with installing a simpler roof with one slope. But if you think about it, the financial expenses do not differ so much. Moreover, in terms of functionality, a gable roof has a number of advantages:
A simple example of a gable roof: 1 - rafters; 2 - transverse fastening; 3 - Mauerlat; 4 - ridge beam.
You can design a gable roof on a small bath yourself, but first you need to decide on the materials. This is not only the wood used to assemble the frame, but also the coating responsible for the angle of inclination. For each type of material, its own indicators are recommended:
The indicators are dictated not by the decorative finish, but by the weight load on the roof frame. The heavier the material, the more you need to make the angle of inclination. Gentle slopes, under the influence of precipitation (snow) and the load exerted by the coating, can break through. In addition, heavy construction will create an additional load on the foundation of the bath. This also needs to be taken into account.
When choosing a material and determining the angle of inclination, it is recommended to take into account the climatic features in the region. If the precipitation is not intensive, then the given indicators for each material can be changed.
In addition to the coating in the construction of a gable roof on a bathhouse and other structures, lumber is required:
In addition, you will need a film to isolate the steam passing from the steam room and washing department and a heater.
The roof in any constructive plan is a frame sheathed with roofing. All work is carried out in strict sequence.
Mauerlat is installed first. To do this, a beam of 150x150 mm is laid along the upper part of the walls and fastened to the studs. They are immured in advance at the stage of laying the walls of the bath from brick or other material. There is also a wire fixing option. For this, segments of the required length are laid between the penultimate and last crown of logs, if the bath is built of wood, or in brickwork. Mauerlat must be laid evenly, both horizontally, and check the diagonal of the structure.
 In the Mauerlat, grooves are cut for laying the rafter legs, at a certain distance. If a Wall panel thicker than the base of the roof, it is additionally wrapped with roofing material in several layers and laid with bricks on the outside to increase strength.
Next, you need to assemble the truss structure. This is a rigid triangular bundle of timber. To further strengthen them, a spacer is mounted across each. A crossbar is installed at the top of the corner. It is mounted after the installation of the rafters, and it is better to assemble them on the ground, having previously “removed” the dimensions.
When the required number of rafters has been collected, they must be installed on the Mauerlat. The ridge corners are mounted first. Trim and attach to the Mauerlat. All is ready. Of all the types of bath roofs with two slopes, the process of installing the main rafters in this system is the simplest. At the end of the work, the evenness of both structures is checked. Next, the rope is pulled along the top of the corners and the rest of the trusses are mounted relative to this landmark.
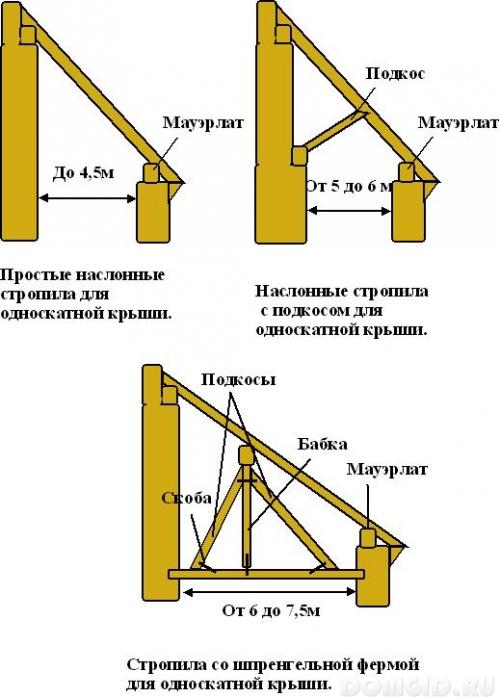
After installing all the rafters, we check the evenness of the installation and carry out a control fixation to the Mauerlat and the ridge bar. If the roof slope is more than 4.5 meters, then you need to additionally install supports, so that they hold the rafter leg on one side and rest against the floor beam on the other.
The skeleton of the roof is assembled, it remains to carry out the final work. First of all, we determine the place where the chimney exits, if it is not laid through the wall. We mount a metal adapter and isolate it with a heater.

Next, we fasten the vapor barrier layer to the rafters with staples of the stapler. On top of it we stuff a crate of not edged board. The step is selected according to the type of roofing material. Under roll coatings continuous sewing, for sheet materials, boards can be fixed at a distance of 15–20 cm from each other. The crate is stuffed throughout the entire truss system, with a protrusion beyond the lower edge by about 20 cm. You don’t need to do more, and if the trusses are longer, then they are sawn off at the same distance.
No need to rush to lay the cover. First, you need to give it additional strength by sewing up the end parts. For this you need a board. AT brick baths, the stone is laid out, with the sewing of the gables. If you plan to use the attic space, leave space for the installation of a window frame.
When the structure is sewn from the gables, it will be much stronger. Now you can proceed to the next step. Waterproofing is laid over the crate. In some cases, the membrane used for this purpose is laid between the rafters, under the counter-batten. This allows you to create an additional air layer for quick drying of the roof structure and additional ventilation of the bath ceiling from the attic space.

The last step in the assembly of a gable roof. The laying principle is the same for all types of coatings. It is necessary to start from the bottom of the cornice and gradually rise, overlapping the lower rows with the next layers. Make sure that the laying is even so that the appearance is not spoiled by curved lines. Having closed both slopes, we install ridge bar, fixing it with self-tapping screws.
The process of assembling a gable roof is over. This is the easiest option for designing a truss system. Taking into account the advice, you can independently design a reliable roof on the bath that meets all technological requirements.
An important stage in the construction of a private bath is the construction of a roof structure that can provide reliable protection from negative impact precipitation and perform an aesthetic function.
In order for the bath roof to last for many years, you will need the right choice of design configuration, calculation of the angle of inclination and the length of the overhang. Of course, you can turn to professionals to carry out the work, but independent construction roofing can save you a lot of money.
The modern bath roof is a functional and reliable design, which can be of two types.
This type of roof is the most affordable for installation and cost-effective. The design provides for the installation of rafters with an emphasis on opposite walls. At the same time, it is important to correctly calculate the appropriate angle of inclination of the slope to protect the roof from possible damage and deformations.
A shed type of structure should be erected in a site with a high wind load in order to prevent stagnation of rainwater and snow cover on the surface.
Such a roof has a number of advantages: reliability, durability, heat capacity, the possibility of arranging an attic space. In addition, precipitation does not linger on it, but its cost is much higher than that of a single-sided counterpart.
The gable version of the roof is made in one of two ways:
The angle between the installed rafters determines the slope of the slopes: the smaller it is, the steeper the slopes.
Most often, gable roofs are:
In order to competently build a roof on a bathhouse with your own hands, it is necessary to study in detail its device, which provides for the following functional elements:
It is intended for the correct distribution of loads over the entire surface of the roof. The rafters on the bath are mounted using crossbars, ties and spacers to ensure the strength of the finished structure.
The rafter system can be assembled on a finished building or on the ground with subsequent installation on a bathhouse. truss supports must have a secure fixation with load-bearing walls and supports in order to prevent deformation or failure of the roof when exposed to strong air masses.
The crate can be assembled with a solid shield or a cellular base of wooden beams. Choice suitable option lathing depends on the type of material for the roof. Under the rolled roofing felt, a continuous crate is required, for corrugated board - cellular.
A mandatory stage in the arrangement of the roof in the bath is to ensure protection against the penetration of moisture and steam. To create a waterproofing layer, tiles or slate sheets are used, for a vapor barrier layer - roofing material or parchment paper.
Practical and safe materials are used as roofing: rolled roofing material, metal tiles, ondulin, asbestos cement or bitumen slate, roofing steel.
The roof for a bath is a building envelope, which is designed to protect the building from negative atmospheric effects, as well as to maintain comfortable conditions in the premises. Therefore, modern roofs must meet a number of requirements:
During construction pitched roofs it is important to comply with certain standards and norms. If the bath building is adjacent to residential building, then it is rational to install a shed roof - more affordable and cheap option. In this case, the height of the roof can be arbitrary, but taking into account the height of the residential building.
For full-fledged bath complexes or private baths equipped with an attic room, the best option are gable roofs. With the right approach to heat and waterproofing, such a structure can be used for living. When organizing a gable structure, it is important to choose the right location for the ridge and calculate its height.
Modern construction market offers a wide range of reliable and durable roofing materials. The following materials are suitable for covering a bath roof.
Non-ferrous metals (zinc, aluminum, titanium alloy) or galvanized steel are used for the production of corrugated board. The main difference between the material is the thickness of the metal base. Decking is different high strength, wear resistance, light weight and affordable cost.
Suitable for organizing a gable roof, subject to an angle of inclination of 35 degrees. The metal tile is resistant to corrosion, provides good sound absorption, has a long service life (over 45 years) and an attractive appearance.
Roofing material based on ceramic and bitumen is suitable for creating one- and gable structures, convenient to use, practical and durable. Roofs from soft tiles look aesthetically pleasing and attractive.
Affordable material for roofing, it is cheap, easy to install and has a short service life (no more than 15 years). Roofing felt is laid subject to an inclination angle of 5 degrees. This is the most budget option. roofing material.
Ordinary sheet slate is an affordable and cheap material used for roofing. He possesses long term service (up to 40 years), does not require special care. Sheet stacking is quick and easy. The disadvantages of the material include high moisture absorption and brittleness.
Euroslate is a more expensive and practical roofing material, which has an attractive appearance, good operational characteristics and high cost.
A popular material with high ductility, strength, wear resistance and durability. It is ideal for covering curved roofs. In addition, ondulin is easy to install and affordable.
The most popular is a bath with a pitched roof. A roof structure with one slope can be easily built with your own hands from available materials. One of the load-bearing walls should be several rows higher than the others to create the desired slope of the slope - from 20 to 45 degrees.
For construction works tools and materials required:
According to the work instructions, shed roof for the bath is built in stages:
The load-bearing beam is laid along the perimeter of the outer walls and is intended for mounting the rafter system. In log cabins, the upper row is the Mauerlat; in brick and block buildings, it is equipped additionally. Beams are fixed with wire, anchor bolts or studs.
Studs are inserted into the upper wall rows to a depth of 40 cm in increments of 65 cm between each other so that top part threads towered above the supporting beams by 3.5 cm.
The rolled roofing material is laid on top with pricking on the studs in the places of their installation. Next, the beam is laid on the tip and hammered to make small serifs. Holes are made along the serifs, after which the beam is installed on the studs, over which the nuts are screwed.
Grooves are made in the load-bearing beams for overlapping in increments of 65 cm. After installing the ceiling beams at the ends, they must be indented 32 cm outside the load-bearing walls. Ceiling ceilings perform the function of rafters, therefore they are fixed to the Mauerlat with nails or wire. After installation is completed, all elements are treated with an antiseptic primer.
The lower part of the floor structure is hemmed with boards. Over the installed rafters, an overlapping film is laid, the joints are glued with adhesive tape. Next, heat-insulating material is mounted - rolled or slab. The gaps are being filled mounting foam, an overlapping membrane is installed on top with fixing the joints with construction tape.
Beams are stuffed onto the rafters through a film for waterproofing, after which the finished frame is sheathed with boards. The width between the bars can be from 1.5 to 14 cm, depending on the type of roofing material. A finishing coating is mounted on the finished crate - slate, metal tile, ondulin or corrugated board. Sheet roofing fixed with self-tapping screws with gaskets to prevent moisture from penetrating through the inlets.
For an overall bath, it is better to equip a gable roof with an attic room for storing bath accessories and inventory. The assembly of the rafter system is carried out in stages.
To assemble the roof structure, you will need:
Step by step construction guide gable roof includes the following steps:
In the load-bearing beams of the structure, grooves are made for the installation of beams for the ceiling. The step between the grooves is 100 cm, the depth is up to 8 cm. The beams are pre-treated with an antiseptic composition, dried and mounted with an edge into the grooves. Additional fixation on nails.
A gable roof consists of triangular truss structures - trusses, each of which is made of the same bars - legs, bases and lintels. The elements are fixed to each other using screws.
For the legs, boards of 5 × 10 cm are used, the length of which is 2.8 m. At the edges of the board, they are cut at an angle of 45 degrees, holes for screws are made, after which the elements are securely connected to each other. From the junction of the truss structure, an indent of 50 cm is made for the groove for the jumper. Slices are cut at the ends of the jumper rectangular shape, thanks to which it is mounted in the rafters. Screws are screwed in at the junction of the jumper and rafters. Other farms are assembled in a similar way.
Two roof trusses, located on top of the side walls, are sheathed. For this, 5 × 5 bars are used, installed in a horizontal position with a step of 35 cm. To reinforce the structure, additional bars are installed in a diagonal direction.
Finished structures must be placed on the ceiling beams. Fixation on spacers in compliance with the geometry of the structure. Farms along the edges are mounted first. For additional strengthening of the installed structure, jibs are used - beams exposed between the supporting beam of the wall and the rafters at the level of the lintels.
Next, the installation of the remaining rafters is carried out in compliance with the vertical level. The technological distance between the individual rafters should be 100 cm. All elements of the rafter system are connected by a canopy of two boards nailed to the upper beams on both sides of the roof.
For the lathing, a board is used with a length sufficient to cover the roof and protrude beyond the rafter system by 25 cm. Technological gaps between individual boards can range from 2 to 48 cm, depending on the type of roofing material.
A hole is made at the outlet of the chimney right size with the installation of a continuous crate around the perimeter.
A counter-lattice of 5 × 5 cm bars is installed on the waterproofing with pre-treatment with an antiseptic composition. The selected finishing coating is mounted on the counter-lattice from the edge of the eaves. A hole is made under the chimney, and after installing the pipe, the joints are carefully sealed with bituminous impregnation or adhesive mixture are closed with a protective apron.
At the final stage, the roof structure is insulated. The insulation is laid from the inside between the beams with minimal gaps. The joints between the insulation are filled with mounting foam. Gables are insulated separately. FROM inside they are upholstered with waterproofing material, then the crate is fixed, after which the insulation and vapor barrier are mounted.
For interior cladding on the insulated roof surface, you can use lining, board or plywood.
Only compliance building technology and the use of quality materials will allow you to build a reliable and solid roof for a bath that can withstand wind loads and various environmental conditions.
The construction of the bath begins with the construction of the foundation, then you need to do it, and only after that comes the time to build the roof of the bath. The roof protects the room from atmospheric precipitation, and also gives it a complete look.
The main feature of the bath roof is simplicity. If roofs of complex construction are often erected for a house, then for a bath - the simpler the better.
The roof consists of several elements: a frame (rafter system), lathing and flooring (roofing and waterproofing materials). If you plan to additionally make an attic, then you will also need an attic floor. It is worth doing if you have a budget, and you often go to the bathhouse. If it is used only in summer, then it is better to limit yourself to a simple bathhouse without an attic - it is easier to build and cheaper.
The angle of the roof can be different - from 2 to 60 degrees. The higher it is, the more efficiently and faster the precipitation will roll. But making a too high roof is not recommended in regions with strong winds.
Please note that the higher the roof, the greater the consumption of materials, and, consequently, the more expensive the structure. Therefore, too large a roof angle is also irrelevant if you want to save money and build budget bath.

The bath roof project usually provides for one or two slopes.
A bath with a shed roof is a simple and budget option. Usually this type of roof is chosen for summer or. The main advantage of a shed roof is the low cost of construction.

Gable roof- This is the most common type of roof. It is chosen if the bath area is more than 12 square meters. Such a roof looks more aesthetically pleasing and has high functionality.

If the bath is an extension to the house, then the best choice It's a single pitched roof. In case you want to make a spacious attic or additional living space, then stop at a gable roof.
Below are photos of bath roof projects:


This process includes several stages: first you need to build a frame, then make waterproofing and install a roof.
The roofing system will be based on the Mauerlat - load-bearing beam laid over the walls around the entire perimeter of the bath. If you are building wooden bath, then there is no need to install a power plate, the top row of the log house will play its role, but if you are building or from aerated concrete, then you need to fix the beams to the wall with steel wire, anchor bolts or construction studs.

To install them in the Mauerlat, special seats, which are needed so that the overlap lies strictly perpendicular to the walls. The distance between the grooves should be about 0.6-0.7 m. Next, beams should be laid in them, which should protrude 0.3 m beyond the walls of the bath. If they protrude by more than 0.5 m, then you need to install additional external support column.
Fitted on the cover waterproofing material.

To install a roof truss, it is permissible to use logs with a diameter of at least 12 cm, a bar with a section of 0.6 square meters or boards 40x150 mm. The easiest option is trusses made of glued or edged timber.
The truss truss is a truss leg resting on a Mauerlat. According to the method of fastening, construction legs are of two types:
It is possible to use two types of rafters if you do common roof over several flights.

The rafter system does not have to be erected by climbing onto the building. It will be safer, easier and faster to assemble the roof truss on the ground. But keep in mind that in this case it will be more difficult to lift it - this will require the help of several people or a crane.
First you need to build the side rafters, and then the front ones.
If you plan to make an attic, then in one of the front rafters you need to prepare window frame, and in the other make a doorway.

The purpose of the roof is to protect the premises from external influences, so this stage has great importance. To ensure waterproofing, a vapor barrier film must be overlapped on the rafters, the joints must be connected with adhesive tape.
The most popular material for thermal insulation is mineral wool- it is fire-resistant, durable and has high heat-insulating properties. You can use roll slab insulation, the latter is more convenient. Between the rafters, you need to tightly lay the insulating material, seal all the gaps with foam. It is also recommended to overlap it, and close the seams with foam.
But try not to compress or bend the edges of the material too much. Any deformation significantly reduces the properties of the insulation.

For construction it is permissible to use different materials: timber, boards, etc. The crate can be in the form of a solid shield or with gaps between the bars - it all depends on which roofing material you choose. If you plan to install a soft roof, then the crate is best done from boards with gaps of 1 cm.
In private construction, the construction of a bathhouse is a special ritual, in which not only the desire to create a washing room is invested, but something more. The bath is a reflection of the soul of the house, a place for rest in spirit and body.
The construction of the bath is completed by the erection of a roof over it, which must immediately meet many quality criteria and appearance. Let's figure out how to make a gable roof in the bathhouse on our own, and also highlight others possible options roofing structures applicable to cover the bath.
In this article
Depending on plans for attic space and aesthetic preferences, the roof for a bath can be made of two types:
Before you make a roof on the bath, you need to calculate it. Consider in detail the process of calculation and design gable design, as the most popular and widespread:
The angle of inclination depends on the weather conditions of the region - its choice is influenced by wind and snow loads. The steeper the roof, the better it gets rid of snow masses, but the worse it resists strong wind. The calculation of the snow and wind load of the roof is done according to the SNiP data and maps dividing the country into special natural zones.
The slope of the slopes also depends on the chosen roofing material, each of which assumes the presence of its own interval of the possible slope of the slopes. It is possible to get acquainted with these data in specialized tables or characteristics of roofing materials.

Thus, the choice of the angle of inclination and height cannot be made "at will", but must be the result of painstaking computational work.
Choice building materials. Design and calculations are important when choosing and purchasing building materials. Accurately made calculations make it possible to determine the required sections of the timber for the rafters, the need to create a sparse or continuous crate. These parameters are related to the obtained roof load data.
The amount of insulation waterproofing film and roofing depends on the area of the planned roof. When buying building materials, you should always purchase 15-20% more materials for possible overruns due to overlapping or waste.
Having created a plan for the future roof, you can actually move on to the main issue - building a roof for a bath with your own hands.
The roof structure is based on a truss system, which is a complex of wooden elements:

All wooden elements roof structures are made of dried wood with a moisture content of not more than 20% without knots and cracks. Before installation, the wood is treated with special agents to prevent the formation of mold, fungus and wood damage by pests.
There are two ways to build a truss structure:

When calculating and choosing a material for the truss system, the total load on it is taken into account, which depends on its weight of the structure, snow load etc. As a rule, rafters are made of wooden beam section 50*100 mm.
Consider how to do it right truss system for a gable roof:

An important point in the construction of a roof structure is its vapor and waterproofing. The protective material is spread over the rafters with an overlap of up to 10-15 cm at the joints of the material and fixed with nails or staples. It is important to create ventilation gaps between the waterproofing and the roof. To do this, a counter-batten is created under the crate system.
Next, the crate is stuffed, the step of which depends on the selected roofing material. Under soft roofs a continuous crate is made of moisture-resistant plywood; for other materials, the step of the system can be increased to 40-50 cm, depending on the slope of the slopes.
If you wish to create warm roof a heater is used for the bath, which is laid from the side of the attic between the rafters and sewn up with a layer of vapor barrier material.

One of the finishing types of work is the installation of roofing material on the bath roof. Regardless of the chosen roof, the order of work will be as follows:
An important point in the construction of the roof on the bath is the question: how to make a chimney? It is most advisable to bring the pipe in the bath through the roof 30-50 cm from the ridge with an elevation of 50 to 100 cm above the roof. Pipe passing through roofing cake, whose materials ignite easily and quickly, must be associated with mandatory pipe insulation. To do this, a special manhole is made in the built roof, the walls of which do not allow the pipe to come into contact with combustible elements of the roof.
The final work is the installation drainage system, sewing roof overhangs and facing roof gables.

To cover the bath, other types of roofs can also be used - shed or unequal. Compared to a gable, they are not so practical, but they have a number of reasons for building just above the bath. Consider their main features.
Consider how to make the roof of the bath in the form of a shed structure. This type roofing can be used if it is necessary to cover a bath of a fairly small size or in the case when the bath is an extension to the main building. To use such a design, one of the walls of the building is made higher in order to obtain the required angle of inclination of the roof. It is recommended to observe the slope of the slope within at least 20° for less load on floors, and in regions with snowy winters, increase this figure to 45°.
Calculation and construction of a shed roof for a bath with their own hands, in principle, repeat all the points above for a gable construction. Let's dwell on some points that are typical for a roof with one slope:
The remaining operations for the construction of a shed roof are identical to the order of work for a gable roof described above.

An interesting version of the roof for a bath is a design with two slopes of various lengths and angles of inclination. A longer and gentler slope in this case can be a canopy over the veranda adjacent to the bath. With seeming attractiveness, this type of roof for a bath has two drawbacks:
Considering that the calculations and construction of an unequal roof are fraught with a lot of difficulties, the construction of such a roof over a bath is irrational.
The erection of a roof over the bath as a whole follows the basic rules for the construction of roofs. The predominantly small size of the baths dictates special wishes for the roof being erected, which is most consistent with the gable roof. It allows you to create a durable, comfortable and outwardly attractive roof over a bath structure with the lowest economic and construction costs.
Bath is a source of health and longevity, it gives real pleasure to the body and gives good mood. In order for the bathhouse to perform its main functions and last for many years, it is necessary to properly build each of the elements of this building.
During the construction of the bath, it is important to pay attention to each stage of its construction, the totality of all correctly performed work guarantees the durability of the building, therefore, in order to ensure the success of proper construction, you need to know how to properly make the roof of the bath.
What the roof will be depends on many factors, including the area of \u200b\u200bthe building, the material from which the walls were built and the nature of the area where the bath was built.
Before you start building the roof of the bath, you need to choose what design it will be.
Roof structures are:
with an attic;
no attic.
A do-it-yourself roof for a bathhouse with an attic is optimally suited for a bathhouse that will be operated in winter time. Such roofs are characterized by high thermal insulation properties, and heat transfer through ceiling is usually minimal. In addition, the attic can serve as a recreation room, a billiard room or a place to store bath accessories.
On the summer baths it is better to build bare roofs.

Now you need to choose a roof shape. They are divided into 2 types:
lean-to;
gable.

This type of roof is the simplest, respectively, requires the least time and money. Shed roof suitable for small baths, as well as for those baths that are erected as an extension to another building. Centaur walk-behind tractors will prove to be great helpers in the delivery of building materials in small batches, if you have a trolley trailer.
It is preferable to build a building with a similar roof in places where there is a large wind load, this will reduce the overall windage of the building.
It is worth noting that snow and rain from a shed roof roll off worse than from a gable roof, which gives it an additional load.

So that precipitation does not stagnate on the roof, a shed roof must be built at a certain angle of inclination. Most optimal slope 20-30˚, in areas with heavy rainfall, it is recommended to build a roof with a slope of 45˚. It should be borne in mind that the consumption of materials in this case will be greater, but the bath will be protected from possible serious damage to the roof.
Maurelat installation(guide beams). Beams are attached to the wall of the building with anchor bolts.
Rafter preparation. To begin with, nests for the rafters are cut down, then the rafters are attached with slate nails to the Mauerlats. The rafters should be installed at a distance of 60-80 cm, and protrude beyond the wall 15-30 cm.
Crate. The crate, after a certain distance, depending on the type of roof, is nailed perpendicular to the rafters.
Waterproofing and roofing. The selected waterproofing material is laid on the crate, and after that, the roofing material.

A gable roof provides a good slope to atmospheric precipitation, which has a positive effect on its service life. In addition, such roofs allow the arrangement of the attic. It is worth considering that the cost of such a roof is higher than that of a pitched roof.


erection attic floor. Roof assembly begins with the construction of an attic floor, which can be assembled on the ground and then raised to the roof.
Mauerlat installation. It is installed on finished walls, if the bath walls are built of gas block, foam block, brick, the surface must be insulated before installation using a special welded material. For a uniform load, the logs for the Mauerlat must be at least 18 cm. Accordingly, with the laying of the Mauerlat, the location of the rafters and the nest for their installation is determined.
Installation of rafters. Rafters can be assembled on the ground, or directly during installation. The rafters should be installed every 60 cm - 1.2 m, after which they are connected with iron brackets to the Mauerlat. For the cornice, it is necessary that the ends of the rafters protrude up to 30 cm above the wall.
Crate. Depending on the type of coating, the crate can be either solid if roofing material is selected, or located at a certain distance (up to 1 m.) If slate is selected.
Waterproofing. Waterproofing material is attached with a stapler to the rafters.
Thermal insulation. How the thermal insulation of the roof will be carried out and what material will be used depends on whether there is an attic in the bath and whether it will be used as a dwelling, but under any condition, the insulation must be non-combustible. The most commonly used materials are mineral wool, ecowool, stone wool, etc.
Roof installation. After laying the waterproofing and thermal insulation, the roofing material must be laid.

To know how to build a bath roof, it is necessary not only to know the main phases of construction, but also to know how roofing and waterproofing material is selected and installed.

As a roofing material for a bath, roofing material, slate, metal tiles, corrugated board and galvanized sheet can be used.

Roofing material is the cheapest, but its service life is much lower than other materials.
The roofing material should be laid with an allowance of 10-15 cm, while making sure that “waves” do not form. Next, marks are made on the edges of the material protruding beyond the borders of the crate, and they are cut off.
The first sheet is reinforced with special buttons, each subsequent installation of roofing material should be done with an overlap of 8-10 cm.
Skates are either bought ready-made in the store, or made independently.
Roof waterproofing is carried out at the last stage of its construction. The most commonly used membrane film. It is laid directly on the rafters before installing the crate. The film must be laid with an overlap without tightening and secured with adhesive tape.
Roof insulation can be done in three ways: between the rafters, under them, or laid on top of the rafters. It is most difficult to carry out thermal insulation between the rafters, but if three methods are used simultaneously, then it must be borne in mind that such thermal insulation should be done closely, without gaps.

It should be noted that the installation thermal insulation material under the rafters reduces the attic area, so it is better to lay the insulation on the rafters.
Thus, knowing how to build a roof on the bath, as well as other components of the bath, you can be sure that the bath is guaranteed to become a real source of health and vigor for many years to come.
If you adhere to proper nutrition, then avocados are probably in ...


Pizza can be cooked not only with meat products - sausage, sausages and ...