If you adhere to proper nutrition, then avocados are probably in ...


To better understand what a half-hip roof attaches to, you can imagine a design that looks like something intermediate between a hip variety and a simple gable.
Distinguishes semi-hip design from the rest of the trapezoidal pediment.
There are a lot of characteristics of such a design that you should pay attention to and understand them before proceeding with the installation.
Basically, they construct a half-hip structure for attics. The roof can be gable and four-slope, in which there is a corresponding number of cut triangular edges. The location of such sections - above the end walls.
This is what distinguishes the half-hip from a similar hip design. Roof slopes are symmetrically located in relation to the axial beams and have equal angles of inclination.
If we consider such a design from the positive side, then the following points can be distinguished:
Regarding the shortcomings, the following can be said:
It is not easy to design such a variety on your own, everything depends on the construction of the truss system. This system characterized by many differences compared to conventional gable and shed roofs.
Half-hipped roof: photo below.
House with a hipped roof

Frame house with half hip roof
The rafter system is much more complicated than the hip variety of the roof, it is represented by trapezoids and various polygons, in addition, the hips themselves are also of a different shape.
From the species diversity of the semi-hips are presented:
There are two types of rafter system for such a roof, it depends on which rafters are used to build the structure:
The listed elements create a truss system:
ATTENTION!
To increase the strength of the rafter system, special ties are mounted in it, connecting elements located on opposite sides. The installation of additional screeds is carried out flush with the ceilings or at the level of the middle of the rafters.

Scheme of the truss system
 To any roof, regardless of its type there is not one layer of material, but several.
This solution allows you to provide the roof with all the necessary characteristics and properties for comfortable life.
The composition and structure of roof owls may vary depending on its purpose and variety.
With regards to the half-hip, such a roofing cake is represented by the following layers:
Each material in the "pie" of the roof is designed to perform certain functions, Much depends on the correct installation of such a system..
All materials must be properly selected in accordance with the individual characteristics and parameters of the structure.
The roofing pie is laid in the same way in all types of roofs, the crate is mounted in the first place, on which materials are subsequently attached alternately.
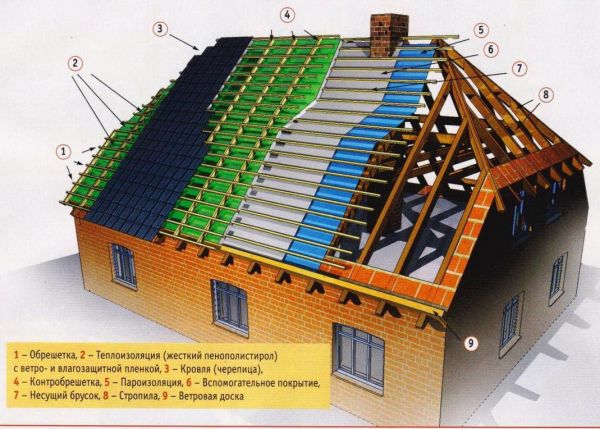
roofing cake
It is better to break the whole construction process into several separate stages, understanding the essence of which the construction will take place easily and without errors.
Process steps:

rafters

Mauerlat installation
Diagram of installation of diagonal rafters:
Manufacturing and installation of hip legs. The distance that the rafter leg should rise relative to its lower part be sure to measure and the result is postponed from the top of the skate and also mark. From this point, a lace is stretched, along which they are guided in the further process of installing the rafters in the central part of the structure.
To mount the leg of the semi-hip design, you must:
Completion of construction. When the roof truss system is ready, the last step is filing the cornices and building a crate for laying materials for the roof pie. After completing the laying of all the necessary layers, regarding the individual roof structure, the installation of the roofing is carried out.

Despite the complexity of the design of the half-hip, having understood the essence of the process, you can easily cope with the task of erecting such a roof. The most difficult thing in the installation process is to equip the end parts of the roof system, so it’s worth starting to understand the process from these stages.
In contact with
When choosing a project for the construction of a private house with their own hands, they take into account not only the practical side of the issue, but also the aesthetic one, because it will become the “face” of the site. More often than not, prospective homeowners choose with their hearts, as they say, making decisions based on what they find attractive and what they don't. Perhaps that is why the original, unusual half-hip roof has become so popular.
Responding to customer requests, architects and designers are creating more and more projects with a half-hip roof, which is also called Dutch. Having extensive experience in private housing construction, they explain their choice not only by its aesthetics, but also by its high functionality, which will be appreciated by residents of regions with a harsh, windy climate. Under what conditions to opt for such a structure and how the process of building it with your own hands, read in a specially prepared material.


The design of a half-hipped roof cannot be called simple either in design or in do-it-yourself installation, as it is a cocktail of the positive qualities of a simple gable and hip,. If we talk about the appearance, then in the shape of the pediments it resembles a trapezoid, which is formed due to the hip elements, cutting off the top of the triangle. Due to its structure, a semi-hip gable roof has several advantages:

Interest in building a semi-hip roof with your own hands is very commendable, but you must understand that only professional roofers can do it. You can participate in it personally, with your own hands, if you work under the guidance of an experienced craftsman who will draw up a drawing. During preparation and installation, you may experience the following difficulties:

Nevertheless, we assure that the information received about the half-hip gable roof will be useful. After reading this article, you will easily “read” the drawings, find out how the installation process should take place and be able to show off your knowledge of terms in front of the masters.
As already mentioned, the roof truss system with hips is difficult to assemble with your own hands, it includes both elements that are available in a gable roof and new ones. It is characterized by the following scheme:

Depending on the layout of the future building, the truss system can vary significantly. There are two types:


Roofers are advised to use a layered type of truss system for DIY assembly, if possible. So the roof structure is more resistant to external loads, there is more space for arranging the attic.
The construction of a semi-hip roof is a complex, painstaking process that can only be entrusted to professionals. They mount the roof in the following sequence:

After the completion of the external work, they move on to the internal. For. In order to use the attic room as a living space, the half-hip roof must be insulated, its frame is sheathed with decorative material. When the work is completed, it will only be necessary to regularly inspect the roof, monitor its condition, and carry out preventive repairs with your own hands.
The truss system is, one might say, the most important component of the roof. It is this system that is the framework for all other elements. In any truss system there are basic components. They are present in any similar design. But the very layout of the rafters, struts and other elements can be different. It all depends on the type of roof. And what is the truss system of a semi-hip roof? What are its features and how to build it? This will be discussed in the article.
The truss system of a semi-hipped roof is a rather complex structure. It may not work to build it with your own hands, without the help of professionals. But before proceeding to the study of the nuances of its construction, you should deal with the type of roof itself. The half-hip design can be made in two forms, namely:


There are other types of half-hip roofs. Their designs can combine Dutch and Danish styles. But in any case, the design and installation of a half-hip roof truss system is a rather difficult job.
The half-hipped roof is not used so often. First of all, this is due to the rather complex truss system. Most often, the construction of such a structure is trusted by professional builders. If you do not have the proper experience in carpentry, then it is better not to choose a half-hip roof for your home.
In addition, financial costs increase significantly. Rafters and other elements will need more. In addition, they have different sizes. All this significantly increases the cost of the project.
But the half-hipped roof has its advantages. These experts include the following:
Therefore, if you have experience in carpentry, and you are sure that you can handle the complex structure of the truss system, then this roof option is quite suitable for you. 
Preparatory stage
Any business, especially if it concerns construction, must begin with planning. First of all, you should draw up a diagram. The truss system of a semi-hipped roof has a rather complex device. But at the same time, drawing up its scheme does not differ much from the same work in the construction of other types of roofs.
First of all, you need to do the calculations. You need to decide on the following parameters:

When calculating the angle of inclination of the slope, it is also important to consider what kind of roofing material your half-hip roof will be covered with. Each manufacturer indicates its optimal parameters, under which their products will work most efficiently. 
When calculating the load, first of all, the amount of snow cover is taken into account. In addition, the effect of the wind must also be taken into account. This type of load depends not only on the weather conditions in your area, but also on the angle of inclination of the slope of the half-hip roof, and the weight of all materials that will be used in construction should also be taken into account. 
After all the preliminary calculations, a drawing of the half-hip roof truss system is drawn up. It indicates the location of all structural elements, it is better that it be more accurate and detailed. In this case, the installation of the half-hip roof truss system will be easier and without errors. 
The device of the truss system of a semi-hip roof, as mentioned earlier, is quite difficult. Therefore, starting the construction, you should first get acquainted with all the nuances of the upcoming work. If you decide to use a Dutch-type semi-hip roof, then the installation of the truss system is carried out as follows:

If we are talking about the Danish version of the half-hip roof, then there are no big differences in the installation of the truss system. But there are some nuances. In the Danish version, the trapezoid-shaped rafter legs of the slopes do not fit the ridge bar. Here they will rest with their upper part against the surf bar. This element is the base of the vertical pediment. It is fixed to the rafters of the side slopes of the roof. 
During the construction of the truss system of the semi-hip roof, only high-quality materials should be used. Pine is best suited for these purposes. In addition to the main structural elements in the form of rafters, additional elements are also included here. Braces are mandatory. They are necessary to strengthen the long rafters. Crossbars, sprengels and other elements can also be used.
The step or distance between the rafters is chosen depending on the load that will affect the entire system. As a rule, this parameter lies in the range from fifty to one hundred centimeters.
When installing rafters about other elements, it is important not to forget about insulation and waterproofing. As a rule, a half-hip roof is used in cases where the owner of the house wants to make an attic floor instead of an attic. In this case, it is impossible to do without roof insulation and additional vapor and waterproofing. 
Half-hip roofs are one of the most interesting options borrowed from northern European architecture. Their streamlined shape is extremely adapted to gusty winds. Shortened triangular slopes allow you to significantly expand the boundaries of the useful attic space without placing a massive roof structure on the walls.
They look stylish on buildings of any number of storeys and purposes. The only drawback lies in the difficult construction technology. However, those who know how the half-hip roof truss system is built will do the job without any problems.
The semi-hip "family" cannot be unconditionally attributed to the four-slope class. Moreover, it clearly served as a parent base for development. Rather, it is a commonwealth of structures with two and four slopes, the construction of which predetermines the use of both methods of construction.
The semi-hip category differs from the hipped parents in that the characteristic triangular element of hipped roofs is shortened. A part of the vertical gable of a stone house or a similar gable of a wooden structure adjoins it. The shortened hip, of course, is located at an angle to the indicated gable walls. The angle between them can be convex or concave, and the half-hip is located above or below.
According to the shape and location of the structural components, half-hipped roofs are divided into two main varieties:
Based on the two basic varieties, many variations with a half-hip theme have been developed. Among them are not only structures that differ in height, size of slopes, angle of inclination, shape of elements. There are hipped roofs, all sides of which are built according to the Danish or Dutch principle, there are buildings that have a shortened hip only on one end or on one side.

In all structural combinations, part of the rafter legs is mounted according to the rules for constructing frames for gable roofs, i.e. hanging or layered way. Hanging rafters are installed if the equipped box does not have an internal load-bearing wall or it is not possible to install supports for the ridge run. The layered technique, on the contrary, is implemented when a reliable support exists or can be arranged for the upper heels of the rafter legs of a gable roof segment. The lower heels of both types of rafters are supposed to be based on the Mauerlat, on the upper crown of the log house that replaces it, or on the floor beams.
Regardless of the number of design versions, the construction of the truss system is based on one of the main half-hip methods or on their combined use. Having dealt with them, you can understand how to apply Danish or Dutch technology in arranging your own home and how to combine the usual pitched part of the roof with shortened hips.
The construction of a structure with a trapezoidal short hip and a triangular pediment above it differs little from the construction of a traditional four-slope type. True, in terms of the scheme of the truss system of the Dutch-type half-hipped roof, it does not resemble a sealed postal envelope. It looks more like a rectangle divided in two with trapezoids along the edges of the end sides. True, until the stage of construction of short slopes, all work is carried out in a similar way.

First, the supports are installed for laying the ridge run. Instead of separate support posts, a frame can be used, the upper side of which will serve as a run for the future roof. Then ordinary rafter legs are installed. Technological differences begin with the installation of diagonal legs and dutch half hips. After all, they are obliged to form the plane of a shortened pentagonal slope, and not a full-fledged triangular hip, as in standard four-slope roofs.
The goal is achieved by installing a horizontal jumper-surf, to the corners of which diagonal rafters are connected by a notch. Some of the sprigs, located in the center of the future slope, are fixed on horseback to the surf with nails or corners. The remaining sprigs are mounted in the usual way: to the diagonal rafter on top, to the Mauerlat or floor beam at the bottom.

To ensure rigidity in the half-hip zone, the areas where the jumper is attached to ordinary rafters are reinforced with struts. The extreme roof trusses on both sides are made double. The places of fixation of the jumper to the rack and to the rafters are additionally strengthened with short pieces - pieces of the board nailed from below. They will prevent deformation of the structure when the load is exceeded.
The triangular part of the pediment rising above the shortened hip is sheathed with a board or sheet material. However, reasonable owners arrange small windows in a vertical triangle for natural light and ventilation.
The photo selection will acquaint you with the common types of Dutch roofs of the semi-hip variety and the forms of the truss systems:

As usual, the basic Dutch version has become the basis for the development of a lot of modifications. According to one of them, the place of the gable triangle is occupied by a half-hip of a similar configuration. With a pentagonal shortened slope, it forms a convex rather than a concave angle. It should be noted that concave corners also take place in a number of architectural solutions. In plan, the scheme is similar to a familiar envelope, but the projection of the hip components is different.
The difference is in the construction algorithm. At the stages of construction of the gable part of the roof, work is carried out as dictated by layered or hanging technology. Then, in order to create a characteristic break, first of all, its shortened counterpart is mounted in front of the extreme ordinary truss truss, and diagonals are already attached to its corners. Further, everything is done according to the above plan and according to the drawings of the Dutch truss system for a half-hip roof. Only the upper hip triangle is constructed according to the Danish method.

The Danish variety is no less interesting than its Dutch "girlfriend", but at the head of the rafter system, a slightly different method is laid. In fact, both types of roofs can be organized from two tiers erected on top of each other. This is how it is being built, which is quite suitable if an attic is to be located in the attic space. However, the broken method is noticeably more expensive and more troublesome than the half-hip method, which should be familiarized with due attention.
We have already found out that the short Danish hip has a triangular shape, and the pediment adjacent to it has a trapezoidal shape. In plan, the roof is very similar to the hip structure, but the shortened hips are much smaller and their angles do not match the angles of the roof.
Before construction, it is highly desirable to acquire a worthy project and make calculations for the elements of the truss frame. Toiling with calculating the size of each element is too dreary. According to experienced roofers, it is enough to calculate the longest part of the system. Other elements are allowed to be of equal or slightly smaller section.

The construction of a half-hip frame begins according to the rules common to all roofs with the installation of a Mauerlat. It is necessary to support the lower heels of ordinary and hip rafter legs on it. It should be noted that the support will be carried out at different levels, because. the upper planes of the bearing walls and gables are at an unequal height.
The construction of the first stage of the truss system is carried out in four stages:
There is no image of the floor beams in the example drawings, because it would interfere with grasping the principle of the process. In reality, there must be overlap.

The diagonal rafters of the Danish roof connect the edge of the ridge to the corners of the gables. For their manufacture and installation, a number of specific actions are carried out that allow you to perform work with sufficient accuracy:
Before installing the diagonal rafters, the pediment Mauerlat is freed from the auxiliary cutting of the board. Ready rafter legs move to their place and are securely fixed. Nails are suitable for fastening the upper heels, it is better to use corners below.


The lower heel of the diagonal rafter leg rises above the Mauerlat to a distance that requires mandatory measurement. The result obtained should be postponed from the top of the ridge and noted. From the point found in this way, a lace is stretched to the middle of the pediment. It will serve as a guideline in the manufacture and installation of the central hip rafters.

In order to install the central leg of the half-hip, you must:
To fill the hip slopes, people do not deviate from the studied methodology, but taking into account the actual size and specifics of the installation. The upper cut is undermined only on one side at an angle equal to φ / 2. With the lower node, everything is simple - all lines in the correct scenario should be symmetrical. Upon completion of the processing of the workpieces, all hip elements are installed and fastened like ordinary counterparts.
Similar actions are carried out in the manufacture and installation of the sprigs of the main slopes. To form the lower cuts, one of the hip elements is used. For the upper cut, a line is first drawn at an angle β, then it is ground from the required side at an angle obtained by calculating using the formula 90º-φ / 2.
Among the stages of preparation:
The Danish type truss frame is ready. It remains to hem the cornices and build a crate according to the technical features of the coating being laid on the roof.

The principle of building truss systems for roofs with shortened hips is not simple, but understandable. The difficulty lies only in the arrangement of the end parts, and we described the rules and specifics of their construction in as much detail as possible. Now it is necessary to apply the information received in practice: to practice construction yourself or to control the hired team.
The truss system is, one might say, the most important component of the roof. It is this system that is the framework for all other elements. In any truss system there are basic components. They are present in any similar design. But the very layout of the rafters, struts and other elements can be different. It all depends on the type of roof. And what is the truss system of a semi-hip roof? What are its features and how to build it? This will be discussed in the article.
The truss system of a semi-hipped roof is a rather complex structure. It may not work to build it with your own hands, without the help of professionals. But before proceeding to the study of the nuances of its construction, you should deal with the type of roof itself. The half-hip design can be made in two forms, namely:

There are other types of half-hip roofs. Their designs can combine Dutch and Danish styles. But in any case, the design and installation of a half-hip roof truss system is a rather difficult job.
The half-hipped roof is not used so often. First of all, this is due to the rather complex truss system. Most often, the construction of such a structure is trusted by professional builders. If you do not have the proper experience in carpentry, then it is better not to choose a half-hip roof for your home.
In addition, financial costs increase significantly. Rafters and other elements will need more. In addition, they have different sizes. All this significantly increases the cost of the project.
But the half-hipped roof has its advantages. These experts include the following:
Therefore, if you have experience in carpentry, and you are sure that you can handle the complex structure of the truss system, then this roof option is quite suitable for you. 
Any business, especially if it concerns construction, must begin with planning. First of all, you should draw up a diagram. The truss system of a semi-hipped roof has a rather complex device. But at the same time, drawing up its scheme does not differ much from the same work in the construction of other types of roofs.
First of all, you need to do the calculations. You need to decide on the following parameters:

When calculating the angle of inclination of the slope, it is also important to consider what kind of roofing material your half-hip roof will be covered with. Each manufacturer indicates its optimal parameters, under which their products will work most efficiently. 
When calculating the load, first of all, the amount of snow cover is taken into account. In addition, the effect of the wind must also be taken into account. This type of load depends not only on the weather conditions in your area, but also on the angle of inclination of the slope of the half-hip roof, and the weight of all materials that will be used in construction should also be taken into account. 
After all the preliminary calculations, a drawing of the half-hip roof truss system is drawn up. It indicates the location of all structural elements, it is better that it be more accurate and detailed. In this case, the installation of the half-hip roof truss system will be easier and without errors. 
This work requires knowledge of many nuances. Therefore, most often it is trusted by professionals. But if you want to do everything yourself, then you can use special programs or online calculators, we also recommend reading: calculation of the truss system.
The device of the truss system of a semi-hip roof, as mentioned earlier, is quite difficult. Therefore, starting the construction, you should first get acquainted with all the nuances of the upcoming work. If you decide to use a Dutch-type semi-hip roof, then the installation of the truss system is carried out as follows:

If we are talking about the Danish version of the half-hip roof, then there are no big differences in the installation of the truss system. But there are some nuances. In the Danish version, the trapezoid-shaped rafter legs of the slopes do not fit the ridge bar. Here they will rest with their upper part against the surf bar. This element is the base of the vertical pediment. It is fixed to the rafters of the side slopes of the roof. 
During the construction of the truss system of the semi-hip roof, only high-quality materials should be used. Pine is best suited for these purposes. In addition to the main structural elements in the form of rafters, additional elements are also included here. Braces are mandatory. They are necessary to strengthen the long rafters. Crossbars, sprengels and other elements can also be used.
The step or distance between the rafters is chosen depending on the load that will affect the entire system. As a rule, this parameter lies in the range from fifty to one hundred centimeters.
When installing rafters about other elements, it is important not to forget about insulation and waterproofing. As a rule, a half-hip roof is used in cases where the owner of the house wants to make an attic floor instead of an attic. In this case, it is impossible to do without roof insulation and additional vapor and waterproofing. 
The half-hipped roof is a rather complicated structure. To make it last for a long time, you should choose the right material for the roof. It must meet the following requirements:
When erecting the rafter system of a semi-hip roof, many places for attaching elements to each other are used. In addition, some rafters rest against others. Therefore, it is better to use roofing material with low weight. This is necessary in order to reduce the load.
The most optimal option can be considered a profiled sheet or metal tile. These materials have high strength and service life. Plus, they don't weigh much. Ceramic tiles are unlikely to fit. Mainly due to its large mass and the complexity of laying, read more: installation of metal tiles, how to cover the roof with corrugated board with your own hands.
When calculating the amount of materials for a semi-hip roof, it is worth considering what type it belongs to. The Dutch variety will have fewer folds. This means that there will be less scraps of roofing material.
Also, for a semi-hip roof, you can use a soft roof. Many use ondulin or euroslate. Such material is inexpensive, lasts a long time, is easy to install and looks attractive. But here you should be careful. For a soft roof, a continuous crate is required. And this circumstance will contribute to an increase in the load on the truss system, which is very undesirable.
Half-hip roof truss system: scheme, device, installation
Thinking about building your own house or even a summer house, you want the house to be beautiful, unlike the neighboring ones, comfortable and functional. It would also be nice if it was inexpensive. A mansard-type roof allows you to solve almost all of these problems. The appearance of the house turns out to be interesting, and the building can be decorated in different styles - all the options for combinations of roofing, the type and shape of the roof, windows and balconies, and it is probably impossible to count. As for the cost, it is worth talking separately.

The combination of slopes directed in different directions gives a very unusual effect. Exactly such a house you will not call ordinary
The device of the attic floor is considered beneficial due to the fact that there is no need to spend money on building walls. This is only partly true.
Firstly, a lot of money will be spent on creating a truss system. Its cost depends on the type of mansard roof chosen (see below) and on the price of lumber in your area.
Secondly, you will have to pay a considerable amount for the insulation and vapor barrier of the attic roof. It is clear that roofing material alone is far from enough to provide the required air conditions for residential premises (if the attic is planned to be residential). You will have to insulate, and the layer of insulation should be significant. For example, for central Russia, a layer of high-density mineral wool should be from 200 mm, plus a layer of waterproofing and vapor barrier.
Thirdly, windows are much more expensive. If you make them auditory, they construct a special structure from rafters, which complicates the relief of the roof, and therefore increases the cost of materials and installation. Even on an ordinary gable, you have to think about the arrangement of valleys and snow retention above the windows.

Skylight installation in the roof
The second option - windows in the roof plane - require especially careful sealing so that precipitation cannot get inside. This makes the installation more expensive by 1.5-2 times. The windows themselves cost about the same amount: they must have a reinforced frame and reinforced glass that can withstand snow loads. In addition, for maintenance, the frame must be swivel, and this is another increase in cost.

What you need to install a roof window and the order of installation of components
Two types of windows are installed in the attic - vertical and in the plane of the roof. Both types can be used in the same project. The photo below is a good example of such a combination. You can’t say for sure that the house is unforgettable. How many more options could there be?

A multi-level mansard roof is also a common technique.
In addition, such popular and inexpensive roofing materials - metal-based materials such as profiled sheets, metal tiles, roofing iron - are not recommended for use when constructing a mansard roof of a private house. There are two reasons:
If you calculate well, additional thermal insulation and sound insulation will minimize the cost savings when buying roofing material. Perhaps another, more expensive initially roofing, will turn out to be more profitable as a result. So here you need to calculate the options.
All this was described so that you have a more complete idea of whether it is really so cheap to build an attic floor. It turns out - not so much. However, this solution has its advantages:
We tried to most fully describe the cons of the mansard roof and its pluses. If the difficulties did not frighten you, choose which design you like best.
The roof of the mansard type used in the construction of private houses has various device options. You can make all existing types of roofs, except, perhaps, flat. All the rest can be implemented both in a "pure" form and in combination.
Shed
Houses with shed mansard roofs look non-standard. Her device is the simplest due to the lack of a skate and the problems associated with its arrangement. The beams rest on a Mauerlat fixed on multi-level walls. The bevel is formed due to the difference in the height of two opposite walls. In this case, the slope angle should be in the region of 35 ° -45 °. A smaller slope will lead to the accumulation of a large amount of snow, which requires strengthening the load-bearing beams and installing additional supports, and this reduces the already not very large living area in such an attic floor.

Shed mansard roof
If we talk about the external design of the house, the buildings look non-standard. Most often, a large window is made in the high wall of the attic floor: the design itself is conducive to this. See the photo below for examples.

This house with a pitched mansard roof is the most conservative
The shed roof device is the cheapest if the distance between two opposite walls does not exceed 4.5 meters: you can lay standard length beams on the walls and not make supporting structures. Apparently this is the reason for the decision in the photographs below, but it turned out very interesting.

If the distance between the walls is less, the design is quite simple.

Non-standard solution: two shed roofs form a terrace between them
gable
A gable mansard roof is the most widespread: with a general structure, there can be many solutions. The design itself is the most optimal: at a relatively low cost, it allows you to meet various requirements for the required area of \u200b\u200bthe room.
The easiest way is to implement an attic under a conventional gable roof, but its height should be sufficient so that a living space can be allocated under it (if the floor is supposed to be made residential). May be:
The fronts are straight. The room turns out to be trapezoidal, in fairly wide buildings one can single out a square one. The disadvantage of a gable roof of a mansard type is that a large space is cut off on the sides, which is not always acceptable in private houses. So that considerable areas do not walk, they are used for storage or closets.

The design of the attic floor under the gable roof
With such a device, windows are made in the roof, their location depends on the angle of inclination. They can be auditory, as in the photo above or in the plane of the roof, as in the photo below.

Windows can be located in the plane of the roof
There is another version of the mansard roof of a private house with two slopes - one and a half floors. It is installed on walls driven out to a certain level. The house is then called "one and a half floors" (one of these houses is in the photo above).
The difference in usable area is obvious, but the costs are higher (for wall material)
These are two types of gable mansard roofs. There is a third one - broken lines. They can be distinguished into a separate category - the device has significant differences.
The device of a broken mansard roof is both more complicated and simpler. In fact, these are the same two slopes, but consisting of two parts with a different slope. Such a structure allows, without spending money on building walls, to get a living space that is only slightly smaller than on the lower floor (by about 15%). In this sense, its device is simpler. But the truss system has a more complex structure, and in this sense, its device is more complicated.

The construction of a broken mansard roof is the most commonly used variant of the truss system - with the removal of part of the rafters beyond the wall surface. Thus, an overhang is formed that protects the junction with the walls from precipitation.
It is this type that is most common in self-construction. It easily allows you to increase the usable area, build on small buildings such as a garage or summer kitchen, get additional, almost separate, housing. Since the materials used in construction are usually light, the bearing capacity of the foundation is usually sufficient, but the calculation does not fit.

A small room made of logs below, and on top - a vast attic, based on racks
Four slope
These are already complex systems that must be calculated. The surface is large, the cost of insulation increases significantly, at the same time, the size of the attic space decreases: parts of the premises are cut off from all four sides.
Their plus is high resistance to strong winds: all surfaces are inclined and the wind load does not press so hard on the slopes. The structure is such that the overhangs can be made low, protecting the walls from the effects of precipitation and winds. In addition, houses with such roofs are considered by many to be the most attractive. The classic version of a four-pitched roof is hip.

One of the types of four-pitched roofs is a hip and attic room under it. You can stand in full growth only in the central part
With their device, inclined rafters are reinforced - they account for most of the load. In general, its rafter system is one of the most complex, material-intensive and, therefore, expensive. So that you can evaluate the entire amount of work and costs, consider its design in the photo below.

Rafter system hip mansard roof
On the top picture you can see all the stops, cuts that need to be put, on the second, the structure and location of the rafters are more clearly drawn.
There is also a transitional option - half-hip. It is a cross between a gable and a hipped roof. In this case, the hip is made only for part of the height of the floor.

Mansard semi-hip roof. Organization of its truss system
Only the main types of mansard roofs are described. There are also combinations. For example, a hip can also be a broken line, like a lean-to. There are really a lot of options. The main thing is not to make gross mistakes when developing the truss system, and then to implement everything correctly.
How skylights are made in the roof has already been described above. Almost the same principle is used to build balconies. There are even special window systems that allow you to do this in the slope surface. Although the implementation is simpler, such a window costs decently.

One view of a small balcony
If the bearing capacity of the walls allows, by increasing the size of the dormer-type window, you can make a hanging balcony.

The dormer window can also be turned into a small balcony
The balcony area can be supported by columns. Only in this case, the removal is done above the entrance. Then the columns organically fit in, and also serve as decoration.

The columns that form the front door support the platform
The balcony on the pediment of the house with an attic is built according to a different principle. The overhang extended forward protects it, if the wall allows, the platform is made hanging.

Balcony on the pediment of the mansard roof
In small houses, more often a balcony is made due to the fact that the pediment of the attic floor is shifted from the load-bearing wall. Due to this indentation, a platform is obtained. Peaks in such roofs are made by continuing the roof at least to the same level with the outer wall, and even better - further. This ledge will also protect the gable wall and reduce the amount of rain that will fall on the open area.

The pediment of the attic is moved inward. The resulting area is used as an open balcony
The design of this type of roof is such that by extending it you can even make a covered terrace. Its edge can rest on a decorative wall or on pillars.

The complexity of this project is long rafters

A similar idea was implemented in this project, but the roof here is multi-gabled. It is difficult to calculate it yourself, it is even more difficult to make valleys correctly, because they are rare
If we talk about non-standard solutions, then the “L”-shaped mansard roof - from two sheds, will turn out to be functional. In addition, this is an inexpensive way to decorate such a non-standard building.

"G" shaped shed mansard roof
If you need an inexpensive way to build a house - read about frame housing construction.
The roof is the protection of the home. Its appearance speaks of the tastes of the owners and expresses the individuality of each building. The correct shape and design are the key to a long service life, and an equipped attic allows you to expand your living space.
Mansard type roof: types, options, design, photo
In this publication, you can see how a mansard half-hip roof is equipped, a design whose drawing, with comments and explanations, was sent to us by Vadim Nakhapetov from the city of St. Petersburg. He dealt with these materials in the process of building his country house in the Leningrad Region.
In general, the scheme of the roof of a house with an attic, or rather, the drawings of the truss system of the attic roof, does not differ at all from the construction of a roof with a cold attic. All the differences lie in waterproofing, insulation and ventilation - a pie that ensures the safety of the insulation between the rafters.
You can see the drawings of mansard roofs that have already been published on our website in the "Roof" section. You will see that there is no difference in design. But there are differences between different types of roofing.
For example, the scheme of a broken mansard roof and the scheme of the truss system of a mansard roof with straight slopes are very different.
For clarity, here again we duplicate both these schemes.
Scheme of a mansard roof with straight slopes:

Scheme of a broken mansard roof:

As you can see, the design is different, and the methods of fastening the rafters, and the consumption of lumber and roofing material. In terms of efficiency, a mansard roof scheme with straight slopes breaks ahead. However, in terms of habitable living space, the sloping roof is in the lead.

Below is a drawing of a house with an attic, built in a country style. Such a small house with a small building spot seems to be designed to equip another living space under the roof.
Half-hipped mansard roof - construction (drawing from V. Nakhapetov):
And now a little theory, so that the scheme of the house with an attic becomes more understandable.
It cannot be said that the arrangement of the attic roof is some kind of revolutionary word in the construction of residential buildings. In the conditions of cities, this is a long-spread way to increase the area for living, and for students, poets and artists and other representatives of not very paid professions, perhaps the only opportunity to rent cheap square meters.
This was due to not very comfortable living conditions, and, as a rule, such rooms under the roof were poorly insulated.
But this shortcoming of theirs has long been overcome, and the "battle" for additional square meters has long moved to a qualitatively different level. The most important thing in the attic is a properly executed roof, without leaks, respectively hydro- and thermally insulated.
Such an attic space implies two versions: summer and winter. At the same time, the type of roof can be any, it all depends on the wishes and tastes of the owner of the house, and, of course, on his financial capabilities.
As with any other construction, a preliminary project is indispensable here. First of all, it is necessary to provide a staircase, along which it will be convenient to get to this room.
Even a properly constructed and beautifully designed attic room will lose a lot if the exit to it is not done properly. And in order to take advantage of such coveted square meters, you will have to master the skills of a climber.
Among other things, when the attic is settled in an old house that has its own layout, this can cause some problems. Such a need, as a rule, arises when the number of family members has increased and living space becomes an urgent need. Then many factors must be taken into account.
First of all, the premises on the floor under the attic space should be used rationally and, preferably, according to their functional purpose. You may even have to re-plan the existing rooms a little, but it's worth it. In the case when the living room under the roof was originally provided for in the project, then the space under the stairs will not raise questions.
The design of the attic space itself can have vertical or sloping walls. The effective area obtained as a result will depend on the type chosen. The most common roofs for attics are gable roofs with a break in the middle. In such a room, there may be slight problems with the installation of cabinet furniture, but it will ideally serve as a guest, children's or play room, for example, a billiard room.
If the option with vertical walls is chosen, then the foundation must first be examined for its strength. Although this is a small additional burden, but still, it should be taken into account. Vertical walls can be lightened by placing windows in them (at least 12% of their area), through which enough daylight will penetrate and it will be easily ventilated.

But still, one cannot do without a reinforcing belt. It will level the horizontal surface of the load-bearing walls and serve as the basis for attaching the Mauerlat beams. It would be good to provide, when arranging the belt, the laying of galvanized metal rods, on which the Mauerlat will be fixed.
If walls with a slope are chosen, which will serve as the roof configuration itself, then it should be remembered that in this case, the Mauerlat beams will also serve to fasten the beams for arranging the floor.
The next step will be the manufacture of the truss system, which will become not only the basis for the roof, but also the walls and ceiling of the future attic. It must be reliable and built in compliance with the rules imposed by the materials of the external coating. Since wood is used for the installation of the rafter system, the battens, it must first be treated with an antiseptic mixture.

It is necessary to provide openings for windows, which can be made in the form of a so-called birdhouse, or standard windows that are attached directly to the roof. The truss system, in addition to being able to withstand the load of roofing material, must also have a certain margin of safety in order to withstand the weight of snow in winter and withstand winds.
A feature of the roofing device for the attic space is double moisture insulation: waterproofing directly under the roofing material, which will protect the room from moisture from the outside, and vapor barrier, which will protect the insulation from condensate from the inside.
Otherwise, the latter may lose its thermal insulation properties. As a result, the cost of heating the room will increase significantly.
As a finishing material, the use of wooden lining, drywall or plywood sheets is widely practiced.
The above tips will help to imagine the amount of work that the owner of a country house or cottage will have to face if he decides to build an attic with his own hands - the scheme of the attic roof truss system will help him.
Mansard semi-hip roof - design, drawing, diagram
An attic is an attic space designed for housing or storing household utensils. Unlike a flat roof in multi-storey residential buildings, a mansard roof can be gable and multi-slope. For the construction of cottages, in terms of price-quality ratio, the best option is a gable roof.
 Cottage, during the construction of which the technology of the attic roof was used
A mansard roof is a wooden structure in the shape of a triangle or polygon. It consists of rafters and truss beams. From above, it is closed with a “pie” of insulation, vapor and waterproofing. Rafter legs hold the entire mass of the roof. The rafter beam acts as an additional connection and support.

The extreme pairs of rafters form a pediment. It can be triangular and trapezoidal in shape, which depends on the type of attic structure. Inside there is a living room with straight or broken walls.
Any building structure has characteristic positive and negative properties. Knowing these features will help when choosing a roofing system.
Advantages
 A good example of a full-fledged living space in a mansard roof
Flaws
There are several constructive types of mansard gable roofs, which can differ in the shape of the slopes, be symmetrical or asymmetrical, and be at different levels relative to the ground.
The shape of the slopes differ:
 Classic gable roof
  The layout of the elements of a classic gable roof
A flat mansard roof is not always suitable for the construction of residential premises. This is due to its design features.
Important! The optimal slope of the slopes is 35°-40°. This angle gives an even distribution of loads. With such an angle of inclination, it is impossible to create a full-fledged attic room. That is why the slopes of a broken shape are more often used.
 General view of a broken mansard roof
For clarity, a broken gable system can be divided into three triangles. Two right triangles make up the side slopes. The outer line of the slopes will be their hypotenuse. The upper part of the roof consists of one isosceles triangle, which lies on two rectangular ones.
 The layout of the load-bearing elements in a broken mansard roof
Important! In the side triangles of a broken attic system, only layered rafters are used. In the upper triangle, both layered and hanging can be used.

By location they distinguish:
 Mansard roof with symmetrical slope
 Mansard roof with asymmetrical slopes
Slopes located at different levels
They don't have a horse. The slopes in the attic do not connect with each other, but seem to hang over each other. Houses with this type of roofing look unusual and are not widely used in our country.
 General view of the house with slopes at different levels
Hip and semi-hip roofs
These mansard roofs form a separate view due to the fact that their slopes are located not only on the sides, but completely or partially replace the gables.
 hip roof
  hip roof construction
 Cottage with a semi-hinged mansard roof
Important! In some directories, hip and half-hip roof structures are called four-pitched. The essence and principle of operation of the system does not change from this.

Any building structure consists of a skeleton and a shell. Roofing or rafter systems are no exception. The comfortable and safe living of homeowners, as well as the terms of trouble-free operation, depend on their strength and operational characteristics.
The skeleton of a gable mansard roof is a wooden truss structure. It must meet several basic requirements:
A gable roof covering is a shell that protects the interior from heat, cold, moisture, snow and wind. It must meet several basic requirements:
All roof truss structures consist of the same type of components:

The main structural elements of a gable mansard roof

These three elements form the basis of any mansard gable roof. From them you can build a simple truss system. For more complex structures, there are a number of additional elements:
The number and frequency of installation of these elements depend on the design load on the attic gable roof. We must remember - the more elements, the more expensive and heavier the whole structure. The less space will be left for the attic living space. Therefore, before building, you need to carefully calculate everything, but it is better to make a full-fledged construction drawing with all the calculations.
Do-it-yourself gable mansard roof, photo
If you adhere to proper nutrition, then avocados are probably in ...


Pizza can be cooked not only with meat products - sausage, sausages and ...