Hmm, yoda_daro claims that this is a test to determine their sexuality...


It is unlikely that a major overhaul in the house can do without upgrading or completely replacing the electrical wiring. Very often, additional sockets or switches are required to connect household appliances or light sources, as well as other electrical devices.
In this case, it is better to disguise all the wires in the wall. But for this you need to know how to ditch the walls for laying electrical wiring with your own hands, without resorting to the help of professional electricians. At the same time, the main thing is to take into account all the features of the wiring of the house electrical network and the nuances of gating concrete, brick and other surfaces.
No need to grab right away hammer and chisel. First of all, you need to draw a detailed wiring drawing on a paper sheet and provide for where all the sockets, switches and lighting fixtures will be placed. You should also take into account the material used for the construction of the building, on which the method and tools for chasing walls for wiring will depend.
I would like to note that today there are SNiP regulated by documents rules for the distribution of electrical wires in the walls of buildings. At the same time, it is advisable to familiarize yourself with them before starting the arrangement of the strobe for wiring, since their non-compliance affects the safety of electrical work.
Following these rules, the wiring layout will be completed in accordance with all regulations and it will be possible to proceed to the direct chasing of the walls.
To date, there are various ways holding chasing, depending on the tools used:
But regardless of the chosen method and tool for wall chasing, such works have the same course of action.
With brick walls, usually there are no special problems with chasing. Bricklaying is carried out using a cement-sand mixture, which is easily knocked out with an ordinary hammer and chisel, after which an electric cable is laid in the groove formed. In this case, in the horizontal direction, everything will go like clockwork, since seam between bricks runs through the entire wall. In turn, in the vertical direction, you will have to break through bricks.
With concrete wall the matter is quite different. Such a surface is very durable, therefore, with the help of a chisel and a hammer, it will take a lot of time to lay even a short wire. Therefore, it is advisable to use other more effective ways. Only a wall chaser will help to make strobes for electrical wiring in a short time and with virtually no dust. But due to the high price of such a device, only professional builders use it. Therefore, for domestic purposes, more common tools are used - a grinder or a puncher.
First you need to find out presence or absence hidden wires along the proposed route for laying the strobe. For this purpose, special devices are used, thanks to which to determine the location of the electric wire will not be difficult. This is done for safety reasons, so as not to get a power tool into a live wire.
Markings are applied to the wall surface along the strobe route, starting from the junction box towards the locations of sockets, switches and lamps. But before you start any work, you need to curtain the doorways damp cloth. This will prevent dust from scattering all over the back streets of the house.
The perforator can be used to pierce both a brick and a concrete wall. To do this, you need special nozzles - wide drill and spatula. In turn, all work is reduced to the following actions:

Despite the fact that this method is very fast, the groove obtained in this case is not quite even and has torn edges.
With a grinder, you can easily perform gating for wiring both a brick and a concrete or plastered wall. But for this you need to purchase a special diamond coated disc. In this case, all work is performed in the following sequence:
Thanks to this option, the groove is very even. However, the use of this power tool is accompanied large quantity dust. During operation, it appears so much that you have to use a vacuum cleaner. In this case, you will need an assistant holding the suction hose in the immediate vicinity of the cut.
A wall chaser can be compared with a grinder, only heavily modernized. Such a tool has two diamond-coated discs, the distance between which can be adjusted. cutting wheels closed with a special casing preventing direct contact with the wall.
Thanks to the adjustments provided for by the design of the wall chaser, it is possible to change not only the width of the intended gate, but also its depth. In addition, there is a special outlet on the casing for connecting a vacuum cleaner, which will suck up dust flying out from under the diamond discs.
It is with the help of a wall chaser that you can lay electrical wiring in the wall to the maximum short time while all work will be carried out practically without dust. After the sides of the groove are cut, it remains to select the core of the strobe with a drill with a rebound function.
The use of a chisel and a hammer is impractical if the wiring will be carried out in a concrete wall. If a brick wall is subject to gating, then all work come down to the following steps:

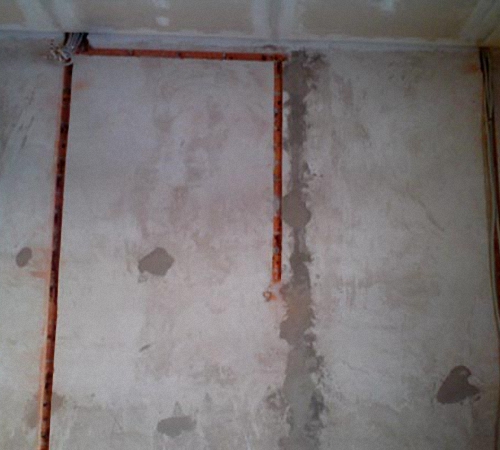
After the completion of the gating, the resulting grooves must be thoroughly cleaned of dust. Then the surface is opened with soil. After the primer dries, the wire is laid in the groove and sealed with plaster, gypsum or putty.
Only the right tool in accordance with the material of the wall in which it is necessary to make strobes for wiring, it will allow you to complete all work quickly and without dust. At the same time, modern tools allow you to carry out all the work on the wiring of house wiring with your own hands.
Many of you in your childhood rested with your grandmother in the village. In almost every collective farm house, electrical wiring was laid overhead: using insulators, at some distance from the wall. The wire was used high-quality, with cloth insulation: it’s not scary to touch.
This method is still used today: wooden houses and baths, and just like that, "in retro style."
However, from the point of view of rationality, the laying method is not the most reliable. Firstly, there is a possibility of damage to the wiring by any sharp object. And if there are small children in the house, or pets with strong teeth, the wires turn into a source of danger. Secondly, the aesthetics are, to put it mildly, controversial.
In wooden houses, the problem is solved quite simply: there are special mounting boxes for wiring. Different colors, sizes, with fire protection. But what about in houses with concrete (brick, plaster and other) walls?
Regardless of the method of wall decoration (drywall, plaster, curly wallpaper ...), the cable, which contains life-threatening voltage, should be hidden in the main wall. When building typical panel houses, electricians did not have a headache at all about the wiring. Recesses were organized in the walls in advance: lay the cable, grab it with alabaster, and you can plaster.

What about when building a new house? You can pre-design cable routing routes, and even mount them in brickwork cable channels. This is a progressive method that ensures the strength and safety of electrical wiring.
But in reality, the cable is laid after the construction is completed, before the fine finishing of the walls (and often after it). The same situation if you bought new furniture, and the cabinet has traditionally covered the outlet.
Another reason to shift the wires: repairs in the apartment. In old houses, the power cables in the walls have an aluminum core. Not that it's completely bad, but given the old wires and new PUE requirements(Electrical Installation Rules), it is better to lay other wires, with strong insulation and a copper conductor. And the standard arrangement of sockets-switches, to put it mildly, is far from perfect.
The purchase of powerful electrical appliances, such as a boiler, air conditioner, electric stove, requires a power line to be connected.
So, do-it-yourself wall chasing for wiring - how realistic is it?
Important! Laying the cable to the depth of the plaster is unacceptable. The requirements are violated fire safety(when the wiring ignites, paper wallpapers can “take up”), and the likelihood of damage from the outside increases. Only inside the wall.
Security Notes:

If desired, you can lay the cable in the corrugation. This will make it possible to replace the wiring without opening the wall.


 With this method, it makes sense to lay the wire in the corrugation.
 If you started construction or repair, you can buy such a device. The cost is quickly offset by ease of use. The groove is cut with circular saw on concrete (two disks can be installed, for the width of the strobe). The sole is equipped with guide wheels, which allows you not to waste effort on moving the appliance along a rough wall. You can adjust the immersion depth. But the main advantage is the presence of a dust extraction chamber. Using a hose, the wall chaser is connected to a construction vacuum cleaner, and you can work without even taking the furniture out of the room. There is no full mechanization, after passing through the wall, you need to manually knock out the core. This is done with the same jumper, or with the help of a perforator.
  The wall chaser makes it easy to work in the ceiling. For the operator, the position of the surface does not matter - it is equally comfortable to ditch the vertical and horizontal.
 After making the guide cuts, the middle is knocked out in a known way.
Of course, there are ready-made devices on sale that turn your angle grinder into an effective wall chaser. That's just the cost of such nozzles is approaching the price of the angle grinder itself.

Again, the decision is made based on the amount of work to be done.
However, there is no reason to be upset. A homemade dust collector can be made literally from construction debris.
Several scraps of laminate, a piece sewer pipe made of plastic, and a household vacuum cleaner (preferably a cyclone type).

You can even adjust the wheels, the scope for creativity is not limited. In addition to the main purpose, the nozzle (even if homemade) increases the safety of work. Modern cutting discs no longer scatter to the sides, as they used to. And they don't break often. But the stones flying out from under the grinder can injure the operator.
With a dust collector, chasing will be comfortable and safe.
We figured out how to properly ditch the walls for wiring: of course, it all starts with the correct markings.
Tip: when marking the places for installing boxes, try to take out the lines as far as possible. After chasing, all your hole center markings will disappear.
Now consider how to properly lay the cable.
After the strobe is formed, it is cleaned with a vacuum cleaner. Then, with a gloved hand, or by applying a thin rail, the uniformity of the depth and the absence of protruding parts in the strobe cavity are checked. This is important: if the wire sticks out above the wall, security will be compromised in this place.
It makes no sense to install boxes in advance if you have to finishing walls (thickness will change). Therefore, the wires are laid first, but before entering the niches for the boxes, 10-15 cm of cable free play remains, without putty. For installation, leave 15-20 cm of wire. You can’t save money, if something goes wrong, you will have to do the installation again.
The wire itself can be fixed traditionally, using asbestos (gypsum), or fixed with special clips inside the strobe.

Then putty is made to the level of the wall. At the same time, the free running of the cable in front of the installation site of the boxes is maintained.

Tip: before laying the cable, mark the ends (where you came from, where to connect), especially if several wires are put into the box. When laying several cables in one strobe, they are laid in parallel, and not on top of each other. It is not allowed to twist one wire around another.
Before final grooving, draw a laying plan, with accurate measurements in relation to the corners.

This will avoid problems when drilling walls in the future.
Important! All work related to the supply of voltage to the cables is carried out only after the putty (plaster) has completely dried. Before applying the top coat, also wait for the putty to dry completely in the strobes.
Overhaul, redevelopment, new construction of a house or utility room are associated with the issue of summing up or moving sockets, switches, laying a new cable, masking pipeline systems. All communications up to 1/3 of the thickness of the ceiling are hidden in the wall panel.

Wiring in concrete is done at an early stage repair work. Walling in a populated area is undesirable due to the high concentration of cement dust. Preparation for work in the living room provides for the tight preservation of office equipment, furniture, flowers, the presence of a construction vacuum cleaner for collecting debris and dust. Before starting work, they check with the plan for laying the old wiring, de-energize it or bypass these places. There are several concrete crushing technologies:


The completion of work has the same actions, regardless of which technology was used to make the strobe. When the groove is completely ready, it is cleaned of construction dust with a vacuum cleaner or a broom. The groove cleared of debris is treated with a primer. Laying cable into the wall is another difficult technological process which must be approached with the utmost care. The laid cable is fixed in a strobe and sealed with plaster, putty or gypsum.
Most buildings are made of concrete, therefore, when laying electrical communications in the wall, you most often have to deal with this material. General principle work on concrete is no different from the technologies described above. All the tools described are suitable for it, except for a chisel. However, there are some general rules chipping on concrete.
When choosing a gating technology, choosing between the option of performing work with a grinder or a puncher, it is better to stop at the second option. Hammer drills are more powerful machines designed to work on hard surfaces. In addition, when making holes, such an amount of dust will not be released as from working with a grinder. Works in high-rise buildings It is recommended to perform during the daytime and only on weekdays. The noise level from the perforator is so high that its work will be clearly audible even through several overlaps.
During work, it is recommended to use the services of an assistant who will moisten the work surface when making holes. This method is widely used by builders, it allows you to reduce the amount of dust flying around the room. The disadvantage of this method is the complexity of the work, a wet wall is less amenable to gating.
For work on concrete, builders do not recommend using a wall chaser, since in this surface it will not remove a significant part of the material and it will be necessary to clean the remains with a perforator. Therefore, to facilitate concrete work, the puncher is immediately used as the main tool.
The possibility of chasing work in a load-bearing wall is a moot point. It is forbidden by law and all architectural norms to carry out any work in a load-bearing partition that weakens its load-bearing capacity. Shtrobleniye refers to this type of work. During the removal of the top layer, the reinforcement is exposed, it becomes subject to various influences and the formation of corrosion. If corrosion of the reinforcement begins, the entire structure of the house is weakened.

To carry out such work in a load-bearing wall, it is necessary to obtain a special permit for this. If we are talking about a panel house, then, most likely, a work permit will be denied. AT brick houses such work is most often allowed. After receiving the papers, all work is carried out very carefully in order to reduce damage to the wall to a minimum level. To determine the location of the reinforcement elements in the wall, use a standard metal detector. He talks in more detail about how walls are shredded for wiring, the video at the end of the article.
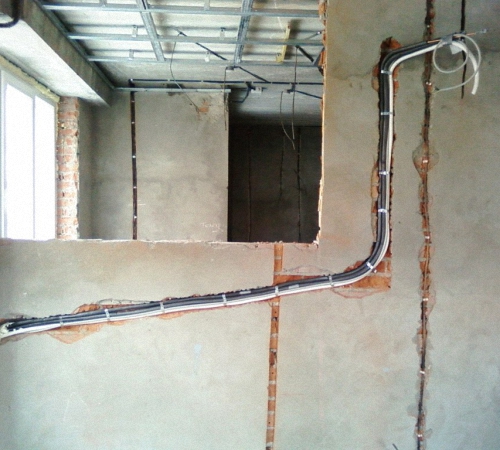
The wires in the strobe fit in two ways. The first involves laying cable channels for wiring. In this case, the pipe itself is first laid in the strobe, and then wires are pulled through it to the location of sockets or switches. The wire is pulled into the pipe with a dense steel wire. If the installation of wires is carried out without using a pipe, then they are fixed in the groove with gypsum, plaster or putty. The wires connected to the sockets are cut, leaving a length of 10-15 cm, the left end is tucked into the hole for the socket.
Most convenient installation sockets - blocks in one frame. One block contains not only electrical sockets, but also connectors for cable TV, telephone, internet, etc. Such blocks can significantly save space and create an attractive aesthetic technical corner in the room. The blocks are mounted on special latches, they are combined before installation, and only then they are installed as a whole block into the prepared holes.

The holes for the block are drilled solid, a gap of no more than 1 mm is left between them, and the central partitions are removed. Thus, the unit is mounted in the wall as a whole. Frames and metal frames sockets must be in close contact with each other. After equipping the unit and connecting communications to it, plastic frames of sockets are installed. This work is carried out after laying the finishing materials on the wall, since the rosette frame is designed to hide all the shortcomings of the decorating elements. When wallpapering under the outlet, their edges are wrapped, but if the wall is painted, the overlay will hide the seams and chips at the place where the opening for the outlets was made.
To install the switchboard, a hole is drilled in the wall rectangular shape. The size of the hole in depth, width and height is adjusted to the size of the future shield, leaving a small margin. In the niche, the body of the shield is first installed, it is fixed with a solution of gypsum. At this stage, the installation concealed wiring considered completed. The switchboard equipment belongs to electrical work and carried out in accordance with the instructions in the user manual.
You can create a strobe, that is, a groove in the wall where electrical cables will be hidden, on your own. However, here it is important to observe not only the rules for conducting the operation in question, but also the general construction legal framework. The article discusses the features of the operation, the tools for its implementation and various methods of work.
Laying new wiring is an integral part of the overhaul. In addition, it often becomes necessary to add new sockets and switches in the room or around the entire perimeter of the housing.
In any of these cases, you can not do without the operation of wall chasing.
Wall chasing is the cutting of walls with the help of specialized electrical equipment, for all kinds of needs. One of the most striking examples of a case where such an operation may be needed is wall chasing for the purpose of wiring.
The strobe gasket is intended for laying electric cable or other communications and objects that need to be hidden. The operation is accompanied by education a large number dust and dirt, and also requires the use of a special tool.
Before you start crumbling the wall, you should plan and draw a diagram of the future wiring, taking into account all related objects: sockets, switches, and so on.
Do-it-yourself wall chasing is a real task for home master. This operation can be carried out using special electric tools, as well as manually.
 There are several methods of gating, which will differ depending on the selected tool:
Each option differs in its level of complexity and the amount of effort and resources expended. In addition, the time spent and the quality of the final result differ. If desired and possible, it is permissible to use other tools.
Due to the growth in the number electrical appliances many residents of panel houses are looking for ways to hide the wiring not under the baseboards, but in the walls or ceiling.

As a rule, in most panel houses, the walls of the panels are load-bearing and it is forbidden to ditch them. If the wall is not load-bearing, then you should make sure that the work carried out will not upset the balance of load distribution on the walls and ceiling and will not lead to the destruction of the structure.
Before you start laying electrical wiring directly into the walls panel house, you should first familiarize yourself with the plan of the apartment. Walls that are stiffeners can be ditched, and those that serve as load-bearing walls are strictly prohibited.
 load-bearing walls in monolithic house slicing is usually not possible. This is due to the fact that in case of violation of the integrity of the wall, this can directly affect the structural strength.
Due to the fact that the laying of bricks is carried out using a cement-sand mixture, then when chasing brick wall there are no particular problems. Using a hammer and a chisel, you can knock out this mixture manually, and the gap formed between the bricks will serve as a groove for the cable. Of course, after all the work has been completed, the groove will be covered with plaster.
In order to maintain the strength properties of the wall, it is recommended to crush the surface of the brick wall only in the horizontal direction according to the seams between the bricks.
For each individual case, tools, strobe directions and other features may vary. First of all, the choice is influenced by the type of building and walls that are located in the desired room. In addition, the dimensions of the strobe also have an additional effect.
 A perforator is used for chasing walls, as a rule, in the case when only one of the rooms is being repaired. This is due to the fact that specific dispersed dust is formed from the wall chaser, which penetrates everywhere and can spoil things and furniture.
For chasing with a puncher, it is necessary to drill holes with a diameter of 8 mm along the marked route. The distance between these holes should not exceed one centimeter. After that, a special nozzle for chasing is put on the puncher, and the device is switched to impact mode. Next, you need to punch a strobe between the marked holes.
First you need to mark the location of the future location of the cable. After the markup has been completely completed, you can begin to create gutters. With the help of a grinder, this can be done in two ways:
 A drill can also be useful in solving the problem in question. Will need to use electric drill, supplying it alternately with a drill, a nozzle with a short drill and a special spatula.
First of all, using a drill or a nozzle with a drill, you should drill holes with a depth of at least 25 mm and at a distance of 10-15 mm from each other. The next step, using a nozzle in the form of a spatula, is the arrangement of the gutter.
Knock out a groove the right sizes, according to the markup applied in advance, it is possible with a spatula. The blade is directly a nozzle for the perforator, which carries out the formation and deepening of the groove according to the cuts marked in advance.
Among the advantages, one can single out the fact that the recess is formed quickly, and its edges and shape will be even, which will not require additional manipulations. Among the disadvantages is that the use of a spatula can provoke a large amount of dust.
Those who are interested in the question of whether it is possible to ditch walls without dust can get a positive answer. This becomes possible when using a specialized wall chaser equipped with a powerful vacuum cleaner. The dust that is generated during operation will fall into a special chamber, which prevents its penetration into the surrounding space.
 The operation in question is performed according to the rules:
The right tool makes it possible to quickly pierce the wall under the cable or outlet. The choice should be made according to the material of a particular wall, its characteristics and location. Fast and convenient option is to use a perforator or impact drill, but in this case, the strobe may turn out to be uneven.
 In the event that shaping is carried out in bearing walls Oh, then you should not exceed a depth of 20-30 mm.
At this depth, as a rule, reinforcement is located, the damage of which can not only have catastrophic consequences, but is also a violation of legal norms.
Regardless of the chosen option for carrying out the work, the general procedure will be general, and it is presented below:
After carrying out the work and laying the cable, dust and dirt remain in the ditches, which prevent the quality adhesion of the primer to the wall. Armed with gloves and wide brush, it is necessary to close up unevenness in the wall along its entire length with a generous layer.
The stages of work will be as follows:
 You can easily and quickly make cuts on a brick wall according to the marked lines using a puncher or a grinder.
To perform such an action, you will need a puncher, a spatula, and also a drill for concrete.
To avoid the formation of large volumes of dust, before starting work, cover the room with a film and humidify the air. It is also recommended to crush the wall surface according to clearly marked contours.
The time of the operation in question directly depends on the chosen method, tool, groove dimensions and the characteristics of the wall material.
The article discusses all aspects affecting the concept of the gating operation, its features and rules for conducting.
Chasing walls for electrics in a house is such a process when you have to break and build at the same time.
On a standard two-room apartment, on average, up to 50 meters of strobe are cut through. And for some reason, many are sure that all furrows are made exclusively for wires or plumbing pipes.
And in the meantime, this work can be well combined with the manufacture of niches for socket boxes.
Drilling or chasing
 Drilling niches for socket boxes is one of the most labor-intensive operations when installing all rough electrics.
Often, for the manufacture of 3 holes for a recessed block of sockets, it takes no less time than for all the strobes taken together, resembling this niche. 
To date, there are three main ways to do this work:


The simplest, fastest and most labor-efficient is the third option. Why this is so can be explained by several reasons.
The wall cutter-wall chaser copes with any material, from foam block to high-strength reinforced concrete. Correspondingly, impact bits of the SDS plus type are omitted here.
Yes, they cope with foam blocks, bricks, but there are already problems with concrete walls. It takes much more time, plus the hammer itself is operated in a tougher mode. In fact, at its limit. 
If you hit the rebar, you simply can’t save enough crowns. It's only in advertising they cut it like clockwork. 
Let's say you have masonry that was laid just a couple of days ago, then plastered and at first glance everything dried up. But it is worth hammering it with an SDS max perforator and you will see that the plasterers will have to be called again. Or do the work for them. 
Even taking into account the fact that the puncher has the ability to work "at half strength", this does not guarantee that microcracks will not appear between the blocks at the joints, which will become even wider over time.
When cutting with a wall cutter, the material of the walls does not resist the disk at all, so such damage does not occur here. Moreover, after cutting out a strobe or niche, you can use an ordinary chisel and carefully hollow out everything you need from the inside. 
Again, without the use of a perforator and its impacts.
Of course, professionals can make neat holes with a perforator in a bare, unplastered concrete wall. However, it is right to do the electrician after the plaster, and not before. 
Not always SDS-max puncher can go through and cut through the reinforcement. And in this case, don’t dream about any in-depth 60mm sockets and wiring without junction boxes. 
True, in this work, never forget about such a factor as load-bearing walls. About whether it is possible to ditch in them, and if so, in what way, read in more detail at the end of the article.
Diamond discs
A very important thing when cutting strobes and cutting niches is the quality of the diamond blades. You can never save here and you should buy only well-known brands. 
Even if your wall cutter or wall chaser is not Hilti, DeWalt, but some other little-known brand, buy only expensive consumables. On cheaper diamond discs, in the first place, it’s not the diamond coating itself that can grind off, but simply tear it out seat under the fixing nut. 
If the purchase of a wall saw is an unaffordable luxury for you, and in the meantime the hammer drill is already available and you don’t need to buy anything, then work the old fashioned way. 
With all the secrets of drilling socket boxes, how not to break crowns when passing reinforcement, read the link above.
Cable chasing - tool selection
For gating directly under the wiring, you do not need to engage in handicraft and gouge curves and oblique slopes and furrows with a spatula - a chisel. 
To date, there is already a rich assortment of both relatively affordable and quality wall chasers, as well as cheap attachments for chasing an ordinary angle grinder. 
They can be easily purchased, even if they are needed to repair just one apartment. With their ridiculous price, you will not feel any increase in the budget. 
The speed at which these nozzles work will pleasantly surprise you. And again, with high-quality disks, the material of the walls will not play a dominant role. 
When choosing wall chasers and nozzles, it is especially worth paying attention to the possibility of sawing corners at 90 degrees. And that all this was done without dust. 
Any comfortable chasing is impossible without dust removal. Of course professional construction vacuum cleaner to repair one apartment or house, few people will buy. 
In this case, take care of at least minimal dust collection devices or redo conventional vacuum cleaner under construction functions.
By the way, the Air Duster nozzle freely throws out all the waste when shredding, even without a vacuum cleaner. True, a protective mask in this case will be a mandatory attribute of your work. 
It is a mask, not just goggles and a respirator. A very high-quality model is offered by our Chinese comrades. 
Its price is several times lower than professional masks from ZM, and the build quality is at the same level. Read reviews.

Find out the latest current price and you can order a similar mask from here.
Chasing technique and work procedure
Let's go directly to the process of gating. The order of work is the following.
After marking, first holes and niches for socket boxes are made with a wall cutter, and then the strobes themselves.
Niche cutting technique is simple. Take the machine and first apply to the wall the edge that is closer to the dust outlet. 
After the disk is completely deepened, there will be no dust at all. Of course with a vacuum cleaner. 
Do not forget that gating is an operation that is always associated with a great risk to your health. Therefore, the application minimum funds personal protection is a must. Even if you only need to walk a few centimeters. 
After cutting the strips, with a chisel by hand, knock out the resulting squares. In order to do this without a puncher and a chisel, the cubes must be relatively small.
Therefore, in addition to the perimeter of the niche, with a double block of socket boxes, pass the wall cutter disk also in the center. And with a triple block or more, several such incisions are made. 
But in any case, it is still several times faster than drilling with a crown. She will be the best option only in soft walls - gas block, foam concrete.
The only advice is to use it with a larger diameter than the socket itself. When you plant it on the solution, you will need a good gap between the socket and the wall. Only in this case, the mortar or gypsum will hold the box well and securely.
And when installing sockets, there will be no problems with their falling out or tearing out when using even a non-standard plug. 
Distances, depth, strobe width
 What nuances should be paid attention to when chasing walls for cable? First, this minimum distances and indents. Please adhere to the following guidelines and rules:

 Also pay attention to the location of the groove relative to the socket. It doesn't have to go right down the middle.
Always orient it closer to the edges. And left or right also plays a role. 
If the future socket or switch is close to the doorway, then it would be more correct to hold the gate exactly to the far edge from the door. Otherwise, when installing the doors, installers with a long dowel will damage the cable when drilling. 
Even when shtrobleniye often use laser level. First, it facilitates and speeds up the work. And secondly, the cable will be laid perfectly evenly.
In the future, when drilling a screw into the wall under the picture, you will know exactly how many millimeters away from the outlet you have a cable under the plaster. 
There will be no need to use all sorts of tricky devices and fancy wall scanners to detect wires under the plaster. 
The correct cutting direction is from top to bottom. You will be less tired, and gravity, on the contrary, will be an assistant during work. 
It is enough to attach the wall chaser to the wall, and then high-quality discs and the force of gravity of the earth will make most work for you.
Is it forbidden to ditch in a load-bearing wall?
Most main question which worries everyone - is it possible to cut and ditch load-bearing walls. And what do SNiP and GOSTs say about it.
Although it was signed for Moscow, its recommendations are followed in other regions. Specifically, paragraph 11.11 says: "It is forbidden to make grooves in HORIZONTAL seams and under internal wall panels. It is also forbidden to make grooves in wall panels and floor slabs."
It turns out that it is impossible to cut strobes in the ceiling in any direction. 
There, use only external cable fasteners using clips and corrugations. 
In monolithic panels, it is possible to cut a strobe only in a layer of plaster, without going deep into the wall itself and without weakening its surface. As for other load-bearing walls, only vertical strobes are allowed there, but even so, the integrity of the reinforcement inside should not be violated. 
That is why electricians say that plaster should always go to electricians, and not vice versa.
Thus, you get the necessary head start, a couple of extra centimeters of a layer of plaster. And when cutting a furrow or drilling a socket box, you simply won’t reach the fittings. 
Just imagine that in the load-bearing wall in the photo below, you will cut a niche for recessed socket boxes 6 cm inside! And the same number on the other side in another room. 
And if your neighbors from below and above do the same. How long will your high-rise building last and who will be to blame if one day it collapses like a house of cards.

Of course, this is the most extreme and unlikely case. However, most often such houses, after 10-15 years of operation, are recognized as emergency.
What to do if without sockets in monolithic wall not enough? In this case, put drywall there and mount the socket in plasterboard wall without breaking the monolith. 
As for panel houses, where virtually all walls are load-bearing, then in them standard is the use of factory voids in the slabs. Otherwise, you will have to lead the electrician along the ceiling (on clips) or along the floor (in a screed). 

Instruction The frames of the film merge for us into continuous movement due to ...

Pranayama is a breathing practice in yoga. Pranayama literally translates as...