INSTRUCTIONS AND PROPHECIES OF THE Blessed MOTHER ALIPIA GOLOSEEVSKY, Kyiv...


The builders did not think about crooked walls, and the apartment owners did not ask themselves the question: to make or not to make repairs? Nowadays, people want to live in beautifully renovated apartments, and the alignment of the walls in brick house has become a headache for everyone, from the owners of the apartments to the builders.
Of course, you can live in an apartment with crooked partitions, trying to hide flaws with decorative finishes. But if you want to live in an apartment with a quality repair, you should first of all pay attention to the issue of a smooth plane.
During the repair, finishing work, we wonder what is the best way to level the walls. There are currently two methods available for alignment.
One of these types of mill alignment is carried out using the installation of structures,
the other involves the use of various building mixtures (plaster, cement, putty).
First you need to understand the terminology. There is the concept of "leveling the walls", which means that the entire area of \u200b\u200bthe wall will be leveled, and "leveling the surface", which means obtaining a flat and smooth surface. Therefore, it is important to first decide what we want to achieve, and only then proceed to repair work.
When leveling the surface with drywall, you must purchase in advance at the store building materials

Considering that the standard width of drywall sheets is 1.2 m, there must be a distance between the profiles that is exactly 60 cm. As a result, an extra profile remains in the middle of the drywall sheet, which will help us fix this sheet for greater strength.
After the design is completed, you can begin to attach drywall sheets to it.
After attaching the drywall to the frame, we proceed to its finishing.
A more convenient and acceptable option for leveling, wall insulation is repair using building mixtures, for example, using plaster. But first, you need to analyze the degree of curvature and set the angle of inclination. This analysis requires a level.

If the leveling requires serious builder intervention, then you can choose one of the two currently available leveling methods:
In order to level with plaster, you should purchase a soil mixture, plaster, level and spatulas (large and small).

Walls are plastered in two main ways.
If you decide to choose the second method when leveling, then you need to remember that in this case the building mixture, namely plaster, must be applied in several layers and each layer is primed separately.
Usually, only three layers of plaster are required to level the walls.

So. The surface of the wall, as a rule, has many flaws, irregularities and various recesses. In order to hide them, the so-called "zero" layer of plaster is applied to the wall. Before you begin to cover with plaster, it must be examined for protrusions and depressions. This knowledge will be required during the application of plaster on the surface, we will remember exactly where to apply the plaster in a thicker layer.
In order to prepare the mixture for the start of the main work, we will need a bucket of water and a drill with a mixer nozzle. The proportions for diluting the dry mixture with water are indicated on the packaging.
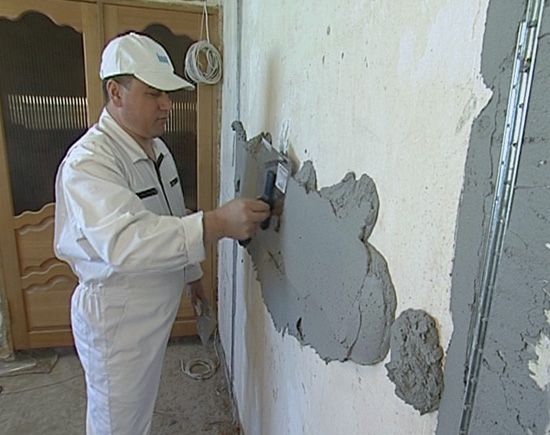
To apply plaster, we need a wide spatula, on the edge of which, with the help of a second spatula, the finished mixture is applied.
As we already know, cement leveling of wall surfaces is used only if there are various damages, indentations and other flaws, or if no previous work has been done on this wall. Finishing work, and also if the wall has a slope in one direction or another.

If there are recesses on the wall, then it should be “built up”, bringing the cavity up and completely covering it with cement mortar.
In the second case, when the wall is initially “bare”, a layer of cement screed is simply applied to it entirely.
Cement leveling will require guide rails, a level, a dry cement mix, a rule and a trowel.
As in the case of using plaster for leveling, in the case of cement leveling, a base in the form of a primer is first applied to their surface.
Before you start painting on the walls cement mortar, it is required to calculate the level of the layer cement mixture required for alignment.
Due to the fact that the air in these rooms is constantly humid, the alignment of the walls in the bathroom and kitchen should be carried out with a mixture prepared from cement. Do not use drywall or plaster.

With a slight surface roughness, in which it can be eliminated directly during the laying of tiles, applying more adhesive mixture to places with flaws.
As we already know, the surface is leveled with putty. Thus, it is prepared for wallpapering and applying paint.

When applying putty, it should be remembered that its layer should not be more than 2 mm. After putty is applied to the surface, the wall is sanded and brought to perfect smoothness and evenness. After sanding, the surface is ready for decorative finishing.
In order for the walls to be perfectly aligned, you need to pay attention to their outside corners. When aligning the corners, special squares (metal and perforated) are used. A thin layer of a mixture of gypsum is applied to the entire surface of the corner on both sides, on which the square is applied. Then it is hidden under a layer of plaster (or gypsum) and we achieve the formation of a smooth surface of the wall and corner.
Walls in wooden house after consultation with a specialist, it can be leveled with a plasterboard construction.
If the walls in a wooden house are slanted, then after finding the slope point with the help of special wooden beams you can direct the wall in the desired direction.
In the houses of the old Soviet construction, the walls, unfortunately, do not always differ in special evenness. In most cases, their surface is covered with bumps and pits, has cracks or chips. At the same time, their plane itself often often deviates significantly from the vertical or horizontal. Of course, rooms with such walls do not look very attractive. Before wallpapering, painting or, for example, before finishing decorative plaster, the surfaces of the enclosing structures in such apartments have to be adjusted. How to level the walls? The answer to this question, of course, many homeowners would like to know. Surfaces with defects can be corrected using different materials.
In our time, there are two main ways to align the walls in a room:
In the first case, the alignment of walls for wallpaper or decorative plaster is most often done using drywall. Also, dry correction technology may involve the use of plywood, lining or PVC boards. In the raw alignment technique, one usually uses different types plasters.
Such wall leveling materials are usually supplied to the market in dry bags. Before use, they must be diluted with water, in the amount determined by the instructions for use. Plaster can be used to level the walls:
The initial mass of materials of this type is a very fine powdery dry mixture. The answer to the question of how to level the walls in the apartment, gypsum plaster is very good. Its composition, among other things, includes various kinds of plasticizers. And so it lays down on the walls very evenly.
With the use of such plaster, alignment can be carried out concrete walls or brick. Do not use such mixtures mainly only in very damp rooms - saunas, bathrooms, swimming pools, etc. It is also not allowed to use gypsum to level the facades of buildings.
The main advantages of plasters of this type are:
Also, the masters also refer to the advantages of gypsum plaster and its fine texture. Aligning walls for wallpaper using such mixtures has the advantage that at the final stage in this case it is not necessary to apply finishing putty. Another undoubted advantage of such plasters is rapid maturation. If necessary, it is possible to start pasting the walls, leveled with a gypsum mixture, in a week.

The disadvantages of the compositions of this variety include primarily their high cost. Leveling walls with gypsum plaster is usually quite expensive. The funds of this variety cost about one and a half to two times more expensive than cement ones. Also, the disadvantages of mixtures of this type include a very short period of viability. It is necessary to use the prepared gypsum mixture within an average of 45 minutes. Of course, such a short “life” makes working with plaster of this variety not particularly convenient.
Of course, when choosing a plaster of this variety, like any other, you should first of all pay attention to the brand of the manufacturer. The most popular gypsum mixtures in our country are:
It is this material that most often serves as the answer to the question of how to align the walls inside or outside the room. There are two main types of such plasters on the market today. For leveling surfaces, both a cement-lime mixture and a cement-sand mixture can be used.
On the walls, both of these types of plaster lie no worse than gypsum. At the same time, the cement leveling mixture is much cheaper. Such plaster is the best answer to the question of how to level the walls in the bathroom. It is perfect for wet areas.
The only thing in which cement plaster loses to gypsum plaster is not a very smooth texture. After using such a mixture, it is usually necessary to additionally apply a finishing material. Another disadvantage of cement plaster in comparison with gypsum is long term maturation. It is possible to proceed with the final finishing of walls aligned with its use only after about a month.

Compositions of this type, like gypsum, are supplied to the domestic market by many companies. But the most popular plasters in our country are:
The Starwell mixture can be used to level the walls not only indoors, but also outside. Such plaster costs about $ 5.9 per bag weighing 25 kg. Polimin SHV 1 mixtures may only be used indoors. The permissible maximum thickness of the leveling layer when using both types of plaster is 20 mm. The price of a mixture of Polimin ShV 1 is approximately $ 3.6.
Compositions "Vetonit TT" can be used for leveling indoor walls and facades. They can be applied to the surface with a layer of up to 3 cm. Such a plaster costs about $ 9 per 25 kg.
Building facades are thus most often leveled with cement plaster. However, sometimes acrylic mixtures are also used for this purpose. Such materials are more expensive, but at the same time they give a much stronger leveling layer. Such finishing composition based aqueous solution acrylic. The main advantages of plasters of this type are:
The disadvantages of plasters of this variety, as well as gypsum, include a short pot life. Also, such a mixture has earned not too good consumer reviews and for a not particularly high degree of vapor permeability. Walls covered with plaster of this type, unfortunately, simply stop "breathing". They refer to the disadvantages of mixtures of this variety and the fact that after drying they can accumulate static electricity and attract all sorts of garbage to themselves.
The most popular manufacturers of such plasters in Russia, as well as gypsum plasters, are Osnovit, Vetonit and Knauf. Also, Ceresit brand plasters are often used to level the facades. Such mixtures are usually supplied to the market already in ready-made. It is not necessary to dilute them with water. It is convenient to work with them, but plasters of this type are more expensive than gypsum and cement ones. Therefore, they are usually used only to correct walls that have only minor defects.

Alignment of walls for painting or any other type of decorative finish using such material can be done both outside and inside the room. But most often, silicate plaster, like acrylic, is still used for finishing facades. Such materials are made on the basis of silicone resin. They also include liquid potassium glass, a water-repellent agent and mineral fillers. Like acrylic, silicate plaster is expensive. And they use it, respectively, only for leveling walls that have minor defects or as finishing after cement-sand mixture.
The advantages of silicate plasters include primarily:
The main disadvantage of such mixtures is considered to be a short pot life.
Acrylic and silicate plasters, therefore, are in most cases applied to walls in a thin layer using the usual technology - with a spatula or by means of a spray gun. Cement and gypsum mixes superimposed on surfaces usually in a thick layer. Therefore, when working with them, among other things, special guides are used - beacons. The use of such additions allows you to get the most even surfaces. Work is carried out in this case in several stages:
After the composition dries, beacons are removed from the wall. To level the walls (seal the grooves remaining after the profile), a little more gypsum or cement plaster is diluted. At the final stage, the surface is treated with a paint grater and covered with a thin layer of a fine-textured mixture.

Compositions of this type can be:
For wet rooms and facades, depending on the budget, can be selected cement plasters, acrylic or silicate. Gypsum is usually used to decorate rooms from the inside. Also, in some cases, for this purpose, of course, cement can also be used. Putties of this variety are applied over plaster, often using a special reinforcing paint mesh.
Plasters are, of course, just a great answer to the question of how to level the walls. However, such tools can, unfortunately, be used mainly only to remove holes and bumps from the surface. More serious defects in the form of deviation from the plane by means of a crude technique are rather difficult to correct, and sometimes even impossible. After all, apply plaster compositions on the surface is allowed only not too thick layer.
some disadvantage raw technology is also the fact that with its use only concrete or brick walls can be leveled. For wood similar materials are usually not used.
Therefore, the raw technique is not suitable for eliminating serious wall defects, as well as for leveling cobbled or chopped surfaces. In this case, another method of correction is usually used - dry. The walls with this technology are simply sheathed on the frame with some sheet material. Types of finishes in this case can be used different. But most often drywall is used for this purpose.
Actually, the GKL sheets themselves for wall correction can be used in two main varieties:
The second type of GKL differs from the first primarily in color. Moisture resistant sheets have a greenish tint. They, for example, are an excellent answer to the question of how to align the walls in the bathroom. It is produced by the industry in our time and refractory GKL. Sheets of this variety can withstand not only very high temperatures, but even open fire(In one hour). Such drywall is very expensive, and therefore it is used mainly only for leveling the surfaces of stoves and fireplaces.

The leading manufacturers of GKL in Russia are:
The quality of all these brands of drywall are quite good. But the Knauf sheets are still the most popular in our country. This company supplies the domestic market with three main types of GKL:
If desired, today you can purchase both ordinary sheets of this manufacturer 2500 x 1200 mm, and non-standard ones. The width of the latter can be 600-1500 mm, length - 1500-4000 mm, and thickness - 6.5-24 mm.
Any special preparation of the walls when using GKL is not required. Surfaces in this case are usually simply cleaned of dirt and dust. Next, a special aluminum or steel profile is mounted on the wall using a level. Actually, the drywall itself is attached to it with the help of dowels of a special design with plastic wide heads. GKL sheets are fixed during installation so that no cruciform seams form between them.
At the final stage, the plasterboard surface can either be wallpapered or treated with a thin layer of plaster. Of course, it is often used for finishing GKL and finishing putty.
Such materials are also usually used for large deviations of surfaces from the horizontal or vertical. In addition, such a finish can also be used when the walls need not only to be leveled, but also insulated.

In the latter case, timber is usually used to assemble the frame for the material. It can be wall-mounted both vertically and horizontally. Actually, for insulation between the bars of the frame, plates are subsequently installed mineral wool or polystyrene foam. Then a vapor barrier film is sewn on top, and the leveling material itself is installed on top of it.
The walls in the apartment are most visible structures of the house. If floors can be covered various materials, and make the ceilings hinged, then uneven walls cannot be hidden anywhere. Especially if they do not have carpets and other distracting coatings, then verticality and unevenness will be immediately noticeable. Therefore, do-it-yourself wall alignment is the most best option improvement of the interior of the premises in the house (apartment).
During the construction of houses, all finishing work is most often carried out by contractor construction organizations, and in private buildings by hired teams. Often, their lack of control leads to differences along the entire length of the walls up to 5-10 cm. Plastering made by inept guest workers without the use of professional tools and sometimes no experience at all in finishing, forces the owner of such newly built housing to perform additional alignment of the walls when moving in.
To perform the alignment of the walls in the apartment, the following materials are used:
To carry out leveling with wet mixtures, you need a special tool:
Wall alignment belongs to the category dirty work Therefore, it is necessary to have working overalls made of tarpaulin material.

Due to the high labor intensity of the plastering process, many homeowners with little building experience perform wall cladding with sheet material - drywall. This method is also loved by professional teams - also because of the time savings. Panels are attached to a previously equipped metal frame or glued to the wall with special glue.
The main requirement for such work is the removal of the vertical level of the wall surface during the installation of a metal profile.
Alignment of walls with wet mixes
The most common method remains the use of a wet type of wall leveling. To perform this type of work, minimal skills in using a spatula and removing beacons are required. Wall leveling compounds can be purchased at any building materials store. There you can also find instructions for preparing solutions.
Before the main leveling stage, you need to remove the old coating from the surface (wallpaper, whitewash, paint). In necessary situations, a flimsy, falling off old plaster corners and other places. In practice, the entire old coating is more often cleaned to the main concrete or brickwork.
The procedure for leveling walls begins with measuring the differences along the entire length of the wall. This can be done with a long special tool - a building level. Or by pulling any cord along the wall. The verticality of the surface is measured using a simple plumb line. In the presence of differences of not more than 30 mm, they begin to work. The largest layer of the laid plaster should not exceed the allowable dimensions.
Lighthouse Alignment
Surface preparation for painting is most often carried out according to beacons, which serve as a guide. The initial alignment of the walls with putty is carried out by applying it between the beacons and distributing the solution from the bottom up. The ends of the tool must be in contact with the surface of the beacons installed along the entire height of the wall at a certain distance from each other, corresponding to the length of the rule.
The final alignment of the walls consists in grouting the surface with a special device - a plotter. After its completion, it is recommended to apply a primer over the putty for better adhesion of the paint.
Working with spatulas
In the absence of experience with the rule, you can use two spatulas. One will serve as the "palette". It will be possible to dose the quality and quantity of the solution on it. And the other spatula, smaller, will be working. They apply a layer of the mixture to the wall. When using a spatula, it must be held at an angle of 45º to the surface. In this position, the mixture will lie flat.
Surfaces are usually carried out in three layers, with a thickness of each of at least 1.5-2 mm. The temperature in the room should not be below 10º C and the sun's rays on the applied putty should not be allowed. After applying the putty, the wall must be primed.
2. Preparation of surfaces for leveling.
3. Methods for leveling surfaces.
4. Plastering walls.
5. Video.
A rare living space boasts perfectly even walls that were originally. This moment can negate all the efforts, aesthetics and reliability of the coating. Therefore, the first thing is to do everything as it should be, without neglecting this step.
1. How to understand that the walls are uneven?
Clarity will bring one of the ways with the use of tools. As a rule, there are not so many of them: plumb lines, building levels and rules.
Leading in demand - building rule and levels. Generally, optimal parameters- two or two and a half meters. In this case, they are the most functional: it is required that the tool vertically rise to almost the entire height of the wall, and also that it can be easily rotated diagonally. As a rule, if it is not in the home "arsenal", a perfectly flat rail can be used. But it should not be too thin, bending when force is applied, otherwise accurate measurements will not work. It will be enough of its size in the section of 20 × 50 mm. A rail, level or rule is applied to the wall surface vertically, horizontally and diagonally. Track the dimensions of the gaps formed between the wall and the tool, which will show the degree of surface roughness.

Another simple and affordable way to check the verticality of a wall that does not require expensive tools is to use a plumb line. Even if the farm does not have such a device, it is easy to quickly make it yourself. This will require a thin but strong cord about three meters long, as well as a load weighing 150 ÷ 200 grams, best of all - a balanced, symmetrical shape. It is not difficult to use a plumb line: for this, a nail is driven into the wall, under the ceiling, stepping back from the joint 25 ÷ 30 mm, onto which the cord is fixed, and the load tied to it freely falls vertically along the wall. The load should hang freely, not reaching the floor by 10÷15 mm. When the load settles down and does not move, you can see how distorted the surface is - measure the gaps at various points along the height - and compare the results.

In addition to the evenness of the walls, it is necessary to check their perpendicularity, that is, the corners of the room must be straight. A building square will help in determining this parameter, which is applied in several places along the entire height of the joint and make the necessary marks. True, the square must be quite large in order to accurately identify possible deviations. If there is no large square, then it is better to apply the Egyptian triangle rule. To do this, two legs, multiples of 3 and 4, are laid off from the corner along the walls, and the hypotenuse should be a multiple of 5. For example, 1.5 m (0.5 × 3) is measured along one wall, and 2 m (0.5 × 4), and the distance between these points in a straight line should be 2.5 m (0.5 × 5). If this is not the case, then the angle is clearly different from the right one, and it is necessary to look for the cause and a way to eliminate it.
Probably the most optimal and accurate option is to use laser level(laser plane builder). This device sets perpendicular vertical planes, projects lines in space, along which, by simple measurements with comparisons of the gaps, it is easy to identify the uneven surfaces of the walls, their correspondence to the vertical plane and mutual perpendicularity. Having determined the deviations of the walls from the required plane, the location of irregularities - depressions or bulges, they immediately evaluate their approximate height or depth. - In the case when surface defects or deviations from the vertical plane are 8 ÷ 15 mm or more, the walls will have to be leveled by plastering on beacons or by installing drywall sheets. - If the differences do not exceed 5 ÷ 8 mm, then you can fix the surface by applying a thin layer of plaster or putty mortar.

2. Surface preparation for leveling
In order to understand what stages the work on leveling the walls consists of, it is worth considering these processes in more detail. However, before moving on to brief description each of the alignment methods, a few words need to be said about the common for all technologies preparatory activities. The preparatory stage can be difficult and tedious, but it should not be brushed aside, as this is the guarantee of the quality of the leveled surface and its operational durability. It is especially necessary to carefully approach the preparation of walls for plastering, but drywall also requires its own special approach. So, the preparation of walls for further alignment includes several important operations, which include the following:
The first step of the wall must be completely cleared of decorative coating, if it is present on surfaces, it is removed old paint or wallpaper. These processes are made different ways which are detailed in a separate article.

After the walls are freed from the old finish, the plaster layer will open, which requires the most thorough examination. Such a revision is necessary, since cracks could appear on it during operation, or delamination, partial or complete, is not excluded. Depending on the degree of damage to the old plaster layer, it will have to be removed completely or a proper repair should be made. If this layer has a sufficiently large thickness, poor-quality material is used for it, and its surface is uneven, then it is better to get rid of it completely. If the wall has large protrusions, they will have to be knocked down, and small bulges should be sanded or brushed off with a metal brush.

If “wet” work is supposed to be on the wall, then to ensure electrical safety, the room will most likely have to be de-energized. Usually, in such cases, it is planned to replace sockets and switches, which means that the old ones must be dismantled and then the bare wires insulated.
After cleaning or repairing the surface of the wall, it must be primed several times - this is to strengthen and dedust the surface and to create conditions for reliable adhesion between the surface and the new leveling mortar.
After the final drying of the primer, you can proceed to the application of putty, plaster, or to the installation of special beacon profiles, along which the surfaces will be leveled.
If you plan to level with plaster wooden walls, then they are cleaned of dust and primed with an antiseptic primer for wood. Thereafter dry walls sheathed with wooden slats - shingles, which will create a good adhesion of mortar and wood.
3. Methods for leveling surfaces
The choice of a method for leveling walls directly depends on their condition, that is, whether they have significant curvature, or whether it is simply necessary to eliminate a slight surface relief that can appear through layers of paint or. In fact, there are not so many technological methods for leveling walls. They have been used for decades, but with the advent of new building materials, they are constantly being improved. So, the alignment of the walls is carried out in the following ways:
Plastering, that is, applying a special leveling layer to the surface mortar. In turn, this method can be divided into two types - this is the alignment of the walls along the beacons and without their use.

Mounting drywall sheets, setting the desired evenness of the wall surface (often also called "dry plaster"). This alignment option is also divided into two different approaches - this is the fixing of sheets on the frame, or the frameless fastening of the GVL directly to the wall.
Leveling the walls with putty This method of bringing the surface in order is used in combination with the other two mentioned above, or independently. If the walls have a smooth surface, without major geometric distortions, but there are small irregularities on it, then it is the putty that will help to bring them to perfect smoothness.

4. Plastering walls
A few words about leveling mortars Currently, a very wide range of ready-made building mixtures is presented in construction stores, designed for plastering works. They can be on different bases.
Cement-based plasters are used for outdoor work, as well as for rooms with increased level humidity;

Gypsum mixtures are suitable for walls made of almost any material, but their scope is limited only to interior decoration. However, many master finishers and homeowners prefer to cook plaster mortars on one's own. And the basis for this, in addition to cement or gypsum, can also be lime or clay. Lime and cement-lime mortars have proven themselves for external and interior decoration, and clay-based plasters are seen as generally inexpensive (in the presence of free raw materials) and are suitable for leveling wooden, clay or brick walls.
5. Video
Smooth planes are an indispensable condition quality repair, in apartments it is very often necessary to align the walls, since ideal geometry is rare even for new buildings, and in old houses this problem is even more urgent. The process is not easy, but with patience and adherence necessary requirements All work can be done on your own.
Small irregularities and minor defects are easy to hide under wallpaper, decorative plaster. In more difficult cases walls are leveled in one of the main ways - by applying plaster mixture or plasterboard lining. Each of them has its own strengths and weaknesses.
If the walls of the apartment are relatively even and have a slight degree of curvature, many owners often prefer the use of leveling solutions.
This alignment method has been known for a long time, and it has a number of positive aspects:
To reduce the thickness of the applied layer, at the preparatory stage, all cracks and recesses are pre-filled with quick-drying mixtures, and the protrusions are knocked down with a perforator.
The disadvantages include the following points:
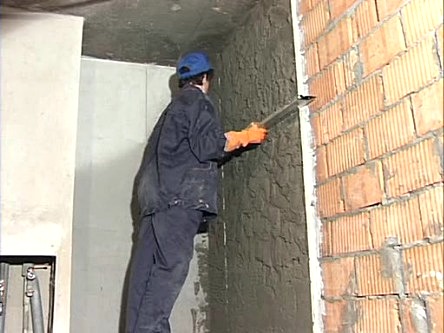
If the wall is concrete, then the simplest, most affordable and common method is to use a cement-sand mortar. The technology is simple, therefore, in the absence of experience, it is possible to acquire and improve the necessary skills in the process of work.
To carry out the plastering correctly, follow the step-by-step instructions:

The next step is priming. For better adhesion of the applied mixture to the surface, it is recommended to use a deep penetration composition with antiseptic properties. Onatstrengthens the base, improves adhesionand prevent the appearance of mold, the development of fungus.
On open flat areas, the primer is applied with a roller in a continuous layer, but in the corners it is more convenient to use a brush. After the first layer, after a pause necessary for it to dry, re-processing is carried out.
Before plastering the walls, beacons must be set up. For these purposes, metal profiles with a T-section or ordinary wooden slats. They are pressed into the "cakes" of cement, previously thrown on the base, gypsum mortar and, until he seizes, they quickly set the level.
An arbitrary distance is chosen between the beacons, but for the convenience of working at the corners of the room, at least 30 cm recede.
The main thing is that the rule along the edges rests on adjacent profiles and moves freely in the vertical direction.

Starting plastering, you can take the dry mix in the package and, diluted with water, prepare in accordance with the manufacturer's instructions. Or, using the most common materials - cement and sand, mix it yourself. Further, taking a trowel or spatula, ready composition applied to a pre-moistened wall so that the layer protrudes 2–3 mm above the level of the beacons.

Then, on them, trying to smooth the surface, they draw a rule from the bottom up. In places where small indentations remain, add a solution and re-align. If necessary, another layer is applied, leveling it in a circular motion, and the wall is left to dry. At the final stage, putty is used as a finish.
Working in separate rooms, you have to pay attention to the specifics of their purpose and features of operation. So, the bathroom is relatively small, so special difficulties does not arise, but considering high humidity and intensity of use, the question is natural - what material to choose?

Best of all, according to its characteristics, a cement-sand or gypsum leveling mixture is suitable; after hardening, their structure acquires the necessary properties that increase resistance to moisture. You can also install waterproof drywall, but the room is small and the frame will take up some space. At the end of all work, the walls can be painted, but the best option- glue ceramic tiles, as it will create additional protection and ennoble appearance.
There are several ways to align corners, but the easiest and most effective way is with perforated profiles.When removing irregularities inner corner with your own hands, you need to perform a series of sequential work:

External ledge perform the same way, but the perforated corner is applied in reverse. After making the final alignment of the side surfaces and waiting for the complete hardening and drying of the material, they begin to grind it. To do this, take a grater or sandpaper, fixing it in a special holder, and, exercising light pressure, pass over the entire surface in a circular motion.
The number of layers applied and the choice of material, starting or finishing, depends on how curved the walls are.
Upon completion of work, in order to remove adhering plaster from the tool, it is placed for a while in a container of water or a small spatula is used. If as final finishing painting is planned or wallpaper will be glued, then for better adhesion of materials, a primer is applied to the walls.
Very often it is not required to completely plaster all surfaces, sometimes it is enough to identify and eliminate problem areas in the form of protrusions and depressions “by eye”. This method is very efficient and allows you to achieve significant savings in time and materials.

The main attention is paid to such significant places as corners, doorways, ceiling and wall joints. The remaining planes are aligned using the rule, pressing it and simultaneously moving it along the surface, the presence of depressions is determined. After filling them with plaster, the excess is removed with a tool, re-wiring them to the walls. The application of the solution is carried out in several layers, each of which must be dried and covered with a primer on top.

Actions continue until the plane is flat and the rule is completely attached in the absence of recesses. After plastering, finishing putty is used as a final finish. After waiting for it to dry, the surface is polished with a special grater or sandpaper.
The visual method is complex and requires some skill, so it is used only experienced builders. But all the work can be done in a short period of time and, if the partition has a slight slope, an acceptable result can be obtained. As a result, all the main decorative elements (skirting boards, baguettes) will be perfectly even.
Due to the complexity of plaster leveling, more and more often, the GKL installation option is chosen as the main way to eliminate irregularities. This is also true if the house is wooden and the use of leveling solutions is impossible.
The main advantages include the following points:

Disadvantages of using drywall:
Sheets are mounted in two ways: frame and frameless. Each has its own technology, scope. The first option involves the installation of crates, it is carried out with a significant curvature of the walls, during installation additional insulation, soundproofing the room, as well as when it is necessary to hide the wires.

Step-by-step instructions for arranging a drywall construction:
With this method, if the planes are relatively flat and do not need preparation, the sheets are mounted directly on the base.
The order of work is as follows:

It is very important to set the first skin element correctly, since all the others will be joined to it. To facilitate the task and prevent sheets from slipping, in the lower part at the level of the plinth, a rake is screwed y. It, holding the fragments in the right position until the glue is completely dry, will ensure reliable adhesion of the surfaces. Then it is removed and the installation site is covered with a plinth.

Before wallpapering, start finishing GKL:
By correctly determining the amount of work to be done, the consumption of material and, having assessed the quality of the walls, it is possible to significantly simplify the repair. Indeed, with a slight curvature, there is no need to erect a frame and install GKL sheets. Then, to obtain the desired result, in order to eliminate small irregularities, it is enough to clean and level all surfaces with plaster.
INSTRUCTIONS AND PROPHECIES OF THE Blessed MOTHER ALIPIA GOLOSEEVSKY, Kyiv...

Eufillin dropper in ampoules is used to treat pathologies that ...

Among all ointments for the treatment and prevention of joint diseases, the most ...