The disadvantage of this method is that we reduce the internal area of the rooms.
After that, putty, wallpaper, oil paint or wall panels.
Recently, textured wall paint has gained popularity, which allows you to level surface irregularities up to 2-3 mm.
You can apply paint on any surface, and when using special additives, it can be used both for and for external painting building facades.
The relief and pattern is formed through the use of fillers.
Types of textured wall paint
Textured paint- This is a thick dispersion mass, the basis of which is a polymer.
The relief is formed by special fillers. Manufacturers offer ready-made water-soluble paint usually white color.
Various shades and colors are obtained by adding colors (special pigments). Substances based on mineral binders are sold in powder form. They are simply diluted with water according to the instructions, the main area of \u200b\u200buse is facade decoration.
The use of polymer binders allows the surface to withstand mechanical and climatic external influences.
Classification of paint by type of surface
According to the type of surface, textured wall paint is divided:
- Relief. These are paints with the help of which numerous and varied structures are obtained, which are formed due to various fillers. As a filler, most manufacturers use natural quartz chips. Apply paint with a flat spatula.
- Marseille wax. These paints imitate the structure of natural materials (cork, stone). To protect against moisture and give depth to the color, the paint layer is coated with wax. Widely used in restaurants, swimming pools and offices.
- Atacama. The paint has a velvety surface with excellent reflective effects. Effects appear as a result of the use of metal filings, the relief forms quartz sand, and the base is acrylic.
- mizuri. The basis of the paints is acrylic, and modified starch is used as a binder, all this is diluted with water. These paints are used to create smooth surface, and embossed textures.
- Pearl Blend. Distinguished by its unique pearl luster. Pearlescent pigment is finely ground and added to acrylic base with the addition of water. The effect of wet silk is obtained by applying the finished mixture with a roller, in different directions.
As we understand, a competent choice will allow you to create an original and unforgettable design of your home with your own hands.
By size and type of filler
To create relief and density, the following fillers are used:

Particle shape
- Drop-shaped.
- Scaly.
According to the particle size of the filler
- Fine-grained - particles have sizes up to 0.5 mm.
- Medium-grained - particles have sizes from 0.5 mm. up to 1 mm.
- Coarse-grained - particles have sizes from 1 mm. up to 2 mm.
Key Benefits of Using Textured Wall Paint
Thanks to a balanced multicomponent composition, we have a number of advantages:
- The composition of the paint includes only environmentally friendly components. The composition is completely hypoallergenic.
- High resistance to moisture. Possibility of use in a bathroom, a bath, pools, kitchen.
- Easy to wash and clean painted walls.
- The paint does not absorb the smell and is not afraid.
- The covering is steady against mechanical loadings, ultra-violet radiation and frosts.
- Can be used on almost any surface
- Masonry.
- Brickwork.
- Concrete surface.
- Wood.
- It is enough to apply one layer, does not require fixers and additional operations.
- No special skills are required to use. Can be used for interior and exterior walls.
- At the colors of this type high elasticity, which allows them to be used in new buildings, and when the building shrinks, the surface does not deform.
- Big choice color palette, and also has good decorative properties.
disadvantages
The disadvantages include 2 factors:
- The first factor is that if you decide to make repairs, you will have to completely remove the textured paint from the wall, and this is a laborious process.
- The second factor is the high cost. For a high-quality drawing, consumption per 1 sq.m. is from 650 gr. up to 1500 gr.
It should be noted that paint consumption depends on the pattern on your wall surface.
It is also possible to use special varnishes to increase the effects.
That is, the shade, and the color of the picture will look different depending on the light.
How to paint walls with textured paint?
Surface preparation
We start with the preparation of the surface of the walls, as mentioned above, chips, cracks and irregularities up to 2-3 mm are allowed. The most important thing is to align the walls in a plane, usually a building one is used for this. Moreover, the very texture and relief of the future paint will visually hide most of the defects.
We process the prepared surface. You should wait for the primer to dry completely, which is about 4-6 hours to a day. The rate of drying of the primer is affected by humidity and room temperature. There are times when two coats of primer are required.
Paint preparation
The next step is the preparation of the paint itself. We bring the paint into the room for several hours, so that it takes the temperature environment. Some paints have temperature and humidity restrictions, so read the instructions carefully before use.
If you want a smooth surface of the coating on the wall, then you should add ordinary water, no more than 1% of the paint volume. If relief is required, then add fillers. To give desired color add color to paint. Regardless of the added components, the entire volume should be thoroughly mixed to obtain a homogeneous mass.
Mixing should be done only with a construction mixer, and not by hand.
Application
The layer should be thick, but not more than 1.5 cm. Sometimes paint is applied in two layers. The second layer is applied only after the first has completely dried.
Complete drying of the layer occurs after 24 hours. Applying paint small areas approximately 1.5-2 sq.m.
And do not forget that the setting of the paint on the walls already begins 15 minutes after application. In these 15 minutes, a decorative pattern should be applied.
Drawing tools
For application decorative pattern you can use the following tools:

Lacquering
After applying the pattern and completely drying the paint layer, the surface should be varnished or waxed. This is done so that the color and texture last for a long time.
Manufacturers and price
This is enough new material on the construction market. But, despite this, there are quite a lot of manufacturers of this product.
The price depends on the manufacturer, filler, binder, color, presence of special additives in the composition.
Now we will voice the most popular brands:
- Ecoroom,
- Bayramix,
- amourcoat,
- organic,
- Balticolor,
- Clavel,
- GALAMIX.

The content of the article:
Textured wall painting is a view decorative finishes, which allows you to create relief patterns on the surface of structures due to the density of the material used. With the help of textured paint, you can not only decorate the walls, but also mask their minor defects. The color of the material is easy to change by adding acrylic pigments to it.
Advantages and disadvantages of textured coatings
The main difference between textured paint and its “smooth” counterparts is the aesthetic component, which helps to give the walls a beautiful and amazing effect. Coatings based on decorative paints have a lot of advantages, which is the reason for their wide popularity:
- The average service life of a textured wall covering is 10 years, while wallpaper can last no more than 5 years. In addition, burnt or worn canvases will have to be removed and replaced with new ones, and the textured coating can simply be refreshed with a new layer of paint. This greatly simplifies repairs and saves time.
- Decorative textured coatings do not fade from exposure sun rays, have sufficient mechanical strength and are not afraid of mold.
- The surface of the walls, painted with such material, has a monolithic appearance, creating a harmonious single picture.
- The textured coating is easy to clean, and it is much more difficult to put a stain on its surface than on paper wall wallpapers, which often quickly get dirty in corners and around switches.
- The choice of design effects and a variety of shades for textured wall painting water-based paint so huge that it will satisfy any pretentious designer and amaze the homeowner inexperienced in this matter. When applying layers of textured paint using spatulas and special rollers, you can feel like a skilled craftsman, experimenting with texture and colors. Due to its diversity, decorative coatings fit perfectly into almost any interior.
- Textured water-dispersion paints, being completely safe for health, will perfectly fulfill their purpose in children's rooms. Coatings do not contain carcinogens and do not cause allergy attacks.
- The materials are universal, they can be used in the design of kitchens, respectable living rooms and bright rooms for children with equal success. Moisture resistance of textured paints allows them to be used for facade works and bathroom walls.
- antistatic decorative coating does not absorb dust.
- Each textured coating applied to the wall is unique. In this it differs from wallpaper, the mass production of which often makes the walls of different apartments the same. When working with decorative paint, something original is obtained every time, the use of special technologies makes it possible, using the same bucket of paint, to achieve completely different effects.
- The textured coating looks natural and rich on the surface of the wall, which transforms ordinary apartment in a nice comfortable home.
- Despite the sufficient thickness, the coating has good permeability and does not create obstacles for air circulation in the premises.
The disadvantages of painting walls with textured paint include the need for preliminary preparation of the base, although this coating is excellently applied to wood panels,
finishing putty, plywood, plasterboard, chipboard, metal and glass. The surface of the walls must be smooth before painting, but the paint itself can fill small cracks in it.
Another disadvantage is the increased consumption of material, which is 1 kg / m 2 of walls, this circumstance significantly affects the cost of the coating, causing it to become more expensive.
Decorative Effects of Textured Wall Paints

Textured paints that can transform rooms due to their design special effects are very popular today:
- pearly effect. Such paints make the room lighter, which is especially important in cloudy weather in the autumn-winter period. At different angles and types of lighting, the pearlescent coating has the ability to change color, for which the material received the name "chameleon paint". The walls painted by her look like a stretched silk cloth.
- Velvet or velor effect. The composition of such paint includes colored solid particles. The wall treated with this material has the appearance of a velor fabric - the same textured, soft and deep.
- granite paint. Contrary to its name, it does not have granite chips. The impression of its texture is formed by acrylic bubbles of paints of different shades, which break when applying the material to the wall with a spray gun.
- Textured decorative paints
. They contain fragments of shells, mineral particles, fine sand and other additives. Each type of such ready-to-use paint gives its own special effect A: shiny and embossed surface, coral wall, seascape, etc.
Finished textured paints do not require the addition of pigments or the use of special technologies for their application to the walls. It is only necessary to carefully prepare the surface and decide on the tool that will be needed to work with the material.
Preparing walls for texture painting

Start painting the walls with protection
floor covering and ceiling with a film from unwanted ingress of dust, debris and splashes of material in the process of preparing and decorating surfaces. The film can be fixed with masking tape.
Before texture painting the walls, it is necessary to remove the old finishing material, stains of rust, mold and grease from them with all mechanical devices and chemical means suitable for this purpose.
After that, it is necessary to seal the cracks on the walls and level the surfaces to be painted, plaster or putty.
After the walls have dried, they must be treated with a penetrating primer to create adhesion of materials to the base and reduce paint consumption for finishing. The primer should be applied with a paint roller.
Five hours after priming, you can start working with textured paint. It must be mixed well and add the pigment of the desired color. To facilitate the staining process, the material can be slightly diluted with water, but its volume should not exceed 1% of the weight of the paint.
The technology of applying textured paint on the walls

The job of painting walls is similar to the process of puttying. It is performed in various ways. The common point for them is that the paint is applied to the surface of the walls with a wide spatula, with which an area of \u200b\u200bno more than 2 m 2 is processed. The corners of the walls are painted with a narrow spatula.
Not a large number of textured mixture is taken on a spatula, and then applied to the surface of the wall. Then, with the help of various devices, it is given the desired texture. After a couple of hours, the paint will begin to stick to the wall and dry completely after two days. Only after the end of this process can acrylic, varnish or wax be applied to the surface.
Drawing a picture during textured painting of walls can be done manually or a stencil can be used for this purpose. Relief is applied to a monochromatic coating by rolling it with a cloth or by tapping it with a brush having a hard bristle.
Fantasy can suggest any ideas for applying patterns. It can be waves, tree branches or various shapes. To give the painted surface a relief, you can use a variety of improvised materials.
Ways to create a textured pattern on the walls

Applying a textured pattern to the surface of a painted wall can be a difficult task for an inexperienced person. Therefore, it is advisable to first practice on a specific section of any plane. This will help to acquire the skill and avoid the cost of reworking the finished work.
When painting walls with textured paint with your own hands, you can use various ways terrain creation:
- Using a foam roller. Textured white paint should be applied to the wall and leveled with a wide spatula. Then the surface should be rolled with a roller, giving it the desired structure. A day later, it is required to apply pale blue paint to the texture, and carefully remove its remnants foam sponge. For the final finish, the dried surface of the wall must be treated with a grater, remove the resulting dust with a dry brush and apply the finishing layer of mother-of-pearl enamel to the coating using a fine-nap roller.
- Using a trowel. In this case, it is necessary to apply two layers of light brown textured paint to the wall, the first of which is applied with a spatula, and the second with a trowel. A day after the surface has dried, it should be painted white matte enamel using a fur roller.
- Using a rubber roller. With this method, the material must be applied to the wall with a wide spatula, and then create the desired pattern with a textured rubber roller for painting walls.
In addition to the above tools, improvised means are often used to create a relief surface on a layer of paint. For example, a thick rope wrapped around a roller. When rolling the wall with such a device from top to bottom, a pattern resembling bamboo stalks is created.
If you use a piece of newspaper in a plastic wrap as improvised means or hit a freshly painted coating with a wet rag, you can give it an original and interesting design.
Two-tone textured wall painting

With the help of textured paint, two-color drawings can be made. This type of wall decoration has become very popular. For example, on fresh paint, you can make various strokes with a sharp object, and then immediately, before it dries, with a mixture of a different color using a stencil, make a new drawing on the wall. The result will decorate its appearance.
Clear outlines of geometric patterns will look good on the wall. In order to make textured wall painting with such a pattern with your own hands, you need to attach a masking tape to a fresh solution to get an imprint on it. Then you need to apply paint of a different color to the tape.
The most effective and simple method creating a two-color coating is scratching a surface that has not yet dried with a stiff bristle or comb teeth. Best effect achieved with a chaotic arrangement of scratches.
How to paint walls with textured paint - look at the video:
All these methods of textured wall painting are just a small fraction of what can actually be done. There are a lot of similar options that are subject to the master and depend on his imagination and the available tools at hand. Textured painting allows and encourages experimenting with patterns and colors in order to get interesting patterns of wall coverings that give interiors an unusual and attractive look. Good luck!


Make the room stylish and give it original design possible with quality finishes. Today, among a large abundance of materials, decorative wall covering with plaster or paint is popular, for which a tool is used - a textured roller. In order for the finish to have a beautiful appearance, it is recommended to consider in more detail all the nuances of using this device.
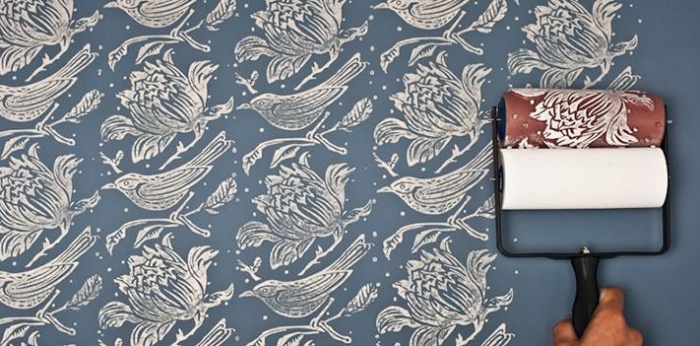
The design of the device is quite simple: rollers for painting walls are made of various materials and by pressing are attached to the handle. The cylinder itself is located on a solid metal rod, which is fixed on the handle. Decorative wall paint rollers are used to create sinuous ornaments and patterns that look very advantageous in classic and modern interiors.
To work with the tool usually does not require additional skills. After the liquid composition of the future coating is diluted, the roller is knurled in a special cuvette. This is done to avoid smudges during work - thus, the paint lays down evenly, and the plaster is applied with a roller without leaving clots on the surface.
In the video: painting with a texture roller.
Important! Experts do not recommend using the same tool for different kind coatings: when applying textured paint, one type of roller is required, when using plaster, another. Besides, there is always an option self-manufacturing tool.
Roller materials for decorative wall treatment
Modern tools differ among themselves in the material of the working surface. Application textured plaster using a decorative roller allows you to divide fixtures into several categories:

A textured roller creates beautiful textured coatings. In addition to these types of materials, foam rubber, foam plastic and fabric are also used. Textured plaster rollers made of foam rubber are suitable for priming the first layer for further decor. They also performed well in creating the effect of bubbles on the wall. In fabric analogues, soft plush material is used, which forms original traces on the surface. The foam product is similar to a structural rubber roller, but is notable for its fragility.
Classification of rollers according to the texture of the finished pattern
Tools have the most diverse structure, thanks to which the final ornament is obtained. Some imitate natural materials, others simply create an arbitrary pattern. All rollers can be divided into 2 groups:
- Textured fixtures- are able to transfer materials such as fur, wood, textiles and natural stone chips to the surface of the plaster. With the help of a textured roller, a relief is created, which is achieved due to the material used to make the tool. For the effect of uneven fibers, a fur roller is used, to make an imitation of natural stone, a rubber product with a special pattern in the form of eyelets is suitable. Such a device is used on a primed wall without the use of pre-finishing.

- structural products. Plastering with a roller of this type involves the application of a complex repeating ornament. This effect is achieved with the help of curly clippings on the roller. The peculiarity of their application lies in the fact that the coating should be applied to the prepared wall with the finish. For example, when the plane is finished with paint or plaster without relief, then it is dried and decorated. To achieve a more beautiful ornament, processing is carried out using a figured roller, which has a certain pattern.

In addition, products are classified according to the width of the roller. They come in sizes from 30 cm and up. The wider the tool, the faster the composition of the textured paint will fall, but choosing a narrow tool, the chances of getting an attractive clear structure are higher.
Self-made tool
As you know, some finishing fixtures are expensive, so making a device with your own hands will be a way out of the situation. We suggest that you familiarize yourself with how to make a textured roller with your own hands.
- For the first option you will need a clothesline and an old unusable tool with a reliable roller and a strong handle. Before making the device, wrap it with a rope and fix the ends tightly. Depending on the frequency of winding, you can adjust the future texture, which will create a variety of stripes on the wall.
- The second method involves using an old foam roller. By cutting the roller in several places with sharp scissors, you can get a texture roller with an original effect for the walls. Cuts can be combined with each other, make them wider and longer - all this will be reflected in the plane.
- Another way to make a textured painting tool is to use a plastic bag. Wrap it around a wall roller and tie it with a thread. It can be replaced with adhesive tape, which will add traces of texture.
On video:
creating a texture roller with your own hands.
Jacks of all trades also offer to make a structural roller with your own hands. This will require a little patience and imagination. To get a quality coating, think carefully about your idea. You can also use the template when covering the wall with trim. To get on the wall structural plaster, consider this option for manufacturing a roller:
- Take an old tool, preferably foam rubber;
- Cut figures of the same size from dense fabric;
- Form fantasy flaps from cuts and twist them like origami;
- Attach the resulting products evenly over the entire area of the roller using construction stapler or pins - the relief roller for plaster is ready!
Thus, it is possible to create almost any conceived structure on the surface of the wall, using improvised means.
wall coating technique
To keep the plaster a long period time, it is necessary to pre-treat the wall. If you intend to use a textured roller for painting walls, there is no need to paint the surface in the main color. When working with a structural tool, this procedure is mandatory so that the patterns on the roller do not stretch the finished mixture in the wrong direction.

Use the suggested tips to achieve the desired result:
- Do not press the tool close to the plane, move carefully and slowly.
- Using a patterned roller for decor with texture, start the next path where the border of the first pattern passes. Do not overlap the ornament.
- When you reach the ceiling, press the tool to the top. After that, work with normal pressing.
- Corner places must be treated with a brush - the roller will not pass into narrow joints.
- If it happens that the relief ornaments come out too convex, they can be corrected with a dampened grinding net.
Painting walls with a patterned roller requires care and smooth movements. Refuse to rush and keep the evenness of the pattern. Sometimes a stencil made of dense material is used during work.

Advice! To create a "fur coat" effect, marble chips, textile fibers, you can resort to using a relief roller for painting with a textured base. The material is applied to the walls, after running the tool in a container with paint. If excess is formed during work, they are removed with a spatula.
Having independently applied decorative rollers, you can create an attractive surface as good as any decorator. Choose a tool with the necessary structure and turn on your imagination - the result will surely delight you with its appearance.
- Balcony Balcony and Loggia Repair Dreams of a homeowner about a warm, comfortable balcony or loggia are feasible. One has only to want, having required amount bills, and dreams will turn into reality. Combining a glazed, insulated balcony with a room and a kitchen, turning a loggia into a winter greenhouse or into a separate living space - all this can be done, and with your own hands. In this section of the site you will find step by step instructions for insulation and glazing, as well as installation and installation finishing balconies and loggias. They will help you do the work yourself or professionally evaluate repair work made by qualified builders.
- Bathroom Bathroom renovation hot bath you probably want to relax. beautiful ceiling, luxurious walls and floor are very conducive to this process. Few owners of square meters» refuse to use high-quality sanitary ware, faience sanitary ware, household appliances and equipment. The publications collected in this section of the site will help you choose the right ones for you. Appliances, plumbing and finishing materials. Even in Khrushchev, this room, the area of \u200b\u200bwhich does not exceed 2 square meters, with proper planning, can look great and meet functional requirements.
- doors Entrance and interior doors - selection, installation, installation My home is my fortress. This is how the English lawyer Edward Kok once described the feeling of security in his home. But not a single outpost will be reliably protected without strong, and sometimes even armored gates. A modern apartment, like a medieval citadel, needs protection in the form of front door. We think if you protect the entrance to the apartment with modern door block, a sense of security will settle in you forever. But that's not all. Members of a large family, having their own personal space in the house, instinctively want to isolate themselves even from their own people, at least for a while. And here it is impossible to do without interior door. This section of the site contains publications on the selection and installation of entrance and interior doors.
- Kitchen Kitchen renovation The kitchen is undoubtedly the most popular room in a modern apartment. We cook in it, and often eat food, unless, of course, a dining room is provided in the house. During the preparation of culinary masterpieces, the hostess spends almost all of her time in it. free time. It is important that the necessary kitchenware, household items and equipment were at hand, and the furniture was located so as not to hamper the movement of the cook. In this section of our website, we will talk about food-compatible finishing materials and their application. Our step-by-step instructions will allow you to do your own kitchen renovation or teach you how to supervise the work of a hired repair team.
- Repair materials The choice of building materials and their description Materials for repair is a capacious concept that implies thousands of items, hundreds of groups and dozens of categories of building materials. They help to realize the wishes and dreams of comfortable, functional and convenient housing that meets the requirements. At the same time, the appearance and quality of the elements of your home directly depends on the chosen building materials. In order not to regret the wasted money when poor-quality finishes fall off or lose decorative properties, purchase only repair materials tested by professionals. Do right choice The publications collected in this section of the site will help you.
- Window Windows and balcony frames An important element of a modern apartment is a window. And the question of what it is made of plays an important role in ensuring comfortable living in this apartment. Indeed, in addition to protecting the room from atmospheric phenomena, the window protects from street noise, especially when the room is facing a busy highway. This section contains materials on the manufacture, appearance and features of windows and balcony frames for your apartment or private house.
- Floor Repair and finishing of the floor An integral part of the interior of the dwelling is the floor. Trouble-free living of households is associated with the condition of the base of the floor and flooring. Even the health of the inhabitants of the apartment directly depends on whether the floor is warm or cold. This is especially true for young children who spend most of their time in games, on the floor. Modern building materials require absolute evenness of the base on which laying is planned. This section of the site combines publications in which we describe and show the process of preparing, installing and installing screed, "warm floors" and finishing.
- Ceiling Repair and decoration of the ceiling It is known that ceilings in modern apartments are not very even. The team of our site, relying on vast experience, will tell you many ways to repair, level and finish them with finishing building materials. Stretch - PVC and fabric, suspended - plasterboard, coffered, armstrong and grillto, pasted over with wallpaper and painted with paints. Each type of ceiling can become a real masterpiece. Step-by-step instructions, photos and videos about the installation or installation of each type of ceiling are collected in this section of the site. With the help of these materials, you can easily do everything yourself or professionally control the craftsmen hired to carry out the work.
- Walls Erecting, leveling and finishing walls Having a roof over your head is certainly great, but it would not hurt to lean on strong walls built for centuries. In apartments of block and brick high-rise buildings, they are naturally strong, but crooked, like a janissary's saber. Therefore, before finishing, they need to be leveled, and at the same time soundproofed to isolate themselves from noisy and reckless neighbors. And the walls bordering on the atmospheric environment also require insulation. In this section of the site, we have collected descriptions of building materials and step-by-step instructions for installing, assembling and fixing the finish, as well as sound, noise and even waterproofing walls.
- Toilet and sewerage Renovation of the toilet The age of the Internet and urbanization, super speeds and stress leaves little room for solitude and the opportunity to calmly reflect on the complexity of life. Household chores are also not conducive to special philosophical activity of the brain. However, during the day, even a super-busy person finds time for solitude and calm reasoning. This time is dictated by nature itself and the place for it, no matter how ridiculous it may be, is the toilet. This section of our site contains publications on the arrangement of the toilet, sewerage, on the choice of plumbing and its installation.
Textured paint is applied to any building material from wood to reinforced concrete, but some conditions that are necessary for high-quality adhesion to the base must be met.
Step 1, base preparation
The surface to be decorated must be solid, dry and relatively flat. Therefore, after examining the area on which it is planned to apply decorative building materials, you need to make it such.
The main condition for successful application and long service life of the coating is the strength of the surface. Textured paint for walls and ceilings is applied in a fairly thick layer.
Peeling colored areas and old plaster remove with a spatula. Chips, potholes, as well as the corners of the connection of the wall and ceiling, plaster with a cement-sand mixture. Areas painted with oil paintwork materials, process sandpaper coarse grain, giving them a roughness to improve adhesion.
Treat the entire area to be decorated with putty on water based until a flat plane is obtained.
After the putty has completely dried, cover the area to be decorated with a deep penetration primer. Now let's talk directly about how to apply textured paint.
Step 2, application of water-based paint
To avoid the appearance of unevenly painted areas on the wall or ceiling, coat the surface with acrylic water-based paint, tinted in a color similar to that of the building material. After the background layer has dried, apply textured paint.
Step 3, applying decorative paint
Immediately before starting the application process, thoroughly mix the contents of the container until a homogeneous mass is obtained and proceed to painting.

Now about how textured paint for the ceiling and walls is applied to the surface. There are several ways to apply to walls and ceilings:
- Spray gun.
- By brush.
- roller.
- spatula.
Moreover, this method directly depends on the consistency. And it, in turn, depends on the grain size of the filler. The larger the grain, the thicker the consistency.
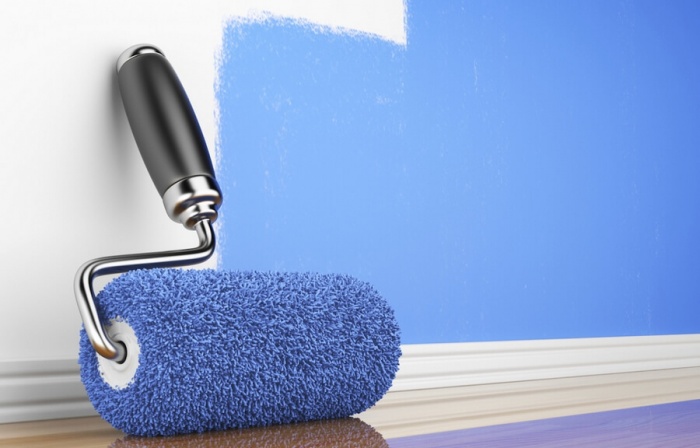
For texture painting walls with a smooth and flat surface, it is convenient to use such construction tool like a roller. There seems to be nothing complicated in using the tool. After all, we all saw rollers, we all had to use it or watch how others use it.
However, it should be taken into account that they are various types and issued for specific purposes. This can complicate his choice when buying. That is why this article will give practical advice that will help you in choosing this tool. And also find out what types of paint rollers exist, what to look for when buying, and what is the peculiarity of each of them. We will take a closer look the right tools for textured walls.

Some information about paint rollers
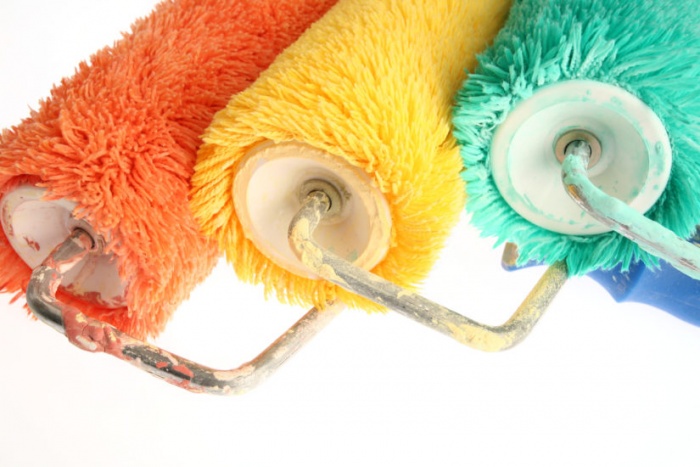
For all of us, this simple tool is not too abstruse. Its design is quite simple: the main part of the tool is a roller that rotates around an axis. The surface of the roller is sheathed with a material that absorbs paint, transferring it to the surface of the walls. In order to work it was simple and easy, a handle - a clasp is attached to the axis. And it is also practical that such a handle is not permanent, you can replace it for more convenient use.

The differences between paint rollers are mainly in two points:
- Roller coating, which is called a fur coat.
- Roller width.

Quality, convenience, as well as the finished result of the work performed depend on such factors. That is why we will consider all its types, so that your work is not difficult, but brings you pleasure.
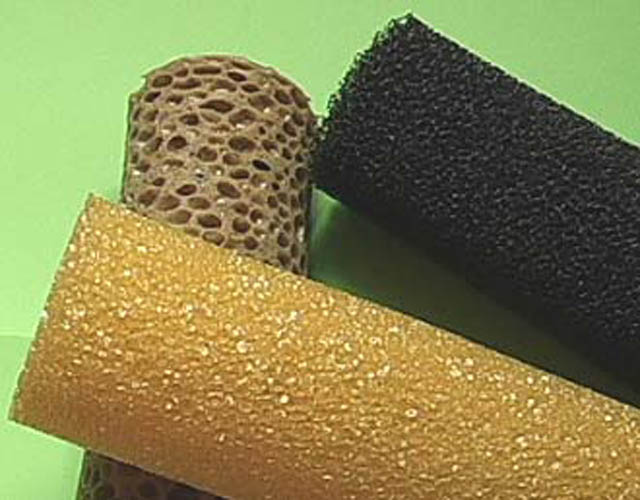
coat type
In our time, there are such types of this material:
- thread;
- fur;
- foam;
- velor;
- flock and some with a flat surface;
- textured and texture rollers for decorative painting.
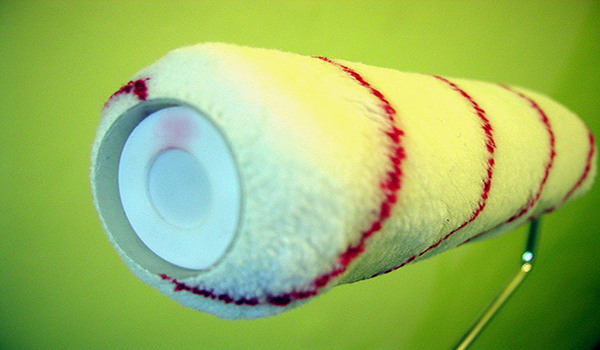
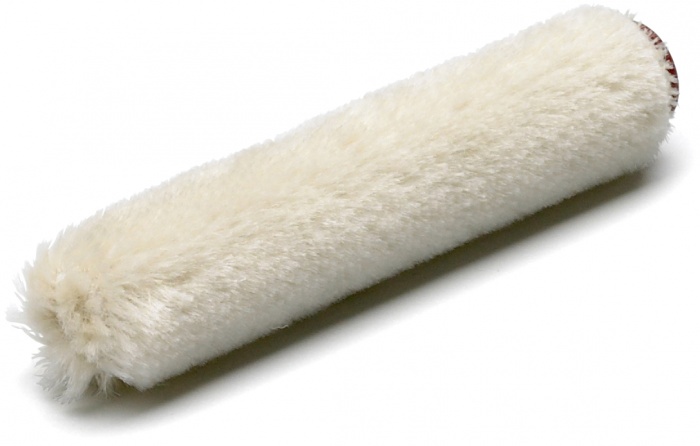
Fur
When painting walls, such rollers are universal, since any kind of paint can be applied with a fur roller, even paint made on an organic basis.
Advantages:
- the composition is qualitatively and evenly applied to the surface of the walls, which makes it easy to do the work with your own hands;
- absorb a sufficient amount of paint;
- when painting, the composition is not splashed;
- excellent for uneven surfaces such as decorative plaster.

The materials from which the villi are made:
- Natural fur . Such material contributes to the good absorption of paint into the fibers and its distribution on the walls. The only drawback may be that the lint can fall out from time to time and be applied to the surface along with the paint. Often this happens with cheap, low-quality rollers.
- Polyacryl. The main advantage of such materials is the relatively low cost. Polyacryl is a worthy replacement natural fur. However, it has a significant drawback - it is used for painting walls only on a water basis, and without any fillers with aggressive substances.
- Polyamide. Compared with the previous material, this type is more durable and wear-resistant. That is why you can use fur coats made of such materials for paints of any type. The disadvantage is that during the painting of the wall, the paint will splatter more.

Fur coats may have lint different lengths. If you need to paint a rough surface, choose a fur coat with a long pile, if you need to paint a glossy surface, use a fur coat with a small pile.
Advice! In order for your roller to last as long as possible, properly care for it. After each use of the roller, take the time to wash it well.
How to do it right? First, soak the roller in kerosene, and then in plain water. If you used a roller to paint the walls water-dispersion paint, maintenance of the instrument will be even easier. In order to wash it, simply use a hose with water pressure.
Velor
Such painting is pleasantly performed, as it is applied in a beautiful uniform layer. If the surface has been previously prepared with high quality, then the painted surface will look completely smooth.
Often in hardware stores, sellers say that such a tool is intended for specialists. Why? Because with careless work, all defective places will be visible on the surface. Another disadvantage is that the bristles of the fur coat do not absorb a large amount of paint, which will force you to regularly wet the roller.
Foam rubber
The main advantage of this material is its price. For example, foam products can cost from 30-40 rubles. Such rollers can be used for painting walls with water-dispersion paint. Among the shortcomings, the following points can be distinguished: it does not stain well uneven surface, short-lived, splashes paint. But, despite such minor flaws, this roller is not the worst option, especially when painting. small area. For example, walls in the kitchen or bathroom.
Rollers for decorative wall painting
What does the concept of "decorative painting" imply? First of all, this is the application of patterns and drawings to the surface of the entire wall or to a specific place.
To perform this work, there are two types of rollers:
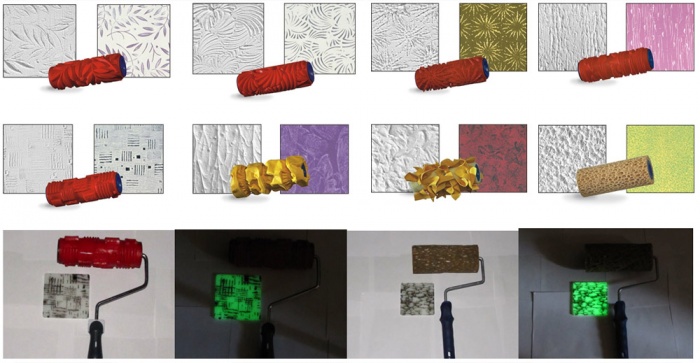
Such a structural roller is able to put a beautiful ornament on your wall. The photo shows what the finished result looks like.

Advantages of textured finish
When decorating walls in a room, it is worth imagining two varieties - the use of special textured paint or the use of different finishing technologies. In applying the first option, you will have to go to the hardware store and select special paint containing acrylic components. When finishing, such paint lays unevenly on the surface, so you can get the effect of granulation.

Textured wall painting has many advantages: you can do the work yourself, without having special building skills, such a finish masks all the irregularities well, the paint is non-toxic, prevents mold, and is resistant to mechanical damage.
There is another version of the decor - this is the painting of the walls using stencils. Carry out such coloring with a water-based substance. This finishing method has the following advantages:
- low cost of work;
- allows you to draw, in those places where you like;
- a large selection of colors;
- the ability to do the work with your own hands, etc.

Texture paint tools
So, what do you need to do decorative wall painting? These are the following tools:
It is clear that not all of this list you will use. But these are all devices that can do the job. However, it also happens that there is no way to spend your money on various expensive rollers. What to do in this case? Don't panic, because this moment you can show your imagination and make your own original design of the room.
Using a homemade tool
In order to make a textured roller, you need to impose or glue pieces of foam rubber, fabric or cellophane on a regular one. After performing such a procedure, you can use such a roller to apply them water-based composition on the surface of a wall or ceiling. This decor option will look very original and aesthetically pleasing. You can also use wire wound on a roller.


