How I got cancer. Rami Blekt Intro to number four...


There are a lot of options for finishing the ceiling. You can order a stretch ceiling, rack or suspended. Paint or whitewash it. But some of the options listed involve quite complex technical solutions, others result in cash spending and others are obsolete. There is a good option - ceiling tiles. The advantage of ceiling tiles is that it allows you to change the interior of the room very quickly, and at the same time it is easy and simple to install, and it is inexpensive. Manufacturers offer many shapes, colors and texture options for ceiling tiles. At right approach and the right choice of materials ceiling in a room of 20 sq.m. independently glued with ceiling tiles in 1-2 hours.
We will analyze in detail how to stick it correctly ceiling tiles on one's own?
The material from which the ceiling tiles are made is polystyrene foam. It has soundproofing and heat-insulating properties. Of course, if the upstairs neighbors love dubstep, the soundproofing qualities of the ceiling tiles will not be enough, but they can significantly reduce ordinary household noise. In addition, neatly glued tiles with carefully processed seams and decorative elements after painting white acrylic paint hardly distinguishable from stucco.
In order to properly stick the ceiling tiles, you will need a very small set of tools: a stepladder that will allow you to freely reach the ceiling, a construction or clerical knife with replaceable blades, a metal ruler, and a surface for cutting tiles, such as several layers of cardboard.
First you need to calculate the number of ceiling tiles and purchase it. Manufacturers in the bulk produce ceiling tiles with dimensions of 0.3x0.3 and 0.5x0.5 meters. To calculate the required amount, it is necessary to divide the total area of \u200b\u200bthe ceiling by the area of one tile. For example, for a room with a total ceiling area of 20 sq.m. you will need 40 ceiling tiles measuring 0.5x0.5m. Plus 10-15% for marriage and mistakes.
Ceiling tiles are glued not only with a special adhesive for ceiling tiles, which was kindly imposed by the seller in the same store where the tiles were purchased, but also liquid nails, superglue gel, universal adhesives and even PVA glue. By the way, there were cases when special glue for ceiling tiles and liquid nails categorically “refused” to hold the ceiling tiles, and universal glue coped with this task best of all. The consumption rate of the selected adhesive is usually indicated on the packaging.
Before sticking the ceiling tiles, you need to prepare the ceiling. It should be at least dry, clean and even. If it does not meet the requirements, it must be cleaned of old paint or whitewash, clean and putty cracks and irregularities and allow the surface to dry. It would be useful to prime the surface of the ceiling with a deeply penetrating primer.
Now comes the turn of marking the ceiling. It is undesirable to start from one of the corners. It is best to start gluing the ceiling tiles exactly from the center of the room. And how to find it, this very center? Here it is best to use the help of a second person and a harsh thread. One thread is stretched diagonally from corner to corner, and the second is between the other two corners. At the place of their intersection, there will be the desired center of the room. Here we put a cross with a pencil. From here we will start. In addition, it would be useful to draw lines along a thread from the corners of the room, connecting them to the center. The lines will help you later understand how to properly glue the ceiling tiles in even rows, without deviating to the sides.
Pasting the ceiling with tiles is diagonal and traditional. With a traditional tile, it is glued parallel to the walls, and with a diagonal one, respectively, diagonally. Which method to choose - everyone decides for himself.
On a dry and even surface, lay the first ceiling tile and apply glue to its surface. You can apply glue different ways. Someone applies it in stripes, someone prefers spot application. It is important not to apply the adhesive too close to the edge of the tile, as it may protrude from the joint and stain the front side when gluing. It is best to step back 5-10mm from the edge, and if the excess nevertheless comes out, immediately remove them with a clean cloth.
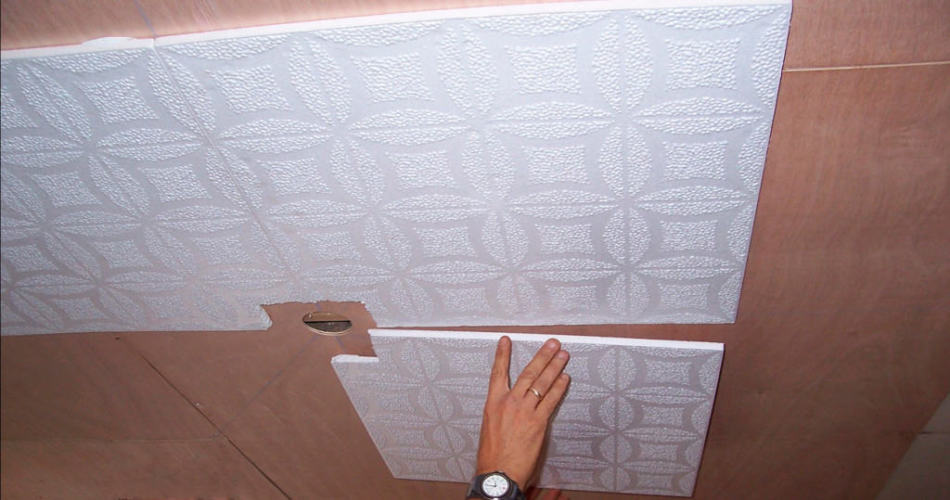
The first tile is glued in any of the selected corners from the intersection of the center lines of the markings on the ceiling. The glued tile must be pressed and held in place for 30 seconds to 2 minutes, avoiding movement. The holding time depends on the selected tile adhesive. After the tile is securely glued, move on to the next one.
It is most convenient to glue ceiling tiles in a circle from the center of the room. As a rule, near the walls it is necessary to trim the tiles. It is not at all difficult to do this, the ceiling tile is easily cut with a sharp clerical knife. With a ruler or tape measure, measure the required distance from the edge of the adjacent tile to the wall and, laying the tile on a flat surface, cut it off using a metal ruler and a clerical knife. Cutting a hole for a chandelier is also not difficult. An inverted mug or saucer can be used as a template.
After all the ceiling tiles are glued, you can putty the gaps between the tiles, especially if the tiles are planned for painting, for example, with acrylic paint. It is also important not to forget about ceiling plinth and decorative "sockets" under the chandelier from the same foam. As a rule, they are not difficult to find in the same stores that sell ceiling tiles.
Despite the fact that today there are enough a large number of finishing options ceilings, decorating the ceiling with expanded polystyrene tiles is still popular.
Applying ceiling tiles is a cost effective and commonly used method of renovating a ceiling. The finishing material is lightweight and has a wide range of colors and textures. Technologically uncomplicated installation allows you to unrecognizably transform the ceiling space in your own living room, bedroom, hallway with your own hands.
The surface of modern expanded polystyrene tiles is smooth, wavy, convex or corrugated. Finishing material has three main types, which have certain differences between them:
Standard product size 50x50 cm, for finishing large area ceiling, you can purchase plates 60x30 cm, 70x40 cm or 100x165 cm.
First of all, you need to choose the right finishing material for decorating the ceiling with your own hands. When choosing a quality polystyrene tile, you need to carefully examine the product. All coverage elements must meet certain parameters:
Any flaws, defects in the ceiling covering will immediately attract attention, so if defective material is caught, it is better to use it to fill small remote areas near walls or windows.
To purchase the exact amount of finishing material, experts advise dividing the total area of \u200b\u200bthe room to be decorated by the area of one tile.
For example, the width of the kitchen is 2 m, and the length is 3 m. The area of \u200b\u200bthe room will be 6 square meters. m. The size of a standard tile is 50x50, therefore, the area of \u200b\u200bone tile will be 0.25 square meters. m. Now we divide 6 by 0.25, we get 24 tiles.
Finishing material must be selected from the same batch, this can be verified by comparing the article indicated on the package, the date of issue. The kit sells a ceiling plinth made from that raw material, similar in design.

To stick the ceiling tiles, you need to choose an adhesive designed for polystyrene foam. Installation of plates on concrete, brick, wooden or plasterboard surfaces is carried out on liquid nails, special facade adhesives, mastics, silicone sealants or tile adhesive mixtures.
Advice! During operation, do not use glue, which contains acetone, gasoline, ethers. Strong solvents can damage the Styrofoam.
Arranging the ceiling with ceiling tiles does not require special knowledge and skills, so many apartment owners prefer to do this simple job with their own hands. In order for the result of the finishing work to be a beautiful and even ceiling covering, it is necessary to strictly observe all stages of installation.
During repairs in residential premises, it is necessary to thoroughly clean your ceiling from whitewashing, painting or old ceiling covering. It is easy to get rid of loose and flaking areas with a metal spatula.
After cleaning the surfaces, the ceiling is cleaned of dust and treated with a primer mixture. When the primer is completely dry, you need to carefully inspect the plane for the presence of visible defects such as crevices, gouges or cracks. Obvious irregularities must be puttied gypsum mixtures, small docking slots will be hidden by decorative tiles.
After the mortar has hardened, the restored areas must be re-coated with a primer. covered building mix the base will provide a stronger and stronger connection with the adhesive.
In normal small apartment difficult to meet square room with equal sides, therefore, in non-standard rooms, gluing ceiling tiles is carried out diagonally.
Installation of the ceiling covering begins with marking the center of the living space. To do this, from opposite corners you need to pull strong threads, the place of their intersection will be the main point.

If the living room has a hanging or ceiling lamp, then it is better to start installation from this site. The edges of the four tiles are carefully cut for fasteners, electric wires lighting device. A decorative overlay can be glued to the cut out area.
The fastest sticker of a ceiling tile is carried out parallel to the junctions of the vertical and horizontal planes, starting from the wall opposite front door. This option is more suitable than others for decorating large rooms.
Before you start gluing the tile, it must be unpacked and allowed to lie warm for several hours. Expanded polystyrene products react negatively to sudden changes in temperature and humidity. To avoid deformation of the ceiling covering, the material must acclimatize in the repaired room. When the glue and all the necessary finishing materials have already been purchased, the question arises: “How to apply glue correctly?”
It is better to study the instructions in advance, which describes in detail the method of applying the adhesive. Different manufacturers offer their own version of the use of glue. For example, one adhesive composition must be left to swell, other products do not need additional time.
The adhesive is completely distributed over the surface of the tile and ceiling, applied dotted or dotted. There are types of polystyrene foam boards, on the underside of which shallow grooves for glue are applied.

A decorative plate, well smeared with glue, is pressed tightly against the base, so that there are no indentations from the fingers on the front side. To do this, it is better to use a white rag or foam sponge. Adhesive that has come out at the edges should be wiped off with a dry, clean cloth.
the first decorative tiles you need to glue in the very center of the ceiling, where the chandelier is located or follow the markings. Further, the subsequent elements are mounted tightly to each other finishing coating. During installation, you should control the pasted row, monitor the alignment of the sides and the pattern.
Some manufacturers have simplified the task, applied convenient markings in the form of arrows from the wrong side. When installing such a finishing material, it is necessary to ensure that all arrows have the same direction. For convenience, adjacent elements can be temporarily fixed together with construction tape.

As a rule, a number of slabs adjacent to the walls are cut. In this case, you must first take measurements and transfer them to the finishing material. The element cut off with a construction knife is installed in the designated place.
A decorative plinth glued with adhesive putty will reliably hide an ugly joint between the wall and the ceiling. Plinths made of wood, plastic are fixed with screws or nails.
Upon completion of all installation work it is recommended to paint the entire surface with acrylic paint. It can be a pearly white surface, reminiscent of plaster moldings, or a beautiful ceiling painted in colors that are in tune with the interior of the room.
During operation, the ceiling tiles are easy to clean from dust with a vacuum cleaner, grease marks from the laminated surface are removed with soapy water, some types of pollution are erased with an ordinary school eraser.
Lightweight styrofoam tiles are the most sought after ceiling covering. With its help, they transform the space in kitchens, hallways, bedrooms and even in the halls for receiving guests. First of all, people choose this finishing material because, in comparison with stretch ceilings it's worth every penny.
And, of course, everyone, without exception, likes the fact that even the person who makes repairs with his own hands for the first time in his life can handle such sticking. For such beginners, we will tell you how to properly glue the tiles on the ceiling and by what methods this can be done.

 Scheme No. 2
 For those who do not know, ceiling tiles are squares with perfectly even sides that have a front and back side. In view of this, when carrying out finishing work, you must carefully watch whether you fix them correctly on the ceiling.
After all, if you glue the tiles without paying attention to this nuance, then in the end you will not be able to lay down the perfect pattern. Also, when planning such work, it is extremely important to decide in advance which way you will glue the tiles. This must be done in order to understand exactly how much material you may need.
Methods for gluing foam to the ceiling:

 Recommendations for marking
 As mentioned a little above, in order for the ceiling tile to look perfect, it is necessary to carry out preliminary marking before fixing it. Remember, if you don't want to redo all your work from the beginning, you must do it.
After all, only the markings correctly applied to the ceiling will help you place the first tile as it should, and subsequently create the perfect pattern. If you attach the tiles to the ceiling with diamonds or diagonally, then the markings will help you mask the seams as well as possible, thereby making the canvas visually even.

 It is necessary to start finishing the flow from a central point
 If you carefully read our article, you probably understood that you can start gluing the slab to the ceiling from two places. If you are doing this for the first time, it will be better if you prefer the method in which the tiles are glued parallel to the wall. In this case, you will not need to carry out any preliminary measurements, and you can literally immediately proceed to the main stage of work. All you have to do is find perfect place on the ceiling and fix the first plate on it.
After fixing it, you will need to check if you placed it correctly, and you can proceed to fixing the rest decorative material. If you want to create a more complex pattern on the ceiling, then you will need to mark it (we told you above how to do it correctly) and after that you can start transforming the living space. In this case, the first tile will need to be placed in the center of the repaired room.

 Glue application scheme
 Most people who make repairs for the first time in their lives think that applying glue to a finishing material does not require any special knowledge. But as practice shows, even such a simple, at first glance, process must be carried out correctly. If you apply glue randomly, then as a result the tile will not fix as it should, and what is most unpleasant, the resulting seams will not ideally adjoin the ceiling covering.
So, to begin with, apply a small amount of glue to the very center of the tile, then place droplets diagonally from this point, and at the very end, apply a line along the entire perimeter of the finishing material. When applying glue to the tile, make sure that the droplets are not very large. If there is a lot of glue, then when pressing the tile to the ceiling, it will begin to come out and, as a result, you will have to remove the excess, and this can damage the structure of the finishing material.
Yes, and remember, if you want the adhesive to fix the tile on the ceiling as well as possible, you will need to hold it in the air for 1-3 minutes before fixing it. During this time, the adhesive will react with air and this will help the substances that are responsible for adhesion become more active.

 Adhesive for ceiling tiles
 As a rule, people think that the more expensive the glue, the better it is. Of course, in most cases expensive remedy much better than the cheap one. But still, in the case of ceiling tiles, you need to pay attention to other factors. The most important indicator of the quality of the adhesive is the adhesive strength. The higher this indicator, the more reliably the decorative material will be fixed on the ceiling.
In addition, you should pay attention to how quickly the glue dries. The sooner this happens, the better it will be for you. After all, if it seizes not for 30 seconds, but for 2-3 minutes, then you will simply get tired of holding the tile for such a time and, most importantly, you will definitely not be able to fix it correctly. Also, when buying, be sure to pay attention to the viscosity of the adhesive.
If the glue you have chosen is very liquid, then try to choose another option for finishing work. As practice shows, a too liquid adhesive base will not allow you to securely fix the tiles on the ceiling and it is likely that after a while you will have to redo everything from the very beginning.
Types of adhesive for fixing ceiling tiles:
Before proceeding with fixing the tiles, it is imperative to prepare the ceiling space. If you do not do this, then in the end, with all your desire, you will not be able to properly fix the finishing material. For this reason, it will be better if you first carefully inspect the ceiling and repair all defects.
But keep in mind that in order for the tile to fit perfectly, it is not enough to repair all the cracks and pits. If you want a grip between the ceiling and decorative coating was the maximum, then you will definitely need to grind the surface, and then carefully prime it.
 Seamless tile gluing
 In principle, seamless tiles are glued in the same way that we introduced you a little higher. Therefore, in this case, you will also need to initially measure the area of \u200b\u200bthe ceiling in the room being repaired, apply markings on it, determine the center point, and only after that proceed to gluing the decorative material. But still, if you want to end up with a perfect ceiling covering, then glue the tiles either diagonally or parallel to the wall.
Yes, if you prefer the last way finishing the ceiling, then start fixing the tiles on the wall opposite the window. Such a little trick will help you make the gaps that form during finishing less noticeable. similar material. And finally, I would like to say that, although some sources claim that in the case of seamless ceiling tiles it is not necessary to apply glue around its entire perimeter, it still needs to be done.
As practice shows, if this is not done, then after drying, the gap formed during installation is quite striking. And, of course, do not forget that the ceiling tile is made of a very soft material, so you need to hold and smooth it not with your hands, but with a foam rubber sponge or a soft cloth.
 Ceiling tiles for uneven ceilings
 As a rule, in old houses and apartments, the ceilings are far from ideal. Most often they are covered with cracks and small depressions, which are very striking. If you live in a house with the same ceiling, you can fix it if you wish. appearance home with ceiling tiles.
If you don't want to mess around with leveling and sanding the ceiling, then just buy foam tiles and glue it in a way parallel to the wall. True, you must remember that you can do this if the defects on the ceiling are the most minimal. If they are too large, then you will either have to decide to completely tear out the surface or install a special frame.
Usually it is installed slightly below the ceiling itself and this makes it possible to hide even very prominent defects. True, in this case, more expensive tiles, for example, wooden, metal or ceramic, will have to be fixed on it.

 Ceiling tile grouting tips
 As mentioned a little above, even the so-called seamless tiles require additional processing of the gaps that form after the ceiling sheet is completely dry. In view of this, when planning such finishing work, immediately include in their cost special means which will help you to make the repaired surface as smooth as possible.
As for how to do this, in this case it is best to give preference to acrylic sealant. In case you want to seal the seams without too much trouble, then invest in a tube of sealant and a gun that will help you distribute it evenly.

 You can paint ceiling tiles
 Sooner or later, the desire to paint a tiled ceiling appears in all people. But as practice shows, only a small part of novice repairmen decide to take this step. Most of these people believe that the paint will simply ruin the ceiling tiles and they will have to spend money on expensive repairs again. In fact, not all tiles can be painted.
For example, seamless tile should never be processed dyes as this will definitely make the seams darker and as a result, they will stand out quite strongly against the general background of the room space. The rest of the tiles can be painted calmly, though keep in mind that in order for the color of the updated ceiling to be as saturated as possible, it will be necessary to apply paint in at least two layers.

 ceiling painting scheme
 As for the choice of paint for updating the ceiling, when buying it, you need to pay attention not only to color. In case you want the ceiling long time remained in perfect condition, you must choose the correct dye.
And this means that it must prevent the growth of mold, be moisture resistant and have dust-repellent properties. In addition, it must necessarily have a moderate level of glossy effect. In view of all this, we can definitely say that it is best to paint ceiling tiles with water-based or acrylic paint.
Today there are many options for finishing the ceiling. The choice of finishing materials depends only on the taste of the owner and the amount of funds allocated for repairs. If planned a budget option finishing, then gluing foam tiles is an the best choice. Firstly, the material itself is inexpensive, and secondly, it is quite possible to carry out the installation yourself, thereby saving on paying for the services of builders.
Made of expanded polystyrene, this is an excellent option for finishing the ceiling. Modern manufacturers offer various options tiles - with a relief pattern and smooth, white or tinted, regular or special, allowing you to create seamless coatings. An important advantage of this finishing material is its simple installation. Consider how to properly stick tiles on the ceiling without resorting to the services of professional builders.
When buying materials, it is important to pay attention not only to the appearance of the tile, but also to its quality.
Here are the signs of a good ceiling tile:
In addition to tiles, you will need to purchase more and, best of all, choose one that is designed specifically for polystyrene foam boards.

On the initial stage to solve the problem, it is necessary to determine the amount of material.
To do this is quite simple.
Advice! Since when solving the problem it is unlikely that it will be possible to do without the need to cut the tiles, therefore, the calculated value should be increased by 10%.
To carry out work, prepare:
Consider how to properly stick the tiles, breaking the work into several stages.

Before sticking tiles on the ceiling, you should prepare the surface.
Advice! If the ceiling was previously finished with the same finishing material, then the question may arise, how to properly tear off the ceiling tiles? Needless to say, the withdrawal process old tiles simple, but rather time-consuming, the old coating should be removed by prying the tile with a spatula and cleaning the glue remaining on the ceiling.
Advice! It is especially important to prime wooden floors or plywood ceiling. Otherwise, the tile will hold much worse.
Before laying the tiles, mark the ceiling.
First you need to decide on the method of arranging the tiles, you can lay them both parallel to the wall (direct method) and diagonally (see). Laying begins, as a rule, either from the center of the room, or from the location of the chandelier.
Twine is required for marking.
Advice! Most often, the chandelier is not located exactly in the center of the room, so the layout has to be done a little differently. To do this, two lines are drawn through the attachment point of the chandelier, parallel to the walls and perpendicular to each other. In the right angles formed by these lines, we build bisectors (that is, we divide them in half) and draw these lines until they intersect with the walls. Thus, we got the markup, according to which the tiles will be glued.

Consider how to properly stick the tiles according to the markup.
The work is done like this:
Advice! The adhesive composition should be applied around the perimeter of the tile and in its center.
Let's consider how to lay the tiles correctly if the diagonal sticker method is chosen.
The markup with this method is similar, but the placement of the first tile will be different. In this case, when installing tiles with marking lines, it is necessary to combine not the edges, but the corners. Certainly, such a ceiling tile sticker is more difficult option and requires some skill.

So, polystyrene ceiling tiles are practical option ceiling decoration, which is quite easy to do with your own hands. You can see how to lay tiles on the ceiling on construction sites, where the layout of the tiles is presented and tips are given on how to complete the work.
When carrying out repairs, many are wondering how beautiful and at the same time cheap to finish the ceiling. One of the most suitable options is the decoration of the ceiling with polystyrene foam ceiling tiles. Working with such tiles does not require special skills and it is feasible for even one person to perform.
Ceiling tiles have been popular for many years. A variety of patterns and colors will satisfy the taste of even the most demanding customer.
As always, before repair, prepare necessary tools so as not to look for them during work and waste time on this.
To work with ceiling tiles, you need very few tools, for sure, many of them are already in your arsenal:
Calculate required amount tiles, for this measure the area of the room, add 10-15% to the stock. As a standard, tiles are sold in packs of 8 pieces, the size of one tile is 50x50 cm. In a package of 2 sq.m. so divide the area of the room by 2 and get the number of packages you need to buy.
Any major hardware store will gladly provide you with at least a dozen ceiling tile options to choose from. AT recent years multi-colored and designer options are becoming more and more popular, consider these, in case you want to try something new.
Advice: Transfer the dimensions of the room to a notebook sheet and draw a ceiling tile on the resulting rectangle on a scale, so you can accurately find out the number of tiles required. It is especially useful to do this when gluing tiles diagonally.
Trying to save money, many begin to glue the tiles from the corner, yes, this is economical, but it will look much worse than with other options. 
Having determined how many and what kind of tiles you need, you need to choose what you will glue it on.
There is no shortage in the choice of adhesive materials, many people use the "moment", "glue master" or others liquid adhesives, but there are also special mastics and pastes created specifically for tiles.
On the packages of any type of fastening material, consumption rates per square meter will be indicated for a certain type of application, read the instructions and calculate the required amount for your room.
There is no optimal advice on which adhesive base to choose, for some, simple glue holds for decades, and for some, the tile falls after a year. Here leading role plays the base on which we attach the operating conditions of the premises. So it might even be worth experimenting with different types adhesive precisely on your ceiling.
Do not forget to choose a suitable ceiling plinth (fillet). They are sold individually, 2 meters each and in various widths. 
Before the immediate start of gluing tiles, it is worthwhile to carry out some preparatory work that will extend the life of your new ceiling. The ideal option will, of course, if you completely clean the ceiling of the old coating. but often this seems impossible and labor-intensive.
The tile is perfectly glued to such substrates as: concrete, fiberboard, drywall, chipboard, OSB, but they should also be primed beforehand.
Consider the most common types of ceiling base.
When all the preparatory work has been carried out, the primer has dried out for the allotted time, you can start gluing the tiles.
Consider the process of gluing tiles parallel to the walls:

If you still want to make the seams less visible, then paint the tile with paint to match.
Gluing tiles diagonally is not much more difficult than parallel.

In fact, the process of gluing ceiling tiles is much easier than it seems at first glance, so do not be afraid to take on this business yourself.
Here are some tile care tips:
If you have any questions, please leave comments.
How I got cancer. Rami Blekt Intro to number four...

Luck is one of the most unpredictable phenomena in a person's life. Its impossible...

The other world is a very interesting topic that everyone thinks about at least ...