
Hmm, yoda_daro claims that this is a test to determine their sexuality...


It is unlikely that a modern person can imagine his existence without comfort and the usual benefits of existence, therefore, when arranging a frequency house or summer house, first of all, it is necessary to properly equip the water supply system, and of course the sewer system in compliance with all sanitary and hygienic standards.
Mounting sewer system time-consuming process and requires a serious approach, in addition, it is best to design sewers on initial stage construction of private buildings.
Before starting work, it is necessary to carry out water supply and only then carry out the installation of the sewerage system, adhering to a strict sequence.
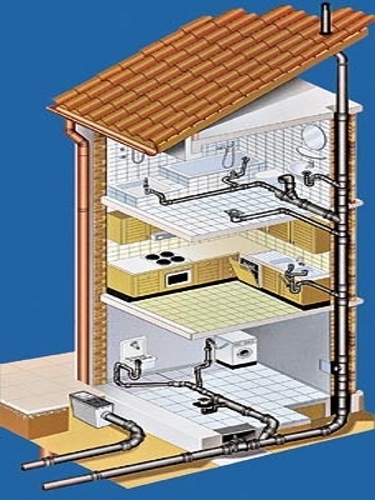
The basis of any type of sewer system is a common riser, into which wastewater flows. Everything that passes through the riser enters the laid external sewer system and merges into the sump, which is located on the site.
Important! For the riser, you will need a pipe of a sufficiently large diameter (from 100 mm), since this pipe diameter is used to drain waste from the toilet. Install a riser in the very corner of the bathroom or in a pre-equipped shaft.
In addition, it is important to prepare all the tools and materials necessary for the work so that everything is at hand during the work.
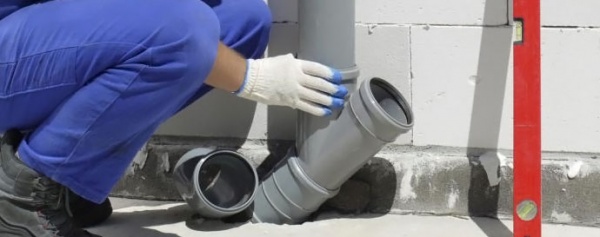
To ensure better sealing of pipe joints and avoid leakage, the joints are lubricated with grease or silicone.
Since plastic pipes are most often used in the arrangement of the sewer system, it is necessary to ensure their reliable fixation. how more reliable fastening, the lower the probability of deformation of sewer pipes, since the mass of filled pipes is much greater than empty ones.

Do-it-yourself sewerage is quite simple, even without certain skills and experience. The main thing is to follow the sequence of work, purchase high-quality materials, and prepare the tool you need for the job.
Important! If you are still unsure of your abilities, you can always invite professional craftsmen who will carry out all works on installation of the sewerage quickly and qualitatively. However, in the process of their work, you can monitor the progress of the work, gaining experience and at the same time controlling the quality.
It is very important that the drain pipes coming from the toilet or bathtub exit at an angle to prevent clogging and ensure a normal level of system performance. The angle of inclination per meter should be between 2 and 4 degrees.
You should not purchase corrugated pipes for arranging the sewerage system - give preference better pipes with an internal nasty surface. It is recommended to fix the pipes immediately after connection and docking. To do this, it is necessary to build a box or gutter of drywall or other waterproof material. This design will achieve reliable fixation and get a rigid system that will be resistant to mechanical damage and water displacement.
Important! When installing the transition from a vertical to a horizontal drain, it is advisable to install a connecting element with an angle of 90 degrees in this place. This will help to significantly reduce the load on the nodes and pipes from pressure when draining water.
At the next stage, the drain line is taken out of the house. a hole of the required size is made in the foundation and a corner is cut out at an angle of 15 degrees and then a constant level of inclination of the drain pipe is set, inclusive, until it enters drain hole no more than 2-3 degrees.
Do not make a smaller slope or, on the contrary, tilt the pipe too much. A small slope will slow down the flow of drains, and with a strong slope, the sewage will pass too quickly through the sewer pipes, leaving solid fragments on the walls, which will soon lead to clogging and disruption of the sewer system.
Important! When too proximity over time, the foundation may be damaged, and too long distance can provoke the appearance of stagnation in the system, especially if it has many joints and turns.
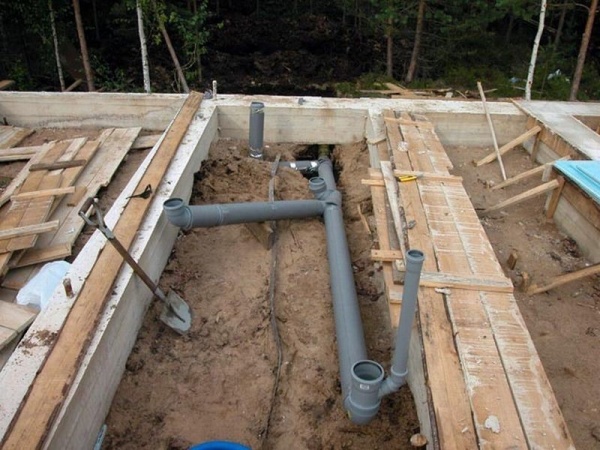
At the final stage, it is necessary to dig a trench for laying the pipe, the depth of which depends on the climatic and weather conditions in your area. If winters are harsh and cold, the trench must be deep enough to prevent freezing and damage to the integrity of the pipes. For greater safety, you can insulate the pipes with insulation before the final backfilling of the soil.
It is equally important to install several small manholes along the entire length of the sewer pipes, which will allow an audit of the sewer system in case of blockages. Immediately before laying the sewer pipes, it is recommended to concrete the trench. The bottom of the trench should be as dewy as possible without elevation changes.
To ensure a quality standard of living in your country house, you need to take care of the convenience of the outflow of used water and waste products. Properly calculated at the design stage and subsequently installed sewerage in a private house is the key to long and trouble-free operation. Such a design can be mounted independently, with your own hands, if you approach this issue thoroughly. The design of the house plays a key role in drawing up the scheme of the internal pipeline, but for laying the external sewer networks you need to follow a few rules.
The sewerage device in a private house must be carried out in accordance with all the rules and regulations so that its operation is long and trouble-free. Internal - combines all the pipes that are inside the house and plumbing fixtures. Its main purpose is to lead Wastewater formed in the course of human life. Installation of the internal sewerage system is carried out taking into account SNiP according to a pre-agreed plan. But the main thing in this project is the installation of a cesspool, septic tank or other container for collecting wastewater.
The distance to the object for living should be 5-12 meters. If the distance is greater, then difficulties may arise with the outflow of fluid from the pipes.
The distance between the outbuildings and the sump must be at least 1 meter.
The distance from the neighbor's fence is 2-4 meters.
Distance from decorative and garden plants- 3-4 meters.
From wells and wells, a sump with sewage should be located at a distance of at least 30 meters.
The depth of the pit is determined depending on the level of groundwater, but not less than three meters.
The bulk of sewage should be below the freezing point of the soil. The tank can be filled with a gap of 35 cm to the top cover.
Which treatment systems to install directly depends on the desire and capabilities of the owner. There are such types of sewer systems:
Septic tank - allows you to ensure not only the collection of wastewater, but also their processing. In the chambers of such tanks, wastewater is settled and processed by special bacteria that feed on organic matter.
Biological wastewater treatment using a special station. This option is distinguished by a high degree of wastewater treatment and high productivity. However, the station depends on electricity and is quite expensive.
Dry closet - this option is only suitable for giving, where the owners live intermittently. The dry closet is not able to solve the problem of drains from their kitchen and shower.
Cesspool - this option was previously resorted to most often. But due to technological progress, against the background of which the number of household items interacting with water has increased (dishwasher and washing machine), the number of drains has increased markedly, and the volume of the cesspool has ceased to cope with it. And the risk of soil contamination in this case is much higher.
You can make a sewer in a private house with your own hands in all of the above cases, except, perhaps, for installing a cleaning station. Here you can not do without the help of specialists.
To install a cesspool, a long and voluminous pit is dug in the ground, where wastewater from the toilet, kitchen and bathroom is drained through pipes. In some cases, the pit is lined with bricks. The advantages of this design include low cost and ease of installation. However, the cesspool still has more disadvantages:

It all depends on which pit the owner preferred. The design with an earthen bottom is more dangerous in an ecological sense and can lead to poisoning of the entire site. A sealed pit is a brick-lined structure with a concrete bottom. This option is safer and requires cleaning 1-2 times a year. Construction from concrete rings also considered an airtight pit.
A popular option is a sealed storage tank, which can be metal or plastic. The first option has significant drawbacks - it is subject to corrosion and needs to be replaced over time, especially in such an aggressive environment as wastewater. Also, a metal tank requires a waterproofing procedure.

Sealed tank
The plastic container is more suitable option which has many advantages:
By cons plastic container can be attributed to its rather high cost.
This option is suitable for a small family of three, where the total volume of water for local sewerage does not exceed 1000 liters. Design single-chamber septic tank- this is a sealed container or structure with a filter for discharging water into the soil. The last option is a construction of concrete rings with the periodic addition of biological preparations to the tank in order to improve the quality of cleaning.

Advantages of a single-chamber septic tank:
Low price and ease of installation;
The ability to do all the work with your own hands;
Safety for the environment;
No unpleasant odor;
A reinforced concrete septic tank, like a plastic container, is resistant to aggressive environments;
Durability of operation.
The principle of operation of this design is very simple: wastewater enters the septic tank through pipes, solid particles settle to the bottom. From the sump, water goes to the soil and soil for treatment. The main thing is to choose the right place drainage area, the installation depth of the septic tank was correctly determined and the volume of the tank was calculated.
The disadvantages of a single-chamber septic tank include the need to install it at a great depth in order to prevent the pouring of sewage into water resources.
When is it advisable to install a two-chamber septic tank in a private house? The first chamber of this design is used for settling water and its purification. All impurities settle in it, and only water, oil and the remains of household chemicals remain on top. Secondary wastewater treatment takes place in the second chamber. Oil and household chemicals are already deposited here. Only the water remains at the level, which is 65% purer than it was before. When the container is full, it upper layer enters the soil. But due to the insignificant level of contamination of the liquid, it does not pose a danger to the environment. A two-chamber septic tank for sewage in a private house provides a high level of wastewater treatment and safety. This design is suitable for installation in a large house where 5-8 people live.

Advantages of a two-chamber septic tank:
High quality wastewater treatment;
The container does not rust and lasts up to 50 years;
Installation of a two-chamber septic tank can be done by hand.
To weak side such structures can be attributed to the need to sometimes clean it from silt. It is worth knowing that this should be done carefully, without completely getting rid of silting, because microorganisms that feed on organic compounds from drains and live in it participate in the separation.
A biofilter in a septic tank is a container that is filled with an inert material (expanded clay). How does a biofilter work:
Sewer masses enter the sump, are cleaned and enter the biofilter;
Aerobic bacteria living in the biofilter break down and oxidize organic compounds from wastewater;
The water is cleaned of contaminants and enters the drainage pipe.

The advantage of septic tanks with a biofilter is a high degree of wastewater treatment, a reduction in the area of the soil aftertreatment site and complete autonomy of the structure. The disadvantages of the structure include the need to add biological products, the high price, the need for regular cleaning of the biofilter and the periodic release of the septic tank from wastewater using a sewage machine. However, sewage almost completely leaves the water, settling and splitting during the separation process, giving out clean water, which covers all the disadvantages of the biofilter tank.
All options for structures require a competent and correct approach. Therefore, having decided to conduct a sewer pipeline with your own hands, and preferring the option that is better in your opinion, it is still advisable to consult with specialists. After installing any type of sewer, you should clearly follow all the rules of operation, clean it in time, and monitor the level of overcrowding. Only then will living in a country dwelling be as comfortable as possible and will not harm the environment.
Without sewerage, life in a private house can hardly be called comfortable. Usually it is mounted at the stage of building a house. However, there are exceptions when, for some reason, the owners are forced to return to the issue of laying it later, when the house has already been built. Such a gasket will be more difficult and will entail additional costs. For example, you will have to lay an internal sewerage system, based on the current layout of the house, and it will not always be possible to cut all the pipes into one sewer pipeline or into one sewer riser. But all installation-related issues can be resolved correctly if certain requirements are met. After that, the level of comfort in a country house will become different, and the environment will not be damaged.
Important! In large private houses with a significant load on the sewerage system (there are several bathrooms, bathrooms, a washing machine, a dishwasher in the house), experts recommend using a scheme with two or more septic tanks.
Experts also recommend connecting to the central sewer, if such a possibility exists. The connection itself will cost more, but in the future it will remove almost all problems from you. And now we will talk about local (individual) sewerage, which also consists of internal and external.
To laying work internal sewerage relate:
When developing a project for a private house, the placement of premises to which it is necessary to bring sewage is usually carried out in one zone on each floor. This layout simplifies the laying of sewer pipes. At the same time, for each house the sewerage system is designed individually.
For the installation of sewerage in an already built house, ordering a design solution is quite expensive. You can draw up an internal sewerage scheme yourself. Of course, you will not be able to develop a scheme in the same detail and professionally as the “Sewerage” section in the house project is being prepared. But it will help you properly lay a sewer pipeline or mount a riser, and calculate the needs for equipment and materials.
Stock up on a tape measure, a pencil and a house plan. If you don’t have a house plan on a scale, measure everything required distances and put them on graph paper. Determine the location of the sewer pipeline or riser(s), as well as plumbing fixtures. Mark the fittings (for the pipeline) and the distances from the fittings and the riser to the plumbing fixtures on the diagram. With the help of fittings you can change the diameter and direction of the pipeline. Calculate the number of required connecting elements. This work will need to be repeated on each floor.
The diameter of the riser or sewer pipeline (bed) and the diameter of the outlet for draining waste from the bathroom is 100-110 mm. For drains from the kitchen and bathroom (they are called gray), a pipe with a diameter of 50 mm is used. Turns in the sewerage system to avoid blockages are performed by two elbows located at an angle of 45 °.
Calculate the need for pipes of different diameters and connecting elements, and you can get to work.
For the installation of internal sewerage, cast iron, polypropylene (PP) or PVC pipes(PVC). Cast iron can be called a "classic" of the genre, they are able to withstand heavy loads, durable and reliable. However, today polypropylene and PVC pipes are popular, which have a recognizable grey colour. They are much cheaper than cast iron and the installation process is simpler. Especially popular due to their flexibility and low weight polypropylene. In addition, PP pipes can withstand the high temperature of wastewater. One can argue about the reliability and durability of all these pipes, but both will serve you for a long time.


Very important! Remember that for risers and deck chairs we need pipes with a diameter of 100-110 mm. The same diameter is required to drain waste from the bathroom. We lay pipes with a diameter of 50 mm to the kitchen sink and to the bathroom. Gray polypropylene or PVC pipes are used only when laying in the house, others are used for external sewage.
We will lay pipes of mixed gravity sewerage. By use, sewerage is divided into mixed and separate, for a private house we choose mixed. According to the method of wastewater outlet, sewage can be gravity and pressure. Pressure is quite expensive and rarely used.
An assistant is needed to lay the sewer. It will be much more difficult for one to cope with this work, and it will go more slowly. We buy diameters of 50 and 100 mm, elbows, tees and revisions. We will need sleeves for installation in those places where the system passes through ceilings or walls. The connection points, in addition to the use of mandatory rubber cuffs, are additionally isolated with sanitary sealant.

Getting started, remember that sewer pipes in accordance with SNiP must be laid at a slope. Slopes for internal, external and storm sewers are different. For a self-flowing internal, the slope is from 2 to 3%, which depends on the diameter of the pipe. A slope of 2% is a slope of 2 cm per 1 running meter. For pipes of smaller diameters, the slope should be 3%. Without observing this rule, we cannot install a normally functioning internal sewerage system.
The slope must not be less than 2% and must not exceed 3%. In the first case, in a gravity sewer, solid particles will remain on the walls of the pipes and cause clogging. In the second, the maximum allowed flow rate of wastewater in polypropylene pipes will be exceeded, which will lead to the division of wastewater into fractions and the settling of solid particles.

To work on the laying we need:
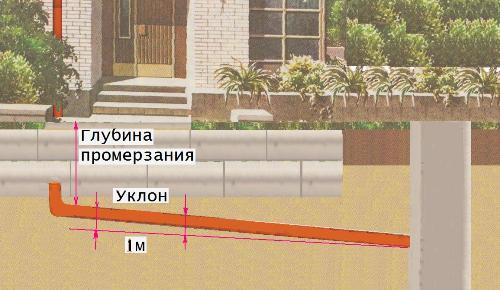
Work is recommended to start with the release - the junction of the internal and external sewers. Starting the installation from the release, it will be possible to avoid the discrepancy between the two systems. The outlet is mounted through the foundation. If the installation is carried out at a depth less than the freezing depth in the region, thermal insulation of the pipe is provided. Otherwise, the outlet will freeze and you will be left without sewage until spring.

If the foundation did not provide a hole for the release, it will have to be punched. The diameter of the sleeve (this is a piece of a pipe larger than that of the outlet, with a diameter of approximately 130 mm). The sleeve protrudes from each side of the foundation by at least 150 mm. The hole and the installation of the sleeve must be done so that a slope of 2% is provided for the external sewer leading to the septic tank. The diameter of the outlet itself must be equal to the diameter of the riser. In our case it is 100 mm.
When choosing a place to install a riser, try to mount it in the bathroom. In this case, the toilet outlet (Ø 100 mm) will be short. There is a simple rule - the larger the outlet diameter of the plumbing fixture, the closer it should be located to the riser.

You choose the laying method yourself: in boxes, in an open way, in walls, etc. The pipes are connected to the riser using oblique tees. If in your scheme there is a point of intersection of outlets from the shower, bath and sink, a collector pipe with a diameter of 100 mm is mounted in this place. Installation of water seals is mandatory - they will protect the house from unpleasant odors.
Important! Remember that the revision is mounted on each riser, and after each turn of the sewer, a cleaning is installed. In the future, in case of clogging of the sewer, it will not be difficult to clean it.
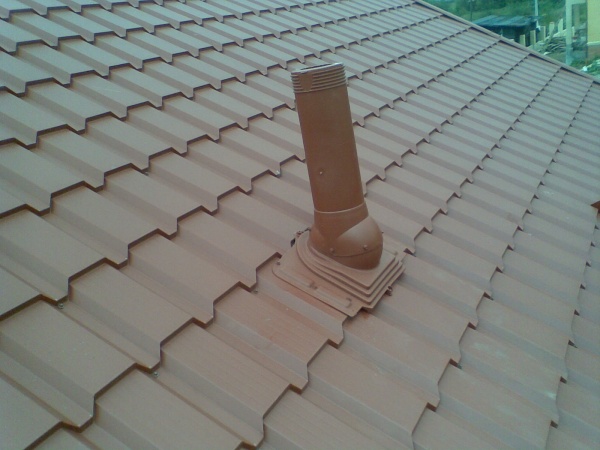
The fan pipe is a continuation of the riser up. First, a revision is installed at the place of its connection, then fan pipe taken to the roof. It should not be combined with ventilation at home. The exit must be higher than the roof ridge (but not less than 700 mm from the roof) and at a distance of not less than 4 meters from the windows. It is recommended to place the ventilation of the house, the chimney and the fan pipe at different heights.
After completing the installation of the internal sewage system, it is spilled with clean water to check the tightness of all connections.
External sewerage is a system of pipes from the outlet to the septic tank or deep cleaning station. For laying in the ground, pipes with high rigidity are used that can withstand the pressure of the soil. Often used pipes painted in Orange color- they are clearly visible in the ground. Their diameter is 110 mm.

There are several outdoor sewage systems, but we will not consider cesspools and sealed containers for collecting wastewater (these are storage systems) as options. Cesspools have faithfully served a person for hundreds of years, but in the yard of the XXI century it is necessary to use more modern devices to equip a private house, especially since they are affordable. We are talking about various septic tanks: with a biofilter, with two and three chambers, simple single-chamber with soil cleaning, as well as deep cleaning stations.


To choose a septic tank that will fully meet the needs of your family, you must take into account the number of people living in the house, the nature of residence (temporary / permanent), the approximate daily water consumption for each family member (depending on the number of plumbing fixtures in the house and the availability of household appliances). In addition, experts will take into account the level of groundwater in your area, the size of the site, which determines the size of the area allocated for treatment facilities, the type of soil and the climate in the region of residence.
Which type of septic tank you choose, or perhaps stop at a deep biological treatment plant, depends on your financial capabilities. And, of course, expert advice. When considering a decision, take into account the existing restrictions on the placement of such objects:

The main problem in the device of external sewerage is right choice treatment facility. With earthworks and laying, you can handle it without much effort.
Two obvious conclusions. Firstly, it is desirable to design a sewage system simultaneously with the development of a house project, and to carry out its installation at the construction stage. You don't have to drill walls and foundations. Secondly, even if you could not install the sewer during construction, there is nothing wrong with that. Carry out the necessary calculations, draw up a diagram and get to work. There is a lot of work, but you can definitely install a sewer in a private house with your own hands.
The arrangement of sewerage in a private house begins with a layout and a laying scheme. This allows you to most conveniently arrange all plumbing, make the right slope, accurately calculate all consumables.
As a result, the system will work smoothly, and in the event of a breakdown or clogging of one of the elements, everything can be quickly and easily repaired. In this article, we will tell you how to properly draw up internal and external (external) sewerage schemes for a private house or country house, what is the optimal depth for laying sewer pipes and what consumables should be used when constructing and installing an autonomous system with your own hands in the house and outside.
Charting starts from a distant plumbing fixture in the attic or top floor. All horizontal lines must be reduced to one riser. To save money and consumables, bathrooms on different tiers are placed one vertically.
Sewerage in the house consists of:
It is important that the house does not have a transition from a larger sewer diameter to a smaller one. Therefore, in the diagram, the toilet should be located as close as possible to the riser.
Accurate drawing of the internal system depends on the number of storeys of the building, the presence of a basement, the number of plumbing used and the number of users. The depth of the septic tank and the attachment to additional equipment also matter ( pumping station or separately for each device).
On the diagram All items must be displayed to scale. so that in the event of a scheduled repair or an emergency, you can quickly figure out the wiring and find a breakdown.
External sewerage starts from the pipeline from the foundation. Effluent is diverted to a septic tank, cesspool or filtering structure. At each turn of the pipe, revisions are installed (adapters with covers, with which you can quickly clear the blockage). Outside there is also an inspection well and a ventilation hood.

Ventilation is removed from the riser through a fan pipe. Due to strong foreign odors, it cannot be mounted near windows, with access to the courtyard or near smokers. Categorically it must not be connected to a conventional ventilation shaft. Instead of an umbrella, you can use a special vacuum valve at the top of the riser (not to be confused with a check valve!).
The final element of the system is a storage and cleaning tank. In the absence of a central collector for the intake of drains, autonomous installations are used.
 Be sure to determine the volume of the septic tank. The calculation is carried out taking into account that 200 liters of water per day is used for each inhabitant of the house. Drains in the septic tank settle for 3 days. Based on these data, we get Exact size waste tank.
So, a family of 4 people consumes 800 liters. In three days, 2400 liters are accumulated. Means, it is necessary to select a septic tank of just such a volume. If desired, you can make a small margin in case of a maximum load of the tank. Septic tanks with such parameters cost from 20 thousand rubles.
Main armature:
 Before you begin to equip the sewer system, you must carefully read the basic requirements put forward to it. As we will tell in a special review.
Water can be not only beneficial, but also harmful to human body. Which coarse filter better fit to give, find out from this.
 According to the recommendations of SNiP for pipes with a diameter of 50 mm, a stable 3 cm is made for each meter of laying. With a cross section of 100 mm, this value can be reduced to 2 cm. In order to avoid clogging and “fatting” of the sewer in the kitchen, it is advisable to increase the slope by 0.5-1 cm for each meter of wiring.
When mounted on land plot maintain the same angle of inclination. A sleeve (a pipe of larger diameter than the main pipeline, protruding 15 cm from each end) is installed in a hole made in the foundation. It provides a transition to the external sewer, and located 30 cm above the freezing level of the soil.
Burying pipes below the freezing level (on average it is 1.6 m) is unprofitable- you will have to make a very deep septic tank. Subject to a constant slope, it will be 4-5 m, where groundwater may already appear. The cost is increased by additional concrete rings and stronger (corrugated) pipes that can withstand both the pressure of the drain and the weight of the soil.
The drain temperature is usually above room temperature, which prevents freezing, and if desired, thermal insulation or heating cable insulation can be used.
Pipes are used to drain waste from plumbing fixtures diameter 5 cm. The pipe from the toilet should have a cross section of 10-11 cm, which will help avoid blockages.
Pipes can be used to organize a sewer system in a private house. cast iron, reinforced concrete or plastic. The latter are more acceptable due to their strength, durability, corrosion resistance and smooth surface.
Designed for outdoor networks. They are distinguished by their characteristic orange or yellow-brown color. Despite being relatively cheap, these pipes have sufficient strength, which allows their use both for external and hidden installation. For them, a connection by cold welding is recommended. All turns are made using fittings and bends.
For internal communications, they are light gray in color and have different technical parameters depending on the manufacturer and model. Their common features:

Briefly instructions on how to properly make a local autonomous system sewerage in a private country house (in the country) with their own hands, looks like this:
For pipe bends, fittings for external engineering networks. If the distance from the foundation to the septic tank is more than 10-12 m, it makes sense to equip the site with an intermediate revision well.
This video shows how to properly make a sewer for a private house, as well as how to lay pipes yourself:
How to properly sewer in a private house, do everything according to the scheme yourself and lay pipes for the system without errors? Installation of the sewer system will be better if follow a few guidelines:

When installing a sewer it is important to consider every nuance: the placement of plumbing, the relief of the site, the location of the intake manifold or septic tank, the depth of pipe laying and the angle of inclination.
Only with careful scheming, careful planning and order installing a sewerage system in a private house or in a country house with your own hands can guarantee that the system will not freeze in the middle of winter and will drain well without creating additional problems in the house and on the site.
From this article you can learn how to create a sewer in a private house with your own hands: a scheme on the basis of which the construction of a waste system is carried out, its phased production with useful tips and recommendations of specialists, information on laying the pipeline and related procedures. An overview of popular types of sewage, their features, specificity for suburban areas and prices for them.
Unlike city apartments, not every private or Vacation home has all communication systems. Therefore, the owners of such housing are forced to carry out their laying on their own in order to provide elementary conditions of comfort. If the organization of this system, along with water supply, was originally included in the design of the building, then there should be no problems with their construction. It is much more difficult if you have to include a sewerage system in a private house that is already ready.

The simplest option for implementing such an idea would be a project in which the sink and shower are installed inside the building, and the toilet is located outside of it on the street. In this case, you can do without complex work for laying the pipeline, as well as the installation of treatment facilities. This scheme involves the removal of the sewer from the house and its supply to the sewer pit.
The second option is more difficult, since the toilet, shower and sink in this case are located inside the building. If incorrect calculations are made or the system construction technology is violated, there is a risk of contamination of the site and water located nearby with waste. In such situations, a septic tank is indispensable.
Helpful advice! Experts recommend placing toilets, bathrooms and kitchens nearby. Due to this, it is possible to organize a single collector, thanks to which the waste liquid will be sent to a sewer or septic tank.

To choose the right sewerage system and the scheme for its creation, you need to consider the following factors:
Conditionally existing sewage systems can be divided into two categories: storage and purification. A more detailed classification will allow you to select the appropriate operating conditions type of system, since even the same type of circuits can have significant differences.

A pit latrine is most often used for sites with a house used for temporary residence, for example, only a week a month. It does not consume a large number of water. An important condition is the groundwater level not higher than 1 m from the bottom of the pit. Otherwise, water pollution by sewage is inevitable. This type The sewer system is rarely used in modern construction.
Storage tanks are used for the construction of sewers in a private house when high level ground water. Since the tank is sealed, there is no risk of soil contamination with waste. However, this system has drawbacks. Firstly, the additional costs associated with the need to call a sewage machine for periodic pumping of wastewater. Secondly, the scheme will have to provide a place for the entry of this equipment to the site and its placement.
Single-chamber septic tanks are the simplest soil purification systems. Their principle of operation is in many ways similar to cesspools. The scheme is suitable if the groundwater is not high. If the house is used for permanent residence and there is an active use of water, then it is not recommended to use the scheme of a single-chamber septic tank for the construction of a sewerage system.
Two-chamber septic tanks are also dependent on the groundwater level. It is desirable that they lie at least 1 m below the day of the system.

Helpful advice! In order for the sewerage in the form of a two-chamber septic tank to function normally, it is recommended to change the sand and gravel that was used during construction every 5 years.
Septic tanks with biological filters are considered the best sewage systems in a private house where people live on a permanent basis. For waste processing, special microorganisms are used, which result in there are no restrictions on such sewage, only a connection to the electrical network is required.
A septic tank with a filtration field performs two cleaning methods at once - soil and biological. The tank is divided into two sections. The installation of such a sewer is possible only if the groundwater runs at a depth of at least 2.5-3 m. A significant amount of free space will be required for construction. Moreover, to neighboring buildings, as well as to the nearest sources of water, there should not be less than 30 m.

Aerotanks or systems with forced air supply are very expensive, but due to their advantages, they justify the money spent. Such structures are not limited in terms of installation, however, they require a power source and the constant presence of people. The minimum sewerage price for a private house with installation in this case is approximately $4,000.
The construction of any communications should be carried out according to a previously developed and approved project. Such a project usually has a scheme for creating internal and external sewerage wiring in a private house with your own hands.

internal system includes:
Plumbing fixtures include items such as a non-tray shower stall, bathtub, sink, and toilet. The internal system ends with an outlet pipe. This element is placed at the level of the foundation part of the building.
When arranging an external sewage system in a country house with your own hands, the diagram of this section of the system must have an external pipeline that provides drainage from the building, as well as storage or treatment equipment. When the project is ready and approved, it is possible to determine the optimal diameter and size of the pipes, as well as the amount of material required for the job. At the same stage, a sewer collector is selected.

Helpful advice! During the construction process, it is better to rely on the requirements of regulatory documents. SNIPs will help determine how to properly sewer in a private house, as well as eliminate errors in the design process.
When arranging sewerage, the choice of a place for installing a septic tank is extremely important. Its placement is influenced by the following factors:
Sandy soils have a loose texture. Due to this, the liquid can easily pass through the soil, so there is a possibility of contamination of groundwater with waste.

When installing a septic structure, it is important to adhere to certain requirements:
In addition, it will be necessary to equip an area for the arrival of sewage equipment.
On the diagram of the internal sewerage system in a private house, you need to mark all the points of the system with your own hands. First, the installation of the central riser is carried out. The optimum pipe diameter is 110 mm. In order for gases to leave the room without hindrance, a riser should be installed so that it top part was displayed in the attic or protruded above the level of the roof of the building. The central riser should be located at a distance of at least 4 m from the windows of the building.
Next, a horizontal pipeline is laid. The installation of inspection hatches will allow you to monitor the state of the system and perform its cleaning in a timely manner. These elements must be placed at the lowest point of the sewer and above the toilet.

For each plumbing fixture, it is necessary to provide for the presence of a siphon with a water seal. This will prevent the entry of unpleasant odors into the room. In the process of laying sewers in a private house with your own hands, it is recommended to avoid turns at an angle of 90 °. These elements complicate the movement of effluents.
The pipe coming from the toilet is connected directly to the system. To do this, it is better to use a pipe with a minimum diameter of 100 mm. For the bathtub and sink, you can take a smaller pipe with a diameter of 50 mm. The line should be placed at an angle that will ensure the movement of fluid. In the foundation, you also need to make a blank for a hole to bring the system out. A non-return valve must be installed on this pipe, which will prevent sewage from entering back into the system.
Helpful advice! If 90° turns cannot be avoided, the pipe bend area can be made from two 45° corners.
The design is a two-chamber collector, the sections of which are articulated with each other using an overflow pipe. To begin with, a pit is pulled out with a depth of 3 m of the required volume, taking into account the number of permanent residents in the house. It can be formed manually or using special equipment (excavator). At the bottom, it is necessary to organize a sand cushion up to 15 cm thick.

Then a formwork structure is formed on the basis of chipboard or boards. It must be reinforced with a reinforcing belt, which is made of metal rods. Bandaging is carried out using steel wire. After that, you need to make two holes in the formwork and install pipe trims in them. Thus, the entrance zones of the system highway and the overflow pipe connecting the sections will be obtained.
The formwork structure is concreted. To distribute the solution evenly, you need to use a vibrating tool. The septic tank must be monolithic, so it is poured once.
Related article:
Overview of the available methods of treatment of domestic waste. The principle of operation of various sewer devices.
The bottom of the first compartment must be formed by pouring concrete. The result should be a sealed section that will be used as a sump. Here, the separation of solid large fractions will take place, which will settle at the bottom. Clarified partially purified water will accumulate from above. Due to the connecting pipe, it will fall into the adjacent compartment.
Helpful advice! The use of aerobic bacteria will enhance the decomposition of solid particles.

There is no need to organize the bottom in the second compartment. The section is made on the basis monolithic walls. Suitable and stacked one on top of the other. The recommended diameter size is 1-1.5 m. A thick pillow is formed at the bottom of the compartment sedimentary rocks, which acts as a filter for drains. For these purposes, pebbles, crushed stone, gravel are suitable.
An overflow pipe is installed between the two compartments. The angle of inclination is 30 mm per linear meter. This pipe is placed at the level of the upper third. Most often, the owners of summer cottages, when installing sewerage in a private house, use a two-section design, although it is possible to equip a septic tank even with 4 compartments, which will provide the best level of cleaning.
Overlapping for a septic tank can also be made by hand. For this, formwork and concrete are used. Alternatively, reinforced concrete slabs can be used. It is obligatory to install an inspection hatch that allows you to control the exhaust and filling of sections. Then the pit must be covered with soil or sand. The sump should be cleaned every 2-3 years.

From the area where the sewer pipe leaves the foundation and to the septic tank, you need to lay a highway. The pipeline should be located under a slope, due to which the flow of waste water will be ensured. The larger the diameter of the pipes used, the smaller the angle of inclination will be required for the full operation of the line. The average is 2°.
In the diagram, the depth of laying the sewer in a private house with your own hands should be below the freezing level of the soil in winter. The average is 1 m. In warm regions, there is no need for large pipe penetration, 0.7 m will be enough. If the house is located in a cold region, the depth indicator should be increased to 1.5 m. pillow, tamping it well. This procedure will allow you to securely fix the pipes and prevent the destruction of the line during seasonal soil mixing.
The most optimal for a summer cottage will be a scheme for laying a direct highway from the house to the collector. If necessary, you can rotate. This location can be installed manhole. Pipes made of cast iron or plastic, designed for external sewage, are suitable for work. The recommended diameter is 110 mm. All joints must be sealed. The trench with the laid pipeline is first filled with sand and then with soil.

Helpful advice! If the trenches for the installation of the pipeline are shallow, the line must be additionally insulated using thermal insulation materials.
Systems that do not require pumping, as a rule, are represented by designs of two- or three-chamber septic tanks operating simultaneously. If the system has two tanks, at least ¾ of the structure is allocated to the sump, for three-chamber - half. In the first section, heavy fractions settle. As it fills, the liquid overflows into the second compartment, where light particles are separated. In the third section, the water is fully cleaned of wastewater and fed into a drainage well or filtration fields. It is important that the two containers are airtight.
This type of system also needs to be pumped out, but not as often as with a conventional septic tank. This is done with a drain or fecal pump for sewerage, the price of which depends on the manufacturer and capacity and varies between 2700-25000 rubles. This equipment is used to remove sediment that accumulates in the sump.

The frequency of the procedure is affected by the composition of the wastewater and the size of the tank. The structure must be cleaned when the height of the silt reaches the level of the overflow. For six months, about 60-90 liters of sediment accumulate in the tank. Based on this data and the volume of the container, you can approximately find out how much time between cleanings.
To find out the required volume of a septic tank without pumping out, you should daily allowance water consumption per person (200 l) multiplied by the number of residents and add another 20% to the result. If the groundwater level is high, it is recommended to make a concrete screed at the bottom of the pit or lay a concrete slab for reinforcement.
A recess in the ground breaks out taking into account the size of the septic tank. To this is added a minimum of 20 cm on each side, and even more is better. Pipes are laid on a sand cushion in a similar way with a slope to a depth of 0.7-0.8 m.

The price of installing a turnkey septic tank is formed taking into account:
Most often, if turnkey installation of septic equipment is performed, 2-3 people are involved in the work. Since the installation of the structure is carried out manually, there is no need to use specialized heavy equipment. As a result, the landscape remains untouched, and the owner of the site has a chance to save a lot. It is impossible to do without changes on the site if sewerage is laid from the ground. The price per meter of work performed is included in the total cost of turnkey work.

Helpful advice! To prevent the elements of the system from moving during installation and from floating up, it is recommended to perform the procedure for concreting the body.
If there are soils in the summer cottage that do not have filtering properties, like sand, installation work will increase significantly in price. These soils include loam and clay. To provide normal conditions for the full functioning of the system on the territory, it will be necessary to form a bulk-type filtration field.
The price of sewerage installation in a turnkey private house:
| Septic tank model | price, rub. |
| Tank | from 18700 |
| Cedar | from 79900 |
| Uni-Sep | from 56000 |
| TopBio | from 111700 |
As in the case of a residential building, the sewerage of a bath includes an internal and external system. Even if the building has a dry steam room, it will be necessary to drain the liquid from the shower. The water collection system depends on how the floors are installed. The sewerage scheme is entered into the bath project at the development stage and is laid down in initial stage construction even before the floors are laid.
If it is planned to install wooden floors from boards, then the elements can be laid closely or with small gaps. If the coating is installed tightly, the floors are formed with a slope from one wall to another. Next, you should find the lowest point near the wall and leave a gap in this place, where the gutter will be subsequently installed (also with a slope). At the lowest point of its placement, a connection is made to the sewer outlet pipe.
Important! If the bath sewerage scheme involves the collection of liquid from several rooms, including from the toilet, it is imperative to install a riser with ventilation.
If the wooden flooring will be made with slots, small gaps (5 mm) should be left between the boards. Under the floor is done concrete base with a slope towards the central part of the room. A gutter and a sewer pipe will be installed in this area. Instead of a concrete base, metal pallets can be laid on top of the insulated floor under a wooden deck. If the floors are self-leveling or tiled, a water intake ladder is installed at the lower point of the slope, which drains the drains into the pipe.

For the installation of sewer pipes, it is necessary to form ditches with a slope of 2 cm per 1 m. Their depth is 50-60 cm. A pillow should be made at the bottom of these trenches. To do this, a layer of sand 15 cm thick is poured and carefully compacted. In this case, do not forget about the slope.
Next, the installation of the sewer line is carried out. Polypropylene pipes with a diameter of 100 mm are laid in trenches. If necessary, a sewer riser is equipped. It must be fixed to the wall with clamps. Be sure to organize ventilation. When the system is ready, the flooring is installed using one of the previously discussed methods.
Upon completion of all work, the ladders and gratings provided for by the project are connected to the system at the designated locations. In the area where the water intake is connected to the outlet pipe, it is desirable to install a siphon. It will prevent the penetration of odors from the sewer back into the room. Most often, ladders are equipped with built-in water seals.

On sale you can find gutters made of asbestos cement, plastic or cast iron. It is not recommended to use products made of wood and steel, because. they quickly break down under the influence of moisture. The minimum allowable diameter of the gutter is 5 cm. If the project provides for the presence of a toilet bowl or other sanitary equipment, it is installed and connected. This completes the work on the organization of internal sewage. External system performed in the manner described earlier, and may be a septic tank or a drainage well.
Air exchange in the bath can be organized different ways. Each of them has its own characteristics and advantages. After studying the specifics of each method, you can choose the most the best way for a bath.
The first method involves creating a hole for feeding fresh air. It should be placed behind the stove-heater at a height of 0.5 m from the floor level. The exhaust air will be discharged through the opening on the opposite side. It must be placed at a height of 0.3 m from the floor. To enhance the movement of air flows at the outlet, you need to install exhaust fan. All openings are closed with gratings.
Helpful advice! The lower the ventilation hood is placed, the more intensive the air exchange process will be. It is important not to overdo it in this regard with the steam room, otherwise there will be a significant heat leak.

The second method involves placing both holes in the same plane. In this case, the work will affect the wall opposite to the one where the furnace is located. The inlet duct is placed at a height of 0.3 m from the floor level, at a similar distance from the ceiling, an exhaust hole must be made and a fan installed in it. Channels are closed with gratings.
The third method is suitable for floor coverings where the boards are laid with gaps to drain the liquid. The inlet is made at a height of 0.3 m from the floor on the wall behind the stove. In this case, installation of an outlet duct is not required, since the exhaust air will exit through the gaps between the boards.
As a material for the manufacture of autonomous sewers, polypropylene is used, which is characterized by low weight, environmental friendliness, strength and high thermal conductivity. Wastewater treatment is carried out by certain types of bacteria that feed on organic waste. Access to oxygen is a prerequisite for the life of these microorganisms. Price autonomous sewerage in a private house is much higher than the cost of arranging a conventional septic tank.

This is due to the numerous advantages of autonomous type systems:
The possibilities of autonomous sewers Unilos Astra 5 and Topas 5 are considered the most optimal for summer cottages. These structures are reliable, they are able to provide comfortable living and the necessary amenities for residents. country house. These manufacturers offer other equally effective models.
The average price of autonomous sewers Topas:
| Name | price, rub. |
| Topas 4 | 77310 |
| Topas-S 5 | 80730 |
| Topas 5 | 89010 |
| Topas-S 8 | 98730 |
| Topas-S 9 | 103050 |
| Topas 8 | 107750 |
| Topas 15 | 165510 |
| Topaero 3 | 212300 |
| Topaero 6 | 341700 |
| Topaero 7 | 410300 |
Note! Features of autonomous sewage Astra, Topas, Biotank and other models listed in the tables allow you to perform deep biological treatment plums. This figure in some cases reaches 98%. As a result of treatment, wastewater turns into clear water with a small admixture of silt.
The average price of autonomous sewers Unilos:
| Name | price, rub. |
| Astra 3 | 66300 |
| Astra 4 | 69700 |
| Astra 5 | 76670 |
| Astra 8 | 94350 |
| Astra 10 | 115950 |
| Scarab 3 | 190000 |
| Scarab 5 | 253000 |
| Scarab 8 | 308800 |
| Scarab 10 | 573000 |
| Scarab 30 | 771100 |
The tables show the standard cost of the system. The final price for the installation of an autonomous sewer on a turnkey basis is formed taking into account the prices for laying an external pipeline and other points affecting earthworks and installation work in general.
The average price of autonomous tank type sewers:
| Name | price, rub. |
| Biotank 3 | 40000 |
| Biotank 4 | 48500 |
| Biotank 5 | 56000 |
| Biotank 6 | 62800 |
| Biotank 8 | 70150 |
As in any other system, it is recommended to install the pipeline at an angle from the house towards the purification tank. The optimal angle is between 2 and 5° per meter. If you do not adhere to this requirement, the full discharge of wastewater by an autonomous sewer for a summer residence will become impossible.
During the laying of the highway, care should be taken to securely fix its elements. To eliminate the risk of pipe deformation and displacement during soil subsidence, the soil at the bottom of the trenches must be carefully compacted. If you fill the bottom with concrete, you get a more reliable fixed base. During the installation of pipes, it is desirable to adhere to a straight path.
Be sure to check the joints for tightness. Liquid clay is usually used for docking. It is allowed to use specialized tools recommended by the pipe manufacturer. If a line is being installed on the basis of elements with a diameter of 50 mm, the maximum allowable length of the straight sections of the system is 5 m. When using products with a diameter of 100 mm, this figure is 8 m maximum.
Important! The waste storage tank cannot be placed at a distance of less than 10 m from residential buildings.

First, the optimal place for the installation of a wastewater tank is selected. To do this, you can use the data recommended for the installation of a conventional septic tank, then you can start earthworks. A pit breaks out under the installation of the container. The dimensions of the recess in the ground must correspond to the dimensions of the tank with an allowance of 30 cm on each side.
The technology allows the installation of a biological filter and a septic tank in one pit. Earthworks also involve the formation of trenches for laying the pipeline. In this case, a slope of 2 cm must be observed for every 0.1 m of the line. The bottom of the pit is rammed and poured concrete mortar. After the site is fully dry and hardened, you can install the plastic container. To fix the structure on the base, it is desirable to use cables.
At the next stage, an autonomous sewage system of a country house is assembled and a pipeline is supplied in accordance with a pre-planned scheme. At the same time, the biological filter blocks are filled. For these purposes, an absorbent with a bioactive effect and expanded clay can be used.

After the entire system is installed, the recesses in the soil are filled back. For this, earth and sand are used, the use of a cement-sand mixture is allowed. All this is poured in layers and carefully compacted. At the same time, water is poured into the septic tank. The liquid level should be slightly above the top mark of the bulk material. The pipeline is covered with sand and then earth. In this case, there is no need to compact the backfill. The system can be connected only after the sewerage has been checked.
In view of the foregoing, self-assembly of stand-alone equipment is not so difficult. Usage finished structures allows you to eliminate any inconvenience associated with the removal and treatment of wastewater. By adhering to the manufacturer's instructions, any owner of a summer cottage can install an efficient and trouble-free system with a long service life with his own hands. If another system is being installed, the ideal result is only possible if the calculations are carried out correctly.

Instruction The frames of the film merge for us into continuous movement due to ...

Pranayama is a breathing practice in yoga. Pranayama literally translates as...