Physicist and astronomer Stefan Feeney of University College London, one of the...

A shower cubicle is an essential attribute of a suburban area, designed to brighten up our stay at the "hacienda". How to make a summer shower with your own hands in just one day and without spending much on building materials? We have developed step by step instructions installation of a collapsible design of a country hygienic cabin, which can be dismantled for the winter and stored in a protected place.
The process of manufacturing a summer shower should begin with the choice of a place for its installation. In doing so, we advise you to consider three points:
Based on this, when choosing a place for installing a summer shower, follow these rules:
To DIY outdoor shower, be aware of some requirements, non-observance of which can lead to instability and destruction of the structure. First, do not forget that the water tank has a decent weight, and therefore the support legs must be chosen so that they can withstand it. In addition, they need to be securely fixed: experienced summer residents recommend burying the racks in the ground, or even better, pouring them with concrete.
Secondly, it will be necessary to make a drain in the floor and ensure the drainage of water - for this purpose, a large-diameter pipe buried in the ground under a slope is usually used. Stagnant moisture threatens you with a putrid smell, as well as an abundance of mosquitoes and midges.
Third, make the right choice when buying a tank. Metal containers are more durable, but they are heavy, and the water in them heats up slowly. Plastic ones weigh much less, are easily washed out and contribute to the rapid heating of water, but have more short term services.
And now about the materials that you can use if you decide to make a summer shower with your own hands. Most often, summer residents make a frame (base) of wooden beams or metal pipes (profile), and use as a sheathing:

It's time to tell and show how to make a summer shower with your own hands in just one hour. We offer a collapsible cabin option that can be easily dismantled and stored until the next summer season.
For its manufacture you will need:
Cut the pipe into 4 pieces of 2.2 m and 8 pieces of 0.8 m.

Prepare fixtures for assembling the shower.

Using two pipes of 2.2 m and two of 0.8 m, assemble a rectangle.

Then make a second similar rectangle and connect them together with the remaining 0.8 m long pipe sections.
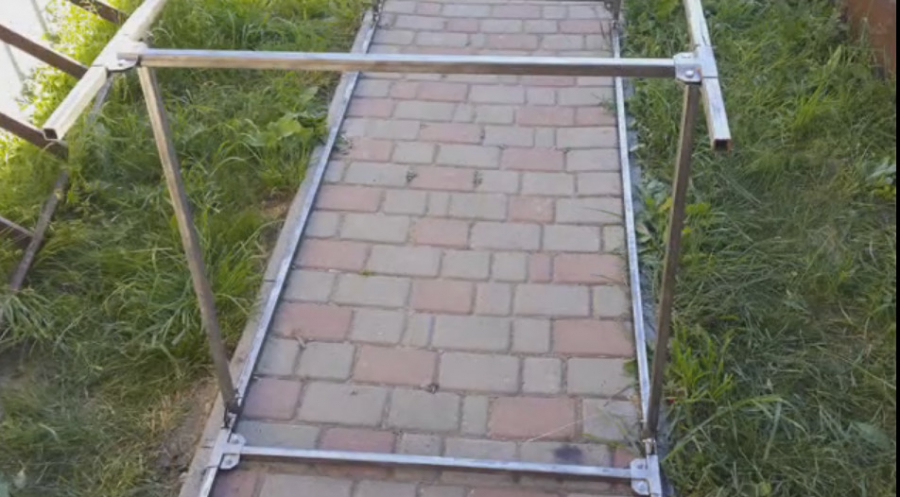
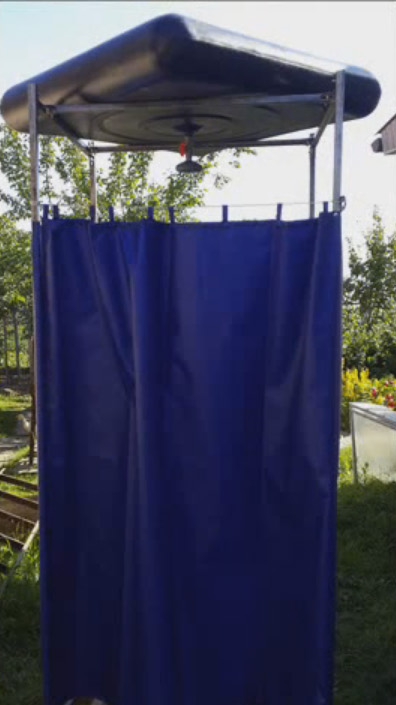
Install the frame and place the tank on it.
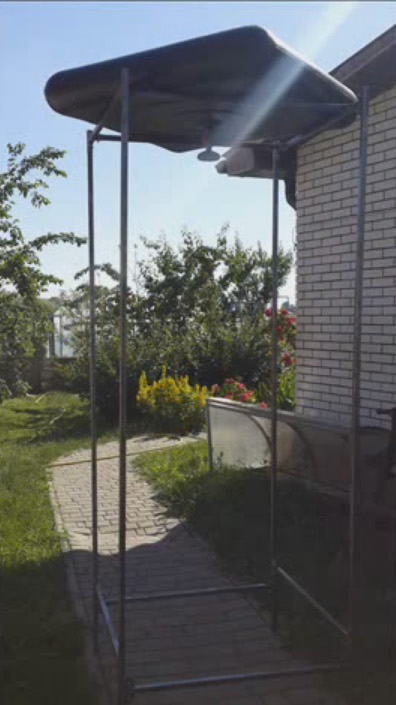
Hang the curtain and the shower is ready. You can use a wooden pallet as a flooring.
If you want a more stable and durable shower for a summer residence you can use the tips from this video:
During the summer work in the summer cottage, there is a desire to freshen up under the pressure of warm water. Not everyone has country house convenience, so a summer building in the form of a shower can be made in the yard.
Summer showers for summer cottages are the most different forms and layouts of varying complexity. Today, many manufacturers offer simple easy-to-install shower enclosures, in which the frame is made of an aluminum profile and the cover is made of polycarbonate plates. A 100 liter plastic container is installed at the top. Such a shower can be removed in the utility room for the winter. You can buy an outdoor shower for this type of cottage both in supermarkets and in online stores, which are very numerous on the network. It is only necessary to choose the appropriate configuration, height and internal volume of the structure itself.
There are also more complex stationary buildings that are used not only in summer, but also in winter. Usually they are created from a capital foundation and building material (foam block, gas block, brick, concrete block). Intermediate and one of the most commonly used materials for a classic summer shower is wood. In any case, building a summer shower for a summer residence with your own hands (see photo) will not be special trouble ate everything carefully planned and prepared. In modern conditions, there are many opportunities and means (materials, equipment, tools) for a quick solution to any summer problem. How to build a summer shower in the country with your own hands and which option to choose? 
Depending on the complexity of the future structure, several types of these useful structures are distinguished.
simple summer shower.
In the country, it can be installed in a hidden part of the plot. To make such a structure will not be particularly difficult. To do this, it will be enough to prepare four supports made of wood, metal or durable plastic. They go deep into the ground by 80 cm. For this, holes are dug for the diameter of the material. Then the supports are installed in the holes and poured with concrete. 
As side walls, you can use a simple opaque fabric, a sheet, a tablecloth, blue or blue plastic sheeting. white color. A watering can with a special device in the form of a pedal is installed on one of the supports, which can be bought at a plumbing store.
The shower tank can be made from a 15 liter bucket. (for one person this is quite enough), but you can install plastic container special purpose. One end of the hose is connected to the water supply, and the other end is connected to the tank. From it below a hole is displayed where the watering can is connected. The pedal and the tap of the watering can are connected with a rope. The simplest shower for a summer residence is ready.
Ready shower for a summer residence.
You can buy an inexpensive summer shower in disassembled form. At the dacha he  assembled at a pre-selected place, according to the attached instructions. Its price depends on the internal volume of the booth, the quality of polycarbonate panels, plumbing fixtures (faucet, watering can, shower rack, shelves with hooks), the capacity of the water tank, and the presence of an additional heating system. However, you can experiment with the configuration according to your taste and financial capabilities.
The main thing you need to pay attention to when buying such a shower is the presence of a hygiene passport, instructions for assembly and operation, as well as a passport for the structure.
The indisputable advantage of such a summer shower in the country (see photo) is its transportability and the possibility of storage in winter unassembled in utility room country house. This is one of the most budgetary and low-cost projects for installing a shower cabin in the country in the summer.
Wooden summer shower.
How to make a do-it-yourself shower out of wood? A question of this nature can often be heard from summer residents who are just starting to settle in a summer house. 
Wood is a versatile material. From it you can easily create any design of a shower stall. Working with wood is very easy and interesting. What do you need to create a wooden shower stall? A drawing is preliminarily drawn up and the quantity is determined required material. Metal corners (for the frame), screws, nails are taken as fastening accessories.
The presence of a screwdriver greatly simplifies the task. When everything is ready to start work, you can safely proceed to assemble the frame. It must be made of durable timber with a diameter of at least 80 cm to support the weight of the planned container. Then it is sheathed with boards. Sheathing can be chosen very different, because it performs not only a decorative and covering function, but also strengthens the entire frame. You can also cover the roof with any material. You can use porous polycarbonate, metal profiled sheet, slate.
It should be noted that the cost of such a structure, if you have your own material, will be much cheaper than a finished purchased booth.
Capital buildings of the summer shower. You can build a summer shower in the country with your own hands from bricks, concrete blocks, stone, gas blocks. This method requires the owner not only design thinking, but also special skills. Everyone can build walls, but here the question often arises about the reliability of the structure. What should be taken into account when building a capital building?
 Interior finishing and installation plumbing equipment carried out according to the individual wishes of the owner.
Immediately before raising the container to the roof of the house, it is necessary to install a tap with a spray nozzle. Ready-made tanks for summer showers have a built-in valve system to prevent the tank from overflowing. If it is not possible to purchase a tank, each time you fill the water, you will need to monitor the level. To do this, a hole is drilled under the top of the tank and a tap with a hose removed is installed. When it overflows, water will come out of the hose. Such a signal will indicate that the water supply needs to be shut off.
After installing all necessary components, the container is planted on the roof or next to it. If it is made of polycarbonate, it is possible under the roof. In principle, many summer residents place the container immediately under the cover. In this case, the water will heat up longer. The tank is attached to the base with metal ties. 
Building a summer shower in the country is not difficult. If the cottage is used only in summer, it will be enough to make the simplest shower. If it will be visited in winter, it is necessary to build a permanent structure and install additional equipment for heating water and premises.
Staying at the dacha in the hot summer will bring real pleasure only if you can enjoy the coolness of the summer shower at any moment.
Of course, today trade offers literally everything, including a portable option, but to ensure comfort on personal plot, building a summer shower for a summer residence with your own hands is not difficult. It is only necessary to know the basics of its device and follow the rules for its creation.
The easiest way to get a beautiful front lawn
Of course, you have seen the perfect lawn in the movies, on the alley, and perhaps on the neighbor's lawn. Those who have ever tried to grow a green area in their area will no doubt say that this is a huge job. The lawn requires careful planting, care, fertilization, watering. However, only inexperienced gardeners think so, professionals have long known about the innovative tool - liquid turf AquaGrazz.
A shower installation is one of the simplest summer cottages, which necessarily requires thinking through the option of water supply and drainage.
Standard option - rectangular room having 3 closed sides and an entrance door.
Before construction, it is necessary to determine which option is the most suitable. The owners of summer cottages can use different materials for its construction. Often a country shower is arranged as a frame structure. In this case, strong side walls are not provided, being replaced by light ones, covering from prying eyes. No less relevant are more permanent buildings with brick or block walls.

Today, the following options have become the most popular among summer residents:
Let's take a closer look at the various options.
Equipping a shower in the country, first of all, we determine a convenient place for it. It is preferable to choose open space, allowing airing and drying, best of all - having some elevation above the rest. Most use water heated naturally by the sun. That is why a shady place is not the most the best way.
Thinking through the design, you should not be limited to the area of \u200b\u200bthe shower itself, it is necessary to provide a place for changing clothes.
The most convenient when planning a building are the following sizes:

Preparatory work includes not only creating a circuit, but also preparing a pit for waste water. This will allow the soapy water to collect and prevent it from spreading over the area. The sewer pit can be approximately of the following dimensions: length and width - 100 cm each, depth - 40 cm. It is recommended to fill the bottom of the pit with gravel.
Frequent shower use large quantity people arrange a special drain pit, which is connected by pipes for draining water, laid at an inclination of 3-5 degrees. The optimal distance to such a pit is from 5 to 8 m.
To build a wooden shower, you need to prepare a base measuring 1x1 m, attach four side beams or timber to it and sheathe them.
The frame beams must be strong, so we choose a beam of 10x10 cm for them. The frame racks should be strengthened with the help of corner braces.
You can install a shower in different ways. Frame racks can be fixed in the ground. At the same time, the edges of the beam are protected from decay with the help of machine oil or bitumen, wrapped with roofing material in 2 layers, placed in dug holes and concreted.

You can also make concrete supports as a foundation. In these supports, located 20-30 cm above the surface, frame bars are attached.
Another option for the frame is metal pipes.
Pay attention to the special strength of the frame for the shower ceiling or a special frame for the water tank: a container filled with water has a significant weight.
Important: when sheathing the walls of the shower, it is necessary to leave gaps of up to 3 mm between the beams for their expansion under the influence of high humidity.
In regions with a hot climate, there are options not for complete lathing of walls, but only partial, covering the torso of a person.
After sheathing, the walls should, first of all, be protected from the fungus by using antifungal impregnation for this. And then the building is covered with a water-borne facade acrylic varnish in three layers. This will allow the water to slide easily and roll off without lingering on the walls.
The floor can be made in the form of a grid, allowing water to drain into the pit, or solid, in which water flow is provided.
The last step in the arrangement of the shower is hanging the door.
In the construction of a summer shower, such a construction material like polycarbonate. The construction of a shower structure from it attracts with its economy, ease of creation, durability and ease of maintenance.
Polycarbonate sheets from 8 mm to 15 mm thick, having an opaque color, are well suited for the walls of a shower building. At the same time, they provide good warming up during the day, and in addition, they retain heat for a long time.

The construction begins with the construction of a frame for the future shower.
Important: the polycarbonate shower frame must be further strengthened with vertical, horizontal and diagonal lintels. This will help ensure greater structural stability, taking into account the windage of polycarbonate.
Polycarbonate sheets are cut without any problems with an ordinary knife to the desired size, the edges of the cuts are processed with sandpaper.
To fasten polycarbonate sheets, it is necessary to use special fasteners: hardware with special caps that prevent the penetration of water, and thermal washers. When fastening, the fasteners should not be completely tightened - this will prevent deformation of the sheet.
To protect the inner layer of the sheet from the resulting condensate, it is necessary to drill several holes in it. They can be arbitrarily located on the sheet, a sufficient calculation is 3 per 1 sq. m. In this case, you should not drill a hole closer than 3-4 cm to the edge of the sheet, this will save it from possible chipping.
Important: processing of polycarbonate walls of the shower cabin special means provides additional protection against ultraviolet radiation.

For the convenience of summer residents, ready-made showers made of polycarbonate have recently been produced. The seller can complete everything necessary for self-assembly designs: sheets right size depending on the conceived model, a metal frame, anchor fastenings. At the same time, sellers provide the buyer with the opportunity to choose the color of polycarbonate sheets.
Another convenient way to build a shower room in a summer cottage involves using sheets of corrugated board as walls.
The construction of a shower cabin in this case is carried out similarly to the options already considered, traditionally used as a frame wooden beam or metal pipes. But in any case, the constructed frame also requires additional reinforcement with crossbars.
Fasteners for corrugated board: galvanized self-tapping screws with a sealing washer. Fastening is carried out through one wave. Cutting corrugated board, if necessary, is carried out with scissors or a grinder with a special disk with teeth.

If the arrangement of the summer cottage has just begun, and the construction of the shower is still ahead, but the need for it is already felt, you can arrange a simple construction from auxiliary materials.
In this case, to the metal frame, which can have not only a rectangle, but also a circle at the base, a moisture-resistant material is attached as walls: a dense polyethylene film or a film screen, it is also possible to use a tarpaulin.
After installing the water tank, the shower is almost ready. The floor in it can serve as a wooden grate and a rubber mat.
For all its unpretentiousness, this design has such advantages as:

A more capital and durable structure, which will perfectly fit into the interior of a summer cottage, is your summer shower made of bricks.
In this case, during construction, all norms and rules of construction are observed. brick house. When building a brick house, the following must be considered:
summer shower, even brick,
- the construction is quite light, not requiring a powerful foundation. It is enough to pour concrete into a trench, the depth of which is up to 40 cm, the width is 20 cm.
Important: when preparing the foundation, you should immediately install a drain pipe, otherwise, when laying it later, the foundation will need to be broken.
When choosing the design of the future summer shower, one cannot but take into account such an important component as a water tank. Typically, water is supplied to the shower from a roof-mounted galvanized or metal shower. plastic tank.
When determining the dimensions of the tank, the possible number of users is taken into account. A tank with a capacity of 200 liters is a convenient option, as the experience of many summer residents shows.
Important: the color of the container affects the degree of heating of the water in it. The darker the color of the water tank, the better it warms up by the sun, and therefore the water in it heats up faster.
Sometimes the tank mounted on the frame itself performs the functions of the cab roof.
In showers with walls and a roof made of polycarbonate, it is more expedient to install a water tank under the roof.
Before installing the container on the roof, it is necessary to strengthen the shower head by making a hole in the container.

An important point that must also be thought out in advance is the method of filling the container with water. The most convenient option is to run a special pipe to the tank or fix a permanent water hose. If the option of such an eyeliner is not possible, it is necessary to provide a place for installing a ladder.
Important: when using a suitable container, such as a barrel, as a water tank, it is necessary to protect it from debris and water evaporation by using a special cover.
It is also possible to build a heated outdoor shower for summer cottages. This requires a metal tank for water, in which heating is pre-mounted - a heating element. Sufficient power of the device is 2 kW.
By connecting the device to the power supply system, a heated outdoor shower can be used while in the country, from early spring to late autumn, in almost any weather.
A shower in the country is not necessarily a separate structure. Depending on the design of the site, taking into account the existing buildings, options are possible:

When deciding how to make a summer shower near the house, you must do the following:
As the side rails of the wall shower, natural mesh screens with plants weaving along it can act. The best choice plants - climbing, which will create a reliable and environmentally friendly green screen - loach, ivy, grapes.
The planning of the hozblok is carried out taking into account the placement of the soul there. The utility block is built of bricks or special blocks, it is a capital structure. The shower compartment will require the creation of a water diversion and drainage system. But in the hozblok with its strong walls it is reliable: on its roof you can install large-capacity water tanks.

This option is possible on a plot with large houses under construction, in which there is also a place for a shower room. To do this, in a specially designated place, they mount the purchased ready-made shower stall, which has a special acrylic tray. Water will be discharged with a corrugated hose, to the owners country house you just need to connect it to the sewer.
Manufacturers of building materials give summer residents the opportunity to choose construction options, taking into account any budget. A skillful hands the owner of the summer cottage will be able to build a shower that will successfully fit into the interior of the plot and make the stay at the cottage truly enjoyable for everyone!
The summer time gives us the warm sun, greenery, flowers and a great opportunity to take a shower on fresh air. After the tightness of a city apartment, this procedure brings a pleasant feeling of renewal and unity with nature.
Despite the simplicity of the outdoor shower design, there are many interesting options its implementation. We will get acquainted with the most interesting and profitable for construction in a summer cottage in this article.
It's no secret that you can build a summer shower for a summer residence from different materials. For the frame, you can take profile metal or wooden beams. To fill the walls of the booth, cellular polycarbonate, corrugated board, tarpaulin, plastic wrap, siding, blockhouse are best suited.
In addition to using frame structure, the walls of the shower cabin can be made of blocks or bricks. The washing compartment can be single or interlocked with a toilet. This solution reduces the cost of construction and allows rational use of the area of the site (photo No. 1).

Photo No. 1 "Two in one" - a popular way to combine a shower with a toilet
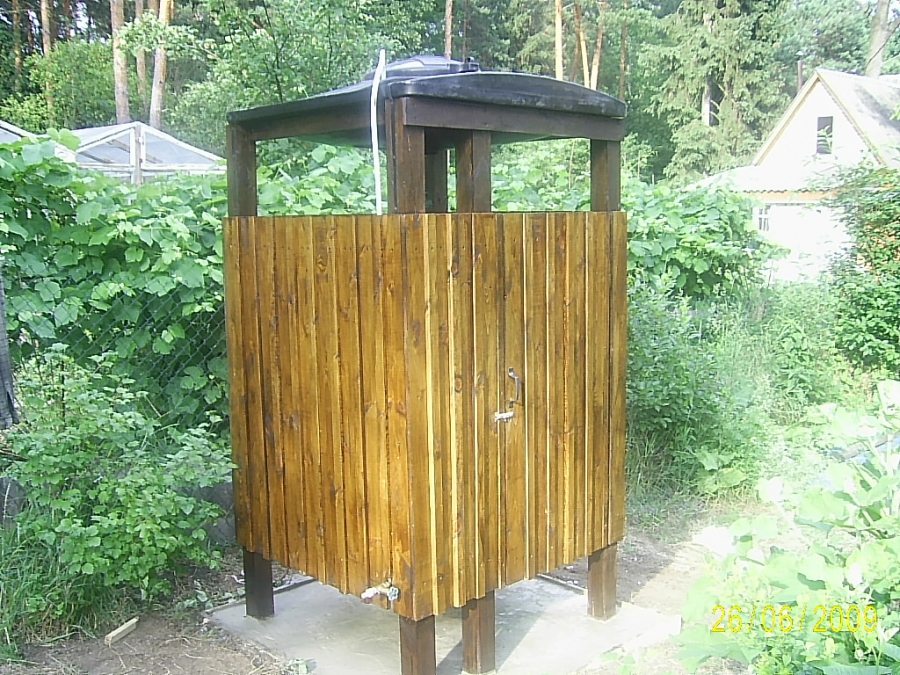
The simplest and most inexpensive outdoor shower is a frame made of wooden bars sheathed with a planed board (photo No. 2-3).
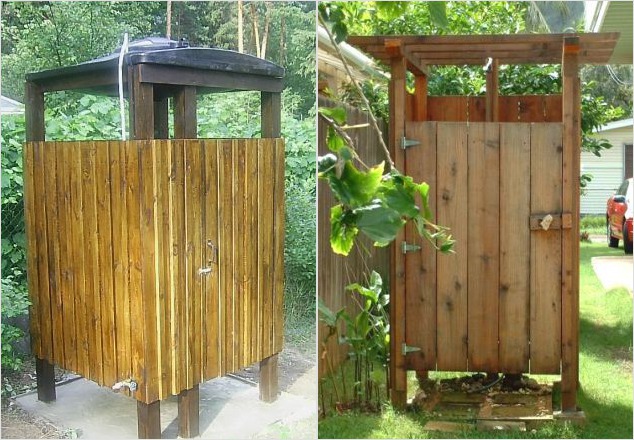
Photo #2-3 Summer shower with a cabin made of timber and boards

Photo No. 4 An example of the simplest prefabricated structure made of timber and boards, which can be covered with an awning
The main thing to pay attention to in this case is the strength of the frame on which the container will stand. The frame racks must be protected from decay and reinforced with corner braces. The concrete floor can be replaced with a standard shower tray by directing soapy water from it into a common septic tank.
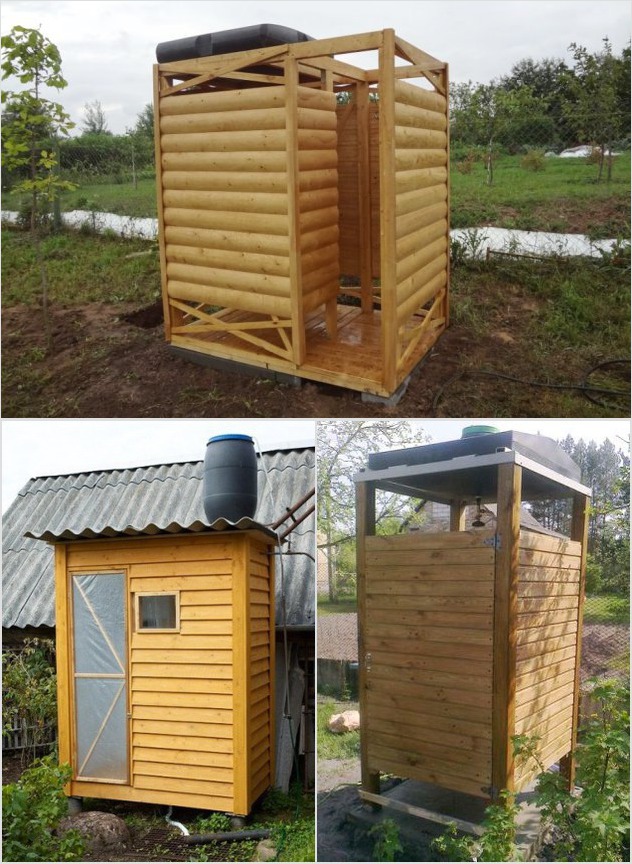
Photo No. 5-6-7 Variants of interesting, but at the same time simple wooden showers
If you have a grinder and welding, then you can make a summer shower with your own hands from a metal profile and cover its walls with a tarpaulin. If welding machine no, then the frame is assembled using threaded connections, and the corners are reinforced with steel plates - “kerchiefs” (photo No. 8-9).
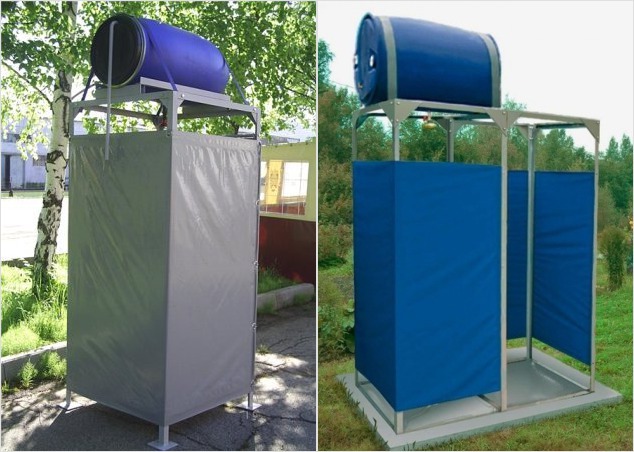
Photo No. 8-9 Summer shower from a metal profile covered with tarpaulin
This version of the shower is more convenient than a single cabin, since it has two isolated compartments: for undressing and washing.
Photo No. 10 shows a garden shower popular among summer residents. It also uses a metal supporting frame, but the filling of the sidewalls is made of a film screen, put on rings and a cord.

Photo No. 10 Shower stall with a metal frame and a screen made of polyethylene film
The metal base of the booth is easily combined with corrugated board. So it turns out a simple and reliable design, well protected from the wind (photo No. 11).

Photo No. 11 Shower cubicle sheathed with corrugated board

Photo No. 12 Garden shower with a dressing room (220x100) from profiled sheet and pipes
In the factory, outdoor shower cabins are most often made using two materials: a profile pipe and sheet polycarbonate. If you want to save money, the same design can be assembled by independent efforts. It turns out aesthetically pleasing, durable and practical (photo No. 13-14).

Photo No. 13-14 An excellent shower for a summer residence - a profile pipe and cellular polycarbonate
The dimensions of this design are designed for the installation of a flat plastic tank with a "watering can".
The shape of the shower cabin does not have to be rectangular and closed on three sides. Photo #15 shows interesting solution based on a wooden beam wall and metal pipe along which the screen moves. You can't put a heavy tank on such a shower. It is designed to supply heated water from a domestic water supply.

Photo No. 15 The original "corner" street shower
A frame for a summer shower is not needed if you attach it to the wall of the house. To do this, you need to line it with a waterproof material and bring the mixer with a hose to the surface. By filling the floor with large pebbles and making a simple drainage, you will get what you dreamed of: a cozy corner for water procedures, filled with air and light (photo No. 16). If you do not like the open version of the wall-mounted shower, then put a lung against the wall as in photo No. 17.

Photo No. 16-17 You can take a shower in summer not only in a cabin, but also near the wall of the building, and the wall shower enclosure will protect you from prying eyes
Weaving plants can be successfully used to fill the walls of an outdoor shower. All that is needed for such a solution is a lattice screen made of mesh, on which ivy, hops or grapes will weave a living carpet.
When considering the materials from which you can build a shower structure, do not forget about natural stone. The option shown in photo #18 will perfectly complement the landscape design.

Photo No. 18 A wall of wild stone, curled up like a snail, is the best place to place a summer shower
Fencing masonry this case performed dry, without the use of a solution. It is not needed here, because a flat stone was used in the work. It is securely held in the wall array due to its weight. The considered option does not involve the installation of a container, since its appearance will spoil the beauty of stone lace. The shower head is supplied with water from an external water supply.
If there is an old tree on your site, do not rush to cut it for firewood. Its trunk can be used as an original outdoor shower installation. Surround it with a curvilinear concrete wall, and your creativity will delight neighbors and friends (photo No. 19).

Photo No. 19 An old tree on the site is not a hindrance, but the basis of the original shower design
Continuing the review of the options for a summer shower, we note that it can be built not only from purchased, but also from inexpensive improvised materials.
In photo # 20 you see such a design. Its frame is made of wooden blocks. Weaving from a willow vine, which grows next to summer cottages, was used as a fence.

Photo No. 20 Simple, inexpensive and beautiful - a wooden frame sheathed with willow vines
If you are going to build a utility block of bricks in the country, do not forget to plan a shower compartment in it (photo No. 21-22).

Photo No. 21-22 Compact hozbloki "shower shed" from blocks
On the solid stone walls of such a structure, you can easily install any volume and shape.
Shower cabins of factory production are presented in several options. In some, the metal frame is equipped with a screen made of synthetic fabric. Others are sheathed with cellular polycarbonate or completely made from modular plastic panels. The buyer is offered two planning solutions: an outdoor shower with and without a dressing room.
The average price of an outdoor shower with a moisture-resistant awning and a 200-liter plastic tank (heated) is 15,000 rubles. For a frame-tent structure, supplemented by a locker room and a washbasin, you will have to pay at least 18,000 rubles.
A single cabin made of cellular polycarbonate on a galvanized frame with a heated 200-liter tank can be bought at a price of 20,000 rubles. This design can be supplemented with a locker room, paying about 5,000 rubles for it.
Summer shower cabin made of plastic metal frame, equipped with a heated tank will cost no less than 24,000 rubles.
Note that prices can vary greatly in the regions of the Russian Federation, so you can get the most up-to-date information from local manufacturers.
The choice of material in this case depends on the set of tools that you have. If the farm does not have a welding machine and a grinder, then the frame is made from planed bars. You can sheathe it with a board, plastic clapboard or simply fix the film waterproof material on the racks.
A summer shower made of polycarbonate on a metal profile is more durable than a wooden one and is not much more difficult to assemble. For this work, you need to prepare a steel corner 50x50mm or a profile pipe with a section of 40x20mm (wall thickness 2 mm). The number of purchased profiles is calculated based on the dimensions of the shower: height 2.1 meters, length and width - 1 meter.
Cabin dimensions may differ from those indicated, since its length and width depend on the dimensions of the purchased tank. The length of the racks must be taken 10 cm more than the height of the frame (for concreting).

It is more convenient to assemble the sidewalls on a flat asphalt or concrete platform, using the welder's magnets to fix the profiles.
The sequence of operations looks like this:

After that, it remains to weld the door frame and fix the hinges on it. The work is completed by cutting the cellular polycarbonate and fixing it with self-tapping screws to the shower frame. To collect water, you can use a steel pallet or, at the concreting stage, make a drain channel by installing a ladder and a sewer pipe in it.
V last years a shower in the country has ceased to be a luxury. After a day of work in the garden and in the garden, a shower will help relieve stress, cleanse not only the body, but also the soul. Moreover, the installation of a country shower does not require any huge efforts. All difficulties arising on the way to cleanliness and comfort can be overcome if you approach the matter wisely.
Even if so far your summer cottage is just a flat piece of land that has not yet been “overgrown” with any buildings, you cannot do without a country toilet: the need for this building arises after 2-3 hours of being in the country.
Modern man strives to live in as much as possible comfortable conditions. That is why the question "how to build a country shower and toilet?" should be treated responsibly.
A dacha for a modern urban dweller is a place where he wants to get a charge of vivacity and relax. However, dreaming of outdoor recreation, an urban person does not want to give up the comfort to which he is accustomed. Therefore, the question of building a country shower, as a rule, confronts every owner of a summer cottage.
Although today the offer of ready-made country showers is quite large, most summer residents still prefer to build this “piece of civilization” with their own hands. This is a serious opportunity to save money, get a building that will reflect the individuality of the builder, and in addition, make the shower convenient for yourself and your family.
The simplest device for a summer shower: a tank with a tap, a hose and a shower head. Such a shower is usually arranged near the house.
The tank must be fixed above the height of a person so that it is in the sun.
A hose is put on the tank tap, on the second end of which a shower head is attached. Often such a shower is adjacent to the wall of a country house. Therefore, it is very important to protect the wall of the house from the destructive effects of moisture. For this, tiles, oilcloth or water-repellent coatings are suitable. True, without a shower stall, the shower is not protected from the wind and is only suitable good health people.
On a note
To install such a shower, it is very important to choose the right place: it should be an open area on a hill. Since the water will heat up in the sun, it is very important that the tank is not shaded by trees or country buildings.
In this case, a flat tank is mounted on four high racks. Thus, the tank becomes a roof.
A hose is put on the tap in the tank, and a watering can is placed on its free end. Racks are fitted with any moisture-resistant material, and on the ground
On a note
Tank is best to choose black or others dark colors- so it will attract the sun's rays, and the water will heat up faster.
Very often today summer residents prefer a polycarbonate soul. The advantages of such a soul are many.
Firstly, it is easy to clean, in addition, it quickly warms up by the sun and retains heat for a long time. This material does not mold, is not afraid of water, it is easy to build and very durable. Well, another undoubted plus is a huge selection of colors of this modern material. 
Polycarbonate does not need to be painted, and it will perfectly fit into any "interior" of a summer cottage. Also in favor of choosing polycarbonate, we can say:
However, it is unacceptable in winter to clean snow from a polycarbonate shower stall using garden tools. Do not wash with hard washcloths and sponges. Due to the low weight of polycarbonate on a windy day, the construction of a shower is not possible.
Nothing complicated
For those who love comfort

The above options for a summer shower are not suitable for those who love comfort and coziness. A more thorough approach is to build a special building for a summer shower, something in between a bathroom and a bathhouse. This work should not be taken lightly, because such a building should stand for more than one year, be convenient and economical in operation.
This means that you will have to take care of a reliable foundation, solid walls, a water heating system and an outflow of used water. Any construction begins with a project. It will help you calculate required amount building materials for a summer shower and determine the order of work.
Operating procedure
We are preparing a site for construction. The first step is leveling the ground. On the site it is necessary to make a slight slope so that the water drains. Most likely, more than one person will use the shower. This means that you will need a drainage pit.
Drainage hole.
It should be arranged at a distance of 200-300 cm from the shower house.
The height of the frame should be from 250 to 300 cm. So, you need a foundation. Possibly pour strip foundation. And you can just make bars-supports.
If a strip foundation is selected.
The strip foundation is suitable as a base for both brick walls (if you decide to build a brick shower) and wooden ones. For masonry, it is necessary to dig a trench, bring it above the zero mark, fill it with cement mortar. The role of waterproofing will be performed by roofing material in several layers. The foundation is filled with crushed stone, rubble stone, gravel or broken brick. Coarse-grained sand and gravel are poured into the trench in layers of 15-20 cm, each layer should be compacted and poured with water. At ground level, the foundation is poured with cement mortar. The plinth is made of brick and is insulated with two layers of roofing material. On the outside of the foundation, it is necessary to make a blind area about a meter wide with a slope to divert water from the foundation and walls.
The columns are placed at each corner of the building, as well as at a distance of no more than 1.5 m from one another. Such a foundation is suitable for a fairly large shower house. Under columnar supports with a diameter of about 20 cm, holes are dug below the freezing level of the soil with a diameter of 25 cm. Asbestos-cement pipes can be used as columnar supports. The pit is half filled with sand, the sand is poured with water and rammed. Asbestos-cement pipes are cut to the desired size. Each piece of pipe is wrapped with a layer of overlapping roofing material for insulation. The pipe is placed in a pit, sprinkled with fine gravel 50 cm long, after which a concrete solution is poured into the pipe to a third of its height. We raise the pipe, the concrete spreads along the bottom of the pit, creating solid foundation. After that, the pipe is pressed into the concrete, reinforcement is inserted into it, and the space between the walls of the pit and the pipe is filled with fine gravel to the very top. The next step is to fill the pipe with concrete completely. Concrete must be compacted - thus, the air will be removed from the concrete and its strength will increase.
Shower house - light structure, and often just wooden support bars are enough. To install them, pits about 150 cm deep are drilled along the perimeter of the future building. Support bars are installed in these pits, the lower part of which is treated with an antiseptic composition against decay and other effects of exposure high humidity and wrapped with a layer of roofing felt or roofing felt. The supports are poured with concrete. It is very important that the supports are strictly vertical. To determine their verticality, you must use the building level. We give the foundation to "freeze" - this will take several days.
Then the frame is erected, the upper and bottom trim frame.
The rafters are attached to the top harness. Roofing iron is laid on them, which perfectly reflects light. Thus, the water heats up quickly enough.
Now it's time to install a container for a summer shower on the roof. Its volume is calculated based on how many people will use the shower. For three people, a capacity of 100 liters is enough, if the family is larger, you can use a two-hundred-liter barrel. You will need an appropriate lid for it, the container is painted black so that the water is heated by the sun's rays faster, and under the lid it will evaporate less. The barrel must have a threaded outlet and a faucet with a shower head.
by the way
A little trick: a greenhouse above the water tank, thanks to which the water heats up faster and cools down more slowly. Supports are installed along the perimeter of the tank, and polycarbonate sheets are fixed on them from all sides.
If in a shower house you need hot shower, questions of hot water supply in the country, read below.
A hose and a pump can be used to pump water into the tank. Or you can simply pour buckets of water into the tank by placing a ladder against the wall of the shower. An obligatory part of the tank is a level for measuring water. You can install a valve in the tank that will shut off the water when the barrel is full.
The walls of the shower, as already mentioned, can be made of wood, as well as slate or profiled sheet. When using wood, wood protection measures are very important. The walls of the shower should be covered with impregnations that will protect the wood from mold, rot, insects, etc.
Floor covering. If the shower house provides for a dressing room, this room and the washing area must be separated by a high threshold so that water does not flow into the dressing room. The floor in the dressing room is covered in the usual way. In the shower itself, a tray is installed, a drain pipe that goes to the gutter. If the drain has not been made, and the shower will not be used daily, the floor is simply made slightly sloping, with slots for water to drain.
It is very important to choose the right wood for the butt in the shower: the moisture content of the boards should not be higher than 10%, most often it is pine, spruce, birch. Logs are also made from the same tree, but bars or logs of the 2nd and even 3rd grade are suitable for the log.
Floor boards should be well sanded. And it is undesirable to varnish or paint them, especially if you plan to supply hot water, since paint coatings under the influence of high temperatures will actively evaporate.
In the locker room and in the soul itself, the floor is laid in different ways. In the washing room, the floor is equipped with special drains that will drain the used water. And in the locker room, the floor must be dry and have the ability to retain heat.
Installation lag
This is the first stage of laying the floor. A bar for floor support logs is usually - rectangular shape. Such a beam is laid directly on the foundation.
The boards are nailed to the logs in one direction, leaving a gap of 10 mm from the floor to the wall.
In the shower, when laying the floor, it is important to take care of the flow of water. If it is sandy soil, it is enough to dig a hole (1 x 1 m) under the floor and fill it with rubble. Otherwise (especially when it comes to soils with a high clay content), you should take care of the sewage system before laying the floor. Clay soil does not absorb water well. Therefore, water is diverted from a specially completed pit, from where it flows through a spillway pipe into a pit located more than two meters outside.
When laying the floor, a slope is created at some point (usually in the center of the shower room). A funnel is placed under this point, the junction of which with the floor is carefully sealed. A sewer gutter is attached to the funnel. The floor can be raised by placing wooden bars between the joists or thinner joists placed closer to the center. The steepness of the slope is approximately 15-20 mm per meter of floor. With this design of the drain under the floor, it is easy to place a layer of insulation.
You can also make the floor in such a way that its center is higher than the corners, and the slope, respectively, is towards all the walls. In this case, the extreme logs are made thinner than the central ones, and a gutter is laid along the perimeter of the room, from one of the joints of which a drain is arranged. Sometimes a slope is made to one wall.
Leaking floor
Such a floor is suitable, provided that the shower is on sandy soil, which has good absorbent and thermal insulation properties. In this case, the slope is not
female The first board is laid from the wall (retreating the necessary gap), perpendicular to the direction in which the logs were laid. Nails
it is better to choose galvanized ones, this will give them protection against rust. The boards are nailed to the logs, maintaining gaps of 3-5 mm from one another.
Door installation
A moisture-proof curtain is placed between the shower and the changing room. If the shower house is a solid structure, you can make a door between these rooms.
And finally, the appearance of the shower house in landscape design your site.
Washing is an intimate procedure, and therefore it is important that the shower house is hidden from prying eyes. Tall trees, decorative hedges, etc. will help. The area adjacent to the summer shower is usually decorated with plants planted in a tub, ornamental shrubs and sometimes even garden sculptures.
 This elegant solution allows you to immediately solve several problems in your summer cottage.
Hot shower is not a luxury
Having a water pipe in the country with hot water, you can make life very much easier for yourself and your family: after all, this allows you not only to wash the dishes calmly and comfortably, but also to arrange a hot shower. The easiest option for plumbing can be done in the country with your own hands.
Usually, in a standard country house, cold water is supplied to the house. Let's say we want to have two points of water intake: in the kitchen and in the shower house. There are two issues that need to be addressed here: first of all, it is necessary to create a source of hot water supply, and also to solve the problem low pressure in a cold water supply.
Possible sources of hot water supply:
As for the low water pressure in the plumbing: very often at the outlet we get a thin jet of water, which is not enough to organize a shower. Installing a pump will help solve this problem. Thus, it is required to install a storage water heater, a pump, a filter for water purification, and also to make a dilution of the water supply to the kitchen and to the shower house.
Pros and cons of different models of water heaters
| Gas water heater | The country version of a gas water heater can be installed directly in a country house. Gas heaters are suitable for use only if the main gas is connected to the country house. They are very economical in comparison with electric heaters. Reliable and easy to use. However, their installation requires a project, which must be agreed with the gas service. Installation of such equipment is carried out only by specialists; it is forbidden to install a gas water heater on your own, as it is dangerous. |
| Electric water heater | It is also suitable for installation in one of the premises of a country house. It is more environmentally friendly than gas, and it is also much safer. Modern models are quite beautiful and will not spoil the interior of a country house. These water heaters are fully automated, and therefore convenient. No special permissions are required to install them. However, these heaters are quite expensive to buy and operate: they have expensive “fuel”, and besides, they depend on the presence of voltage in the network. |
| Diesel, solid fuel, combined | Requires installation outside a residential building. You will need a separate building under. Note: If you decide to build a boiler room in your summer cottage, it is preferable to buy a heater model that provides not only hot water supply, but also heating. |
| Wall mounted water heater | This is the most budget option - as a rule, such water heaters are not expensive and compact in size. However, these models, as a rule, have very serious installation requirements (in particular, for a bulk water heater). They can only be installed on a solid wall with a non-combustible coating. There are also very strict requirements for distances to building surfaces. |
| Floor water heaters | Safer - the boiler cannot fall, since only horizontal supports bear the load. If the summer resident has a large family with children, this is the preferred option. There are models that require partial wall or wall mounting. |
| Instantaneous water heater | As a rule, these are wall models of water heaters. In order to choose a place for them, you should consider the location of the outlets. These water heaters are economical and give out hot water after 30 seconds. However, the disadvantages include low productivity: you will not get a large pressure of hot water. |
| storage water heater | Suitable for those families who need a large amount of hot water during the day. The pluses include the fact that hot water will be supplied with great pressure. On the downside, in addition to the high price, the fragility of the tanks - corrosion of internal parts quickly disables them. Storage tanks are made of steel or cast iron. |
On a note
A mounted storage water heater with a volume of 50 liters, as practice shows, provides enough hot water for a family of two or three people. The water heats up for about an hour.
As a rule, summer residents who come to the dacha only on weekends, and then in the “summer season”, only need a small water heater. If people live in the country all the time, and sometimes even all year round, it is better to approach the solution of the problem of hot water supply and heating in a comprehensive manner and put up a building for a boiler house on your site.
A double-circuit connection scheme for a water heater in a country house, provided with a diesel, solid fuel or combined device, is a very economical and durable solution. The system is mounted once and in the future only support it quality work. And in this case, the best option for heating water is an indirect storage water heater.
The installation of boiler equipment has a number of disadvantages: it requires material investments and is laborious in itself. However, all investments pay off very quickly, and such equipment has been operated for several decades.
| Wood-burning water heaters for summer cottages | The advantages of such water heaters include the cost-effectiveness of their operation. In addition, in addition to firewood, as a rule, it is possible to use other types of solid fuels - briquettes, coal briquettes, coal, etc. Modern solid fuel water heaters do not require cleaning out soot and constantly reporting fuel to the furnace. Once having laid firewood or other fuel, a summer resident can be free: the system will maintain the set temperature using fuel very economically. There are models with tanks of large, medium and small volume. The volume is selected based on the needs of the family. |
| Diesel water heaters | They have not yet gained popularity among domestic summer residents, but in Europe they are widely used to supply hot water to country houses. Ease of use due to the fact that it does not need to be loaded with fuel. Its flow is regulated for a long period by automation, which is tuned to the temperature indicators you set. It is possible to switch a diesel boiler to gas consumption. It is not difficult to connect such a water heater in the country. Big choice tanks of different volumes allows you to find the required volume for your family. |
We install water supply with a storage water heater
On a note
Sometimes summer residents are used to increase the pressure in the water supply garden pump with automation. However, this is also not the best option: it requires a lot of space and is very noisy.
A fine filter is placed after the pump, since for it to be pushed through it must be high pressure. With its help, water is purified from the smallest particles of impurities, and its main function is not only to protect water, but also to protect the water heater: so its service life will be much longer.
On a note
Water from the country water supply should be drained for the winter. This is done using a check valve on storage water heater. After that, open the cold and hot water taps to drain all the water remaining in the system.

Very often, washing in a country bath is carried out by the old-fashioned method, with the help of basins, pelvises and ladles. But a bath shower will provide much more comfort.
If cold water is not supplied to the bath, water should be supplied from central water supply or from a well, a well.
If cold water is supplied to the house, the issue is solved by laying pipes to the bath. This can be done in two ways.
the fact that it is quite simple and cheap to do this. Plastic, metal and even rubber pipes are used. But this is a method suitable only for use in the warm season.
If there is a need to organize an autonomous water supply for the bath, a separate well (well) is equipped. This is a rather expensive option: you will need to drill a well, purchase and install a pump, plus the cost of insulation.
There are certain objective reasons why the arrangement autonomous water supply baths become very expensive and complicated.
To supply hot water to the bath, as well as to organize a hot shower in a shower house, water is heated using storage or instantaneous water heaters. The most economical option for a shower in a bath is heating water in an ordinary tank, where the water is heated due to the fact that the stove is heated. Such tanks can be either built into the furnace or remote. For hot water supply of a shower in such a tank, a separate connection is provided.
Pipes from a tank or water heater lead to a shower mixer. The water temperature in the shower is regulated by a valve valve, as in a shower in an apartment.
Modern summer residents use metal-plastic or polypropylene pipes: these modern materials are distinguished by a long service life and resistance to any damage, including corrosion resistance.
They are easy to install and also much cheaper than metal pipes.
On a note
In addition to pipes for mounting a hot water supply system, you will need fittings - parts that allow you to connect parts of the water supply system, couplings for splicing straight pipe sections, elbows for turning, tees for branches. How many parts are needed will depend on the length and configuration of the pipeline. The mixer and heater are connected to the system using hoses.
When installing polypropylene pipes, remember:
Physicist and astronomer Stefan Feeney of University College London, one of the...

Introduction Military monastic orders, orders of chivalry, orders of meritIn 1120...
