INSTRUCTIONS AND PROPHECIES OF THE Blessed MOTHER ALIPIA GOLOSEEVSKY, Kyiv...


How difficult or simple is it - do-it-yourself electrical wiring in the garage. You will now learn about what the wiring diagram in the garage must include, what materials to use and what electrical appliances to install.
If you are not afraid of wire cutters and pliers, the word PUE is not a curse, and the abbreviation PUGNP does not put you into a state of deep trance, then do-it-yourself electrical wiring in the garage, the scheme of which will be discussed in our article, will be quite within your power.
We will not design a mini-car service with lifts, a machine park and several welding stations. As well as we will not be limited to the "grandfather's option" with a single light bulb in the center of the ceiling and a socket for connecting the "carry". So let's get started.
The standard garage wiring diagram includes:
You can work in the dark, but without much pleasure. And we need to make sure that staying in this sacred place for a motorist brings only positive emotions. In addition, crawling with a flashlight in search of a runaway nut is not included in our plans, which means we will start with lighting.
The more light, the better, but there is absolutely no need to cover the entire ceiling with lamps. You can correctly position several fixtures to get uniform lighting.
For domestic use it is enough that we have:
Of course, the luminaires must be protected from destruction in case of mechanical impact, and ensure the safety of the user in case of moisture ingress is not worse than IP65.
As one of the schemes for installing luminaires, we can recommend the location of linear fluorescent luminaires under the ceiling closer to the walls. These lamps will provide general lighting. For a standard garage of 4 x 6 meters, 2 36 W lamps are enough on each side and one at the back wall and near the gate.
Illumination of working areas of workbenches will be performed protected LED lamps directional radiation with an operating voltage of 12 volts.
They do not heat up, which eliminates the possibility of getting burned, and the voltage below 36 volts eliminates damage. electric shock in case of lamp failure. In addition, they are the most efficient use of electricity.
We illuminate the observation pit with anti-vandal LED lampshades with diffused light. The supply voltage is 12 volts, we place the transformer in the electrical panel at the entrance to the garage. In a medium-sized pit 1 x 4 meters, it is enough to install in checkerboard pattern 3-5 small lamps.
 We place sockets in such a way that they are convenient to use, however, the location should exclude the possibility of inadvertent damage to the sockets themselves. Usually they are placed 60 centimeters from the floor.
It is most convenient to place 2-4 sockets above the workbench, 1 socket near the light switch, and 1 near the gate.
These must be moisture-proof sockets with a grounding contact and with a cover. Installing an outlet in a viewing hole is undesirable; it is better to use an extension cord if necessary.
In order to save energy, we will install switches with two keys, so we can adjust the intensity of lighting in working area. The switch is placed 15 centimeters from doorway at a height of 1.5 meters from the floor.
We install a separate switch on the lighting in the inspection hole so that when it is turned off, it de-energizes the transformer.
If at the time of the construction of the garage hidden wiring was laid in the walls, we use it. However, in the absence of such, we do not waste our strength on ditching the walls. Let's make an open wiring.
Cables are laid in metal pipe, corrugation, cable - channels, or in a self-extinguishing tube. It is advisable to use non-flammable cable VVGng or NYM.
For lighting, it is enough to use a copper cable 3 x 1.5 mm 2; for sockets above the workbench - 3 x 2.5 mm 2; for a socket designed to connect a high power load - 3 x 4 mm 2.
 Since they not only put a car in the garage, but also sometimes work, it is necessary to ensure safety, both electrical and fire. To do this, we must use a differential machine or RCD together with grounding.
We lead the ground wire from a common shield, the wire must have a cross section of at least 6 mm 2. In the absence of a grounding bus in the shield, we make a point grounding.
At the entrance to the garage, we install a shield on which we mount an RCD with a rated current not less than that allowed for your garage in a cooperative. In the case of a garage in a private house, 32A will be optimal. We select differential current no more than 30 mA. Temperature conditions - appropriate minimum temperature in your region.
The ideal option is to use separate RCDs for lighting and sockets. If the protection of the outlets works, then you can figure out the reasons for what happened in the light.
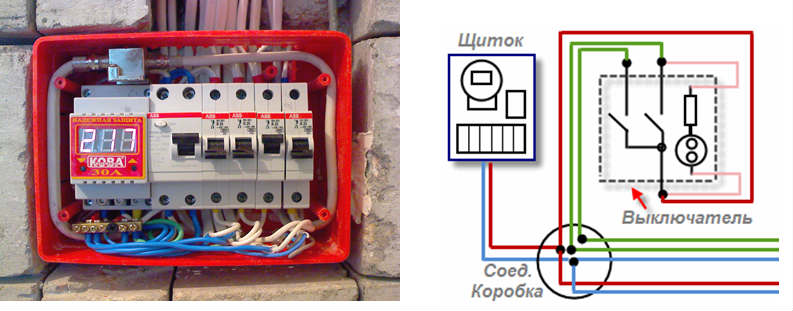
Below is a drawing of an exemplary garage protection scheme.

But if you plan to use a separate RCD for 32-40 A, then install a regular “automatic” 25A on the sockets after it, and 10A on the lighting. This is quite enough to connect the main tools to the sockets in turn.
 If you like to be in the garage and make something with your own hands, after a while you will have the necessary minimum of a power tool.
To be ready for this, it is better to plan the load on the power grid in advance and take this into account when drawing up the wiring diagram in the garage.
Below is the approximate power of household electrical appliances:
As you can see, we do not foresee anything heavy-duty, which means that we chose a cable with a cross section of 4 mm 2 and a 25 A circuit breaker correctly.
Below is a table for selecting the wire section for permissible power and current.

As a conclusion, it is worth noting that the time, effort and money spent will certainly bring you satisfaction from the work done. And high-quality do-it-yourself wiring will allow you to be confident in the electrical and fire safety your garage.
Video about self-manufacturing garage lighting.
The issue of connecting the garage to an external power source is decided individually, depending on where it is located and what it is supplied with. In any case, external connections should be entrusted to a specialist. But the internal wiring in the garage for any car owner who is at least a little versed in electronics will not cause difficulties.
It is about the organization of electrical / wiring in the garage itself that will be discussed further.
Not all owners of boxes adhere to generally accepted norms. Everyone lays lines and mounts circuit elements in a way that is easier and more convenient for him. In addition, garages are different - in size, material, interior arrangement. Therefore, the author considers it completely pointless to impose specific schemes. But to recall the basic rules and regulations for the installation of electrical / wiring, give a few useful advice will be superfluous.
It should take into account all the features of the garage and its arrangement (the presence of a viewing hole, the location of workbenches, shelving, and so on). It is necessary to immediately decide which sectors of the box need to be powered. For example, lighting in the cellar should be mandatory. Plus - a line for an electric / sharpener, a work shield with for connecting an electric / tool, a charger, and the like. How much will it take lighting fixtures(depending on the size of the garage and the presence of a viewing hole)? Accordingly, it is determined optimal scheme wiring.

Even at the stage of connecting to an external power source, you need to decide on the number of phases “wound” into the garage. It will not be very convenient to work with one, especially if it is supposed to be installed in the box big number various devices and equipment that need to be connected to the network (lamps, mini-machines). In this case, it is advisable to bring 3 phases into the box, and evenly distribute all loads between them.
A separate topic is grounding (). This should not be neglected; there should be at least an elementary circuit, since every garage owner will definitely have to deal with connecting fairly powerful equipment. For example, welding machine. Therefore, if you are engaged in arranging the wiring in the box, then taking into account the perspective. So more reliable.

It is necessary to lay different lines for lighting and sockets. Accordingly, select the wires of the optimal section. This will slightly reduce the overall cost of electric / wiring in the garage. In this case, it is necessary to provide for its sectoral lighting.

In addition, it is advisable to put your own circuit breaker in each line. Even better - in conjunction with the RCD. Or instead of them -. Since there are no windows in the garage, a malfunction in one of the threads will significantly complicate its search and elimination. Installing protective devices in the circuit will allow you not to turn off the light completely throughout the room.

If the owner plans to use a powerful electric / heater in the garage, especially a home-made one (which is most often done), then a separate line is necessarily laid for him. At the same time, even at the stage of designing the electrical wiring of the box, it is necessary to immediately select an external cable with the corresponding cross-sections of the cores.
All routes are laid, as in other rooms - in a straight line (horizontally and vertically). No zigzags, corners are allowed.
The distance of the wiring from the ceiling (ceiling) is 100 mm, at least.
Luminaires installed in the inspection pit should only be closed type. With high humidity in the garage, it is advisable to install devices designed for low voltage and connect them through a transformer (12 - 36 V).
Recommended (minimum): for switches - 150, for sockets - 60 (cm). It is necessary to foresee in advance the possibility of using any device powered by the 3-ph line when working in the garage. Therefore, it is desirable to install at least one such outlet.

The garage is a room with high humidity. In addition, the vast majority of motorists cannot boast of heating in the box. Consequently, regular temperature jumps, since the sashes garage doors periodically open/close.
It is necessary to take into account the possible load. After all, a motorist has to work not only with a low-power electric / drill, but also with a “grinder” or other tool. Often you have to turn on the welding machine. Therefore, it should be calculated for a current limit of 16 A, which corresponds to the power of the connected equipment of about 3.5 kW. As a rule, more is not required in the garage.
Installation of power lines should be carried out only in protective sleeves (corrugation) or plastic cable channels. Especially in a metal garage! If this is neglected, then safety precautions can be forgotten.
On input field line you need to put a shield in the garage (there is a sale different sizes, with mounting rails installed). It is mounted, in addition to other devices, and the central switch, so it should be placed next to front door, for ease of use.
It is not recommended to assemble the circuit on various boards (fiberglass plates, plywood, etc.). Firstly, due to the specifics of the premises (primarily dampness), and secondly, due to the poor maintainability of such an assembly. After all, the board will have to be fixed to the wall, and access to its back side (for example, to replace a device) will be complicated.
It is advisable to use cable products with copper conductors for wiring (). First, aluminum breaks easily when bent. Any re-assembly, re-wiring will require cutting off the ends of the wires and stripping them. Practice shows that a gradual shortening of the line cannot be avoided. Therefore, you will have to make an increased supply of wiring along the length. Secondly, with the same calculated current rating, aluminum conductors must be of a larger cross section than copper ones. Working with them will not be so convenient.
The recommended method of line installation is open. First, it greatly improves the maintainability of the wiring; secondly, it reduces the amount of work (you don’t have to); thirdly, if you subsequently need to make additional wiring, change the line routing, then there will be no problems. Although there are also opposite opinions. Probably, some contradictions are caused by the fact that we are talking about a completely different garages. For example, metal boxing and foam concrete blocks. And yet, the author considers open wiring to be the best option.
Twists in the wiring are not allowed. Especially when it comes to splicing conductors, the cores of which are made of dissimilar metals (aluminum and copper).
Information is enough. But these are just some recommendations. general plan. How to wire in own garage It's up to you, dear reader.
For the convenience of using the garage, it is extremely important to carry out the necessary communications. This includes sewerage, plumbing and electricity. If you can still do without water and sewerage, then you can’t do without light. Therefore, after finishing construction works do not forget to conduct electricity. Even if you have been using the garage for some time, wiring in the garage will not be superfluous. This article will be devoted to this issue. In addition to the theory, we offer you an interesting video material and photographs, which depict individual work processes.
The first step on which success in this business will depend is the creation of a wiring diagram. It is important to think over and produce necessary calculations. So, when planning a circuit, be sure to determine the place where the input will be power cable. Also designate a place for an electrical panel, a place for installing light bulbs, switches and sockets.
When creating a wiring diagram, pay attention to the following nuances:

Advice! It is not necessary to lay electrical wiring in a single-phase garage. It is better to lay a three-phase, which will cope with possible loads.
Before you make electrical wiring in the garage, you should pay attention to other technical nuances. In particular, what are the requirements for it. As a rule, the garage is mostly occupied by its owner, so the electrical wiring must be reliable, functional and safe. As for aesthetics, it can go by the wayside.
As for safety, it is better to give preference to closed wiring. What if you have a metal garage? Of course, laying a closed wiring does not work. In this case, special corrugations will come to the rescue, in which the cable is laid. These corrugations are attached to the surface of the walls.
Advice! Be sure to ground. Especially if you have a metal garage, without grounding anywhere. This will increase operational safety.

Another important nuance that cannot be ignored is dampness. It is available in almost all garages, since in most cases there is no heating. Accordingly, buy fixtures with protection class IP44 and more. It has already been said above that it is better to lay a three-phase electrical wiring. This will be a huge plus if you need to equip a workshop in the garage.
Important! Laying three-phase electrical wiring in the garage requires special permission from the energy supervision. Therefore, obtain all permits in advance so that you do not have to pay fines.

To make electrical wiring in the garage with your own hands, you need to assemble a suitable construction material and tool. So, from the tools, you may find it useful:
From the materials you need to purchase:

As already mentioned in this article, there are 2 methods of laying electrical wiring in the garage:
In the first case, strobes are made into which the cable is laid. The wires are fixed in the gates with alabaster or special plastic brackets with an interval of 300 mm. Further mounted also in a hidden way distribution boxes. After checking the system for operability, all strobes are plastered.
Advice! Take a photo of all wires. Such pictures will come in handy if after a while you want to hang shelves or drill a hole. Otherwise, you can forget exactly how the wires were laid and break through the wiring.

Another method is external. It's simpler and cleaner. Mainly used in metal or concrete garages where it is problematic and unrealistic to make strobes. Special boxes are fixed along the walls, along which electrical wiring is laid. The cable is placed in a special corrugation, which will protect it from moisture and other mechanical damage. It is also necessary to use reliable fasteners that will allow you to keep the wiring unchanged for a long time.
In order for the wiring in the garage to be done according to the technology with your own hands, we suggest that you familiarize yourself with the step-by-step instructions. All works consist of several successive stages. It is better to start this stage when you have already developed a scheme. According to it, it will be easier for you to make an accurate calculation of the material and, in fact, to perform installation work electrical wiring in the garage.
It is also worth saying a few words about the features of the design of electrical wiring in the garage. Divide the lines into lighting and sockets. Also divide the garage lighting lines into a left side and a right side. You can separately draw a line into the viewing hole or in the center of the garage. Thanks to this, you can save light by turning it on only where it is really needed.

So, first of all, the installation of an electrical panel is carried out, in which all the wires will be decoupled. An input cable is also supplied to the shield. Next, scatter wires for sockets, lighting fixtures, switches, and more. The method of attaching the wire depends on which laying method you have chosen. If outdoor, then first lay the box. If internal, then initially with the help of a puncher and a chisel you make strobes. It is a dusty and labor intensive process. However, the end result will please you.
To simplify the task of making strobes, first, according to the scheme, mark all the walls. Having drawn the places for laying wires, sockets and switches, you can start dusty work. Further, having laid all the wires in the strobes, you should grab them with alabaster or plaster. After, junction boxes, boxes for sockets and switches are installed.

All cables are bundled in junction boxes. It is important to do everything exactly. To connect the wire, it is better to use twists. They will provide reliable contact. If all wires and boxes are installed, you can plaster all the gates and places around the junction boxes.
When everything is dry, you can proceed with the installation of switches, sockets and lighting fixtures. As you can see, making electrical wiring in the garage is not particularly difficult. Additionally, we suggest that you watch a video that is devoted to our issue, namely, how to make electrical wiring in the garage with your own hands:
Wiring your garage is not that difficult. However, this requires a lot of attention. Therefore, the following tips and recommendations will be quite useful:
Given all the tips and tricks, we are confident that you can do the wiring in the garage on your own. Remember also that voltage should be applied to the wiring only after checking for correct installation. For this, a special unit for measuring resistance is usually used. If certain defects are found, do not be lazy, but immediately eliminate them. This will allow you to safely start the electrical wiring in the garage.
So, we have thoroughly considered with you the question of how to do the wiring on our own. This is quite real, the main thing is to be careful at every stage. But keep in mind the fact that if you have never dealt with electrical wiring before and you feel that you cannot handle it yourself, then ask for help. So, you can prevent a lot of problems. Moreover, you will avoid unnecessary waste of building material. In addition, we suggest that you carefully read the photos and diagrams in this article. Also watch the video, which clearly and simply shows how to complete the task. We are confident that the material provided will be useful to you and you will be able to handle all the work yourself.
The premises in the garage cooperative, as a rule, are also used as a workshop. Locksmith work, repair and maintenance of a car is difficult to perform in an apartment. Therefore, car owners organize workplace in your own garage.
If you plan to perform more complex work than changing oil and filters, the room must be electrified. Most garage cooperatives provide a similar service, but the service usually ends with connecting the input to the meter. Further wiring in the garage is carried out by the owner. Calling an electrician will cost a lot of money. However, if you have basic electrical skills, you can do the work yourself.
As a rule of thumb (informal), laying should be done carefully, using quality materials. A common misconception is that “any trash will go into the garage” can lead to a fire or electric shock.
Key points to know:
Often a situation arises when you purchase a garage with electrification already completed. If the wiring diagram in the garage was made by the previous owner with violations, it must be redone.

Before laying the wiring in the garage with your own hands, you need to draw a diagram. Regardless of the condition of the premises (a new garage, or equipment is already placed in it: workbenches, light points, shelving), perform the layout.


Important! Installation of lamps and switches on metal walls is not allowed. Use dielectric substrates.
The general rule for placing power points in the garage: a standby outlet near the input shield, and groups of outlets in work areas. Each group is connected to a separate circuit breaker. When the machine is triggered, your entire garage should not be de-energized.


Do-it-yourself wiring in the garage starts from switchgear. If the electricity meter is located outside, the “reference point” is the input machine. If the counter is inside, the same machine is installed immediately after it. The input machine can be connected in front of the meter (with consumer access), then it is sealed together with the meter.

Once the equipment is sealed by a power sales employee, you will not be able to change the input configuration. Therefore, the wiring diagram in the garage is planned initially, taking into account the location of these elements.
Why do you need "land" in the garage?
Grounding is carried out according to standard rules: 3 rigid conductors connected to each other are vertically installed in the ground.

A steel bus (copper cable) is run from the ground loop to the garage. From the ground connection point, wiring is carried out to the shield, and to the socket network. Frame metal garage is grounded on a common basis, and cannot be a connection point or a ground bus.
- Use of an ungrounded outlet network, and an ungrounded power tool in metal case unacceptable! Especially in a metal, grounded garage.
- It must be remembered that conventional circuit breakers, grounding are not a guarantee against electric shock. This is what RCDs are for.
From a security point of view, the question is: "how to do the wiring in the garage with your own hands?" is in first place. You may have excellent grounding, an expensive fireproof electrical panel, and a damaged wire with an incorrectly calculated cross section will be the weak link.
Pick up desired cable possible according to the table.

It must be remembered that the diameter of the copper core and the cross section of the conductor are different values. If you have quality wire without marking, measure the diameter of the stripped core with a micrometer or caliper, and calculate the cross section using the formula:
section = 0.785 × diameter²
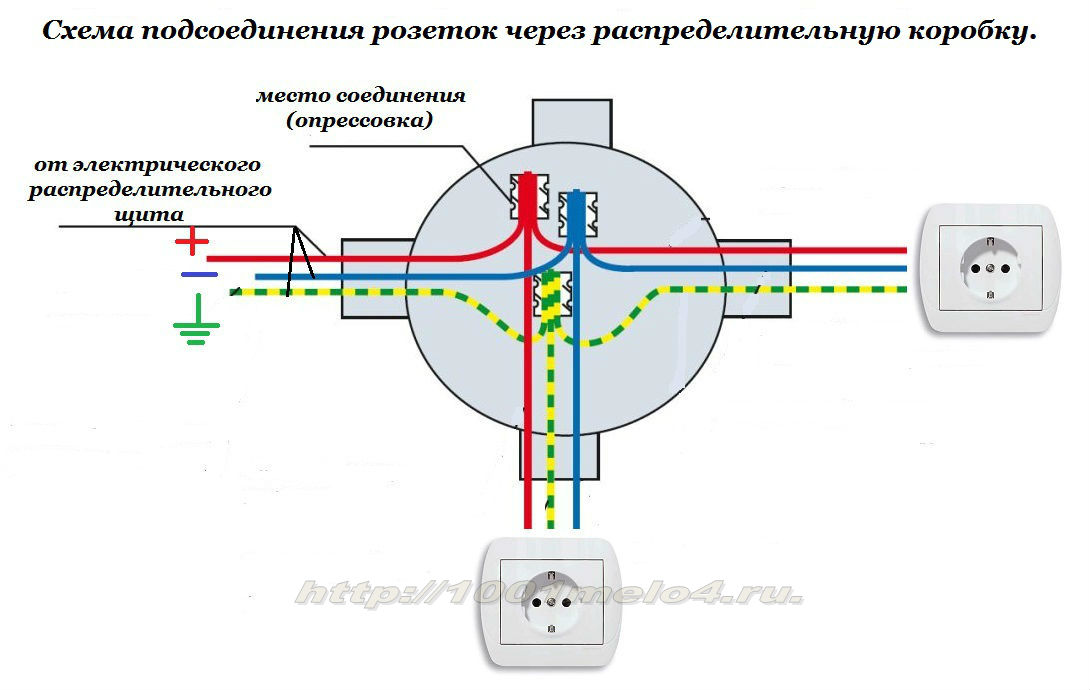
The classic wiring for the garage is not suitable, junction boxes only increase the vulnerability of the wiring. The best option- star: one circuit breaker - one consumer (group).
The figure shows the wiring diagram in the garage.

Depending on the material from which the garage is built, we organize cable laying. For stone and metal structures ordinary corrugation (steel or plastic) is used. It must be remembered that laying the wire in the corrugation only increases the resistance to mechanical damage, and is not fire protection. Even the marking "NG" is not a 100% guarantee against fire during overheating. Therefore, circuit breakers should not be overly powerful. Optimum overheating operation - exceeding the allowable current by 2 times.
The corrugation with the cable is laid parallel and perpendicular. Diagonals, rounding of corners are not allowed. There should be no shelves or racks in front of the laid lines. It is especially dangerous to crush the insulation with a metal box or canister.

Of course, the electrical wiring can be laid in cable ducts. This is somewhat more expensive than corrugation, but much more aesthetically pleasing.
In some cases, it may be the main one. Not all garages have power supply.

If you do not use the garage long term, the battery must be completely disconnected from the backup power line.
Even in the simple garage lighting is required, but if the wiring is done on hastily, then it would be unreasonable to expect it to be reliable and fireproof. Creating proper working conditions in this room, one cannot neglect the rules for working with electrical wiring, otherwise the consequences can be the most unpredictable. In this article, we will tell you how to do the wiring in the garage with your own hands, adhering to the rules and regulations.

Depending on where the garage is located, the way it is connected to the power supply may differ.
In car cooperatives, each garage has a power supply, the condition of which must be taken care of by an electrician, but as for the wiring inside the building, here you can improvise, of course, within the permissible limits. Therefore, it will be necessary to develop an individual wiring diagram, taking into account the allocated or maximum permissible power.
Find out what power the machine is installed at the entrance. If 10 A, then you can only rely on the fact that in the garage, in addition to lighting, it will be possible to connect a low-power drill, grinder and the like to the network, and even then not at the same time. When the input machine is designed for a trip current of 16 A, it will be possible to briefly use weak household electric welding. With a machine installed at 25 A, there will be no special power restrictions.
As a rule, the garage of a private house is connected to the power supply through a common machine. When calculating the power of electrical equipment that will be connected in the garage, it is necessary to take into account the power consumption of appliances in the house. If this is not just a garage, but a car repair shop in which electric welding will be carried out, then the do-it-yourself wiring diagram in the garage should include a separate 220 or 380 V line.

To correctly draw up a wiring diagram, make a list of electrical appliances that you plan to use in the garage. AT without fail the number of lamps and their location are taken into account.
If the garage is only used for parking and minor repairs vehicle, there is no need for in large numbers sockets and lamps, but you don’t need to save much either. Above the workbench or near the entrance, you can install several sockets and two-gang switch in order to be able to divide the lighting lines into groups.
A multifunctional garage should have good lighting and many conveniently located outlets. It is also necessary to provide safe lighting of the viewing hole.
In any garage, an RCD (residual current device) must be installed. Although this device is not cheap, it will protect the owner from electric shock. The rated current of the RCD must be selected in accordance with the load current of the wiring line, otherwise the device may not work at the right time.
Also don't skimp on the purchase. circuit breakers- it is better that each line is connected separately. Of course, it is necessary to take into account the total power of the connected devices so that you can calculate the cross section of the wire being laid.

Often, owners of garages used only for car storage are limited to installing a paired circuit breaker at the entrance, one or two sockets and several lamps that are controlled by single-gang switch. This scheme has its advantages: to pick up the car from the garage or put it there, just turn on one switch, and the light will be on throughout the room.
One outlet is connected directly to the machines, while the second is included in the same circuit with the lamps. Leaving the garage, you can be sure that by turning off the light, you de-energized the far outlet. Even if the owner of the garage accidentally forgets to turn off the charger, it will turn off along with the light. The simplicity of the scheme implies some limitations. So, all 4 lamps will turn on at the same time, and the second socket is only suitable for powering low-power devices through it, otherwise the switch contacts will burn out.

Now consider wiring diagram garage with viewing hole. 5 lines depart from the introductory electrical panel:
An introductory machine, an RCD and several circuit breakers are installed in the electrical panel - each for its own group. As for the lighting of the viewing hole, it is carried out through a transformer that lowers the voltage to 12 or 36V.
itemprop="video" >
On the Internet, you can find photos of a wide variety of wiring diagrams in the garage.

Having drawn up a diagram, purchase everything you need to complete the job. We will do it thoroughly and for a long time, so consider the installation concealed wiring. In fairness, it should be said that there are other ways to lay wires in the garage that you can read about.
In order not to waste precious time and effort in vain, purchase or rent a wall chaser and a puncher with a set of drills and a concrete crown, the diameter of which will allow you to install socket boxes and junction boxes in the holes cut with it. We won’t even talk about a chisel and a hammer, since such a tool should be in any garage.
For further work you will need:
The switchboard can be made independently, as the author of this video:
itemprop="video" >


It is quite possible to do the installation of electrical wiring in the garage with your own hands, as you will now see.
So, there is a scheme, tools and materials are prepared - you can get to work.

Now you can conduct electrical wiring in the garage, which will help step-by-step instruction. Let's make a reservation right away that professionals first lay the corrugation in the wall, install the sockets, and then tighten the cable. But if the wiring in the garage is being laid for the first time with your own hands, then it is better to adhere to the technology we have proposed.
itemprop="video" >

When the wiring in the garage is performed by a non-specialist, there are often problems with connecting the RCD. A selection of two videos will help you avoid mistakes when connecting this device.
itemprop="video" >
itemprop="video" >
As you can see, even a non-professional can handle this job. If, after reading, you still continue to doubt your abilities and your palms begin to sweat from the mere thought of working with electricity, then it is better to invite a specialist.
INSTRUCTIONS AND PROPHECIES OF THE Blessed MOTHER ALIPIA GOLOSEEVSKY, Kyiv...

Eufillin dropper in ampoules is used to treat pathologies that ...

Among all ointments for the treatment and prevention of joint diseases, the most ...