So, I continue to scribble. In fact, in the past week, I've met...


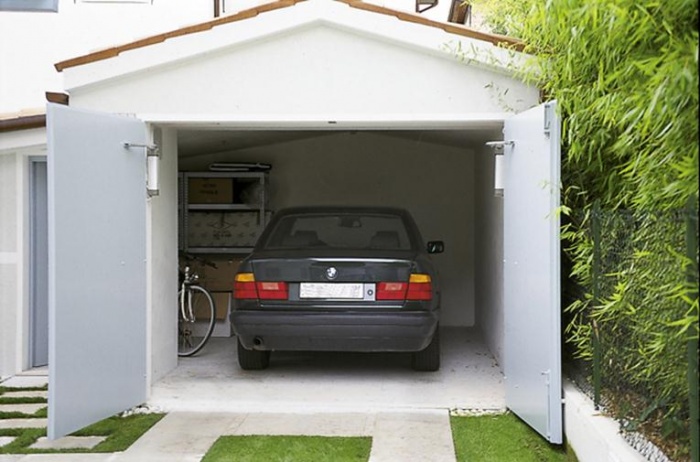
A garage is a mandatory building for a car owner. Those who live outside the city in private houses build garages next to the house or even attach to the house. And those who live in hell big city, you have to store the car in a garage cooperative away from home. But wherever the garage is located, the safety of the car in it is ensured by the gate, the design of which may differ depending on the preferences of the owner and the possibilities of the premises, space and expediency. by the most simple solution will buy ready-made gates and install them in place, but you can make garage doors with your own hands, be sure to take into account all the design features and customize them, as they say, “for yourself”. In this case, you will be sure of their quality and reliability.
In total there are several types garage doors, most of which appeared quite recently, just when we began to focus on Western technologies. Largely thanks to Hollywood films, we learned about gates that rise up and leave under the ceiling by pressing a button on the remote control. Now such know-how is not uncommon even in our country.
The oldest and most reliable option garage doors. However, such gates were used everywhere, not only for garages, and have earned the trust of many years of trouble-free practice, even in difficult operating conditions. Swing gates consist of two leaves on hinges and a frame in doorway, the sashes close tightly, leaving no gaps. Making a garage door with your own hands is quite easy, the mechanism is simple and reliable, “for centuries”.
They began to use somewhere in the first half of the 20th century. They represent one sash, which drives off to the side parallel to the front wall. Although there may actually be two wings, then they will move off to different sides, or even one, but folding into several sections. For the free movement of such gates, it is necessary to have a lot of free space in the front wall of the garage. So sliding gates used in hangars and industrial enterprises. In private construction, such gates are not installed in the garage buildings themselves, but to enter the site.

appeared relatively recently. They are one canvas (gate leaf), which rises up to the ceiling when the gate is opened and becomes parallel to the floor. At the heart of such gates is a hinged-lever mechanism and guides. The convenience of these gates is that they do not take up free space either in front of the garage or inside it. An up-and-over door can be considered as the door to your own garage, if the climatic conditions permit or if the garage is heated.

Overhead sectional doors also new to our market. They are a canvas consisting of sections that refract and drive along the guides under the ceiling when the gate is opened. It is based on a spring mechanism and guides with chain drive. The advantage of such gates is the same saving of space.

They are used for garages quite rarely, as they do not provide the required reliability. They are aluminum plates, as in roller shutters, which are folded into a special box under the ceiling when the gate is opened. It is advisable to install such gates only at facilities with security and access system, as well as in a heated room.

Important! Gates of any type can be made automatic, working from a key fob.
When choosing a garage door, consider not only the beauty, sophistication and laudatory reviews of advertisers, but also practicality, durability and adaptability to our climatic conditions and other operating conditions. The most reliable choice would be swing gates, they will not let you down even in severe frost, well, maybe you will have to warm the castle at most.
Before you make a garage door up-and-over or overhead sectional, think carefully. Firstly, all the advantages of these types of gates can only be felt in warm regions. If you really want just such a gate, remember that the garage must be heated. Remember our winters, both guides and lever mechanisms will freeze in fancy gates, you will not be able to open the gate at all, you will have to leave the car under open sky. In pursuit of the client, the manufacturer praises his product so much that sometimes his odes are full of absurdity. As, for example, the advantage of overhead sectional doors is that you don’t have to clear the snow from the gate, because they open upwards, and not outwards, like swing doors. Where is the dignity here? If there is snow in front of the gates, then you simply cannot enter them. And if you drive in, you will push a couple of tens of kilograms of snow into the garage in front of the car. So don't be fooled. Snow still needs to be cleared.
Swing gates are the easiest to manufacture. They can be done independently from start to finish by purchasing the necessary material: steel corners, profiles and sheets. Accordingly, the dimensions of the gate and their design features you can plan in advance and execute exactly the gate that you like.
You can try to make up-and-over doors yourself, but for this you need to have considerable engineering experience and knowledge for right choice counterweight and mounting mechanisms. In most cases, such gates are simply bought ready-made and installed according to the attached instructions.
It will not be possible to make overhead sectional doors on your own, unreasonably high costs, time costs and no guarantee that all this will work correctly. Therefore, if you have already decided to install such gates in your garage, order them from the manufacturer.
Like any responsible business, garage doors begin with project documentation. It is not difficult to make drawings of garage doors with your own hands, just draw a sketch on a piece of paper, be sure to indicate all sizes and materials.
First you need to choose the right height and width of the gate. The minimum allowable width of the garage door should be such that the distance from the car body on the right and left sides to the door frame is at least 30 cm. Of course, the greater this distance, the more convenient it is to drive into the garage. The maximum reasonable width is 5 m. Most often, garage doors are made from 2.5 to 3 m wide.
Important! When choosing the width of the garage door, please note that the distance from the door frame to the perpendicular wall must be at least 80 cm.
The height of the garage door is selected depending on the size of the car and most often ranges from 2 to 2.2 m. But if you plan to park a minibus, it is better to immediately make an opening of 2.5 m.

Our swing gates will consist of a frame that will frame the entrance, a garage opening, and two hinged leaves. The frame is best made from a steel corner of at least 65 mm. For the manufacture of the sash frame, you can use both a steel corner of 50 mm and a steel rectangular profile, then sheathe them with sheet iron from 2 to 3 mm thick. Loops will need reinforced external ones. Based on the drawn diagram of the garage door and the dimensions applied to it, we calculate the amount of required materials and purchase them.
Important! A drawing of a garage door must be made at the design stage of the entire garage.
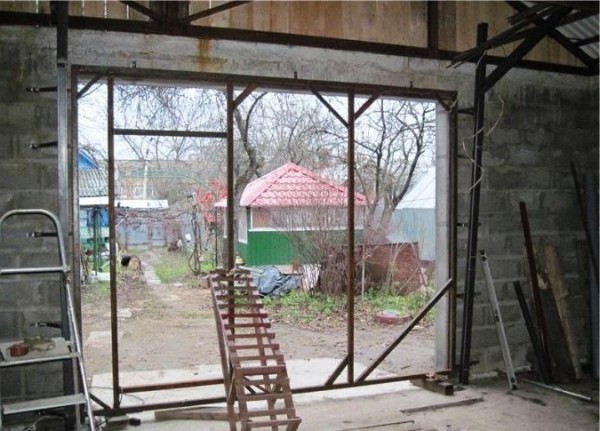
The manufacture of garage doors begins with a frame that will frame the entrance to the garage. It is best to start doing it at the stage of building the front wall. When no more than 50 cm of masonry is ready, it is necessary to suspend the construction of the wall and install the gate, and then continue laying the wall.
For the manufacture of the frame, we need steel corners 65 mm, steel strips 20 - 30 mm wide and 3 - 4 mm thick, as well as pieces of steel reinforcing bar to fix the frame in the gate opening. From the tool, a grinder, tape measure, square, level and welding machine.
The frame for the garage will consist of two parts: external and internal.


Important! If during the welding process the corner led, this can be corrected with the help of a lever welded to it from the scraps of the corner, which will help to forcefully correct the frame geometry. Holding it in the required position, we weld the corners to it. On the photo depicting the process of making a garage door with your own hands, you can see what this lever looks like.
The frame or frame for the leaves should be slightly smaller than the garage door frame so that it fits easily into the opening and the leaves fit snugly against the outside of the frame.
For the manufacture of the frame for the leaves, you can use a steel corner, as well as for the gate frame, or you can use a rectangular profile. The difference will be only in the convenience of work and the load capacity of the frame.

Sheet material can be used for sashes; a steel sheet with a thickness of 2 mm or more is considered the most reliable.

Important! Sheet material easily guides during welding work, therefore, to begin with, you should grab the corners and in the middle of the web by welding, and then weld the entire sheet with point movements with a distance of 10 - 15 cm. After completion of the work, welding in the corners must be cut off so that the sheet does not deform in the future.
If our entire structure is on a flat surface, the sashes lie on top of the frame, you can closely examine what we have done, whether everything is correct, whether the sashes go everywhere easily, whether it catches somewhere. If all is well, you can proceed to install the gate in the garage.
First of all, the gate frames are installed: internal and external. Even at the stage of building walls, when 50 cm of the wall is ready, it is necessary to put the gate in the opening.
Be sure to check the evenness of the location: horizontal and vertical.

Between themselves, the frames are connected by strips of metal 4 cm wide, which are welded to the frames in increments of 60 cm.
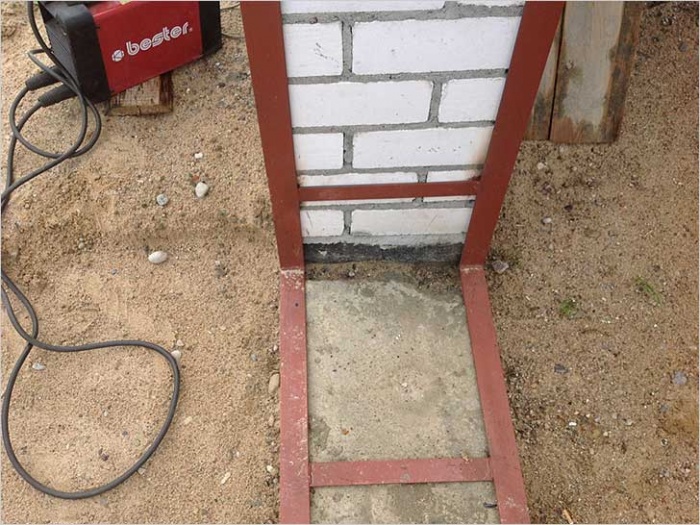
Then you can continue laying the front wall of the garage so that the bricks occupy all the space between the outer and internal frames. In the course of masonry, we embed the frame into the masonry: for this, we weld reinforcing bars at least 20–30 cm long to the frames and embed them in the seam between the bricks. There should be at least 3 such rods in height.
Having reached the top of the frame, we install a floor beam on it: metal or concrete.
Upon completion of all work, we check the functionality of the gate: how the doors open and close, whether the metal “clings” somewhere.

Installation of garage doors is completed by installing locks and locks. The most common option is this type of constipation. One of the wings is closed with locks from the inside of the garage, which enter the floor and ceiling. To do this, it is necessary to drill holes with a depth of no more than 5 cm in the frame and the floor / ceiling. And the second sash is closed with a lock, the tongue of which hooks onto the fixed sash or enters a hole specially cut for it in the sash frame. Outside, this design is reinforced with a padlock, which is threaded into the ears welded to the sashes and connects both sashes.
There are more complex options locks and constipation for the garage, but on this issue it is better to consult with a specialist.

The most common material for insulating garage doors is polystyrene; recently, extruded polystyrene foam is gaining more and more popularity. To fix the material on the gate leaves, it is necessary to lay out the sheets of material inside the frame of the leaves, and then sheathe everything from the inside wooden clapboard or plywood. It is impossible to use cotton wool insulation for the insulation of the gate, as they quickly lose their properties.
Important! Having insulated the garage and gates, do not forget about high-quality ventilation.
Even installing a good lock may not protect your car and protect it from robbery. After all, you can always cut the hinges with a grinder and just remove the sashes. This is exactly what they did in the turbulent nineties. What to do?
When protecting your garage from burglary, the main thing is not to be too smart, so that in case of losing the keys there is at least some chance to get into the garage without resorting to taking out the walls.
Making a garage door with your own hands takes about 1 - 2 days of work. In this case, your product will have a unique size and design, if you want something special.
Modern construction market presented various options garage doors of different price categories, which are able to fit the needs of any potential buyer. However, if you have a welding machine at hand, you can make them yourself. This is done not because of financial difficulties, but to satisfy their ambitions.
Every day exploiting the structure, there is pride because it was done without anyone's help. Walls and foundations protect the car from bad weather conditions, and reliable gates - from the likelihood of robbery. The photos and videos presented in the article will help you understand the technology for manufacturing garage doors.
To date, there are the following types of garage doors:

Currently, the most common garage doors are swing. Using all the necessary elements, you can make a design from start to finish with your own hands. It is swing garage doors that will be used as an example.
Every design idea should start with a work plan and detailed description. When drawing up a drawing for garage doors, you should take into account all the requirements that apply to them. If installation is required in an existing opening, then its measurements are first taken, after which the sashes are created. However, if it is possible to increase or decrease the opening, then the following rules must be followed:

These simple rules everyone must know who dared to take on such a task. Subject to these requirements, the question will never arise of how to make a drawing for a garage.
Also, welding will be required for the work. Before you start using it, you should take care of necessary materials and tools. For creating standard design you will need:

Required tools:
For garage door manufacturing you need to choose a flat area. If it is not possible to find such a place, then a semblance of foundation columns should be made. There should be such a distance between them that will be equal to the dimensions of the future frame, after that they align the support and measure four profile pipes right size. They are interconnected at the corners and slightly raised above the base. This is done with the help of bricks and leveled in such a way that the structure is located in a single plane.

start weld the frame at the corners. During the welding process, it is necessary to constantly check the horizontal level and each element individually. It is very important that the pipes are perfectly straight. If you make a mistake at this stage, then later it will be possible to correct it only with the help of a sledgehammer.
make support pads made of metal plates n, which will be used as a frame attachment to the garage wall. Fastening can be carried out by welding to metal mortgages or using anchor bolts. In the latter case, it is necessary to create holes for anchors.

alignments swing gate do it yourself made in the same plane with the frame. To make it more convenient to work with the alignments, the supports are temporarily welded from below. You will need 12 metal supports, four plates on the long and two on the short tubes of the frame. On the base plates along the inner perimeter of the frame, lay the details of the alignment. The left and right sections are represented by four pipe sections. So that later they close well, a gap should be left between the inside of the sash and the frame.
After welding the corners, in order to strengthen the structure of the doors, diagonal or vertical and longitudinal stiffeners are installed. They are also made from corners or pipes. In order for the corner seams to be neatly connected to the metal sheets of the door, they must be carefully sanded.
Do sheet metal marking. Be sure to take into account the gap between the gate and the frame, which must be closed with a sheet of metal. So that the door in the closed state does not have slots, on the left side the metal should be cut flush, and on the right side more by 2-3 cm. The sheet is placed on the gate and welded to it. Welding is performed on a horizontal surface, so it is placed at a height convenient for the welder from the floor. The sheet on the hinge mounting side must be welded end-to-end with the gate frame.

It is necessary to try to by the beginning of work, the hinges had already been made. Welded to the canvas upper part hinges, and to the frame - the bottom. To strengthen the fastening, use reinforcement, which is applied with inside. It provides welding with special strength.
To close the shutters and as an additional security, it is best to use a deadbolt mounted on the inside of the canvas. Locks are hinged and mortise. For a padlock, external hinges are required, and to install a mortise lock, it is recommended to use an additional metal plate. It is best to install 2 or 3 locks. If one lock breaks, then even in this case it will be possible to close the door.

This is necessary in order to to protect metal from corrosion. Painting in progress different ways, for example, powder method. It is carried out in the factory, so it will not work on your own. If the painting of the garage door is done by hand, then a primer is first applied.
After the canvas dries, it is covered with paint in several layers. Since any paint fades sooner or later, the color should be updated once a year.

To carry out installation of the outer and inner parts of the frame, metal pins measuring 15 - 18 cm are taken and fixed in the slopes. The ends of the pins should be cut and sanded so that they do not interfere with the closing of the leaves. Both parts of the frame must be fastened with metal plates by welding, after which the finished sashes are hung.
With properly done work, do-it-yourself garage doors in the photo are almost impossible to distinguish from factory models.

Since in a heated room about 60% of heat escapes through the canvas, then many seek to insulate garage doors. It's pretty easy to do this job. It is only required to make a wooden crate on the inside, after which the space is filled with polystyrene foam or mineral wool. After that, the crate is covered with facing slabs or clapboard. Thus, swing garage doors are obtained, completely made by hand. In more detail, the manufacturing process of the gate is presented in the video.
Thus, building a garage door- It's a tricky business, but it's doable. You can make a design yourself for quite a short time, as evidenced by the video, which clearly demonstrates all the stages of such a process. And thanks to the photo you can decide on the most good option garage door.
Garage - for the car owner can be said to be a second home. Garage owners often live outside the city in their households, build garages near houses or simply attach them to houses. Regardless of the location of the garage, the safety of the car in it is provided by gate systems or simply gates, the design of which varies depending on the requirements for them.
Swing garage doors
Today you can find numerous varieties of gate structures, most of which entered the market in the recent past since the orientation of our economy to the technologies of Western countries.

Garage doors up and down

Garage doors lifting - sectional
for subsequent installation in the garage, do not pay much attention to appearance and equipment, and pay more attention to practicality.

Starting the construction of homemade garage doors, it is important to consider the basic requirements.

Swing garage doors - scheme
The easiest for independent device are swing gates. To establish how to make them on your own from the beginning to the logical conclusion, it is quite possible to buy the material necessary for the garage device: corners, sheets and profiles. As for the type of size of future gates, as well as their design, you can plan ahead and make such a type of gate that you like.

Garage doors lifting - rotary: scheme
It is also possible to make lifting and turning systems on your own, but you cannot do without engineering knowledge for correct selection counterweight and manufacture of mechanisms. In many cases, gates of this type are purchased ready-made and mounted in the garage according to the manufacturer's scheme.
It is not possible to produce lifting-sectional ones on your own, as this will entail no small expenses, and a lot of time, plus the gates obtained in this way may not work correctly. Therefore, we strongly recommend that you purchase such gates from the manufacturer with his professional installation.
As statistics show, most motorists prefer to build their garage on their own. This will significantly save on hiring specialists. And the advantage over a purchased garage is the ability to plan the garage space yourself, make it for yourself and using your preferred materials. An important element of the garage are the gates. You can also make them yourself, so as not to buy an expensive design.
From this article, you can learn how to make a garage door on your own using improvised means. And since the swing design is most often used, you will recognize its device from metal.
To make a garage door, you can not do without careful planning and detailed drawings. Thanks to the graphic drawing, which has detailed instructions and designations of each detail, you will be able to create the right gate that meets all requirements. You will have a reference point and finish the job quickly.
Advice! Drawings will allow you to assemble the design immediately and see what errors may occur. Also, thanks to them, you will find out the preliminary amount of material and the cost of construction.
When making a drawing, you must consider the size of the garage door opening. You need to figure out the width and height of the opening. Usually garage doors are made according to this scheme: their width and height should be 60 cm more on each side than the dimensions of the car.
Note! Swing gates are made with an allowable gate width of up to 5 m, and a height of up to 2.5 m. This size will be enough for a small car, SUV or small minibus to enter.
In general, garage doors consist of the following elements:
All these elements are made of metal. In addition to everything, you need to take care of such trifles as a lock and a latch. In addition, the sheathing of the frame can be made of a simple rolled steel sheet, the thickness of which is 3 mm, or of corrugated board.
Advice! To make your garage warmer, it is better to make the gate so that it is immediately insulated. In inner space insulation is laid, and from the inside it is sheathed with clapboard or plastic panels.
When you have fully drawn up the drawings of the future gate, you can begin to prepare what is necessary for work. Based on the budget, buy right amount materials. Only here there is a small nuance, it is better to buy 10-15% more so that there is a reserve for unforeseen circumstances.
If speak about necessary tools, then you can not do without:

Note! When working as a grinder or welding machine, you must understand that sparks can harm you. Never work without safety goggles and gloves. Shoes should also be tight and closed. You can't use slippers.
As for the materials, they can be different. For example, the frame is most often made of 65 mm steel corners. For the manufacture of the frame, profile pipes will be required. And to connect the structure, loops are used. You can buy cylindrical, rectangular or hexagonal. Also in the work you may need reinforcement bars. When you have prepared everything you need, you can begin to work.

Here you have several development options. Some make gates at the construction stage of the garage, when the opening has not yet been erected. In this case, the entire structure is made, the gate is installed in the required place, and then the walls are erected, taking into account the selected size of the opening. Then you can make gates of the width you need. If your garage is already ready, then the frame is first made, taking into account the dimensions of the already finished opening for the gate.
Note! The frame of the structure is made of metal corners and is divided into the outer and inner parts. The corners are welded so that they can fit tightly into the opening and clasp it. When the inner and outer parts of the frame are installed, they must be connected with a metal plate, as shown in the figure.

Now let's start the process of creating a carrier frame. All work must be performed on a perfectly flat surface. For this job, you need to have a square, a welding machine, a tape measure and a grinder with a metal cutting disc. Step-by-step instruction next:

Advice! If you study the instructions regarding welding, it is better to assemble the frame using tacks. You should not immediately weld the seam, but make several welding points so that the structure holds, but on occasion it could be leveled. And after measurements, you can brew the seam completely. Thanks to the tacks, the frame, when heated, will not lose the diagonal and deform.

Now you can start making the gate leaves. In order for the structure to function correctly, the sashes must be 0.8-1 cm smaller than the internal dimension of the outer bearing frame. So, the doors will open and close freely. To create sashes, you must follow the instructions:

That's it, your garage door frame is ready. We can say that you have completed the most and difficult part. It remains only to sheathe the gate sheet material and install it. Let's take a closer look at the entire fabrication and installation.
Can be used as cladding steel sheets, whose thickness is from 2 to 4 mm or corrugated board. We will consider the first option, since it is a durable sheet of steel that is used for the garage door. It will also additionally make the sashes stronger. The process is the following:

That's all, your gate can be installed in its place. If you have a built garage with an opening, then the structure must be inserted into it and pressed as tightly as possible. To fix in this position, use the bars that serve as supports. Inside the garage, install the inside of the frame that you made initially and fasten them together with metal plates. It is better if the plates are located on the same level with the gate hinges.
In the event that the opening has not yet been built, the supporting frame and the entire structure are assembled and installed at the opening. When the gates are standing, they begin to build a facade wall.
If you are careful, carefully check the correct dimensions and adhere to all wishes, then you will get a strong and durable garage door that will serve you for a long time. With this design, you have the opportunity to insulate the gate by laying the foam from the inside and making the sheathing. It remains only to install the security system (locks) and check the functioning of the garage doors you created. Making a garage door with a gate is a little more difficult, but not critical. You can see the process in this video:
In many ways, not only its appearance is determined, but also the degree of prosperity of the car owner. At the same time, not every owner can afford expensive and rather complex structures (lift-turn or roller shutter, for example), the manufacture of which involves significant costs. That is why most owners prefer to use simple swing structures in their garage, the manufacture of which is not associated with high costs. To all those who plan to build a garage swing gate with their own hands, we advise you to first worry about studying the relevant materials.
In the process of studying, you will be able to learn that the assembly of such structures is usually carried out according to the following scheme:
Let's consider each of these operations in more detail.
Before the beginning installation work you will need to prepare the following working tool:

Installation work begins with the preparation of a frame structure, which is supposed to be used as a frame base for future garage doors. For the convenience of its manufacture, you should first prepare a sketch of the future frame, which consists of inner and outer parts. This drawing should indicate the height and width of the frame itself (according to the size of the entrance opening), as well as the dimensions of the internal gate used to enter the garage.

Note! When the frame is cooked from the corner, then most often they sheathe the opening.
The preparation of the frame structure begins with cutting the blanks of the channel (or angle) in accordance with the dimensions indicated in the sketch. After that, the resulting blanks are laid out on a hard and even surface in the order indicated on the previously prepared sketch. In the process of laying, it is necessary to carefully monitor the observance of all dimensions, which must exactly correspond to those indicated in the diagram. At the same time, the correctness of the formation corner joints checked with a square.
After mounting the frame, carried out in compliance with all the previously mentioned requirements, you can start welding it, after which the resulting seams should be carefully sanded.

In accordance with typical scheme Swing gates inside the frame structure are sashes, each of which is made in the form of a separate frame, which is subsequently closed with a solid metal sheet. For their manufacture, as a rule, the same profile is used as in the preparation of the overall frame. The sashes are installed in the following order:

At the final stage of installation work, hinged hinges are welded to the gate in pre-designated places. In this case, the lower fixed (supporting) part of the hinge is mounted on the frame itself, and the upper movable part is welded to the sash frame.
As internal locks of the gate, ordinary bolts mounted in the upper and lower parts of the leaves can be used.

It will be more convenient to paint all metal structural elements, as well as to insulate the swing gate leaves before hanging them on the support loops. Before painting, all treated surfaces must be primed, which guarantees a reliable protective coating that can serve you for many years.
In order to increase the rigidity of the garage doors, additional metal jumpers (stiffening ribs) are arranged on the inner surface of the doors, welded not only to metal sheets, but also to frame elements in increments of approximately 0.5 meters.

Insulation of metal swing gates is carried out using materials of synthetic origin or foam (polyurethane foam) plates, which are fixed on the surface of the leaves with a special glue. To close the insulation boards, any decorative material suitable for the texture can be used.
At the final stage of the work, the leaves are hung on the hinges, after which it is necessary to check the ease of their movement when opening and closing the gate.
This video is about making garage doors. You will hear good advice about the performance of welding work, you will see the drawings, and you will know in what order you need to perform the work:
So, I continue to scribble. In fact, in the past week, I've met...

The class of bivalve mollusks, as you know, has four different names, ...

The leaf is one of the most plastic plant organs. In the process of adapting to...