


Once upon a time there was an old man and an old woman, they had a daughter, Alyonushka, and a son, Ivanushka. An old man...


MATERIALS
TOOLS
Step 1
Pour the prepared soil mixture into the bowl, lightly compact it and level it. Pour the prepared soil mixture into the pot so that it upper layer did not reach the edge of the container by 2–3 cm. No later than a day before sowing, spill it with a fungicide solution (“Fundazol”, “Ridomil”, etc.) - in order to prevent various diseases. Spread snow on the surface of the soil with a layer of 1–1.5 cm.
Step 2
Seal.
Step 3
First, shake them off a sheet of paper in small portions.

Step 4
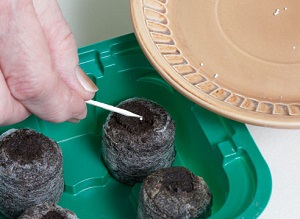
Then lightly loosen the snow with a toothpick in those places where the petunia is sown too densely, and distribute some of the seeds to free places. When the snow melts, the seeds will be slightly drawn into the soil. It is not necessary to sprinkle the crops with earth - the petunia sprouts in the light.

Step 5

Place the bowl in a bright, warm place. If it is cold on the windowsill, you can determine it under table lamp and cover with glass. Seedlings will appear in a week. From now on, they need to be ventilated at least once a day (preferably twice). When removing the cover, first wipe off the condensate from it and leave the crops open for 10-15 minutes. Exact time does not have of great importance. Nothing bad will happen if you cover the crops right away (for example, being late for work). You can air for an hour if you have other things to do at this time. It is only important not to forget to do this every day. At first, petunia seedlings develop very slowly: their strength is spent on building up the root system. If the seedlings are too thick in places, thin them out with tweezers. When the petunia leaves touch the glass, remove it, but continue to carefully monitor soil moisture. Petunia is demanding on watering. Overdrying will kill your plants. You can moisten from a pallet or by watering “under the root”, the main thing is that there are no drops left on the leaves. As soon as the petunia seedlings grow up so that they can be held with your fingers, pick them into pots or cassettes, carefully loosening the thin roots with a spatula or toothpick.
Step 6

If the roots are long, pinch them so that when planting you can freely distribute them in the ground. Water carefully until the soil settles.
Step 7

To prevent the plants from stretching, place the grown petunia in a cooler place. A month after picking, it can be taken out to a glazed balcony, veranda or greenhouse.
Step 8

Petunia varieties and hybrids with strong shoot growth need pinching. When the petunia plants reach 5–7 cm, pinch the shoots over the 4–5th leaf for better tillering of the plants.
Step 9
From the axil of each leaf grows new escape, and the petunia blooms more profusely.

Step 10

In early June, seedlings are ready for planting in a flowerpot, balcony drawer or in a flower bed.
In this case, you need to use a regular roll of toilet paper instead of snow. Landing is done in exactly the same way as in the snow: you put paper on the soil, sprinkle it well and scatter petunia seeds on top.
All of these methods have been tested by me. I practically did not know the problems with growing petunia seedlings. But these methods of planting petunias have one drawback - petunias need a pick! And this is a very laborious task. The next option for planting petunias for seedlings saved me - and now you - from the painstaking work of picking petunias.


After planting the seeds, wrap the petunia container in plastic and place in a warm place. You can not worry about 7-9 days, petunia sprouts at 22 - 23 ° C. As soon as shoots appear, immediately expose the mini-greenhouse to the light. If you are planting in early spring, you will need at least 15 hours of light a day; but I plant seeds for seedlings in the first decade of April. Flowers have time to grow and bloom before landing on a permanent place on June 10.
If you want to get more abundant flowering, then pinch the first bud on the petunia.
Do not flood the petunia too much - it can tolerate some dryness of the soil, but it will die from high humidity. high humidity provokes such a disease as "black leg".
And the last. To protect the petunia from diseases and grow not elongated, but plump stems, I spray the petunia seedlings with a solution of Baikal EM with Zircon: 1 ml per liter of rainwater. Baikal and 0.1 ml. Zircon.
Put the petunia seeds on a sheet of paper and shake them in small portions into a bowl, trying to distribute evenly. Spread the granulated seeds over the surface.
Then lightly loosen the snow with a toothpick in those places where the petunia is sown too densely, and distribute some of the seeds to free places. When the snow melts, the seeds will be slightly drawn into the soil. It is not necessary to sprinkle the crops with earth - the petunia sprouts in the light. Planting petunias in the snow for seedlings does not need to be buried in seeds, they remain spread out on top.
For seed germination, place the pot in a bright, warm place. If it is cold on the windowsill, you can put it under a table lamp and cover it with glass or a plastic bag. The first shoots will appear in about a week. Petunias grow very well under the snow, you shouldn't have any problems.
As soon as the first green sprouts appear, you need to air the pot with plantings 1-2 times a day. When removing the cover, first wipe off the condensate from it and leave the crops open for 10-15 minutes. The exact time doesn't really matter. Nothing bad will happen if you cover the crops right away (for example, being late for work). You can air for an hour if you have other things to do at this time. It is important not to forget to do this regularly, every day.
At first, how to sow a petunia in the snow, the seedlings will develop very slowly: all the main forces of the flower are spent on creating and building up the root system.
If the petunia seedlings have sprouted very thickly in places, you can thin them out with tweezers.
When the petunia seedlings grow up and the leaves touch the glass or plastic bag, remove it. At this time, you need to carefully monitor the moisture content of the soil. loves seedlings of petunias wet soil. Overdrying will kill your plants. You can moisten from a pallet or watering "under the root", try to water so that there are no drops of water on the leaves of the seedlings.
As soon as the petunia seedlings grow up so that they can be held with your fingers, pick them into pots or cassettes, carefully loosening the thin roots with a spatula or toothpick.
If, when picking, you see that the roots are long, then pinch them so that when planting you can freely distribute them in the ground. After transplanting, water gently until the soil settles.
In how to plant a petunia in the snow, we will give you one piece of advice. If you are planting granular seeds for growing in a pot or plant, plant them immediately in a permanent growing place. This way you will avoid transplantation. Do this if there is enough space on the windowsills for flower seedlings.
To prevent the plants from stretching, place the grown petunia in a cooler place. A month after picking, it can be taken out to a glazed balcony, veranda or greenhouse.
Petunia varieties and hybrids with strong shoot growth need pinching. Then the petunia bush will bush. To do this, when the petunia plants reach a height of t 5–7 cm, pinch the shoots above the 4–5th leaf for better tillering of the plants.
A new shoot grows from the axil of each leaf, and the petunia blooms more profusely, and the bush will look more decorative.
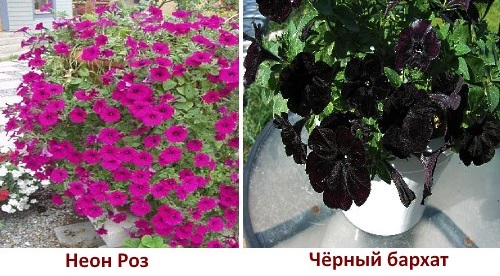
Petunia is my favorite decorative culture most flower growers. bright flowers this wonderful plant can decorate the site like a placer precious stones. In addition, petunia is actively used as a pot culture, with which balconies, verandas and terraces are decorated. There are several types of petunias that differ in flower shape and size. However, sowing petunias for seedlings is almost the same for each of these species.
To achieve high-quality flowering culture, great efforts should be made. And no wonder, because the cultivation of petunia seedlings is considered a true art, and if you do not master it, you are unlikely to achieve good results. We will try to deal with the peculiarities of sowing petunia, so that bitter disappointment does not overtake you as a result.

Before you sow the seeds of this crop, you must decide with which particular variety and type seed you will work. And if, when choosing a variety, you need to be based solely on personal preferences and characteristics of the place where the flowers will grow in the future, then the choice of the type of seed is limited to just two forms of sale.
More specifically, petunia seeds are sold:

The advantage of granular (coated) seeds is that they are more convenient to sow. In addition, they have a higher germination rate, although the same can be said about the cost. But placer seeds will cost less, and you can determine by eye how good the seed is.
Note! After selecting and acquiring seeds, it remains to decide when it is best to start sowing. This moment is extremely important, but for some reason many beginners forget about it.

As a rule, about two months pass between sowing and the formation of the first flowers. Therefore, if you plan to enjoy the colorful neighborhood of petunias in the spring, you should take care of everything in advance. But the sprouts of this culture are susceptible to spring colds, and therefore too early transplantation into open soil can simply cause the death of seedlings.


Familiarize yourself with the generally accepted crop sowing dates.

Terms of maturation and planting seedlings of popular crops (including petunias)
Also, in order to obtain strong and high-quality seedlings, take the choice of containers and soil with all responsibility. Since seeds germinate best when greenhouse effect, give preference to wide containers with average depth(it is also important that they have a lid that lets through sunlight). For this, transparent plastic containers for storing food are suitable, for example. To obtain friendly shoots, be sure to monitor the quality of the soil mixture used. You can use packaged soil for indoor plants(this is sold in every specialized store) or, as an option, (we will talk about the latter in more detail a little later).

If you wish, you can prepare the soil mixture yourself. To do this, mix lowland peat, soil (both sod and leaf) and humus in equal proportions. You can also add sand (about 1⁄2 parts). Before backfilling in containers, be sure to sift such a soil mixture through a sieve.

Note! It is recommended to lay a drainage layer on the bottom of the container, which can be pebbles, expanded clay or small brick battle. After that, the air will freely flow to the root system, and such a nuisance as waterlogging of the soil will be prevented.
Immediately before sowing, prepare the selected containers (and these can be either the plastic containers mentioned above or small wooden boxes). Preparation consists in disinfection, for which you can use any antiseptic For example, formalin.

In the case of using wooden boxes, lay a layer of thick paper on the bottom. The instructions below use special seedling greenhouses that are sold in every gardening store.
Cover the soil mixture with a layer of at least 6 cm, but at the same time, at least 2-3 cm should remain to the edge of the container. Pre-drain (optional, but desirable with a small-lumpy substrate structure).

Petunia seeds are very small, their size often does not exceed 0.5 mm. For this reason, it is quite difficult to distribute the seed with a certain step. From this point of view, granular seeds are more convenient - you can take them with tweezers and spread them on the soil in even rows. If so, the conditions will be the same for all sprouts, and further diving will be noticeably simplified.

Important information! The seeds do not go deep into the ground due to their small size, but are simply laid out on top and sprinkled with a 1- or 2-mm layer of substrate.
If you plan to sow alluvial seeds, you can use one of the instructions below.

Many gardeners mix the seeds with sand or soil to help spread them evenly across the surface of the soil. It looks like this.

Get a seed container, fill it up soil mixture in accordance with the above requirements, then thoroughly pour water.

Then take a small plate, pour the seeds and some sand into it. Mix the contents thoroughly.

Spread the resulting mixture evenly over the surface of the moistened earth.

Moisten the crops (you can use a spray bottle), and then sprinkle with a 1- or 2-mm layer of soil.

Important information! Do not use a watering can for watering, otherwise the seeds will go too deep into the soil (and they should be located as close to the surface as possible). Sometimes the seeds after moistening do not fall asleep at all.
The next option is to sow on a thin layer of snow (no more than 1-1.5 mm) laid on top of the substrate in a container.

First, take a spoon and evenly distribute the snow with it over the soil mixture in which the seeds are planned to be sown.

Sprinkle the seeds on the snow. The advantage of this method is that the seeds will be clearly visible on the snow. Therefore, even if they are unevenly distributed, you can easily move them with a toothpick.

The melting snow itself will pull the seed into the soil to the required depth. So, in this case, nothing is needed to water or sprinkle.
In this case, you will be able to evenly distribute the seeds over the surface of the substrate in such a way that it is convenient to dive the seedlings in the future.

In addition, the use of this method is advisable if you want to sow a limited amount of seed in separate containers (for example, in).

Take the seeds and sprinkle them on a paper sheet so that they are clearly visible. For work, you still need a couple of toothpicks. The seeds, as noted earlier, are very small, so it is easier to pick them up with a pre-moistened tip of a toothpick. In the future, to shake them into the ground, use a second toothpick (it should already be dry).

Note! After sowing, close the containers and transfer them to a room where the temperature is about + 20-22 ° C. Make sure that the substrate is always wet, but the water should not stagnate either. Wipe the condensation that accumulates on the lid every day; do not forget about the daily ventilation of seedlings for 10 minutes.
If you do everything right, then after a week you will see the first shoots.

When the first shoots appear, you can congratulate yourself - the most difficult thing is left behind. Next, nature will take over, but you have to help her a little. Start with a 10-minute hardening of the seedlings (that is, airing) daily, later do this several times a day. When the first true leaves appear on most of the sprouts, you can remove the lid of the container altogether.


When the seedlings grow to 4-5 cm, proceed to dive. To do this, take a narrow garden knife and dive each sprout to a depth of about 3 cm, directing the blade strictly at an angle of 45 degrees relative to the soil surface. As a result, you pinch off the tip of the main root, which will stimulate the development of a branched root system.


Transplant the dived seedlings in " Kindergarten", which can be:
Note! In order for the seedlings to turn out to be of high quality and strong, each seedling should be deepened somewhat during planting so that a maximum of 3.5 cm of the trunk remains above the surface. This will prevent the seedlings from pulling out.
The use of separate containers for picking will facilitate subsequent planting in open soil, and the plants themselves will not be stressed, since their roots will remain intact. Usually, disposable plastic cups are used for this, having previously made holes at the bottom and filled up the drainage layer for the outflow of moisture and free access of oxygen.

When new leaves appear after picking, continue hardening the seedlings. The best option is the ventilation of the room. At the same time, containers with seedlings should not stand directly on the windowsill, otherwise there will be a risk of frostbite on the foliage. Start with the same 10 minutes every day, gradually increasing this time to half an hour.
When each seedling has 3-4 true leaves, you can start feeding. It is important that the first few dressings are not applied under the root - you can spray the seedlings with fertilizers intended specifically for this purpose. It is also desirable to use growth promoters that strengthen the leaves and stems to ensure strong plants by the time they are planted in open soil. The transplant itself should be done around the end of May.

"Agricola" - a fertilizer suitable for petunias
For beginners, large seeds of flowers such as dahlias and purslane are great. Geranium, zinnia, petunia, calendula, begonia, aster, lobelia, snapdragon, primrose, salvia, verbena and other plants are also very popular among gardeners. Read more.
In the absence of the ability or desire to grow petunia seedlings in standard ways, we recommend using peat tablets for sowing granulated seeds. So you will reduce the loss of seedlings, as well as save yourself and seedlings from the unpleasant dive procedure.

The sowing process itself is not difficult. Peat tablets of medium size (about 3-4 cm in diameter) are suitable for you. You will also need a special tray for pills or a plastic food container. The algorithm of necessary actions is given below.

Table. Step-by-step instruction for sowing seedlings of petunias.
| Steps, illustrations | Description of actions |
|---|---|
| Pour the tablets with water until they are completely swollen, about a few hours before planting. You can add water if it is completely absorbed. But if the tablets swell, and there is still water at the bottom, drain it. |
| Place the seeds in special recesses (one at a time). You can use a toothpick or a match for this. Note: even granular seeds stick to a moistened toothpick. |
| People often complain that granular seeds germinate for a very long time, and the plants themselves turn out to be weak. The reason is simple - the seeds need more moisture to "break through" the protective shell. And so that the seedlings are good and friendly, moisten the spread out seeds with a spray gun until the shell is soaked. Alternatively, you can put a few drops of water on each seed, for which it is convenient to use a pipette. |
| After 5 minutes, smear the loose shell in the tablet. So the shoots will be friendly. |
| Cover the container. In the absence of a mini-greenhouse, use a container for food products. It is necessary that the tablets do not come into contact with the lid. Place the container in a heated area. |
| At a temperature of approximately +25°C, after a week you will be able to see the first shoots. If the temperature is below + 20 ° C, then they most likely will not appear at all. After germination, reduce the temperature to about +18°C, otherwise they will stretch. Tablets should always be wet, however, there should not be excess water at the bottom. Air the seedlings periodically. Feeding is not required, because the tablets already contain all the necessary fertilizers. |
| Picking, as noted earlier, is not needed, because seedlings should be transplanted along with tablets. At the same time, the soil in the new container should be loose and fertile. Here is one of the effective recipes: mix washed river sand, peat and humus in a ratio of 0.5: 2: 1, you can also add wood ash (2 tablespoons per 1 liter). Alternatively, you can use a "store" fertile mixture. |
| Remove the protective shell from the tablet. Do this with extreme care so as not to damage the film. So the roots will be able to master the new soil earlier. |
| If the roots have grown through the shell, you can simply make a few cuts on it. |
| Place the tablet with the plant in a pot, and fill the remaining voids with the prepared soil mixture. Lightly tamp. It is important that the root neck is flush with the surface. |
| Water the soil around the plant. If she sits down after that, add more to make her even with the tablet. |
Note! After 10 days, you can start hardening. Take the containers to the veranda or greenhouse (a lot depends on the weather here). Remember about mandatory protection from drafts, wind and direct sunlight.
As a result, we note that floriculture requires considerable patience and love for plants, and this is especially true when it comes to petunias. But if you know all the rules for sowing petunia for seedlings, then you can certainly tame it and achieve an excellent result!
5109
It's no secret that petunia today is the queen among ampelous plants. It attracts with long flowering, ease of cultivation, variety of varieties. Sometimes for landscaping a balcony, several dozen of these plants are required, and this is quite expensive. But there is a way out - to grow seedlings of petunias at home. Some gardeners complain that the seeds are very small - they do not germinate if planted incorrectly. We offer you a time-tested method - sowing petunias in the snow.
The term for sowing petunias for seedlings
To calculate the planting time, you should remember that modern petunia hybrids begin to bloom 60 days after planting. The sooner you need flowering plant, the earlier you should plant it for seedlings. However, remember that when early landing you will have to purchase a lamp for supplementary illumination. If you do not have the opportunity to highlight seedlings - plant no earlier than mid-March. For seed germination, a temperature of + 25 ° C is needed.

Step 1. Soil preparation
You need moist and loose soil. At home, you can mix peat, earth, sand in a ratio of 2: 1: 1. It is better to add sand to the finished soil. It is better to steam the soil in the oven or microwave to kill pests. In order to fertilize the soil, spill it with any preparation based on potassium humate, for example, Energen. Some gardeners advise adding saltpeter - seedlings grow on it by leaps and bounds.
Step 2. Sowing petunia seeds
The best containers for sowing are plastic containers with a transparent lid. Pour the soil into such bowls and lightly tamp it down. On top, apply a 1.5 cm layer of snow. Then mix the seeds and sand, spread evenly over the snow. As the snow melts, the seeds will penetrate the soil. Close the lid of the container and place it on a bright window sill or illuminate the seedlings with a lamp.

Step 3. Thinning petunia seedlings
The first shoots should appear in a week. Only from this point on, it is possible to arrange airing every day for about 1 hour. Landings must be thinned out with tweezers if they are too thick.

Step 4. Timely watering
Carefully monitor the soil moisture - its lack will destroy the plant. Watering should be under the root or in the pan. Do not forget to feed the seedlings with preparations based on potassium humate.

Step 5. Dive the petunia seedlings
When two or three full-fledged leaves appear, the seedlings must be picked into separate pots. Spill soil for precipitation. The roots should be loosened with a toothpick.

Step 6. Pinching
Once upon a time there was an old man and an old woman, they had a daughter, Alyonushka, and a son, Ivanushka. An old man...

Gods - Olympians (myth of ancient Greece) The most powerful of all sons ...

To see torn shoes on their feet in a dream can be people who have a big ...