Once upon a time there was an old man and an old woman, they had a daughter, Alyonushka, and a son, Ivanushka. An old man...


Walking in the park or in the forest, most do not even suspect that right under their feet you can find a lot of material for all sorts of beautiful handicrafts, including topiary. Leaves different trees: both spring green, and golden-red in autumn, and cones at every step lie idle. So we go out into nature to collect material for a new creation.
In order to make a topiary from autumn leaves, a master class is simply necessary. Not everyone knows how to deal with such natural material, especially if it is dry. autumn leaves. You can see photos of the finished work below.
So, the first MK will be for working with fresh foliage, and the second - for working with dry.
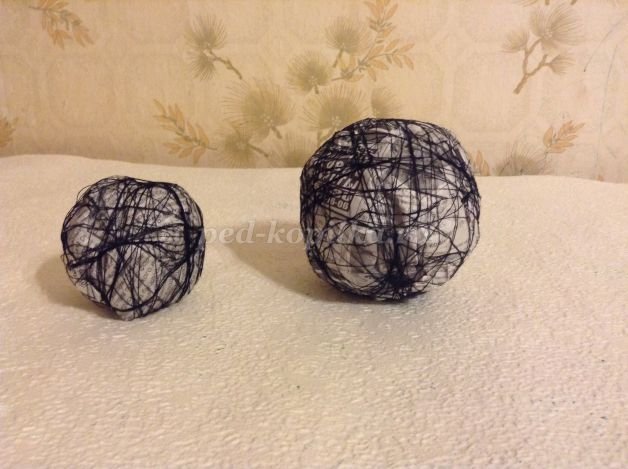
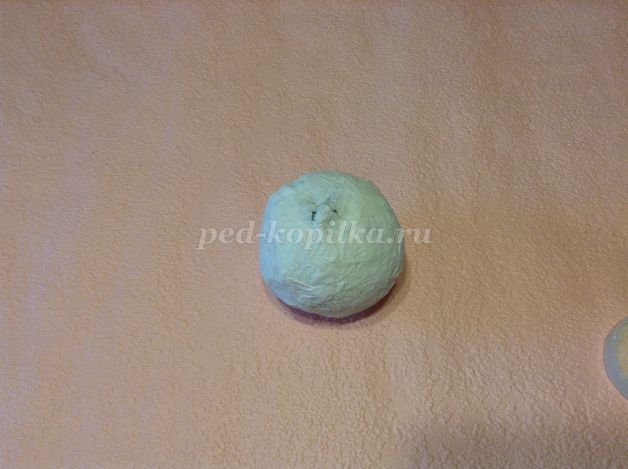
So, for the base you need to take a large number of newspapers and, laying one on top of the other, form a ball. For better fixing of the form, you need to wrap the base with threads.
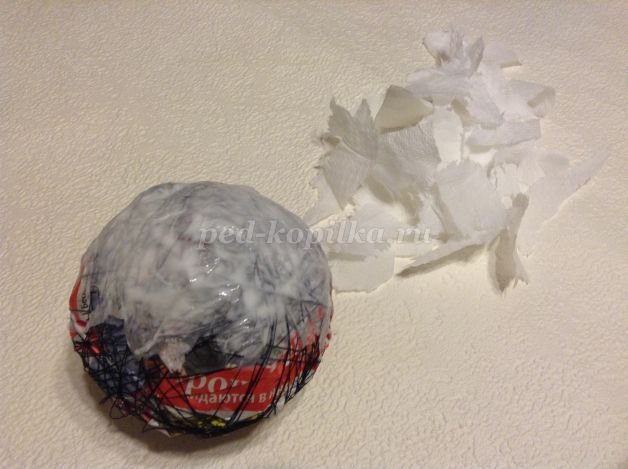
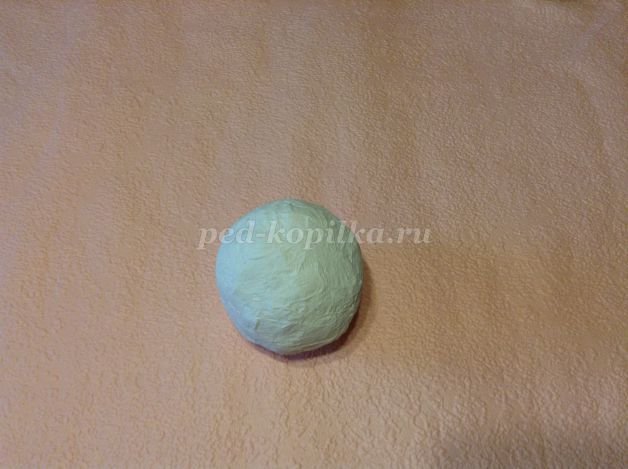
Now you need to take any napkins and tear them into small pieces. We apply PVA glue to the base and glue it with napkins. This is necessary in order for the ball to take more correct form. It is best to stick several layers of napkins. by the most the best option will leave the ball to dry overnight.

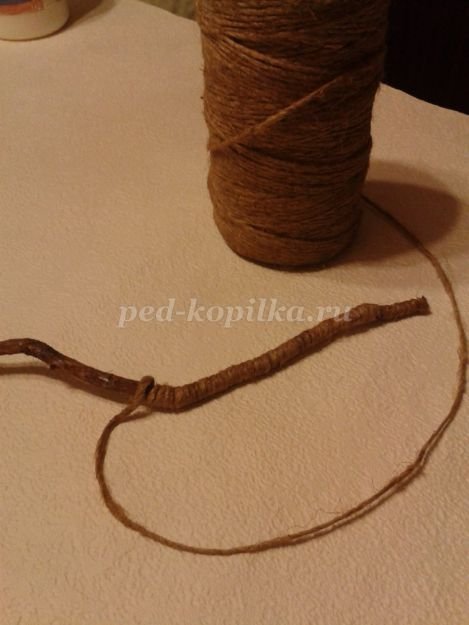
For the trunk, you can take Chinese sticks and, connecting them together, wrap them with any suitable material. Or take any stick that is suitable in size. In this MK, a regular branch is used. It must be greased with PVA glue, wrapped with twine and allowed to dry well.
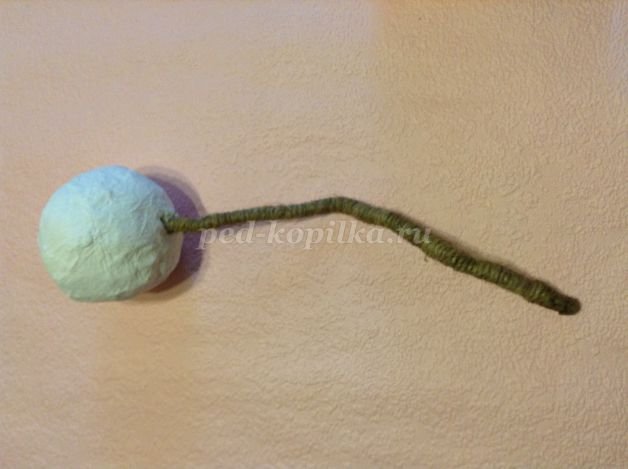
In the ball, which we prepared in advance for the base of the topiary, you need to make a cut in the form of a cross. Put hot glue on the top of the barrel and insert it into the base, press it a little. Also seal the edges of the cut with a thermal gun.
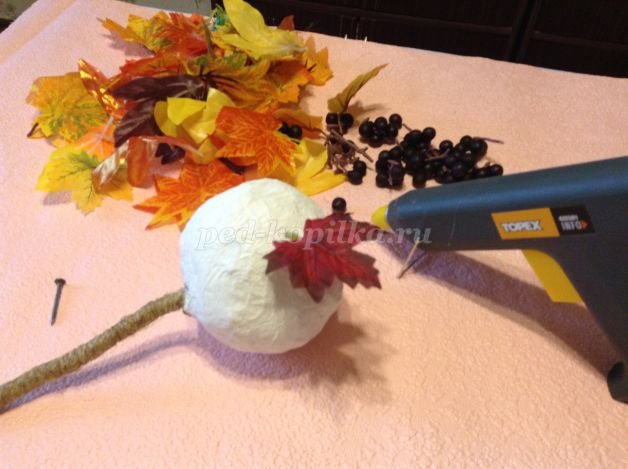
Now begins the most interesting stage- Topiary decoration. To do this, take any carnation, make a hole in the base. You need to drop a drop of hot glue into it and insert a leaf inside. Continue gluing the leaves further as you like. Additionally, you can glue and artificial berries. Or whatever you prefer.
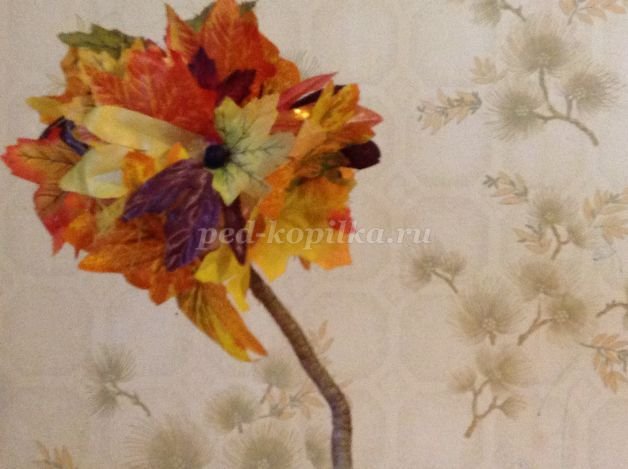

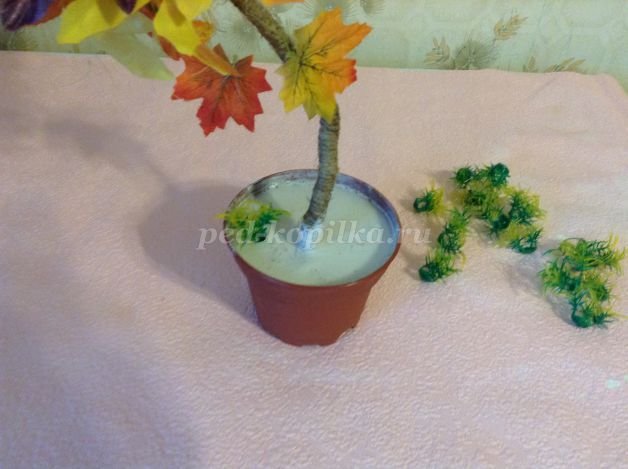
The last stage remains - the stand. For it, you can take any suitable container that is suitable in shape and volume. It can be a small bucket, mug or flower pot. Next, you need to pour gypsum into your container, and as soon as it starts to thicken, insert the topiary right into the center there. Now fix.

Once the solution has hardened a little, you can take up the stand. Take artificial or real grass and lay it directly on the cast. We decorate the pot itself with twine. To make it lie tightly, glue it with a heat gun every 4 cm. Take a satin ribbon and tie it around the stand in the form of a bow. Or, for example, stick miniature artificial leaves on the pot. Here is such a wonderful topiary turned out from maple leaves.


Of course, it is much more difficult to work with dry leaves than with ordinary ones. But nothing is impossible in the world of creativity! From this mk, with the help of detailed instructions and photos, you will learn how to do it right.
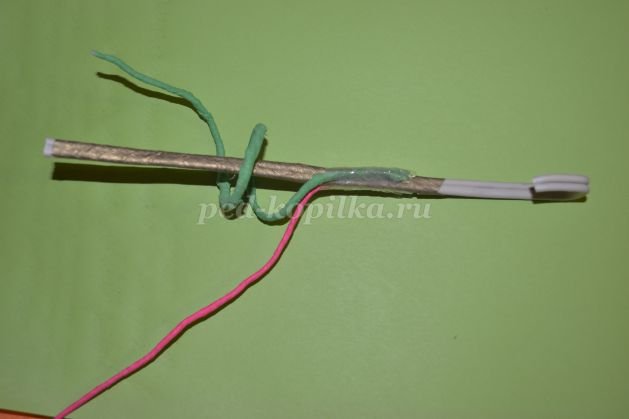
Take three wires 25-30 cm long. Use corrugated paper to wrap the wire. In this example paper is taken three colors: pink, green and gold. Put a drop of glue on the ends of each of the colored strips, then the paper will hold better.

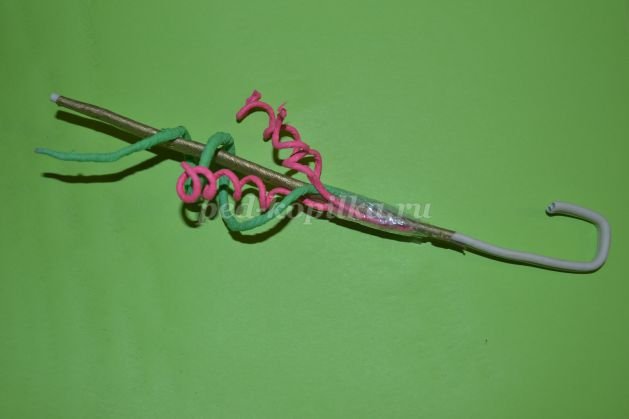
Using tape, fasten all three wires together, and then wrap the pink and green around the golden one.

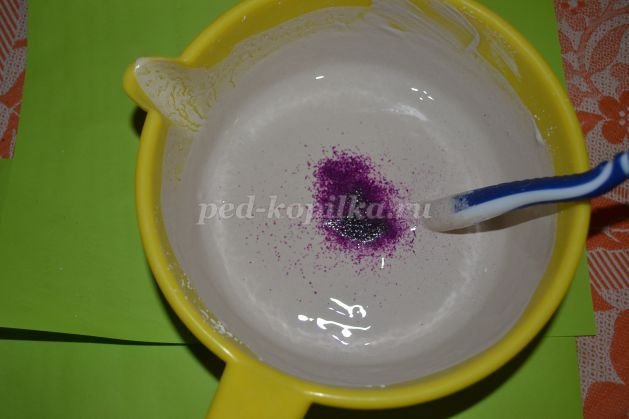
In this lesson, a translucent decanter is used as a stand. purple hue. Therefore, gypsum mixed with potassium permanganate is used here as a filler. It turns out a very beautiful shade.
While the mixture is still warm, pour it into a decanter.
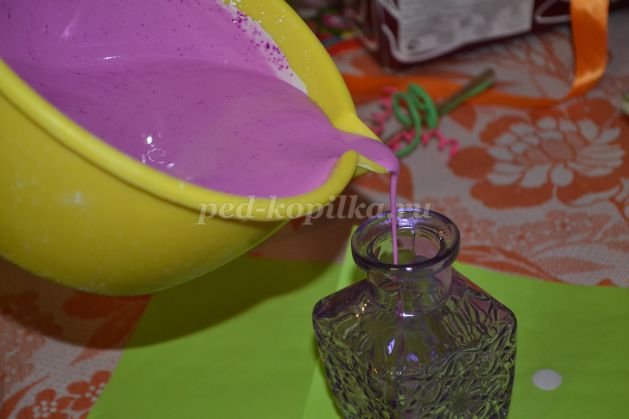
Now insert the already finished wire barrel inside.

It is the turn of the base for the topiary. Take newspapers and colored paper for printing, and build a ball out of them. In order for the shape of the future crown to be more correct, wrap the figure with tape and then with threads.

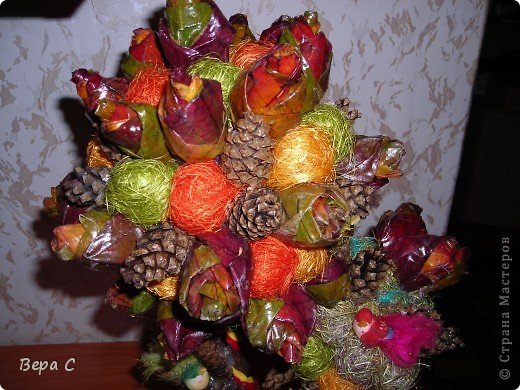
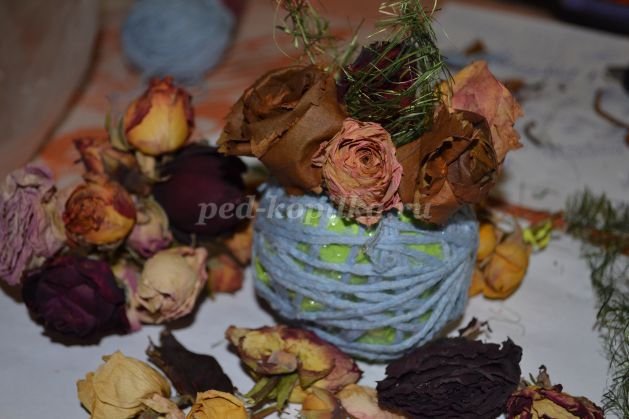
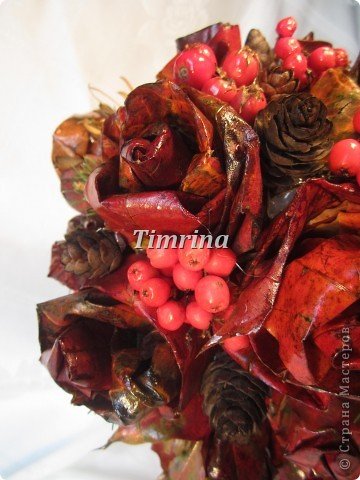
Now you can start creating the crown. In addition to roses from dry tree leaves, dried flowers are also used here. Roses from leaves and flowers must be prepared in advance from fresh materials, as dry ones will break and nothing will come of it. Most often, such flowers are made from maple leaves.
Let's continue to decorate the topiary. Using a heat gun, glue dried flowers and roses from leaves to the base. You can also take balls from wrapping paper.

Glue over the entire base and attach, in the place where it will be attached to the trunk, a square of wrapping paper. Next, make a small hole and drop hot glue inside. Place the ball on the stem of the topiary and gently press down.
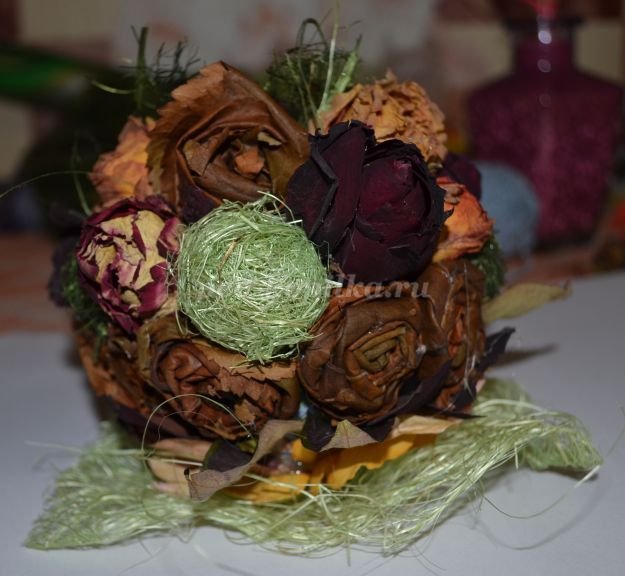
Stayed finishing touches. Decorate the crown with small beads, and make a pattern of small roses on the decanter. Everything, the topiary of dry leaves and flowers is ready!

Of course, natural materials from which you can make ornamental trees are not limited to leaves and flowers. It can be nuts, and acorns, or, for example, cones. Below are some works of leaves and cones.

Julia Gritsko
Basic techniques for working with tree leaves
Basic techniques for working with tree leaves
To organize effective activities for when working with tree leaves, gluing techniques are used, warping, imprinting, copying, cutting and stuffing.
WORK METHODS AND THEIR VARIABILITY
1. "GLUING"
1.1. WHOLE LEAVES
1.2. PARTS (PIECES) LEAVES
2. "DEFORM"
2.1. FOLDING LEAVES
2.2. TWIST LEAVES
3. "PRINTING"
3.1. PAINT
3.2. USING WAX PENCILS
3.3. ON PLASTILINE
4. "COPYING"
4.1. STROKING LEAVES ON THE CONTOUR
4.2. DRAWING LEAVES FROM NATURE
5. "CUTTING OUT"
5.1. Stencil LEAVES
5.2. FIGURES FROM LEAVES
6. "PACKING"
6.1. DIRECT WAY
6.2. THE REVERSE WAY
1. "Glue"
Dry leaves- very brittle material, and work with him, and it must be glued very carefully and carefully.
variability reception:
1.1. Gluing whole leaves
1. Let's select leaves big and small size.
2. Flip sheet convex side with veins down.
3. For more smooth surface sheet apply PVA glue with a brush. If a leaves small glue is applied by drop method.
4. In a certain rhythmic sequence (large, small, etc.) glue leaves on the surface in accordance with the markings or without it.
5. Wet the excess glue with a napkin and press it sheet to the surface with the palm of your hand.
good to use leaves with color transitions. The picture is lively and more natural. Usually, plants such as poplar or viburnum have a very rich palette of colors and leaves You can show light and shadow.
Result: Dried a leaf of wood is glued to the base of the work.
1.2. Part gluing (pieces) leaves
It happens that in the process work or storage dry leaves break. Broken parts can be used for decoration works: stars, raindrops, path, etc. You can make a mosaic of pieces leaves. And if you cook a multi-colored crumb, it will help to revive the background.
1. We spread glue on foundation by design, markup.
2. Sprinkle this surface with multi-colored crumbs from pieces leaves.
3. Press lightly with the palm of your hand through a napkin.
Result: The outlined pattern is filled with crumbs from leaves looks like a mosaic.
2."Deformation"
Deformation is a change in the shape of something under the influence of force. To change shape tree leaves use techniques folding and twisting.
variability reception:
2.1. folding leaves
1. Fold the sheet and, making sure that the fold line has been outlined correctly, with the help of fingers, moving away from you or from left to right, we smooth the fold line. At the same time, hold both parts with the fingers of the left hand. sheet so that they don't move.
2. Then we fold the intended fold in the given direction in accordance with the idea.
3. Fix the result with threads, blades of grass or wire.
Result: modified form leaves in accordance with the idea.
2.2. Twisting leaves
1. Sheet roll around the finger of the left hand or on basis table with the fingers of both hands.
2. Then lightly holding both parts sheet and without pressing on the resulting tube, we fix it on glue or a paper clip, accurately determining the desired diameter of the twist.
Result: modified rounded volumetric shape sheet in accordance with the idea.
3. "Imprint"
AT this case tree leaf It is used both as a tool - a means of creating an image and as an expressive artistic means.
Acceptance variability:
3.1. Imprinting leaf paints
1. We cover tree leaf with paints of the same color or different colors from the side of the convex veins, leaving no empty spaces and not forgetting to paint the edges.
2. Then tree leaf we apply the painted side to the paper, trying not to move it from its place, otherwise the print will be fuzzy, smeared.
3. To obtain a print, press firmly sheet to paper.
4. Then we take leaflet by the handle and carefully remove it from the surface of the paper sheet.
5. Take the next leaflet, paint it in a different color and print it elsewhere in the composition. leaf you can cover not with one color, but with different ones, then the print will turn out to be two-color.
6. Can be reused already painted leaf by applying a different color to it, then when mixing different colors may have an unusual hue.
7. When the drawing is filled with prints leaves, paint the trunks with a brush trees, where the imprinted veins leaf will resemble twigs in a colored crown. Result: picture leaves with indistinct outline, but with a well-drawn texture sheet.
3.2. Imprinting leaves with wax crayons
1. Spread tree leaf, protruding veins upward.
2. Cover it from above xerox sheet(color) paper.
3. Shade the surface of the paper with a wax pencil.
4. For reinforcement color saturation the resulting print tree leaf shade again, pressing harder with a pencil.
5. For picturesque drawing, you can use different colors of wax pencils.
In addition to wax pencils in this reception you can use art crayons, pastels, charcoal and colored pencils.
Result: clearly visible texture and contour tree leaves.
3.3. Imprinting leaves on plasticine
Like reception can be used in work with mastic and plaster, but for work with children it is better to take plasticine.
1. Knead and spread the plasticine on a smooth surface.
2. Then we roll out the plasticine with a rolling pin into a layer about 2 cm thick, and cut off the uneven edges.
3. Lay out on plasticine sheet, protruding veins down.
4. We roll over the formation with a rolling pin with some pressure.
5. Carefully remove sheet and cut off uneven edges.
Result: relief image tree leaf.
4. "Copy"
In order to learn how to copy, you need to take an even, flawless tree leaf and get started.
Acceptance variability:
4.1. Stroke leaves along the contour
1. Take a simple tree leaf.
2. Put it on paper.
3. Take a pencil and trace leaf along the contour holding it with your hand.
Result: silhouette image tree leaf.
4.2. sketching leaves from nature
1. Place a leaf of a tree in front of you.
2. Start sketching sheet, visually comparing its shape, size, contour outlines.
3. Coloring sheet and draw the veins with pencils or paints.
Can be put leaves at different distances from you and draw them at this distance. Accordingly, on paper leaves should be the same size as you see them, not actual size. This has to do with perspective - things appear smaller the farther they are from you.
Result: realistic image of tree leaves.
5. "Cutting out"
Cutting scissors should be well sharpened, close and open well. To cut straight, it is necessary, cutting right hand(for right-handed people, do not close the scissors to the end, but move forward in small steps. All paper manipulations are performed by the auxiliary hand.
variability reception:
5.1. Stencil cutting leaves
1. Sketch the original image of the silhouette by hand "approximately" or circle around leaves on paper(future stencil).
2. Carefully cut out the outline of the pattern with scissors. Stick the end of the scissors into the part of the surface that you are cutting, bring the cut to the line.
3. We cut the paper smoothly, without interruption, strictly along the contour of the picture. Unless absolutely necessary, do not tear the knife from the paper.
4. You can cut several silhouettes on one stencil leaves in a certain order so that the frieze can be sealed in the future.
For further creativity, you can use the inside of the stencil (reverse stencil) and external (straight stencil)(see below reception"Stuff"). The stencil can be used multiple times.
Result: inside of the stencil - silhouette sheet of paper, the outer part is a paper background.
5.2. Cutting out a shape from leaves
1. Cut a straight line - the auxiliary hand just moves along leaf forward, as if trying to "catch up" with the cutting hand.
2. Cut out the square - we reach the corner of the image by turning sheet; without taking out the scissors, we continue to cut out the figure.
3. Cut out a circle - after every three cuts, move the hand holding sheet, closer to the scissors; wherein left hand trying to catch up with the right.
4. Cut out complex contours - combine hand movements from the above steps.
Result: the figure of any image obtained from tree leaf(letter, Christmas tree, circle, etc.).
6."Stuffing"
If you want to get a bitmap on the surface, the easiest way to do this is by spraying with a hard brush, brush, spray gun or paint sprayer. For denser stuffing of the image, a foam rubber swab and thick paint are used. (gouache paints).
variability reception:
6.1. Stuffing in a direct way
1. For stuffing simple patterns in one color, we take a straight stencil.
2. Using a round brush (tampon) and the selected paint on the stencil we beat off an exact copy of the intended pattern.
3. In this case, the background color is the color of the surface.
Result: Clear shaded silhouette tree leaves, the background around the silhouette drawing is the color of the paper.
6.2. Stuffing in reverse
1. With this method, we use a reverse stencil, where only the background is filled with paint.
2. After stuffing the background, the pattern appears due to the color of the surface itself (paper), and the space surrounding the pattern is darkened or brightened.
The reverse stencil is also used for stuffing borders and friezes.
Result: Silhouette tree leaves are not painted over, has a surface color (sheet of paper) . The background is painted over.
Good afternoon, we continue to talk about autumn crafts. And today I have prepared a new portion of ideas for crafts on the theme of autumn. Here will be the most beautiful work, feasible as children in kindergarten, as well as more serious art objects worthy of the hand of a master. A variety of crafts autumn theme you will find in our other articles - And I will also give you at the end of the article a list of links to other children's crafts for this fall.
Well, let's start, let's see what beautiful and simple crafts I have prepared for you today.
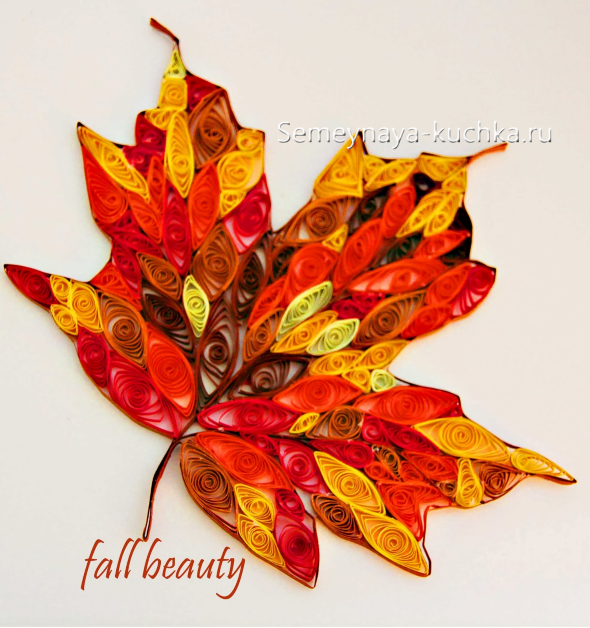
Autumn is beautiful golden leaves. From narrow strips of paper you can transfer openwork beauty autumn leaves. Here in the photo below we see simple openwork twists using the quilling technique. For such airy leaves, you don’t need a lot of paper at all. And such work is easy enough for children to do. school age.

Children younger age can add simple leaves- where each element of the sheet is ONE single large quilling twist.

And more complex crafts-leaves on the theme of autumn are made in several stages. First, on a piece of paper, we draw the outlines of a maple leaf. Then we fill this silhouette with twist modules - starting from the center and gradually moving towards the edges of the silhouette. After the entire inside of the sheet is assembled, it remains only one continuous strip of paper to glue along the entire contour edge of the craft.
And you can start doing crafts with veins(as in the left photo below). First, stretch the veins from the strips of paper - following the drawn contours of the veins on the paper - stick a pin into the end of the drawn vein, stretch a strip of paper, wrap it around the pin and glue the second half of the strip to the first half. After all the veins are collected and fixed on pins, we begin to lay paper twist modules.
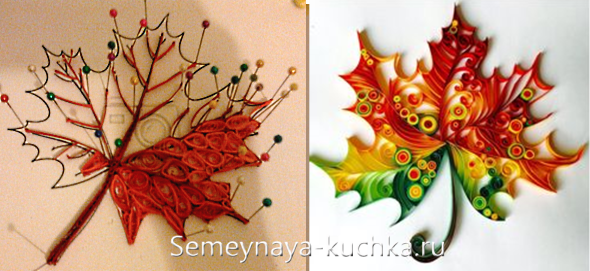
There are different quilling techniques for creating patterned twist modules. By alternating different patterns and shades of color, you can make real masterpieces-crafts on the theme of autumn (like these oak leaves with acorns in the picture below).

Quilling modules can be stacked in autumn picture-panel(as in the photo below). How to make such shaggy flowers, I told in detail and showed in photographs in a special article.
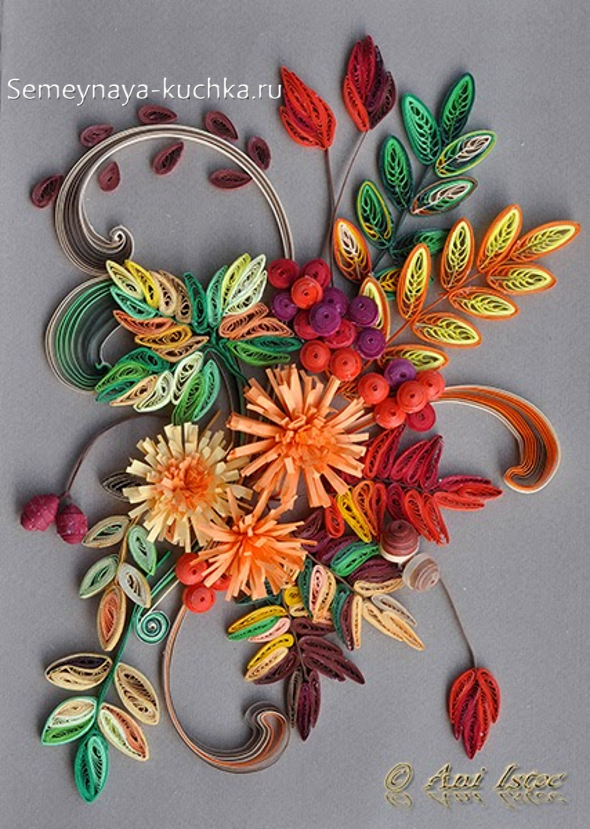
Birds, rowan twigs, squirrels, hedgehogs may appear on quilling craft paintings on the theme of autumn. Everything that has to do with the autumn forest.
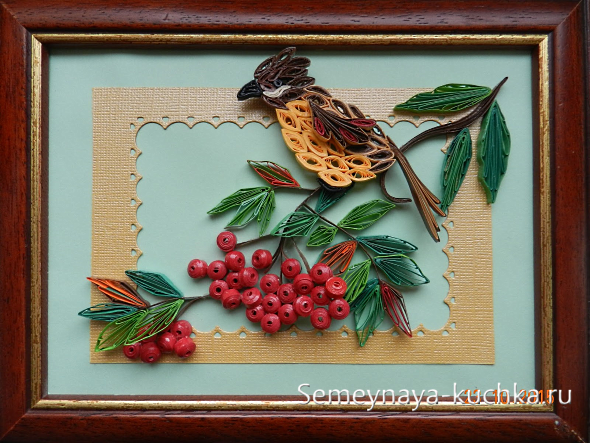

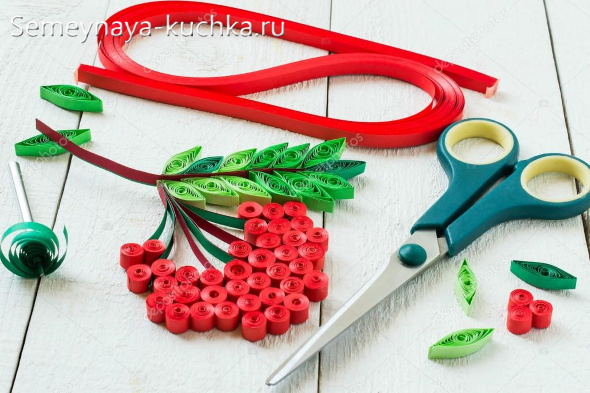
If you are just starting your first steps in the quilling technique, then on the theme of autumn it is better and easier to do rowan craft.

This craft has simple berries - round twists. And simple leaves - twists in the shape of an eye (that is, the same circle-twist was first loosened, untwisted, and then squeezed with fingers from both sides, giving the shape of an eye).
Children of primary school age already have sufficiently dexterous and strong fingers to twist and flatten quilling modules themselves. Therefore, for them, simple crafts on the theme of autumn using the quilling technique will also be able to do.
For example, it’s easy to make such a hedgehog and a round, relaxed apple tourniquet.
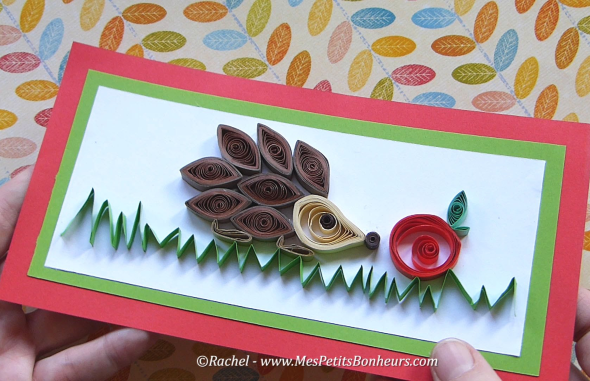
Many more ideas and ways to make an autumn hedgehog craft and in the technique of quilling and from natural material and from paper you will find in our article.
And when the child gets the hang of it, you can give him tasks-crafts with already Large quantity quilling modules (as in the photo with autumn crafts below).

For the manufacture of such children's crafts, it is better to use stencils. A lot of quilling stencils on the theme of autumn can be found on the Internet. I plan to write a separate article on autumn quilling and publish full-size ready-made stencils in it. In the meantime, for a start, here is an idea for an autumn tree made of paper rolls.

Thin crepe paper (wrinkled or corrugated) is suitable for very beautiful autumn-themed crafts for children. You can make a tree craft from a toilet paper roll. Or craft autumn flower on an ice cream stick.
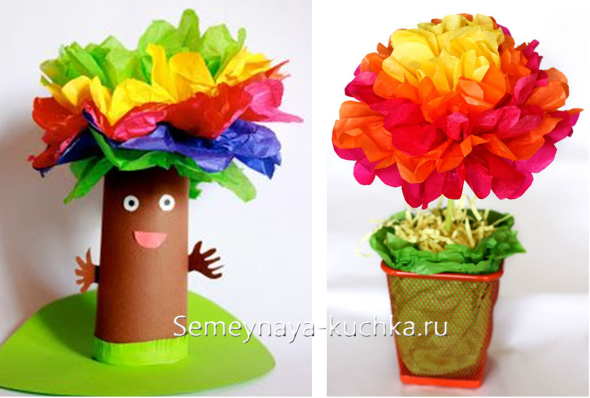
The most important thing is to learn how to make multilayer lush pom-pom flowers. In the article "" I give detailed explanations of how to make such lush flowers quickly and easily with children's hands in kindergarten.
And here they post such a schematic photo-instruction. And I give step by step description your actions.

Step 1- we put colored sheets of paper on top of each other (crepe or colored paper table napkins)
Step 2- we fold this stack of colored paper layers in the form of an ordinary accordion (as in the manufacture of a paper fan)
Step 3- from the two ends of the folded fan we make a rounding with scissors (this is so that the edges of the flowers are oval)
Step 4- we drag the middle of the fan with a wire or rope, tie it into a knot.
Step 5- we push the blades of our fan from both ends and in both directions - and push the colored paper layers apart, unstick them from each other. We get a magnificent rainbow cloud.
And now we either partially put this cloud into the tree trunk (toilet paper roll) or attach it to the stem of the flower (ice cream stick or a long skewer). And in the end we get a craft tree. Or an autumn flower craft.
An ordinary newspaper can be a beautiful autumn gift or craft for school competition on the subject of autumn.
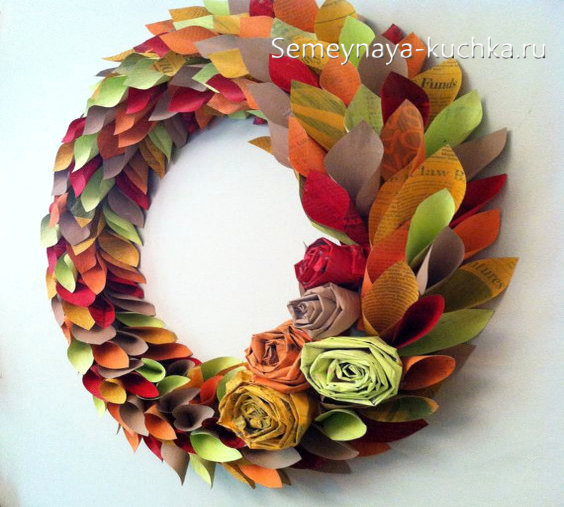
newspaper sheets we paint with gouache in different colors of autumn. Next, we fold each sheet in half several times and circle the silhouette of the blank for the future petal on it. The silhouette may be in the shape of a triangle (or a heart). Cut out such colored silhouettes. And now we twist each of them so that the tip of the triangle (or heart) looks up.
From the newspaper we turn thin tubules-bundles. From them we twist the body-base for the wreath. We fix with wire or rope.

Pine cones are a very versatile craft material. From them you can make animals and birds and many other crafts on the theme of autumn for children. I have a separate article Crafts from cones and there is a whole menagerie on this topic. And in this article I want to show the other side of the bump. Her beautiful inner world.
Namely world bumps in the cut.
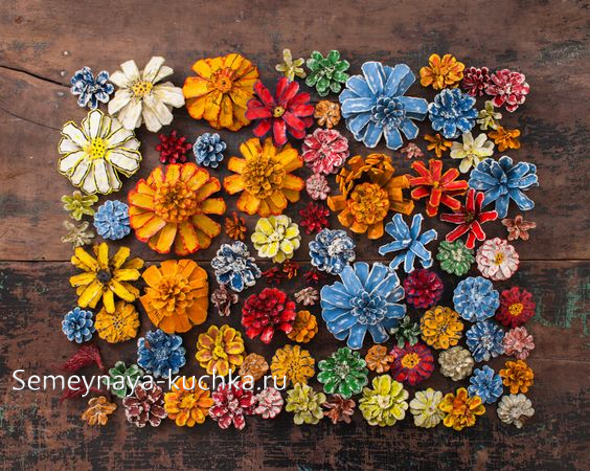
If the cone is cut in half with a knife. Then we see a flat center with scales similar to petals wooden flower . You can use tongs to pull out the extra scales-petals. Or vice versa, glue with glue to add petals-flakes to this cut of the bumps.
And then decorate everything with gouache. Draw the colored edges of the petals, draw the middle, and even draw the fluffy stamens with thin brush strokes (as in the photo below). Are obtained beautiful flowers from cones.

Crafts for coloring cones are very popular with children. You can make whole wall panels from cones-flower beds on the theme of autumn.
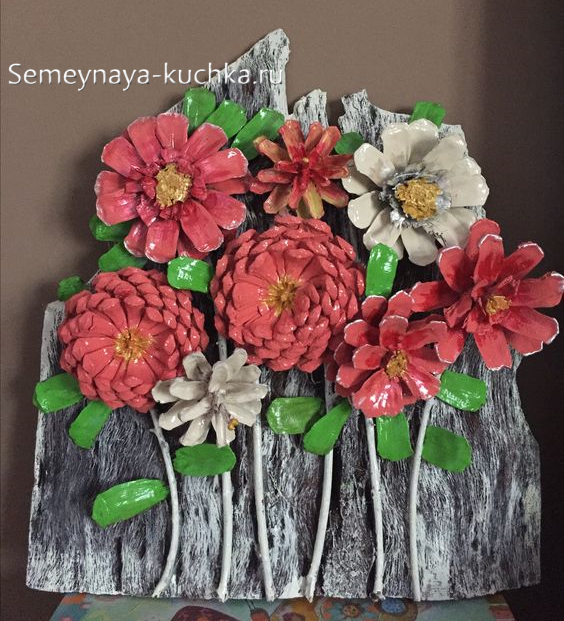
But below we see blanks for a cool craft - AUTUMN FLOWER. See orange flowers so similar to marigolds. Here, in the middle of the saw cut from a large cone, a small cone with lush open scales is inserted. Everything is beautiful in yellow. The edges of the scales are painted red. And it turns out the poured flower of marigolds. You can collect a realistic bouquet. Open the Internet, look - what shape and coloring they have, and repeat the same shades with gouache, stamens, stripes, specks - and you will get an autumn flower bed that looks like a real one.
This is a very chic craft, which is done quite simply. With such a flower bed, you will win any school autumn-themed craft competition. Rest assured. Moreover, I will now reveal to you three little secrets, how to achieve perfection in this craft ...
Little secret. How beautiful to open the scales of the cone. Soak the cones in hot water. They closed off the water. Remove from water and place on a baking sheet in the oven. We fry them at a low temperature and they open beautifully - spread evenly in all directions.
And another little trick. To make your flower bed fragrant, you can use aromatic oils (sold at a pharmacy). We put the opened cones, even before painting them with gouache, in a cellophane tight bag - we drop a few drops of aromatic oil there - you can mix, drop a drop of different things (this will not spoil). And close the bag tightly, shake so that the droplets are distributed throughout the bag. And let the bump lie there for a day, soak properly.
And another little nuance. How to make your flower bed sparkle. After you have applied the main color and drawings, strokes, specks, etc. with gouache. Spray on top with hairspray. This will fix the paint, it will not stain your hands and the color itself will become two tones juicier and brighter.
The middle of each cone flower can be decorated with a round hat from an acorn - also painting it with colored gouache (as in the photo below). From such chic flower cones, you can make whole wreaths-crafts on the theme of autumn.
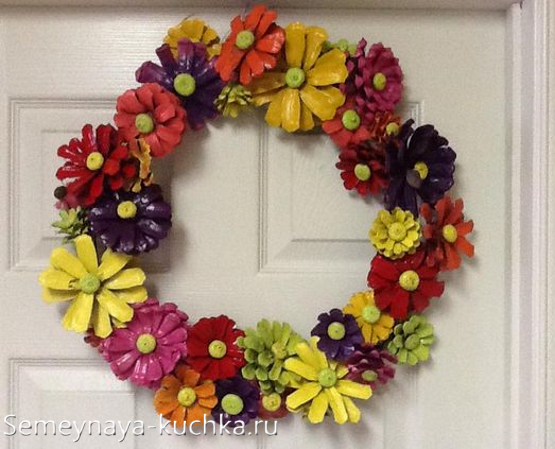
You can not arrange the decorated cones in the form of flowers, but simply stick it on a cardboard donut ring cut from a large pizza box.

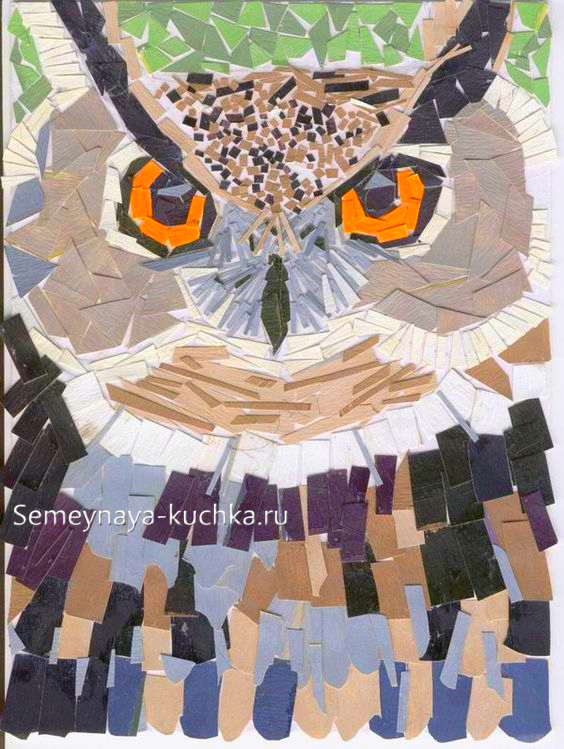
Bulk applications from cereals are loved by all children. And this is good. Because it's useful. Autumn mosaic applications of cereals and seeds are very calming to the psyche and develop fine motor skills of the hands.
Can be added to cereals curly pasta. We attach the material to plasticine or glue from a hot gun.
Young children can be given simple mosaic crafts on the theme of autumn. For example, here is such a craft in the form of an autumn tree all kids love it junior group kindergarten.
We paint in advance watermelon pits(or pumpkin seeds) in different colors of gouache. And children lay out whole panels of these colored bones on pva glue.
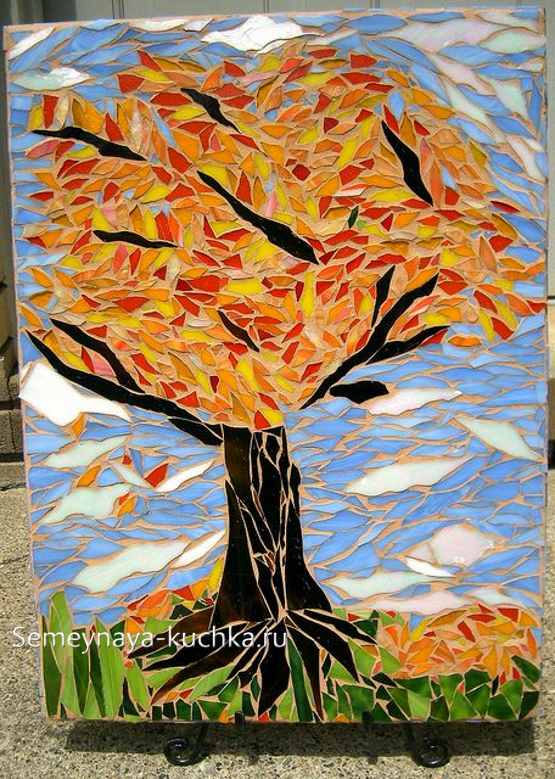
And make it even faster mosaic material on the theme of autumn from colored maple leaves. We simply cut them into cubes and pour them into bowls. Children themselves choose the elements and stick them on the crown of the painted tree.

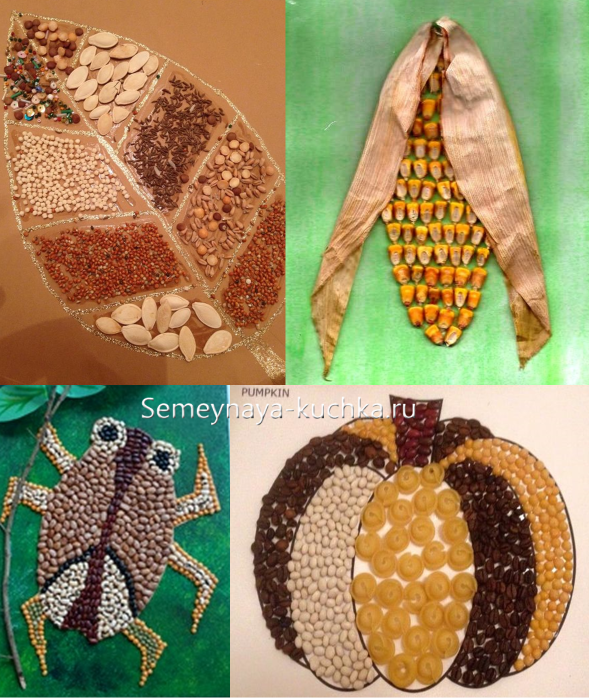
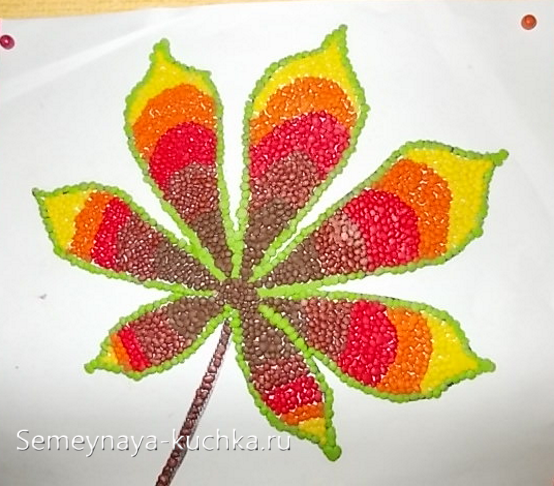
Here's another simple ideas crafts on the theme of autumn for children at school and kindergarten. The autumn leaf is divided into sectors and each sector can be filled with material of different texture. If there are no seeds and cereals, each sector can be filled with chopped mosaic and maple leaf, but different color- a sector of yellow, a sector of green, burgundy, orange, red, etc.
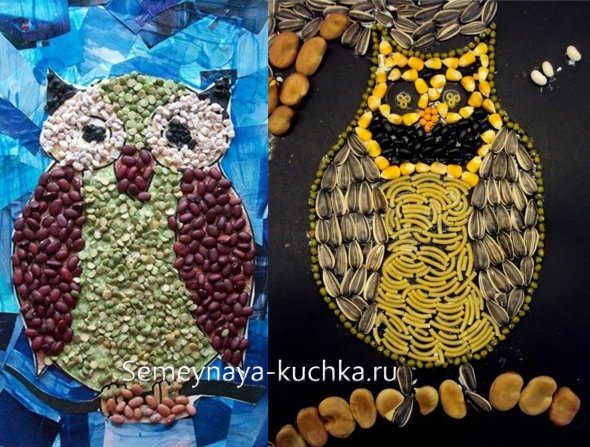
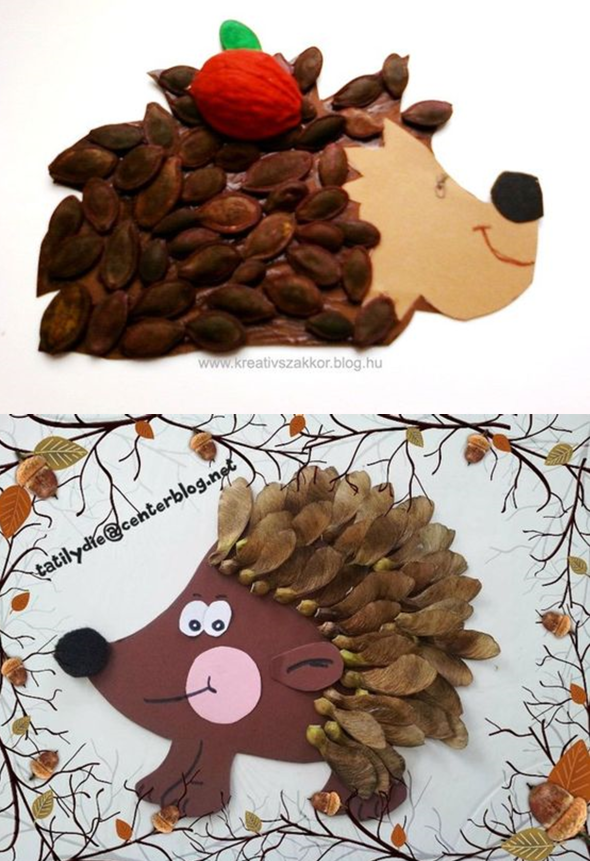
And hand-made hedgehogs made of natural material, beloved by all children. Hedgehog spines can be laid out from watermelon pits, their winged maple seeds. And an apple on the side of a hedgehog can be made from a walnut shell.
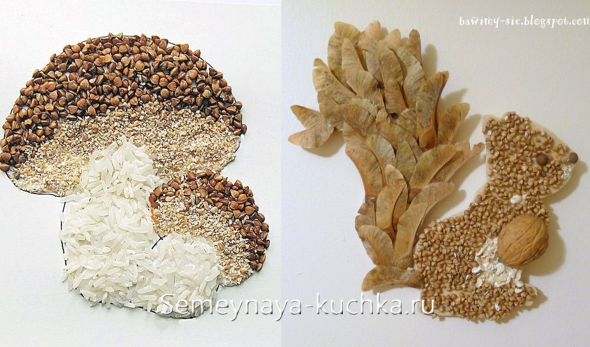
Crafts on the theme of autumn can be nonchalant colors - but the different texture of the bulk mosaic material will make it chic. The combination of rice, buckwheat and barley groats will give us a beautiful boletus mushroom.
Light oatmeal and maple seeds will help you make a wonderful squirrel with your own hands.
And here is my favorite combination of a mosaic of dry leaves and acorn caps.
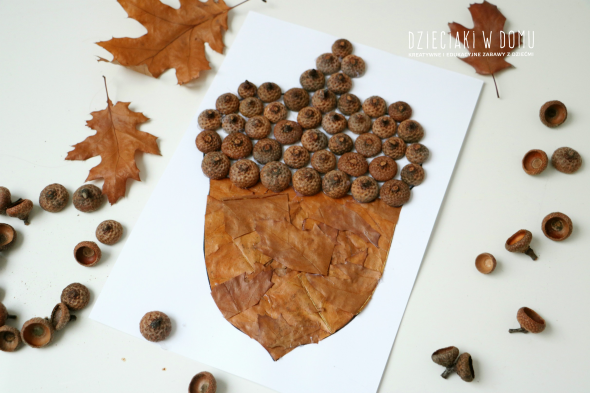
You can make such a beautiful craft on the theme of autumn with your own hands - the silhouette of a squirrel from acorn hats. We print the silhouette on the printer. We cover it with black gouache. And on the glue from the hot gun we attach hats from acorns. Beautiful craft as a gift to friends and relatives.


Mosaic from lumps . Lumps can be paper (crumpled balls of their crepe or corrugated paper).

Or lumps can be from colored plasticine (as in the photo of the craft below).
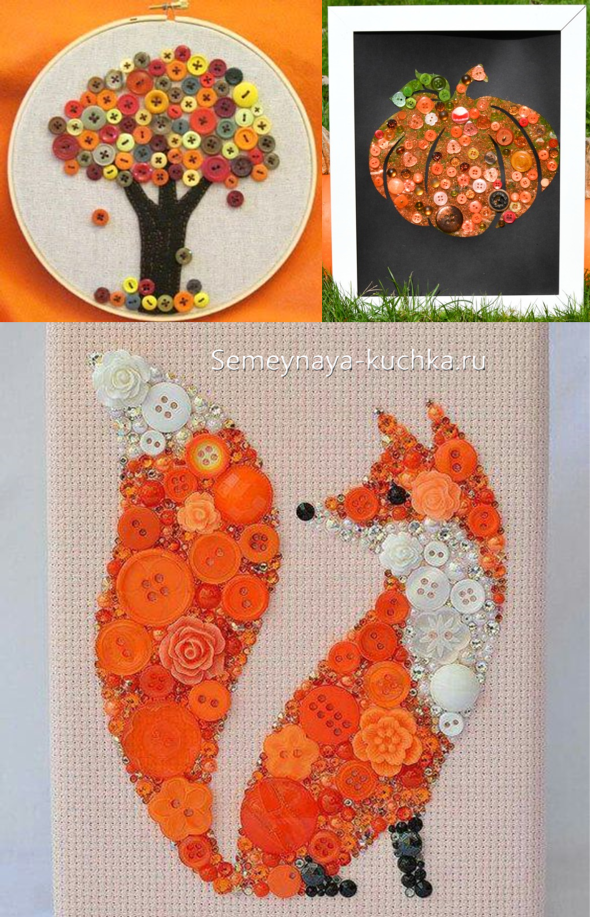
Mosaic for adult art crafts on the theme of autumn may consist of more expensive material - buttons and beads. Autumn is rich in button craft ideas. It can be trees, pumpkins, and a red fox like autumn - the queen of the autumn forest.
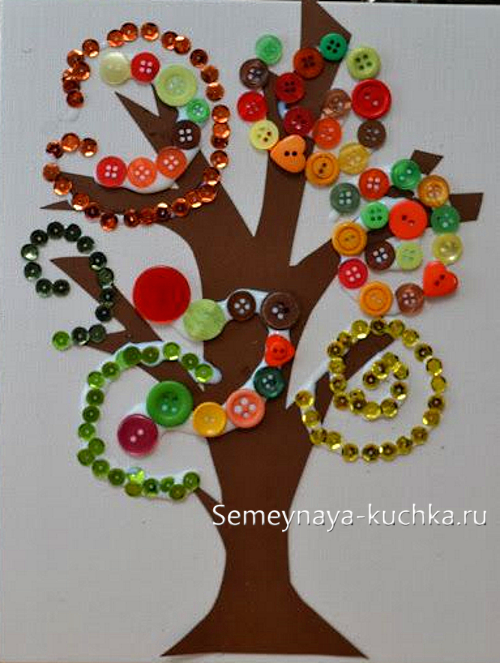
But the child also loves to work with buttons. You can stick buttons on a glue gun or plasticine. You can lay out a long sticky path from the glue gun with your own hand, and the child quickly fills it with bright buttons and sequins (as in the photo of the autumn crafts below)
Autumn paper mosaic. This is a children's craft. When a sheet of colored paper is cut into squares. Each color is poured into a separate bowl and the child begins to lay out the picture. It looks beautiful when everything is laid out on a black background, that is, black cardboard is suitable.
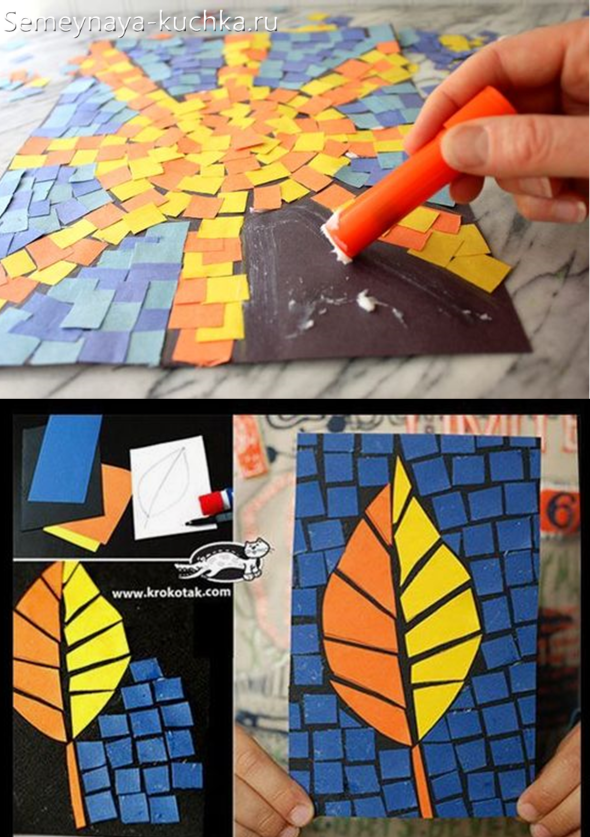
How less baby the simpler the mosaic task should be for him. The contours of the future drawing should be drawn in advance on the background and serve as guidelines for the child's borders of the layout of the elements.

You can cut mosaic material different size . In order to fill in each sector of the picture with a different texture - small or large, cubic or triangular.
Can be cut out of thick cardboard uneven pieces of the future mosaic. First, cut the cardboard into uneven strips with winding edges. And then cut these long strips into short segments, also strongly obliquely and unevenly moving the scissors.
Collect crafts from such crooked cardboard elements. And then seal the cracks. Apply PVA glue to the gaps between the cardboard and fill these places with fine sifted river sand or sifted barley groats. Dry and top coat with hairspray to make everything shine. Get the effect of a real ceramic mosaic. Excellent quite simple and chic crafts on the theme of autumn. Suitable for children and parents - everyone can find their own portion of work in cutting and laying out.
Not in the first article on the topic of autumn, we are talking about the technique of imprinting maple leaves. Because the right print is very beautiful. Children really like such art activities where you can make stamps and prints. Against the background of such a paper sheet stamped with leaves, you can make autumn applications with a squirrel or a hedgehog.

Children love to make elegant crafts from autumn leaves. On our site there is a large article on a variety of techniques for such children's creativity Leaf crafts
In this article, I will show you some more ideas for kids. These cute flowers with eyes are suitable for school and kindergarten age.
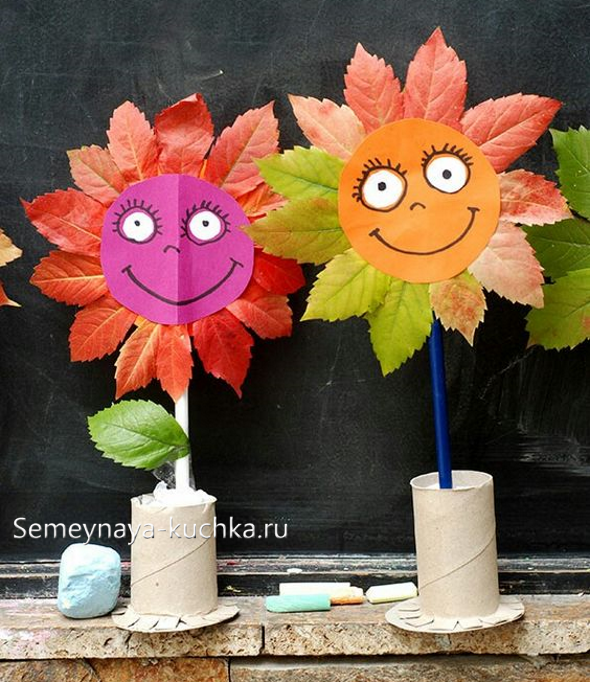
We cut out a circle from cardboard - we glue white eyes on it and draw a smile and eyelashes with a marker. We turn the cardboard disk over and on the reverse side we attach the leaves to the glue or plasticine so that they look like half a sheet over the edge of the cardboard round. On the reverse side of the flower, we attach the tube-leg to plasticine or adhesive tape and put the flower in a vase from the toilet paper sleeve.
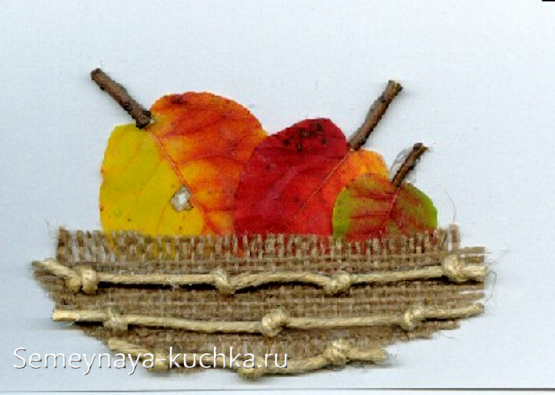
Here is a beautiful application of round aspen leaves. Or cut with scissors in the shape of a circle of maple leaves. We stick them on a sheet of paper, add sticks at the top, and glue the silhouette of the bowl in which they lie down. A simple craft for young children on the theme of autumn.
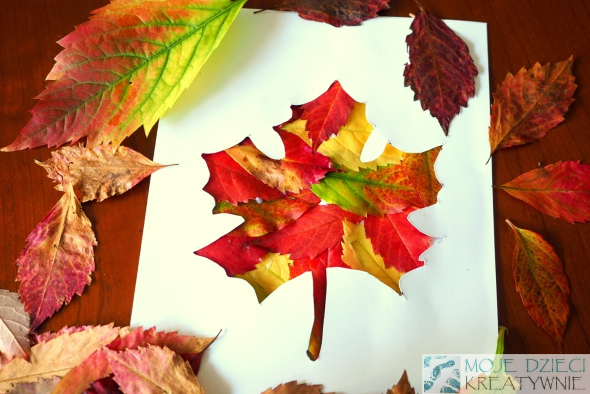
You can take a sheet of paper to stick autumn leaves on it in a chaotic manner. And from above this leafy canvas is covered with a sheet of cardboard with a silhouette-hole cut out in it in the form of a maple leaf.
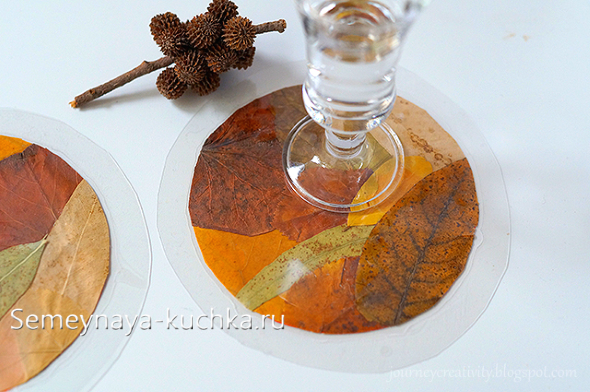
You can also make a carpet from hardwood. Cut out an even circle. And laminate the round on a laminating machine we get useful handicraft table setting stand.
You will find even more interesting techniques for working with autumn foliage in the article.
Leaves can be dyed. And they will have new craft opportunities. The painted sheet acquires a new creative life. Here's how it goes.
We took a long willow leaf and covered it with a pattern. We look at it and understand that it resembles a long feather of a wondrous bird.
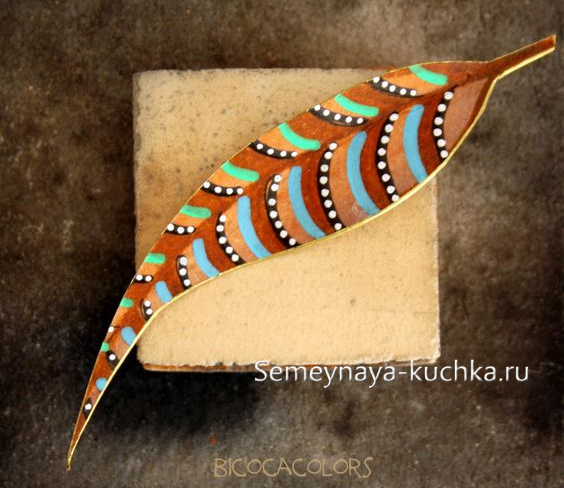
Then we draw a new feather-leaf and another one, each time changing the pattern. Then we lay out the feather leaves on the table and now we see the silhouette of the future craft. Beautiful firebird.
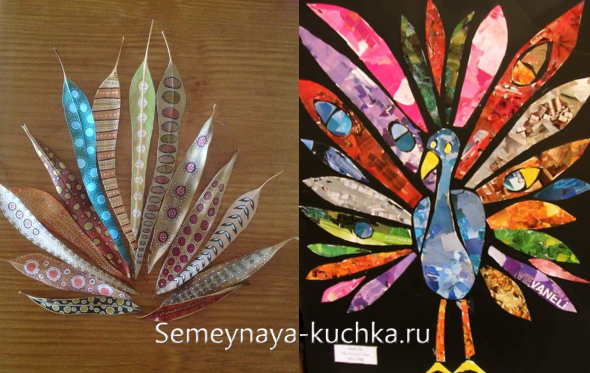
It is not easy for children to draw neat patterns with a thin brush. And it is not necessary. Let the children's painted leaves be bright spotty, not necessarily with an even symmetrical pattern. Anyway, this work will be great.

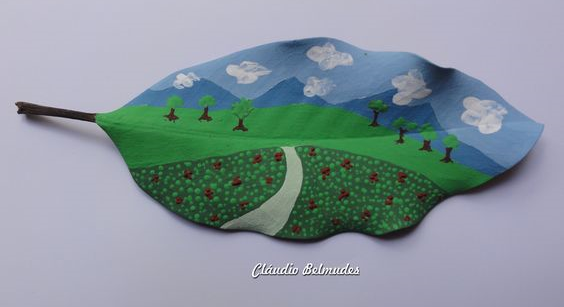
At an older age, you can draw whole mini-pictures on large leaves. I will not talk in detail about the technique of such painting on autumn leaves, I already talked about this in the article
This craft requires work with a sharp paper knife or blade, so children should not take it on their own. Let an adult cut out the inner parts of the sheet. The clear tutorial below will show you all the steps. They are simple and understandable.
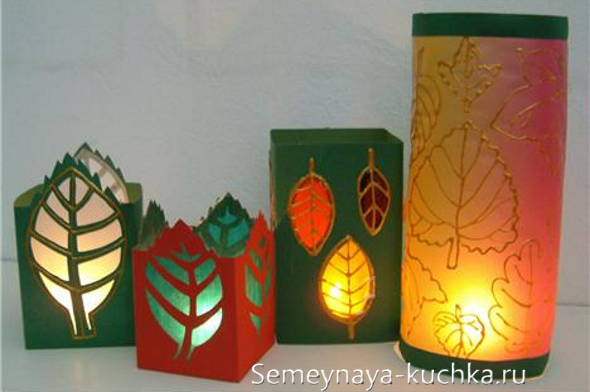
We cut out a long strip from cardboard - we fold it into 4 parts-sashes, plus on one side there should be a small overlap-stock for gluing. In one of the halves of the sides we cut a hole in the form of a sheet with a knife. On the inside paste parchment. We glue the wings to make a hollow cube. And inside we put a glass jar with a candle tablet at the bottom.
By the same principle, one can candle holders made of thick wrapping paper and rolled into a tube. On it we cut out the silhouette of a maple leaf, on the reverse side we glue parchment transparent paper, painted with watercolors in a delicate color. We turn this two-layer sheet into a roll, fasten it with a stapler. Inside we place a candle or a garland of LEDs.

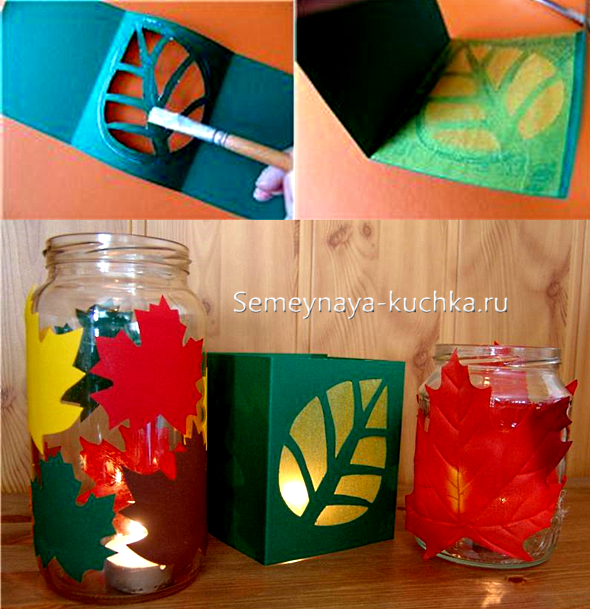
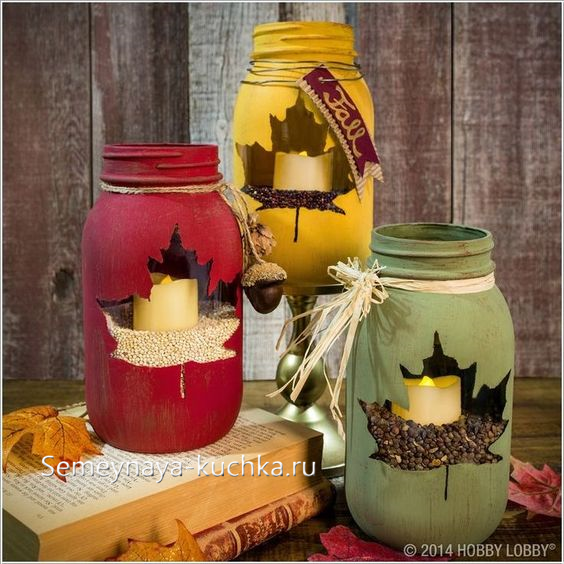
And here are some more jars of candlesticks, The simplest crafts on the theme of autumn. The jars are smeared with gouache blots, or pasted over with pieces of colored napkins, and on this blotted background we paste the silhouette of a tree trunk with branches. And you're done.

You can paint the jars like this with a hole in the form of an autumn leaf. Cut out a sheet of paper. We glue it on ordinary soap on the side of the can. We cover the jar with acrylic paint. Wet the paper sticker with water - the soap soaks and the sheet peels off. It turns out a candlestick. Pour grain inside and put a candle.
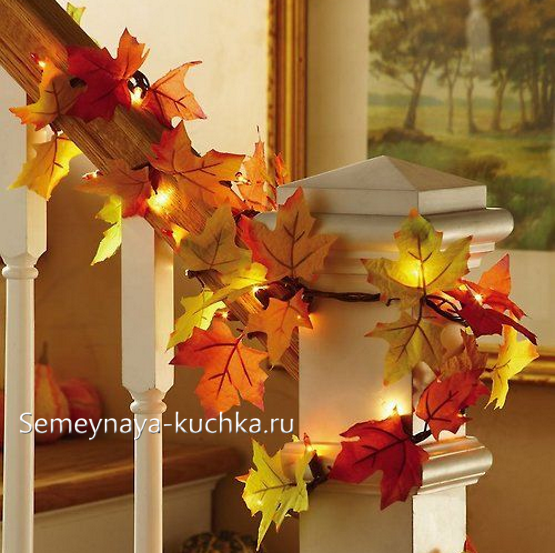
And you can White Christmas LED garland decorate with autumn leaves - tie foxes to each diode with adhesive tape and get a glowing autumn garland. Beautiful crafts on the theme of autumn, to decorate your autumn holiday.
If you loved to embroider as a child, then this fall you can make an embroidered craft on an autumn theme. It can be a beautiful yellow-green-red leaf, made in different embroidery stitch techniques (as in the photo below).

It can be a picture-landscape on the theme of autumn, made in the technique of smooth surface.

You can swing at a large canvas with many elements. Or you can make a simple autumn tree.

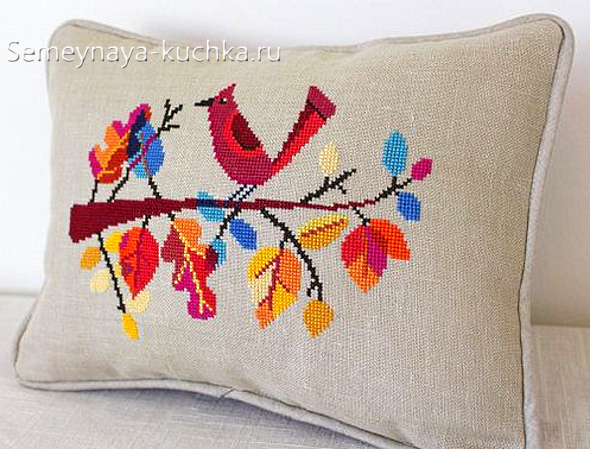
You can decorate with embroidery useful thing- such as a pillow. A great gift for DIY crafts on the theme of autumn. Scheme for such embroidery you can draw yourself watercolor paints on paper in small cells- such paper is sold in the drafting department.
And autumn leaves look beautiful if they are made of bright beads. There are a lot of beading techniques, so there are many ways to make an autumn leaf from beads. Here I offer the simplest - accessible to children, the one that is taught in children's creativity circles. We make the outer frame of the sheet with a central vein from thick wire. And already with a thin wire we braid this frame, stringing on it, in the course of weaving, rows of beads.
Autumn leaves are the most colorful material for decorating postcards. The colors of the leaves sometimes amaze with fantastic shades! And you can dry them very simply - iron them with a hot iron through paper. This is the most fast way while retaining the bright color of the leaves.
That's why The first task of October "Autumn Leaf" is to use autumn leaves in the design of a greeting card.
Assignment deadlines for a surprise: October 3 - 16
Surprise from scrapbooksale sponsor: 
How and with what to glue dry plants on a postcard, you can read below (click on "Hidden area" to expand / collapse the text).
Knowing properties various types glue, it is easy to choose the most suitable glue. However, there are no strict rules in this regard, you can use what seems more convenient or at hand in this moment. The main thing is that the plants are firmly fixed, and there are no traces of glue left on them. When working with dry plant material several types of glue are used - depending on the situation and the quality of the glued material.
Wallpaper glue suitable for gluing flat surfaces that are completely in contact with each other. It is ideal for securely fixing paper, dried leaves.
Special floral glue "Oasis" used for fast bonding of small transparent elements. It can be applied pointwise. But it should be borne in mind that in some cases this adhesive provides the material.
PVA glue very popular when working with dry plants, because it securely fixes the material, but requires a sufficiently long exposure to dry completely. It is better to apply glue with a thin brush on the thickest parts of the plant (veins, flower core), without smearing the entire surface of the plant with glue.
For gluing coarser parts (twigs, buds) is used hot glue gun. With small drops of hot glue, you can quickly, accurately and firmly glue even the most inconvenient element for gluing. Be aware that hot glue can ruin appearance material, leaving light spots on its outer surface, so it is not used to fix very thin or porous materials.
To fix small and relatively light elements, it is also used double sided tape. It is suitable for gluing a wide variety of materials: natural fibers, petals, leaves and other parts of dried plants.
Written based on the materials of the book "Collages and Panels" by Yulia Maryina.
Dry leaves are very fragile and you need to think in advance how to keep the plants for a long time. The easiest way is lamination. I immediately laid out the leaves, grass and flowers in small groups (compositions) between the film, so that later I could easily cut out the desired composition or individual flower. On the first postcards, I glued the laminated leaves with Glossy accents and fixed them with a stapler for reliability. But then I made sure that Glossy accents were holding securely and did not use the stapler anymore.
A few years ago, I simply covered the composition with a piece of transparent film using double-sided tape. Or covered the composition with a transparent self-adhesive film - also fast and reliable way. Then I glued it under the cut out window in the postcard.
On the Internet I found a very similar way to protect plants called hand laminate.
Can transparent film flash on sewing machine and stick it on a postcard. Or take advantage of the master class, where the photo is inserted into a frame with plastic window. Thus, you can insert a cardboard box with dried flowers under the plastic.
Perhaps you yourself will come up with a simple and original way plant protection.
Happy creativity!
P.S. You can use purchased dry plants!
1. For crafts, small or medium-sized leaves are more suitable. As well as all kinds of berries (for example, mountain ash), dried flowers, seeds and herbs, spices that any housewife has in the kitchen (peppercorns, allspice and cloves). To highlight the details of the application and its background, you can use pencils, felt-tip pens and paints.
2. Before doing leaf applique, prepare materials for crafts. The leaves collected in the forest or park must be thoroughly dried. To do this, simply iron them with a warm iron, having previously laid paper on both sides. After that remove upper layer paper and let the leaves dry completely.
True, this method of preparing the leaves is not suitable if you are making an application with a small child. Yet such a fragile material as dry leaves is more suitable for older children. In babies, the leaves will literally crumble in their hands. In this case, it is better to make an application from undried leaves, and then dry the finished composition.
3. Before gluing the leaves onto cardboard or a sheet of paper, make a barely noticeable pencil sketch of the future application on it. So the child will better imagine the future composition and more accurately glue the details of the application to the paper.
4. As for the glue, then normal fit clerical, which must be applied to the sheet with a very thin layer or dripped with liquid glue in several places on the sheet.
5. You can start making the simplest applications already with a one and a half year old baby, gradually complicating the plot.
1. Mark with a simple pencil the location of the future application.
2. Take prepared leaves. They must be taken with caution. Teach your baby to do this with tweezers or one finger dipped in water.
3. Now you need to glue the leaves to the cardboard. If the leaves are not too dry, then apply the glue directly to them, and if they are dried, then the surface of the cardboard should be covered with glue.
4. After the application is completely ready, cover it with a napkin and put it under the load for a day (for example, under a stack of books).
To kids
For the little ones, simple stories are suitable. Ask your child to build from leaves everything that he saw during a walk, for example, trees. Help him glue small leaves (birch or aspen) to the album sheet or cardboard, and draw the twigs and the trunk with paints or felt-tip pens.
Children 3-4 years old
Older children can complicate the task - to think about what or who this or that leaflet looks like. You can not only make some kind of animal or bird, but also create a whole plot, for example, a bird sitting on a branch or a cute hedgehog with mushrooms on its back.
Preschoolers
With preschoolers you can make leaf applications several trees at once (aspen, birch, maple, mountain ash). These can be simple compositions of one figure, and more complex ones, consisting of several figures. From colorful leaves you can make and beautiful postcard, and a bookmark or something else useful.
Create beautiful applications with your child - you can then make a whole art gallery out of them.
Once upon a time there was an old man and an old woman, they had a daughter, Alyonushka, and a son, Ivanushka. An old man...

Gods - Olympians (myth of ancient Greece) The most powerful of all sons ...

To see torn shoes on their feet in a dream can be people who have a big ...