
Short. The purpose of ND filters is to reduce the amount of light entering the...


Topiary or living sculpture- this is an amazing spectacle created by human hands. Topiary art originated in ancient Rome. And since then, hundreds of unique images created by topiarists with incredible talent at different times still delight modern experts in this field.
Topiary appeared in Russia relatively recently, about two centuries ago. This art was "grafted" into the Russian people by elegant English lords.
Today to have a topiary at their summer cottage It means to have exquisite taste. This luxurious and fashionable kind of landscape design is quite possible to create with your own hands.
Let's take a look at which plants are most suitable for topiary.
Most often, they are used to create living sculptures. This plant must be handled very carefully as it is poisonous. Boxwood requires a thorough haircut twice a year. Holly is also often used for topiary. This plant needs to be cut once a year.
Yew is also a poisonous plant, which is sheared no more than twice a year. For curly hedges, privet is ideal. It is cut twice a year during the warm season. Cotoneaster will be an excellent option for implementing the most daring ideas, as it grows very quickly.
To create a do-it-yourself topiary experts recommend that beginners plant two bushes. One for training, and the second, as they say, "clean". With your light hand, the bush you bought can become a cone, circle, pyramid or ball. Your fence may well be guarded by Mickey Mouse or any other fairy-tale hero.
The simplest version of topiary art is a hedge, which can consist of several plants at once.
As an example, let's try to grow a bird bush.
To design a green sculpture, you will need the following:
- a bush (for example, honeysuckle or ivy) from 0.3 to 1 meter;
- wire mesh;
- gardening scissors;
- secateurs;
- support;
- file;
- brush and paint;
- two small bars of hard wood.
The main condition for creating such a sculpture is that all the stems of the plant you have chosen should be quite flexible and still remain strong.
Determine the "habitat" of your bird in the country. Dig a small hole in this area and drive a support into the ground. Then you will need to plant the plants, tying it, but not too tightly, to this support. Leave one root branch outside. It will serve as a leg for your bird.
To create the body, cover the bush with wire mesh, creating the desired shape. In the subsequent period, this grid will serve as a kind of guideline for cutting the plant. To make the frame more stable, tie the mesh tightly to the support.
As the bush grows, try to loosen its connection with the support a little. Shoots that will grow through the mesh should be pinched. This contributes to intensive branching and the development of denser foliage.
When the "bird" grows up and gets stronger, you should attach a beak to it. It must first be cut out of hardwood and shaped with a hacksaw.
Paint the beak with paint, choose the color of your choice. After staining, you can cover the beak with a layer of enamel. When the enamel dries, carefully drill holes in the beak - these will be the “nostrils”.
Pass a thin wire through these holes, and use it to attach the beak to the mesh frame.
Plant pruning should be done from top to bottom.. Leave 3-4 buds on a branch. Otherwise, the "bird" may wither and dry. During periods of active growth, the plant needs constant feeding. Active growth, as a rule, falls on the spring-autumn period.
Topiary figures will become one of the best decorations in the landscape design of your backyard. They look very impressive and invariably find themselves in the spotlight.
You will certainly make your city acquaintances jealous by showing them a photo of a summer cottage decorated with many beautiful living sculptures.
The desire of mankind to do everything “quickly” was reflected in such painstaking garden art as topiary. The formation of a bizarre crown of a tree, sometimes requiring decades, now takes no more than a few months. Who so simplified the hard work of a gardener? As usual, the most hasty nation in the world. Trying to quickly absorb the next portion of fast food, one of the Americans figured out how to make fast topiary quickly and naturally. Growing an intricate green figure, thanks to a sparkling thought from across the ocean, is now easier than ever - you do not need to wait for years until the tree grows, and then cut it for a long time to achieve a certain crown configuration. It is enough just to purchase a ready-made wire frame, fill it with an earthen mixture, plant ground cover plants and - voila! Topiary is ready. Curious? To be continued…
The desire to diversify our lives encourages all of us to search for an exciting activity designed to paint monotonous everyday life in bright colors. If gardening is your passion, why don't you transform your garden plot with an original plant figure - a duck or a peacock, an elephant or a lion ... or maybe you prefer a flower car? The ancient art of topiary, redrawn in a modern way, will allow you, without straining, to create a topiary with your own hands literally within one day. Of course, provided that you do not plan to do something large-scale, striking with its dimensions the owners of nearby land. To begin with, it is better to try your hand at creating a small garden figurine using the topiary frame technique, gradually moving on to more complex compositions.
Learning how to make a topiary with your own hands using a finished metal frame is within the power of any gardener who has the patience and perseverance to the right extent. First, you need to choose a frame for the future green sculpture. Its size and shape should harmoniously fit into the garden landscape. It is better to take a small but expressive form - after all, you create an accent that simply has to attract attention.

Expressive green sculpture based on Formula 1 is made of ground cover plants on the basis of the frame

Exotic ostriches, created on the basis of globular topiary bushes, will bring a touch of extravagance to your garden
Ready-made frames, which can be purchased at specialized garden stores, are made from 2-3 mm wire. They are a lattice structure with sufficient gaps to allow access inside. In addition, a lid is located in the upper part of the frame, which is designed to further simplify access to the "insides" of the metal structure when filling it with a substrate - a mixture of earth with peat or sphagnum moss.
Before you start filling the frame, the moss must be soaked in warm water for about 30 minutes. Filling the structure of the future topiary with a substrate, it is necessary to prudently create holes in which ground cover or climbing, succulent or herbaceous garden crops are then planted. For such purposes, perfect: rejuvenated, saxifrage, sedum, loosestrife, ivy, grapes.
When forming a topiary from weaving plants, an earthen lump is moved from a plastic container to a metal mold, and the shoots are distributed along the frame and stuck with U-shaped clips. If the figure to create a topiary is medium or large, bags of crushed foam are placed inside the substrate to lighten its weight.

Fluffy hedgehogs, born thanks to the frame topiary, will decorate the green lawn on your site

A cute family of pigs made on the basis of a frame and ground cover plants will create an unusual flavor in the garden
Caring for frame topiary involves regular watering and fertilizing, pinching and pruning. It should be remembered that such a green sculpture should not be left to winter in the open air - it is better to bring it into an unheated room with an air temperature of about 5 degrees. If the weight or volume of the topiary does not allow this, you can cover it with a wooden box insulated with straw or polystyrene.

Curly haircut of a bush - topiary in the form of an elephant is within the power of experienced masters of green sculpture
In an effort to further speed up the process of creating a green sculpture of complex shape, an express topiary was invented. The essence of this method of forming a topiary is simple - in spring, weaving plants such as periwinkle, girlish grapes, ivy or hops are planted in open ground, tending to quickly form shoots.
Then, a metal mesh frame is installed on top of the planting, which serves as the basis for creating the topiary. As they grow, the branches of the plants are distributed along the frame and secured with a rope made of natural material or cut. By the end of the season, the frame will overgrow, the metal rods will completely hide under the green cover - you just need to remember to water and feed the topiary.

It will take only a couple of months and the frame of a retro car will turn into a green sculpture of unprecedented beauty.

The pyramidal forms of trees, created using the topiary technique, give the garden landscape solemnity and elegance.
Of course, the ancient Roman gardeners could not even imagine how much modern society would transform the classical art of parks, similar in design to sculptural modeling. Indulging in topiary, they did not at all try to speed up the process of creating a living sculpture, on the contrary, they found charm in a leisurely search for an ideal form. If you are closer in spirit to the classical approach, then you can make a topiary the way the Romans did it, followed by the gardeners of the 18th and 19th centuries. What is needed for this? A lot of patience, imagination and a well-honed tool: garden or trellis shears, loppers, pruners, wooden slats.

A combination of trimmed borders and pyramid-shaped topiary clearly separates the lawn from the path
Here are some tips on how to make a classic topiary. It is best to start the “sharpening” of skill on simple geometric shapes. Moreover, a simple three-dimensional figure can easily be complicated by transforming it into another one - turning a cube into a ball, a cylinder or a pyramid - into a cone.

Pyramidal topiary towering against the background of spherical bushes create an unusual contrast of shape and color.
You need to start by identifying the “patient” for your first exercises. So, let's go looking. Your goal is a tree or bush aged 5 years and older, with a well-developed root system and a crown that is larger than the intended size of the figure. Good options for making topiary, choose from plants such as spruce or prickly, brilliant cotoneaster, purple vesicle, pinnately incised hawthorn, Tatar maple. Topiary cutting is best done in March or April, or from June to August, but not in autumn, so as not to weaken the plant before wintering.
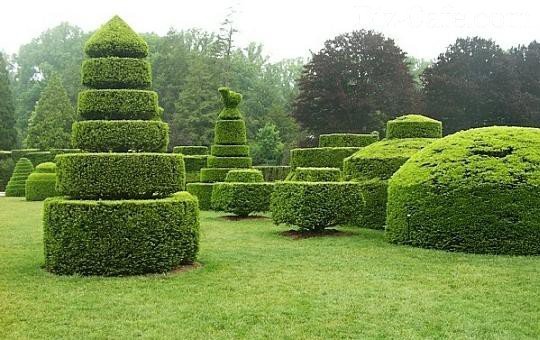
Topiaries of complex geometric shape are created over the years - they require painstaking cutting of the crown as it grows.
Here is a step-by-step instruction that will help you make a topiary in the form of a cube:
It is important to know! Periodically move away at a distance of 3-4 meters from the topiary in order to assess the correctness of the form from afar.

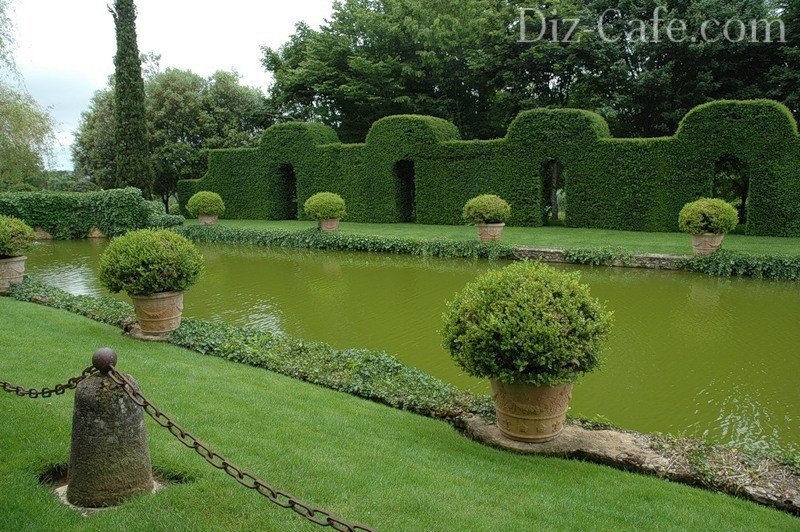
A grape arbor harmoniously exists next to an unusual landscape created with the help of a topiary on the lake
A topiary in the form of a ball can be made from a cube by truncating its faces. The most suitable plants for ball-shaped topiary: purple willow, Thunberg barberry, vesicle, western thuja, gray spirea, spruce, yew, boxwood and many others.

A ball-shaped topiary molded from a standard tree will look spectacular in both regular and landscape landscapes.
Cylindrical topiary, as a rule, can be easily made from western arborvitae, a variety of which naturally has the shape of a column. Good cylinders can also be obtained from European larch, round-leaved shadberry, small-leaved linden. The principle of cutting a topiary in the form of a column is the same as that of a cubic one. Under the crown of the tree, draw a circle, install guide wooden stakes, and cut out a cylinder already bolder than the cube you conquered.
Topiaries in the form of a cone and a truncated cone look good. In order to build a frame for a cone-shaped topiary, dig at least three poles and fasten them in the center, in the place of the imaginary top of the future cone - in the likeness of an Indian wigwam. Again, nature itself comes to the aid of beginner topiaries by creating a western “smaragd” crown with a conical shape.

Topiary haircut in the form of clouds or "pompoms" creates the effect of a landscape of extraterrestrial origin
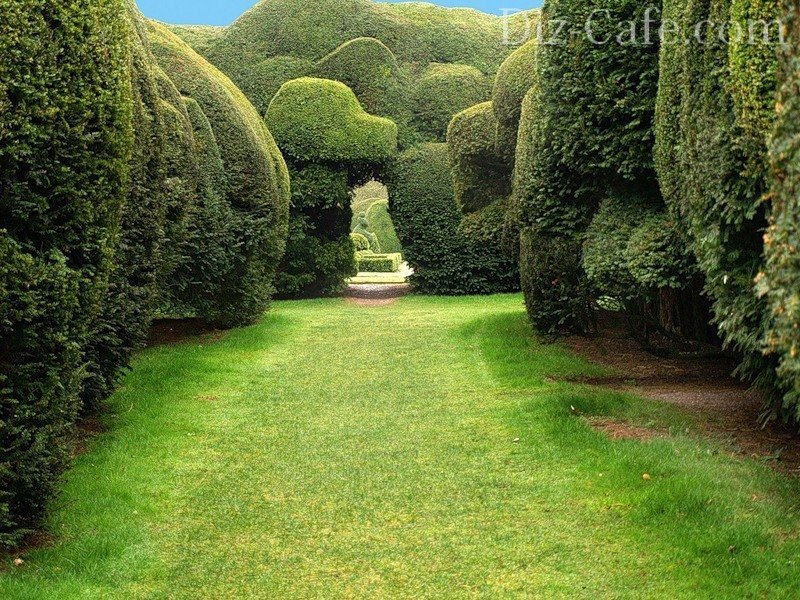
Topiary in the form of cones or columns can serve as an excellent frame for a green path leading to a fantasy arch
By training the firmness of the hand, you can later try your hand at making pyramidal topiary with three and four faces, arranging a mini-complex of Egyptian pyramids in your garden, giving your site a completely unique look. Having brought your skills to perfection, you will smoothly move on to creating such complex green sculptures as a spiral, tiered geometric volumes and their combinations, and not far off - to the figures of animals and people.

Thanks to a modern vision, topiaries are acquiring more and more complex and unexpected forms.
A removable metal frame that is placed on top of the crown of a tree or bush will greatly simplify the process of cutting a classic topiary. Such an auxiliary element is used to make it easier to make a topiary with your own hands and is the best suited for beginner topiaries.
The easiest option for a beginner topiary is to create a green ball from a boxwood bush planted in a pot

A separate trend in topiary art is Japanese niwaki, which is a haircut of tree crowns in the form of clouds.
The plant "lives" in a mesh attire, adapting to a given shape, and you just have to cut off the naughty branches that break through in spite of the imposed growth trajectory. At the end of the formation of the crown, the frame is removed. However, many gardeners do not agree with a similar approach to how topiary can be made - the plant tends to grow together with its “outfit” so much that it cannot be removed without damaging the crown.
Topiary is a transformation of trees and shrubs into large figures of various shapes. To independently create a masterpiece on the first attempt is an impossible task. Looking at the photo of the topiary, you can immediately understand the complexity of mastering the skill. It will take a lot of time to master this skill, but the result will more than pay for the effort expended.
Topiary brings order and a sense of peace to the gardens, used in the design of the classical approach. It is recommended to apply symmetrically, so they form ideal lines in the frame of the garden.

If you want the instruction to please you in the winter, then choose evergreens for landscaping. Green topiary figures, framed by a snow cap, transform your yard into a fabulous landscape.


Planting plants is allowed not only in open ground, but also in large containers and pots. But only certain plants are suitable for this, for example:

They allow you to form the perfect contour of a figure, for example, a ball or a cone.

When forming a list of necessary plants, it is worth considering your preferences.

The most popular are plants from the coniferous family, since it is easier for them to give a certain shape, which lasts for a long time and special care conditions.

Main types:

Deciduous plants:

For a grandiose figure, a rough elm or linden is planted. They attract not only with their aesthetic appearance, but also emit wonderful aromas that are beneficial to health.


This technique takes as a basis the manual cutting of shrubs with ordinary garden shears or secateurs. Here, one of the main roles is played by the art of the specialist's topiary, and his ability to cut plants correctly and measuredly.

The next important step is to choose a suitable plant with a well-growing crown to be able to change shape to the desired result. The shape of the leaves, their length, the density of vegetation - everything matters.

Tip for beginner gardeners - conifers and deciduous trees, such as thuja, boxwood bushes, privet, are a convenient option.

It is not difficult to do the job, but it will take a lot of time to complete it. Let's describe the progress in detail:

Decide on the shape of the topiary, it should fit into the overall design of the garden and be practical.

Basic forms:


Create a metal frame for the topiary from wire, preferably steel, fasten by welding or with special ties.

Pour out the base, in this case, black soil with nutrients, adding a resinous substance for viscosity. Add water.


Secure with a steel mesh so that the structure is stable and the earth does not spill out. Spray water on the structure.

Add earth, pour water. The mixture should be viscous and not go beyond the frame. Remove excess layers of earth with a trowel. Make sure that there are no gaps, otherwise everything will fall apart.

Sow the soil with seeds. Combine flower seeds and herbs for the best effect.

There is a long process of caring for plants. Water only with a watering can, so as not to spoil the structure.

It is not necessary to have the most sophisticated tools in the arsenal, the most classic and simple ones are enough. The most common set includes:

It is worth applying patience and imagination, and you will get a masterpiece. Do not immediately take on a complex figure, first get your hand on simple forms.

Even simple, but voluminous figures in the process of mastery formation can be converted into more complex ones. The cube is converted into the shape of a ball through certain manipulations and actions.


The last, final step in creating do-it-yourself topiary in the garden. It is worth sowing the structure in the order in which the plants will grow. First flowers, then lawn grass.

Consider an example of planting a topiary in the shape of a lion:


The process of choosing plants, various planting schemes - gives a wide flight for your imagination when making a topiary. But do not forget that summer is not all year round, and in winter everything can die if you do not take care of warming. It will take a lot of effort and time to master such a skill, but the result is worth it.


In the interior, you can often find a hand-made topiary or a tree of happiness, which attracts good luck, wealth and good mood.

How to make a tree of happiness with your own hands? Everything is very simple. To do this, you need the following set of materials, namely:

Preparing necessary materials:
We wrap pencil tape and insert it into the ball. Alternatively, you can fix it with mounting foam in a mug.

Next, in the workpiece in the form of a ball, you must insert and artificial flowers so that there are no empty spaces. After that, the finished crown is strung on the trunk. Decorative moss or grass is used as decoration. Also, in addition, an artificial butterfly can be planted on the edge of the mug.

Do-it-yourself photo of a tree of happiness from corrugated paper. Such a topiary is made according to the same principle as the topiary in a cup. Only for its decoration, instead of artificial flowers, you can use flowers from multi-colored corrugated paper.

Topiaries made from aromatic plants are very popular. They serve not only to decorate the interior, but also to fill it with aroma. Trees of happiness made from coffee beans are very popular.

To make such a tree you will need the following materials:
Coffee Tree Making Guide
Using scissors, one hole must be made in the plastic blank.

Parsing whitewash brush on strands.
We attach strands to one end of the branch. For these purposes, we use an elastic band for money. We coat the future “trunk” with glue and spirally glue it threads. You can fix the thread at the other end of the stick with an elastic band.

Glue the blank in the form of a ball with brown threads. Also for these purposes, you can take fibers from the maklovitsa.
Using super glue, liquid nails or a glue gun, glue the ball with the first layer grains.

Tip: the grains are best glued in a chaotic manner. Glue must be applied directly to each grain and quickly glued to the workpiece. All work must be carried out in a well-ventilated area.
The second layer is done in the same way.
We create original pot for wood. To do this, you need strands from the brush. We smear the bottom of the container with universal glue and put it on the strands laid out on the table. Threads that protrude beyond the edges must be cut.

We cut the strands of the brush. They should be 3 cm longer than the height of the container. Next, you need to apply glue to the glass. Moreover, the glue is not applied to the entire surface. 2.5-3 cm should be left on top. Next, the container is pasted over with strands prepared in advance. After that, it is tied with twine from below, and the excess is cut off. It is also necessary to cut the strands from above. As a result of this, the threads should rise above the glass by two centimeters.


Pour into container filler. It can be sand or plaster. You can also use mounting foam for this purpose. Next, you need to move the strands at the top and put a funnel with a barrel on the container.


At the top of the container should be tied twine.

Finally, you can put a few coffee beans near the barrel. Also, moss can be laid at the base of the composition, and an insect can be seated on the crown.

To create such a flat coffee topiary with a magnet, you need to stock up on the following materials:

Step-by-step instruction
The first thing to do before starting work is to turn on thermal gun to warm it up.
While the heat gun is heating up, you can make blanks. To do this, draw a circle and a pot on cardboard and cut out these details with scissors.

We collect the details of the tree. crown and pot connect with a flat stick. To do this, insert the stick into the cardboard blank so that it is between two layers of paper.


We use glue to fix the parts together.

The workpiece must be glued burlap from two sides.

Tip: the burlap on one side should be equal to the diameter of the workpiece, and on the other side - a little more. In this way, you can hide the ends of the cardboard and the tree will look beautiful from behind.
impromptu pot decorate as well as the crown.

We glue on the back magnets.

We decorate the crown coffee beans. They are attached with glue along the edges of the workpiece. Moreover, the grains should be arranged with cuts downwards.


We glue the next row in such a way that the grains are arranged with cuts up. We alternate the subsequent rows by analogy with the first and second row.

To give the crown volume, it is necessary to glue several layers in its central part.

In conclusion, it will be necessary to glue decorative ribbons and lace.


To make such an ornament, you will need the following materials:
Step-by-step instructions for making a topiary - a tree of happiness
Inserted into the workpiece boxwood branches so that there are no gaps.


The branches that will act as the trunk must be tied wire.

A hole is made in a spherical blank and a ball is placed on the barrel.


A layer of moss must be laid on top of the gravel.

The crown can be decorated with artificial flowers.


Topiary can also be made from artificial paper money. Such decoration can attract financial well-being to its owner. Making such a money topiary with your own hands is not difficult.

For the manufacture will need the following materials:

Step-by-step instruction
We decorate the pot. Colors the upper part, about one to two centimeters. For these purposes, it is best to use acrylic paint. Glue the rest of the pot with twine. For these purposes, we apply a thin layer of glue over the entire surface with a toothpick. The tip of the twine is securely fixed with glue.


Crown base we make from an old newspaper and threads. To do this, it is enough to simply crumple up newspaper sheets and wrap them with threads. In our case, the workpiece is obtained in a diameter of about 10-11 cm. In order for the ball to be strong, it must be coated with PVA glue. After the glue has dried, it is necessary to make a hole three to four centimeters deep in the workpiece.


12-15 skewers must be tied together. Their number depends on the diameter of the paper blank. We tie the skewers on both sides with threads. Using a hot glue gun, we pump hot glue into the hole and immediately insert the connected swords there. After the glue dries, you can start wrapping the trunk with twine. In the process of wrapping, we coat the trunk with glue. We fix the ends of the twine.


Napkins or newspapers should be torn into pieces. PVA glue is mixed one to one with water. Next, one or two layers of the adhesive mixture are applied to the blank from newspapers so that threads and newspapers are not visible.

Doing gypsum mortar and pour it into the pot. About one centimeter should remain to the top edge of the pot. The trunk must be installed in the center of the pot. If necessary, hold the barrel with the workpiece until the mixture hardens. This process takes about 15-20 minutes.


While the plaster hardens, you can make blanks from artificial bills. To do this, they must be cut in the shape of a circle. To make disks, you will need artificial money 15.5x6.5 cm in size. On average, 17-18 disks will be needed for our ball. Paper blanks must be folded in the form of an accordion with a width of about one centimeter. In the middle, we tie the resulting accordion with a ribbon, and glue its ends on both sides.


We glue the bills to the ball from the bottom up. For these purposes, hot glue is used. We close the gaps with coins.


From paper money we make elements of various shapes and attach them in a chaotic manner.

Gypsum can be decorated with sisal.

Under the tree we lay small burlap bags. To do this, cut out a circle from the fabric, the diameter of which is about 9-10 cm. We take a needle with a strong thread and sew it around the entire circumference at a distance of 1.5 cm from the edge. After that, we tighten the thread. We put a large coin inside the bag, and stuff it with cotton wool or padding polyester on top. We tighten the bag and fasten it with a few stitches.


Decorative details should be glued to the pot, and the crown can be decorated with coins.


Do-it-yourself topiary from ribbons looks very impressive. To make such an ornament you will need the following materials:
The tape is cut into small strips and wound around the finger so that rings are obtained. Then, in turn, it is necessary to attach the formed rings to the workpiece. At the same time, they make sure that there are no empty spaces on the ball. On one side, a pencil is inserted into a ball with ribbons, and on the other, it is inserted into a pot filled with gravel. As a decoration, you can put decorative frost or decorate with trimmings from ribbons.


Topiary can also be made from fresh flowers. For this you will need the following materials:
We wrap the inside of the pot with a bag and fill it with a putty solution so that 5-7 cm remains on top. Insert a stick into the solution and leave it overnight. After the putty has hardened, the remains of the package must be cut off.


Cut out a circle from a floral sponge and fill the pot with it to the very top. Next, wet the sponge and lay a layer of moss on top. In the central part of the sponge, you need to stick roses. You can fix them with decorative tapes with wooden rods. Bows can be used for decoration.


Do-it-yourself paper topiaries are very popular. They can be made according to any of the above instructions. For the base you will need a polystyrene foam ball, a decorative small vase, a pencil and paper flowers. For the manufacture of flowers, you can use both plain and corrugated paper. To revive the topiary, you can use ordinary moss, which is usually placed in a vase.
To make such a topiary, you will need a standard set: a blank in the form of a ball, a pot, stems, ribbons and about 300 grams of colored candy. The manufacturing process of such a topiary is standard. The rod is inserted into the pot, the ball-shaped blank is pasted over with a red ribbon. Glue the lollipops on top with a glue gun. In order not to stain the sweets, it is better to take them with tweezers. The space around the trunk can be decorated with glass pebbles or large beads.


This decoration is easy to make with your own hands. On each lollipop, you need to stick on the drawn eye. Further, all the sweets are stuck with a blank in the form of a sphere of polystyrene foam.


Topiary made of balloons looks beautiful. In order to make such an ornament, you will need the following materials:
The process of making such a tree is standard. Only balloons connected to each other are attached to the ball-shaped blank instead of flowers.


Another original idea is to make a shell topiary with your own hands. Such a tree will long remind you of a summer vacation on the seashore. To create such a masterpiece, you need to stock up on the following materials:

To start we do tree crown. To do this, sisal and shells must be glued onto the foam ball using a heat gun.


Let's move on to the device. trunk. Our barrel will be made of wire, which must be wrapped with white thread and twisted. For our tree, two trunks will be made. Only the second will be wrapped with twine.

The next step is the production pot. To fix the tree, foam in the form of a cylinder will be used, which must be attached to the bottom of the pot with glue. The trunk is attached to the crown on one side, and stuck into the foam on the other. We use hot glue to fix it.


For strength, we fill the distance between the flowerpot and the foam with paper, glue it and close it with cardboard. Next, a beige sisal is placed in the container first, and then white. Shells of various sizes and shapes will also be used as decor.


To give bright accents, a webbing tape. The crown can also be decorated with beads on a fishing line.


To start, let's make crown. For these purposes, you can take a ready-made base ball, or you can make it yourself from newspapers and threads. In our case, the base was made from newspaper, which was crumpled into a ball with a diameter of 6-7 cm.


Let's start filling the pot plaster. After the solution is filled, it is necessary to insert the barrel there and leave to harden.

While the solution hardens, you can begin to make a decor for the crown. To do this, you need to cut off a small piece of sisal and make a ball out of it. In total, it will be necessary to make about 25-40 lumps.

To decorate the trunk, we use a lace or twine. We fix the sisal balls on the workpiece with glue. We decorate the space around the trunk with sisal, decorative ribbons, beads, etc.


Do-it-yourself topiary made of felt looks original. To make such an ornament, you need to prepare the following materials:

Manufacturing procedure
The hardest part of the job is flower making. All blanks are made from fabric circles of different sizes. A minimum of 30 such blanks will be needed for a topiary. In order to make a voluminous rose from a circle, they must be arbitrarily cut in a spiral. The rosette turns out to be more magnificent if it has many turns. Also, before each flower, small circles-bottoms are cut out, which are attached from below. For decoration, we attach a bead to the middle of the flower.


Trunk can be painted with acrylic paint.

Mint was used as a filler for the pot. paper filled with glue.
We put a piece of green around the trunk felt which will mimic grass.

We connect the trunk with a pot and crown.
We attach blanks of flowers and leaves to the crown.


We decorate the product with ribbons, ribbons and beads.


With the onset of cold weather, many are thinking about making a New Year's topiary with their own hands. To do this, prepare the following materials:

Manufacturing procedure
Using white acrylic paint, it is necessary to paint the pot from the inside and fill it with polyurethane foam. Until the foam has hardened, he inserts a branch there, which will be the trunk of the New Year tree.


We fix New Year's balls, sweets and cones on the crown with the help of wire, toothpicks and glue.


Cones can be painted in white and gold.

We decorate the topiary with New Year's tinsel.


"Green sculptures" in the gardens were made during the time of the Roman Empire. In the gardens of Julius Caesar, as Pliny the Younger describes in his writings, complex animal figures, inscriptions, obelisks and pyramids were created from trees and shrubs.
The heyday of the art of creating topiary fell on the Renaissance. In the gardens of France, which is considered a trendsetter in this type of landscape design, real green labyrinths, rooms were created, gardeners came up with interesting and very beautiful forms. It was the Versailles Gardens in France, with their exquisite topiaries, that became the source of inspiration for the creation of the Peterhof gardens in Russia.
In China and Japan, the art of figured pruning of trees - bonsai - is also popular. Gardens and parks in these countries are unique. Masters, cutting off all unnecessary, create their own unique compositions.
Creation is a very painstaking and lengthy process. To form an ideal figure, the imagination of the master and a good eye are needed. Before proceeding with the creation of a topiary, it is necessary to carefully prepare the soil and mark out places for planting. Fertilize the soil before planting, based on the needs of the crop. This will help accelerate the growth of shrubs and trees and make them more lush. Plant the plants in the garden according to the prepared plan, and after they take root, you can begin to create topiary.
The choice of trees and shrubs for a topiary garden depends on the preferences of its owners, many plants tolerate a haircut perfectly. But it is best to form figures from shrubs and trees with dense, small foliage or needles.
Coniferous plants are the easiest to shape, such as:
To create topiary from deciduous plants, the following will work well:
From elm or linden, you can create unusual topiaries and large figures. You can grow a topiary garden very quickly using beautiful spireas, vesicles, Tatar maple. However, only simple geometric shapes, such as a ball or cube, can be formed from these plants, since the plants grow very quickly and require constant shearing. 
Topiary in the form of a cube Step 1. To form a topiary, make a frame. To create a cube shape. To do this, draw a square on the ground around the plant.
Step 2. Install wooden slats on each corner of the square and firmly fasten them together with slats located horizontally. Directly above the bush, you will get a structure, the wooden slats of which will serve as parameters for cutting.
Step 3. Take the trellis scissors and cut the branches that go beyond the structure. Cut slightly above the line set by the slats so that you can correct if you make a mistake.
Step 4. Move away from the bush about 3 meters to the side and evaluate whether it turned out evenly. Take a pruner and bring the figure to perfect condition and remove the slats.
Step 1. Form a cube from a bush, as described in the previous master class.
Step 2. Make a cardboard frame. Measure the height and radius of the bush, subtract 2 cm from these measurements (per cut) and mark them on the sheet. Draw a semicircle and cut out the template.
Step 3. Place the pattern vertically against the bush and cut off the branches that go beyond the pattern. Then attach the leaf to the other side of the bush and also cut off any excess branches. Periodically move away from the plant to assess whether you cut the bush evenly. 
Having learned how to create beautiful geometric shapes with your own hands, you can start creating creative shapes and form topiaries in the form of spirals, buttons, complex shapes. New ideas will be prompted by the natural outlines of the tree or shrub that you have chosen to form your own topiary. A source of inspiration for you will be the topiary created by the masters of famous gardens in the world, among which are the public garden Ladue in Maryland, USA, Longwood Gardens in Pennsylvania, Drummond Park in Scotland, the park at the Levens Hall estate in England, the terraced garden of Chateau de Villandry in France, and lovers of garden art can admire not only their photographs, but also live. All of them are open for visits.
Gardeners form not only neat hedges, arches, geometric and creative shapes. They created topiaries, the ideas of which are suggested by the environment and which are real works of garden art.
Do not forget to regularly feed cut plants with complex fertilizers and water them so that they grow green mass and there are no bare branches. Please note that the haircut stimulates tillering, respectively, the buds located close to the cut point begin to grow actively. As the branches grow, adjust the shape of the topiary.
It is best to start forming plants in the spring, after the foliage has appeared, the shape can be adjusted throughout the summer. Keep in mind that it is not worth shaping topiary before winter, because a haircut is always stressful for a plant, and during a period when growth and development slows down, a haircut can cause it to be weakened and, as a result, prone to pests and diseases.
Short. The purpose of ND filters is to reduce the amount of light entering the...

The obligation to pay calculated tax payments arises for various ...

The receipt reflects a lot of useful information: a list of documents that you ...