INSTRUCTIONS AND PROPHECIES OF THE Blessed MOTHER ALIPIA GOLOSEEVSKY, Kyiv...


Rolled off lipstick and can't find eyeliner? You urgently need an organizer for cosmetics. No need to spend money and buy an expensive acrylic cosmetic organizer, in this article we will look at many options on how to make a DIY cosmetic organizer.
Improvised means, a little imagination and order in cosmetics are provided to you. Let's get started.
The organizer, whatever it is, solves the problem of organizing your cosmetics and your Have a good mood: everything is in place and at hand. Let's look at what materials organizers can be made of and where they can be used.
Organizers for storing your decorative and can be made from:
The organizer can be:
Now we will consider in detail and make organizers for cosmetics with our own hands.
Box storage system various shapes and sizes, standing on a bedside table or dressing table or hidden in a chest of drawers, will help to put things in order in cosmetics and other small things.
For the organizer of the boxes we need:
There is another way to make an organizer from cardboard box, only the filling will be from cardboard tubes that remain after using foil, cling film or baking sleeves. Let's do:

Organizer made of corrugated cardboard with two drawers is very roomy. For its manufacture you will need:
You should get these details.

Here is a drawing of an organizer for cosmetics:


Of course, without certain skills, working with wood and plywood is difficult. But you can connect the male half and work together. Wooden organizers are.
Most often they consist of:


You can decorate such an organizer with paint, varnish or self-adhesive. It can also accommodate the cosmetics of adult fashionistas.
The organizer made of newspaper tubes, which are prepared in advance, looks very beautiful and original. It can accommodate both nail polishes and various makeup tools.
Let's try to make an organizer of the simplest form. For this you will need:


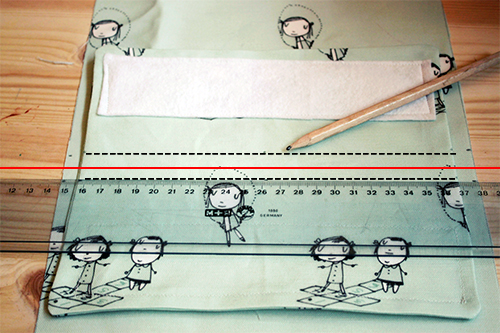
The travel organizer is a case made of fabric, to which many pockets and departments are sewn. It easily rolls up and unfolds when needed. This organizer takes up little space and is very convenient when traveling.
We will sew an organizer from felt. It is easier to work with for beginners, since the felt does not require additional processing of the edge. We will need:

Under the transparent organizer for cosmetics, you can adapt plastic trays for storing office paper. The tiered design of the office organizer will help accommodate great amount cosmetics. The fact that the design is transparent will allow you to easily find the desired item.
We make an organizer from a cardboard box. We decorate it beautifully and get the right thing and interior decoration.
Original organizer for cosmetics on the wall. Excellent decoration and comfortable item.
We make a chest of drawers for cosmetics. original ideas for pens.
In this article, we told and showed in detail what are and how you can make organizers for storing cosmetics with your own hands. I think that you definitely wanted to clean up your cosmetics and make an organizer with your own hands. Well, how did it work? Write and share your ideas, tell us what you got.
Helpful Hints
Cardboard is a versatile material from which you can make not only boxes, but also various crafts, as well as things that are quite useful in everyday life.
This ecologically pure material It's easy to find and pretty easy to work with.
Here we have collected the most interesting and useful things that you can make from cardboard at home or in the country.

You will need:
Toilet paper rolls
Cardboard box (from shoes is ideal)
Tape or glue to hold the grommets together (optional)
* The number of bushings depends on the number of cables and space in the box.

* You can fill the box full or half full with bushings to leave room for larger items.
* So that the bushings do not hang out in the box and fit snugly together, you can fasten them with tape or glue.

From an ordinary pizza box you can make convenient stand for a laptop. This stand was created by Russian designer Ilya Andreev. He cleverly managed the folds on the cardboard to create a folding stand.


You will need:
Stationery knife
Ruler (preferably metal)
A place where you can cut (a plank or a special rug)
Glue (PVA or hot).

* Select the dimensions of the parts according to the dimensions of your computer.
* Make incisions on the parts about 6 cm.
* This stand has been designed for 13" and 15" laptops.

*Use glue to secure all the pieces starting from the bottom.


* Allow the adhesive to dry before testing the stand.


You will need:
Scissors or utility knife
Ruler and pencil
Wide tape.
* Each module in this shelf is a triangular tube. Its size depends on the size of the shoes.
First you should make one module.
1. First, cut the cardboard, divide it into 3 parts with a pencil and a ruler, bend it into a triangle and secure with a wide adhesive tape.


2. Create some more modules in this way.

3. Each row of triangular modules must be glued to a sheet of cardboard for stability.
4. You can put another cardboard box on top.


You will need:
cereal boxes
Scissors
Colored tape or colored paper for decoration (optional)
PVA glue.
1. Glue the boxes together.
2. Wrap the boxes with colored cardboard or colored wide tape.


You will need:
cereal boxes
Scissors
Colored tape or colored paper
PVA glue
Cardboard sleeves from toilet paper or paper towels.


1. Prepare the cardboard. If you have boxes, then straighten them.


2. Now you need to make a hexagon from a sheet of cardboard. To do this, you need to make additional folds, one on each of the two largest sides of the cardboard.

3. Place the box flat and make a couple of slits (see image) so that the tops of the figure can be bent towards the center.
Stationery organizer is a device for organizing and storing pens, pencils, scissors, brushes, stickers, notes, paper clips, buttons and other little things that we use at the desktop at home and in the office.
They are:
There are many commercial organizers made of plastic, acrylic, wood. Their main disadvantage is that not all models are suitable for the workplace. For example, your box might have custom sizes, and all existing boxes either large or small. The dividers made by hand will meet exactly the dimensions that you need. And you can make them from any improvised materials.
Such a box for various stationery items looks like it was bought in a store. It's actually a piece of thick cardboard. It is best to use the one left from the packages from under household appliances. Such a do-it-yourself cardboard organizer is not difficult to do, but the work requires special care.

The order of creation is as follows:
All is ready! It remains to place the necessary items here.
This type of device is suitable for those who are engaged in various creative activities: draws, creates postcards and various crafts, and so on. After all, it is designed to store and organize a large number pens, markers, brushes, pencils, etc.

An organizer is made from a box and cardboard cylinders. You can use those that are left after using toilet paper, T-shirt bags, foil, cling film or parchment.
We make a desktop in the following way:
The organizer is ready. It remains only to fill it with pens, pencils and other stationery.
An organizer will also help to put things in order in the drawers of the table, which it will not be difficult to make out of the box. Only now you will need to take a lot of different boxes that you have been collecting for so long and finally they are useful to you. If you do not have boxes, then make them yourself from thick cardboard.

And now we will learn how to make a do-it-yourself office organizer for a desk drawer:
A bright desk drawer organizer is ready. It can store writing implements, small office supplies (pins, paper clips, erasers), scissors, a stapler, and more, and it's easy to find items in a specific place.
Wall organizers help to remove some items from the table, thereby increasing workspace. And if you approach the creation of a panel creatively, then it can also become an object of art.

We give instructions on how to make an organizer for the office with your own hands so that it can be hung on the wall:
The organizer is ready. It remains to drive a couple of nails into the wall and hang it in place.
There are many more ways to make organizers from improvised materials.

For example, for desktop storage, you can use decorated glass and iron jars, boxes. For wall - plywood, cork board, canvas, old frames and so on. Do not be afraid to show imagination, and then you will see for yourself what beautiful things you can do.
Organizers are not only beautiful decorative element, favorably complementing the interior, but also quite a practical thing that allows you to competently organize the space in any room.
The stores offer a wide range of different organizers that will be appropriate in any interior, but it is more convenient to make it yourself. This makes it possible not only to save money, but also to make the most suitable option for personal needs.

The main thing is to know how to make an organizer with your own hands and follow all the advice of experts.


Jewelry requires a special place for storage, since small parts are quickly lost if mishandled. At the same time, jewelry should be in plain sight in order to simplify the process of gathering the fair sex. Organizers in the form of a frame for photos or a picture are suitable for storing jewelry.

The main materials from which you can make an organizer in a home workshop:

The finished frame can be purchased at an art store or a hardware store, but it must be uncoated in order to be able to paint the product in the desired color.

The painting process is carried out first of all, for which two layers of paint are applied with short breaks (about 1 hour), so that the first layer has time to dry well. On the dried paint you need to apply a layer of varnish.

Do not forget that after each stage it is desirable to clean the brush of paint, especially before applying varnish.

A piece of beautiful fabric, lace or a regular picture is inserted into the frame, which will become the background for the future organizer.

The decorations will be held on ropes (ribbons) or self-tapping screws. The cuts of the ropes along the length of the frame are located along the product and are fixed either with a stapler or with glue.

You can hammer 2 small nails on each side and just pull the rope over them. Large nails, metal hooks and baskets can act as jewelry holders.


At the last stage, you need to fix the loop with a self-tapping screw to hang the picture on the wall. Your jewelry organizer is ready!

In addition to jewelry, organizers are convenient to store various little things that can be found in every home. A photo of a homemade organizer for small things can be found on the Internet and used as an example.

To make such a product is simple, but for this you will need the following materials:

To begin with, the dimensions of the future organizer are determined. It will consist of several parts, which are located depending on personal needs in any convenient way.

5 pieces of cardboard are cut out: rectangular for the bottom and 4 as walls. The large part is easily replaced by 2 small ones that stick together in the middle.
 The main thing is that the structure is firmly fastened with adhesive tape.

The walls of the organizer are glued to the base with ordinary adhesive tape from opposite sides. To do this, the wall is placed on the edge of the base, and the tape captures two parts at once. After that, the other two sides are glued, and the edges between all the walls are fixed with adhesive tape. If necessary, you need to cut off some part of the cardboard at the joints to make it easier to form the "box".


At the fourth stage, it is necessary to measure the box from both the outer and inner parts, and then transfer the measurements to fabric or scrapbooking paper. It is recommended to use different shades for decoration so that the product looks more stylish and interesting.

Before gluing the fabric, it must be carefully ironed to facilitate the subsequent stage of work.

In the upper inner part, the fabric is fixed with a stapler, and the bottom edge with glue. After that, a double-sided adhesive tape is half-glued to the upper inner edge, which is bent to the outside. It should be on both sides of the edge.

Fabric parts for the outside of the box are placed on the adhesive tape that was glued earlier, with inner sides s around the entire perimeter of the product.

A double-sided adhesive tape is glued to the bottom around the entire perimeter of the box, after which a fabric is pulled over it to finish the outside. This must be done so that there are no folds or ugly creases on the fabric.

The bottom is covered with fabric, after which marks are made to bend it to fit the box. The excess needs to be bent inward, where the segments of double-sided tape are located.
 Thus, the bottom of the box is filled and the product acquires its final form. Any errors are glued with glue.

Sometimes the box is filled so small details that large compartments are not suitable for storage. Partitions come to the rescue, which are installed inside, dividing the space into many small cells.

Partitions are made of cardboard, pasted over in the color you like, each of which has cutouts on one side. The size of the cell depends on the number of cutouts on one partition. After preparatory work they are simply inserted into each other, creating separate "boxes" for small components.

This is how one box is made, or several, but at the same time they are connected with double-sided tape or a stapler into a single product. Organizer departments can be different sizes depending on the imagination of the master.

According to a similar principle, a do-it-yourself organizer is made at home from cardboard tubes. Tubes from hardware stores or a food film base are suitable as a material. large sizes, from which several segments are made. They are pasted over with cloth or paper, the edges are sanded with sandpaper, fastened to each other with glue or glued to a chipboard stand, which acts as a base.


In our review - a lot of ideas plus three detailed master classes.
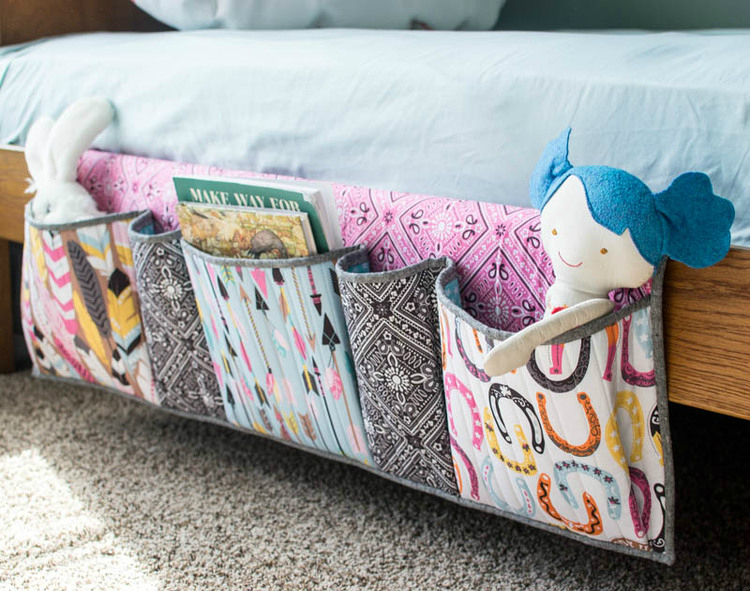
Based step by step master class By making the simplest basic model of a wall organizer, you can make any organizer - with more or less compartments, a wider or longer organizer, a bathroom organizer from waterproof material.
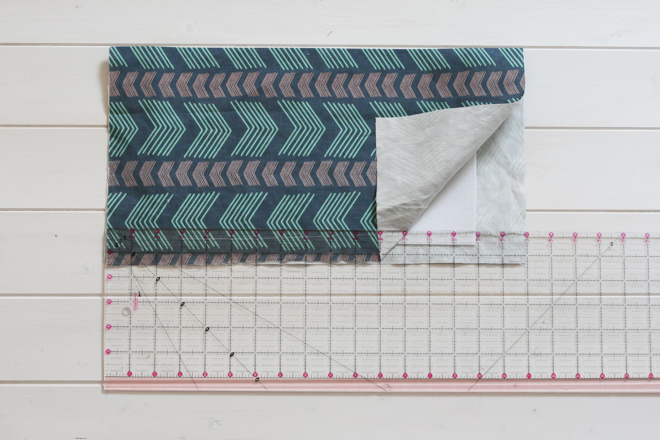

photo: blog.spoonflower.com
Fold each pocket piece in half inside out, insert a piece of plastic inside and topstitch.


photo: blog.spoonflower.com
Iron the fabric on the sides inward with an “accordion” so that allowances remain on the side.

photo: blog.spoonflower.com
Stitch the folds of the edge of the pocket. So process each of the pockets.

Now let's get to work on the basic organizer. Place the plastic part between the layers of the double fabric part.


photo: blog.spoonflower.com
Sew the pockets to the base.

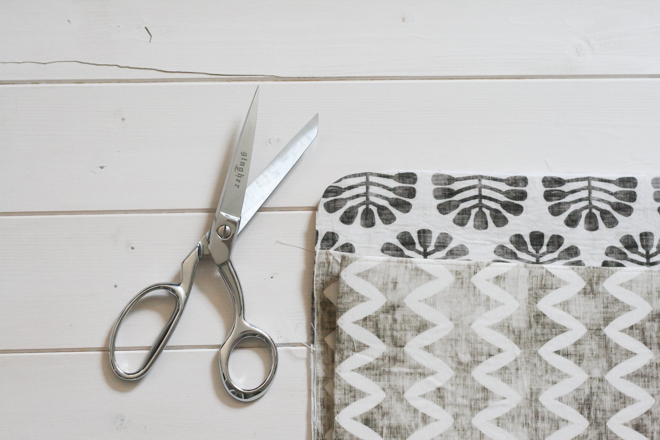
photo: blog.spoonflower.com
Using a round object as a template, round off the corners of the base.

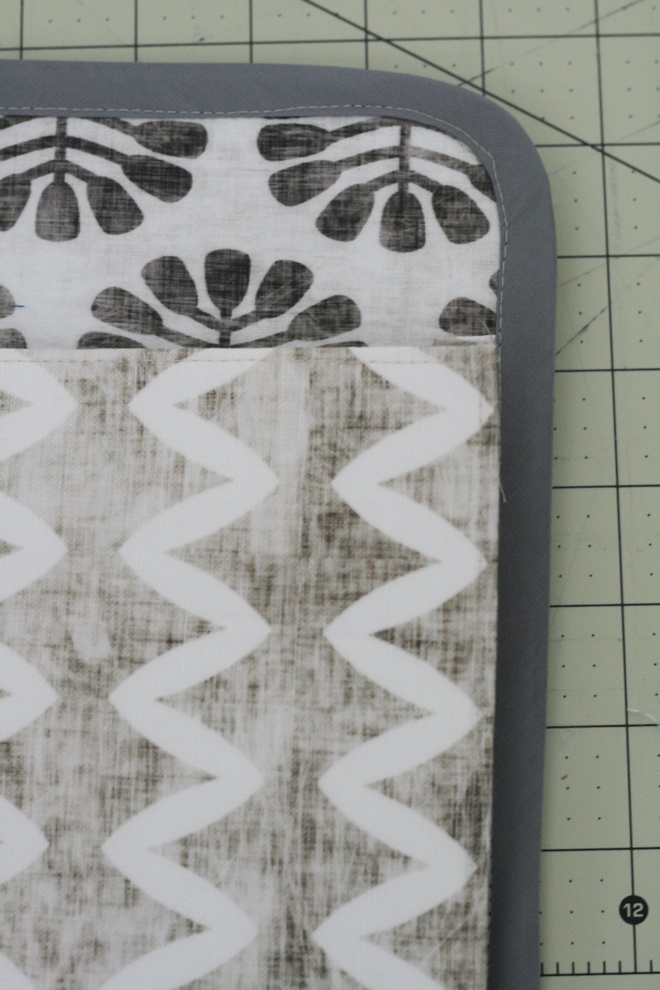
photo: blog.spoonflower.com
Work the organizer in a circle with bias tape or tape.


photo: blog.spoonflower.com
Mark the location of the eyelets and install them. Ready.


photo: handmadepride.tumblr.com

photo: imperfecthomemaking.com

photo: livesimplybiannie.com

If your closet lacks compartments with shelves, you can add them by sewing a similar organizer. It will come in handy in the bathroom, for example, for towels, and in the nursery - for toys, and in the hallway - for hats and scarves.


photo: blog.spoonflower.com
Cut out the fabric and cardboard according to the diagram in the picture (the number is the number of parts).
12 parts 23x23 cm (lining fabric);
2 parts 23x32 cm (main fabric);
2 parts 20x23 cm (main fabric);
2 parts 32x69 cm (main fabric).
Remember to add 0.5 cm allowances.


photo: blog.spoonflower.com
Sew, as shown in the picture, the details of 20x23 cm. Turn it inside out, iron it, sew on the Velcro.
Mark the middle of this part and sew with two lines to the middle of one of the parts of the main fabric 23x32 cm.


photo: blog.spoonflower.com
Connect this piece to one of the lining pieces. Sew the details as shown in the photo. Insert cardboard between the shelves.


photo: blog.spoonflower.com
Lay out the finished wrong side of the organizer on the table and baste, and then attach the details from the outer fabric 32x69 cm. On one side, leave a piece for eversion unstitched.

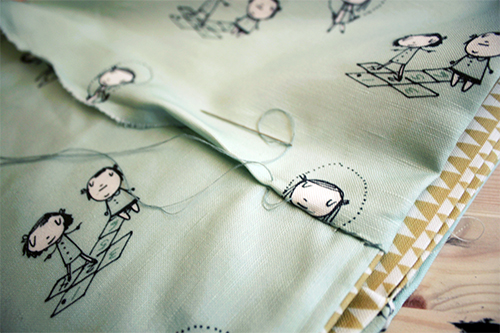
photo: blog.spoonflower.com
Turn it right side out and sew up the open section.


photo: ebootcamp.org

photo: diyjoy.com


You will need felt sewing machine, threads, scissors.


photo: coupons.com

photo: craftbnb.com

photo: pdc2011.org
INSTRUCTIONS AND PROPHECIES OF THE Blessed MOTHER ALIPIA GOLOSEEVSKY, Kyiv...

Eufillin dropper in ampoules is used to treat pathologies that ...

Among all ointments for the treatment and prevention of joint diseases, the most ...