Physicist and astronomer Stefan Feeney of University College London, one of the...


In order to make a sofa out of cardboard, the first step is to decide on the size and shape of the structure, because in fact, cardboard can be used to make a wide variety of furniture of the most diverse shapes. Once you have decided which sofa you want, you can proceed to the pattern constituent parts designs. To do this, we take cardboard boxes (which will need a lot) and cut out all the parts of the sofa from them according to a pre-made template (pattern).
After that, we cut out a lot of small rectangles from cardboard and glue them in those places where the greatest loads usually occur during operation, that is, on the back and seat of the future cardboard sofa. As glue, you can use ordinary stationery glue or PVA glue.

Now we glue all the parts of the cardboard together and leave them for half a day so that the glue is completely dry. It is advisable to press down the structure to be glued with something heavy so that after drying, bumps and bumps do not appear on the surface of the cardboard.

After that, we glue the finished dry structure with paper, foam rubber and sheathe it with a cloth. At each stage, we make sure that the glue dries completely. And only then proceed to the next work.

As a result, we get such an interesting sofa, consisting of two parts. On the back of the upholstery there are Velcro fasteners that attach both parts of the sofa to each other. If necessary, the sofa can easily turn into two armchairs.

And here is another cardboard sofa, the manufacturing technology of which is similar to that described above. Only in this case, the cardboard was not covered by anything (neither cloth nor paper), but it was planted on metal carcass. It is difficult to say how comfortable such a sofa will be in operation, but since this model was developed by a well-known design company, I can assume that such a creative cardboard construction can become almost the most important decoration of the interior.

And another interesting cardboard sofa made of cardboard boxes, inside which some dense material lies. The author of the idea forgot to mention what exactly is inside this structure so that it does not fall under the weight of an adult, but I think you can come up with some of your own options, based on what materials that can withstand loads are at hand.

Do-it-yourself cardboard furniture today can be both a hobby and part of family business. Cardboard has existed for quite a few years, but only recently furniture made from this unique material has gained great popularity in the world, due to a change in the attitude of mankind to the quality of life. And, although the cardboard is completely recycled environmentally in a safe way, the production of furniture from it is just a godsend! Cardboard products are strong, almost weightless, and fairly easy to make.
The most iconic modern models cardboard are the creations of the world famous architect Frank Gehry, invented in the 60s, his designs were created by cutting pieces of cardboard. “One day I saw a pile of corrugated cardboard outside my office - the material I prefer for building architectural models– and I started playing with it to glue the pieces together,” the architect explained. Thus, he managed to turn massive blocks of cardboard into cardboard sculptures. To repeat the designs created by Frank, no master class is needed, because the principle of their creation is incredibly simple. The line, which is still produced and sold by Vitra, consists of contemporary chairs and tables.
The method of cutting and creating almost any shape has become popular all over the world. After all, it turned out that cardboard is no worse than plastic and wood, literally everything can be made from it! How easy it is to make a piece of furniture or decor. Cardboard is asymmetrical tables, bookshelves, tables and armchairs in the Victorian style, folding tables and furniture that you can take with you anywhere. Class! Such furniture is modern and fresh, has an individual secret of its beauty and attracts with its simplicity.
Apart from flat parts, to create chairs, armchairs, cabinets and shelves, designers often use cardboard tubes. Sometimes materials are combined to make a unique and one of a kind model. Even if it doesn't work out in the end, it's a lot of fun to experiment and make art using the creative part of your personality! Cardboard - interesting stuff which is easy to purchase. You can ask for it in grocery stores or buy packages from some company, and the product from it can be painted or glued.
French-born designer Françoise Manceau-Guilhermond has had a passion for cardboard as a material since childhood. As a baby, the girl made Christmas decorations, and when she gave birth to a daughter, she began to invent all sorts of toys for her. In 2004, Françoise saw a TV report about creations cut from cardboard. She was inspired by some designs and decided to make a coffee table. In early 2005, she presented her work to the market for the first time. Today, Francoise's master class can be completed upon arrival in France.

In 2007, the French artist-designer decided to start her own business, which allowed her to participate in exhibitions. Developing furniture, the Frenchwoman uses several materials at once, combining cardboard with wood.
There are completely different fundamental approaches to furniture design:

Once the shape is found, a scale model needs to be made to test how the large shape will look and how strong it will be.
Then proceed to the direct manufacture of the model itself. If you approach the development creatively, then from the minimum amount of cardboard you can make very durable furniture that can be assembled without the use of glue.

Thin and long sleeves are interconnected not only with glue, but also with ropes, creating a flexible structure from which you can easily make, for example, a hammock or a screen.
Quite strong chairs with an ergonomic shape are constructed from pipes.

Or designer tables of any shape that look ultra-modern.
When choosing a corrugation for furniture, you need to check the material of cardboard boxes for some properties and characteristics:

Six-layer cardboard can be used to make extremely strong bookshelves. For example, this cabinet can hold up to 80kg of folders. Accuracy when cutting material is very important, it is on it that the beauty and strength of the structure depends. For maximum accuracy, you can use laser cutting. If you cut cardboard into vertical grains, then the structure will be more stable, because parts with horizontal cuts are less strong. Polyurethane adhesive can be used to connect with stiffeners. To create any model you need to follow the same principles:
It is about these very principles that any master class tells. The criss-cross design of the struts provides the best stability and makes it possible to create sturdy furniture. Cardboard is easy to cut, which allows you to come up with almost any shape without holding back your imagination.
The ancient art of origami, paper folding, is also used to make cardboard furniture. A convenient cardboard bookcase can be made without the use of glue, by making a thoughtful cutting of the corrugation.

All parts of this design are painted in advance, and fastenings are made by folding cardboard into pre-designed grooves.
Assembling this shape is not much more difficult than folding a cardboard box. But only a master who has a good spatial imagination can create patterns for such a model.
This master class details how to make a cosmetic table, consisting of a structure, the basis of which is a beautiful silhouette. In order to make such a table, you will need:

After cutting 3 main identical parts, grooves are cut in them in order to place spacers in these grooves. After that, the spacers are calculated.
The "skeleton" of the table is ready, now you can proceed directly to the creation of its shape.
To make the surface of the table monolithic in appearance, you need to seal all the joints with soft paper.
The working surface of the table is also glued, then the whole structure is painted acrylic paint. If the mold is smooth and free of defects, the finished product will look like it was made from plastic or wood.

Next, you can proceed to the production of drawers, which are decorated in decoupage style. In order to master this design principle, you need to study the corresponding master class. Furniture handles are mounted on each drawer. After the final assembly, the table will take its place in the interior.
In interior decoration, paper furniture is in demand - you can make simple figures with your own hands. Another area of application of these items is toys for children. Every child will want to have a dollhouse with beautiful handmade paper furniture. To make such products, you will not need additional origami skills, you just need to follow the instructions provided.
Origami furniture - interesting direction, requiring special attention. The production of such figurines does not take a large number time, and the resulting result pleases with its appearance adults and children. main feature products - the maximum similarity with the real items of sets: sofas, tables, cabinets, armchairs and chests of drawers.
Use this furniture real life unlikely to succeed, but objects will become good option to create a layout of a future room or design dollhouse. To achieve similarity with real furniture, textured paper is used in the design, imitating various surfaces: stone, leather, fabric, wood and metal. When creating objects, it is better to use paint, which does not completely impregnate the material, but only gives it color.
The following materials are used for manufacturing:
You can work with paper on your own, or you can connect loved ones to the process. Then the resulting products will be diverse, but together they will form a single ensemble.

You can make anything out of paper. You just need to show imagination and perseverance. Consider master classes in the manufacture of popular types of furniture. Based on detailed instructions, you can make other types of interior items. The most popular are:
To find out how paper furniture is designed correctly, you need to consider each option separately.
A paper sofa will look great in a dollhouse or a miniature replica. real interior. Before you start, pay attention to the paper sizes:
The color of the paper is chosen at will, but it is better that it fits into the future interior or imitates real furniture. Having picked up the materials, you can start manufacturing:
Turning the product over, it is necessary to form the legs of the sofa and it will be ready. Such a beautiful and original item will become a real decoration of a toy living room or an original art object.

Fold the sheet in half

One more time in half

We make three bends from the bottom

Making corners from below

Raise up the bottom

Making side folds

Aligning the back

Making legs

Ready product
The most optimal and profitable way to create a paper chest of drawers is to use matchboxes. They are conveniently put forward, so making an item is not difficult. If you want to make a chest of drawers out of paper, then you should use paper blanks. It is convenient to store small light things in this chest of drawers. Beads, beads, locks, clips and other little things for creativity and needlework will perfectly fit here. The top of the chest of drawers can be painted with colored felt-tip pens, giving it an original look.
The design of a chest of drawers from paper consists of the following steps:
This chest of drawers is also a good gift for a girl with large quantity jewelry: all jewelry will fit in the boxes.

Making boxes

Creating drawer elements

Connecting elements

We decorate the coverings with patches

We glue the facades of boxes

Create pens

Finished chest of drawers
Making a stylish chair out of colored paper is also not difficult. To create it, you don’t even need glue and adhesive tape, you only need a sheet of paper of the required color. It is worth noting that cutting blanks from beautiful textured paper will give a better result than furniture from ordinary plain material. In addition, if you find diagrams that show pieces of furniture made in various styles- you can make a chair that is as similar as possible to real furniture. For work, you need one sheet of paper in the shape of a square. Its dimensions are selected depending on the dimensions of the future product:
It turns out an original and easy-to-make chair made of paper. To diversify its surface, you can stick decorative paper imitating leather on the seat.


The design of the cabinet is similar to the manufacture of a chest of drawers, which was described earlier. The difference will be that the frame should be higher, and in addition to drawers, shelves are needed. Some of the nuances of making a paper cabinet:
Finally, decorative handles are glued to the doors. For this, buttons or beads are suitable. The legs are made from thick cardboard.

Assembling a paper table is not difficult, especially if you already have experience with this material. There are many options for creating tables, but beginners should choose less hard way. It consists of the following actions:
To ennoble the tabletop, stick beautiful decorative paper on it or paint it with colored felt-tip pens and acrylic.

Decorating is a separate step. finished products. Do-it-yourself furniture, the schemes of which can be found in this material, is decorated as follows.
| Material | Peculiarities | What is suitable for |
| Self-adhesive paper for furniture | You can use this material in the manufacture of any type of furniture. Such a film is ideal for beginners, because it is easy to cut, and the adhesive layer allows you to decorate the surface without any problems. | For countertops, chair seats, sofas and armchairs, for decorating cabinet doors and chest of drawers. |
| Use of paints | Paints allow you to show creativity, move away from the standards. Using paint, you can draw any pattern and pattern. When choosing a tool, pay attention to the fact that it does not damage paper base. Acrylic or water-based formulations are preferred. | For all kinds of crafts, especially for decorating the front parts of products. |
| Fabric Application | The fabric allows you to imitate the structure of the furniture as much as possible. | Suitable for sofas, armchairs and chairs. |
If gouache is used for decoration, you need to mix it with PVA glue (1: 1). After drying, the paint will not be imprinted on the hands, and the product will receive additional rigidity.
Do-it-yourself paper furniture will be an excellent option for a dollhouse or designing layouts for a future interior. Making miniature items is a fun activity that everyone in the family can get involved in.


Enough stylish table, made under wood and leather, and not just a table, but a folding table.
Author's words: Quite a stylish table, made to look like wood and leather, and not just a table, but a folding table. 1. So, the first photo. Cut out the main shape for our... uh, maybe we should call these legs. In general, cut out the shape for the legs of the table. The photo shows one thick layer, but this is not gluing and not thick cardboard, as it might seem at first glance. it's just that the author apparently cut all 6 supports (3 for one side and 3 for the other) in one go. This is very sensible, because with this approach, the tol will be more symmetrical and, hopefully, will not stagger. 
2. Now we collect each support. We start from the middle, from the middle bar. When making groove cuts, it is best to make them at the same time on the middle bar for the second support. You should get something like this:

3. Now we fill the grooves with mates. The width of all inserts should be equal, and the height should correspond to the height of each specific element to which they are attached (well, I think this is quite clear from the photo).
I want to say that exact dimensions tables are unknown, I don’t think it’s big, most likely it’s something like coffee table, but the same design can be extrapolated to a more serious subject, for example, to make a table for the living room. Why not? So you will have to set the width and height of all the details yourself in accordance with the overall scale.
To strengthen the joints, we use quick-drying glue - a moment or, even better, we use a glue gun for this. 
4. Using the same glue gun, glue the side parts of the cardboard sheets to the main central part of each support on the sides. As you can see, the table part is already quite stable)). Here in this photo it is not yet visible (it will be noticeable in the next ones) that the author, when gluing the side support into one whole, strengthened the joints by additionally gluing the edges of the “lattice” with pieces of cardboard, so it turned out that the constituent elements of the side supports seem to consist of a double sheet of cardboard. 
Remember that there should be two such pieces.
5. Only on last photo we have not closed the outer sides. In the next photo, they are already neatly covered with cardboard plates. The author omitted this procedure in his photo-MK, but there is nothing particularly complicated here. We cut out a cardboard rectangle along the width of the side support, slightly bend it, winding it, for example, on a stick to give it a curved shape, and attach it to the side parts of the supports with a glue gun. You can try sticking it all in one layer, bending it accordingly. But the author, and this is really more convenient, cut the rectangle into two parts and pasted them joint-to-joint separately. In this photo, we already have two supports with sidewalls and the bottom of the table is also glued here: a layer of thick cardboard is glued to the lower parts of the supports (you can pre-glue two sheets of cardboard).


6. Now, on the basis of the glued bottom, we make the following grid:

Inserts in the grooves in the central part are not needed yet, just cut them out, try them on and put them aside. and we cover the grid to the right and left of the central part again with layers of cardboard glued with a glue gun
1.

2.

7. It is not visible in the next photo, however, there should again be a grid (stiffening ribs) on top of the first layer of cardboard. they must be very carefully adjusted so that they are almost flush with the upper edge of the oval cutout in the side supports, so that the layer of cardboard laid on top lies tightly on the stiffeners themselves and is glued to this very upper edge of the oval cutout. In general, see the photo: 
Yes, and do not forget about the grooves in the central part. Now they can be filled.
At the same time, we finished the inner sidewalls of the table supports. As you can see, I will lower it and from the inside everything is pasted over with cardboard.
1.

2.
 8. Now drawers. How to make them, I think, is quite clearly visible in the photo. It's all about measurement accuracy. The only reminder is that we make the front “lid-wall” from two layers of cardboard (although it would be possible to strengthen the entire box in a similar way ..)
1.

2.

3.

4.

5.

But such partitions not only organize the space inside the box, but also strengthen it. 
9. The next stage. Now back to the top again. On the surface of the cardboard sheets on both sides of the central part, we again glue the stiffeners, measuring them so that they are flush with common surface side supports. At the same time, we close the side "insides" of the table with sheets of cardboard. 
10. Now what is our countertop. We also remember that our table is folding.
The tabletop consists of a bottom thick sheet of cardboard (two sheets can be glued together), the perimeter of which is equal to the perimeter of the table's surface area. the top cover sheet of cardboard is the same. Two sidewalls are sealed tightly with narrow strips of cardboard. in the end the table looks like this:

But the internal structure is like this: 
These elements are removed from the sides of the table and folded, forming a small addition:
1.

2.

11. Decorating. Honestly, I didn’t really understand what exactly the author did. If anyone thinks of it - write.
I tend to believe that the alignment went with ordinary kraft paper, then it was painted on top with several layers of paint, sanded to get rid of joints (yes, all joints on cardboard should be pasted over with paper tape). The outer lids of the drawers and the tabletop are finished with leather-look material. This can be obtained in needlework stores for book binding) and in the construction and wallpaper departments there should be something similar. The top is dark lacquer. 
Taken from here
Cardboard armchair
I do not know if this idea will be useful to any of the readers. I'm not at all sure that someone will want to put it into practice, and yet. It may well lead readers to other interesting solutions. In any case, I like what happened. Let's say that I want to brag)

It so happened that upholstered furniture from the group kindergarten, which my Polina goes to, was given to another, new group. Our children simply had nothing to sit on. My friend Tanya, who worries about our kindergarten with all her heart and tries to help in every possible way, told me, “Lena, I read on the Internet how to make a chair out of cardboard. And I did it. Will you sew a cover on it?” Well, a cover is a cover.

It was clear that this was such a temporary measure - let at least one chair be in the group until something is decided with upholstered furniture. Tannin's chair seemed unstable to me. He, how to say it ... "played" like an accordion. It seemed to me that he would not stand for more than a week. Somehow it became a pity to spend a large piece of cloth on it. But Tanya spent 2 days cutting and gluing! I decided to make the chair stronger and even then sheathe it.
I didn't photograph in detail the entire process (I never have time for that)), but here are the main steps. I wanted to make a chair. Stable and strong. It was imagined how several kids would jump on it at once (and I was right))). So, at first such a “sandwich” was made in the form of a semicircle: chipboard - between them there are bars - chipboard. It turned out a base about 10 cm thick. This is so that the walls can be fixed. For the same purpose vertical racks. Front wall - plywood; the back is hardboard (it bends so well))). The bend of the back was first drawn by eye on the remnants of the wallpaper, the back at the back is slightly higher. Base on 4 legs from old Pauline wooden cubes.

Polina fell in love with the chair already at this stage)) Here you can see that I started gluing cardboard, filling inner space armchairs. This is the same corrugated cardboard from the boxes that Tanya's chair was made from. Not all layers are solid, most are just glued pieces, in some places there are gaps between them, it does not matter. First glued on PVA. But she soon abandoned it, because. cardboard swells from it like a wet waffle and deforms, so I had to put a load on top, wait until it dries ... It's long and inconvenient, so after several layers I switched to carpentry glue. Great item in every way.

From the photo it is clear how the walls turned out. In the course of work and at the end, I leveled them with a knife. Everything is so easy to cut)) Then foam + glue Moment Gel.


And a cover. (That was the most enjoyable part)) Done.

from Marrietta
The chair is very heavy. But I think this is a plus - at least it will not roll over)) And of course the fabric .... It's just some leftovers that were found at home. The chintz on the armrests, although glued with interlining, cannot count on a long life. But we wanted temporary furniture that would not be a pity to throw it away.
More than six months have passed, the kids tore the fabric on the armrests. I'm thinking of fixing the upholstery, because. everyone is attached to the chair, but in itself it is simply unkillable. But re-upholstery is another story altogether.
I also offer a few photo ideas from the Internet
Believe it or not, cardboard furniture is quite strong and durable. See how to make a chest of drawers, shelves, a table from this material.
It seems that this material is unreliable, but it is not. Using certain technologies, you will make cardboard furniture that can withstand considerable loads. This is perfect for a children's room, it is environmentally friendly and it will not be a pity if the child scratches, draws on such an inexpensive item.
Before embarking on such global pieces of furniture as a wardrobe, dressing table, chest of drawers, practice on simpler products.


To make the product strong, take cardboard, between the layers of which there are two layers of corrugations.

Now the ends of the shelves and they themselves need to be pasted over with newspapers or paper. To do this, use PVA glue, slightly diluted with water. When it dries, paint the shelf with one or two coats of paint. When it dries, you need to apply layers of varnish with intermediate drying of each. To make cardboard furniture more durable, do not spare it. V this case 5 layers of varnish were used.
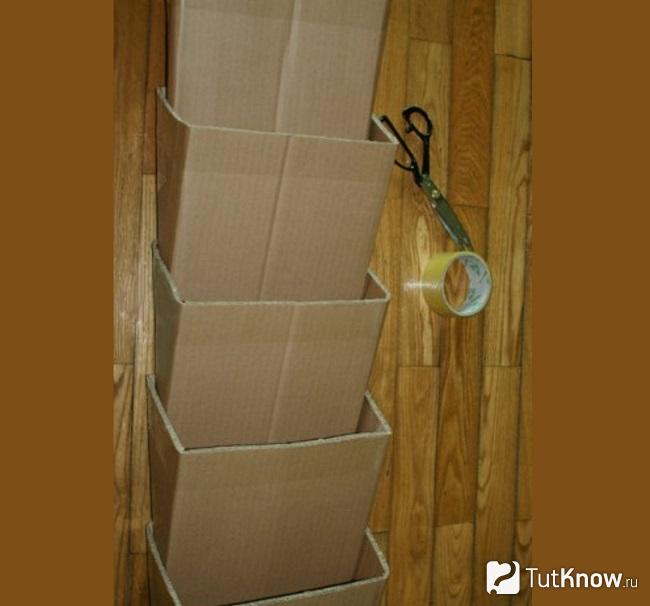
Such shelves can be hung on the wall with corner brackets. If you have a lot of corrugated cardboard boxes, then connect them with plastic clips or double-sided tape, you get a great shelf or rack.

From this material make wonderful shelves for shoes, and some of them can be hung directly on the wall using double-sided tape.


The beauty of this material is that even without locksmith tools and skills at home, you can create things original form, for example, here is such a rack.


To make the box more rigid, you can stick it on a slightly larger piece of cardboard.


This unique material can be given other interesting shapes, make a shelf with your own hands in the form of an octopus or a flower with a box in the center.


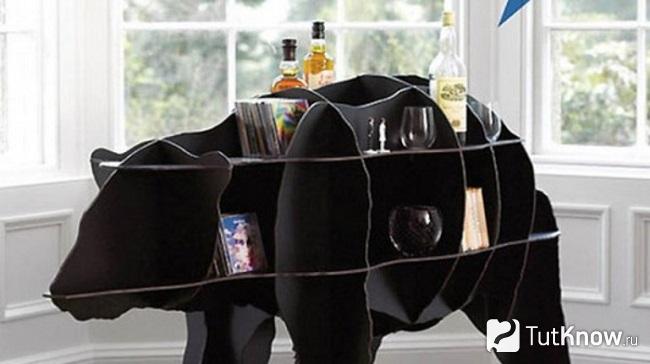
Then you need to start assembling. On the body of the lamb, put on the back, front, side parts. Then, in the slot, you need to put two shelves on one side and two on the other side. This process is covered in more detail in the video at the end of the article, and the diagrams will help create such a shelf.

If the blanks and this product are painted and coated with several layers of varnish, it will turn out to be durable. It will be possible to put CDs, bottles, books here.
Seeing this product for the first time, hardly anyone will guess what material it is made of.

First assemble the product box. To do this, reinforce each part with strips of cardboard bent in a zigzag manner, the second one is glued on top of the same on a paired blank. They need to be left at least overnight under pressure so that they dry and do not lose their shape.

The chest of drawers will have drawers. First, attach strips of cardboard 2 cm wide to the sidewalls of this product. Then glue the shelves on them, each assembled from two parts.


Take:


If you want even more creative idea, then pay attention to the following asymmetric mini wardrobe.


As you understand, it is also easy to make from this material.

For the legs you will need cardboard tubes. You can ask for this junk material at hardware store. Oilcloth, film are wound on it.


If you also wanted to make furniture out of cardboard, be sure to try to make it. The promised plot will help you with this, because it is very easy to make such a shelf, the result is simply wonderful.
If you want to see what else cardboard furniture can be, including beds, stools, chairs, then check out the presented photo selection.
![]()
Physicist and astronomer Stefan Feeney of University College London, one of the...

Introduction Military monastic orders, orders of chivalry, orders of meritIn 1120...
