Individual entrepreneur details in the contract include mandatory and additional information....


A feature of the layout of most apartments in a typical building of the 20th century: a small area of \u200b\u200bthe premises, especially the kitchen (even if the apartment is multi-room). Under such conditions, the ideal solution to avoid excessive clutter of furniture in an already cramped space is to increase the functionality of the main pieces of furniture. If in the living room it can be a sofa, extending if necessary to seat a certain number of guests, then in the kitchen this item is a table. For a large family living in an apartment with a conventional layout, a sliding dining table is an indispensable attribute of the interior: in its normal state, it takes up quite a bit of space - and when extended, it can fit a large number of eaters behind its countertop.
Nowadays (with the choice of various materials and furniture fittings offered by specialized stores), it is much more profitable to make a sliding table yourself: the cost of the table is cheaper, and everyone can choose the design, including individual sizes. Agree - it's nice if your kitchen has a table that exists in a single copy!
The design of wooden sliding tables has been known for a long time. If earlier all the details were made of wood, and only a high-class carpenter could make a good sliding table, today even a beginner can make such furniture thanks to commercially available mechanisms made of durable metal.
Possessing the simplest skills in working with elementary tools: an electric drill, a jigsaw, a screwdriver, you can easily make a table of the shape and size you need. To do this, we suggest you use a few simple examples of sliding tables.
The general principles for the manufacture of such tables are the same for any do-it-yourself products:
Moreover, the first and last points of the algorithm are individual for each case, and it makes no sense to describe them in detail. Detailed instructions for the rest of the steps are given in the proposed descriptions.
The table is named "Minute" because it takes a minimum of time to make it.
The table has a height of 735 mm, table top: minimum size - 1200x800 mm, maximum - 1670x800 mm.
We will need:


As you can see, making a sliding table of the simplest design is easy and does not take much time.
Some inconvenience of this design is in the removable part of the table top: this table does not provide a place to store it, so it is put away in the closet until the next “influx” of guests.
The next option will help you make a sliding round table, free from this inconvenience.
You will need:

Making round table elements:
We propose to do something a little simpler: to assemble a sawing "compass" from a jigsaw or an angled circular saw (depending on what you have) - you can use it repeatedly.
For such a "compass" you will need the actual cutting tool, tape measure, drill, 3-4 self-tapping screws and a meter rail made of plywood. The width of the rail is equal to the length of the sole of the tool (see Figure 8c, this is how the whole structure looks like).

The solution of such a compass can be changed in the range from 20 cm to 1 meter (respectively, the diameter of the sawn tabletop can be from 40 cm to 2 meters). Using it is very simple, the saw cut is clean, and the circle is perfectly even: at a distance of 425 mm from the cutting blade (disc or file), we drill a hole, with the help of a self-tapping screw we attach the structure to the material to be cut - the compass is ready, it remains only to evenly push the tool forward, and he himself will move along the desired trajectory.
Important! It is better not to cut the countertop from the front side - a trace from the self-tapping screw in the center will spoil the appearance.
The tool must be driven slowly and without jerks, otherwise you can get uneven chips on the chipboard surface (if a saw is used, it is better to gradually increase the depth of cut).
Melamine edging tape is produced with a layer of hot-melt adhesive already applied to it (glued with a conventional iron).
However, in order to achieve a better coating, it is advisable to putty and sand the sections before gluing the tape - and only after that start gluing the tape.
The tape is superimposed on the end of the laminated chipboard, pressed against the sole of the iron and so kept for some time (so that the glue melts under the influence of temperature). Then, having removed the iron, it is advisable to press the tape with your hand (after putting on it a fabric folded in several layers of cotton). Cut off excess tape with a sharp spatula or knife - while trying not to damage the cut corners!
The ABS edge is more durable, however, it is not glued so simply. For edging with ABS tape, glue is needed (as a rule, manufacturers recommend the most suitable one). Moreover: when removing excess glue that has protruded beyond the edge of the tape, the solvent can damage the laminated chipboard surface - special care and practice are needed here.

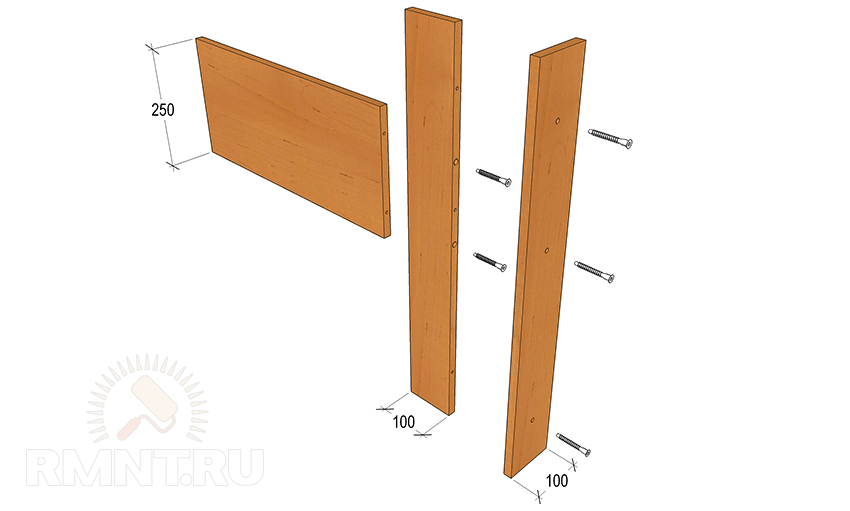
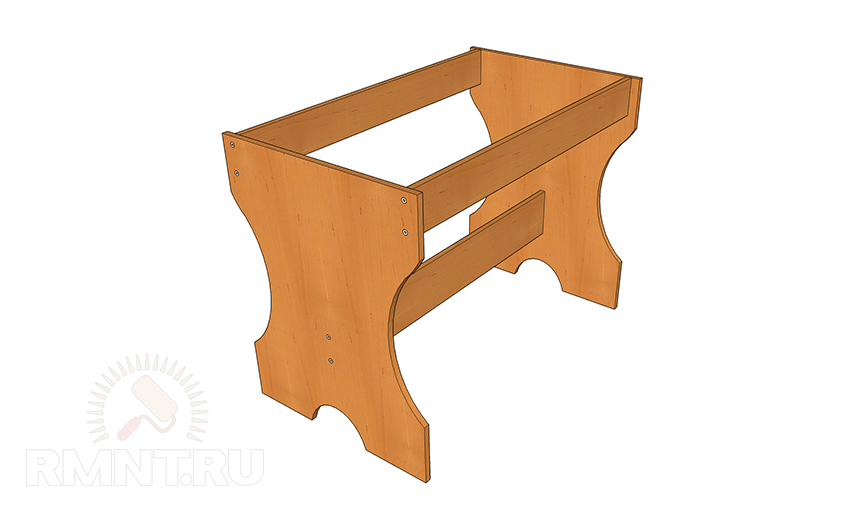
The assembly of the table takes place in stages:
1st stage: underframe with a false tabletop (scheme 1);

2nd stage: assembly of the sliding table structure (scheme 2);

Beautiful folding round table made of wood for the kitchen-dining room
Tiny Soviet-style kitchens are not able to accommodate the furniture and household appliances needed in this room. Putting an ordinary kitchen table is already a problem, it will clutter up the whole space there. The only way to somehow solve this problem is to use a sliding table instead of the usual one.

Kitchen sliding table folded and unfolded in the interior of the room

Extendable dining table - the secret of successful hospitality
Usually furniture is bought in a store, but our people have long found another way out of the situation - to make it with their own hands. Indeed, spending about twenty thousand rubles for, in general, a simple thing is somehow stupid if you can do it yourself.

Dining furniture for the kitchen, made by hand

Wooden oval extendable table with a set of chairs
The desire to make a sliding table gives rise to many problems, and the first of them prompts the master to decide what kind of table he needs? If we do not take into account the very exotic models, then all the tables known to us are divided into two types: round and rectangular.

Rectangular folding table for permanent use and for receiving guests

Folding round table made of natural wood after unfolding becomes oval and can accommodate more people
A round, or rather a sliding oval table is a reality of the everyday life of modern people; making this oval is no more difficult than a rectangle.

Oval glass sliding table in a modern interior
Another thing is when you set yourself the task of making a sliding table of the correct round shape, including in the extended state. It is difficult to assemble such a piece of furniture, the number of parts that make it up is too large and for this it will be necessary to solve a number of engineering issues or use other people's solutions, which will not significantly simplify the work ahead. For a practical person, such super-tasks are not characteristic; he follows the path of least resistance.

Round extendable table that doubles the table top area if needed and stays round
The path of least resistance, in this case, is the manufacture of a rectangular or oval (in the shape of an irregular circle) sliding table. A round table will take up too much precious space in the room, so most craftsmen prefer a rectangle, and it’s easier to find suitable materials for it.

Rectangular sliding glass table
Next, you need to decide on the material. Due to the high cost and complexity of processing solid wood, you will have to abandon the oak tabletop and legs. We will make the tabletop from laminated chipboard, and metal legs can be purchased at the store. Laminate countertops are perfect because they look stylish and beautiful, and the laminated surface of the table repels moisture.

Waterproof laminate suitable for countertops

Furniture metal legs are ideal for a manufactured table
In addition to pieces of laminate and metal legs, many other parts will be required, among them:

Additional accessories for table assembly
Self-tapping screws should be significantly shorter than the thickness of the future countertop. The main tools for assembling the table will be a drill and a screwdriver. However, a screwdriver can be replaced with a screwdriver. The process will become more laborious, but there will be no less satisfaction from the work done at the finish line.

Laminated chipboard worktop

We cut out the details of the tabletop of the future according to the drawing

Sliding table top drawing

Drilling holes in the corners

We attach parts of the guides to the corners, mark the holes and drill

Designs from corners with movable and fixed guides

We fasten the movable side to the right side, the fixed side to the left side of the tabletop

On each side of the table we fasten the lock with self-tapping screws.

Fasten the legs to the tabletop with screws

Kitchen table on purchased metal legs legs

Simple folding table with chrome legs
A kitchen table of this design can become a gathering place for a large family in the evenings or the center of a festive event (birthday, wedding anniversary, etc.). However, the old laminate itself is unlikely to inspire people to a long feast. Another thing, if it is slightly decorated. It turns out that laminated surfaces after some processing can be painted and even painted on them. Very little is needed to achieve the desired effect. Seal the end of the countertop with edging tape, no matter what color, just to close the ugly end. Sand the surface with sandpaper, treat the dents with putty and cover with acrylic paint. Paint can be any color from white to black. An image of flowers in the style of Zhostovo trays is applied to the black background of the table, turning the extendable table, an ordinary utilitarian thing, into a work of art. Handicraft always runs the risk of becoming art, the master who creates it is always the creator.

Examples of painting in the Zhostovo style “Flowers” on a black background
Sometimes situations arise when guests come to the house and the owners have nowhere to seat everyone. In this situation, it is better to think about how to make a sliding table with your own hands in order to use it every day and in the event of a large feast.
It is worth noting that the manufacture of such a model is within the power of even beginners in carpentry. You can easily outdo designer tables by adding a little personality to the furniture. This option can be used both for the kitchen and for the dining room, it is great for large and small rooms. A practical folding table can be one of the most useful things in your home.
Dining tables have fairly simple designs. Folding models are equipped with a special mechanism and additional countertops. In general, everything is quite simple, the main thing is to draw up drawings correctly at the very initial stage of work.
1
2
3
4
5
The main requirements for carpentry work are the quality of the material and the strength of its fastening. We all know what loads the table must withstand and must comply with this standard. In addition, this furniture is very often transported, and this is another signal that you need to take care of the strength of the structure.
Dimensions are set from the one who will use the sliding table. There are practically no restrictions here, except that the countertops must hold firmly at the base.
The retractable parts are attached only at the very edge, so making them very long will not win you. With any, stronger load than their own weight, they will sag, and as a result they will completely break. It is worthwhile to reasonably approach this issue and consider some schemes that will tell you the optimal length for your kitchen table.
All carpenters have a question, what material to choose for a sliding table with their own hands? A lot depends on what you plan to make, as well as on your finances.
1
2
3
4
Remember that the countertop, more often than other places, will be exposed to moisture, food debris and other substances that damage it. Therefore, you should choose the material that resists all liquids as much as possible and not only. The following types of wood are considered the best in this case:
Before you start creating the shape of the countertop, the wood must be thoroughly dried. It is advisable to use a special moisture-repellent solution and cover the surface in several layers. Also, for additional protection, be sure to use varnish.
To assemble the legs, you can use the same material as for the tabletop. A do-it-yourself sliding table will last longer if it consists of the same material. The bars must be at least four centimeters, since only such a thickness will make it possible to withstand a heavy array of wood and subsequent loads on the product.
It should be understood that the assembly of such furniture can take you quite a lot of time. For a broader understanding of the process, watch the video on how to do it step by step with detailed explanations. You can learn something important for yourself from there and add something new to your table model.
In order for all the work to go right, you should prepare all the necessary tools in advance. Today, this is not too big a problem, almost everyone has a similar set in their house:
In addition, you should buy in advance the mechanisms of sliding kitchen tables, which later you just need to install.
Start collecting parts from the bottom of the table, that is, from the legs. Be sure to make marks at the joints in advance, accurately measuring all distances. Before direct assembly, it is advisable to varnish all the parts, so the tree will retain its original appearance longer.
The upper part of the table and the mechanisms are fixed on the legs. It turns out some contouring of the product, on which, as a result, the countertops will be attached.
Remember that a properly drawn up scheme will help to assemble the mechanism the first time, as experienced carpenters do.
Tabletops are attached to the building corners to the already finished contouring. This should be done on small screws so as not to damage its appearance. Be sure to tighten everything thoroughly. For additional fastening of fixed parts of the table, use building glue.
Today, many people are trying to try their hand at carpentry. And rightly so, because a thing created by oneself is much more pleasing than buying in a store. Moreover, if you are a creative person, then using imagination, you can easily add bright details to your room.
Collecting cabinet furniture is a pleasure. All costs pale in front of the ease of use of items made "for themselves." We invite you to study the common designs of folding dining tables, as well as the technique of assembling them, and you will be able to make a folding dining table with your own hands.
The main advantage of folding tables is their mobility, and for this they must be light. Exactly to the extent that the housewife will cope with their transformation and movement. It is unlikely that a table made of solid wood will be easy to lift, and with small dimensions such material is completely inappropriate.
It is supposed to use light and thin laths of factory-cut chipboard or self-cut to create the base of the table.
For countertops, the choice is almost unlimited. You may prefer conventional particle boards, but also consider MDF panels, furniture boards or 40 mm chipboard kitchen worktops with acrylic or vinyl coating. However, keep in mind that for most of these materials, the wrong side is different from the front, it simply does not withstand normal operating loads. This moment can be decisive in some table designs.
There are truly many ways to transform the countertop. The simplest and most familiar of them is used in a table-cabinet, which has two lifting tabletops on piano hinges and swivel legs as a support for them. The table is not always convenient: the person sitting at the central section simply has nowhere to put his knees, moreover, when unfolding it, he often has to move and turn. The aesthetic value of such furniture is almost zero, but the "book" is the most budgetary version of the table.

Sliding tables have a rigid frame with fixed legs. Only the tabletop undergoes transformation: it moves to the side to the middle of the frame, while the open part is covered by the second half, which is stored separately. Such tables are good in spacious dining rooms, the transformation is carried out in a few simple movements.

By the way, there are several layout options, for example, the edges of the table top can be moved with the insertion of the central segment. Or, for example, the tabletop can be folded in half on hidden mortise hinges and lean back onto the open part of the frame after shifting. Do not bypass the rotary structures, in which the tabletop does not move to the side, but rotates perpendicularly, after which it is complemented by the second half.

The legs for the "book" are assembled from three strips of chipboard. Two of them are fastened with the letter G on 60 mm confirmations. At the end of a 100 mm rail, for this, it is necessary to drill a through hole of 4 mm, expand it with a 6 mm drill to a depth of 70 mm, and then with a 10 mm drill to a depth of 60 mm. In other words, manually and gradually perform milling for a recessed confirmation.
To prevent the tabletop from swinging from side to side, the leg is covered from the end with a bar 100 mm wide and fastened with 45 mm confirmations in three arbitrary places, hiding traces of the previous fastening. This method of fastening is the least noticeable and most durable, but you can also use overlay corners, dowels or ties.
For a sliding table, legs from two chipboard strips folded perpendicularly are suitable. A rectangular frame is assembled between the legs of the same material, which fastens the base of the table. Another, more complicated option is to assemble square boxes from planks 84 mm wide and tighten them with confirmations. Such strict and discreet legs will suit most interior solutions, while providing good stability and allowing you to comfortably stretch your legs.

You can also use chrome pipes or turned products as legs for all types of tables.
For sliding and rotary tables, the main frame is made of chipboard strips 120-200 mm wide. In general, the frame encircles the legs in a circle and hides the traces of the table top. Square legs can also be fastened not with an external belt, but with intermediate inserts. The upper ends of the parts must be flush; to give diagonal strength, it is possible to add jumpers inside the frame. The elements are fastened with furniture corners on the inside.

The total length of the base should be 40-50% less than the length of the tabletop when unfolded. The width is chosen so that the overhang of the tabletop along the edges is at least 100-150 mm.
When assembling the base for a “book”, the main dimensions have a stricter relationship. The central segment of the table top determines the overall width of the table, which should be 20-25 cm less than the length of the side wings. That, in turn, should be less than the height of the table by about 50 mm. Since the legs are hidden inside the base when the table is assembled, its minimum width when folded is at least 300 mm.

The base itself is assembled in the shape of the letter P and reinforced with one crossbar 400 mm wide in the center on the edge. It is possible to fasten from the inside with furniture corners, but in this case it is better to prefer confirmations. The leg loops are attached no closer than 50 mm to the edge of the side walls.
Often the inner space of the base of the table is used to store dishes or household chemicals. The easiest way to organize a storage space is inside a folding "book". The width of the central segment must be increased by 200-250 mm and several horizontal shelves should be used instead of one vertical crossbar. It is also possible with a blind lining of the inner box and the installation of doors on the ends of the base.


Due to the complex shape of the legs, the door will be 100 mm wider than the box on both sides, so it is important to remember one thing: the handle on the door is installed on the side where the table leg is in the folded state. Accordingly, under different wings, the direction of opening the doors and the location of the legs should be opposite.
In sliding tables for arranging a niche, it is enough to knock out the frame from below with a solid sheet of MDF and add a few cross bars to secure the bottom more firmly. Another option is to use frame strips up to 400 mm wide and fasten the base along the center. Drawers can be installed in the formed niches on full extension rails.

The tabletop for the “book” must be assembled upside down, laying out the sheets of chipboard on the floor and carefully aligning them. The wings are connected to the central section with piano hinges, then drilling is performed for dowels for fixing to the ends of the base. Additionally, it is necessary to provide limiters in the center of each wing so that the leg does not develop from accidental movement of the foot.

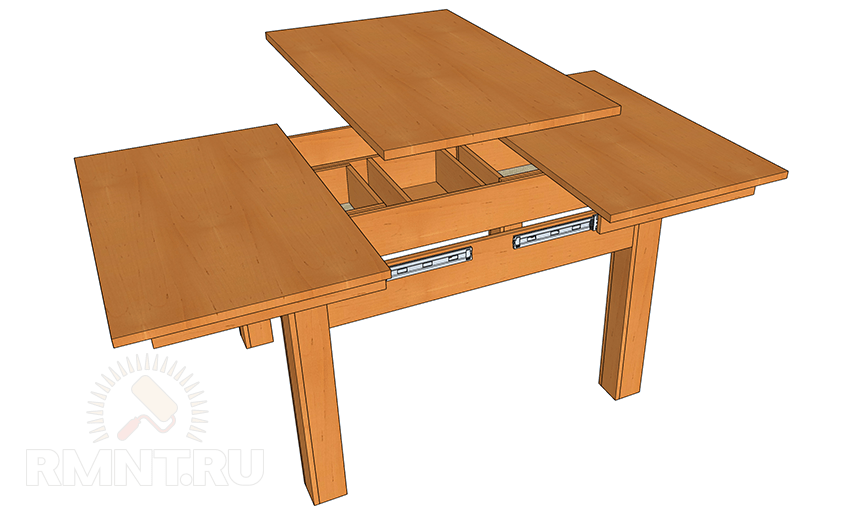
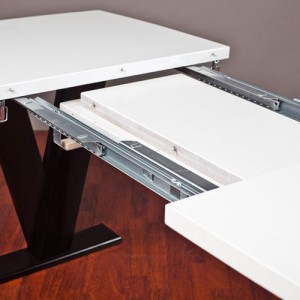
The most versatile option for mounting the table top of sliding tables is on drawer rails. To do this, the table top or its halves are complemented by a pair of longitudinal ribs, the distance between which is 20 mm greater than the width of the base body. The guides can be used as regular or full extension, their length must be comparable to the overhang of the tabletop in the unfolded state. This installation allows you to maximize the size of the unfolded table, at the same time, strength and stability do not deteriorate.
If the tabletop is assembled from two halves, they can be folded with their front surfaces to each other and embedded hidden loops into the ends. With this option, the front surface of the unfolded tabletop always remains intact, that is, its individual parts will not have varying degrees of wear.

Metal dowels at the ends of different segments of the tabletops are also very useful, which ensures greater solidity and eliminates the formation of bumpers and drops.
The dining table is considered one of the most necessary attributes in a kitchen or dining room. The size of the table is calculated based on the number of people using it and the total area of \u200b\u200bthe room in which it will be placed.
To date, the modern furniture industry offers many different options for dining tables, but the most common model is the type of table with a sliding top. This is primarily due to the fact that such a table fits almost any small room. Its versatility allows you to save a significant amount of usable space in the kitchen or dining room. The sliding table is quite convenient in operation, it can be installed in any part of the room.
Despite the technological features, the sliding table type has a simple design. Therefore, if you do not have the opportunity to purchase ready-made dining furniture, you can make a sliding type of table with your own hands. To do this, it is not necessary to have professional skills, it is enough to understand a little carpentry.

At the moment, the furniture market offers tables with special devices that require only the rotation of the desired handle for instant and independent transformation. Such designs are considered advanced, most often they have a high cost. Therefore, the average consumer cannot always afford high-tech furniture.
It is not possible to assemble an attribute of furniture with such a mechanism at home, but on the other hand, you can independently design a sliding-type dining table of a simpler type. The main factor in the discomfort during the operation of such tables is the absence of any mechanism that is responsible for shifting parts of the table top. In Soviet times, they did not pay much attention to this, therefore, almost all elements of the furniture of the last century were put forward and retracted by human effort.
To simplify the design, while adding convenience to it when using it, you will need to equip the sliding table with a special mechanism.
Back to index

The production of the dining table will be carried out on the basis of a classic design, which involves its combination with some modern elements.
For manufacturing, you will need the following materials, accessories and tools:
The main innovative idea in the Soviet-style sliding table is the presence of a roll-out mechanism, which is most often used in the manufacture of drawers.

Synchronous mechanism with stopper for frameless tables with fastening to the tabletop.
For a particular table, two guides will be enough, the length of which should be about 30 cm. In any case, the mount is hidden under the tabletop, so the color and condition of the hardware do not matter.
Sawing components from laminated chipboard and plywood must be uniform, accurate and highly accurate. Therefore, it is best to entrust this work to a skilled worker with a special saw used in furniture production.
The total size of the dining table, excluding height, is 90×70 cm in the assembled position and 130×70 cm in the extended position. This size will be enough to seat 8-12 people at the table in free seating.
Back to index

The components of the table in question will have the following dimensions:
The value of the components on a plywood base:
It is necessary to pay special attention to the finish of each element, as they will always be in sight. If the table will be placed indoors, then it will not require a special moisture-resistant coating. But the splinters still need to be removed, so the best solution is to do a good sanding before varnishing the parts. After identifying roughness, you need to process the surface with emery and varnish it again.
Back to index

The end elements and the crossbar are placed in the middle of the side parts of the frame. The first 2 parts should be fixed parallel to the edges of the side parts, the second 2 parts are located almost in the very center of the formed frame parallel to the bottom edge. The interval between the parts should be approximately 10-12 cm. The dismantled part of the countertop will be conveniently located on the formed structure, but to pull it out, you will need to slightly tilt one of the sides. For this reason, it is necessary to make the interval between the crossbars as small as possible.
The legs are inserted into the corner of the frame and twist right through it from the outside. This is done using self-tapping screws measuring 4x50 mm. In addition, it is necessary to place iron corners on the surface of the frame and legs. At this stage, it is important to check the reliability of the design and the uniformity of the location of each of the legs, otherwise the table will swing. If you find any deviations, you can immediately correct their height.
The appearance of sliding furniture used to be associated with a small area of apartments. And today, more and more often, a rational approach is used in the arrangement of premises: it is not necessary to have a large table in the house or office, you can get by with a smaller product. But capacious tables become necessary during the reception of delegations and guests. What to do? The answer to such a request are tables of different styles made of wood, plastic, metal, glass, equipped with various transformation mechanisms. Such furniture is able to double or even triple the usable area of the countertop.
Despite the large number of proposals, there is a desire to make a round, oval or rectangular sliding table with your own hands. This is due to objective advantages:
Drawings, photographs and a description of the work from the masters will simplify the process.
Technical solutions refute stereotypes. The coffee table in the living room, thanks to the installation of a special mechanism, will provide a comfortable place for gatherings with friends. The useful area of the countertop will increase by 2 times.

In our version, the folded table has the following dimensions:
unfolded:
Individual production allows you to change the size of the product, and, accordingly, its parts at the request of the master. A sliding table can be made of wood, but making it yourself will be time-consuming. The use of chipboard will greatly simplify the task.

The sliding mechanism is available in two versions:

Keep in mind that a round table cannot be made foldable with this type of fixture.

If you like to create such structures with your own hands, purchase parts from which you can make two layout mechanisms.
The device and the connection points of the mechanisms can be understood by considering the diagram below.

Stock up on furniture fittings:
You will also need tools: a jigsaw, an electric drill, a screwdriver, a key for confirmations.
From chipboard (25 mm) it is necessary to cut:
Cutting parts with your own hands must be done as accurately as possible, this will help to assemble the product easier, faster and better. If you have never made tables or cut wood-based materials before, contact a specialist who works with professional carpentry equipment.
If you decide to make a table with your own hands with a single mechanism, then connect the first pair to the bottom of the tabletop, and fasten the other with a connecting panel (from the bottom side).
A large table is the dream of every hospitable hostess. After all, all his friends will fit behind him without any problems. The most popular is the traditional rectangular design, although round and oval tables have always been considered symbols of comfort and well-being.

Today, there are many transformation mechanisms for both rectangular and round tables. We offer to make a full-fledged dining table with your own hands with a tabletop size of 116x92 cm. After moving apart and installing an additional tab 42 cm wide, it will be transformed into a large place for a feast 158 cm long.
We collect the countertop with our own hands. Please refer to the detail drawings. If you want to make a rectangular or round table instead of an oval table, make your own changes.


An oval-shaped folding kitchen table is perfect for those who like to dine with the whole family and receive guests from time to time. It's pretty easy to do it yourself. Self-made furniture is distinguished by original design and the ability to take into account individual needs, due to the characteristics of the room and the taste of the owners of the house.
An oval-shaped folding dining table is good because it has rounded corners. This avoids "unpleasant collisions" and is especially appreciated by those who have small children at home. The oval shape suggests the location of the table in the center of the room. However, if necessary, you can put such a table at the kitchen corner.
Before starting work, you must:
The size of the product depends on the area of \u200b\u200bthe kitchen and the number of people that need to be placed at the table. The optimal solution for a medium-sized kitchen would be a folding dining table measuring 120 × 80 cm (folded), consisting of two parts with dimensions of 60 × 80 cm each.
It will be correct to draw a sketch of the future product on a scale, in order to understand what ratio of the width and length of the table will allow you to maintain a beautiful rounded shape even when unfolded, as well as a size suitable for a particular kitchen.
For a kitchen of this size, a folding oval dining table measuring 120 × 80 cm is suitable if you put it with a kitchenette. If you place the table in the center of the room, access to kitchen cabinets and household appliances will be difficult. When receiving guests, you can put it in the middle of the kitchen.
The optimal length of the dining table top section, for the convenient location of one person, is 60 cm. The sketch shows that a 120 × 80 cm sliding table is perfect for four to six people (six will fit behind it if you push the table to the center of the kitchen). In the unfolded form at such a table it will be possible to seat up to 8 people. If you need a folding dining table for more guests, you can increase the size of the insert or make two of the same.
It is necessary to complete the following drawings and sketches (option with a two-piece table top 60 × 80 cm and one insert 40 × 80 cm):

Two-piece table top 60×80 cm, rounding radius 20 cm

Two-piece table top 60×80 cm, rounding radius 30 cm

Two-piece table top 60×80 cm, rounding radius 40 cm

The specified dimensions of the drawer parts are suitable for a folding dining table measuring 120 × 80 cm in a shifted position. It is necessary to make two parts with dimensions of 80 × 12 cm and 40 × 12 cm.
Folding kitchen table details:
For the manufacture of a folding table top, you can use wood, chipboard, MDF, natural stone and glass. Chipboard and MDF can be either laminated or plastic coated. The thickness of the tabletop can be from 18 to 48 mm (sometimes more).
Natural stone is the most durable, moisture and heat resistant material. But this material has a significant disadvantage, this is a rather high cost. Alternatively, you can use a chipboard or MDF countertop, decorated with ceramic tiles.
When choosing the color and thickness of the countertop, it is imperative to take into account the design of the rest of the furnishings in the kitchen, especially the thickness and texture of the countertop of the kitchen set.
The legs can be made from the same material as the tabletop, or you can purchase ready-made metal supports. They are of two types: for tables with a frame and for frameless designs.
The drawer side can also be made from the same material as the countertop, or from any other material that is suitable in thickness and texture.
For processing slices of chipboard and MDF, edges are used:

The most budgetary and least practical option is the melamine edge, it is the thinnest and is a paper tape with a density of 120-130 g per square meter. m. Its thickness is 0.1 mm.
The PVC edge differs from it in greater thickness and wear resistance.
The ABS edge is made of plastic and is characterized by increased impact resistance and resistance to external influences.
Acrylic edging is often referred to as 3D edging due to its "bulky" effect. This is the most advantageous, in terms of appearance, option.
PVC, ABS and acrylic edges have a thickness of 0.4 to 2 mm. Depending on the thickness of the countertop and other details of the product, a suitable edge width is selected, which ranges from 18 to 55 mm. On sale there are types of edges with an already applied adhesive layer.
 There are three types of sliding mechanisms for folding tables according to the method of fastening:
According to the method of expansion, there are two types of mechanisms: synchronous and non-synchronous. In the first case, the details of the tabletop are moved apart at the same time, in the second case, separately.
When buying, you need to take into account the length of the mechanism not extended and the maximum size of the inserts (these parameters should be indicated in the characteristics of the mechanism).
For a folding table without a frame measuring 120 × 80 cm in a shifted state with two inserts of 40 or 50 cm, a mechanism 98 cm long with a maximum insert size of 50 cm (48/980 / T2S) is suitable.
To fix the countertop, you will additionally need special locks-clamps. Their number depends on how many inserts the table will have.
Based on the completed drawings, you need to calculate:
For a table without a frame with a table top made of two pieces of chipboard measuring 60 × 80 cm and one insert 40 cm wide, you will need: 1.3 sq. m. Chipboard, 9 m edges (with a margin), 4 metal supports, sliding mechanism, 4 tabletop clamps, dowels and self-tapping screws.
 Instruments:
Chipboard and MDF can be purchased in the form of sheets (boards) of a certain size. The minimum dimensions of a chipboard or MDF sheet are 244 x 120 cm. From the above calculation, it can be seen that for the manufacture of an oval sliding kitchen table measuring 120 x 80 cm (160 x 80 when extended), one such sheet will be needed.
Examples of cutting a chipboard sheet for an oval sliding kitchen table

![]()
The main tabletop will consist of two pieces 60x80 cm in size. In addition to it, there will be one piece 40x80 cm in size. The rest of the material can be used to make stools and as a result you will get a wonderful kitchen set.
You can cut out parts using a jigsaw, rounding is done with a milling machine.
First you need to carefully treat all the sections with a sealant (silicone), let it dry, and then you can start gluing the edge. For this, an iron or a building hair dryer is used.
 It is necessary to pre-clean the sections from wood dust. Then attach the edge so that it completely covers the cut (the width of the edge must be greater than the thickness of the countertop). Turn on the iron and set the "synthetics" mode. Lay newspaper between the iron and the cut and start heating the edge. After it starts to stick, smooth the finished area with a cloth and continue to iron with the iron. You need to smooth it until the edge cools down.
If the edge does not have its own adhesive layer, then any universal adhesive can be used. The cut surface must be smooth and dust-free. Glue must be applied to both the edge and the end and glued together, while smoothing with a roller or cloth. Instead of a cloth and a roller, you can use a wooden block covered with felt.
After completion of work, it is required to carefully check for fragments with a loose fit. Then you need to chip off the edge protruding beyond the edges, remove the remaining glue and sand the edges with sandpaper.
Better bonding can be achieved with a building hair dryer. A jet of air with a temperature of 200 degrees should be directed only to the adhesive layer. Well-heated glue should protrude from under the edge. Remove excess glue only after complete drying.
Assembly is performed in the following sequence:


To do this, on the reverse side of the countertop we apply markings with a pencil to determine the place of attachment of the legs. The optimal distance from the edge of the tabletop to the leg is 10 cm. On the beam connecting the center of the circle along which the tabletop was rounded with its edge, we retreat from the edge of the tabletop 13 cm (10 cm + 3 cm radius of the leg) and put a point. This point will coincide with the center of the support.
The sliding table is convenient and compact. But not everyone has the opportunity to buy it, since the price of a sliding table is quite high. But all craftsmen who are ready to create household items with their own hands have the opportunity to make it on their own. Tabletops can be made with your own hands, using a glass coating or wood. Glass tables or from natural wood species look very nice. But since natural materials are not cheap, it is better to entrust the legs and tabletop to be cut by specialists so as not to spoil the tree. Very beautiful sliding tables - on one leg.
The sliding table is very convenient and compact, it can also be made by hand using a glass or wooden cover.
The design can be chosen at will, for example, to make the legs chiseled or figured. The sliding table will have the following dimensions (in millimeters):

In order to make such a sliding table, not so many materials are required, so the piece of furniture will turn out to be inexpensive, but practical and beautiful. The most important thing is that all parts have the right size and are symmetrical. From the materials you will need:

When the parts are assembled, the modeling process can begin. First of all, it is necessary to mark the nests on the wooden blanks for the legs. In the future, the spikes of the frames will be inserted into these sockets to connect the legs. In accordance with the diameter of the spike, you need to make holes. It is better to “plant” the spikes on the glue, in which case the structure will be much stronger.
First you need to assemble the underframe and only then proceed with the assembly of the main parts. A prerequisite is that the docking at the ends should be as accurate as possible. After placing the spikes in the nests, assemble the structure. It is not recommended to glue the parts right away, it is better to assemble the entire table first, see with your own eyes whether the sizes and joints match, and only then glue the parts.
After all the above steps, you need to start installing the insert. Some differences in the level of one or more parts may occur, which can be easily eliminated with a grinder. The sliding table mechanism is mainly made of aluminum. Installation is carried out either with self-tapping screws or by gluing.

The next step is the installation of the sliding mechanism. It is not difficult to attach it, it is enough to fasten the guides to the long frames, and each of the sliders to its own part of the table top. It is better to mount the sliding mechanism by turning the table on the countertop. It is imperative that after installing the mechanism, you need to check how the center insert will be installed.
Under the tabletop, you need to install two slats the same length as the wooden center insert. This should be done for ease of use - when the insert board is not needed, it will be under the table top and held by slats. After the assembly process, the finished product can be stained.
A round table is considered a real chic and luxury. Today they are the most expensive on the market, especially those made from natural wood. It is also possible to make a sliding table with your own hands in a round shape, the main thing is to have a desire.
In principle, the technique for assembling a round table does not differ from the technique described above. The only thing is that the edges of the countertop will have a rounded shape. For its manufacture you will need:
Using a large compass, you need to cut out the shape of the future tabletop from whatman paper. Only after that cut it out of wood. What kind of tabletop will be - glass or wood, depends on the desire of the owner of the future sliding table.
Glass and wooden sliding tables look much more beautiful if they have one curly leg.
All about countertop

First of all, it is necessary to decide what material and what shape the table will be made of. Pine or chipboard is perfect. Naturally, a pine board is preferable, as it is much stronger, in addition, pine boards are environmentally friendly. Boards are cut and processed according to the size of the future countertop. In the event that the table is nevertheless made of chipboard, the sheets must be drawn into 3 parts, 2 of which will be the same size, and the 3rd part will serve as an insert in the center of the tabletop. Before assembling this piece of furniture, it is better to draw a drawing or use ready-made drawings. In order for it to be strong and last for a long time, it is necessary to observe accuracy in the calculations. Only in this case it will not “float” and will be durable.
The legs are mainly made from bars, which can be purchased at the store. The color scheme of the tabletop and legs should be either the same or differ in color by 1-2 tones. And the countertop should be darker. A prerequisite for the manufacture of a sliding table is the proportionality of the dimensions of the table top and legs. Too thin legs will not be able to hold a large tabletop. The length of the legs should match the overall look - a small coffee table will not look good with long legs. But if the idea is an unusual sliding table, then special attention is paid to marking the center of the bar. Legs can be curly. It is also possible to make a figured leg on your own. To do this, it is enough to study the technique of carving figures from wood.
Tsarga - these are strips that connect two parts with ends. To mark the drawers, you need to put the table top on a comfortable surface “face down”, but before that it is better to lay a soft cloth so as not to damage the surface. It is better to make each of the blanks of the tsargi a little larger than the intended size. The excess can always be removed, but the shortcomings of the length - no. The drawer is processed by a lathe and a milling cutter.
All about Assembly
The most important step is assembly. Particular attention must be paid to the connection of the side frames to the leg or legs. To do this, each spike must correspond to a pre-prepared groove. Do not forget about the grooves - they provide a strong connection. When applying glue for structural strength, after drying, all its excess must be removed with sandpaper. In any work, inconsistencies can occur, for example, mismatched edges of the table top. This is easy to fix with a grinder. Then clean with sandpaper and varnish the surface.
The main and clear advantage of a do-it-yourself sliding table is its versatility. A special mechanism helps to make a large dining table out of a small compact table. That is why it is convenient for small apartment rooms. It does not take up much space, but allows you to seat about 9-10 people.
Due to the fact that there is a huge amount of material on the trade market for creating a sliding table at home, it can be made not only multifunctional and convenient, but also beautiful and stylish.
You can classify tables that are moved apart as follows:
Transformers.
Sliding tables got this name due to their unique ability to transform. From a seemingly small table, you can get a quite roomy dining room. The tables are round or oval in shape. The main distinguishing feature of these tables is the increase not only in their size, but also in height. You can make such a table with your own hands. To do this, it is enough to have a drawing. In addition, transformers have recently become very popular not only because of their convenience, but also because of their design excellence. Basically, transforming tables are made of wood or glass. Mirrored ones look very nice and save a lot of space in an apartment or house.
Standard sliding tables.
Tables of this type are no less popular. They are made of natural wood, fiberboard or chipboard. The advantage lies in their compactness. In addition, making a sliding table with your own hands will not be difficult. It is enough to follow the instructions for their construction.
Any sliding table is comfort and versatility. All of them are practical and economical. You can make a table not only for eating, but also for drawing, games. A do-it-yourself extendable table is a great way to make a child's room comfortable and stylish. In addition to all the advantages, transporting sliding tables is much easier than conventional ones.
A do-it-yourself extendable table for a children's room is an ideal solution, especially if there are several children in the family. In addition, it can be combined with a bed. Well, the most important positive side of the do-it-yourself sliding table is its economical cost.
We have been working since 1999
The idea of creating our company was dictated to us by the situation in the furniture market in those not so distant 90s, when there was practically no concept of comprehensive service for handicraft furniture makers who could work with their hands and head.
In the very first months of our work, we realized that we were on the right track. When communicating with the people we served at that time, there were quite reasonable suggestions for improving the services received and expanding the range of related products. Thus began our rapid development.
In 2005, it became obvious to us that gradually our customers have the need and opportunity to buy goods OnLine. In this regard, it was decided to create an online store for modern furniture makers and retail customers. In our new service, we have provided a quick opportunity to understand the huge number of goods needed for the manufacture of individual furniture.
The online store of the DEKS Trademark gradually gained popularity not only in its region, but throughout Ukraine. Many furniture makers from different regions began to cooperate with us, where the service is not only online, but even offline, is still at a very low level. Gradually, we began to have clients from million-plus cities, in which every year it became more and more difficult to move from point A to point B.
And so, from year to year, working to improve our service, by 2010 we became leaders in online customer service in such a highly specialized niche as furniture fittings. In the same year, a decision was made to exhibit photographs of goods of our own production: wardrobes, hallways, sofas for online sale. This decision was also successful and led us to expand the range of furniture and agreements with other manufacturers to sell their products on our site. Today we are very careful in choosing our supplier partners and are constantly working to improve the level of service for our customers.
It's not just the words that decorate this text. Every employee we hire adheres to the company's core value - We Deliver What We Promise Our Clients First Time And Right On Time. The same requirement applies to our suppliers.
All reviews that are in the "Reviews" section are really written by our customers, and not far-fetched. We always welcome constructive criticism and will be grateful for it. We hope that cooperation with us will be useful for you, and this will make life brighter.
We work in Ukraine and EU countries
We love and appreciate every client, so we are always looking for opportunities to make your life brighter.
Trademark DEKS has found an opportunity to improve the benefits of working with us and raise the level of service for you.
We are pleased to announce that we have reached an agreement with the Efficient and Reliable Delivery Service Provider in Ukraine - "Nova Poshta" that from 15.07.16 furniture fittings and components purchased in the Largest Online Store of Furniture and Furniture Accessories TM DEKS will be delivered FREE OF CHARGE when ordering from 1500 UAH. with full and guaranteed cargo insurance. And that is not all!
Furniture of our own production, such as a wardrobe, a hallway, a sofa, will be delivered to any place in Ukraine ABSOLUTELY FREE OF CHARGE! This offer will in no way affect the increase in the cost of goods and is a good bonus for EVERYONE who wants to save Time and Money in purchasing Furniture Fittings and Components, as well as Finished Furniture of Our Production! All other cargo delivery companies - delivery is PAID according to existing tariffs.
Delivery to any EU country is also paid. The cost depends on the dimensions and volume of the cargo and is negotiated on an individual basis.
Huge selection of furniture fittings in Ukraine
We wrote this title not as another PR move (by the type that we are the most, the most .... etc.), but we really want to inform you that on our website it is possible to find almost all products related to furniture fittings and components, which are on the Ukrainian market.
To make a quick and correct purchase decision, it is possible to compare products with each other. We also provide absolutely FREE additional services for the selection of goods (not in our catalog of goods), which is necessary to complete a complex order.
If you are a FURNITURE MANUFACTURER, answer a few questions during registration and receive special prices on an ongoing basis,
We hope that by purchasing goods and services in our online store you will always remain in a good mood and your life will become Brighter! :)
Comprehensive service for a modern furniture maker
This means that in our company there are no missed stages that exist in the production of customized furniture.
From us, the furniture maker acquires all the necessary components and materials - from small things to the largest and dimensional materials, from almost all suppliers who import their goods to Ukraine. We also carry out all types of services for the processing of board materials, we manufacture MDF facades, doors for wardrobes and dressing rooms, and much more ...
Completed orders are sent throughout Ukraine (for delivery benefits, see the "DELIVERY" section).
In addition to highlighting individual designs, we have an Interior UV Printing service. With its help, it is possible to apply in high quality an individual drawing or photograph on any hard surface up to 50 mm thick and with a maximum size of 3000*1650 mm. The most valuable thing in this service is that the ink used in printing is original - the Japanese manufacturer Mimaki, which does not affect human health.
Try to be served in our company and see the benefits and comfort!
We carry out complex orders
If you are reading this text, then you are really interested to know what kind of COMPLEX orders we carry out.
This pleases, which means that you have already encountered the need to perform non-standard services for difficult moments when creating furniture.
As a rule, everything that can be standardized is sold in specialized departments of hypermarkets or bazaars.
Our company was originally created to perform non-standard tasks in the furniture industry and therefore enjoys great popularity.
As a rule, in the manufacture of individual furniture, the furniture maker is faced with uneven walls and floors after repair, and at this moment there are immediately difficulties with the manufacture of non-standard furniture forms. We have all the necessary equipment to solve these problems and also professional consultants who will help you get out of a difficult situation almost like a Hero :). This does not mean that every manager who serves you on the trading floor or by phone will be able to solve any complex issue. To solve or fulfill complex orders in our company, you need to inform us about this and you will be contacted by the necessary specialist.
Try it and see for yourself!
We hope that by purchasing goods and services in our online store, you will always remain in a good mood and your life will become Brighter!
Individual entrepreneur details in the contract include mandatory and additional information....

Storage of cash in institutions and at individual entrepreneurs is carried out at the cash desk. For analysis...

The problem that users of 1C: Pіdpriёmstvo encounter is “Error: Field ...