Proverbs and sayings about May HORIZONTALLY: 2. May will deceive - in ... will leave.4 ....


Design solution, stylish element decor, a great gift for loved ones and an exciting activity for parents and their children - creating photo frames with your own hands from improvised materials. Most important events and pleasant memories captured in the pictures will serve as an excellent decor for your home. How to make a photo frame beautiful and creative, we will tell in this article.
The most common way to make a photo frame is out of cardboard. This goodness is in bulk in almost every house, we cut it out the right dimensions. You won’t have to think long about how to decorate such a photo frame, pieces of fabric, scrapbooking paper, buttons, quilling paper, brooches, figurines, emoticons, ribbons and beads, tubes from bright magazine pages will be used.
If you have the opportunity, use glass as well so that the photo frame has a quality look.


Making a photo frame can start with buying a ready-made regular frame, just add it with individual elements that you like best. Photo frames made of shells and sea stones, twine, anchor figurines are suitable for decorating photos from summer sea holidays. Such parts are easy to seat on hot glue from a gun.


Decor with beads and ribbons for lovers of bright and shiny jewelry:

Consider one of the master classes on how to design a desktop photo frame made of cardboard and paper on a stand.


Step 1. Material preparation. Cardboard, decor paper, beads, ribbons, glue, stationery knife. Cut out the desired size from cardboard. back, stand and front.


Step 2. Decorate the main parts. We glue the decorative paper cardboard, which is the back, as shown in the photo.


Step 3. Fold from scrapbooking paper different sizes ladder, making a visual frame. We sew on a typewriter with a zigzag. Of course, you can not do this, but use, for example, a special decorative tape or just stick it on top.


Step 4. We collect the stand and bend the end. We make holes in the fold with an awl. In the future, brads, small carnations are inserted there.


Step 5. Install the stand. We take cardboard and thicken the place where the stand on the brads will be attached, we simply glue pieces of cardboard. We connect the stand and glue the cardboard to the back.


Step 6. The most important thing is to select the decorations and glue them to the frame. These can be flowers, stickers, ribbons and beads.


Making photo frames will be an interesting educational activity for children with parents. Learning quilling, decoupage, pasting and painting will captivate with an interesting idea to create your own crafts for decorating a children's room.
Old puzzles will certainly lose their details, which cannot upset, paint them or leave the details with the sky, water and grass, glue them randomly to the frame or just leave a smooth outline around the perimeter, if the drawing itself allows it, it will be even more beautiful.


Photo frames with the help of paper modules contribute to the development of fine motor skills of the hands, and spare parts for quilling will create a voluminous carpet of flowers and animal figures. It is easiest to glue on paper with ordinary PVA glue, which is safe and not difficult for children.


Decoupage from small parts involves the application of thick glue. Choose safe, odorless adhesives. Buttons or details of the Lego constructor will create bright frame if you do not have bright buttons, but have old ones, you can cover them with paint or varnish.


decoration eggshell, cereals, seeds, vermicelli, coffee also have a place to be in creativity, especially since such decoration materials can be painted with paints and combined with other decor elements, creating unusual patterns. Photos in the design of food can be placed on the walls of the kitchen or dining room.


Do not forget that frames are often molded from plaster or dough. The dough recipe is very simple, the same as for regular modeling. You can add food coloring to it or color it after it dries. Flour, salt and water are taken in parts 3:3:2. Make a solid frame and wait for it to dry, or if you have modeling skills, create various figures of your child's favorite cartoon characters or just animals.


The frame for a picture is as important as a handbag for a woman - it completes the look.
All famous artists made baguettes for their paintings on their own, and if the pattern on the frame turned out to be too complex, they ordered them in the studio.
Since the Renaissance, picture frames have been made entirely of wood. Complex carved monograms were covered with gold leaf and silver. Sometimes the process of creating a baguette lasted many months.
Modern craftsmen and needlewomen are much more fortunate, because the design of the next work in a baguette has become much easier, and the choice of materials has increased significantly. In framing workshops for a picture painted on canvas or embroidered on canvas, they will select the most good combination frames and passepartout.
However, some creative people nevertheless, they are true to ancient traditions and create exclusive design for their works.
Frame made of dry branches
A frame made of bizarre branches or even log cabins is perfect for an interior in the Russian style.
They fasten the branches with universal glue, a glue gun, or simply tie them with twine.

Frame from old newspapers
Old newspapers and magazines are great material for minimalist or vintage frames. To create such a baguette, in addition to newspapers, you will need a clerical knife and PVA glue.

Newspapers are rolled into tubes of the same diameter, sealing the free edges. Then, with a clerical knife, cut the blanks into parts of the desired length, connect them together with glue or attach them to a cardboard base.

You can also make fancy flowers from newspapers, which will be a great addition to the picture and the interior as a whole.
papier mache frame
Papier-mâché is a favorite material since childhood. From it you can make the most unusual interior things. Its main advantages are lightness, simplicity and accessibility.

Papier-mâché frames can be made in the form of a circle, an oval, a trapezoid... The list is limited only by the master's imagination.

Such frames will perfectly complement any interior.
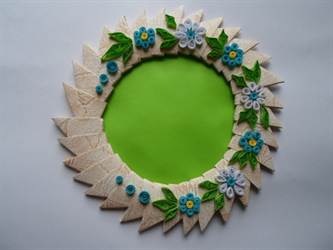
Frame from the mass for modeling
Quite often, a simple picture or photo frame needs additional decor: additional elements, volumetric figures, complex compositions of the type of bas-relief or high relief. papier-mâché in this case will not be able to accurately convey the idea of \u200b\u200byour plan.

To create three-dimensional elements, you can use the modeling mass. It can be ceramic clay, and polymer clay or plastic, and paper glue, and salt dough - the most affordable of all materials.

Due to the plasticity and pliability of the mass, you can create a frame of any shape and for any interior.
Skirting board frame
Lightweight polyurethane strips with patterns have found their application not only in the decoration of streams. They are also used by needlewomen to decorate their paintings.

When creating frames from a ceiling plinth, accurate measurements of the length and width of the baguette, as well as the angle of connection of the parts, which must be strictly 45 °, are very important.

Quite often, such baguettes are covered with gold or silver paint and opened craquelure varnish, which gives the picture an old, antique look.
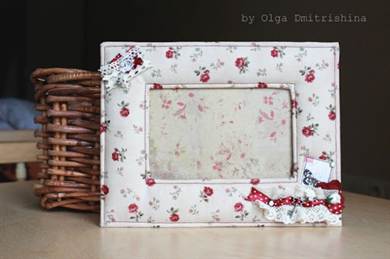
fabric frame
To give a cardboard or plywood frame a presentable look, patchwork comes to the aid of needlewomen.

From various patchwork pieces, you can create a unique frame.

The frame can be made of plain fabric, decorated with patterns of stitches and appliqués.
Hardware frame
After playing a little with the fabric, you can take up the buttons. Frames made of sewing accessories will add bright colors to the interior and create an atmosphere of comfort.

There are two ways to create such a frame: sew buttons onto fabric or glue them onto tinted cardboard or plywood.

Such pictures will decorate the interior of the children's room.
Frame made of pebbles and shells
By the same principle, frames are created from sea pebbles and beautiful shells.

For such baguettes, it is better to use plywood as a basis, not cardboard, because the finished work will be quite weighty.
Frame of cereals, pasta and seeds
Another way to decorate a cardboard frame is to decorate it with a pattern of various seeds.

Melon, watermelon, corn, sunflower, rice, buckwheat, wheat, coffee - seeds of any plants, as well as peas, acorns and chestnuts, are useful.

Take a look at pasta: they make unusual compositions and mosaics.

Pasta frames, painted in gilding and aged with craquelure varnish, look very impressive and perfectly complement the interior of a Provence-style kitchen or hallway.

Dried flowers frame
Another great way to decorate a frame or passe-partout is a bouquet of dried flowers.

Walking in the forest or in the park, you will surely find many beautiful flowers, leaves, spikelets. You can also use branches with berries of barberry, viburnum, mountain ash, elderberry, etc.

Take Special attention collecting and drying plants so that they do not lose their decorative effect. It is recommended to collect flowers in a dry late morning. It's better to dry them. natural way- in the shadow. But to speed up this process, in some cases, you can use an iron (for autumn leaves and reed leaves) and microwave oven(2-3 minutes on medium power for gray and silvery small flowers).

Large flowers and buds should be treated with a solution of glycerin and water at a ratio of 1:2-1:4. The flower is immersed for 1-2 weeks in the resulting solution (the flower should change the color shade), then it must be hung up to dry with the bud down to fix the shape.

Using different techniques and combinations of materials, you can achieve the most amazing results!
We wish you inspiration and creative endeavors! 🙂
Master class "Wooden frame for photos and paintings"
For a family photo. Master Class
Zhbanov Alexander Semenovich, teacher of fine arts and technology, MBOU "Perkhlyaysksya OOSh" Ruzaevsky district of the Republic of Mordovia.


Hello, dear inhabitants of the Country! I present to you the picture frame I just made and suggest you follow my example)
Naturally, it can be anything, not necessarily a frame. Using a similar technique, I made a vase, a candlestick, in general, who has enough imagination for what))
So, we need:
The base is a flat (!!) wooden frame, which you can buy at any art store or make yourself from four small boards. My frame size in light is 30x40. It will be the basis for the future frame.

Polyurethane ceiling plinth- sold on any construction market. Sold individually, usually each stick is 2 meters long. One stick was enough for me for a 30x40 painting.
In principle, you can just buy a plinth already with a pattern, make a frame out of it and not sculpt patterns with your own hands - but we are not looking for easy ways :)
You will also need polymer clay, putty, pva (or gypsum), paint, glue. But more on that below.
So, we carefully measure the plinth, cut it at 45 degrees in the right places, glue it together and glue the resulting frame onto a flat wooden one. For reliability, you can also use self-tapping screws.
I recommend stepping back from the inner edge wooden frame by 0.5-1 cm so that the inner edge of your future frame is not too thick. And, besides, such a step will decorate your future masterpiece.

We turn the frame over and see that on the reverse side the joint of the wooden frame with the plinth forms an ugly gap. We need to cover her up. This can be done with gypsum, and in the absence of it, prepare the mixture yourself by mixing construction putty with a small amount of PVA glue and adding a little starch for density.

It turns out something like this (I remind you, this is the reverse side of the frame).

Now we start making decorations for our frame. The process is simple, but long, especially if your frame is large and you want to decorate it generously.
I opted for the grape design. Printed sheets from the Internet different shapes and size, cut out.
Now oh polymer clay. I can’t work with self-hardening one, it loses its properties very quickly right in the hand. And I like to be distracted, so for myself I chose Sonnet baked clay.
It took me a pack and a half to get to work. Never leave all the clay in the air, cut off as much as you need, wrap the rest in a bag.
Open the clay, cut off a small piece, knead it in your hand. To work with clay, I use a piece of facing tile - I roll it out, a jar of pills (I roll it out) and a sharp knife with a thin blade. We roll out the pancake, put our pictures, circle with a knife, remove the excess, carefully apply veins on the leaf with the same knife.

For the vine, we thinly roll out a small piece of clay, you can do it right with your fingers. Carefully twist the ends onto a toothpick or cotton swab. And into the oven. The temperature and baking time are always indicated on the package.

Clusters of grapes - I made the base of a conical shape (at the back, that is, from the side of the frame, it is naturally flat), and the grapes are just small balls, I stretch it a little, rolling it between two fingers.

We alternately apply the grapes to the base, close the top with several leaves. We bake the already collected bunch. Note that if you combine individual pieces of clay and bake them, they will no longer crumble.

I took a large plinth, the corners of the frame turned out to be deep, I had to improvise how to close them more generously) It seems a bit boring with some leaves, so I decided to plant roses in the corners. Where can roses come from among grapes - don't ask, I don't know))
For roses, roll out a small sausage, you can irregular shape, never mind.

Gently twist the edge of the sausage inward and twist it, picking up the clay a little, this will be the core of our rose.

We roll out the pancake, cut out three flat ovals, it’s not bad if they are slightly pointed (narrowed) on one side. We stick the ovals in a circle with the narrower side down around the core of the rose.

We make 3-4 such circles of three petals. In each next circle, we make the ovals of the petals a little larger and stick each petal so that it covers the junction of the two petals of the previous circle.
So your rosette will turn out more round, without corners.
Having made 3-4 circles of petals around the center, cut off the stem (but not at the root, it is better to leave a little, so that later it would be more convenient to fit it to the right place, you can cut it off after) and bake.
Please note that in the picture the rose is in a decanter - it is very convenient to keep it there so that it does not wrinkle while you cut out other petals. Or, alternatively, you can put a bottle in the neck.

Bow. We roll out (or cut out of a pancake) a long strip, fold the edges to the center. We make a bow knot with a small square of clay. We bend the parts of the bow with a toothpick.
Everything is shown in the picture.

We make two more stripes about half as long as the strip for the bow. We fold each one approximately as in the picture. Please note that each of the two stripes must be folded in a mirror, and not in one direction.

This is how we got a bow. You can bake already folded, but I advise you to bake in parts, it will be more convenient when you glue it.
Important - do not leave baking for later. When you have made a figurine, try to bake it within 2-4 hours, otherwise the clay may lose its properties in the air. Or just put it in a bag.

Let's start gluing. Because the corners of the frame turned out to be deep (a wide and high plinth was taken), then a lot of leaves would have to be laid. So I decided to make some kind of stand.
I just took a piece of wood and glued it on.

Covered with clay on top, removed it, keeping its shape, and baked. Then I glued it on a block and already glued leaves and roses on this stand. I prefer to glue on instant glue such as supermoment.

Well, then we glue, as fantasy tells us.
Those parts that are brownish in the picture are not another clay, but those pieces that I began to bake and forgot about them)) That's how they burned out) But for us it doesn't matter, we'll paint on top anyway.

We cover the finished frame with bronze paint in 2-3 layers. Because metallic paints usually have poor hiding power, I recommend painting the frame first regular paint, for example, brown, and there are already two or three layers of bronze on it. Dry, varnish.

Are you fond of painting or do you embroider original canvases? Then you are familiar with the problem of storing your own works. And so you want to decorate your house with beautiful paintings, panels or crafts! A great option is to place such works on the walls. All you need is a frame. Of course, it can be purchased at a specialized store, but not always. standard sizes of these products correspond to the sizes of your works. In addition, ready-made frames are not cheap.
We offer an alternative option - to make a frame for a picture or a panel with your own hands. The advantage of homemade picture frames is not only the ability to choose any size. Their production will cost many times cheaper than a similar purchase in a store could do. In addition, you will not doubt the quality of materials and workmanship. Our master class is devoted to how to make a picture frame on your own. Shall we start?
We will need:

 Decor options
 An ordinary wooden frame may seem boring and inexpressive to you. Try to revive her. There are many ways to decorate a picture frame. Do you want to give her tenderness and softness? Then use a cloth. To do this, attach the frame to the fabric, circle along the contour, leaving a few centimeters along the outer edge. Mark the center on the fabric inside the frame by drawing diagonal lines, then cut out. Wrap the frame with a cloth, and process the joints with adhesive tape or glue a narrow band. Make flowers out of fabric and glue them to the frame.
You don’t know what to do if you need to frame a picture painted for country house? Use regular brushwood. Cut it into pieces a little more than the width of the plank, grease the frame with glue and carefully attach them parallel to each other. By the way, this decor option can also be used to decorate small photo frames. Experiment!
Proverbs and sayings about May HORIZONTALLY: 2. May will deceive - in ... will leave.4 ....

Popova V.N. primary school teacher MBOU "Kishertskaya secondary school" Rebus is ...

To learn how to compose and understand puzzles, you should figure out what they are from ...