INSTRUCTIONS AND PROPHECIES OF THE Blessed MOTHER ALIPIA GOLOSEEVSKY, Kyiv...


Every girl dreams of having a big house for dolls. If you want to give a child such a dream, then make it with my own hands. How? Read the article.
Currently, toy stores sell not only dolls, but also a lot of products and things for them. The most interesting thing is that for your favorite doll you can buy not only a car, but also a whole house with large quantity rooms. However, this purchase will cost a lot of money.
But after all, you can make a house on your own, and from different materials. Housing for your favorite dolls, made with your own hands by the whole family, will be a joy to your child. Especially if he takes an active part in its manufacture.
There are many options for Barbie doll houses that are sold in online stores. However, you want your doll house to be completely different from others. To do this, apply your skills and turn on your imagination.
Materials for the product:

Progress:
Many girls prefer to play with Monster High dolls. Houses for such dolls are not as glamorous as those of Barbie. Pink wallpaper on the walls will be useless for gloomy Monster High. They fit better dark wallpaper preferably with cobwebs in the corners of the room and skull lamps on the ceiling.

Materials, tools:

Progress:
If you have an idea to make a plywood house for your daughter's dolls with your own hands, then below you will learn in detail how to implement this idea.

Materials, tools:

Progress:
Cardboard comfortable material for such products. From it, mothers will be able to make a house on their own, for this you only need patience, perseverance and time.

Material, tool:

Progress:
If you have abandoned boxes lying around, then use them. Please your girl with a new long-awaited toy - a house for dolls.

Moreover, for the manufacture of the product you will need only a few hours of your time. You will only need to make a room for the doll with a window and a door from each box. And then glue these rooms into a single house.
A wooden house for dolls will turn out to be very durable and will look as natural as possible. Your daughter will love this house for sure.

Materials, tools:

Progress:

Every house should have lighting, and the dollhouse should have it too. Next, we will learn how to make it yourself.

Materials, tools:

Progress:

Dollhouse is every girl's dream. Store shelves are full of a variety of options for houses, but prices often bite a lot. You can give your daughter a lot of positive things by making a house with your own hands. So you and your baby can choose wallpaper, accessories, as well as the desired size of the future house. In our article you will find several master classes at once, drawings and templates that will help you make a house for dolls.


Dimensions are in millimeters.

The dimensions of the parts in the diagram are in millimeters.

Most affordable way do Dollhouse ik is to make it from cardboard boxes, which are found in every home. In addition, the house itself can later be pasted over with the remnants of wallpaper, any other paper, painted or sheathed with fabric. Also, over time, you will have the opportunity to complete the construction of new rooms and floors.
To create a cardboard house, prepare:
First, cut the box in half.
The bigger the box you choose, the bigger your home will be. For Barbie dolls, a box, for example from a microwave oven, is suitable, and small boxes can also be used for baby dolls or small toys.

From each of the halves, cut off the folding tops of the box.

From one of the cut pieces we cut out the frontal part of the roof. On one side of the second piece, we make a rectangular cutout with a clerical knife, which will serve as an exit to the stairs. We glue the parts with the help of adhesive tape.

From the remains of the box, we cut out 2 parts for the roof and the floor for the floor in the attic. In the floor we make exactly the same rectangular hole for the stairs. We glue the parts with adhesive tape.

We will draw a drawing of windows and doors on the front side of the house, and then cut out all the details with a clerical knife. From the remnants of the box, cut out 2 stairs, glue with tape.


Girls who are fond of paper dolls will certainly like houses for them. Making paper houses is easy, and most importantly, their appearance is completely dependent on the child's fantasies. Adult girls will be able to make such houses on their own, and absolutely crumbs cannot do without the help of adults.
The very principle of creating houses for paper dolls is somewhat different from creating houses made of cardboard or plywood. The most advantageous material in terms of durability for such houses is cardboard. Drawings of furniture are applied to it, cuts are made for doors, windows, cabinets and beds so that the dolls can rest and have a snack. To create each of the rooms you need to approach with special attention and arrange the rooms in a logical order so that from each room there is an exit to the next.
Book house.
With the help of the book house, paper doll lovers develop not only their imagination, but also fine motor skills. The pages of such a house can be made of thick cardboard, and each of them is pasted over with office paper or wallpaper and drawings are already applied to them.
On each spread of the book, a room is drawn in a specific theme: a kitchen, an entrance hall, a bedroom, a bathroom and a nursery. A child can put his puppet heroes at the table, bathe in the bathroom, put them to bed, brush their teeth, pushing them into the slots in the appropriate places. Such a house can be put on a corner, or you can just flip through.


House in a notebook.
Houses in notebooks are also convenient for playing with paper dolls. Each spread is also drawn up in a specific theme. Household items are cut out of colored paper and glued to a place previously drawn for them. Each door opens, on each shelf you can put the necessary items in everyday life: clothes, shoes, a towel, a comb, Toothbrush, dishes, books, toys, etc.


House 3D.
Creating 3D paper doll houses is very easy. A4 sheets are folded in half and drawings are drawn on each half. For example, on the lower part there is a floor and a bed, and on the upper part there is a window and a closet. Putting the sheet on the table with the lower part, the impression of a full-fledged room will be created. To keep the design better, and the sheets do not wrinkle, each of them is recommended to be glued to thick cardboard. Each of the rooms is thought out so that there is a transition from it to the second or the door to the street.


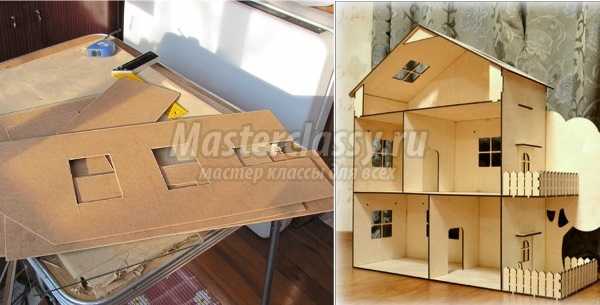
Houses made of plywood, as a rule, last much longer than those made of paper or cardboard. First you need to make a drawing of the future house. We suggest using our drawing. All dimensions are in centimeters.

First of all, we transfer our drawings to plywood and cut out every detail with an electric jigsaw. For a quick assembly of the house in the future, we recommend signing every detail.


On those details where you decide to place the windows, we mark them up.

Since the parts are in the middle of the sheet, we first drill several holes, and then cut them out with a jigsaw.


We carefully sand every detail.

We assemble the house according to the drawing. First, we glue the parts, and then, for greater fixation, we drive a couple of nails into each joint.


After the house is fully assembled, paint it white. You can choose any other.


Here is such a house turned out from the drawing above.

A simple one-story house template.


In order for the house to hold, and on its floors it was possible to mark furniture and the dolls themselves, we would recommend that you use cardboard as a basis.
To create a house you will need:
First of all, on a piece of cardboard you will need to draw a drawing of the future house. We used a cardboard blank measuring 110x74 cm.

We bend 2 side walls of the house. In order to make it more convenient to bend them, before the process itself, walk the blunt end of the scissors along the future bend lines.
From a piece of cardboard, cut out 2 rectangles measuring 50x30 cm and 25x27 cm. This will be the floor between the first and second floors and the partition between the rooms on the first floor. Glue.

We cut out another blank for the floor and for the partition on the second floor, as well as blanks for the attic. Then we cut out the windows with a clerical knife and glue the house from the middle with wallpaper or paper.

We glue the house outside with wallpaper. The roof can also be pasted over with wallpaper, or, for example, you can cut cardboard into strips of 3x31 cm and stick them with an overlap. Window frames are also made of cardboard or ordinary colored paper according to the measurements of the cut out window.

Having made your own dollhouse for your daughter, you will give her a whole game world in which she can develop her imagination.
The dream of any girl is dolls in beautiful dresses, her own doll house with furniture, a fluffy carpet, pets, where dolls can live their carefree life: relax, visit, celebrate holidays and return to it from travels.
In stores, prices for dollhouses start at 1,500 rubles. And these are just modest one-room apartments, and two-story house with stairs, balconies and a bathroom will cost 9000-15000. There are specimens that are completely sky-high - this furnished house costs 25,000 rubles above the height of a child.
If you are not ready to pay such an amount for a doll apartment, our master class is for you! We will make a house for a doll that will not cost a single ruble!
You will need:
Cost: free - from what is.
Production time: 1.5 hours.
Number of participants: we do together with the children.

We examine the material that we have in stock. We choose the decor option "from what is."

We level the floor inside the future house. For this we cut side part box covers. It is perfectly mounted in unevenness on the "floor". Glue it on with tape.


We choose the wallpaper with which we will paste over the doll's room. Glue them to the box.


Then we select a border for them or cut strips from other wallpapers. Glue the border. We lay linoleum and put the carpet.


Now we install the furniture and introduce the dolls to the new home.

But you don’t have to stop there: you can cut windows with a clerical knife and decorate them with curtains. Make opening doors, add a few more rooms out of boxes. Then make an external decor.
Thus, you can make not only a house, but also a shop, a cafe, a school, a hospital for dolls. Unleash your child's imagination and help bring his ideas to life!


Every little girl dreams of her own dollhouse. Nowadays, you can find a lot of them in stores, but they are all of the same type and expensive. From this article you will learn how you can make an original dollhouse without spending a lot of money. Such a house will be unique, the child will be able to furnish it the way he wants. Your whole family can have a great time creating their own masterpiece.


There are many different workshops for making dollhouses. At the same time, a variety of materials are taken: wood, plywood, drywall, laminate, boxes, bookshelves, folders for documents. It's still far from complete list offered materials.
The front wall of the house is either not made at all, or made in the form of an opening door. This is necessary for the convenience of the game. We suggest you choose what is right for you and get to work.
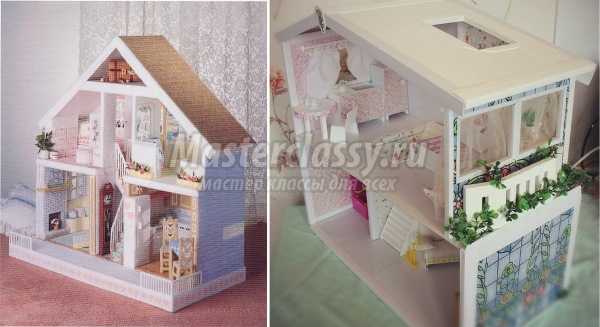
The option of making a dollhouse for girls from wood is one of the most popular. Undoubted advantages of such a house are its strength and durability. It is easy to decorate both from the outside and from inside. However, for making wooden house male help is required.


If the house is built with high quality, it will not be distinguished from the purchased one. You can make drawings for building such a house yourself, or you can use ready-made ones. You can attach wheels to such a house and then it will become mobile.

What will be needed:
 Approximate drawing of a plywood house
Step-by-step instruction:


Mastur class for making a plywood dollhouse, see the following video.
See the required drawings from the video below.


Many of us after repair have pieces of drywall that are no longer needed. Why not use them to please your little princess? From it you can make a wonderful house for dolls.
A drywall house has a lot of advantages, including: ease of working with it, its lightness. Even if you do not paint the walls of the house after assembly, they will still look neat thanks to its white color. A significant disadvantage of such a house is its fragility. It is worth a little pressure on any part of the house, as it will immediately break.
In order to make a drywall house, you can use the diagram above, or you can simply make cruciform partitions to save space in the nursery. These partitions will separate the rooms among themselves, there will be no external walls and a roof.


From large sheets drywall can be made full-fledged beautiful house. Watch the master class in the next video.
If you have sheets of packing foam lying around your house, you can build a house from them. For work you will need:
 Thin foam house frame
Step-by-step instruction:
 Design interior decoration At home, you can offer to come up with a daughter
Home decoration can be very diverse. You can use a transparent plastic box, make printouts underwater world and put an aquarium in the house. You can print pictures, lay tablecloths on tables, add toys to dolls. Let your imagination run wild and you will get the most wonderful dollhouse for girls.
You can make a great dollhouse out of a bookshelf or shelving unit. It is very easy to make, because you already have finished base. To decorate the house, use cardboard, wallpaper, self-adhesive paper, and wrapping paper is also suitable.

Include your daughter in this creative process as well. She will be able to act as a designer for her dollhouse.
If the house is located permanently against the wall, then you can make the roof of the house with black electrical tape, gluing the contours. Glue in the same way chimney. If necessary, rearrange the house to another place, the electrical tape can be safely peeled off without damaging the wallpaper in the room. You can buy ready-made furniture for dolls or show your imagination and make it yourself.
 By placing the house against the wall, the free space in the nursery will increase.
Your daughter asks for a dollhouse, but the garage is gathering dust old chest of drawers? You can breathe a second life into old, already unnecessary furniture. Treat your child by making a dollhouse out of an old locker or chest of drawers . Such houses are very convenient for those whose children play with large or tall dolls.
First of all, you need to know the height of the dolls. This is necessary so that the dolls can be placed in rooms in full height. You may have to combine 2 shelves by removing unnecessary partitions. Work carefully, trying not to break the inner walls of the cabinet or chest of drawers. In place of the partitions that we removed, a void that we do not need will appear. It can be glued with thin slats that fit in size.
After waiting for the glue to dry completely, treat the walls of the chest of drawers with a thin layer of putty. After that, the chest of drawers must be sanded, then it will become even and smooth. Using a jigsaw, you can cut windows.
 house from old furniture will look very solid reliable
The final step will be the design of your house. The outside can be painted. You will most likely have to paint it in several layers in order to paint it over. old color dresser. The walls inside can be pasted over with wallpaper, colored, packaging or self-adhesive paper. And you can also just paint them. We arrange furniture, hang pictures and mirrors on the walls, curtains, spread carpets and invite dolls to housewarming. Now the dolls in your daughter's room will always be tidied up!
Budget option Making the dollhouse is corrugated cardboard. With it, you can create a wonderful toy that will delight your girl for a long time.
We will need:
 The girl can independently "make repairs" in the new house of her dolls

Let's start making a house:
The structure is assembled. You can start decorating.
Inside the walls it is better to paste over with decorative paper or cloth. So you hide the seams in the places of gluing. Outside, the walls can be decorated to your taste: paint, paste over. Decorate your home with beads, rhinestones, pebbles or other items of your choice. Pay attention to the fact that the decor elements hold well on the cardboard, otherwise the house will lose its attractiveness during the games.
Arrange the furniture and invite the child to play.
 In a house made of cardboard, it will be possible to re-paste the wallpaper without any problems if the old ones get bored
Master classes on making a cardboard dollhouse, see below.
Very easy to make dollhouse out of boxes. For him, you will need to choose the right size boxes. The size will depend on the height of the dolls for which this house is made. The number of boxes will depend on the number of rooms you are going to make. One box, one room. Such a house can be made multi-storey by gluing the boxes one on top of the other. This will save space in the room.
It is necessary to fasten the boxes together so that its top is on its side, opening the view inner space rooms. It can be done different ways: using a stapler, glue, double-sided tape. Cut out windows. We decorate the house according to your taste. We furnish the furniture and delight the girl with a new toy, for which you spent a minimum of money and effort.

 Cardboard house - one of the most simple options to please the daughter
Watch the following master class, which shows in detail the process of making a beautiful dollhouse out of a box.
A great box house is easy to make! See the following videos for more details.
If there is very little space in the children's room, you can make a folding dollhouse.
For such a house, we need 4 folders for documents. We glue each folder inside beautiful paper- this will be wallpaper for the walls. Decorate the clip of the folder with a cloth, making a kind of curtain out of it. Print out interior items on the printer and stick on the walls. The house is ready. It remains to open the folders and put them vertically. Add the necessary furniture.
You can make a separate room from each folder of folders.


In dreams, every girl has thoughts about her own doll house. Modern toy stores are full of different goods ... But the doll houses in them are almost all of the same type, and, moreover, unreasonably expensive.
There is an opportunity to avoid unnecessary family waste and at the same time to satisfy and please the child - to make do-it-yourself dollhouse. This idea, in most of its variety, is budgetary, and the craft itself will be one of a kind, exclusive. In addition, the happy owners will be able to furnish unique housing for Barbie or Monster High own will and discretion.
The “construction” of a new house is best done by the whole family. First, at certain points a rough male power(especially when working with wood). Secondly, the child will be able to control the entire process and make adjustments, expressing certain wishes. Thirdly, when creating a masterpiece, decorating and furnishing, you will need the help of your mother, her innate sense of style and taste. Therefore, in the work on the lesson there will be for all household members!
Master classes offer options for a variety of doll houses. The following materials are used for this: wood (plywood, laminate trimmings), drywall, old bookshelves, cardboard (including boxes, folders for papers) ...
This list is by no means full list that can be put into action. In most models, for the convenience of the game, the front wall is either completely absent, or opens and closes like a door. So what material to choose? This decision is made by the child. And his assistants are just getting ready to get down to business with enthusiasm!

The most practical and durable option - do-it-yourself plywood dollhouse, laminate and other types of pressed or solid wood. Such a toy is certainly worthy of attention.
Small models are made from plywood, as well as toy houses for the children themselves. A well-made case is convenient to decorate both inside and out. But it’s worth mentioning right away that without male help you can’t cope with it. The sketch is sketched independently or taken ready. A drawing is being prepared.

Plywood for crafts is taken sheet with a thickness of 7..10 mm or trimmings, the remains of a laminate are used. Of the tools and aids will be needed:
PVA glue or carpentry,
Roulette, ruler,
Wallpaper (remaining after repair),
A simple pencil or stylus,
The film is self-adhesive,

One of important details is " Do-it-yourself plywood dollhouse "scheme. After all, it is precisely on it that all the details required for a particular model are cut out, the location of windows and doors, partitions and the sizes of rooms are determined.
Having settled on the scheme you like or sketching it personally, they cut out all the elements of the future home.
The structure is assembled with glue and, for reliability, is fixed at several points with small nails or thin screws. Having laid the side walls, floors-spans and interior partitions, the roof is attached.
It can be made from corrugated cardboard (which is much lighter and does not load the structure with excessive weight) or the same plywood, finishing with painting “under the tiles”.
The house is located on a sheet of thick plywood or wood, which will give it stability. On request, wheels are attached to it for mobility.
If the front wall is missing, then all ends and joints are treated with end tape for beauty and aesthetics. appearance. The floor is covered with a self-adhesive film. The inner walls are covered with wallpaper.
And finally, you can arrange the furniture. Additionally, the interior is decorated with textiles: drape carpets, cotton curtains, linen tablecloths, etc. If housing is planned as, then around it you can make small garden or at least a lawn.

DIY dollhouse: Compressed foam
From the scattered pieces of foam, you can also make an excellent toy house. Depending on its estimated dimensions, the material is taken with a thickness of 0.5..1.5 cm; but mostly leftovers.
In addition to this, you will need:
bamboo sticks
toothpicks,
glue or glue gun
tassel,
a piece of foam rubber or a foam rubber sponge,
acrylic paint,
wallpaper cuttings,
ruler, pencil,
corrugated board,
remnants of the ceiling plinth,
pieces of carpet, curtains, tulle, linoleum.
First of all, armed with everything necessary, a model is considered and a detailed drawing with detailing is performed for it. For a small children's room, the house can be "gaining" in height - multi-storey - to save free space. Sheet foam is cut according to the drawing.
When cutting material for crafts " How to make a dollhouse with your own hands»It is advised to cut it with a hot knife so as not to crumble. Together with the child, they make a decision regarding the location of windows, doors, interfloor stairs, and make holes and openings in the required places.

Next, assembly begins. To create a strong and reliable structure, the fasteners will be toothpicks broken in half. First, the elements of the house are interconnected by them, and then by means of an adhesive base. The ceiling and floor are reinforced with bamboo sticks as building beams or in the form of columns.
The interfloor ladder is made of thin foam or wooden planks; toothpicks are used for railings. Those who have the skills to complete will replace some of the details with this material.
On the roof, corrugated cardboard or polystyrene is cut into small pieces in the shape of a tile and, imitating a real tiled roof, glue the "cut" on the house, placing each subsequent piece with an overlap on the previous one.
The roof can be painted both completed and on preliminary stage. Outside, a balcony or veranda is attached, taking polystyrene for the base, and the sides made of bamboo sticks.
The exterior of the house is painted with bright acrylic paints. The premises are cleaned with carpet or linoleum; the walls are covered with wallpaper. Instead of window sills, cut and glue ceiling plinths. All sorts of accessories bring comfort: curtains on the windows, imitations of lamps on the ceiling, walls and other little things. The final point is the arrangement of furniture.
By the way, they are often made of foam do-it-yourself dollhouse furniture and other interior elements: a bed, a sofa, armchairs, tables, a fireplace, chest of drawers ... Styrofoam furniture is decorated with fabric, wallpaper or simply painted acrylic paint in the required color.

From drywall
In a minimalist version, a toy house can be presented in the form of a flat base and cruciform partitions, as in " Do-it-yourself dollhouse "photo. External walls and the roof are missing, which contributes to the convenient location of the dolls, and will not squeeze the child in space. The craft is not expensive either in time or in consumables. In addition, it will significantly save space in the child's room.
A drywall house has many advantages. In it, as in manufacturing, the weight of the product is important. After all, the lighter the doll, the more pleasant it is to play with it. So it is with the house, which children sometimes move, transfer from place to place ... Drywall is just what you need: with a relatively low mass, it has sufficient strength. It's easy to work with him. And thanks to the white color, the completed house will not have to be whitewashed and painted, and the ends will look neat. But there is also a comparative disadvantage - brittleness.

From large sheets this material it will turn out a full-fledged house for children's games. For him, you can even use the above diagram and description of the work, as for plywood.
DIY dollhouse: Out of the box
A cute house made of unnecessary boxes is attractive to craftsmen because there are practically no hassles with its manufacture: it is done quickly and from cheap, improvised means. DIY dollhouse out of the box easily drawn up with colored felt-tip pens, pencils or watercolor paints. At the same time, it can be completed at any time in width or an additional floor can be attached.

It will take one large box to work on the cardboard house, which can be divided into 2-3 floors (focusing on the doll's height of 25..30 cm). You will also need:
Scissors or knife (cutter),
Painter's and regular tape,
Decor materials (colored and wrapping paper, fabric scraps, wallpaper trimmings, etc.)
Boxes master-dreamers and do-it-yourselfers have long been put into use. Thus arose. The doll house is one of the most successful.
According to the instructions for the house, a larger box is taken; preferably new or not too shabby and worn. It is cut in half, and the upper folding sides of both halves are cut off. The cut off parts will go to work: on the triangle of the side wall of the roof and the ceiling for the second floor with a hole for the stairs. The formed parts, as well as the subsequent ones, are glued with adhesive tape or glue.
Made from waste pieces gable roof and ceiling for the attic. Windows are cut out on the back side wall of the house with a clerical knife, Entrance door. The remains of the cardboard go to the interfloor stairs.
Each element is pre-drawn on the frame of the house. Sections, if desired, can be covered with masking tape. “Finishing” consists in painting all surfaces with paints or pencils: a tiled roof is drawn, window frames and doorways, from the outside you can even mark the lower formwork and apply a grid brickwork white marker.
In another version internal walls upholstered with scraps of fabric or pasted over with wallpaper, scrapbooking paper.

When the "repair" reaches the final point, you can take on the furniture. At the same time, cardboard can be made not only do-it-yourself dollhouse from boxes but also create furniture. Cardboard cubes are easily "turned" into interior elements by painting. And you can put other nice little things to them.

INSTRUCTIONS AND PROPHECIES OF THE Blessed MOTHER ALIPIA GOLOSEEVSKY, Kyiv...

Eufillin dropper in ampoules is used to treat pathologies that ...

Among all ointments for the treatment and prevention of joint diseases, the most ...