INSTRUCTIONS AND PROPHECIES OF THE Blessed MOTHER ALIPIA GOLOSEEVSKY, Kyiv...


Your little princess is growing by leaps and bounds. And now you have already equipped her children's room, in which there are a lot of toys. But as always, something is missing. Or maybe make Dollhouse uk do-it-yourself plywood? Its scheme is simple. With such a house, the daughter will play much longer than dad or grandfather built it.
Every girl dreams of having a real house for dolls in her room. It is easier to buy such a design in a store, but not cheaper. Moreover, the quality of many toys recently leaves much to be desired. If you are going to make Dollhouse do-it-yourself drawings will be needed to cut out individual parts.
Plywood is a versatile material. It is durable, ergonomic, has an acceptable price category, and working with it is a pleasure for the master. You can come up with a unique plywood dollhouse. Drawings are easy to find on the global network. Fortunately, progress has provided us with such opportunities.
Here are some dollhouse building ideas:


The complexity of the structure being built depends on your skills and abilities. First, all the details are cut out of plywood, and then they are assembled together. The dollhouse can be small or human-sized.
Take care of cutting doors and windows. Children can be involved in the design process. They will be able to decorate the dollhouse at their discretion. Your imagination also plays an important role. The doll house can be a scaled-down version of the real house with stairs, bathroom, bedroom, living room, nursery and furniture. Try it, because it is very interesting and exciting.


Handmade items are always valued more. If you decide to give a gift to your daughter, try to construct a plywood dollhouse with your own hands. Step by step instructions will be a visual aid for you. Start by making a drawing. After all measurements are taken, calculate right amount plywood. Go to the store and buy everything you need.
One side of the house, the facade, is always open. The child should be comfortable playing with such a design. If you want to make an exclusive dollhouse, think over everything to the smallest detail, including decor, and equip it with lighting.


Buying almost anything now is not a problem. But the beauty of making a plywood dollhouse with your own hands is that a child can also be involved in this process. It is advisable to use plywood as the starting material - the durability of the structure, its remarkable appearance guaranteed at a relatively low cost. Yes, and cutting sheets, processing fragments will not cause difficulties; just a simple household tool is enough.
What is a dollhouse? The banal answer that this is a spacious box that stores your favorite toy and its outfits is unlikely to be correct. You can make with your own hands various options houses that differ in their configuration (vertical, horizontal), the complexity of the layout (several levels-floors, with many compartments-rooms). External design- This is a completely separate conversation. If you “turn on” the fantasy, then it will be quite possible to get by with what is at hand. In addition to glue and colored paper, in any home there is always something left after the next repair - pieces of wallpaper, film, fabric, and so on.

What plywood to use? About what to make a dollhouse out of it - optimal solution, partially said. It should only be noted that he is going for a child's toy. It is the strength of the structure itself and its "environmental cleanliness" that should be the main criteria that you need to focus on when choosing products.

One of the tasks that is solved in the process of making something with your own hands is reasonable savings. Consequently, there are practically no options for which plywood to give preference to - it is inexpensive, resistant to moisture and “environmentally friendly”. These criteria are fully met. By the way, they are often confused with FSF products, since it is difficult to distinguish these plywood outwardly even for a specialist.

The linear parameters of the house depend on which doll it is made for (and maybe for several) and where it will be installed. Therefore, it is more correct to familiarize yourself with the photos and drawings available, for example, on the Internet, and on the basis of this, inspired by your own ideas, draw up your own, original scheme that is most suitable for local conditions.


Any dad can cut plywood into fragments of certain dimensions, configurations and connect them together according to the developed scheme. This process does not require any step-by-step instructions. But there are a number of nuances in working with FC, which House master should know.
To avoid a "production" error (and errors are inevitable even during measurements), the same type of house parts should be made according to following scheme. First, one part, and then make sure that it meets the required dimensions. And only then, using the workpiece as a template, cut and process the rest. Otherwise, after assembly, it will turn out (more than likely) that the house will turn out to be somewhat skewed, and something will have to be redone.
Cutting plywood to better produce electric jigsaw. FROM hand tool problems will arise - an uneven cut (not along a line, especially if it is curly), “ragged” ends of parts, partial peeling of veneer in the working area.
Considering the relatively small thickness of plywood, the joints practiced for solid wood blanks (saws, tenon-groove) are unacceptable. Therefore, only by gluing, followed by fixation at individual points with small carnations. In terms of safety for the health of the child, it is better to use the casein composition. Such joiner's adhesives are most often used in modeling, making furniture with your own hands, and it is quite simple to buy a dry mix and prepare a solution yourself. .

Both at the stage of assembling the dollhouse, and after its manufacture, it is necessary to carefully process all the edges of the parts. Even if no defects are found, it is worth once again go through the skin. Microscopic fractions, visually and invisible - potential splinters. Do not forget about the gentle children's palms!
Dads should take into account that girls (as well as all women) have their own secrets. Therefore, drawers or boxes with doors in which you can hide something should be provided at the bottom of the dollhouse or on the side. Mini-hinges are suitable for fastening the sashes (it’s easy to pick up the right sizes at any furniture store).

If the dimensions of the dollhouse are significant, then it is more expedient to first mount the frame from bars of a small section, and then sheathe it with pieces of plywood.
When drawing up a diagram, it is worth considering that it is planned to assemble not just a box for storing toys. Even to little house will need some internal filling. What it will be - a mini-table, a bed - is another matter. But already at the design stage it is necessary to provide possible options and choose the dimensions so that the rooms are spacious enough.

Advice. When deciding how to decorate a dollhouse, one should not forget that here, when choosing materials, one should take into account their component composition. Certain types of stains, oils, paints, varnishes contain toxic substances.

If you really get excited about the idea, carefully plan everything and prepare in advance, then you can make a dollhouse with your own hands in just a few hours. Even half a day off is enough for the child to enjoy the home for his toy for a long time.
Barbie is the most famous doll in the world. For her, they produce clothes, shoes, dishes, accessories, cars, as well as houses, which are sold both separately and together with furniture. Such a pleasure is not cheap, but meanwhile you can easily make a house for barbie with your own hands. This will take a little time and will bring a lot of pleasure, both to parents and to the little mistress of the doll, who will take an active part in arranging a new home for her pet.
The fantasy of the masters has no limits, so they offer to make a house for a Barbie doll from plywood, wood, cardboard boxes, old cabinets and shelves, sheet cardboard, fabric. Each option has its own advantages, and the result depends on the level of skill and effort. It can be both simple and convenient one-story house, and a multi-storey castle with arches, balconies, stairs and even an elevator.
Installation of the structure consists of the following steps:

This installation procedure is typical for the manufacture of a house made of plywood, wood or cardboard.
At the finishing stage, you can connect the child to the work so that he himself chooses the desired decor option. Pink is considered the traditional color of Barbie, so it can be taken as the main tone.
A barbie house made from large cardboard boxes requires little to no financial costs, and you can add new rooms and floors to it at any time.
plywood or wooden house IK is very durable and with careful handling will serve the child for several years.
In a light and comfortable textile house, Barbie doll can travel with her little mistress.
A doll housing made from an old locker can be closed at night with doors.
To build the structure, you will need several identical shoe boxes or just one large box from under any household appliances. It is desirable that the cardboard was dense, but its color does not matter.
Materials needed for work:

We glue the shoe boxes together so that we get two or three floors. And at the big box we cut off the top, leaving the sides 30 centimeters high, and from the remaining parts we make interior partitions. From two identical pieces of cardboard we make a roof and attach it with adhesive tape. Ceilings can be pasted over with white writing paper or polystyrene foam ceiling tiles. The walls are decorated with wallpapers, stickers, pictures. To strengthen the walls, the house is glued on the outside with thick cardboard, and the top is decorated with wallpaper, paper border, or simply painted.
Approximate plan of the house:
In the hall, you can equip a fireplace, folded from matchboxes or glued from cardboard. There is a lot to see on this subject. interesting videos, where everything is described in great detail and clearly.
A cardboard home-made house can be installed in a wide low box and equipped with a courtyard in it.
A very interesting and entertaining toy is a Barbie doll made of paper. For her, you can independently make clothes, houses and accessories. This activity is great for developing the child. Creative skills and fine motor skills of the hands.

Paper doll making:
We draw clothes, hats, handbags and carefully cut them out. It must be remembered that small rectangles are attached to the clothes, which are then bent so that the clothes are attached to the doll.
If you stick a thin magnetic strip on the doll, and attach small metal objects to clothes and accessories, then there will be no need to draw a valve.
For paper dolls, no need to do voluminous houses, but it is enough to draw rooms with furniture in the album. Each separate sheet will be a new room.
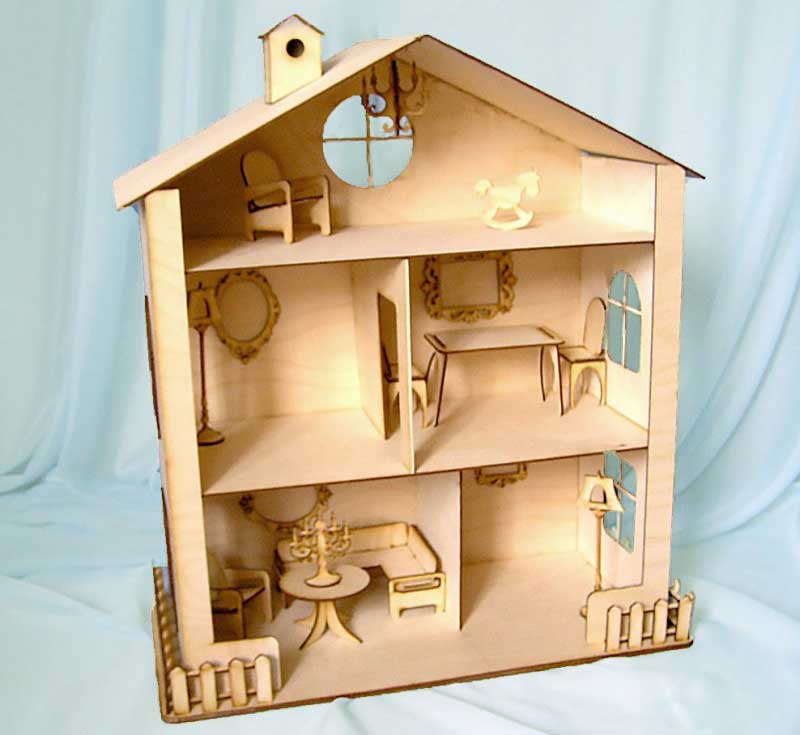
A durable plywood or wooden house can be made independently, having at hand necessary tools. The advantage of such materials is that you can not deal with the internal and exterior finish because the wood has a very beautiful natural color and pattern. Against the background of such a house, it will not be a shame to conduct photo shoots, since it will look much more beautiful than its store counterparts.
Tools and materials:

First, an exact diagram of the future house is drawn on paper, which is then transferred to plywood, carefully observing all dimensions.
Performing work step by step:
Window openings can be trimmed plastic corner cut to fit the windows.
A wooden house can be foldable if equipped with an appropriate mechanism. Then it will not take up much space in the room. For example, door canopies are attached to the corner house, and it folds like a book.
When you need to quickly build a house for a doll, then any materials will be used. You can build a beautiful and comfortable home from a large Lego set, especially if available. a large number of details.

A compact house is easily made from a five- or ten-liter plastic canister. Windows and doors are cut out in it, and the canister itself is painted with paints or decorated with plasticine, salt dough, colored paper.
To prevent the child from injuring his hands, window and doorways are pasted over with adhesive tape or electrical tape.
Everyone in the household will find an old unnecessary closet, bookshelves or a rack. Can you breathe into them? new life, turning it into a convenient and beautiful house for barbie doll.
It should be borne in mind that the distance between the shelves should be about 30 centimeters, since the growth of Barbie is approximately the same.

Materials needed for conversion:
The locker is cleared of old paint, cracks are sealed, and then the entire surface is primed and covered with two layers of paint. On the outer walls, you can draw windows, bricks, patterns, branches of ivy or wild grapes. Partitions are installed inside. Then each room is decorated depending on the wishes of the little mistress of the dollhouse.
Quick article navigation
We are convinced that only home-made can be better than a purchased dollhouse. After all, it is very interesting to “build” and decorate it to your liking for both parents and children. Moreover, everyone can make a house for dolls with their own hands, this will require only a few tools, simple materials and creative inspiration.
A cardboard dollhouse is good because it is done quickly and from improvised materials. It can be very beautifully designed and periodically completed - add new rooms, floors and entire buildings.

Materials and tools:
Step 1. First, cut the box in half and cut off the top flaps from both halves.


Step 2. We put the resulting pieces of cardboard into action: cut out the triangular gable of the roof from one part, and make a small hole in the other - this will be the second floor with access to the stairs. Next, glue the parts into place with tape and / or glue.

Step 3. From the unnecessary part of the box, cut out the slopes for the roof and another floor for the attic, and then glue the parts onto the adhesive tape. Do not forget to cut a hole for the stairs in the attic floor.

Step 4. Now we cut out the windows with a clerical knife and front door on the first floor, having previously drawn the markup. Then we cut out stairs from the remnants of cardboard and glue them to the floors.

Step 5. Hooray! The frame of the house is ready, now you can proceed to the "finishing". In this master class, all the details from the tiles on the roof to the steps of the stairs were drawn with a white marker.

As soon as the "repair" in the house is over, you can start creating furniture.


You can come up with your own house design - paint the house and the roof from the outside, draw window frames, paste over the walls with “wallpaper” made of fabric or scrapbooking paper, and finish the floor with linoleum or laminate. In the next selection of photos you can get design ideas doll miniature houses and furniture made of cardboard.


And here is an example of a cardboard house for dolls, upholstered in fabric, or rather, scraps of old dresses and pillowcases.

And finally, we offer you to watch a video review of a dollhouse for Monster High dolls, made by hand from several large boxes.
Do you want to make a stronger house without fiddling with blueprints and a jigsaw? Then use a small shelving unit or, say, an old bookcase as a base. With the help of the simplest steps, you can turn an ordinary piece of furniture into a wonderful house for dolls.


Materials and tools for reworking the frame:
Decoration materials:
Step 1. Painting the rack
This step is optional if you are satisfied with the color of the selected shelving or cabinet. For example, white or plain colored furniture will look great even without painting.
In this master class, the dollhouse will not only be painted, but also decorated with brickwork. If you like this decor idea, then prepare the following accessories:
So, first we paint the entire rack with gray paint. Once last layer the paint is dry, let's start creating brickwork. To do this, we cut out a rectangle about 3.5 × 8 cm in size from a sponge, which will become a template for painting.

Pour the paint into the container, soak the sponge in it and, starting from the bottom of the cabinet, print the bricks - first one row, then the second row in checkerboard pattern. Do not forget to maintain indents between bricks of about 5 mm. Paint about 1/3 of the house this way.
Step 2. Making windows
This step is also optional, but if you want to create a realistic miniature of the house, then it's better not to skip it. In order to cut windows, you first need to measure the window "frames" (if any) and draw markings on the cabinet walls from the outside.
Once the markings of all windows are ready, you can start cutting. To do this, use a drill to make holes in the corners of the markup inside the border to create a starting point for the jigsaw blade. To make window edges look neater from the inside, inside cabinet along the marking contour, you need to glue the masking tape. In the photo below you can see the process of work.

To give the windows a more finished look, putty and paint the "window niches", remove the tape, and glue the frames on the outside of the house.
Step 3. Mounting and decorating the roof
In order to make a roof, you need to cut 2 boards 30 cm wide from plywood (or other lumber), but different lengths- 61 cm and 59 cm.

Now we join the end of the shorter board at a right angle with the edge of the 61-cm board and again drill holes, but only at the end of the short board, passing the drill through the three holes of the edge made earlier long board. This stage is clearly shown in the next photo.

Glue two boards together, then fix with screws. If desired, the joint can be sealed with putty.

Next, we move on to finishing the roof. It can either be painted in 2 layers, or pasted over with “tiles” from improvised materials, for example, from cardboard or cork sheets. And finally, on the ends on the front side of the roof, we glue 2 parts of the molding.

Step 4. Creating and installing a pipe, installing a roof
It's time to turn wooden block size 5x5x20 cm into the chimney. To do this, simply saw off one of its corners (45 degrees) and paint according to the principle described in Step # 1. When the paint is dry, we fix the chimney to the roof with screws.

Well, that's all, the roof is ready, it remains only to fasten it to the cabinet in inside corners as shown in the photo.

Step 5. Replacing or installing the back wall
The next step involves equipping the rack with a wall, if it is not there, replacing the existing wall with a prettier one (for example, under a white lining) or simply installing the missing wall for attic floor. We perform the following actions: we make the necessary measurements, cut out a blank from the hardboard / wall panel and fasten it on the back side with cloves / screws / glue.

Step 6 Install Partitions to Create Rooms
Cut out interior partitions from any material (hardboard, wood, MDF, plywood), then cut doorways into them and install with glue or screws. Woo-ala! The doll house is built, you can proceed to the most exciting part of the work - the decor and filling the rooms with furniture.


If you add a rack with wheels, the house will turn out to be mobile
And here is an example of equipping a dollhouse with lighting, which can not only create comfort in it, but also play the role of a night light.

Making a dollhouse out of plywood or wood is somewhat more difficult, but it will look better and last so long that in the future it can even be inherited. To create such a house does not need to have special skills. It is enough to have the tools, clearly follow the drawing and the following video instruction, from which you will learn how to make a do-it-yourself dollhouse for 25 cm Barbies and other dolls 25-26 cm tall.
Any girl in childhood dreams of having her own house for dolls. Previously, children built these houses from improvised means: boxes, old boxes, built them in bedside tables. Now in toy stores great amount finished houses for every taste, but mostly they are quite expensive and similar to each other.
If desired, parents can make a unique house for a doll with their own hands, which will be unlike the others and any child will really like it. In this case, you can take into account all the wishes of the child and bring them to life. This is a great opportunity to do something with the whole family and have a great time.
There are several options building material for a classy doll house. It can be made from styrofoam, wood, cardboard, old boxes, drywall, fabric, or plywood.
Usually the front wall of the house does not close, so that it is convenient to play. If you still want to make the facade of the building, then it is made in the form of a door and open only for the duration of the game.
 This option is considered the most popular, since such a house will be quite durable and relatively light. Such a structure is easily repainted and decorated.. But there is no way to do without the help of dad or grandfather. Since it requires the use of power tools.
It is best to create a do-it-yourself plywood dollhouse scheme with your child and take into account where and what kind of room he wants to see, as well as what size they should be. On the Internet, you can find a lot of different drawings of doll houses.
To finished house some parents attach wheels so that, if necessary, the child can independently rearrange it to another place.
To make a plywood barbie dollhouse with your own hands, you will need:
The execution process is quite simple:
 After repair, there are always pieces of different building materials. So that the good does not disappear, you can use it in order to build a beautiful housing for dolls.
Making a drywall house is quite simple. The only disadvantage of this material is its fragility. If you hit or press down on such a structure, it can easily crumble.
For greater strength of the drywall house, only the internal partitions of the rooms can be made, and the main structure can be made of wood or plywood.
The process of creating such a house is similar to the previous one, only for gluing you need to use an adhesive mixture.
For the construction of foam required:
First you need to draw a drawing of the building.
Cut the styrofoam into the necessary pieces. To prevent the foam from crumbling, you need to cut it with a heated knife.
Cut windows and doors.
To assemble, you will need toothpicks. Connect the foam sheets with toothpicks lubricated with hot glue.
The roof must be cut out of cardboard and pasted over with corrugated paper.
In one of the rooms, you can make a balcony with foam plastic. The railings can be bamboo sticks.
Decorate your home with ease foam sponge dipped in acrylic paint.
Inside, decorate the rooms with wallpaper and pieces of linoleum.
Arrange the furniture in the house and decorate the windows with curtains.
If suddenly an old bedside table is lying around in the garage, which has long been asked to be thrown away, you can breathe a second life into it and thereby make an excellent gift for your daughter.
This option is quite simple, since the foundation of the house is already there. Plywood sheets can be used to separate rooms and floors. You can decorate the house with wallpaper or self-adhesive film.
Girls are happy to join this exciting activity. Children have a rather rich imagination, which you can rely on when decorating rooms in a dollhouse.
The cheapest option for a dollhouse will be cardboard. Surely, every house has accumulated old boxes from equipment or shoes, which are perfectly used to build new housing for dolls.
This will require:

You can start making a house for dolls.
You need to cut the box so that the base consists of a whole sheet of cardboard, and the corners only need to be cut to bend. Or cut each piece separately, and then glue it together.
In order for corrugated cardboard to bend easily, you need to draw a small line at the place of the fold with a ruler and it will bend perfectly.
In a cardboard house, there must be interior partitions that will hold the structure.
The walls of the rooms need to be pasted over with wrapping paper or wallpaper. Outside, the house can be painted or glued with a cloth. The decoration of the interior will be rhinestones, artificial flowers or curtains.
Even more simple option can become shoe boxes. Everything is simple here. You need to find boxes that are suitable in size and connect them together. Each box will private room. To make several rooms, you need to divide it in half with an interior partition.
There are several ways to fasten boxes together:

There are many options for how to make a house for dolls with your own hands. For this, any improvised materials are suitable, and a bright children's imagination will help in its design. If dad can still make a light in every room, this house will be just the ultimate dream of any child.
Houses are needed not only for girls. In the same way, you can build garages for cars, castles and fortresses.
Create a house with the whole family and the child will appreciate the time spent with the whole family, doing such an exciting activity.
Attention, only TODAY!
INSTRUCTIONS AND PROPHECIES OF THE Blessed MOTHER ALIPIA GOLOSEEVSKY, Kyiv...

Eufillin dropper in ampoules is used to treat pathologies that ...

Among all ointments for the treatment and prevention of joint diseases, the most ...