INSTRUCTIONS AND PROPHECIES OF THE Blessed MOTHER ALIPIA GOLOSEEVSKY, Kyiv...


We will send the material to you by e-mail
Everyone understands what the yield of plants depends on: the amount of embankment, the correct organization of fertilizers and the quality of the soil. To make it pleasant to take care of the plants, users create beautiful garden beds with their own hands in the country. Photos of interesting compositions and design solutions you will find in today's post. In addition, the HomeMyHome editors will talk about some features of the organization of sites that many do not know about.
A good harvest will be in areas with woody borders
PHOTO: samdizajner.ru
If you are thinking about planting seeds or creating seedlings, you need to choose the right place and understand how to arrange the beds on the site. The quality of the crop and the health of the vegetation will depend on this. Even our grandmothers claimed that all seats should be located strictly in one position: from north to south.
This method provides for a uniform supply of heat and light to future plants. In addition, in this arrangement, the likelihood of fungus formation on leaves and fruits is minimized.
Such a design is permissible only if the site is perfectly flat, and there are no slopes on it. Such a territory will not provoke moisture stagnation after precipitation, so the roots of plants will not rot.
PHOTO: yandex.by


They try to make warm beds with their own hands in the fall. The source of heat is organic matter, which, when rotting, releases special energy. It will be useful for vegetation.

Such specimens are created in a recess 50 cm in size. You can create them directly in the ground or pre-build a box of the appropriate size. The basis of such a bed is compost. The thickness of its laying is at least 15 cm.

With this approach, summer residents can plant plants much earlier. The presence of peat enhances the effect, and the plants become resistant to transplantation.
On a note! Experts believe that using warm beds it is possible to achieve the cultivation of seedlings of high quality.
Any cultivated plants good gas exchange and high-quality removal of excess moisture are necessary. In order for these processes to occur properly, beds with drainage are equipped.

Having chosen a site for installation, a pit is dug 45 cm deep. A layer of sand (15 cm) is laid in it, poured on top organic fertilizers, after which it is laid out fertile soil. Such a base will help to quickly drain water in low-lying areas after rainfall, keeping the root system intact.
There are several options for materials from which you can make beds in the greenhouse. First of all, it is wood formwork. The use of stone or brick is allowed. Each of the options is good in its own way.

In this case, the aisles can be laid out with crushed stone of a fine fraction, screenings or sand. This will provide a comfortable approach to plants, relieve extra dirt and weeds.

When the question arises of how to fence the beds, many immediately go in search of improvised material. Such borders can really be built from anything. An important condition is that they must withstand the pressure of wet soil. You also need to consider that the width of the beds in the garden should be at least half a meter from the inner edge of the curb.
Do-it-yourself fences for beds should look aesthetically pleasing. This will create a certain emphasis on the . Therefore, the organization of these structures should be approached carefully. For example, plastic is smart modern solution. Such material is absolutely harmless, pests do not spoil it, it is considered budgetary. It should be chosen in light shades, since this color practically does not warm up in the sun.


Metal structures are convenient, but not suitable for well-lit and dry areas. The material heats up quickly, the root system of plants lends itself to serious overheating. Over time, rust and corrosion appear. This negatively affects the soil composition.
Related article:
What are their advantages, examples of creative solutions, average prices, consumer reviews, how to properly assemble a garden bed from panels with your own hands. Read about this and much more in our review.
Borders for beds made of wood - a good and harmless option. For manufacturing, you can apply a variety of ideas. Such frames are prepared by twisting into frames using. We bring to your attention a photo of unusual options for how to make a bed of boards with your own hands.


In the future, it is important to know how to process the boards for the beds so that they do not interfere with the growth of plants and are not affected by moisture.
Related article:
Interesting ideas come to the mind of many summer residents and owners of private houses. In the article, we will consider original photo examples and several instructions for creating such beauty.
Surely there are small fragments of slate in every house. They make excellent cheap fencing for vegetable beds. If they are also painted, then they will stand out against the general background of the garden.


Beautiful raised beds can be made from a variety of materials. Brick is also considered the most acceptable. They are much easier to work with, they do not require special care. Often such structures are used for planting decor.


On a note! Garden plants planted in specially designated fenced areas can be arranged around lawn grass. It's quite suitable option creating paths between rows.
Beautifully landscaped vegetable garden high yield cultures is entirely the merit of the owner. The more interesting and correct the beds are created, the better the plants feel. Along with the benefit for them, it is necessary to think about the design of the site itself. We bring to your attention a few ideas in the photo.


If you want to get rid of the growth of weeds beautifully and for the season, you need to create the most favorable conditions for the growth of crops. Each type of plant has its own characteristics.
Usually under blooming ornamental plants use the most unusual designs of flower beds. One of these is detailed in the video. With the help of this instruction, you can easily create the same one.
As a rule, strawberries or strawberries are grown in a well-lit area. It is desirable that a uniform amount of sunlight falls on each berry bush.


If you plan to equip a separate compartment for growing cabbage, then you should choose for it a place where onions or any legumes used to grow. These areas should be dense, the absence of sandy layers is important, since through them a large number of moisture. Because of this, vegetables begin to “starve”.

If it is impossible to choose another site, they dig a trench under the cabbage bed and lay plant waste 7-10 cm high on its bottom. Then fertile soil is poured.
Traditional varieties of tomatoes and cucumbers are not demanding to care for. All they need is careful and proper watering. As for the beds, they are allowed to grow together. Watch a video on how to do it experienced gardeners.
A healthy salad bed is something unusual. It is known that these crops require constant care. Therefore, it is necessary to observe the following conditions for their cultivation.
Dear readers, if you have suggestions or additions on the topic of how to make beds in the garden, write your ideas in the comments below the article. We will gladly study your idea. Perhaps it will be the topic of a future publication.

Save Time: Featured Articles Every Week by Mail
Many summer residents suffer due to the fact that the groundwater is too high on the site. Excessive soil moisture is not suitable for all plants, many develop poorly or die altogether. You can solve the problem by making high beds. With such an organization of landings, it is possible to control the degree of humidity. And a nice bonus to such a decision will be more early term maturation and a much larger yield.
In addition to solving problems with waterlogging, high beds in the garden allow you to sow or plant plants 2-3 weeks earlier: raised above the ground, they warm up more actively due to the fact that the sun heats the walls. This is also facilitated by the decomposition processes occurring in plant waste, which make up a significant part of the backfill. Therefore, such beds are also called warm. If you put arcs on such a bed and cover it with spunbond or other similar material, then the crop can be harvested even earlier.
The device is more problematic in regions with a hot climate. The task in this case is not better to heat the earth, but to keep it from overheating. But this can also be solved: use materials with poor thermal conductivity, for example, wood, to fence high beds. For best effect you can make double walls, between which you can fill up, for example, sawdust, lay foam, or you can leave an air gap - the best thermal insulation. It is better to paint the outer wall in a hot climate with white paint or whitewash. It is known that light surfaces heat up less. In this case, it will be possible to save the root system from overheating: in the south, the earth sometimes warms up very much and the higher the plant is, the cooler it will be. And over the beds you can stretch the same covering material. It not only retains heat, but also protects against overheating.
Raised beds can also be a good outlet for infertile lands. It is more convenient to lay out the imported soil in the beds, and not distribute it throughout the site. Maintaining fertility contributes to the compost layer, which is located under the layer of earth.
The problem of arid regions is also being solved. In this case, the fence for the high bed is coated with bituminous mastic from the inside or covered with a film, a rolled waterproofing material is laid on the bottom (on the grid) (the roofing material will quickly rot, so something from the modern type of waterproofing is better). Complete waterproofing cannot be achieved, but to keep moisture inside in sufficient quantities - yes.

Carrots - one to one. The best on a high bed, although the same variety was planted on a regular one
As you can see, with a balanced approach, almost any problem can be solved. There are few shortcomings in high beds, but they could not do without them:
That's all the shortcomings. If you decide on the arrangement of high beds, be prepared for a considerable amount of work. But the harvest will be many times greater. For testing, you can make one or two beds. Then decide if you need them or not.

In one area there are very high beds and not very…
So, the dimensions of the high beds:
So that the bed is not too high, part of it can be deepened: dig in 20-30 cm, and already put walls on top. The removed soil will go to backfill (there is often simply not enough land), and the substrate from the lower rough layers can be made thicker. And in order to minimize the cost of maintaining such a bed, you can.
You can use anything that can hold the ground. The most durable curbs are made from brick, stone and concrete.

But the brick costs a lot, it takes a long time to fiddle with concrete. A concrete fence is made according to all the rules: first, a formwork into which reinforcement is laid, then it is poured with concrete and they wait until it sets. But the service life is impressive - decades.

Fences for beds made of concrete are the most durable and will never "float"
A brick and stone fence is also folded according to all the rules: on a mortar with dressing. To reduce the consumption of bricks, the walls are placed in half a brick. And so that the earth does not move it, the rows are reinforced with a mesh.

But even in this embodiment, it will be necessary to install support pillars through the meter. If your soil is viscous, heavy, often waterlogged, such walls can be squeezed out. Therefore, put wooden or metal supports that will fix the long walls or make small beds, as for


Fence for high beds made of expanded clay concrete blocks
They also make fences for high beds made of galvanized metal and slate. Slate can be used second-hand, you can buy a new one, wave or smooth - it doesn't matter. Cut the sheets into strips of the required width. There is no need to fear that it is harmful. In slate, asbestos is contained in a bound state, and it does not dissolve in water. It is harmful when it is sawed: the dust rises and through Airways enters the body. To reduce exposure, wear a respirator and wet the incisions.

They make plastic garden fences. Changed siding? Use it. There are old plastic panels - they are in business. But for plastic, a rigid base is needed. They make it from a metal mesh of thick wire.

Grids can become the basis for pebbles or pellets. Only in this case, a double frame will be needed, inside which stones or some other material are poured. This technique is called "gabion" and not only fences for garden beds are made from it, but also fences. But so that water does not seep through the walls from the gabion beds, the inside of the box is lined with a dense film.

The most popular fencing is wood. You can use boards, timber, logs. Wood is good for everyone, except that it rots.

And since all conditions have been created in the high beds to activate this process, destruction occurs quite quickly. You can slow down the process somewhat by painting the boards or by impregnating them with a bioprotective composition. But there is still no guarantee against destruction.

But the material can be used cheap, and sometimes even junk: the remains after construction, slabs, old logs, pallets, etc. If desired, you can even make a fence out of branches. Only the bark is desirable to remove: it is under it that there are many larvae and woodworms. Although...they will also process the wood residue that you lay on the bottom of the backfill. But too many of them are also not needed, so, probably, it is still better to remove the bark.

From the same branches, only freshly cut, you can make a wicker fence. And it will also need to be lined from the inside with a film: to keep water and earth inside.

You can even use straw. It is tied into small bundles, which are interconnected with a wire. It simply cannot be cheaper, but it keeps water and temperature well. The only disadvantage of this option is that such a fence will last a maximum of two seasons, but rather one. But it can then be used as one of the layers.

There are high beds without a fence: the so-called bulk. The soil in them is poured in the form of hills.

To improve drainage, branches are laid inside such a ridge. To reduce the height of the bed (for example, under tomatoes), it is slightly deepened, throwing the soil to the side. After laying the branches, it is covered from above, often there is a need for additionally imported soil. If you can’t choose the row spacing deeply.

The disadvantage of this kind of garden: when watering and during rains upper layer soil is washed away. Therefore, they began to make boxes - to avoid washing out the soil.
Framing is only a small part of the job. You still need to fill the received box. It must be said right away that the thickness of the layers depends on the height of the bed that you have chosen, so if any values \u200b\u200bare given, then only approximately. In addition to the size of the bed, the thickness of the layer, for example, the fertile one, is influenced by the choice of plants: 5 cm is enough for someone, and much more is needed for someone.

So, what to pour into a high bed - layers from bottom to top:
In the last two layers, you can add a good portion of mature compost, as well as sprinkle deeper layers with it. This will speed up the “readiness” of the high bed for planting.
It is better to fill a high bed in the fall. During this period, there will be enough “material” and during the winter the processes inside will gain momentum. In this case, you can plant plants in the spring and hope for a high yield. It can be done in the spring, but there are unlikely to be any significant differences in yield: the processes have just begun and will not be able to have a noticeable effect on the fertility of the backfill. Although you will definitely feel the difference in the amount of water for irrigation: much less water is required.

One of the high bed options: metal mesh and reinforced polyethylene film
In the year of the construction of a high bed, plants that require high fertility can be planted on it: cucumbers, zucchini, zucchini, pumpkin, any kind of cabbage, eggplant, tomatoes, Bell pepper. The next year, you can plant greens - spicy-aromatic and leafy. Root crops feel good in the second year.
After harvesting the second crop, fertility must be restored. If the contents of the bed sagged, in the fall they fill up with good earth mixed with mature compost. If there is nowhere to fill up, remove part of the top layer (on a compost heap or in another box as part of the backfill) and replace it with fresh earth with fertilizers.
It differs only in that covering material is spread over the finished “pie”. Holes are made in it, in which plants are planted. This option leads to the fact that moisture evaporates in minimal quantities, and weeds do not grow in the aisle. The second option - mulching the earth also works well, but evaporation is more intense.

Features of strawberries are that its roots are located mainly on the surface. Therefore, the fertile layer can be small. But this same feature leads to the fact that in severe frosts it can die. Although there is a decomposition process inside the high bed, warming the soil, if the bed is without snow and not covered for the winter, the root system may freeze.
In its structure, it is no different. Is it only because they need poles and crossbars or stretched wire around the edges in order to be able to tie up bushes of tomatoes or lashes of cucumbers.

Most often, questions arise not when laying layers in high beds, but when making a box. Since women often do a lot of gardening, right up to making fences for garden beds, many points may not be clear to them. To clarify the most difficult ones, we present photo reports of making a box from boards and slate - the most common fences.
Several options for how to make high beds from boards were in the photo above. The main snag is usually in the connection at the corners. The easiest way is to overlap them: just put one to the other at 90 ° and knock it down with nails. But there are aesthetes who all strive to do the right thing. And that's right - cut down two boards at an angle of 45 ° and connect them like that. It is this option that will be shown in the photo.

To make it convenient to fix the fence on the ground, vertical bars or pieces of board are nailed in increments of 1.2-1.5 m, the length of which is about 20 cm more than the selected bed height.

The lower end of the bar or board needs to be sharpened - it will be easier to hammer the fence into the ground. Then we take a miter box or circular saw, and cut off the edges at a 45° angle. Putting two boards together creates a perfect 90° angle.

For a strong connection with inside corner set the bar, to which we nail the boards.

Here's what happened. Only he lies "burdens" up. They are driven into the ground
It doesn’t take long to make a fence for high beds made of wood, but it’s even easier to connect the boards end-to-end, and nail metal corners for strength (pictured below).

It is not more difficult to make a similar box from hewn logs. For example, this option: two long sides from logs, and short ones from pieces of boards.

Whitewash the finished fence: both pest protection and a more attractive look.

When making beds from flat or wave slate, questions also arise about how to fix it. The easiest way is to dig in. But this is uneconomical: you will have to make the stripes wider by at least 10 cm and still there is no guarantee that the slate will not “float” in the spring. In the muddy earth, it will simply be squeezed out with a mass. You can fix it, but it's too much time and effort.
Therefore, most often corners or pipes are driven in from one or both sides of the sheet, which clamp the slate and prevent it from deviating strongly. In the photo, the corners are driven in only from the outside: from the inside, the mass of layers of the high bed will press, so that the fence will not fall inside.

The joints of the two sheets are insured with a special welded plate. For reliability, they can be bolted to a wooden bar attached from the other side.

A piece of reinforcement with a welded plate - for insuring the junction of two sheets flat slate
Another option is to make a frame. Attach a bar or a corner to similar racks with welded plates - for whom it is cheaper. And to this frame, attach the slate cut into strips (it holds well with nails, but it’s easier with self-tapping screws).

Frame from a bar in a fence for a high bed
By the same principle - with guides - they make beds from plastic panels and others similar materials. As you understand, especially virtuoso skill is not needed here. The main thing is to keep well.
It is not a difficult process, but before starting work, you need to know some subtleties. It is important to choose the right material for the design, taking into account all the advantages and disadvantages. The installation of the fence must be consistent, otherwise you can make a number of mistakes. In this article I will try to analyze all these points in detail.
Before you start building fences, you need to understand what important functions they perform. Among the functions of fences for beds, the following positions are distinguished:

Fences for beds differ in the material from which they are made. And each material, in turn, has a number of advantages and disadvantages. We will talk more about the most common materials for fences below.
Garden stone fence
Natural material, can be easily collected on the banks of rivers. It is not easy to find stones of the same size, so cementing may be required. If you lay out the cobblestones in several layers, you can achieve a sufficiently high structure that will not allow weeds to disturb your plantings. The stone beds will have enough big weight and sink into the ground. In order to avoid such a situation, you can dig a trench around the perimeter of the beds and then put sand or gravel into it.

Rod fencing
Wooden rods are another natural material that serves as the basis for fencing. To give the fence a shape, you need to prepare pegs of a certain height. Branches should be selected at least 1 meter in size. A plastic pipe can become a haven for pegs - this is necessary in order to prevent the process of decay. When the pegs are securely fixed in the ground, you can proceed to weaving the fence.
Brick fence for the garden
Bricks left from or other structures will be a suitable building material for the construction of a garden fence. First you need to prepare a foundation of shallow depth and fill it with cement. Brick laying takes place in different ways: horizontally, vertically, flat or sideways. If your house or bath is also made of bricks, then such beds will fit perfectly into the design of the site, especially if the pattern and method of laying bricks on the fences will repeat the laying on the building. Brick is an environmentally friendly material. Plus, he's easy to work with. Updating such beds does not occur often, since the material is durable, which is another advantage of using bricks in summer cottage construction.

Wooden fence for the garden
Wooden fences are the most common. This material is very malleable for work and safe for the environment, but not resistant to decay. Using protective varnishes and solutions, you can extend the life of wooden fences. Depending on the type of wood, there are several types of wood fences:
Pay attention to the increased hygroscopicity (humidity) of the tree. During the season of snowmelt or long rains, fungus may appear on the wood. Rotting material not only gradually destroys the structure, but also increases the acidity of the soil, and this can lead to undesirable consequences for plants.

Metal fence for the garden
The main advantage of such fences is obvious - the design is very durable. Most often used sheet metal characterized by its flexibility. There are also disadvantages: the sun raises the temperature of the material, which transfers it to the soil. Thus, the soil can be overdried, which negatively affects the plants. When building metal beds, it is better to take care of the shading of the fence in advance. For the construction of garden fences from sheet or shaped iron, it is better to take care of the upper edge, because the left teeth can cause certain inconveniences. Instead of rotting wooden structures, metal has the property of rusting. This disadvantage can be removed either with the help of special coatings, or by choosing a stainless material.

Concrete fence for garden beds
Concrete fences are most often used on uneven surfaces. The beds located on the slopes are not uncommon, so this material contributes to the additional strengthening of the structure. You can use both blocks and slabs, as well as a filling solution. Concrete curbs are easy to decorate with tiles. Another plus of such fences is high reliability, but it is worth considering the fact that you will not be able to quickly dismantle the building.
Slate garden fence
In most summer cottages, unnecessary remnants of slate used in everyday life and for summer cottages will be found. For roofing, such material can no longer be used, but as a basis for fences, it will fit in the best way. The slate is easy to use. Remember that slate is a very fragile material, and tends to break due to loads, but its strength will be quite enough to protect the beds. The main thing is to carefully transport and install slate sheets.

Plastic fence for beds
Plastic bottles and containers can also be used to fence your gardens. For weighting, the bottles installed in the ground are filled with sand, crushed stone, gravel or ordinary earth. This design is not particularly durable and reliable, but the cost of fences in this case will be extremely low. You can purchase ready-made plastic bumpers, which are lightweight and impact resistant. Plastic is resistant to low temperatures and moisture, but you need to choose a quality material. Neglecting this recommendation, you can get a fence, which will be covered with cracks in frost, and deform when exposed to high temperatures. In this case, it will be necessary to dismantle the structure almost every season. Polycarbonate is often used to build greenhouses, which means that you can find the remnants of the material in your area and use it to create fences for beds.

The process of creating fences for your beds is not difficult, but it requires a competent and patient approach. I suggest that you familiarize yourself with the recommendations for the construction of wood structures, as the most affordable, simple and durable structure. The step-by-step instruction consists of several important steps.


From the foregoing, some conclusions can be drawn. First, build your garden fence based on your personal preferences and the materials available. If there are unused bricks or bottles on the site, use them. Secondly, pay attention to the advantages and disadvantages of each type of building material. And most importantly, responsibly approach the very creation and installation of the structure. By following all the requirements, you will reliably protect your plants from various damages and weeds, as well as decorate your site.
We will send the material to you by e-mail
City dwellers like to spend time in their dachas, where someone organizes only a recreation area, and someone plants flowers, vegetables and grows fertile trees. Spending several hours a day or a week in the process of cultivating the land, the question arises of how to make beds with your own hands, not like everyone else. Interesting ideas come to mind for many summer residents and owners of private houses. Consider the original photo examples and a few instructions for creating such beauty.
Beautiful flower garden without the hassle
Decorating their garden, many people think about how to create beds with their own hands, not like everyone else. Interesting ideas come to mind, but the process of implementation becomes difficult and not everyone succeeds.
At the same time, you should not despair, you can take the finished version as a basis, and on its drawings bring to life your own original creation. Keep in mind that not only the structures themselves will decorate the site, but also the combination of garden paths and the grown crops themselves will be included in the overall landscape design.
Here are some interesting photos of the design of beds in the garden:


When choosing a bed option, it is worth considering the characteristics of the crops that you plan to plant. Some plants prefer wet soil therefore, high ridges are rarely chosen for them.
To equip your garden, it is worth considering not only the shape and subtype of the garden itself, but choosing the material for framing it, as well as equipping the paths. Why do around the place to land? There are several reasons for this:

Important! Choose the right material for the manufacture of beds. It must pass air and not emit toxic substances.
Good choices come from:


The paths between the beds can be left as is, sprinkled with small pebbles or covered with paving slabs. It depends on the option you choose to decorate the garden plot.
The simplest options for fencing that do not require high costs wait a little and have an affordable price: flat slate and curb tape. In the second way, you can create any forms for disembarkation fruit crops.

To make an interesting decor on your site, you first need to buy a flat slate for the garden. The average cost is from 300 to 500 rubles. depending on the thickness of the material. The classic size of one element: 100 by 150 cm.
The installation of flat slate itself will be reduced to a few simple steps:
| Photo example | What to do |
|---|---|
 | Having chosen the place and dimensions of the place for planting vegetables, cut the material of the desired height and length. Along the perimeter of a flat ridge, dig a trench half the depth of the purchased slate. |
 | Install the blanks in the prepared trenches and fill them with soil. Be sure to tamp the soil for the stability of the structure. |
 | Use metal pegs to secure the structure. And pour fertile earth inside. All is ready. |
To make it easier to work, watch the video on the topic:
It’s hardly easier to use do-it-yourself borders for beds. The softness of the material allows you to make any shape, and for strength, the material is not only added dropwise to the trench, but also plastic pegs are used. Here are some interesting photo examples of finished work:


Related article:
In the article, we will consider in detail why it is useful, what types of garden border tapes are on sale and how to install this device correctly?
It is not at all necessary to spend a lot of money on fencing for planting fruit crops; you can use the simplest and most affordable materials that you have left from construction or other work. Often, scraps from boards, bricks or pieces of wavy slate are used.

Those who like to do everything on their own, as well as decorate the garden with bizarre shapes, often make things from improvised materials. A photo of some of the work is presented below:


Related article:
Strawberries are planted in almost every garden. Juicy and unpretentious berry - favorite treat adults and children. But to make it really tasty, you need to properly prepare the garden.

To date, there is a rich choice of material that allows you to accelerate the growth and productivity of the bushes. For example, the price per meter for a spunbond is only about 100 rubles, and such a fabric has many advantages:


If you do not want to spend money even on such a simple and comfortable material, you can make beds from plastic pipes. Here are some interesting photo examples:


Coming up with an option suitable for planting a delicious berry, various improvised materials come to mind. Including beds for strawberries from tires. Moreover, you can create a unique vertical structure that takes up little space in the garden and gives a large harvest.

Tires themselves are useful for work right size, chisel, wooden block and soil with seedlings. An additional carcass is not required, since the tires have a metal cord that provides the proper strength of the structure.

Holes for seedlings are made with a chisel, and the tire itself can be put on a block. Punch a few holes and simple design ready. Here is a video on one of the creation methods.
Planting strawberries in a pipe (horizontally) is a common option in areas with little free space. Moreover, the material itself can be both metal and PVC. Here are some fun examples:


You can even use sewer pipe for strawberry beds. Let's take a closer look at how to make a design for a delicious berry:

When the preparatory work is completed, assemble the structure. To do this, put plugs on the pipes. You deepen the thick one into the ground, and a small tube for irrigation is attached to it in the center. The soil is filled up, and the bushes are planted. To make it clear, watch the video on the topic:
Interesting designs of vertical beds for strawberries made of plastic pipes. Here are some photo examples:


Modern materials, as well as improvised means, allow not only to do it yourself, but also to recreate real pyramids with beautiful bright bunches of strawberries from a photo. And also to make multi-level "houses" for flowers.

Making a pyramid for growing strawberries on your own is not so difficult. Can be used various material for fencing: wood, metal, plastic. As well as all sorts of improvised means:

There are no exact criteria for the form of the base. You can make it round, square, rectangular, polygonal, and even wavy. Consider easy way how to make a multi-tiered bed for strawberries:
| Photo example | Sequence of work |
|---|---|
 | Let's take as a basis the classic pyramid, but with a sharp top. We will assemble from wood, since it is easier to fasten it. |
 | Assemble the first tier. It should be the biggest one. The width of the ridge for strawberries should be 40 cm. A stainless steel mesh can be laid down, it will keep the roots from pests and prevent waterlogging. |
 | At the bottom of each tier, pour sawdust and shavings, as well as dry grass. That is, you get a grid - sawdust - grass. Then a layer of earth. It is advisable to leave the total height of the pyramid at the level of one meter, otherwise it will be inconvenient to take care of the berries. |
 | It is better to make the sides of the levels at an angle, and before disembarking, treat the entire structure with varnish or paint to protect it from decay and increase its service life. |
To make it easier and faster to work, watch the video on the topic:
Vertical beds for strawberries - ideal for small area. You can buy them ready-made at the store or make your own. And the second way is a real flight of fancy. In addition to the considered methods of building beds from pipes, tires and wood, you can make a unique decor with fruitful bushes from bags.

The process of growing strawberries in bags is no different from a classic or vertical garden, but it turns out very interesting options to create beds is not like everyone else.


The use of flat slate for beds has been known for a long time. Every gardener has seen such designs at least once. The material for the sides has a number of advantages:

Despite the ease of installation and undemanding additional processing, slate has negative aspects that must be taken into account when choosing fences for planting strawberries:

But from the wavy material, very neat and beautiful beds are obtained:


From the photo above, it can be seen that creating a bed of wavy slate is not necessarily even and rectangular. You can make structures in several levels or chamfer corners, choosing best option for your area.

Sometimes slate trimmings left after the roof are used. This is the cheapest option for arranging a garden, since it does not incur additional costs, but there are inconveniences of working with different pieces. The easiest way is to buy wavy slate sheets of the same thickness and length. Moreover, the average price for them varies between 200-300 rubles. for 7-8 waves. Average dimensions: length - 1.75 m, width - 1.13 m.

To lay such a fence in the ground, it is enough to dig a small trench around the perimeter of the future ridge. Put straight lines slate into this hole, about half the total height, and dig in with earth. To understand the sequence of actions, watch the video on the topic:
Many summer residents prefer to make slate fencing beds, as it is affordable and simple. And also, no specific skills and abilities are required, as is the case with laying a stone curb.

At the same time, such a practical and harmless material has several recommendations for installation as a fence for flower beds or beds:


And also follow the safety precautions and carry out the installation with construction gloves so as not to injure your hands on sharp corners or self-tapping screws. As a result, it may turn out beautiful vegetable garden, which stands out against the background of neighboring beds:


If you don't have any pieces left after your roof repair, you can buy slate bed strips. The price for them is different, depending on the thickness of the material:
It is easier to work with ready-made strips, since the need for cutting is eliminated. At the same time, you can find very cheap options with and without delivery, as well as order a kit through online stores.

The installation of flat slate for beds does not take much time. Watch the video instruction to understand all the steps of the work:
The greenhouse is the place where summer residents like to plant heat-loving fruitful plants. In them you can see peppers, tomatoes, cucumbers and much more. Some equip the area under the greenhouse or insulate the structure so that they can harvest all year round.

For whatever purpose the greenhouse is used, it is a small space, if you do not take into account commercial options, where you need to place several beds.
Advice! Try to think in advance how many plants will be placed in the greenhouse in order to calculate the number and width of the beds.

Borders that protect fertile land from sprawling are assembled from a wide variety of materials. There are beautiful creations made of wood or neat metal structures, as well as curb tape and improvised means. Here are some options for arranging a greenhouse:


Related article:
There are many design options, one of the most common is 3x6 greenhouses. How to arrange the beds in a long and narrow space is a question that worries many. There are several general options for the location of landing sites in a greenhouse:


When choosing the location of places for planting in greenhouses, keep in mind that the beds near the walls should not be more than 1 m wide. And the dimensions of the central one cannot exceed 3 m. This is due to the need for free weeding and loosening of the soil.
Most often, gardeners opt for a large ridge in the middle and small small ones on the sides. This is the best way to plant several varieties of plants in one greenhouse so that they do not interfere with each other to grow and bear fruit.

If you opted for a 3-meter-wide bed in a greenhouse, then position it exactly in the center, leaving enough space for passage. The path can be covered with small pebbles or covered with a film so that unnecessary weeds do not germinate.
It is not difficult to make a bed with a width of 3 meters on your own. First, you need to decide on the material of manufacture. And then dig a small trench around the perimeter and deepen the tour structure. Be sure to compact the soil from above.

Under the soil, it is worth making a layer of organic fertilizers and laying drainage that prevents waterlogging of the soil. Here is a video example of how to redo the beds and make 3 narrow identical strips:


When there is no need for heating, since the greenhouse is located in a warm or moderate climate zone, use other unusual options for planting. For example, you can organize the vertical placement of beds in a greenhouse. In this case, it all depends on the imagination of the author and the crops for planting.

Below are beautiful photos of the beds in the greenhouse, which you can recreate on your own:


Professional gardeners know the need to prepare any soil in the fall and spring. Such prevention does not allow a large growth of weeds and increases productivity.

First of all, the area for planting plants is dug up. And in the fall, they do it as late as possible: almost before the onset of frost, and leave large clods of earth so that the roots of weeds and pests freeze. And in the spring, on the contrary, they are loosened to enrich the soil with oxygen and quickly dry out after a snow pore. If there are perennial fruitful shrubs on the site, then the need for wrapping for the winter depends on the planted variety. For example, girlish grapes do not need warming.

Important! For any crops and plants that will decorate the garden or benefit, it is worth following individual care recommendations.
Let us consider in more detail the features of soil preparation for winter and spring planting.
Spring is the most active period in the life of any summer resident and owner of a garden near the house. Seedlings are already growing on the window, which should be transferred to open ground or a greenhouse very soon. But you can’t just “poke” the plants into the ground, otherwise they will die or not bring the desired harvest. That is why spring soil preparation takes a lot of time.


It is worth considering the characteristics of the crop that you will sow in the selected area. For example, preparing a bed for carrots in the spring includes several stages:


By following these recommendations, the harvest of an orange vegetable will be on top. There are fewer requirements in preparing the beds for onions in the spring. The main criterion for obtaining a good harvest is the choice of a place for planting. Best of all, the vegetable grows in the sun or partial shade, but bulbs should not be planted in marshy areas of the site.

All the nuances of growing onions, see the video:
Autumn is not only a pleasant harvest time, but also the process of preparing the soil for the next season, as well as wrapping non-frost-resistant plants and removing dried branches in anticipation of winter.


By following the three tips suggested, it will be easier to dig the ground in the spring, and the first shoots will appear much earlier.

But the work in the garden before the onset of cold weather comes down not only to digging and removing old plants, but also to planting some crops. For example, to prepare beds for garlic in the fall, you should follow certain rules:

To make it easier to grow garlic in your area, watch the video
Do you know what an innovation is, how high beds came to our country from Canada. There, the land has been cultivated in this way for many years. Such planting options can be used not only for growing vegetables, but also for creating original ones. Let's find out how to make beautiful and practical high beds in the country with your own hands. Photos, descriptions of technological processes and diagrams will help you with this.
The rate of gas exchange, soil moisture and the presence of beneficial microorganisms depend on the size and shape of the beds. All these parameters affect the quality of the soil.
With the help of raised beds, you can grow a large crop of berries, vegetables and fruits. At the same time, you can get good performance even from a piece of land that is not fertile. A feature of high beds is that they warm up faster than low designs.

There are several types of vertical beds. They differ not only in material, but also in functionality. Some options are made from building materials, while others are simple .
Here are the types of beds available:


When creating isolated beds, factors such as illumination, soil composition, and also its structure can be taken into account. At what height such beds will be placed depends on the volume of the root system, soil characteristics and your own preferences. The minimum height is 15 cm, but to produce better insulation, you can raise them by 30-40 cm. Warm raised landings can be higher than 50 cm, since a layer is still laid on the bottom. Narrow beds can be up to half your height.

The length can be very varied. Most often it depends on the length of the garden. If the bed is too long, then it needs to further strengthen the sides. When arranging any garden, remember your own comfort and convenience. Best Width when you can reach the middle of the structure. The optimal value is 90-120 cm.

You can grow a variety of crops in raised beds. It is not recommended to use plants with tall stems, as it will be inconvenient to harvest fruits from them. Root crops, strawberries, peppers, herbs and cucumbers are often planted on bulk structures.

Note! A special benefit is the filler for raised beds. It is made from organic ingredients. At the same time, the root system is located in the fertile layer, which contributes to the development and growth of plants.
Related article:
Let's find out how to make original beds and what materials they can be built from. Interesting ideas in our review will help you create a variety of designs.
The main advantage of raised beds is that you can place a lot of vegetables and plants in a small area. High beds for strawberries, fragrant herbs and cucumbers are especially popular. Also, such structures have other advantages:

Such structures have certain disadvantages, but there are not so many of them. First of all, you will need top dressing with mineral fertilizers. It is important to monitor the invasion of the bear.
Note! Before starting work, treat the wood parts with an antiseptic and special impregnations. This will prevent the processes of decay and protect against the destruction of materials.
You can also create warm high beds or vertical structures. They are popular because appearance and space savings. In addition, this perfect solution to protect plantings from various pests. Vertical structures are great for growing flowers, strawberries and herbs. You can not only make such designs from improvised raw materials, but even purchase ready-made options. You can see how to make warm designs in the video:

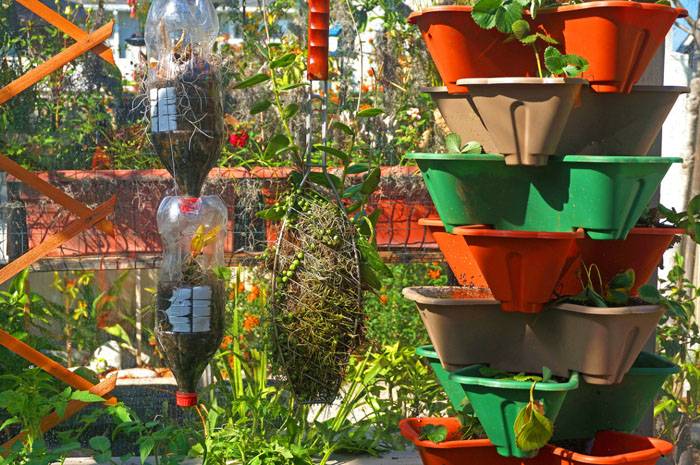
You can see different variants design of vertical beds, but their most important advantage is their miniature dimensions. Such structures can be built from any materials, even from plastic bottles.
Vertical products do not require special care. They are on optimal height in order to handle them comfortably.

You can see how to make a raised structure for strawberries in the video: To increase the rigidity of the pyramidal bed, you need to install an additional pole as a supporting element. In this case, the boards are mounted on a horizontal surface and attached to each other. A rail is installed in the base. The resulting side is fixed vertically, and then the second and third sides are attached to it. After installing the frame system, the length of the rails is measured. They are placed with an interval of 25-30 cm. To make the shelf raised, its ends should be cut at an angle of 30 degrees. After assembly, the structure is filled with soil, which is rammed.
To grow strawberries, you can build a vertical garden bed. At the same time, you need to prepare plastic pipes, steel cable and a special cutting knife. The volumetric section allows you to place the required amount of soil inside. The incision should be made along the structure. To fix the bed in a horizontal position, you need to make a hole in each of the halves. Then a fishing line or cable is pulled through them. Then the parts are placed one above the other. At the same time, you can do different levels beds from pvc pipes with your own hands.

Note! If you plan to place structures in a suspended state, then you need to consider that they can sway. Therefore, it is better to install them in places that are well protected from the wind.
A compact design can be built for crops such as strawberries, herbs, flowers or potatoes. A good solution would be a vertical bed. To do this, you need to prepare a metal mesh, straw, special soil and the necessary tool for processing the material.

To create a bed, you need to bend the grid in the form of a pipe. In this case, the cross section should be 0.9 meters. The edges are fastened with wire. Straw is laid on the sides, and the free space is filled.
To plant potatoes, such beds should be placed at a height of 50 cm from the surface level. Spaces of 10 cm are left between the plants. Then the first layer should be shed, then the soil should be laid and the seedlings should be planted.
Ordinary strawberries can also be used to grow strawberries. Such designs allow you to create an attractive external design. You can use both plastic and clay pots. Thus, you can create a multi-level composition.
Pots must be selected so that their diameters become smaller towards the top of the structure. In this case, the difference between pairs of pots should differ little.

Most big pot installed in the selected location and filled with soil. After that, a smaller pot is placed in it, etc. When the structure is ready, plants are planted in the soil and watered. The largest pot is installed at the base of the structure. A rod smaller than the diameter of the container is placed inside. The pot is filled with soil, and the rest of the products are alternately strung on rods. After filling with soil, plants are planted. Pots are mounted on a pole or high stump.
There are different ways to grow cucumbers in open field. In this case, you can build vertical beds. Also, this option is suitable for planting strawberries.
The tire structure is mounted on the same principle as pot structures. For this, tires of different sections are suitable. But at the same time, keep in mind that old products are not particularly environmentally friendly material.

Before mounting, the tires should be cleaned, dried and, if necessary, painted. The largest tire is placed down, and a part is cut off on the side. The hole is filled with soil and planted with plants. Thus, other elements fit in. Tires can be beautifully decorated with patterns or even unusual cuts.
Article
INSTRUCTIONS AND PROPHECIES OF THE Blessed MOTHER ALIPIA GOLOSEEVSKY, Kyiv...

Eufillin dropper in ampoules is used to treat pathologies that ...

Among all ointments for the treatment and prevention of joint diseases, the most ...