"The woman is created for a man, not a man for a woman" - such a postulate ...


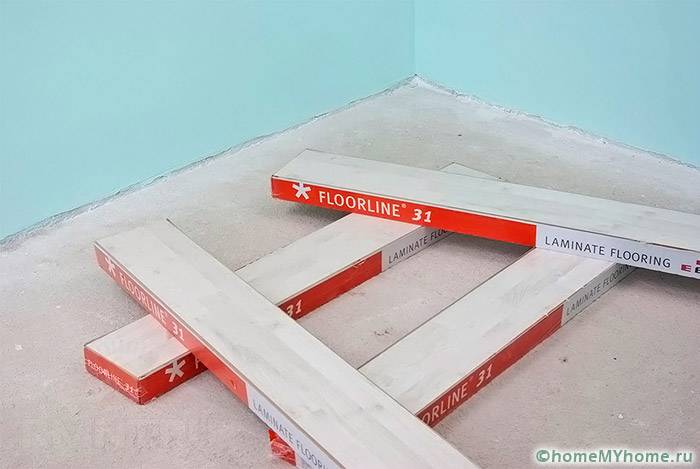
Among the widespread selection of modern flooring, the popularity of laminate is firmly held. This relatively inexpensive type of flooring has a number of indisputable advantages. In addition to the abundance of colors and textures, this material, subject to the rules of installation and operation, is durable, it looks great and does not require special care measures. It is very easy to put it, just adhere to the instructions and correctly implement recommendations for working with laminate.
The laminate panel is a multi-layered design, from all four sides equipped with special lock device. With it, the floating system of this outdoor coating Firmly connected to a single whole. There are several fundamental conditions, non-compliance with which can lead to rapidly damage coverage, the appearance of creak and cracks.
Next, consider the order of work on laying laminate in more detail. What instruments need? What are the features of laying on different bases? How to heated under this flooring? And also consider some additional aspects of working with this material.

The priority assignment that needs to be solved before starting the laminate installation, is the alignment of the foundation. At the same time there are several ways to solve this issue.
1. Concrete floor
Preparation of concrete base with their own hands lies in three stages:
To equalize the floor over the screed, it is convenient to use gypsum fiber sheets. Additionally, they will serve as heat and sound insulation.
2. Wooden floor
Laying the laminate on the wooden floor by technology does not differ significantly from laying on a concrete tie.
It is important to remember that sheets need to be laid with small expansion gaps (up to 3 mm), and hats of self-tapping or nails need to drown well.
Experienced builders recommend handle the wooden base (both old and new) before laminate flooring antiseptic means. This will help prevent the formation of fungal mold or damage to the wooden base with trees insects.
Laminate - practically universal coating. It can be treated anywhere at home or apartment, as well as on any basis. Even on a tile or old linoleum. However, do not forget about checking the surface evenings and cleaning the old coating. Approve the ground required qualityPrepare materials and tools for laying laminate.
Deciding to store the floors with laminate, you need to accommodately approach his choice. When buying it is worth paying special attention on wear resistance, coating strength (scratch resistance), ratio to moisture. Price, a manufacturing country and design, naturally, are also important. Outdoor boards must be served not one year, so their quality must match the characteristics of the room, including from a visual point of view.
1. How to determine the purpose of the class of laminate?
There are two main categories of laminate: "20" -ts and "30" -ts. The first are intended for use in residential areas with a relatively small technical load. Second - for commercial or public premises with large crossings and complex operational features.
In turn, each of these categories is divided into three classes:
The maximum warranty on this category does not exceed six years. Because of their pretty low technical characteristicsHaving a lower cost, such a laminate becomes becoming less popular.
It is worth remembering that the thicker the board and below the level of moisture resistance (up to 20%), the longer it will last, and less the hassle is such a flooring will bring the owners.
2. Purchase a substrate for laminate
Laminate stacked using the "floating floor" technology. This means that in any place it is not attached to the base. So that this flooring light up for a long time, to choose a little high-quality material. In addition to laminate, you must select the appropriate substrate. It will not only become an extra heat and sound insulation, but smooth small irregularities and roughness of the base, soften the sound of steps.

The selection of substrates is quite diverse. It is necessary to proceed from the need to apply one or another view. For smooth bases, there will be a 2-mm thickness, but it is better to use more pain. There are several types of substrates:
Most popular, sold in rolls, has a fairly affordable price. Moisture resistance, thermal insulation and unattractiveness for rodents and mold - its positive sides. One of the options for such a substrate is foil. Such material due to the thin aluminum layer perfectly reflects the infrared spectrum, that is, heat.
But there is such a substrate and negative sides. Polyethylene does not hold the form, so it sends over time. It is also possible to form an electrostatic charge, so in very dry premises the floor can beat the current.
A better variety of this material - foamed polyethylene. The price is higher.
This material of natural origin perfectly isolates heat and is not subject to mold fungi. It is not deformed and can serve for quite a long time. However, the high price and the water permeability is minuses of cork substrates.
Keeping all the positive qualities of the cork substrate, this kind is deprived of disadvantages in the form of moisture permeability, because it is the basis of the bitumen and kraft paper, and cork plug It is distributed based on a layer of 2 - 3 mm. The high price of this material will be justified in the case of styling it under dear types of laminate.
This material today is the most optimal for use as a substrate for laminate in rooms, where it is assumed high load on floor covering. Polystyrene foam is most effective. Since its composition contains air bubbles. It perfectly levels the irregularities of surfaces, but does not change common form, well absorbs the sounds of steps and prevents the passage of moisture to the laminate boards. The polystyrene foam substrate under laminate will provide comfortable conditions Even for barefoot children's legs.
This is an interesting combination of several layers of polyethylene, between which there is a thin layer of polystyrene balls. In addition to positive qualitiesobtained by combining these two materials, this substrate exceeds the air perfectly, which ensures the surface of the body "Breathing".
3. Warm floor
Except laying substrates what is prerequisite For laying laminate, for additional comfort, a "warm floor" system is used. Consider the features of the installation of heating under the laminate.
One of the most rational ways to arrange heating of the floor under the laminate are infrared film systems. To establish such a warm floor can be quite simple with your own hands without resorting to the help of specialists. The cost of such a system is quite accessible, and allows you to abandon bulky pipes and pouring screed.
The thickness of the film is less than a millimeter, and therefore it will not affect general level Outdoor coating. Use it is quite safe.
Under the film coating of the warm floor, you need to be able to store folgize to ensure thermal insulation and reflection of infrared rays of heating elements.
Important: Foil insulating material can be found only under the film system of the warm floor. For other systems, the use of aluminum components in the substrate is not allowed.
Features of the use of thermal film:
The laying of thermal blinds should pass in strict accordance with the manufacturer's instructions. Laying of laminate is carried out only after full check Systems.
In addition to the laminate itself, substrates and heating do not need to forget about the concluding decorative element. Therefore, choose the plinth under the laminate corresponding to color and texture.
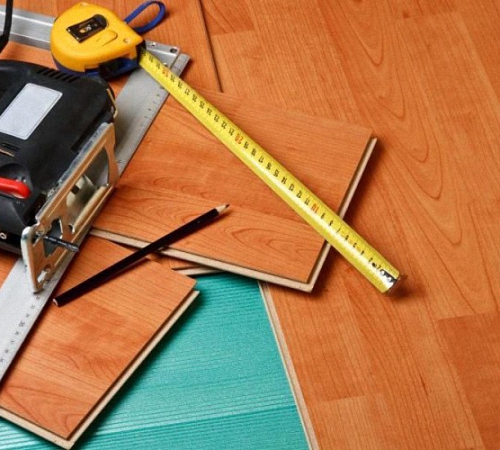
Most of the success in work is properly prepared workplace. For laying laminate, you will need:
Seal the gaps between the lamellas, you can use the cropping of the material. They are used for the device deformation seam Along the walls.

1. Preparation of material
Before you start work, you should calculate and select the order layout order. The laminate installation scheme is as follows: each next row must be started from the board, which does not match the first sheet of the previous row. This means that cross-shakes should not be present in the figure. Ideally, the principle of the location of the seams between the slats should be similar brick masonry - The butt sow is located exactly in the middle of the element in the previous row. But for saving the material, you can begin a new row from the cropped part of the last plan of the previous row. So the intersections of the docking seams can be easily avoided.
You can lay the laminate as along, across, and diagonally diagonally, but it is necessary to take into account that when placing a board of the boardroom, the lamellae must be resolved perpendicularly.
Laminate is stacked depending on the manufacturer's recommendations by adhesive or lock. The assembly of the floor can be held both with the magnificent joining of each bar and rows. The second option professional builders prefer more, as it optimizes the entire work process.
The efforts when closing the locks should not be applied, and you can only "finish" the gap through the cutting of the laminate board or through the bar.
If the repair and flooring is carried out during the cold season or the air conditioner constantly works in the room, it is necessary to give the material to adapt to temperature regime For 48 hours.
2. Instructions for laying
Preparing everything you need can be searched to flooring flooring. The following is offered a step-by-step instruction on the installation of laminate.

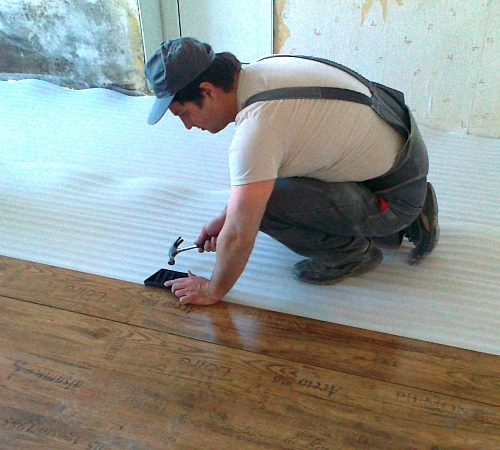
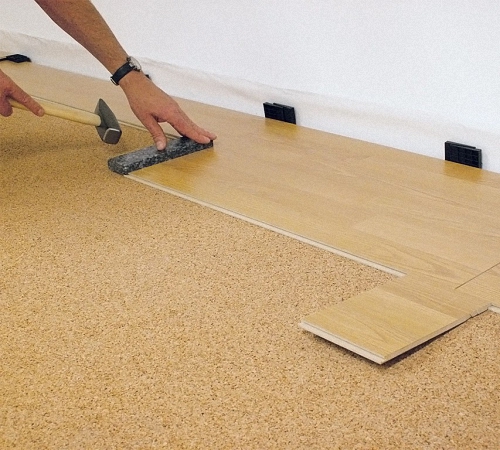
1. We drag the entire surface of the floor with the substrate. So that the sheets do not move, the joints are sampled by scotch.
2. When laying the first row, a cream protrusion of a wall-oriented on the wall is cut. The gaps should not exceed the distance that can overlap the plinth. But both the Laminate Board Wall should not be located. Minimum distance 8 mm.
3. We collect the second line of the panels and connect with the first next.
4. Help the initial elements on right distance From the wall and install the spacer wedges, which determine the distance between the wall and the lamellas of the first row. We place them at a distance of 25 - 30 cm
5. So the floor laying continues to the end. The last row is attracted by a clamp or with the help of sweater.
6. Near the gap door between the laminate and the box should not be. Ideally, you need to start the lamellas closely under the door shoals, having previously done small inscriptions.
7. Near the pipes overlooking the floor, it is necessary to leave the compensation heat gap to 1 cm. For this, the opening of the required diameter is drilled in the right place and cut the board in the middle. Set the board to the pipes, and the remaining part is attached with the help of glue along the end seam and attract the clamp.
8. After the laminate laminate lamella Rabdy Plintus.
Visual guide on how to lay a laminate in the video, which is at the end of the article.
On the laminate packages, the manufacturer specifies the instruction on its laying. Adhere to its and data in this article of recommendations, and the laid outdoor coverage will delight its owners not one year.
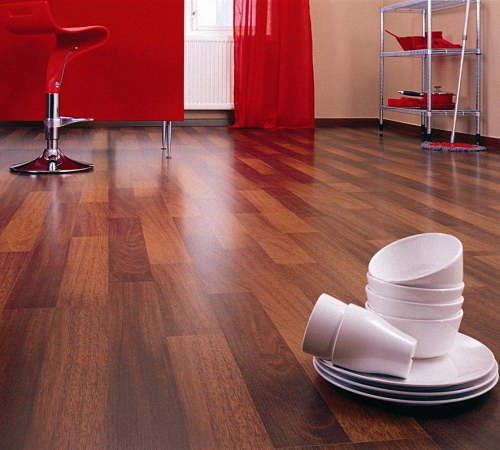
A high-quality and beautiful flooring can make any room with a cozy, stylish and modern. Recently, most people choose a laminated floor, consisting of panels interconnected using a special locking attachment. Laminate is considered one of the most practical materials used to decorate the bedroom, kitchen and other rooms in the apartment. The owners who have decided to lay a new floor, should know how laminate laying is performed, can laminate on linoleum, concrete or plywood sheets, which substrate to choose for sexual coating, etc. It will be easy to understand these intricacies and nuances, for this you can use the recommendations of specialists who know exactly how to put the laminate correctly and what tools may be required for this.
A person who puzzled as to put the laminate himself should know how laminated panels having spikes and grooves are bonded. In stores you can buy different types of laminated coating, characterized by the connection method:
From the type of mounting panels will depend on the technology of laminate laminate with their own hands. The owner must learn in advance about the attachment of the boards and prepare everything you need for the installation (glue, Cyanka, etc.).

Embling on how to put a laminate properly, you need to know about what kind of substrate types under laminated panels:
The owner who decided to lay the laminated panels should know that there are different ways of laying a laminate:
The choice of transverse or longitudinal flooring of laminated panels always depends on which wall in the room the window is located. So that the seams between the boards were less noticeable, the panel must be treated in the direction of the light stream. Laying the laminate diagonally looks very beautiful and originally regardless of the planning of the room, but such work can be quite complicated for a novice wizard, moreover, the material consumption and the number of cropping increases with a diagonal flooring.
Laminate laying options are selected individually for each room. The owner of the apartment must take into account the dimensions, the shape of the room, and also pay attention to the natural source of light (window). If you have any doubts associated with such a procedure, as laying a laminate, you can always watch a video where there is a description of the process and a detailed explanation of each stage of work, as well as tips, how to properly lay a laminate board.
In independence, what kinds of laminate laying will be selected, the master must be adhere to the following rule: each number of panels should be treated in the same way, but in chess order. If the first row begins with a whole long board, the second must begin with a short panel (its length can be from 15-20 centimeters to half a whole panel). The third row repeats the first, the fourth - the second, etc.

To lay the laminate with their own hands, it is necessary to take into account the following points:

To perform a flooring correctly, you need to prepare materials and tools for laying laminate. The owner making all the work independently, it is necessary to have the following set for laying laminate:
In addition to materials and tools, a newcomer should always have an instruction in which it is described how to put the laminate with their own hands.

People seeking information about how to put laminate with their own hands should take into account that this type of flooring can only be treated on the perfectly flat base. Under this condition, the laminated panels will look neat and attractive and also will also serve long term. But the laying of laminate on the uneven floor can lead to the fact that after a while between the panels will appear slits, and the owners will have to do new renovation. Put laminate with your own hands on different surfacesEach of which should be carefully prepared for upcoming repair work.
Newbies in repair business are often wondering how to put laminate on the concrete floor. To flooring panels on concrete turned out to be qualitative, it is necessary to take into account the following rules:
Recommending how to properly lease laminate on the concrete floor, it is necessary to find out how laminated panels are stacked wooden boards, sheets of plywood or chipboard. Perform such repair work, you need to adhere to the following recommendations:
Many owners want to know whether it is possible to lower the laminate on the linoleum. Most often, the masters respond to this question affirmatively. If the surface does not have irregularities, and the linoleum itself is well attached to the floor, then the laminated board can be laid on top of it (in addition, additionally vapor insulation film No need, because Linoleum itself has excellent moisture resistance). Laying of laminate on linoleum will not deliver special problems, it is also possible to lower the laminated panels on tile tile.
Finding out whether it is possible to lay a laminate on linoleum, concrete, tile or wooden boards, it is also necessary to understand which surfaces are not suitable for laminated coating. No one an experienced master It will not be treated by a laminated board on carpet or any other carpet covers. In addition, the installation of the laminate should not be carried out in rooms having increased humidity (bath, toilet, sauna, etc.).
Often, the owners ask repairmen, is it possible to lay the laminate on the warm floor. If electrical or film heating systems are installed on the floors, experts do not recommend raping the laminated board from above. Installation of warm floor under the laminate can over time to lead to flooding flooring. Relieve the laminate board is allowed only for water warm floors.
When the preparation of the floor to laying the laminate will be completed, it is necessary to go to the main work. The novice master should know the basic rules for laying a laminate with their own hands (for this you can view the video tutorial in the Internet in which a detailed commentary of a specialist and a story can be given about how to put the laminate and carry out all the actions in stages:
On how to put a laminate independently, you need to know before the start of work. How to lay a laminate laminate, you can see the video that are posted on the Internet. It is also possible to find information on how to lay the laminate with your own hands, you can in a specialty, where there is usually a detailed step-by-step instruction.

The owners who have decided to contact the specialists performing repair work should know how much it costs to put the laminate. Rates for such a service will depend not only from each specific firm engaged in repairs, but also from the area of \u200b\u200bthe room, as well as on which laminate laying scheme will be chosen by customers.
Typically, the cost of laying laminate is calculated by metraria. On average, the cost of work on the flooring of laminated panels in 2016 is about 150-200 rubles per 1 square meter. meter (without alignment, screed, laying substrates, etc.). Singing the diagonal panels will be a bit more expensive - from 200-250 rubles per m2. The dismantling of the old coating will cost 70-80 rubles, the alignment of the foundation is 200-300 rubles, the substrate flooring is 10-20 rubles (all prices are given in one square meter).
If a person is not sure that he can independently cover his floor with laminated boards, it is best to entrust all the work by professionals who know all aspects of such a procedure as laminate laying, the price of which will vary depending on the set of factors. By entering into an agreement with the repair company, the client must learn in advance how much laminate laying is per square meter, and ask the masters to calculate the final cost of work in the entire apartment.
Laying the laminate does not take much time if the wizard will have a step-by-step instruction with photos illustrating each stage of work. If the owner could not figure out how to put the laminate, it can always call the company performing construction works, and order them for the installation of flooring. Professional repairmen know exactly what is needed for laying a laminate whether it is possible to put a laminate on the linoleum and how to hold the floor, without spoiling an expensive outdoor material.

This material can be laid on any draft floors: concrete, tiles, linoleum or boards. The most important thing is that they are durable, rigid and perfectly smooth. Today we will look at the main nuances as laying a laminate on the wooden floor, as well as we describe this process step by step.
Deflection or deformation;
Instability (shifting boards when pressing);
The presence of large slots, bitch and depression;
Damage caused by fungus.
Old wooden floors are better to disassemble to support bars. It is possible that over the years of operation, they covered mold and fungi. In this case, damaged lags are replaced with new, and all the remaining twice are treated with an antiseptic.
Rocking lags need to be replaced
Remove and replace all damaged floorboards. The slots between the boards are filled with a special putty for the wooden floor. Small differences in height, including the paint layers, can be eliminated using an electric paper or a squabble machine. On the small sites Slops are removed by sandpaper.

Cyclumin painted floors
If the floors laid recently, they can not be removed. In this case, only fasteners are checked, immobinatedly replaced.
Important! Before cycles, a hat from nails and self-tapping screws is necessary to drown into a tree for several millimeters.
The laminated laminate laminated laminate together, in fact, are a single web (such floors are called floating). This is exactly what the strictest requirements for stacking are explained. After all, with the slightest deflection, the whole design can be deformed.

Non-laminated laminate
Permissible drops in the height of the surface on which laminate will be laid - no more than 2 mm for every 2 m. And in case of damage to its locks during the warranty period, the manufacturer may refuse to replace lamellas or return funds due to violation of the laying technology.

Permissible differences in height
That is why after repairing wooden floors and eliminate their damage, the surface must be perfectly aligned. With strong lining heights, the lining heights are mounted under lags of supporting wedges. Final alignment of floors is made using lined From trimming plywood sheets, fiberboard or wooden bars.

Flooring plywood
Important! You should not lay the Faneur or Fiberboard to the walls. After all, when changing the temperature or humidity conditions, it is able to change its dimensions. The size of the compensation (technological) gap is the distance from the wall to the extreme sheets - 0.5 cm.
When diagonal laying there will be 10-15%;
With the usual method of laying waste will be less - up to 5%.
Council. Since the color of the lamelles even in one batch can be varied to get a uniform pattern, when laying it is better to take the laminate alternately from different packs.
Finally aligns the floors;
Evenly redesters the load between the lamellas;
Filling it all free space Between the surface and laminate, protects it from deformation;
Absorbs noise from steps;
Performs the function of the heat insulator.
The optimal option is the substrate from polystyrene foam. It is much cheaper by traffic jams, while perfectly holds the shape. For flooring on wooden floors there will be enough 2 mm substrate. Cheap foamed polyethylene is better not to use - over time, he will quickly sleep and lose the shape, and the floors will begin to deform and creak.

Polystyrene laminate substrate
It is placed only by a smooth side up and connects to each other. without coaching. To avoid the substrate shift, all sheets are bonded between themselves with a construction scotch. If the damper tape is not used, you can start the edge of the substrate slightly on the wall for a couple of centimeters. In the future, the surplus is cut. In order not to strip a porous material when walking, put the entire substrate at once is not recommended - it is better to spread it as needed.
1. To protect the laminate from the swelling during temperature drops between the lamellas and the wall, small speakers From plywood or small bars with a thickness of 0.5-1 cm.

It is not recommended to laminate to the walls of the laminate
2. So that the joints between the lamellas are thickened in the eyes, they must be located in such a way that the light is passing along them (narrow side to the window).
3. The first row is located spike to the wall.
4. Next, the stying is made only with shuttless shifts (in a checkerboard), that is, the next row board center must have to join the previous lamellas. In order to get a similar displacement, the first board of the second row is cut by half or ( long boards) on 2/3.
5. Lamaders can have two types of fasteners. Each package has a pictogram with an indication of the fastening and methods of its connection.
6. When fastening the type Click (most common), the board, which must be allowed, slightly bends at an angle of 30 ° and with a slight force pressed to the second lamella to the characteristic click. To strengthen the connection, the connected boards are bought to each other using a rubber hammer. Boards with fastening type Lock are simply clogged into the adjacent hammer tapping before clicking.

Laminate laying order

Hare Laminate.
Council.In order not to damage fragile lamellas, when hanging boards, you can use each other wooden barberThrough which the boards are bought by a hammer.
7. The lamellas adjacent to the pipes are cut in half in such a way that the incision falls on the center of the pipe. Next in the boards, holes for a couple of millimeters larger than the diameter of the pipe. To seal the compound and arrangement of sounds (metal and bimetallic pipes They are very good sound conductors) are placed rubber gaskets.

Installation of laminate at batteries
8. To obtain a neat joint, door jambs are slightly peeled down in the thickness of the lamella.

The cant is written down at the bottom so that the lamel
9. The transition to another room can be issued by an aluminum threshold, which is invested between the laminate boards, or a special wooden spill with grooves.
Video: Laying of laminate on wooden floor
Send the material to you on E-mail
The apartment is relevant for many. Repair of the house and problems with this related worried everyone who has conceived to spend construction work on their own. Today we will discuss some subtleties of laying laminated coverage, will answer the question "how to put the laminate", tell me how to avoid the most common mistakes and reveal small professional secrets.
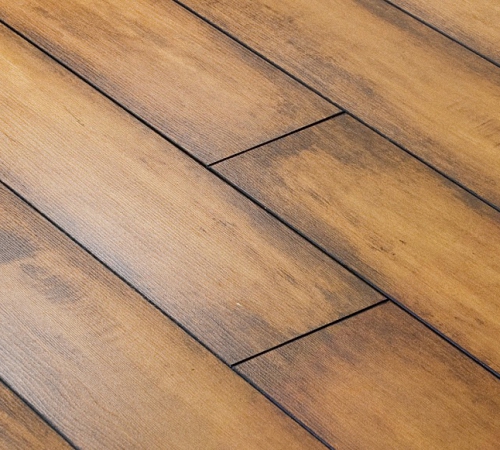
The coating happens different species and flowers
Laminated board today is very popular and widespread material for floor covering. The collective name "Laminate" (what is happening from the Latin "layered") combines the types of fiberboard used for the fixture flooring.
Today, the industry produces a wide variety of pubisted. The right choice of material will allow you for a long time to forget about the floors and not worry about their condition. Let us briefly stop on the layered structure of the floor to choose the most suitable material with the knowledge of the case. Laminate layers are several, the top is the protective film carrier at the same time decorative function.

In addition, this film has different wear resistance. It is this characteristic of parquet is divided into classes. And when we mentioned proper choice, It is the coverage that was meant. Surely, every person who has begun to repair, wants to make a job with high quality and for a long time. To do this, it is necessary to use high-quality material, and not Chinese fakes. Good stuff Must have certain characteristics with the corresponding class.

The classification of floors is carried out in accordance with the European standard EN13329. It highlights two groups of use:
but. Wear resistance class 1.
b. Wear resistance class 2.
in. Wear resistance class 3.
g. Class of Wear Resistance 4
but. Wear resistance class 1.until the 4th
This is reflected in the coding of the material, the 1st digit is the scope, and the 2nd is the abrasion class. Thus, for residential apartments, a blackboard with marking 21 or 22 is perfect, and for public spaces you need a class 33-34. It is important to know that freshly removed floors will not turn into a rubbed board after six months.
Helpful advice! Before laying, the material is not recommended to unpack about 2-3 days, let the material be searched in room temperature and humidity. Tutuch should not be opened, let them be in the factory packaging. It will give good adaptation To local conditions.

What kind of better, it is definitely difficult to answer. It depends on the conditions in which the coating is stacked: humidity, rough floor (concrete or board), floor horizontal and so on. Optimal is considered to listen to the recommendations of the seller of the source material of the floor, because a substrate with a specific set of properties is selected to a certain laminated board. It is important that the substrate performs the main functions:

Article on the topic:
When the substrate is notified, it is important that its seams do not coincide with the seams of the board. Better to fit the nipple sheet Material in a checkerboard, and fix painting scotch. The substrate in the roll It is necessary to roll out the walls on the walls, and the shoulder joints also scratch well.
Important! The connected venge seams will make the surface uneven, which will damage the coating.
In order not to make mistakes, look at the laminate editing video with your own hands, presented below.
You can start the flooring of laminated panels from any angle of the room, and continue preferably from the window to the door. Previously, it is necessary to calculate the required amount of the board, for this you need to calculate the size of the extreme slats at opposite ends of the room, with a strip width of at least 50 mm. Starting the floor should be started from the gap between the wall and the first strip of 10 mm, so that the indent is not "left" it is necessary to set the space. Below is a convenient calculator for calculating a laminate, which will calculate the required amount of this material for different methods of styling:
"The woman is created for a man, not a man for a woman" - such a postulate ...

How is HIV on different time segments manifest? The reasons for the development of AIDS is ...

Stomach Cancer: Symptoms, Causes, Treatment of Stomach Cancer is a change in cell type ...