INSTRUCTIONS AND PROPHECIES OF THE Blessed MOTHER ALIPIA GOLOSEEVSKY, Kyiv...


Most of the work related to the development and installation of water supply systems requires a certain amount of experience and a clear understanding of the specifics of the operation of a water supply system based on an artesian well. But even in such a difficult matter, there are many individual elements and nodes that are quite capable of being installed with your own hands. For example, connect a hydraulic accumulator and a pressure switch to a pump. The complexity of such work is minimal, the installation of a hydraulic accumulator for water supply systems does not require special skills or knowledge of electrical installation;
There are three classic options layout of pumping and accumulator equipment for a well:
Note! In any case, before setting up the accumulator pressure switch, you will need to correctly calculate the required water pressure in the house, taking into account the requirements household appliances and the existing height difference between the level of the pump and the maximum point of water extraction in the house, most often this is an air outlet valve for the heating system.
Immediately after drilling the well and determining the debit, they begin to equip it. Based on the depth of the aquifer and the degree of its contamination with salts and sand, a decision is made on the method of designing the head, where it is necessary to put the pump, and which version of the pumping system and pumped storage installation is best suited.
A submersible pump unit has always had a lot of advantages, but the more powerful and perfect the pump, the larger the volume of the pumped storage unit must be used to compensate for pulsation and water hammer. Therefore, when choosing a scheme for installing pumping equipment and a hydraulic accumulator device, the system parameters were successively determined:
Note! To ensure the operation of expensive and powerful pumping systems of Danish, German and Italian manufacturers, hydraulic accumulators from 50 to 100 liters are most often used, which are installed in a well-equipped basement or basement.
The high pressure and pressure of "European" models make it possible to install pumped storage units at a considerable distance from the well, even if the building has a second floor and household appliances that require increased water pressure in the water supply system.
The standard piping connections are shown in the diagram.
This option of installing a hydraulic accumulator in a water supply system provides a number of significant advantages:
Important! Installation of a hydroaccumulation device in separate room requires that polypropylene pipes be laid in the ground to a depth not less than the freezing depth with a slope towards the well of at least 2o. This will allow air bubbles to escape to the filter and the connection point of the hydrostorage tank.
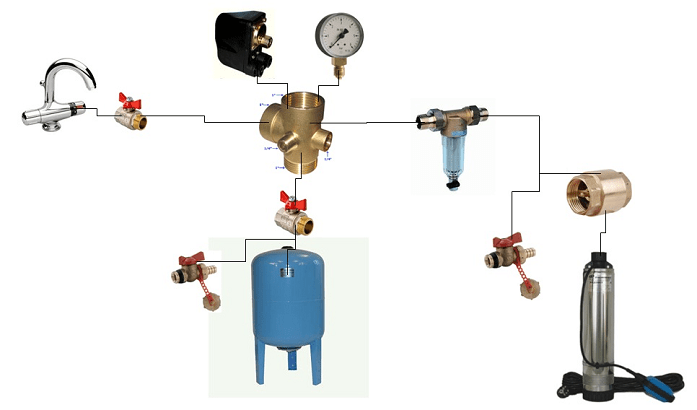
The basis for the construction of such a node of the water supply system is a hydraulic accumulator tank, most often of a vertical design on supports. At the bottom of the tank, a five-pin fitting is screwed in, through which the pump line, outlet line, pressure switch sensor and pressure gauge are connected. The pumping line, most often from the well to the accumulator, is made of polypropylene pipe. In small water systems, connections can be made with flexible hoses, and the relay and filter are usually located on a special mount at a height of at least a meter above the floor.

The disadvantages of such schemes include the sensitivity of submersible pumping systems to a high content of sand and salts. The non-return valve in submersible systems is most often located at the outlet of the pump at great depths. After raising a certain amount of water, the sand remaining in the outlet pipe slowly settles, sinking to a depth, and gradually accumulates on the body check valve, gets inside the device, which leads to the failure of an expensive unit.

For domestic submersible pumps of the "Vodomet" type, you can install in a caisson or head well. Most often, such a scheme is used for low-power pumping systems, with a shallow aquifer.
In the photo you can see the classic correct option installation of a submersible pumping system and a hydraulic accumulator in the well.
The output from the wellhead is fed to the filter, then to the accumulator, and only after that to the pressure switch submersible pump. The output from the well to the filter and accumulator is made with a flexible hose, all other fittings are soldered from plastic pipes. What gives such a scheme? Such an installation allows you to issue sand-free water to the accumulator and relay.
By connecting the system to the water line through a filter, the reliability of the automation is significantly increased. The relay should be freed from dirt and sand as much as possible, otherwise, after a couple of months there will be interruptions in operation.
In the central part of the output line running from the pressure switch to the entrance to the house's plumbing system, there is ball valve with a tee, which allows you to solve a rather difficult question: how to drain the water when adjusting the pressure of the automatic relay.
For large height differences, or if the water in the well is of very low quality, additional pumped storage devices are installed with the separation of the volumes of clean water and process water. The system consists of two hydraulic accumulators and a clean water tank. As a standard, the pump is equipped with a raw water accumulator in the well, from which the liquid enters the vortex pump through the filter of dirt and neutralization of suspensions, which pumps water through membrane filters into the accumulator for clean water located in the house or basement. Water is taken from the tank and sent to the place of use in the water supply system by a conventional network pump.
A pumping device that takes untreated water from a well should be as insensitive as possible to the content of hard salts and clay suspension in artesian water.
It is best to install a properly tuned centrifugal pump with an ejector and a small hydraulic accumulator for these purposes. As backup source water, the first accumulator will not be used, so you can limit yourself to a small membrane model of 10-12 liters.
Special differences in the use and installation of a hydraulic accumulator with surface pump no, except that:
The country-garden option, for all its primitiveness, allows you to very rationally use the capabilities of pumps with high water flow and get by with the minimum size of the accumulator.
The advantages of the pump installation option shown in the photo are obvious. Firstly, there is no need to install a large and expensive accumulator, which does not always make sense to purchase for the needs of a summer residence. Secondly, the relay on the pump can be connected with a flexible hose to the place where water is taken from the tank and adjusted to the minimum 0.1 and 0.2 atm off and on, respectively. In some cases, the pressure switch membrane is replaced with an electromechanical timer that allows you to pump out a certain amount of water from a well or well for a programmed period of time.
All of the listed options for installing a hydraulic accumulator have been tested in practice and proven to be reliable. If the quality of water in your estate or private house leaves much to be desired, use the pump method described in the article with two accumulators and a membrane water purification filter. Most branded hydraulic accumulators have a certified rubber sheath in which you can store a supply of purified water for a long time. drinking water. For technical needs, you can use a conventional tank, described in the last subsection, complete with a small and cheap vortex pump.
Let's analyze the seven most common myths about hydraulic accumulators and their functionality.
Such a phrase can be found quite often in the descriptions of hydraulic accumulators. Variations - the accumulator creates a constant pressure, etc.
Let's start with the fact that the membrane (rubber pear) in metal case no pressure, either constant or "variable", is simply not able to create. The pressure is created only by the pump. What pressure the pump provides, the same pressure will be in the accumulator. The only thing that can be said is that the accumulator, in the absence of water flow, maintains the pressure created in it and contributes to its gradual decrease with the beginning of the drawdown and a gradual increase after all the taps are closed. Those. without it, the pressure would change instantly, and with it it changes smoothly, due to a change in the hydraulic volume by stretching-compressing the membrane. This is the main reason for using it. For the correct functioning of the system with the ubiquitous pressure switch, it is precisely a smooth change in pressure that is required, which is ensured with the help of a hydraulic accumulator.
There is no need to talk about constant pressure in a standard system with a pressure switch and a hydraulic accumulator. The whole point of the functioning of such a system is that the pressure is constantly changing, due to which the operation of the pump is automated using a pressure switch. Constant pressure can only be at a constant flow, but as soon as the water flow changes (open or close an additional tap), the pressure changes instantly. All that a hydraulic accumulator can do is to set the inertia to the system, which is actually required of it. Constant pressure in systems with variable flow can only be achieved using a frequency converter, when the pump speed changes depending on the water flow.
So much the better for what? For the accumulator itself, for the reliability of the system, for the pump? A large volume hydraulic tank is more expensive, takes more space, the cost of replacing the membrane is higher. Some cons.
But there is a certain logic in the statement and it consists in the following: the larger the volume of the hydraulic tank, the less often the pump will turn on. And the less often the pump is turned on, the longer it will work, since the resource will be preserved (the starting mode of the electric motor is the most stressful - a jump in starting current, high starting torque, increased load on pump parts).
However, on the other hand, it is logical to assume that there is a certain limit in terms of the volume of the accumulator, which must be stopped. After all, it never occurs to anyone to buy a hydraulic accumulator with a volume of thousands of liters for a private house. Although with such a tank, the pump may turn on only once or twice a day or not turn on at all. Do not forget that the useful volume of the accumulator is about 30%.
The misconception is that even if we reduce the number of pump starts per hour by half (increasing the volume of the accumulator), the pump will not last twice as long as a result. Even knowing the number of starts per hour, we cannot estimate the total operating time in each cycle, which is much more important for the resource. In the same way, if you use the pump for only half a year, for example, during the summer season, you should not expect that the pump will last twice as long as that of a neighbor who uses the pump all year round.
Engine manufacturers do not give a certain limit on / off for the entire life of the engine, after which the engine fails or requires repair. The engine life is affected by the total operating time and thermal conditions. But at the same time, it is really important that the number of short-term pump starts per hour does not exceed the values \u200b\u200bspecified by the manufacturer (these data are in technical documentation to the pump). This is the main criterion by which the volume of the accumulator is selected. And if the pump is equipped with a device soft start, then the number of these same launches can be increased. Those. the volume of the hydraulic tank can be reduced.
If you pay attention only to the external aspect, then it is difficult to disagree with this statement. If we are talking about standard hydraulic tanks with a replaceable membrane, then outwardly they really look alike like twin brothers.
But as often happens, the most important thing is inside. Although hydraulic accumulators have a really simple device, even here there is room for nuances. That is why air escapes in some hydraulic tanks, and the membrane fails in a year or two, while others hold pressure and last much longer.
Read more about the difference between expensive and cheap accumulators.
The water supply system (not to be confused with the heating system) does without an air vent without problems. Air bubbles with properly laid pipes are removed through a tap during drawdown. And with improperly laid pipes (with the possibility of the formation of air pockets), the air vent will not save the matter.
Note that pressure switches can also work with air (for example, they can be installed on compressor equipment).
You can install an air vent for complacency, but this does not give a real effect.
Helping the buyer to navigate the variety of expansion tanks, most manufacturers actually produce hydraulic accumulators ( expansion tanks for water supply systems) is blue. The standard color association works, and there is nothing wrong with that.
However, the accumulator is only painted on the outside, so there are no technological problems to change the color.
Hydraulic accumulators are an integral part of many domestic and industrial pumping stations(comes with them). Manufacturers of pumping equipment do not independently produce expansion tanks and purchase them from specialized enterprises. For marketing purposes, these tanks can have not only a different nameplate, with a name different from the original one (which is not uncommon today), but also a different color. At the request of the customer, the manufacturer of hydraulic accumulators can paint them in any color at the factory.
For example, Grundfos used green accumulators for a long time, Pedrollo had red tanks, and DAB used white ones. Moreover, even different batches of goods could be different color. Sometimes the choice of accumulator color depends on the general colors pump manufacturer.

The color itself has no effect on specifications accumulator and by and large can be anything.
Therefore, if you have failed, say, a green hydraulic tank from a Grundfos station, it makes no sense to look for a tank of the same color.
Of course, blue is the most common color on the hydroaccumulator market, but not the only one.
Indeed, if you plan to use your accumulator again next year, then it is necessary to drain the water from the tank. However, there is no need to bleed air after draining the water. The membrane is strongly compressed under air pressure and squeezes out all the water.
There is an opinion that the membrane is lighter in a free state and it is better to remove it for the winter. Without arguing and even without taking into account the labor costs, we present only one important counterargument. All hydraulic accumulators are sold with pre-inflated air at the factory, which greatly deforms (compresses) the membrane, since there is no back pressure of water in the unconnected state. In this form, a new tank can be stored for more than one month, or even a year, until it finds its owner. And there is nothing wrong with that. The accumulator is installed, the air pressure is controlled, the system is started and everything works great.
Our operating experience household systems water supply indicates that the positive effect of the complete emptying of the air cavity for the winter period has no practical confirmation.
Of course, you can go to extremes, dismantle half of the water supply system for the winter and the hydraulic tank to boot. Rinse everything, dry it and put it at home in a warm place. But this option is better left for "experts". The maximum of what needs to be done is to drain all the water and blow the system with a compressor.
When the membrane fails, it is necessary to decide whether to replace the membrane alone or replace the entire accumulator.
Do you want to extend the life of the membrane? Don't forget to control the air pressure.
It is logical that the decision is made on the basis of a comparison of the cost of a new membrane and the entire hydraulic accumulator assembly. For some expensive European brands, the cost of the membrane is about 60% of the total cost of the product. Of course, this is not the real cost of the membrane, but the brazen policy of the manufacturer, trying to make money on spare parts and service, which is quite common today. In addition, it is far from always possible to find a similar replacement, since manufacturers can specially manufacture membranes with a non-standard neck. Therefore, it is not surprising that the buyer decides to purchase new equipment.
For other manufacturers, the cost of membranes is at the level of 30-35% of the cost of a new accumulator. AT this case we would advise you to evaluate the condition of the body and flange and, if they are in satisfactory condition, opt for a replacement diaphragm. This operation is simple.
If the accumulator is not always in a humid environment, then its body and flange can last a long time.
vodomaster.com

A hydraulic accumulator is a vessel operating under pressure, inside of which there is an elastic flask-shaped membrane made of natural rubber or butyl and meeting all the requirements of environmental standards. With the help of a hydraulic accumulator, hydraulic energy is accumulated and returned to the system at the right time. The hydraulic accumulator is designed to store water, maintain optimal pressure in water supply systems and prevent water hammer. Replaces storage tanks and water towers.
According to the method of energy storage, a hydraulic accumulator with mechanical and pneumatic storage devices is distinguished. A hydraulic accumulator with a mechanical storage, in turn, can be divided into cargo and spring. In cargo hydraulic accumulators, the energy of the hydraulic fluid is accumulated and returned to the system due to the potential energy of the load placed at a certain height.
Constant accumulator pressure
Simple design
Large working volume
small cost
Small energy consumption
Big inertia
Bulky design
low pressure
In spring-type hydraulic accumulators, the energy of the hydraulic fluid is stored and returned to the system due to mechanical energy compressed spring.
Relatively uncomplicated design
Low cost
Dependence of pressure on the characteristics and linear deformation of the spring
small working volume
inertia
Due to a number of significant drawbacks, hydraulic accumulators operating due to mechanical energy storage are not widely used and are of very limited use.
In pneumohydraulic accumulators (otherwise pneumohydraulic accumulators), the energy of the hydraulic fluid accumulates and returns to the system due to the energy from the compressed gas. In pneumohydraulic accumulators, nitrogen or compressed air is used as a compressible medium.
High power consumption with small size;
Lots of various options design and purpose
Accumulator pressure changes according to polytropic processes of gas compression and expansion
Pneumohydraulic accumulators have found greater distribution in industry and everyday life. These accumulators have sufficiently strong tanks for given pressures (metal, composite, etc.), they use membranes or cylinders inside, which serve to maintain the desired pressure of the working fluid in the entire hydraulic system or heating / water supply system. In everyday life, most often hydraulic accumulators are used for autonomous water supply systems in country houses, cottage settlements, and small businesses.
 The choice of a hydraulic accumulator must be made taking into account the main criteria and characteristics of your particular water supply system. The choice of the optimal hydraulic accumulator in terms of volume depends on the maximum water consumption and many other factors. When choosing the necessary accumulator, based on the planned water consumption, remember that the volume of hydraulic tanks starts from 24 liters and ends with 500 liters! by the most optimal volumes hydraulic tanks with a volume of water from 100 to 300 liters are considered. There is also a division in the installation of accumulators (horizontal, vertical) - it depends on the possible installation in a room or a caisson.
When installing a hydraulic accumulator, remember the following: simple rules:
It is necessary to install a hydraulic tank with a margin of safety. On the floor, the tank should be fixed using rubber gaskets in order to reduce the noise and vibration that will occur during operation of the device. A good solution would be to connect the hydraulic tank to the pipeline using rubber flexible adapters. The main thing is that the cross section of the liner does not narrow when entering the hydraulic system. When filling the accumulator with water for the first time, make sure that the water pressure is weak and the water flows slowly, as a large water pressure and a sharp filling with water can lead to rupture of the walls of the pear. If necessary, all air must be removed from the pear before starting. Otherwise, damage to the membrane is possible, with the need to replace it. The hydraulic tank must be mounted in such a way that it can be easily serviced. When the installation of the accumulator is completed, you can proceed with the installation of the filtration system.
Remember that, despite the seeming simplicity, the installation of a hydraulic accumulator and filtration systems is very difficult process, requiring certain knowledge and calculations. Quite often, some little things that you simply did not pay attention to during installation can later lead to serious problems and high costs to eliminate them. by the most best solution in this matter - there will be an appeal to specialists.
stat-climat.ru
When designing autonomous system water supply country house it is imperative to determine where the accumulator will be installed: in the caisson or in some other place, for example, in the basement. Despite the fact that this device is not mandatory, its presence allows solving several technical problems: to ensure a constant pressure level in the system and to reduce the number of pump starts, which helps to save its working life. In addition, in some cases, a small supply of water is also useful, for example, if the supply from the well has stopped due to power outages.
The choice of a place for mounting a hydraulic accumulator is not as simple as it might seem initially, since this installation must:
Also, when choosing an installation site, one has to take into account the fact that the operation of water supply installations in the house creates a certain noise of varying degrees of intensity, but in any case, its constant impact is unattractive for residents. Be sure to take into account the possibility of constant access to the accumulator for monitoring and maintenance.
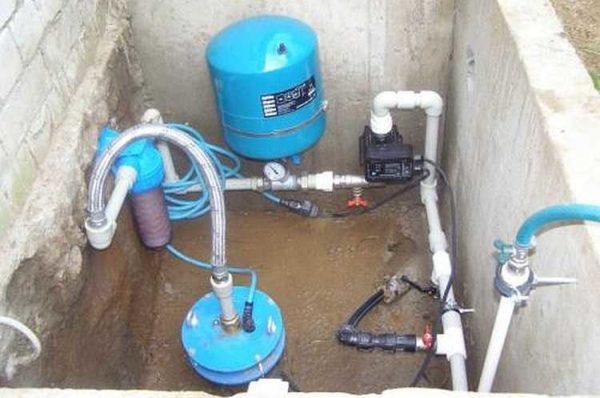
The hydraulic accumulator can be installed in the caisson or in the house, for example, in the basement, boiler room or, in the absence of technical room even in the kitchen. But, as a rule, if Vacation home is planned to be used for year-round living, it is better to place the accumulator in a caisson, which is a hermetic insulated container, into which ground water. Structurally, the caisson looks like a barrel or box, the neck of which is located in the upper part. To protect against freezing, the heat of the earth itself is used, since the lower part of the caisson must be below the freezing level of the soil, on average this figure is 2 m, since the height of these structures is about 2 m, and the diameter is 1 m, although structures and other structures can be made. shapes and sizes.
Given that the installation of a hydraulic accumulator in a caisson involves additional and very serious costs, some home owners decide to install equipment in the house, citing the problem of its better preservation. But if a well or other source of water is located at a sufficient distance, then this option will become very costly, since additional resources will be required for pumping. And besides, even in the house large area find a place for additional equipment and at the same time, it is not always easy to comply with all the requirements for its installation. That's why best option- this is a caisson in which the placement of a hydraulic accumulator is the most logical solution. This will save the house from additional equipment, the operation of which can bring additional discomfort to the lives of its inhabitants.
When designing an autonomous water supply system at home, you can use the help of the specialists of our company "Alfatep" how to choose necessary equipment, and in order to determine the place of its installation. And installation work can be entrusted to our masters.
It is most convenient to choose the necessary equipment on the website of the online store of our company "Alfatep", which presents a wide range of products from leading foreign and domestic companies. And in order to deliver pumps, pipes and other materials and equipment, you can use the services of our delivery service.
www.alfatep.ru
Condensation on the accumulator, pipes, drain tank and filters is a fairly common problem in private homes with autonomous water supply, especially in summer, when the air is saturated with moisture, and the air temperature is much higher than the temperature of the water in the well. It is the temperature difference and high humidity are the main causes of water droplets settling on pipes, a tank and a hydraulic accumulator. This article will discuss 3 interesting and effective ways to deal with condensate on the accumulator, the aquachief 1252 filter column and the toilet cistern.
In my house, the accumulator is located right in the bathroom, and since the humidity there is always high, the amount of condensate even in winter makes it necessary to take measures to remove it. As a rule, with excessive accumulation of moisture on the elements of the water supply system, water flows onto the floor, whole puddles form, which constantly have to be wiped off.
Condensate on the accumulator
At first, there were attempts: to wrap the accumulator with heat-insulating materials in order to reduce thermal conductivity; use industrial devices to absorb moisture from the air; dry the air with heaters. But in all cases the result was negative. The process of transition of water from a vaporous state to a liquid state could not be stopped. After some time, it became clear that it was useless and even pointless to fight the very cause of the appearance of condensate, so it was decided to direct all efforts to combat the consequences of this physical phenomenon.
And then I asked myself the question - what is it that most of all does not suit me in this situation? The answer was quite simple - I did not want to crawl every evening with a rag and wipe the floors, squeeze the water into a bucket and then drain it into the sewer.
Then I remembered that somewhere on the veranda an old stove with a set of baking sheets was gathering dust. Why not try placing a baking sheet under the accumulator? Brilliant idea 🙂 As it turned out, a baking sheet as a water tray is the most optimal solution in the case of a floor accumulator! And the dimensions are suitable, and the metal can withstand the weight of a hydraulic accumulator filled with water (in my case, a hydraulic accumulator with a capacity of 100 liters). Having previously emptied the tank, I placed a metal pan under it.
The condensate collection tray is located under the accumulator
Now all the water that settles on the walls of the tank flows directly into the pan, and there is no more need to wipe the floors every evening 🙂
But that's not all. Having solved this problem, another one appeared - but how to remove water from the pan? Use the cloth again to collect water and then wring it out? Then nothing really changes - what's the difference where to collect water with a rag - from the floor, or from the pan? 🙂
Having pumped water out of the pan a couple of times with the help of medical syringes, I thought about automating this process. And immediately the thought of a pump for pumping water came to mind. Searching the Internet, I found several schemes for homemade pumps. I went to the garage to look for the right components and came across an old non-working nebulizer.
What is a nebulizer?
A nebulizer is a medical inhalation device that sprays medicinal product with air flow. In fact, there are other ways to spray, but most devices use airflow. You can read more about the types of nebulizers on Wikipedia.
Old nebulizer as a pump
By design, a nebulizer is a pump, only it is designed to pump air, not water. Having slightly modified the old nebulizer, namely, by adding an inlet pipe (through which water will be sucked from the pan), I tested it as a water pump. The results were impressive! The device is quite suitable for regular pumping of water.
The suction hose is lowered into the sump
I inserted the outlet pipe into the cork from the bottle, fixing it with electrical tape. As a container for collecting water, I used a bottle from a drink with a capacity of 2 liters. This is what the whole system looks like.
Homemade system for pumping water
When it accumulates in the pan a large number of water, turn on the nebulizer for a couple of minutes, and all the water is pumped into the bottle. Beauty 🙂
I made a video about this method of removing liquid from the pan.
In addition to the accumulator, there is another problematic place where a lot of condensate also accumulates, which eventually forms a puddle on the floor. This is a filter column.
aquachief 1252 filter column
Despite the fact that the filter walls are made of plastic, they do not have sufficient thermal insulation, which leads to their cooling when filtering cold water from the well, which in turn contributes to the formation of condensate.
In this case, an attempt was made to insulate the walls of the filter in order to prevent contact of humid air in the room with the cool walls of the filter.
A small digression...
In fact, my struggle with condensate and puddles on the floor in the bathroom began precisely with the filter column, and only then, having realized that the insulation of the walls of the column or tank is a very laborious task, and the result does not give 100% guarantees for the elimination of condensate, it was decided the decision to install a pan under the accumulator and not engage in its insulation, thereby fighting natural physical processes 🙂 In addition, I got a large 100 liter accumulator after installing the filter column. Before him, there was a wall-mounted tank with a capacity of 50 liters, which failed, slightly flooding the room. I already talked about this in an article about automatic shutdown pump in case of water leakage 🙂
So, the first thing I decided to cover the walls of the filter column with mounting foam. I did it in 2 layers.
Application polyurethane foam to the filter column
After spending a couple of hours on the painstaking process of applying the foam and waiting for it to completely harden, I conducted the first test. It turned out that mounting foam has a high thermal conductivity, and also absorbs moisture well. In other words, the result turned out to be unsatisfactory - condensate still appeared, now on the hardened mounting foam.
As a second step, I decided to waterproof the walls of the filter column. I wrapped the entire column with foil insulation (aluminum foil based on foamed polyethylene) over the hardened polyurethane foam. The use of this insulation provides complete waterproofing, as well as a significant reduction in thermal conductivity (the thicker the polyethylene layer, the better the thermal insulation). With this approach, the outer wall of the column is no longer cooled by water passing through the filter, and it is physically impossible for condensate to settle on the walls. We can say that the problem is solved 🙂
Finishing touch: upper part the columns where the insulation sheet ends had to be covered with sealant, since a small amount of condensate was still flowing from the filter head (automation unit).
Filter column - insulated version
After installing the pan under the accumulator, I decided, just in case, to put the pan under the filter column 🙂
Tray for collecting condensate under the filter column
So, there is one more problematic place left - the toilet cistern, on which a large amount of settling moisture accumulates every now and then. Condensation on the drain tank was not as easy to overcome as in the case of a hydraulic accumulator or a filter column. Wrapping with insulation did not give special effect, since the bottom of the tank was still in contact with air and the resulting condensate fell directly onto the floor. It was also not possible to substitute a container for collecting water under the tank due to the peculiar shape of faience, the presence of a fitting for water supply, as well as a bulky drain corrugation.
But in fact, the complexity of the problem turned out to be very illusory, and the solution was simple and reliable. It was decided to supply hot water to the drain tank instead of cold 🙂 This solution guarantees the absence of condensate, since the air around the tank will not cool and the process of water transition from a gaseous state to a liquid one will become impossible!
As a result, collecting necessary materials, organized the eyeliner hot water from the water heater, and also installed an additional faucet. In the summer I will shut off the cold water supply and open the hot water supply, and in the winter - vice versa.
Hot and cold water supply to the toilet cistern
I also set the temperature of water heating by the boiler to 40 degrees, so as not to spoil the plastic insides of the drain tank, and also not to spend a lot of electricity on frequent water heating.
Water temperature set to 40 degrees
In general, I am satisfied with the result. The problem of condensation in the bathroom has been completely solved! No more puddles on the floor 🙂
I hope the article will be useful and help readers cope with similar problems. Thank you for your attention!
Added on 05/08/2018:
Almost a year has passed, summer is coming, he resumed supplying hot water to the tank, but now 40 degree water is not enough for domestic needs, so I had to increase the heating temperature in the boiler to 60 degrees. To save hot water, and also in order not to damage the rubber gaskets and plastic mechanisms of the drain tank by exposure to high temperature, I decided to organize the mixing of hot and cold water before supplying it to the tank, slightly opening the cold water supply tap. To do this, it was necessary to perform a small technical refinement - to add a check valve to the hot water supply pipe. Without a non-return valve, cold water enters the common hot water line, because. The pressure in the cold water line is higher than in the hot water line.
Check valve on the hot water line
eanik.ru
The presence of a hydraulic accumulator in the water supply system of a private house or cottage helps to have an additional supply of water in case of a breakdown of the electric pump or a power outage. The specialization of this device is aimed at increasing the pressure of the liquid in the pipes and protecting the pump from water hammer.

Seasonal draining of water from the accumulator supports correct work devices
To create the right conditions for the operation of the accumulator, a seasonal drain of water is carried out in its tank. The performance of such work is associated with the protection of the device from freezing, followed by ensuring the integrity of the hydraulic tank. It is important to follow a certain sequence of actions when carrying out protective work.
The hydraulic accumulator reduces the indicator of the frequency of switching on an important unit of the water supply system - the hydraulic pump. The electric motor is subject to minimal wear, thereby increasing its service life.
Another important property is the volume of the hydraulic tank.
It has a supply of liquid when the pump is turned off, electricity is turned off, and when the water supply system breaks down. This function is convenient for its use in suburban areas where there are problems with the power supply. The hydraulic accumulator protects the water supply system from water hammer that occurs when the pump is turned on and maintains the required pressure level in the pipes.

Hydraulic tank - a vacuum reservoir required for liquid
Hydraulic tank - a vacuum reservoir for liquid. When it is taken from the system, the pressure in the device drops. At this point, the pump automatically turns on. It works until the required pressure indicator in the system is reached. During operation, some parts of the accumulator require replacement and scheduled repairs. Therefore, a regular inspection of the surface of the hydraulic tank for problems is carried out. If faults are found, corrective action is taken.
Before carrying out repair work on this device, it is necessary to organize the draining of the remaining liquid from the tank. This process is carried out different ways depending on the design features of the hydraulic tank. Some models of the device are equipped with a drainage mechanism. When it is opened, the accumulated liquid quickly drains.
If the hydraulic tank does not have such a function, the connection of the device with nozzles by the threaded method is used. The use of the American fitting is the most convenient way. The presence of such a node in the water supply system allows you to remove the hydraulic tank for draining the remaining water and subsequent repairs. Before draining the water from the accumulator, the electric pump is de-energized.
The next step is to open any water tap in the system and disconnect the water supply pipe to the hydraulic tank.
After that, the drain itself is carried out. This sequence of actions will ensure the safety of stopping the water supply system. Drainage of accumulated water is carried out in such cases:

Drainage of water from the hydraulic tank is carried out in various cases.
An important role is played by the tightness of the safety membrane. It separates the chambers of air and water. Membrane integrity is difficult to determine. The operation of the system does not change if it is damaged. But when frost sets in, the membrane that has lost its integrity is finally destroyed.
After draining the accumulated liquid, the hydraulic accumulator is pumped. The air cavity becomes accessible after the membrane is removed. After removing it, make sure that there is no water in the air compartment. Inspect the tank walls for corrosion. Its presence is a sign of a violation of the tightness of the membrane. The tank is dried and the damaged area is cleaned. There is no need to inspect the water tank. It is made of thick rubber.
If water is detected in the air compartment, urgent measures are taken to replace the membrane. It serves as a fuse between the two main components of the device, the storage and air chambers. To get to the membrane, unscrew the flange with the water supply fitting. The membrane is removed. The tank is dried and a new part is installed.
During installation, hermetic means are used. They smear the place of contact of the flange with the membrane. This allows you to organize the correct operation of the water supply system, protecting the tank from loss of air pressure through an unprotected joint. After carrying out all the work, the accumulator is connected to the pipes for supplying and discharging water. If the membrane is replaced before winter period, start operation of the device.
vodospec.ru 
paper filter how to make
The device of a well near the house solves the problem with its uninterrupted water supply. But in order for this source to work normally, it is necessary to competently organize the entire process - from drilling a well to equipping it and putting it into operation.
With permanent residence in the house, the most reasonable solution is to equip a well with a caisson. This version has a lot of advantages, which you will learn about from our article. It will also talk about the step-by-step implementation of the project.
With year-round use of the well, one cannot do without installing a caisson at its mouth. This enclosing structure is a waterproof chamber located in water-saturated soil. From the point of view of ease of maintenance and operation, a well with a caisson is the best option.
In addition to the caisson, the integral elements of a water well are a surface or pump, pipes, shut-off and control valves, if desired, the owners and a head.
In winter, a stable temperature is maintained inside the caisson. It usually does not fall below 0°C. In such conditions, pumping equipment can be operated all year round.
This solution has a number of advantages:
Thus, in the presence of a caisson, unfavorable external factors will not affect the quality in any way.
The main requirement for the caisson is tightness. If this condition is violated, casing pipe Dirty water from the chamber may enter the aquifer. Pollution of the aquifer is unacceptable, so the head of the well and the caisson must always remain dry.
This device in the water supply system performs the same role as the compensation tank in heating system. In itself, in its normal state, there is always a certain amount of water under stable pressure. Its presence in the system guarantees slower wear of pumping equipment, since it is turned on less often.

The hydraulic accumulator performs 3 functions: protective, preserving, limiting. The first is protection against water hammer, the second is the presence of a certain supply of water, the third is the limitation of the number of pump starts
The material from which the accumulator casing is made, as well as its individual elements, does not react with water, therefore it does not affect its quality in any way. The basis is the use of compressed air. It is pumped under a pressure of 1.5–2 atm into the gap between the casing and the rubber membrane.
The workflow consists of the following steps:
There are two types of this equipment according to the installation method: vertical and horizontal. If you have to choose between these two types, then you should know that the bleed valve overpressure in a vertical unit is at the top. The whole process happens automatically.
If you place the well closer to the house, then:
You can also save money when choosing a drilling method. To make a well for personal use, you can do the work using hand drill. Sometimes used electric tool, percussion devices.
When choosing a specific tool, you need to proceed from the characteristics of the soil. With an independent manual method, considerable efforts will have to be made, but with favorable conditions it is possible to reach the aquifer lying at a depth of up to 15 m.
A well of shallow depth can also be drilled with an auger. Its rotation is carried out both manually and with the help of mechanisms. In any case, a tripod-shaped tower is built above the future well to facilitate the lifting of the tool. When choosing the second method, you will also need an electric motor that is suitable in power.
For cutting a well, the shock-rope method is also used. The working tool here is a pipe, the edges of which are sharply sharpened (a driving glass with a strong edge along the lower edge). Due to its considerable weight, it crashes into the ground with great effort, then it is removed using a rope system and freed from the ground.
Reinforced concrete rings and bricks. This type of caissons practically does not provide tightness on long time. This threatens the equipment with flooding and subsequent loss of performance.
Metal. If all the requirements were met in the manufacture of metal caissons, they will have good tightness.
Earth in relation to metal is an aggressive environment, therefore, the enclosing structures of such chambers are subject to oxidation, as a result of which depressurization may occur.
Plastic. Caissons made from polymer materials convenient, light weight, easy to install and operate. The probability of depressurization is rather small, because the material is not subject to corrosion. Plastic caissons serve much longer than metal ones.
Arrangement of a well with a concrete caisson:
A visual aid for the installation of the caisson and equipment for the well:
Making a well with your own hands is a responsible and time-consuming process. It is possible to perform the work competently only if you have certain knowledge and skills. But nothing is impossible, the key to success - the right approach and meticulous preparation.
It is necessary to adopt a key rule: there are no secondary nodes in the well device. If at some point it is problematic for you, entrust the solution of the issue to specialists so that later you do not have to equip a new well.
Tell us about how the caisson was built over the wellhead on suburban area with my own hands. Share technological nuances that will be useful to site visitors. Please leave comments in the block below, ask questions, post photos on the topic of the article.
The caisson (from the French "caisson" - a box) was originally used as a structure for working under water - its inside was protected from water by the supply of compressed air.
However, over time, caissons began to be used in open ground, leaving it with its former purpose: as a rule, this device helps protect an artesian well from freezing water in it and prevents groundwater from getting inside.
 Metal (4mm) 1x1m |
Metal (4mm) 1.2x1.2m |
Metal (4mm) 1.5x1.5m |
Secondary functionality, in the form of an opportunity additional installation in the caisson:

metal sewerage caisson
 Please note that the ends of our caissons are made with a minimum number of welded corners, it is much more difficult to manufacture, but in the future the caisson will serve you much longer, because. such corners are much stronger and less prone to corrosion.
<— На фото можно видеть, что угол без сварного шва.
It should also be noted that our Topas50 company offers a whole range of services related to caissons, including: making caissons, installation and repair. Also, together with our partners, we can perform the whole range of works, from drilling a well to introducing water into the house. Those. caisson for a turnkey well.
In the event of any problems with the installed caisson, our specialists will be happy to help you.
In recent years, many firms have set up caissons, and it is not uncommon for them to leak. We can help with this problem too. Maintenance and repair of caissons is one of our activities.
We do a full cycle, from drilling a well to arranging a caisson and a well. Watch the video on how to properly equip a well with a caisson:
A hydraulic accumulator is an extremely useful device, both for organizing autonomous water supply and for improving the performance of a system connected to a central water supply.
A master with at least minimal experience in plumbing work will install a hydraulic accumulator with his own hands without any problems and connect it to the water supply system.
Agree, the key to successful work is an understanding of the device and the principle of operation of the equipment. We will help you understand these issues, as well as describe and illustrate the step-by-step technology for installing a hydraulic accumulator.
Information about connecting, setting up and carrying out current repairs of the storage tank will be useful during its operation.


Water and air are separated by a gasket. By pumping or bleeding air, you can regulate the pressure that it exerts on the water. As a result, water enters the system under pressure, and this provides the necessary pressure.
A mandatory element for a hydraulic accumulator is a pressure gauge, with which the current pressure in the tank is monitored. The optimal pressure indicators in the air compartment of the accumulator are 1.5-2.0 atmospheres.


Modern models are relatively easy to disassemble and then reassemble with the necessary maintenance, replacement of components or other types of repairs. If the accumulator is installed correctly, then it will not be necessary to drain the water from the plumbing system for its maintenance.
From this device during the day, water is taken and pumped. As a result, the unit is constantly under the influence of the working process, during which it makes noise and vibrates. This point should be taken into account when choosing a place for its installation.
Image gallery


First you need to choose the most suitable place. It should be spacious enough, especially if a large tank is used.
After installing the container, there should be enough space around it so that the master can freely inspect the hydraulic tank, perform maintenance and repair measures, and, if necessary, dismantle and disassemble the unit.
To dampen vibration, the accumulator must be installed on a solid base, such as a concrete slab. The mounting base must be carefully leveled. Rubber gaskets are placed between the base and the body of the accumulator, which should partially dampen the vibration.
The connection of the accumulator with the water supply is carried out through a special fitting for five outlets.
It is through this element that the remaining elements of the system will be connected to the hydraulic tank pipe, namely:
The fitting can be installed either directly on the hydraulic tank branch pipe or on a transition element in the form of a rigid hose. The decision should be made based on where the hydraulic tank is installed and how convenient it is to connect other communications to it.
The pressure gauge, pressure switch and other elements are connected using threaded connections. Of course, all of them must be well sealed and sealed with linen thread, FUM tape or other suitable material.
Schematically, the connection of the pumping station can be represented as the following steps:
A surface pump is not always used in the autonomous water supply system of a private house. Owners of deep wells have to use special submersible pumps.
The process of connecting the accumulator to the water supply system is performed according to the following scheme:
When connecting a hydraulic tank to a submersible pump, an installation should be provided that will prevent the outflow of water into the well when the pump is turned off.
To connect the accumulator, special flexible adapters are used. This helps to reduce the effect of vibrations on the plumbing system.
It should be borne in mind that in this section, between the water supply and the accumulator, it is unacceptable to reduce the clearance of the connecting structures, since this will worsen the hydraulic characteristics of the system.

To reduce the effect of vibration that occurs during the operation of the hydraulic tank, it is recommended to use special flexible conduits. Their dimensions should not be less than the diameter of the outlet to which they are connected.
The initial filling of the tank with water must be done very slowly. The fact is that during long-term storage, the rubber membrane, made in the form of a pear, could simply stick together.
A sharp stream of water can break the gasket, and with a weak pressure, it will neatly straighten out. Another really important point is that before water is supplied to the accumulator, air must be completely removed from the part into which water will be pumped.
Immediately after unpacking the purchased battery, and / or immediately before connecting it, it is necessary to measure the pressure of the air that is pumped inside. This indicator should be 1.5 atm, this is how hydraulic accumulators are pumped during manufacture. However, during storage in a warehouse before sale, leakage of part of this air is a completely natural phenomenon.
The most reliable option for such measurements is a conventional automobile pressure gauge with a suitable gradation scale that allows measurements to be made with an accuracy of 0.1 atmospheres. As practice has shown, it is not worth using cheap Chinese plastic models for these purposes, their accuracy is very doubtful.
Electronic models are sensitive to environmental conditions and are too expensive for a conventional hydraulic accumulator.
What should be the air pressure in a hydraulic tank filled with water? Everything depends on the situation.
A pressure of 1.5 atmospheres will provide quite a decent water pressure in the plumbing system. But it should be remembered that the higher the pressure, the smaller the volume of water stored in the tank. If you need both a solid supply of water and good pressure, it makes sense to look for a large tank.

To control the air pressure in the hydraulic tank, it is recommended to use a conventional automobile pressure gauge, which allows measurements to be made with an accuracy of 0.1 atmospheres
It is recommended that in the accumulator the operating parameters of the air pressure be less than the minimum pressure that causes the pump to turn on, by about 0.5-1.0 atmosphere. Sometimes they act differently.
The air pressure in the accumulator is left at the level of 1.5 atmospheres, as set at the factory, and the value of the minimum pressure or switch-on pressure is calculated as 2.0-2.5 atmospheres. Thus, to the air pressure in an empty tank - 1.5 atmospheres - add this difference of 0.5-1.0 atmospheres.
Excessive pressure does not reflect well on the integrity of the elements of the hydraulic tank, but low air pressure in it is not useful either. If this indicator is reduced to a level of less than one atmosphere, the membrane will touch the walls of the tank. This will lead to its deformation and rapid breakage.

Two springs are used to regulate the pressure switch. With the help of the first set the pressure to turn off the pump, and with the help of the second - the difference between the maximum and minimum pressure
After the system is installed and connected, it is necessary to set up the pressure switch. To do this, under the body there are two adjusting nuts with springs. The procedure for adjusting the pressure switch is usually described in detail in the instructions that come with the device.
Connecting and setting up the accumulator correctly is only half the battle. In order for the device to work for a long time, it must be properly operated, periodically perform preventive inspection and maintenance.
The instructions prescribe a medical examination twice a year, but practice shows that this is not enough. The condition of the accumulator should be checked every three months. With the same frequency, it is advisable to monitor the settings of the pressure switch in order to correct them if necessary.
Incorrect operation of the relay creates additional loads on the entire system, which can also affect the condition of the accumulator.
If dents or signs of corrosion are found on the body of the device during the inspection, these damages must be repaired. It is best to do this as early as possible, otherwise corrosion processes will develop, which can lead to a violation of the integrity of the accumulator housing.
An important preventive measure is to check the pressure in the hydraulic tank itself using a pressure gauge. If necessary, the required amount of air should be pumped into the device or its excess should be bled off.
If this does not help and the new pressure gauge readings do not correspond to the expected ones, then either the integrity of the accumulator housing is broken or its membrane is damaged.

If the membrane installed in the accumulator is worn out, you can try to replace it with a new one. To do this, the device will have to be dismantled and disassembled.
Some craftsmen manage to detect and repair damage to the hull, but such repairs are far from always durable and reliable. The rubber liner or membrane is the weak point of the accumulator. Over time, it wears out.
You can also replace the membrane with a new element at home, but for this you will have to completely disassemble and reassemble the accumulator.

When choosing a suitable place to install the accumulator, it should be remembered that it must be spacious enough to carry out maintenance of the device.
If a home craftsman doubts his abilities in this area or does not have enough experience, he can cause even more damage to the device than the previous breakdown. In such a situation, it is better to contact the service center.
An overview of the operation of a 50-liter hydraulic accumulator is presented in the following video:
This video clearly demonstrates the procedure for adjusting the pressure in the hydraulic tank and setting the pressure switch:
The advantages of using a hydraulic accumulator are obvious, so this device is increasingly being used both in private houses outside the city and in metropolitan apartments. If the unit is installed and connected correctly, it will work for many years without breakdowns and interruptions, providing the family with high-quality water supply.
Do you have experience in self-installation and connection of a hydraulic accumulator? Please share information with our readers, tell us about the features of setting up and operating a hydraulic tank. You can leave comments in the form below.
INSTRUCTIONS AND PROPHECIES OF THE Blessed MOTHER ALIPIA GOLOSEEVSKY, Kyiv...

Eufillin dropper in ampoules is used to treat pathologies that ...

Among all ointments for the treatment and prevention of joint diseases, the most ...