Physicist and astronomer Stefan Feeney of University College London, one of the...


Liquid wallpaper - a new progressive method interior decoration walls. It harmoniously combines the advantages of classic wallpaper and decorative plaster. But the high price of such material prevents its wider distribution.
There is a way out of this situation - to make liquid wallpaper with your own hands. Next, we will look at how to achieve the desired effect at home, while significantly saving on the purchase of finished products.
To begin with, let's consider what properties the material offered by manufacturers has in order to understand what to strive for when creating your own.


Tip: if you want to create more attractive and individual ornaments, then it is recommended that you familiarize yourself with the video materials containing master classes in applying liquid wallpaper to the walls.
They are able to introduce you to the basics of combination, which will make it possible to make something more than just a monotonous surface.

Now let's look at what liquid wallpaper is made of. But you should understand what each manufacturer hides complete list ingredients available in the models of liquid wallpaper offered by him.
So only the general composition is available to us:


Tip: To make the task easier, buy threads in spools and cut them lengthwise without unwinding.
This will greatly speed up the process.


We examined the ingredients, now we make liquid wallpaper on our own:

At the same time, we stir the minerals and fibers that determine the main color until completely homogeneous, but the additional decorative elements leave in random order. This will give the composition more aesthetics.


You can use a simpler and cheaper way to create an analogue of liquid wallpaper on your own:


This method will not require a lot of cost and time from you, but, of course, it will be inferior in quality to a more complete recipe.
Liquid wallpapers perfectly combine all the good things that can be taken from ordinary ones. At the same time, its cost is also correspondingly high.
But this shortcoming can be circumvented by own production the required solution. We considered a more full-fledged method that has all the necessary advantages, and an even more economical one that allows you to achieve a similar visual effect.

The video in this article will introduce you to additional materials. Keep up with the times!
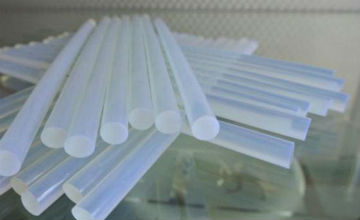
Liquid wallpaper is one of the varieties of decorative plaster. The main difference is the presence of cellulose (or textile substance) and a binder in the form of glue.
Liquid wallpaper is used to renovate interior rooms. In no case should they be used for external work.
This method of interior decoration is in great demand due to a number of positive aspects:
Despite the large number of advantages, there are no ideal things, everything has disadvantages that are completely solvable:
Making liquid wallpaper at home on your own from plain paper is quite simple.
The ready-made purchase composition usually includes the following elements:
Before you start making your own wallpaper, it is necessary that all the ingredients are prepared in advance, and before buying them, you should take into account some of the nuances:
The easiest and cheapest way to make this finishing method is stationery paper.
To obtain such a mixture, we need:
If you are planning to renovate large area, then it is worth stocking up with a sufficient amount of the same paper. Otherwise, differences will be visible on the walls.


There is no single recipe for making liquid wallpaper. It is necessary to take into account personal preferences and the intended design. Before you make a large number, it is better to make a trial batch and try to apply them on the wall.
However, there are some rules that will help make your work easier:
It is better to make a drier mass, water is always easier to add than to get rid of it.

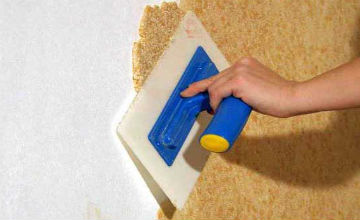
You can apply such wallpaper using a special spatula or grater with a transparent base, for convenient and uniform application of the resulting mixture on the walls. The application process is very similar to decorative plaster, it is very simple and does not require the mandatory call of specialists.
Hardware stores offer popular finishing material , known as "liquid wallpaper" and consisting of glue and various fibers.
This material is suitable for application on any wall, like ordinary wallpaper.
However, from sawdust can be covered, which, by most characteristics, is at least as good as liquid wallpaper available in stores.

The main advantage of this material compared to other types of liquid wallpaper in low price.
After all, the cost of wood waste rarely exceeds several hundred rubles for a large bag (25-40 kg), which is enough for several tens or even hundreds of square meters.
Often wood waste can be obtained as a gift, and the cost of glue will not exceed 1000 rubles, while a kilogram of finished liquid wallpaper rarely costs less than 300 rubles.
More detailed information about where to get sawdust, you will find.
The texture of the hardened sawdust material is a little rougher (which cannot be attributed to disadvantages, because sometimes apartment owners try to achieve this effect using purchased material), however this can be fixed by boiling them in water with a small addition of soda.
In terms of vapor permeability and thermal conductivity, all materials of this type are approximately the same, as well as in terms of ease of application.
Due to the low price, sawdust liquid wallpaper can be used as additional insulation and soundproofing, for which you will have to make a layer 5-7 mm thick.
Such a layer of purchased liquid wallpaper will be very expensive, and when using a mixture based on sawdust, your costs will be even less than when applying a purchased material with a layer of standard thickness.

Exists several core technologies, which differ in the way the solution is created and the method of its application.
In addition, sawdust liquid wallpaper is ideal for decorating various applications.
Therefore, we will detail about each stage, that is: preparation of the composition, application of the composition, drying and decoration (including applications), finishing.
To cook the simplest, but far from the most effective enough to mix sawdust with PVA or Bustilat and immediately apply to the prepared wall.
The surface of such wallpaper will be very rough, with many sharp edges, therefore, in order to level the surface, wood waste must be processed before mixing with glue.
If you fill them with water at a ratio of 1:5 (5 liters of water per 1 kg of sawdust) and leave for 10 hours, then after mixing with glue composition will become much softer and after application to the wall forms a less rough surface with a small number of small sharp edges.
In this case, the texture will be the same as when mixed with glue without adding water.
If you want to create the most even surface with the preservation of texture, then wood waste must be boiled for a day in water with a small addition of soda (1 teaspoon per 1-3 liters of water).
After cooking, the wood pulp needs strain and mix with glue by slightly increasing the amount. If you want to make the texture less noticeable, then after cooking, the mass must be cooled and chopped with a regular kitchen blender, then drained and mixed with glue.
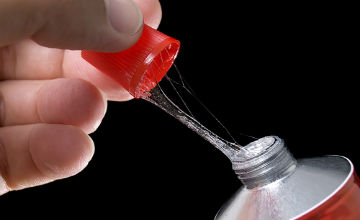
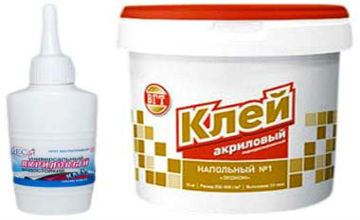
As glue you can use:
Compositions without gypsum harden longer, optimal proportion of glue in relation to sawdust in them is 3:4 - 4:5.
Setting time 10–15 hours, pot life ready mix 1–2 hours.
In addition, compositions without gypsum after hardening are not afraid high humidity and somewhat worse pass through themselves water vapor.
The optimal ratio of sawdust and glue with the addition of gypsum is 2:1;
The worse adhesive adhesion to this material and the thicker the solution layer, the more plaster needs to be added.
If you previously mixed sawdust with water, then the amount of glue and gypsum should be increased by 1.5–2 times. The consistency of the finished mixture should correspond to thick semolina or gypsum putty.
If you are not satisfied with the natural color of the wood and you want to add color to the mixture, then consider the following: in order for the colors to be the same on all walls, it is necessary to mix with the color the whole solution, which will go to this area.
Therefore, as an adhesive, you will have to use CMC or PVA, without adding gypsum to them. Moreover, the first glue is preferable, because you can choose the option for medium or heavy wallpaper, which will make the ready-to-use mixture more sticky.

Using a tinted solution, it is necessary to develop it before the life time ends. Therefore, CMC is preferable, because this parameter is 4-6 hours.
Moreover, the glue must first be prepared as indicated on the package and, only then add to the prepared mixture similar to PVA or Bustilat.
If you do not want to tint the entire mass of the solution, or the total area of \u200b\u200bthe walls is so large that you do not have time to cover it with liquid wallpaper in one day and doubt your ability to make a mixture of the same color and shade the next day, then you will have to paint ready-made wallpaper.
For this you can use any water soluble acrylic paints , using slightly dried ones if possible, because they spread less and are easier to work with.
Any wall must first be cleaned of old wallpaper or other finishes and repaired.
Necessary, make sure the surface of the wall is smooth and solid, without loose and weak areas, without peeling and other defects. Stone, brick and concrete walls for this they plaster, wooden ones are leveled in the most appropriate way.
After that, the surface of the walls needs to be primed, which is made from the same glue that is used to make the solution, mixing it with water in a ratio of 1: 2.
After the glue dries, you can start applying the wallpaper solution. This preparation is used for walls made of any materials.
If, in addition to the wallpaper layer, you plan to decorate the wall with appliqué, then the ratio of glue and water needs to be changed to 1:1. This will increase the consumption of glue, but will create a stronger base that can easily withstand any decoration. 3 days after such treatment, you can start applying the prepared mixture.
To apply the finished mixture to the wall, you will need a transparent plastic trowel, which can be purchased at most hardware stores or order online.
Sometimes this tool is called a trowel or liquid wallpaper grater.
Apply mortar to the wall start from the top right corner(left-handers will be more comfortable starting from the upper left corner) of any wall. A trowel with a sawdust-adhesive mass is placed against the wall at an angle of 10-15 degrees and, not pressing hard, they begin to move it in a circle with a radius of an elbow.
And the center of the circle is constantly moved from place to place so that the distributed solution takes the form of a more or less uniform spot.
The optimal layer thickness depends on the fraction of sawdust and the density of the solution.
If you used small wood sawing waste or chopped it with a blender after cooking, and the density of the finished mass is similar to yogurt in small rectangular cups, then the optimal layer thickness is 1.5–2 mm.
How larger size sawdust and the thicker the solution, the more you need to make the layer thickness, constantly visually checking it.
If you want to make a wall without a pattern, then apply the finished mixture in the same way until you cover the entire wall. Avoid holes, bumps and other defects, especially be careful in the corners.
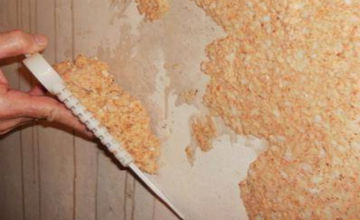
We recommend after applying the solution with a clerical knife hold carefully straight line by angle and with a thin spatula remove the mortar from the other wall. If for some reason you do not want to do this, then first apply the mortar along the corner between the walls, evenly distributing it on both sides and creating a layer of the same thickness.
 If you want to make patterned wallpaper, then first mark the wall with a pencil.
Then draw on the markup with the widest possible marker and remember the outlines of the picture.
After that, apply the solution so as to step beyond the boundaries of the pattern by 5–20 mm and without waiting for the glue or plaster to set. cut the solution with a clerical knife along the line of the picture and remove excess with a thin spatula.
If you have not reached the markup, then repeat the operation by shifting the cut line in the desired direction. If you slightly stepped over the marking line, then use a trowel to restore the pattern with a solution, and then repeat trimming and removing excess.
It is very important to cut through the solution and remove the excess not with a trowel, but with a spatula, so you will ensure a smooth edge of the picture and prevent the appearance of bumps on its borders.
After the material has hardened, prepare a new mixture of the same consistency, but with a different color and apply it in the same way.
This method is also suitable in cases where you want to make a drawing by changing the size of the sawdust in the solution or adding various sparkles and other decorative elements to the solution.
Sometimes there is no way to pre-align the wall, so liquid sawdust wallpaper has to be used as plaster. In this case, the composition with the addition of gypsum is optimal, but without the addition of color, because it sets faster.
On the wall install beacons first from wooden slats or aluminum corners, exposing them on a plumb line, then the solution is applied with a trowel and a large trowel or a wide flat board.
It is most convenient to plaster with a solution of liquid sawdust wallpaper, moving from the bottom up and filling the space between the beacons one by one.
The pot life of the finished mixture is 3-5 minutes, so you have to work very quickly and mix only as much of the mixture as you can use at a time.
You can increase the life time of the finished mixture using CMC glue, which it is necessary to replace PVA or Bustilat. If there is no desire to contact CMC, then a solution can be used as a moderator citric acid at a concentration of 0.05%.
Another good gypsum retarder is slaked lime, which, moreover, makes the solution more plastic.
The ratio of gypsum and lime should be 6:1, however, such a composition can only be used for plastering, because it is unsuitable for finishing and creating liquid wallpaper.
After the plaster has hardened, liquid sawdust wallpaper can be applied to it, doing this in the same way as on a properly prepared wall.
Wallpaper drying time depends on the time of complete freezing(polymerization) of the adhesive, i.e. 20–30 hours. The exception is compositions based on CMC, the polymerization time of which is 3–5 days.
Sawdust liquid wallpaper, due to its high strength and good adhesion to any surface, can be used as a basis for gluing various applications.

At the same time, applications can be glued three different ways :
Each method has advantages and disadvantages.
First good only suitable for uneven surfaces, because the glue with which the application is attached to the wall fixes well only tightly pressed parts. In addition, this method can be used if you first applied sawdust liquid wallpaper, and then decided to decorate it with an application that will always look like a separate element.
The second way allows make the applique part of the wall and give the impression that it comes out of the wallpaper. However, for this method, it is necessary to very clearly mark the pattern on the wall first, then cut it with a clerical knife and remove the material inside the pattern.
After that, the appliqué is placed against the wall and it is checked to what extent the cut out area corresponds to the contour of the appliqué.
There is a high probability that a gap will appear between the application and liquid wallpaper from sawdust, therefore it is advisable to use this method when it is possible to make a solution of the same color that was used.
Third way allows you to securely attach the application or even papier-mâché of any shape to the wall, and then cover the wall with wallpaper, so that the decoration will look like a part of the wall, as if sprouted through a thin layer of liquid wallpaper.

Moreover, in this case it is possible choose the best glue which can hold even a heavy application.
We talked in more detail about creating applications and papier-mâché from sawdust in the article.
After the glue has hardened, liquid sawdust wallpaper is applied to the wall, using a plastic trowel for this.
Due to its small thickness and convenient shape, you can bring the wallpaper close to the decoration, which will create the effect of a single picture.
Often applications or papier-mâché are heavy parts weighing several kilograms, so it is very important to choose not only the right glue, but also the way to use it.
After all, using the same glue in different ways can get different results. Moreover, adhesive must match the surface to which you will attach this or that part.
This glue after hardening turns into a strong and rather rigid polymer, however, its curing time is 10-15 hours.
Therefore, it is well suited only for gluing to smooth wood, plywood and other similar surfaces of appliqués and papier-mâché made from sawdust and other similar materials, including fabric.
In standard use, both surfaces are smeared with glue and pressed against each other for 15-20 hours.

However, it is not always possible to create such conditions, so they use the "hot" method, applicable to any decoration which can be heated with an iron.
A thin layer of adhesive is applied to both surfaces to be bonded and left to dry until the adhesive has completely hardened.
After that, the parts to be glued connect and heat with a hot iron. The temperature of the iron and the warm-up time must be determined individually, because they depend both on the thickness of the upper part and on the type of surface to be bonded.
Experiment and you can stick not too heavy sawdust crafts even on concrete.
If the size, shape or thickness of the parts to be glued do not allow the use of an iron, heat both surfaces to be glued using a building or household hair dryer.
After heating the adhesive layer on both surfaces and pressing them together, press down strongly (do not overdo it so as not to damage the parts) for 2-3 minutes.
During this time, the glue will seize and harden, but the connection will gain maximum strength after 30 minutes. This way ideal for gluing applications or papier-mache to ready-made liquid sawdust wallpaper based on this glue.
These adhesives include:
Such adhesives are well suited for jewelry made of plastic, rubber and any non-slippery materials, but due to lower than PVA mobility impregnate porous and uneven surfaces, such as plaster or unplaned wood, are worse.
Therefore, with their help it is impossible to provide a reliable adhesive connection in the way indicated on the package.
As the solvent dries, the adhesive becomes first more sticky, then hardens. Therefore, the adhesive bond receives the maximum strength either after 10-15 minutes of strong pressure and subsequent polymerization for five hours, or with "hot" gluing, which is carried out in the same way as with PVA.
If it is impossible to use the hot method, and gluing traditional ways does not give the desired result, use this method:
Apply glue in a thin layer on both surfaces to be glued and leave to dry for 2-4 hours, then apply a thin layer of glue on one side again, wait 2-4 minutes and, having attached the part to be glued to the surface, press it down strongly.
Hold it for 2-3 minutes, the bonding will gain full strength in 5-8 hours.
The packaging of the rods indicates what type of surface they are suitable for. hot glue used for gluing any decorations from:
rods of any type are suitable for most wall and finishing materials.
If you want to paste decoration from other substances or the wall/decoration is made of some non-standard materials, then it is necessary to select the rods according to the maximum correspondence.
Such glue is applied only to one surface and immediately pressed to the other.
Hot glue is very thick therefore not suitable for bonding to concrete or plastered surfaces. But it is ideal for gluing to any smooth surfaces including glass.
If you glued the part unsuccessfully, do not worry. Warm it or the surface with a building hair dryer, then peel off the part and glue it again.
This type of glue is different from fabrics and glass. If you need to stick something to the glass, or vice versa, stick the glass on some surface, then you will need any alcohol-containing liquid and ordinary baking soda.
Glass must be degreased. If it's dirty, then must be washed first with any glass cleaner.
After that, it is necessary to apply a few drops of glue on the glass and the surface to be glued, then sprinkle the glue on the part to be glued with soda and immediately press it to the glass.
Baking soda reacts with superglue and turns it into a very durable solid. The polymerization time of such glue is 5–10 seconds.
Don't use superglue where even slight bending is possible. adhesive bond. Cured superglue is very tear-resistant, but crumbles even with a slight bend.
This is a general purpose acrylic latex based adhesive. suitable for most materials.
The downside of the glue is a rather long polymerization time, depending on the thickness of the layer.
The thicker the adhesive layer, the longer it takes for the solvent to evaporate and polymerize.
It is impossible to speed up these processes, therefore acrylic adhesive cannot be used in a "hot" way.
It shows maximum efficiency compared to other adhesives on concrete, brick and plastered surfaces. Moreover, for maximum effect, the surface must first be primed, then, when it dries a little, glue an application or papier-mâché to it.
Liquid wallpaper from sawdust are highly resistant to moisture, however, in the kitchen or in the bathroom it is advisable to cover them with a layer of protective varnish, which can be used as the same PVA glue.
Lacquered wallpaper can not only be wiped with a slightly damp cloth, but also washed if necessary.
Unvarnished wallpaper, in the solution of which gypsum was added, can only be wiped with a slightly damp cloth, an attempt to wash them will cause the gypsum to begin to crumble.
Sawdust liquid wallpaper is in no way inferior to similar materials based on other fibers, but much cheaper.
In addition, they can be used not only as a topcoat with a thickness of 1-3 mm, but also used as a plaster. After all, this material has high strength and adhesion, so it fits well on any wall.
You also learned how to:
In contact with
Liquid wallpaper is Beautiful design, original structure, good performance, the possibility of self-production and simple application technology, which contributed to the wide distribution of this finishing material. At the same time, liquid tapestries, after applying them to the surface, hide small flaws in the form of cracks and traces of old fasteners.
The composition of liquid wallpaper is fundamentally different from decorative plasters in that materials such as cement, lime or sand are not used for their preparation. As a filler for factory-prepared compositions, the following can be used:
Cellulose, as the basis for the manufacture of liquid wallpaper from paper, has become widespread due to the low cost of the component. White color fibers and their small size subsequently make it possible to obtain bright and saturated color tones.
To obtain a three-dimensional surface texture, stiffer cotton fibers are used. Compositions prepared on the basis of cotton well hide most of the defects present on the surface.
To prepare a mixture of wallpaper with natural silk fibers, a barrett is taken - a type of material that is not used in textile industry and having a low cost. The material has an unusual structure and high performance.
At home, paper, sawdust and textile fibers are most often used. As a binding material that provides the necessary adhesion, an adhesive mass based on PVA or Bustilat is used. To obtain the desired color shades, liquid wallpaper contains mineral pigments. In addition, some compositions may contain gypsum and special decorative additives.
 Liquid tapestries based on paper.
 To prepare liquid wallpaper from paper with your own hands, you will need:
As an additional decorative additive, you can use silk or cotton fibers at the rate of 0.5-1.0 g/m 2 .
Chopped wood for the preparation of wallpaper trellises must be of a certain size. Small sawdust resulting from sawing should not be used. On this basis, only a pasty mixture is obtained that does not have a texture. The right foundation there will be material that can rather be called fine chips. It is easy to obtain after mechanical grinding of wood shavings or other wood waste.

To prepare liquid wallpaper with your own hands at home, based on wood, take one volume of glue and gypsum. 2.5 parts of chopped wood, a coloring pigment and a little plasticizer or detergent are added to them. To improve strength finishing coating it is recommended to add reinforcing polymer fibers.

Textiles for the preparation of the finishing mixture include silk and cotton fibers, linen, wool, polyester, synthetic winterizer. As a result, a large number of published recipes on how to make do-it-yourself liquid wallpaper from textile fibers is explained by the variety of base materials with different bulk weights and particle lengths.
 Linen fibre.
 Therefore, when compiling the working mixture, it is necessary to select the best combination components by experience. And you need to start with an equal volume ratio of fibers and liquid glue, gradually increasing or decreasing the amount of one of them.
After obtaining a good result, coloring pigments, plasticizers and other materials are added on a working basis. Gypsum is practically not added when using textiles as the main raw material.
For the preparation of colored solutions for wall surface finishing, mineral and synthetic dyes are used. They can be sold as a powder, thick paste, or concentrated solution. However, only water-based formulations or those designed to be dissolved in water can be used for work.

Original color shades are obtained by mixing pigments of different colors. The concentration of the dye is determined by the level of required color saturation, but it should not exceed 1.5% of the total volume of the finished mixture.
As additional decorative materials add to liquid tapestries:
By adding such materials, it is possible to change the aesthetic qualities of the finishing coating. However, it should be borne in mind that their amount should not exceed 20% of the total volume of the working mixture.

The addition of plasticizers makes the working mixture more plastic and facilitates the process of its application to the wall surface. Special solutions offered for sale can be replaced with liquid ones. detergents or even a simple soap solution.
Can be used as an antifungal liquid glass(sodium silicate) or purchase special chemicals. Protection against the formation of fungus may be required when finishing internal corners external walls, junctions and other places of possible cold bridges. For work on internal walls antifungals are not required.
 plasticizer action.
 The technology for making mixtures for applying liquid tapestries to walls is not particularly difficult, but it may take time. Sometimes it takes from a day to several days to obtain the desired fibers and a high-quality base. The following are instructions for handling raw materials and formulating quality blends.
To obtain the base, paper, cardboard, old newspapers and other similar materials must be dissolved into individual fibers. To do this, the feedstock is cut or torn into the smallest possible pieces. After that, the pieces of waste paper are weighed and filled with ordinary water in a ratio of 1:5 according to the measured weight.

Duration of paper soaking lasts at least 5 hours. After that, using an electric drill with a mixer installed on it, which has sharpened edges, the mass is further crushed until a homogeneous composition is obtained.

The paper needs to be bleached before adding coloring pigment, as printing ink clearly creates a gray tint and dulls the saturation of color shades.
To do this, use chlorine bleaches such as "Whiteness" or special oxygen compositions. The operation is carried out several times, but there is still no guarantee of achieving exceptional whiteness. Therefore, the choice of raw materials should be approached with special attention.

After the bleaching procedure, the paper pulp must be washed with clean water, color pigment and half of the necessary PVA glue must be added. Now the resulting composition should ripen. To do this, it is transferred to a sealed plastic bag and placed in the shade for 12 hours.
After such a peculiar maturation and before applying to the wall surface, gypsum, glue residue, decorative additives, plasticizer are added to the prepared mass, after which they are thoroughly mixed. Proportional composition of liquid wallpaper on paper basis was given above.
The process of manufacturing liquid tapestries from small wood chips consists of the following sequential operations:
The preparation of the working solution is done in small portions that can be worked out at a time. The presence of gypsum leads to a reduction in setting time, which, in turn, leads to hardening of the working mixture until it is completely exhausted.
The process begins by grinding the fibers into short lengths. After that, they are mixed with glue in a ratio of 1: 1 and mixed well. Pigments and decorative additives are added, mixed and left to stand for a period of at least 8 hours, depending on the type of textile used.
If the wallpaper mass is too thick, you need to add water and mix again.
The rest of the components are added just before application. finishing composition on the wall. note that the presence of gypsum leads to an increase in the density of the solution and a reduction in its hardening time.
There are several technologies for applying the working solution to the wall. It can be done:
Before processing, the wall surface is covered with two layers of deeply penetrating primer. Aerated concrete and foam concrete must first be plastered. The joints of gypsum boards must be puttied.

Immediately after application, the mixture is leveled with a wide spatula to a layer thickness of 2-3 mm. A flat surface can be checked using a two-meter rule. During alignment, it is convenient to use side illumination, which will indicate all the errors. A complex color pattern can be applied and leveled in 2 times.

Drying of the applied layer after leveling occurs in two days. Until the end of this period, no work on the surface of the wall is carried out.
Despite the fact that liquid wallpaper is a fairly innovative finishing material, their popularity is constantly growing. Thanks to their numerous advantages, they manage to win market share from many traditional materials or more familiar roll webs. By the way, this material has a completely different appearance. In addition, they must be applied in a completely different way, and to be precise, this process is most similar to the installation of decorative plaster. With all that, making liquid wallpaper at home with your own hands is quite possible. We will talk about how best to make them and apply them correctly in our article.
As for the composition, liquid wallpaper has a whole set of ingredients at once. Let's list them:
Designer Tip! In most cases, this finishing material is used in the design of walls and partitions, both residential and non-residential premises. Examples include rooms such as the living room, bedroom, and even the children's room.
As for the manufacture of liquid wallpaper, it can be noted that it will not take you too much time. Moreover, it is quite possible to do all the work at home, since this process is not as complicated as it might seem at first glance. This material has many advantages. One of these advantages is the ease of finishing various kinds. uneven surfaces, which include arches, ledges, bay windows, columns, etc. This is one of the advantages this material in front of classic paper, non-woven or vinyl surfaces.
So, let's take a closer look at how to make liquid paper wallpaper. This will be a kind of master class with additional video instructions for greater clarity.
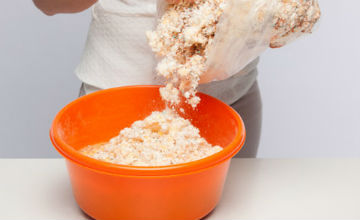
Before you start making liquid wallpaper yourself, you need to prepare for this. So, an important condition is the choice of a suitable container in which the mixture will be made. The best dish can be, for example, a medium-sized plastic bowl with a diameter of about 50 cm and a depth of about 40 cm. It will be very convenient to stir the ingredients in such a container.
In addition, you will definitely need water. Ordinary pure water should be, if possible, at room temperature, it can be a little warmer. This will not affect technical qualities, performance characteristics and ease of installation. However, if the water is warm enough, it will make the hand stirring process more enjoyable.
Attention! If you decide to prepare liquid wallpaper from material purchased at a hardware store, then it is advisable to choose material from the same batch produced at the factory.
So, to prepare the mixture, you will need:
We already had an article on the site about. However, let's briefly recall how best to do this. In order to make such a material, we need the following components:
Please note that the paper should not be too thick. In the case of waste paper, make sure that there are no foreign objects in it: metal staples, adhesive tape, glue residue, ropes, etc. It is best if it is light. The best option for this case– use of leftover paper from offices. Brief instruction how to make liquid wallpaper at home:
Remember! When you get a sufficiently dry and thick solution, you can always add some additional water and stir the mixture.
Be sure to watch the video instructions on how to make liquid wallpaper yourself at home:
We must not forget that further work on applying liquid wallpaper to the walls has certain features that cannot be ignored. In addition, quite often it is necessary to do some additional repairs, in which it becomes necessary to remove some sections of the coating from the walls. For example, such a need may arise when repairing or replacing electrical wiring. So, what is the best way to proceed in such cases? In fact, everything is not so difficult. The only thing you need to arm yourself with a spatula, as well as a spray bottle for water.
Brief instructions on what to do in such situations:
About that, we already wrote in another material presented in the same section of the site. In addition, you can read the reviews and recommendations of experienced professionals. It is also not superfluous when carrying out any work on interior decoration. For greater clarity, you can also study photos of similar works performed by other people. Good luck with the renovation, you'll be fine!
Physicist and astronomer Stefan Feeney of University College London, one of the...

Introduction Military monastic orders, orders of chivalry, orders of meritIn 1120...
