"The woman is created for a man, not a man for a woman" - such a postulate ...


What is the Fiberboard and which types of plates exist, pros and cons of the material, features of use and the rule of choice, wood installation technology on the floor with wooden Lag., glue and mastic.
Raw materials for the production of DVP are waste from sawmill and tree treatments, wood wood, as well as technological chips. After it is stepping and grinding, fibers are formed, which are fragments of wood tissue, individual cells, cell groups. Fiberboard is obtained from such a wood fiber, which is formed in the form of a carpet.
Fiberboard can be of different density. For this criterion, the plates are divided into such groups:
As for the thickness, this indicator may vary from 2.5 to 40 millimeters, depending on the type of plate and its density. Fiberboard most often happens to thickness 8, 12, 16 and 25 millimeters. These are plates of medium and low density, which are usually not used for finishing works. Semi-solid plates are thicknesses 6, 8 and 12 millimeters. Solid, as well as superhard DVPs produce 2.5, 3.2, 4.5, 6 millimeters thick. Such materials can be facing walls and gender.

Laying fiberboard on the floor has many advantages:
Modern Fiberboard on the floor has excellent performance, but it is worth noting small restrictions when installing indoors:
Remember the safety of the use of plates: if you have purchased them more than twenty years ago, and before that they were kept in an unbelievable place, the material can be dangerous. Previously, the technology of manufacturing sheets DVP was different. In order for fibers in the boards, unsafe funds were used. Such plates install in a residential building can not!

If you put the wood plates on the lags, the floor will be warmer than when working with screeds. Also, working with such a type of flooring, traces of fastening Fiberboard to lags will be practically not visible.


It is necessary to fix them according to such a scheme:


We work according to the instructions:
Note! Putting the next row of DVP, you need to displace the joints of the plates of 40-50 centimeters relative to the previous row. So you give the floor more strength, and the load will be uniformly distributed.

Installation carry out according to such a scheme:

We work on such instructions:
![]()
Among the many developers there is an erroneous opinion that Linoleum Laying on Feds is not the most the best way, Say, the surface is deformed through short term. In fact, if the styling is made according to the technology, then such a reason will serve you not one dozen years. In the review, I will cut the workflow in detail, and if you do all the recommendations, the result will be excellent.
Tell me what you need when working, how to choose best Material And from what stages is the Fiberboard location on different types of surfaces. Everything is quite simple, the main thing is to understand all the nuances and not to allow the mistakes that most developers do.
At this stage, you need to perform the following actions.:

With all its merits, the DVP has one big drawback - the plates are afraid of moisture.
Therefore, use this option to prepare the surface under linoleum indoors with high humidity Not recommended.

The price depends on the size of the sheet, so the option 2140x1220 3.2 mm will cost 140-180 rubles, the plate size 2745x1700 will cost 360-420 rubles. As you can see, the solution is quite budget.
From this stage directly depends on how much Fiberboard will fall, therefore it is important to carry out work qualitatively, the process consists of a number of actions.
Let's start considering this type of base as a wooden floor, the process here is as follows:


Concerning concrete groundsThe preparation has its differences:
If you work with a solution on cement basedKeep in mind that it needs for at least 2 weeks for a set of strength, so pre-training is better to spend in advance.

To qualitatively, to put the fiberboard on the floor under linoleum, it is necessary to comply with a number of conditions:

As for the workflow, it is made differently depending on the type of base, start with this option as a concrete screed:


Now we will deal with how to fix the Fiberboard on.
The instructions for conducting work looks like this:

When fastening, special attention is paid to the fastener's caps in the surface, or were slightly recessed into it, otherwise after laying a linoleum sticking caps will appeal.


It is worth noting that Linoleum laying on the chipboard is made in a similar way. The only difference is that the chickens are much thicker and harder and cutting it better knife or electric saw.
We'll figure it out how to put the linoleum on the prepared grounds, this process is simple, so you can easily handle it with your own hands. We will look at the three main ways to conduct work:
| Without fastening the material | If the area is less than 12 square meters, then the linoleum can not be fixed on the floor surface. In this case, you need to cut the cloth on the room configuration and gently lay it. Fixation is made at the expense of plinths, which are located around the perimeter, and the metal melting, which is attached to doorway, it is these elements that must press the material and not to give it to move. |
| Using bilateral scotch | This option appeared relatively recently, but has already gained great popularity due to the simplicity of the workflow and high-quality fixation of the material on the surface. The work is done like this: first the tape is glued across the area in the form of a lattice in a step of 30-50 centimeters, the top protective layer It does not remove. After the upper protective tape is removed from one edge at a distance of about 50 cm, linoleum is stacked and so on |
| Adhesive fastening method | A classic solution that involves the use of special adhesive composition. This option is used in rooms with an area of \u200b\u200bover 20 m.kv, its essence is simple: you smear a portion of the surface with adhesive composition, after which the linoleum is gently pressed. Work is made gradually - the surface is lubricated, the roll is unwound and so to the end of the room |

As for the connection on the seams in the Besleless method, it is easiest to glit on the base of two-way tape, it will reliably fix the connection, and you do not have to acquire the glue composition. From above the metal plank is attached, which protects the joint and additionally fixes it.

Fiberboard is great for preparing the base under linoleum, it is important to choose high-quality material and properly conduct work on its laying. The video in this article will clearly show the workflow, and if something is unclear, then ask questions in the comments under the article.
Fiberboard (fibreboard) is the most affordable and popular sheet material. It is actively used in repair and construction work, as well as in the fields of the national economy. Fiberboard is very often made on the floor, as a base or a final version.
To save costs for such a construction or repair, the home masters perform all the work independently, without attracting expensive specialists. Laying fiberboard on the wooden floor is relative simple procedurewhich can be done with your own hands.
Before any repair and construction work requires a kind of preparation. It concerns and flooring. The first condition is the same humidity of sheets with the surrounding environment. If it is not taken into account, they immediately after the flooring deform.
In the case of flooring sheets in the room, which is heated irregularly, it is necessary to moisten sheets on the reverse side with warm water. After that, lay down to each other with the back side and leave to dry for a day. With flooring indoors with regular heating, the sheets are put on the edge and are in this position.
Such a floor can be laid out on a screed of sand and cement, but a more popular option is to lay fiberboard on the wooden floor.
A day or two, depending on the type of room, the sheets are stacked on the wooden floor with a small ventilation gap. Laying the first sheet is made in the corner of the room and is fixed to the base with nails. On the edge line, the step should be 10 cm with parallel rows of 15 cm.
Subsequent sheets are fixed to the floor accordingly. Previously, they should be carefully docked, not allowing the gap between sheets of more than 2-3 mm. In the process of installation, it is also necessary to observe fire safety. Where the sheets of fiberboard come into contact with vertical pipes heating system, It is necessary to leave the gaps. These places are poured with a special solution of sand and cement. When heating up to 80 degrees, the gap can be 1-2 cm if a more thorough degree of heating is planned - cementing should be up to 5 cm of the gap.
The last leaf in the row is fixed to the floor, taking into account its reign under the remaining area and the curvature of the wall. Excess parts of the Fiberboard can be sprinkled with a jigsaw or cutter, pre-decisive them.
The next row is laid out, as well as the first, but now with a fit for already existing wood fiber plates. When installing near the doorway, it will be easier to cut a little platband than the leaf itself. This will not only give a greater aesthetic surface, but also will retain the integrity of the floor covering.
The popularity of the plates of the fiberboard is due to the simplicity of their installation, so having studied all the nuances, you can also start work.
Laying of tree fiber plates (Fiberboard) on the floor
Warm plates (Fiberboard) - popular finishing materialused in many areas of construction and repair of premises. Very often, the Fiberboard is used to mount the rough floor. It is noteworthy that they can be stacked almost on any surface. The main thing is to be respected by some conditions, and then these sheets can be resolved even on old coatings. In this article, we just consider the entire process of laying fiberboard to the floor with your own hands.
Fiberboard plates are used to equalize the surface having small levels of levels (up to 1 cm). If the base of the floor has more significant irregularities, they must be either eliminated (for example, the fill of the leveling mixture), or to fill the Fiberboard to lags.
In any case, start all the work is necessary from the inspection of the floor surface. If it has such damage such as mold or fungus, they need to be eliminated using a special antiseptic primer.
Next, check the old floor covering. If it is in a decent state, that is, the boards on the floor do not creak, the surface does not have large drops, and the coating itself has whole viewthen the Fiberboard can be laid right on the old finish, without removing it. Otherwise, the floor is cleaned from all unnecessary, up to the base.
Further work will depend on the choice of the method of installation of the Fiber Plays. If they are laid on the glue, the surface of the floor base must be thoroughly brew and wait until it dry (6-8 hours). If old lags are already on the floor, they only need to examine and, if necessary, repaired (link).
Well, if you decide to make lags from scratch, then go to the next item.
In essence, the lags for any sheets of wood are stacked in a similar way. For the beginning, the size of the Fiberboard sheets used is determined, after which the lag installation is marked on the entire floor surface.
As a rule, as a material for the device, the lag is taken wooden barswhich are attached directly to the base. To put them in one level, you can use various lining, for example, from chipboard. About what size to take bars than to secure them to the floor, and what a surface markup should be, you can learn from the article "Installing Lag for Paul".
After everything is mounted, you can start the flooring of the Fiberboard.
To create a draft floor it is worth using plates with a thickness of at least 6 mm. Before starting the installation, all the material must be left for 48 hours indoors. And for better acclimatization of fiberboard, their backsight can be mixed with warm water, but in small quantities (not more than 0.7 liters per 1 m2). For these purposes, you can use a conventional brush.
Before starting to lay fiberboard on the floor, a number of recommendations should be read:
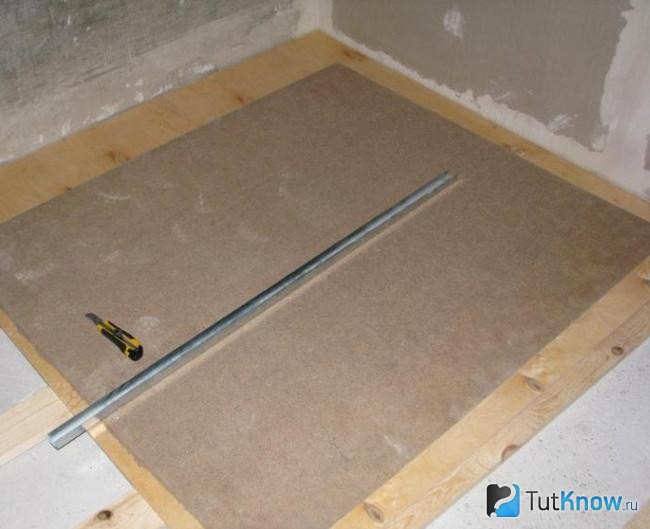
First, the sheet is placed on the lags and is aligned so that all the edges accounted for the middle of the bars. After that, the fiberboard is fixed to lags with nails, screws or screws on a tree with a length of about 30-40 mm and a diameter of 2.5-3.0 mm. At the same time, the fastener step should be 80-100 mm along the edges of the sheet, and 120-150 mm in the central part.
The next plate is also aligned first, then snugs closely with the first, and after being nailed to lags. Seam between sheets should turn out no more than 2 mm. In the same way, the whole range of fiberboard is mounted.
When laying next row The Fiberboard needs to make the displacement of the sheets of sheets in 30-40 cm relative to the previous row. This will give greater strength to the entire floor, and will allow you to more evenly distribute the load.
During the installation of the plates, it will necessarily be necessary in their trimming. This is done quite just with the help of hacksaw, jigsaw or hand saw. To create holes in the fiberboard, for example, under the pipes, cuts can be made by a conventional sharp knife. For a more complex cutting, you can first make a template from cardboard or paper, and then it is already cut on it.
A glue can be used as fasteners to the base of the floor. It is applied and smoothed over the entire surface of the sheet, after which the slab must be left for 20-30 minutes. To ensure greater strength of the coating, the adhesive should also be applied to the preloaded base base.
Next, the sheet is fastened to the surface, after which it presses the cloth. After laying each Fiberboard, the slab must not forget to check its horizontal and evenness. Flooring two adjacent rows, and the cropping of the extreme sheets is carried out in the same way as p. 3.1.
The finishing floor treatment of the Fiberboard is as follows. First you need to carefully examine all the seams: the remnants of the adopted adhesive should be removed with a cloth, and in those places where the gap between the sheets was too large (more than 2-3 mm), it should be embedded with putty. To increase the strength of the connection of the plates, their joints can be sampled by the reinforcing ribbon.
Next, it can be followed by grinding and (or) primer surface of the rough floor surface, but these operations are not mandatory. Everything will depend mainly on the finish coating that you are going to apply over the Fiberboard. And it can be painting, and laying parquet or laminate, and flooring linoleum or carpet, and many other options that you can find out on the pages of our site.
On this, all the work on the installation of fiberboard on the floor is handicapped with their own hands.
Main features of DVP
Fastening
Waterproofing
Concrete floor
Wooden floor mount
Preparation for laying
Installation
The practice of laying a linoleum on the fiberboard is no longer the first decade. Such a solution is particularly attractive, as it is the most optimal way of equalizing surface irregularities. Today there are other methods, but so far many are interested in how to properly put the linoleum on the fiberboard.

One of the main requirements for laying a linoleum is an even base.
It is for this that fibrillers are used, but they are also one of the additions to the insulation of the floor in private houses. Also, the solution also shows the solution on the first floors of high-rise buildings, where many placed fiberboard on the floor under linoleum.
Before you know how to string a linoleum on the fiberboard should learn a couple of features this materialthat will help you better understand the process:
It will be reasonably chosen to work the most available sizes. In this case, the joints between them will be the minimum quantity, and this in turn will turn into an increase in the strength and reliability of the floor covering.

A couple of words about an alternative. The chipboard is also perfectly handled, its ends can always be engaged, and it is just perfect for the leg and cutting. Important moment: In the case of chipboard, you should use precisely.
It is used in this case a shoemaker, and as a support - a metal line or wooden rail. This allows you to get the most flat line.
Today, many use special glue for linoleum on Feds (in stores you can find huge range how to glue the linoleum to fiberboard), however it will be much easier to nail the material to wooden semi Using conventional minor carnations by 15 mm.
Installation is quite simple and hard to make difficulties even in non-professional.
One of the most important points in laying fibrous plates is high-quality waterproofing. because of characteristic features Material often brends from contact with moisture. A sufficiently small flood, so that half a year the floor was noticeable. In order to avoid similar trouble and uses waterproofing. It should be thoroughly dry by the floor after each stage of the work, the material must be profiled, and under the sheets of the Fiberboard laying polyethylene.
In the latter case, the laying is carried out with an overlap at 5-10 cm.

Upon completion of the process, it should be given an abnormal material to fly out. It should be done about 4 days - during this time the sheets must be fully aligned.
Upon completion of the procedure, you can proceed to their direct mount. Depending on the basis of the floor, the procedure has its own nuances.
For fastening used boiled olif or tar. The first option is of greater speed, but later problems may occur, since it is necessary to remove the alley that sticks to the floor is quite problematic.
Alternatively, DVP under the linoleum on the concrete floor can be attached and with the help of dowels.

This approach has an obvious advantage - if necessary, dismantling will be simple.
However, with this approach, additional irregularities will be created on the plates, which ultimately appear on linoleum. To avoid this, it should be done in advance in the Fiberboard a small deepening, which will fit the dowel head.
Orthodoxy is additionally close to putty.
Before starting the laying of DVP under the linoleum on the wooden floor, it should be prepared to prepare it - make alignment. All the bugs need to be treated with a planer, and the yamki fill with putty.
To the base of the plate are fastened with the help of self-samples or nails.
Now that the flooring is ready, you can prepare for the direct laying of the Fiberboard on the floor under the linoleum.
Very important once again Make sure that sheets of sheets are not bored anywhere - otherwise irregularities should be eliminated - sandpaper or putty. Today on the Internet you can find great amount Photos of such work, so that difficulties will not be as follows. Also: "How to make flooring under linoleum - the optimal way."

Specialists recommend slightly moisten the plates before the start of the process. The calculation of water is 0.5 liters per square. m., This should be done with the help of an ordinary painting brush. Upon completion, it will remain to fold the sheets in pairwise wet sides inside, and after leaving them indoors for 48 hours.
Despite the seeming simplicity of the operation, there are a number of nuances:
Superior is cut with a knife, and the slab is mounted.
Finally
As you can see from all of the foregoing - to independently prepare the floor to laying the linoleum of special problems. There may not even be the most experienced person with this business, but even a newcomer, just follow the instructions only. Another question is how to put the linoleum on the Fiberboard, but this is a topic for a different material.
One of best ways Align the wooden floor - it is fiber on it. In this article we will tell you how to do it right, and what is DVP.
The idea of \u200b\u200busing chips remaining after sawing wood has long been used.
Already in 1858, the first patent for the production of tree fiber plates was reached, and six years later, the technology was improved, and modern method The manufacture of this material was developed in 1924. To date, there are three types of such plates:
Sometimes the fibers are compared with the tree, which is actually not the case, because in fact it is a completely different material with various properties and appearance.
The main advantages of this fee are:
It should also be noted that some varieties of this material have high resistance to moisture and are successfully used for external treatments.
As for the shortcomings, there are two on this panel:
Installation instructions
Wooden panels can be folded in three ways:
Laying existing flooring without insulation
This procedure begins with the fact that the floor surface is carefully cleaned from old paint, soil and preparation.
After that leaves wooden panel Fixed in such a way that there are several millimeters between them. To make the corners of the material well attached to the substrate, it is better to place heavy items on them.
Laying without delay
Bearing bands are made of a square high-quality wooden bar, processed by special compositions from microorganisms.
The distance between them depends on factors such as a cross-section of the carrier, the size of the fiber sheets and the degree of till the soil. Level levels are installed at the first level of laying.
Then they are attached to galvanized supports with nylon rings.
Only after this board are installed. Their fixation is designed in such a way that all the joints are on uneven rods. The size of the gap between the plates should be about 2-3 mm, and the distance between the plates and walls is 4-6 millimeters. To secure sheets, nails, bolts or screws are used.
Laying on insulated logs
This procedure is practically no different from installation without isolation, but during the delay before the start of this procedure there is a lag.
Experienced masters advise:
In this article we will talk about popular building material - DVP, consider the features of its use as an outdoor coating. You will learn about the differences in brands and installation features. The article contains information about the mechanical, consumer and operational properties of the Floor DVP.
Fiberboard is a fibrous stove, which in modern Russian-speaking terminology is also called MDF (from the English MDF - Medium Density Fibreboard - the medium density fiber plate).
It is made by pressing the groundwater material (ground sawdust, chips, chips - natural fiber) and cellulose. Additions to the mixture are added to the mixture in the mixture.
Soft plates of brands M-1, M-2 and M-3 are filled with a "wet way" - moistened with water raw materials are sent under the hot press without adding additives.
The material is known for a long time and is widely used in construction, household goods, furniture manufacturing and packaging throughout the world. Accordingly, the variety of this slab is used for different needs. Total twelve varieties are known, which in the context of this article can be consecrated into two categories.
Laminated DVP - pressed plates with a coated with a finely dispersed polymer-wood mass. It has relatively high strength and fire safety. This is a well-known laminate or parquet board Low classes (6-12 mm). Thin thin panels (3-5 mm) go to the walls of the walls and the ceiling. From this material also make elements of furniture (facades), packaging, decorative products, (Good to handle).
It is this material that is the object of interest of our article. In the people, it is often called "organit" or "pressed cardboard" and there is a large proportion of truth. Up to 60% of the material of the recycling - waste paper, chips, bark, used to the production of soft plates (sheets). It is widely used in construction, furniture industry and for packaging.

As a sample, we will take the optimal distribution option DVP M-1 brands (GOST 4598-86). Distinctive feature - With its manufacture, glue or resin (biologically pure material) is not used. Its indicators:
As can be seen from the source data, the Fiberboard is rather towards insulation than to constructive materials. For comparison, the thermal conductivity of polystyrene foam, suitable for similar applications, 0.032 W / m · ° C. At the same time, the strength of the bending plates is significantly inferior to even relatively weak wood - pine (79.3 MPa). However, the fibers of no accident are formed precisely in the form of a plate - this gives the necessary advantages to apply this material on the floor.
The form of a sheet or plate makes it easy and quickly aligning the surfaces, cover the slit and create an intermediate preparatory layer. Fuel and fragility of material during bending tests, breaking and gap in this case do not play roles - on semi Fiberg Works on compression. In this sense, the MDF is closer to the wood - strength to compress pine pine 44 MPa (versus 35 MPa in DVP).

With all the advantages mentioned above, one significant disadvantage does not allow it to be used fully as facing material For floors - low density. It becomes the cause of low abrasion resistance, which is unacceptable for flooring. In addition, soft plates are "afraid of" water and quickly swell during wetting. Therefore, DVP M-1, used on the floor, should be well protected from abrasion and moisture, which leaves them the role of an exclusively intermediate layer. In this capacity, the MDF perform the following functions:

It should also make a reservation that the Fiberboard is rather demanding. It does not tolerate moisture drops and is designed not just for interior decoration, And for residential and constantly heated premises. 10 cycles of a substantial moisture drop will lead to an irreversible warping, even if the sheet is fixed.
Because of the low tensile strength and shift, the stove cannot reliably hold the force at one point - the nails and self-tapping caps are pushing the material. The low thickness of the sheet does not allow to make a sweat to hide the hat. From here, the conclusion - methods of fastening the sheet remains only two - a variety of small points or glue.
Mounting for a variety of points - effective methodBut rather time consuming. In this case, the sheet is fixed on fine thin nails (12x1.5 mm) in increments of 100 to 250 mm. Nails create a uniform clamp of the entire sheet, and the force is distributed not at 20-30, but by 200-250 points. In addition, their small hats are not released on the surface of the Fiberboard.

This method has one critical contraindication - a shaky base. If there is even a poor backlash, it will definitely become a gradual output of nails from seats and a gap of linoleum. Apply the tapping screw is not possible due to the size of the Hat. The method of multiple points is relevant only on a wooden basis.
Installation on glue. Fiberboard in the base version (polished on one side) is well suited for working with PVA glue on the rough side. The glue perfectly connects the material with wood surface. If you need to align the old wooden floor, it is better to apply the combined method - to lubricate the PVA with glue and strengthen the minor nails. The cost of PVA glue is 1.2-1.5 y. e. per 1 kg.
When installing on a concrete or screed there are nuances that need to be considered in advance:
The subspecies of this method is the installation of double-sided industrial tape, designed specifically for gluing wood, PVC, PPR to concrete. The bay of such a tape with a length of 460 m and 12.5 cm wide costs about 10 y. e. (Dk Film, Duraco, USA).
When laying on glue along concrete, it is recommended to arrange more than one layer - the cold concrete is better to reliably block. The clamp can be organized like this: to put the boards on the surface and strengthen them with a dowel to the screed (the sheet is already laid on the glue). After drying the glue of the boards, remove the mounting holes to fill with liquid nails.
It makes it possible that if you paint the fiberboard enamel, it will be good flooring. This is not the case, since the ground surface has bad adhesion. In addition, the surface is sometimes covered with a thin layer of the hydrophobizer.
Even impregnated with the hydrophobizer sheet should be protected from moisture in all means. The easiest and affordable - impregnation of the olifa pure surface (to which the finishing layer will be laid). Cost of olifa 1-1.2 y. e. / liter.
Also, the material is well suited for the draft heaters of the insulation (from the inside!), Especially the minvati - the Fiberboard vapor permeable and allows the insulation to "breathe". The stove is processed very easily - literally cuts the knife. The cost of DVP in the baseline:
Oddly enough, but among the most modern materials Alternatives of DVP M-1 have not yet found. Manufacturers remain only experimenting with its composition, adding hardensions and antipyrenes, and vary consumer properties. This cheap, light and comfortable Material Indispensable as an intermediate leveling layer when finishing the floor.
"The woman is created for a man, not a man for a woman" - such a postulate ...

How is HIV on different time segments manifest? The reasons for the development of AIDS is ...

Stomach Cancer: Symptoms, Causes, Treatment of Stomach Cancer is a change in cell type ...