INSTRUCTIONS AND PROPHECIES OF THE Blessed MOTHER ALIPIA GOLOSEEVSKY, Kyiv...


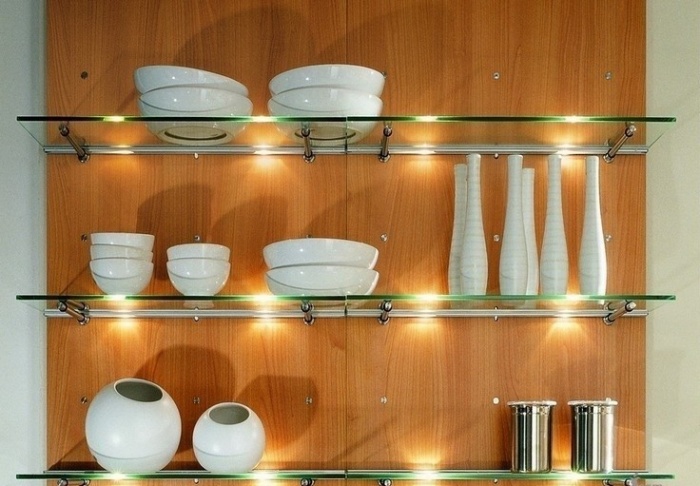
Shelves are quite often used not only to complement and decorate the overall interior of the room, but also for a clearer and more appropriate organization of space. Thanks to their use, the owner of the apartment gets the opportunity to conveniently locate great amount small things that are simply lost in the cabinets.
To date, the market offers a lot of different models that are made of different materials. They also differ in design.
You can choose not only products with classic design but also ultra-modern designs.

But more and more people prefer to make such interior details on their own. Asking how to make a shelf with their own hands, they re-read a lot of literature and look through a lot of catalogs.

However, this does not mean that self-manufacturing of a shelf is difficult and beyond the power of a person who does not have special skills. No, this is absolutely not true.

Familiarization with the literature this case necessary in order to create a product with beautiful design that will fit into the overall interior. Let's consider in more detail what shelves are.
Any specialist will tell you that before you start creating a product, you need to decide for yourself what kind of design you want to get and whether it will be combined with the interior. And only after that you can start creating the product.

Indeed, for a house decorated in a classically seasoned style, it is completely unacceptable to use trendy and modern shelves. They will look extremely awkward.


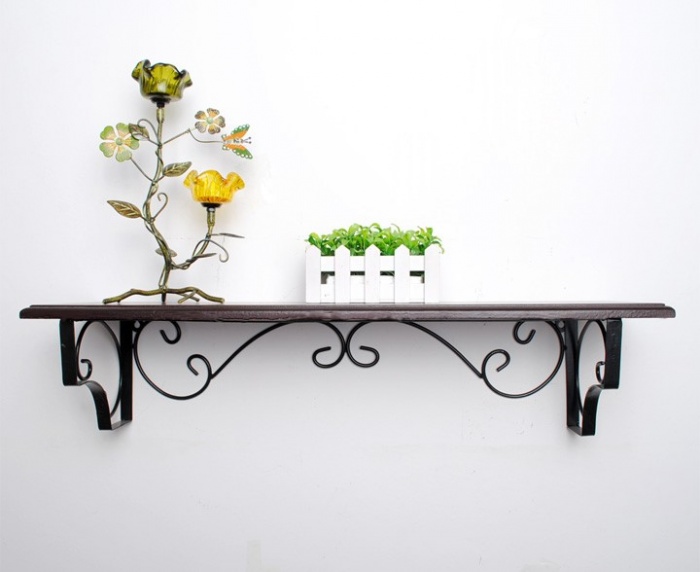
The most popular and widely known subspecies of shelves is the classic shelf. This is due to the fact that it is quite easy to install, and the appearance, thanks to its simplicity, seems refined and sophisticated.
Used with success and open, closed shelves. Closed products are used most often for decoration and installation in rooms decorated in more modern styles. Glass and sometimes plastic are used for their construction.

Open structures can be used both in modernly designed houses and in apartments with a classic design. Over the past few years, this particular type of shelf has gained immense popularity and therefore is gradually replacing the classic options.

AT small spaces quite common to see corner shelves, which have a special way of fastening. They are mounted on adjacent walls that are adjacent to each other. Most often they are used in bathrooms, kitchens and utility rooms.

In addition to the above types of shelves that are mounted on the wall, there are suspended and floor structures. Hanging shelves are mounted in an unusual way.

They are installed with cables and uprights and attached directly to the ceiling. This mount looks quite unusual and original.

Floor structures are most often used in hallways. After all, do-it-yourself outdoor shoe racks not only look beautiful, but also help you organize the space of a small hallway. It is quite easy to make them though.
To create the claimed product, you should purchase or prepare some tools and materials in advance. As connecting elements, you can use whatever suits you best. But the most popular are ordinary screws, brackets and dowels.


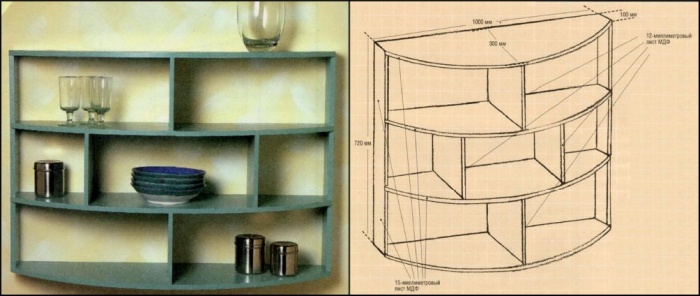
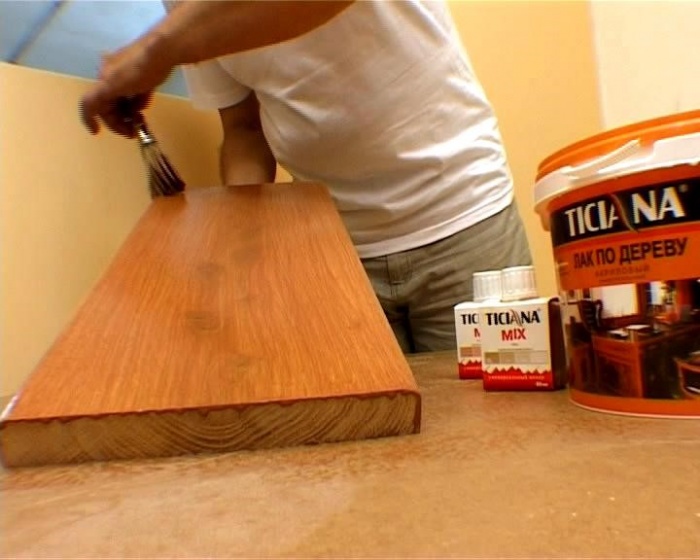
For example, take a photo of the shelves with your own hands, which is presented below. It depicts a product with the following parameters: width 250 mm, height 300 mm, length 1100 mm. The manufacturing process for convenience will be divided into stages.
At the first stage, you need to markup. To do this, you should lay the boards on a table or any other flat surface and transfer the measurements from the drawings. The side walls must have a height of exactly 268 mm.

This marking is optimal because the side walls will be located between the two parts.

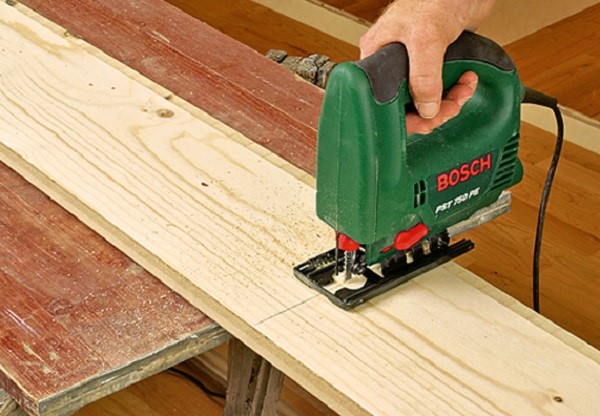
At the second stage, it is required to cut the boards. To get even and neat cuts, you need to use an electric jigsaw. After cutting, you will get 2 fairly long blanks and 2 shorter ones.

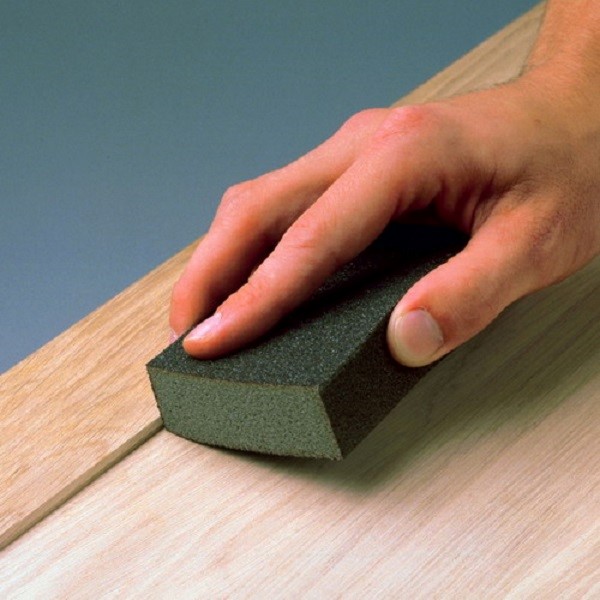
At the third stage, you can start processing the received blanks. The resulting segments should be covered with a special protective varnish or stain, after sanding them.


In the event that you plan only to paint the shelf, you can get by with a conventional antiseptic primer. So you will increase not only the service life, but also achieve more uniform distribution paints.

At the fourth stage of making a wooden shelf with your own hands, you proceed to its direct assembly. The bottom board should be laid on a flat surface. Step back 8 mm from the ends of the workpiece and draw two lines parallel to the cuts.
They should mark 2 points with a distance of 5 cm from the edge. At the marked points, it is necessary to drill holes for self-tapping screws. With the second workpiece it is necessary to do the same manipulations.

After that you should install side blanks on the bottom of the board and fasten them. Once you're done attaching the side panels, move on to installing the top panel and securing it.

At the fifth stage, you should fix the brackets on the ends of the side panels, and make several holes for the dowels in the wall. After that, screw in the screws so that they protrude by 5 mm. And now your shelf is ready.

You can make acoustic shelves in the same way, but you need to take into account the dimensions of the equipment itself. Measurements should be taken carefully, because if you make a mistake, the work will have to start over.


To organize the space in the premises, as well as to decorate the interior, there is nothing better than shelves. comfortable, functional, original form, they help to conveniently arrange a lot of things and give the rooms a more comfortable look. Making shelves on the wall with your own hands is not at all difficult, and you can use a wide variety of materials - wood, fiberboard, glass, pieces of tin, plywood.


| Types of wall shelves | Description |
|---|---|
| Classic | This type of shelves is the most common because of its simplicity, aesthetic appearance and ease of installation. They are a huge flight of fancy: from simple squares to creative asymmetric shapes. |
| corner | This type of wall shelves differs in the method of fastening - it is carried out on adjacent adjacent walls. Most often they are mounted in utility rooms and bathrooms |
| Suspended | This original way creating a shelf involves attaching a simple structure to the ceiling using cables or vertical racks |
| floor standing | This wall shelf is a floor support structure. This type of product is especially relevant in the hallways, as well as large rooms where you don't have to think about wasting space |
| Open and closed shelves on the wall | Wall shelves can be designed, for example, with or without glass |

The tree is the most comfortable material for work. Wooden shelves are simple, complex, open and closed, vertical, horizontal and angular. Taking the basic version as a basis, you can assemble a shelf from several modules and give it the most incredible look. In order for the product to serve for a long time, you should choose the right wood: the boards must be perfectly even, completely dry, without cracks, voids and mold.

During the assembly process you will need:
As an example, a simple rectangular shelf 250 mm wide, 300 mm high and 1100 mm long is used.

The boards are laid flat on the table and measurements are transferred from the drawing. The height of the side walls should be 268 mm, since they will be located between the top and bottom: wall height + board thickness x 2 = 300 mm.

If the markup exactly matches the pattern, you can start cutting. It is best to use a jigsaw for this, then the cuts are perfectly even and neat. You should get 2 long blanks and 2 short ones.

Before proceeding with the assembly, each workpiece must be sanded, stained and varnished. If you plan to simply paint the shelf, the blanks are processed - this way the service life increases, and the paint lays down more evenly.

The bottom board is laid flat on a flat surface. From the ends of the workpiece retreat 8 mm and spend 2 straight lines parallel to the cuts. Now on these lines you need to mark two points at a distance of 5 cm from the edge, and drill holes for the screws there. Do the same with the top piece. When all the holes are ready, side blanks are installed on the bottom board and screws are screwed in. A second board is applied on top and the side walls are also fixed with self-tapping screws.

Brackets are fixed at the ends of the side walls, holes for dowels are drilled in the wall, self-tapping screws are inserted and twisted so that they protrude by about 5 mm. The dowels must be located strictly horizontally, therefore, before drilling, a line is drawn using a level. Now it remains only to attach the brackets to the fasteners and hang the shelf. If desired, the back wall of the product can be hammered with a piece of plywood, and glass can be inserted in front.


To make such a simple shelf more original, you can replace one side wall with a stump of a thick branch. To do this, choose an even branch with a diameter of about 7-8 cm with a smooth clean bark, saw off a piece 28 cm long, cut off all the lateral processes. Chock is treated with a primer, dried and varnished. The bark does not need to be removed. After the varnish has dried, the workpiece is inserted between the upper and lower boards and screwed tightly with self-tapping screws.

Based on this drawing, you can make various variations of wall shelves. For example, reduce the length to 400 mm and make 3-4 blocks at once. Then stack them on top of each other checkerboard pattern and fasten together with metal plates. Or simply fix them on the wall separately, placing them at a short distance from each other.

Often, to save space, shelves are made angular, and they can be mounted both in the inner and outer corners.


The blanks are made according to the scheme described above, only the upper and lower boards consist of two elements, with ends sawn at an angle. The process of making such a shelf is quite simple:

| Wall shelf materials | Advantages and disadvantages |
|---|---|
| Wood: plywood, chipboard, MDF and others | This material is relatively easy to work with, it looks beautiful, natural and spectacular, its service life is quite long, especially if pre-treatment is carried out. |
| Plastic | This material is the most versatile, it can imitate both wood and stone, while removing their imperfections. |
| Metal | Such wall shelves will be very strong, reliable and durable, however, classic interior they fit in with difficulty. In addition, corrosion can also be a problem, so for metal products special handling and conditions required |
| Glass | Transparent wall shelves will create an atmosphere of lightness and comfort in the house. Of course do it yourself glass structure it will be difficult, but if you, nevertheless, decide to do all the work yourself, then you will have to work with glass for quite a long time and very carefully, especially if various cutouts are planned in the design of the shelf |
Shelves non-standard shape are in increasing demand, so if you wish, you can try to collect something original. For example, a bookshelf in the form of a simplified labyrinth is used.
For manufacturing you will need:
If you have everything you need, you can start making the shelf.
On the prepared boards, cut lines are marked with a pencil under the ruler. Measurements should be transferred very carefully, since all horizontal parts have different lengths.
The ends of each workpiece are cut at an angle of 45 or 90 degrees. The diagram shows the first option, so you need a miter box for sawing. It is very important to correctly install the miter box on the board so that the cuts are symmetrical. If the ends are cut off incorrectly, it will not work to fold the shelf.
The ends of the parts are smeared with glue, tightly compressed and additionally fixed with slotted furniture screws. Ordinary self-tapping screws do not fit here. At least 2 screws are required for each joint. Both parts of the shelf are applied to the wall, leveled and the attachment points are marked with a pencil. After that, holes for dowels are drilled, brackets are screwed to the shelf with self-tapping screws and the structure is hung on the wall. Instead of brackets, decorative pelican shelf holders are often used.


If you need a decorative shelf for small items, the next option is perfect - a board suspended on belts.


To make a shelf you will need:
The cuts of the belts must be perfectly even, therefore, if necessary, they are cut with a knife. Fold each belt in half, press the ends against the table, retreat from the edge 2 cm and drill a neat through hole with a drill. Do the same with the remaining three.
On the wall, using a level, two points are determined at a distance of 60 cm. Holes are drilled and plastic dowels are inserted. A belt folded in half is applied to one of the holes and fixed with a long screw - a large loop is obtained on the wall. Another such loop is attached nearby.
A polished board is inserted into the loops and aligned horizontally. To prevent the shelf from moving, the parts of the belts adjacent to the wall near the board itself are screwed with short self-tapping screws. Now another one is hung under this shelf, exactly repeating the steps described above. The result is a light and neat bunk shelf. If desired, you can add 1-2 more tiers.
For the manufacture of the shelves described above, you can use not only wood, but also plywood, as well as sheets of laminated chipboard. The latter option is used most often, since chipboard is light in weight, high strength, practicality and durability. When assembling shelves from this material, all sections must be pasted over with a melamine edge to match the color of the sheet.


Glass shelves harmoniously fit into any interior, and the installation process does not take much time. For work you will need:
Not everyone knows how to cut glass correctly, and therefore it is better to order cutting blanks in the workshop. They will also perform grinding and polishing of the edges, so that when installing the shelf, you will not be cut on sharp edges. Everything else can be done on your own.


The section of the wall where the shelf will hang should be as large as possible. By using building level draw a horizontal line on the wall with a pencil. On the line mark the location of the fasteners, drill holes.


An aluminum profile is applied to the wall surface and the conformity of the mounting marks is checked. Then dowels are inserted into the holes, the profile is baited with one screw and leveled horizontally. After that, tighten the rest of the screws.


Instead of a drill, insert the bracket screw

Screw in the bracket screw

Leave the bracket screw protruding from the wall


Checking the position

We have shelves
trailing edge glass shelf closed with adhesive tape. You can use separate spacers from the tape, placing them where the glass will touch the heads of the screws. The shelf is inserted into the profile, the edges of the profile are closed with protective caps. If two shelves touch on the sides, their edges are fastened with metal fittings.
If there is free time and the desire to experiment, you can create a very unusual shelves on the wall from improvised materials. For example, the corner shelf from plastic pipes. For its manufacture, segments will be needed sewer pipes and corner cuts. The shelf is attached to the wall with screws and dowels.


Old suitcases and diplomats also make great wall shelves. To do this, they are cut in height to half, close back plywood and fixed to the wall with screws or brackets.

Drawers from unnecessary bedside tables are quite suitable for making shelves. To give them an elegant look, the boxes should be carefully sanded, primed and painted in bright colors. Then they are leaned with the back wall against the surface, the attachment points are marked and holes are drilled for them. Even one such shelf looks very original, and a composition of 2-3 drawers will become a real decoration.


You will need:


Wall shelves are able to harmoniously complement the design of the room. The range of their purpose is very wide. Depending on the location and application options, they choose the material for their manufacture and think over the design. What features should be considered before proceeding with the creation of their own hands wall shelf, and what are the main stages of the process, let's get acquainted in detail.
The main purpose of the wall shelf is to place a lot of small items, while organically combining the functions of storage and interior decoration. Depending on this, the option of installing a furniture structure is determined. There may be several of them:


A little imagination, and you can make a wall shelf design with your own hands in various variations. The following models are widely used:
Occasionally, the facade of a do-it-yourself structure is supplemented with glass. This is practical when storing items that do not have a decorative function. A small part of the designs of wall shelves that you can decorate with your own hands is shown in the drawings below:


No construction work is complete without a preliminary plan.
Remark ! Before you start designing a shelf with your own hands, you need to decide on the material for the base.
When choosing it, take into account the place where the furniture structure and its main functions will be installed. The scope of wall shelves is as follows:

The type of fastening plays an important role in the design of the shelf wall structure. Having studied the options for fixing, it will be easier for you to determine the most suitable method.
The traditional fastening of wall shelves is the use of hinges. They are optimally suited for products made of wood and its derivatives. Important condition The material must be of sufficient thickness. The whole process takes place in several stages:
Attention ! Compliance with the horizontal line is important point when fixing the wall shelf.

The use of loops is not suitable for all materials. Installation of wall-mounted glass shelves is carried out using special fasteners for fragile products. Fasteners are made of two parts and are often supplemented with elastic gaskets, a glass shelf is inserted between them. The lower part of the device for reliable fixation of the wall structure is equipped with a clamping screw.
A common model for mounting a glass shelf is an instance called a pelican, capable of holding a wall structure with a thickness of 8 to 34 mm. In addition to glass, it can be used to fasten other materials with similar dimensions.

The hidden installation of the wall shelf is distinguished by simplicity and originality. In this case, the fastener is completely masked. The essence of this method is as follows:


Create individual design rooms allow wall shelves with decorative brackets. They can be made in a production way or belong to exclusive copies. Photos of wall shelves decorated with hand-made brackets are presented below:


Depending on the chosen design and material, the process self-manufacturing wall shelf has its own characteristics.
If you want to make an original wooden wall shelf with your own hands, you will need:
The whole process of DIY wall shelf production is simple. After drawing up a plan or taking as a basis finished project, the dimensions of the structure are transferred to the material. Cutting wood base better with a jigsaw for a perfectly even cut.
All elements of the wooden shelf are carefully polished; in the presence of significant defects, I use putty for wood. On the initial stage need sandpaper number 40, get perfect smooth surface sanding paper under Nos. 80 and 120 will allow.
Connect the parts of the wall structure liquid nails or wood glue.
Mounting marks are made on the shelf and wall. The brackets are connected to the shelf, and a recess is made in the wall with a drill, after which the dowels are inserted.

At the final stage, self-tapping screws are screwed in and the wall shelf is suspended.

Premises with small area it is better to equip with glass wall shelves that form an atmosphere of lightness and visually increase the space. If the experience of working with glass is not enough, it is better to turn to specialists who, at the same time as cutting fragile material, will perform high-quality processing of sections. The following steps for mounting a wall shelf are within the power of anyone who can hold a tool in their hands and are similar to the procedure for attaching a wooden structure:
This completes the installation of the glass wall structure.


A competent combination of a wall shelf with other details of the situation will allow you to create harmonious design spaces with a personality.
Bookshelves have not lost their popularity. They save space and space, and can be placed on the wall in a way that suits the wearer. In addition, the presence of a bookshelf in the room suggests that reading people live here. Modern bookshelves not only perform their main function, they are an important part of the interior of the room and are able to emphasize its design.
It is not difficult to make a bookshelf yourself: it is enough to have minimal carpentry skills and show a little imagination.


To create a wooden shelf in classical style you will need:
Instead of wood for the manufacture of shelves, you can use chipboard, MDF, plastic and other materials.
Once all the materials and tools are prepared, you can get to work.
Consider the step-by-step process of making a shelf:

bookshelf blueprint

A wooden shelf can be stained, varnished, decoupage or craquelure. You can also attach doors (wooden, glass or plastic) to the shelves - they will protect books from dust.


This is the simplest version of the classic wooden shelf. They can also be made multi-tiered, asymmetric. You can show your imagination and create something original and exclusive.
Now it is fashionable, and other furniture, from chipboard boards which captivate with their low cost. But this material contains highly toxic compounds that are harmful to human health.

If you decide to make a shelf from such material, then it is recommended to paste over its ends with a melamine edge. This is done with an iron: the edge is applied to the pre-treated end surface and ironed with a hot iron, after which the excess edges of the edge are cut off with a clerical knife.

As a result, the shelf will take on a more aesthetic appearance, and the edge will prevent the selection toxic substances into the surrounding space.

Finding storage space is one of the biggest challenges people face when thinking about a design, and after that too. Sometimes, even in a large room, another bulky closet will look out of place, but what if you need to place a collection of figurines or a dozen books? Salvation in such a situation is wall shelves, which will be discussed today.
Wall shelves, although they are a variety in themselves, also differ in location. Conventionally, they are divided into the following types:
The lightest and most common option, which is attached to flat wall. But precisely because of their simplicity, they provide a wide field for imagination: shelves of different geometric shapes, sizes, arranged in the form of honeycombs or creating complex compositions.
Such structures can be single board nailed to the wall, or make up the silhouette of a tree in which each "branch" serves as a storage place. Bookshelves are slanted or asymmetrical. In the ocean interesting ideas there are even round ones, only in the case of unusual figures it is necessary to think over every moment in advance: location, content, fulcrum.

This place is usually empty due to its impracticality, however, corner shelves not only rehabilitate the space, but also help transform the interior. Fastening is carried out on two adjoining adjacent walls. In this case, not only the inner, but also the outer corner can be involved.
The variability in the design of corner wall shelves depends more on materials and decor, but even in itself this solution looks unusual. More often, shelves are used for books or household items in the bathroom, as well as in storage rooms.

As the name implies, these shelves are not attached directly to the wall, but are suspended on ropes - from the ceiling or beam. This design is not very stable, so it is used to store books, not crystal vases. But it is ideal for creating original accents in the room.
It can be installed as one shelf, or several. The first option is often created in the form of a triangle or fit a shelf into a circle. The main thing is to make sure the storage is reliable.


A wooden plank nailed to the wall is the easiest shelf option that immediately comes to mind. But for modern design this is not enough. The choice of material, even for such a simple product, is wide enough - as well as their capabilities.
Even if this is an obvious basis, it should not be immediately discarded. Diversify a wooden wall shelf will help complex shapes and fastening. For minimalism or a loft, such a solution would be very appropriate. And if you want to fit an element into a classic interior, it is recommended to pre-process the details, and maybe even decorate with carvings.
To save on material, you can use MDF, chipboard or plywood - beautiful, simple, practical.


But metal wall shelves will definitely attract attention and harmoniously fit into the interior, especially if it is high-tech, fusion or, alternatively, minimalism. Only for their installation will need special skills.
Such a base has high characteristics - durability, reliability, strength. And pre-treatment will save you from corrosion.

A cheap, malleable, versatile material that can look simple or luxurious by imitating natural options, but leveling their shortcomings. Especially if such a shelf on the wall is full of objects, so guests will not have the opportunity to get to know its details better. For the bathroom - a very good solution!


Such a basis has a significant drawback - fragility. A sharp push or impact can damage the shelf, but this will not happen when storing light items. Is it worth mentioning how elegant the glass looks, and how glamorous the mirror surface is? This will give the interior a feeling of weightlessness.

You will also have to choose the method of attaching the shelf to the wall on your own - from three options. The reliability and mobility of the structure depends on your decision.
Installation is done with dowels or anchors to the wall. This provides a strong fixation of the entire product, increasing its load capacity and strength. If the shelves are supposed to store heavy items, then this type is perfect. But there is a big minus - it is very difficult to dismantle it without consequences for the wall or structure.

Moderately rigid fastening with staples and mounting hooks, which is easy to implement at home, unlike the first type. If necessary, they can be dismantled without damaging the shelf, after which a new one can be installed.

Fully in line with modern trends in functionality and mobility, such wall shelves are installed according to the principle of building up: the lower tiers become a support for the upper ones. A variety of combinations of shades or shapes that complement each other look appropriate.

At quality work shelves turn into full-fledged furniture, which, like any other item, must be harmoniously entered into the style of the room.
Everything here is simple and at the same time diverse: both laconic products from different materials and entire ensembles of various geometric shapes are suitable. Instead of empty embellishment - conceptual aesthetics. The priority is modular or mobile types of wall shelves.
It is necessary to focus on wall decoration: in the case of a neutral coating, you can enter bright designs, and on the side with a bright finish, it is better to do without shelves.


Turning around in the classic style is not particularly successful. Wooden shelves on a flat wall, in extreme cases - corner. Brackets can be brought to the fore if they are used and fit the design.


Provence makes similar demands. Only the processing of the base needs to be approached more carefully. First, use a tree or its derivatives. Secondly, cover them with white paint and, if possible, create the effect of antique furniture. Some carelessness in installation will add charm to the design, but we must not forget about its strength.


To begin with, we note that with this style it is unlikely that it will be possible to put a lot of any “small things” on open shelves - that’s why it is minimalism. To fit a lot of items, it is recommended to provide shelves with doors, thereby hiding disharmony from the eyes. Good looking glass or wooden surfaces- even, smooth, directed strictly horizontally.


The freedom-loving loft offers us the greatest variety. At the same time, it is not at all necessary to fanatically grind the boards to perfection - slight negligence is quite organically combined with brick walls characteristic of this style.
An excellent option is shelves suspended on a thick rope or an angular structure based on a pipe brought to the fore. In general, the loft allows you to turn the disadvantages of space into advantages, and technical elements into decorative and aesthetic ones.


In addition to the fact that you can choose wall shelves with interesting design, they can also be further decorated for greater effect. To avoid the effect of clutter, make sure that the practical content of the products does not conflict with the details.
The simplest option that is suitable for standard wooden shelves- surface decoration. Here you can use all available tools: stencils, decoupage, decorative tape and so on. This solution will look good on neutral walls, for example, painted white.
The Provence-style interior is characterized by the use of textile elements, so why not decorate the shelves with them by laying a few beautifully hanging scarves with patterns? Cozy and practical.
A romantic mood will be given by candles arranged singly or in groups. However, you can experiment with light sources by entering some modern tendencies. For example, wall shelves with backlights look unusual - mounted lamps that gently illuminate the details located on them.
Tubular fasteners on the shelves can be used as a kind of "hanger": for example, for a lamp, towels or a garland. With little effort, a simple storage space turns into an elegant element of the interior.


It would seem that such a simple product, but so many options! But not all of them are easy to implement on your own and, let's face it, even a simple look requires certain skills. Before moving on to creating a shelf with your own hands, check out the basic recommendations that will help beginners in furniture business or experienced craftsmen.
So, before the main process, it is necessary to think over the design in detail and make a sketch. Determine for yourself the purpose of installing the shelf, the intended things that will be stored on it, the location, shape and size.
After evaluating the load, select the material and method of fastening. After that, marking is carried out on the surface of the base, and the material is also cut.
The resulting modules are assembled, a re-measurement is made, which is compared with the markup for fasteners. Next is carried out finishing elements, namely, grinding, tightening and painting, if necessary.
Fasteners are installed on the surface of the wall and on the shelf, after which the parts are fixed, as well as leveling with finishing fixing.


In addition to the options listed, here are 30 more wall shelving ideas to help you decide. interesting solution. Inspiration and beautiful interiors!
INSTRUCTIONS AND PROPHECIES OF THE Blessed MOTHER ALIPIA GOLOSEEVSKY, Kyiv...

Eufillin dropper in ampoules is used to treat pathologies that ...

Among all ointments for the treatment and prevention of joint diseases, the most ...