INSTRUCTIONS AND PROPHECIES OF THE Blessed MOTHER ALIPIA GOLOSEEVSKY, Kyiv...


A chandelier lighting fixture is both a decorative element with a large weight and a complex design. The fastening of the lighting device requires increased attention, since the safety of the inhabitants of the room depends on the strength of the installation. The installation of the luminaire can be done in several ways, but in any case, it is important to observe the safety measures for mounting the device and check the grounding of the electrical wiring.
Types of fastening chandeliers to the concrete ceiling are different. The chandelier is installed using the following fasteners:
Before attaching a lighting fixture to a concrete ceiling with a built-in hook, the first thing to check is the strength of its installation. To do this, choose a load the size of the selected chandelier, fasten it, and then pull it with effort. Poorly installed fasteners will begin to stagger or fall out altogether, in which case the hook must be replaced.
To install the hook, you need to make a hole in the ceiling with a puncher and install the collet, followed by mounting the fastener into it. A pin is placed in the collet and a hook is hung, it is also possible to screw the hook directly into the collet. Before screwing the hook into the thread, you need to lubricate the hole with a thin layer of grease and wind two copper wires. Next, one hundred grams of a gypsum solution is prepared, which in consistency will resemble thick sour cream. After that, the hole is filled with a stick, it is important to remember that the gypsum mixture quickly hardens, so stuffing the solution into the thread should be done accordingly.
The hook is placed without delay in the solution until it has time to harden and the excess mixture is removed. Wait for the solution to cool to room temperature, this will happen after 2 hours or more. After the final grip gypsum mixture proceed to fixing the lighting device.

Anchors are used to work with durable concrete ceilings that can withstand heavy lighting fixtures. A large chandelier of more than five kilograms is hung on an anchor hook, having drilled a hole of the desired diameter before that. The fastener has a spacer, which, after installation, will diverge to the sides and fix the lighting fixture.
Such fastener has a sloppy appearance and thereby spoils the design of the premises. To hide protruding and protruding connecting elements, the installation of chandeliers is carried out using decorative bowls, which will allow you to hide the mounting fittings. Anchor fasteners are made of metal, which allows you to withstand heavy lighting elements.
Fixing the lighting device using a mounting plate is carried out on a plasterboard ceiling, which is not designed for heavy loads. In order not to break the weak load-bearing structure, you need to strengthen the place of attachment of the lamp. think over future view fasteners at the stage of mounting the frame. Depending on the size of the fasteners of the lighting fixture, the shape of the installation of profiles is selected, which can be laid in parallel or in the form of a square, rectangle.
Before proceeding with the installation of fasteners, mark the places where the holes will be in accordance with the places of the screws in the bar. Dowels are installed in the recesses and the bar is screwed. If there is a previously installed hook in the concrete ceiling, you should not remove it, as it will come in handy if you need to change the lighting fixture. Fixing the lamp is carried out to the bar with screws. Lightweight chandeliers are fastened with long self-tapping screws. For heavy appliances, fasteners are installed on a ceiling made of concrete or wood.
Fixing the lamp has the following sequence:

It is worth remembering that before installing the lamp, the device is analyzed, i.e., the weight, size and type of fasteners are determined. After the fasteners are mounted, proceed to connect the chandelier to the mains.
So, you needed to replace or hang a chandelier from scratch on the ceiling in the house. At first glance, this event causes little concern and seems difficult for a novice electrician. But it's much easier than you think, because installation work last no more than half an hour and at the same time special efforts are not required.
In order to hang a chandelier to the ceiling with your own hands, you must:
Now let's take a closer look at each of the stages.
Any electric installation work not safe, because a person is dealing with current high voltage. So that when you connect you are not shocked, and you yourself do not fail after a while, we recommend that you consider the following rules and tips:
If you follow these safety measures, you can fix the chandelier on the ceiling quickly and without any problems.
In order to carry out the installation, you will need the following tools:
From the materials you need to prepare:
As for the latter, it should be clarified here. If the chandelier will be fixed to a concrete ceiling, it is necessary to purchase anchors, they are better installed in the wall. In order to hang the case on a wooden ceiling, you can do without a hook, use wood screws (if the lamp is light). To drywall can only be fixed if you get on the frame of the profiles using metal screws.
In order to independently hang the chandelier from the ceiling in the house, you can use one of three methods, each of which is predetermined by the manufacturer. If the product is not heavy, it can be hung on a hook. For weights over 5 kg, anchor bolts must be used. The design of some chandeliers requires the installation of a special bar (bracket). Well last way– fixing the back cover of the luminaire directly to the ceiling or wall. Now we will consider in detail each of the above methods.
To install a light chandelier, you can buy an inexpensive hook with a dowel (as shown in the picture) and screw it into the ceiling, then hang the loop on the hook, provided for by the design of the lamp.

Please note that this method is only suitable if the ceiling is wooden or concrete, because. then you can drill a hole in it and insert the dowel. If the sheathing is plasterboard, apply this species installation is prohibited, because the hook will simply vomit after hanging the lamp.
If the chandelier is large and heavy, you can hang it on an anchor hook. Its design is shown in the photo:
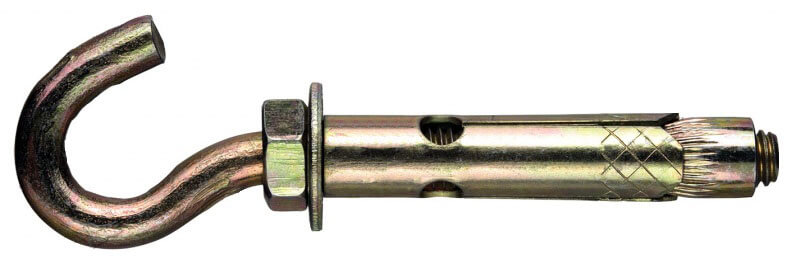
All that is needed is to drill a hole of the required diameter in the ceiling, and then screw in the hook. The anchor will “break open”, which will create secure fastening items of even greater weight.
Such a connection can spoil the interior of the room, so it is recommended to buy lamps that have a decorative bowl, which will hide all fasteners.
If the manufacturer has provided a plank mount, it will be necessary to spend a little more time on installation.

The kit includes a metal bar and 2 screws with nuts. All that is needed is to fix the bar (bracket), and then hang the chandelier tightly to the ceiling yourself.
This option is more time consuming, but at the same time it is not difficult at all. The main thing is to correctly adjust the distance between the screws (it must correspond to the distances between the holes in the luminaire body itself).
If you want to hang the chandelier on the ceiling without drilling with a perforator, you must choose special kind luminaire, the ceiling of which can be fastened with self-tapping screws. In this case, you just need to screw a few self-tapping screws through the holes in the back cover. Most often, this method of fastening is used if the product is light and is installed on the wall (as shown in the picture).


So, in order for you to understand each of the connection methods, we will provide the corresponding step by step instructions for Dummies.
If you use a hook, it is enough to drill a hole in the ceiling with a drill, drive a dowel (or anchor) into it, and then screw the hook itself. Next, you need to connect the wires between the body and the supply wires, carefully insulate them (if required) and only after that hang the chandelier on a hook. We need to dwell on this in more detail so that you know how to properly connect the chandelier to the ceiling.
If the design of the luminaire does not provide for grounding, two wires must be connected to the housing - phase and zero. As a rule, metal lamps provide additional grounding, so in this case you will be dealing with three wires - phase, zero and ground. Each core must be connected in the terminal block according to the color marking of the wires, as well as symbols. If 4 wires come out of the lamp housing, then it means a chandelier for two light bulbs and it must be connected by analogy with two lamps.
Video lesson on connection
If you are installing electrical wiring from scratch, then you need more. You can get acquainted with the technology by simply clicking on the link.
In order to hang the chandelier evenly on the bracket, you must first set the screws at a suitable distance. Then fix the bracket using dowel-nails. Next, you need to thread the body through the studs, and with the help of decorative nuts, securely fix the product on the bar. As in the previous case, the wire connection must be done in advance.
We also draw your attention to the very important point. When connecting a chandelier, the cores must be correctly connected: phase to phase, zero to zero, and ground to ground. If you mix up the contacts, it will happen. To prevent this from happening, we recommend that you familiarize yourself with.
Well, the last way is to mount the back cover directly to the ceiling. In this case, the design of the product has several holes on the back cover, which are simply fixed with self-tapping screws. There is nothing complicated, the only advice I would like to give is that it is not necessary to use all the holes. If the lamp is light, but 4-5 holes are provided, then three self-tapping screws may be enough to hang the case.

Connecting a socket, switch and light bulb in a junction box
When you complete the electrical connection, you need to check all the work. First, visually - so that the wires are not visible (hide the cores in the case). After that, you need to shake the lamp to make sure that the fastening is secure. Well, in the end, turn on the machine and if it doesn’t knock out, and the lamp itself doesn’t sparkle, then everything is done right! As you can see, one person and even a woman can easily hang a chandelier from the ceiling! The main thing is to follow all the rules that we told you about!
Above, we have provided you with instructions for installing a chandelier in the most standard conditions - when the ceiling is even and without defects. At the same time, sometimes you have to carry out fastening in non-standard conditions, which we will discuss briefly.
To hang the chandelier on a stretch ceiling, you can use the bar, as shown in the photo below. In this case, fastening can be carried out even if the ceiling is already stretched and, moreover, the replacement of the luminaire can be done without the risk of damaging the film coating. 
If you decide to hang the product on a sloping ceiling, then it is best to use a hanging chain. When for some reason you have to change the location of the chandelier in the apartment, the main thing is not to get into the wiring when drilling a new hole in the ceiling. To do this, it is recommended to use, which will show where the wires go.
If there is already a hole in the ceiling, be sure to use it so as not to re-drill the hole with a puncher. Too much big hole can be hidden with a special plaster ceiling, which is sold in most hardware stores.
If three wires of the same color come out of the hole, then in order to find the phase, zero and ground, you will have to use a multimeter. Things are easier with two-wire electrical wiring - you can find the phase and zero with an ordinary indicator screwdriver (when you touch the phase, the light will light up).
Liked the article? Add "" to bookmarks and we will delight you with new available instructions with visual video examples, as well as electrical diagrams. We hope you understand how to hang a chandelier on a plasterboard, concrete or wood ceiling!
Related content:
Installation and connection lighting fixtures- This is the final stage of repair in the room. The chandelier is the central lighting that still exists in almost any room. How to hang a chandelier on the ceiling and do it right?
Electrical work is dangerous, because exposed cables can cause harm to health. It is important to eliminate all hazards before starting work. Rules:
Important! You should not buy cheap Chinese chandeliers, as practice shows, they most often fail. This element of lighting will not be used for a year or two, so it is better to find and buy a quality product. The cost of this will be higher.
Before the beginning self installation you need to prepare the tools, you need:
In the process, materials are needed, depending on the chosen installation method:
There are many options for fixing a chandelier, but they differ only in terms of installing a fastener (hook, strap). The general procedure for installing any chandelier:
Exist different ways installation, the choice of one or another depends on the material of the ceiling (drywall, concrete, wood), the weight of the chandelier and the fasteners present in its design.
For light ones, installation with a hook is suitable. If the weight is more than 5 kg, then anchors will be required. In some cases, you should fix the chandelier using a strap. The easiest option is to install the chandeliers directly to the ceiling, without intermediate fasteners.
In fact, in this way you can hang any chandelier on the ceiling, you just need to choose the right hook.
 Installation of a hook for mounting a chandelier
 Options:
Important! This method is suitable for all chandeliers in which a decorative bowl is provided - it hides the mounting elements.
The procedure for mounting the chandelier on a hook to a concrete ceiling:
If installation is carried out on a wooden ceiling, it is still easier here - the hook is screwed into the wood. If it is very hard, then you should first drill a hole, its diameter is smaller than the diameter of the hook.
Important! The decorative hollow bowl (plate, glass holder) moves freely in height, and upon completion of the suspension, it is easily fixed in the upper position.
If the design of the device does not provide a loop for hanging on a hook, the previous option will not work. You need to use a bracket or bar. This option is a little more complicated, but still available for implementation by anyone. home master.
 Replacing a hook with a bar
 A chandelier always comes with a bar or bracket. Insert 2 screws into this element and fix it. Before tightening the nuts, set the required distance. It is determined based on the placement of holes on the chandelier plate. The screws are then closed with decorative fastening nuts. Attach the bar itself to the ceiling with self-tapping screws, and tightly.
 Plank mounting sequence
 After that, it remains to place the chandelier in its rightful place and secure it with those very decorative nuts.
Important! Chandelier designs for the first and second mounting options are very different. But if a chandelier hung on a hook earlier in the room, it will not be difficult to mount a model with a bar in that very place, and vice versa.
If the chandelier is light, not heavier than 3 kg, and small in size, then it can be mounted simply to the ceiling, without any intermediate hardware. Such products are distinguished by the fact that there is a metal plate at the base, most often round with mounting holes. The process is simple:
Similar simple chandeliers have basically only one shade for 1 lamp, they are used for small spaces. Often hung in the kitchen, bathroom, hallway.
 Chandelier with mounting to the ceiling
 Chandeliers with a remote control are presented on the market and are gaining popularity. Such devices make it possible to control the intensity of light. In other models, an air ionization system and fans are presented. Do not think that installing such devices will be a problem, you just need to take into account certain points:
These options are suitable for hanging chandeliers, provided that the ceiling is fairly even: concrete or wood. But modern ceilings can be different: stretch, drywall. And sometimes there are other difficulties in the process, you need to know how to find a way out of such situations. The main point is to have the necessary tools and materials in your arsenal.
In this case, difficulties arise even at the stage of finding a suitable model. The easiest way is to purchase a ceiling chandelier and mount it on a double cruciform bar. But if such a model does not fit in style, you can find a way out.
 Suitable chandelier for low ceilings
 Even a chandelier with a rod can be mounted, but the hook will not be used. This will save up to 15 cm in height. Procedure:
Important! To avoid flashing of light, it is better not to use the “twisting” of cables. It is worth resorting to soldering and insulating with ordinary electrical tape.
This is the most common difficulty, because it is quite easy to level the ceiling with drywall, but it is already more difficult to mount a chandelier. This material it is not designed for a load (including a ceiling one, it is thinner than a wall one) even from a light chandelier, therefore it is never attached directly to the sheet.
When attaching drywall sheets to false ceiling, you need to mark the places where the profiles pass, because it is in them that it is most reliable to mount any device. Another option at the installation site is to fix a bar to the ceiling. It should be of such thickness as to cover the distance between the sheet and the draft ceiling, of course, this place should be noted.
If this is not done, then you will have to make a hole in the sheet in such a way as to get to the draft: concrete or wooden ceiling. The installation activities mentioned above are already being carried out there.
When installing a stretch fabric, the owners do not always want to use Spotlights, which by means of a special device are easy to install in such surfaces. As for the chandelier, it is better to think about the fact that it will be installed even before the installation of the canvas, since a special platform made of plywood and metal plates needs to be placed under it. To do this, you need to decide on the location, size of fasteners, type of installation.
 Installation of a chandelier to a stretch ceiling in a section
 Important! Fixing a chandelier to an already stretched canvas is impossible. An attempt to make a puncture will lead to the fact that the panel (PVC or woven) will disperse and you will have to change it, it cannot be repaired. The hole is no longer patched.
If the bar is fixed, then you can hang the chandelier on it in any way. In this case, it is required to plan the gap, taking into account the fact that the canvas will “walk”. But still, it’s better not to experiment with this on your own and resort to the services of specialists in stretch ceilings. This price will definitely be cheaper than ordering a new canvas and installing it, respectively.
INSTRUCTIONS AND PROPHECIES OF THE Blessed MOTHER ALIPIA GOLOSEEVSKY, Kyiv...

Eufillin dropper in ampoules is used to treat pathologies that ...

Among all ointments for the treatment and prevention of joint diseases, the most ...