INSTRUCTIONS AND PROPHECIES OF THE Blessed MOTHER ALIPIA GOLOSEEVSKY, Kyiv...


Decorating the house on your own is a favorite pastime of many hostesses, this article reveals how to make a lamp with your own hands. You can revive the interior of a living room, bedroom or hallway with the help of improvised means, only by changing the ceiling of a chandelier, floor lamp or table lamp. Do-it-yourself lampshades for lamps can be used not only in a residential interior, but also in the halls of cafes, pubs, pizzerias.
Products made for children's rooms should be made from natural non-toxic materials and painted with ecological paints.
When making, you should also keep in mind fire safety, therefore lampshades made of combustible materials made of paper, plastic, feathers or thread should only be used with lamps that have a low heating temperature.

You need to use LED or fluorescent lamps. They have a number of advantages:
In addition, such lamps are also called energy-saving, their only drawback is their high cost.

It is also desirable that the connection of the wire to the base be made by a specialist. Do not try to perform this operation yourself, as this may lead to undesirable consequences. It is more convenient to decorate an existing ceiling frame or make it from durable and not very heavy materials.

The following materials are used to create fixtures: scissors, a mounting knife, fishing line, wire, pliers, a hot gun, in some cases it can be replaced with super glue. They should be used by an adult, it is unacceptable to involve a child in gluing. Since in one case he will get a burn, and in the other he can glue his fingers or stick to the details of the future product.
Many craftsmen make lamps from completely unnecessary materials:

From plastic containers of different volumes, a homemade chandelier is easily obtained.
Highly interesting option homemade chandelier is obtained from glass bottles. They are used to decorate the halls of catering establishments. It is also a good option for a kitchen in a residential building or apartment. This can be a ceiling, consisting of one or more bottles, in which the bottom is cut off. You can do this yourself, but it is better to use the services of a workshop where glass and mirrors are cut.

For a lampshade made of threads or ribbons, you will need: a finished frame made of strong wire, threads different color, scissors, glue.

You can make a multi-tiered, colored lamp from ordinary disposable spoons.

For a paper ceiling, paper or thin cardboard is suitable. Such a ceiling can be either rectangular or square. First you need to consider the size of the ceiling, the larger the room, the wider the design can be. In a small nursery or hallway, a ceiling with a diameter of 30 - 35 centimeters will look good.

The frame can be made of wire, it will consist of an upper and lower part, consider the manufacture of a cylinder-shaped ceiling.

Such a ceiling can be decorated with a mosaic of CDs. To do this, the disks are cut with sharp scissors into small fragments, which are glued to the outer surface of the pelvis. You can glue only the bottom contour, and paint the rest. Or decorate the entire surface of the ceiling with such a mosaic. The more convex the surface, the smaller the disk fragments should be.

The original lamp can be made from a dry branch of an unusual shape. It must be cleaned of bark and covered with stain, then, if desired, treated with transparent varnish. The branch must be attached to a hook on the ceiling with a regular fishing line. Then I wind the wire with the lamp several times onto the branch. A branch entwined with several wires looks beautiful.

You can make a lamp out of plastic hangers. Detailed in the video:
DIY bottle chandeliers are more suitable for the kitchen. Designs made of glass or plastic will be easy to clean from dust and wash if necessary. For the kitchen, hallway or living room, a lamp made of natural wood.

For a children's room, a ceiling made of painted plastic bottles, a floor lamp made of bright threads or a paper composition is more suitable. The latter option cannot be called durable, but this option will appeal to children. Girls will like the plafond with butterflies, plant elements, boys will like designs with cars, superheroes or bright plastic plafonds.

In some cafes, pubs, original lamps made from bottles are used to decorate the hall. It could be beer bottles. They can serve as both a lamp shade and an interesting frame for a lamp.

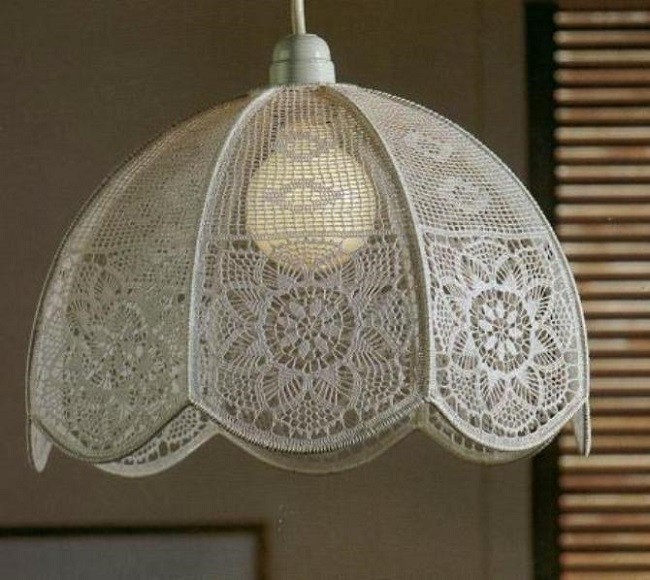
With your own hands you can give new look floor lamp. You can decorate the ceiling with fabric, threads, paper with cut-out patterns, and you also do not need to ignore the base and leg of the lamp. They can be painted with acrylics, glazed, decorated with beads. The decor of the lower part of the floor lamp should overlap with the elements in the upper part. The easiest option is to decorate the ceiling of a solid color with lace or guipure.


The lower part of the plafond of threads can be decorated with pompoms of the same size hanging on a thread. They are glued on the inside of the frame with glue. Pompoms can hang both on the same and on different height. They can be made in one color or combined in several shades.
To decorate paper lamps, you can use lace, thick tulle, beads of different sizes. You can decorate glass jars or bottles with glass pebbles, which can be purchased at hardware stores. You can also use buttons of different sizes and colors. Small buttons can be glued even on PVA.

On the new year holidays It is customary to decorate the Christmas tree, but you can also decorate the shades of lamps, floor lamps. Here you can use the usual rain, do-it-yourself snowflakes, Christmas tree figurines, decorative balls and an ordinary garland. If an energy-saving lamp is installed in a wall or floor lamp, then its ceiling can be decorated with paper snowflakes.

Wall sconces are installed in living rooms, bedrooms, children's rooms. After repair, you can use old sconces only by changing them appearance. You can paint the body of the lamp in a light color, and apply bronze or silver paint on top with a hard bristle brush to create a patina effect. If the ceiling is glass, the pattern you like is applied to its surface using a glass stencil. Here you can use contour (they are used to create a stained-glass window) or spray paints.
Ceiling chandeliers - lighting devices that perform two functions at the same time. Firstly, they are used to organize the main lighting in the room. Secondly, devices are one of the main elements of the decorative decoration of the room.
Numerous manufacturers offer equipment of different designs, but it is far from always possible to find something really worthwhile that fits into the overall interior of the room. In other situations, the cost of the chandelier you like may be too high. That is why many people are interested in how to make a ceiling lamp with their own hands.
Handmade products will be unique and original, thanks to them you will be able to express your taste and character. It is not so easy to make such devices on your own. The work requires a certain imagination and perseverance. On the other hand, a ceiling chandelier can be created from improvised means and items that have become garbage for you.
Choose any materials for manufacturing - wood, plastic, metal or glass. Chandeliers made of wine bottles, wooden skewers or straw look very original. To summarize: the choice of material for a homemade lamp completely depends on the imagination and idea that arose in the head of the owner of the apartment.
The final stage of any repair and construction work will be the purchase of lighting fixtures. Often the main one is the ceiling chandelier, which is installed in the center of the room, provided it has the correct geometry. There is a wide range of luminaires on the market that differ in design, shape, principle of operation, and even the presence / absence of certain structural elements.
Today, all people strive to save money, so it will be important to use a chandelier for energy-saving or LED lamp. It is advisable to choose products with partially or completely closed shades, in which lamps are hidden. Due to this, you will protect the ceiling structure and be able to protect yourself in the event of a light bulb explosion (the fragments will remain inside the ceiling).
If you still like a chandelier with an open arrangement of light bulbs, then inspect it and make sure that after installation the luminous flux will be directed downwards. There is also a simple rule simpler product the easier the subsequent installation.
Another point to consider when choosing a chandelier is the purpose of the room and its dimensions. In spacious halls with high ceilings, volumetric lamps should be installed. hanging type. For small spaces, space savings are required, so focus on flat (flattened) options.
Conventionally, chandeliers for the ceiling can be divided into two main varieties:
And the latter are divided into two subcategories - built-in and overhead. Overhead ceilings are considered best solution for bathrooms, corridors and kitchens. The presence of a separating platform ensures their rapid cooling and high fire and electrical safety.
Recessed lights are also called spotlights. They are often installed (more correctly, they are built in) in furniture, dropped ceilings or arched structures. Manufacturers provide a wide variety of shapes, colors and designs for both traditional and flat luminaires.
Finally, in addition to design features the fixtures themselves, distinguish between the type of light sources used:
Consider one of the most simple examples ceiling lamp made by hand.
For the manufacture we need:
To begin with, a frame is prepared from a plastic bottle. Remove any labels from the item, rinse and dry thoroughly. After that, feel free to cut out the bottom. Cut off all the handles from the plastic spoons, but so that small pieces of 2 cm remain.
Glue the resulting scraps with “scoops” onto the base of the frame from a plastic bottle. To do this, we just need the remaining pieces of handles, which need to be poured abundantly with glue and pressed tightly to the surface (the convex part of the scoop should look out). Tape the container in a circle until the entire surface is hidden. Ideally, spoons are placed in checkerboard pattern followed by a shift for a dense arrangement and the absence of visible areas.
Cartridges with wiring can be removed from some old chandelier, then installed and fixed in a new product by pulling the bottle through the neck. A decorative bowl can be decorated with the same blanks using glue and placed on the neck.
To make sure that the product is working, at the final stage, screw the light bulb into the lamp and connect it to the power source. If successful, it remains to install the chandelier on the ceiling.
For more stylish design and changing colors, you can paint plastic spoons. This will increase the originality and attractiveness of the product.
In addition to the points listed in the first chapter of the article, when choosing a chandelier, you need to focus on a certain style. This is also true for those cases when you decide to make the product yourself. Comfort, coziness and how pleasant it will be to be in it depend on the interior created in the room.
The ceiling chandelier is the main element of the decor, therefore, with a competent approach, the perception of the environment will improve, with a careless one, it will completely deteriorate. As you know, “breaking is not building”, therefore, in order to spoil the interior, it is enough to choose the wrong style.
Decide in advance on the design of the future lamp. The most common styles for chandeliers are hi-tech, modern and provence.
It includes products made of glass and metal. Modern appliances fit perfectly into the design of the bedroom and living room. Externally, the chandelier may look chaotic (with an arbitrary arrangement of decor elements). A great option for people who want to modernize an apartment or a private house, but do not want to make something too complicated. Any errors made in the manufacture of the chandelier may look like an original design decision.
In accordance with this style, appliances are made of glass and wood. The ceiling lamp is characterized by perfectly even and clear lines, has the correct geometry.
The most complex execution, which is suitable for people who understand the principles of hand-made. Various fabrics, colorful ribbons, beads, embroideries can be used to decorate the chandelier. The lamps are gentle, suitable for creating a romantic atmosphere. Provence style lighting fixture is suitable for decorating any living space.
For ceiling mounting of the lamp, certain materials and tools will be required:
Ideally, electrical wiring should be routed using connector blocks. If such products are not available, then twist the bare ends of the wires with pliers and hide under a dense layer of electrical tape. The compounds can also be placed under polymer caps. Make sure the wires wrap tightly around each other.
When laying the cable, pay attention to the material from which it is made. It is advisable to twist aluminum with aluminum or copper with copper. When two wires come into contact different materials gradual oxidation will occur, leading to burnout and loss of contact.
Before installing the ceiling light, determine the phases of the wires. To do this, you need an indicator screwdriver or a special probe. If you attach the working surface to the phase core, the light bulb will start to glow. Otherwise, the wire belongs to the zero phase.
Next, you need to determine the phases on the wiring of the lighting fixture. Plug two wires into the outlet, but in no case touch the third one. If there are several bulbs on the chandelier, then about half of them will light up. Leave any wire in the outlet and replace the second with a third. The second half of the bulbs should light up. Thus, the wire that is constantly in the outlet (and when connected in turn with the other two turns on the light bulbs) is the zero phase.
Attach the lamp to the ceiling. For this, both a classic hook sticking out of the ceiling and a mounting rail (included with most modern devices) are used. If there is a hook from the old chandelier, it is advisable to dismantle it.
If it is necessary to connect a floor lamp or chandelier with a two-wire cable, difficulties should not arise at all. Simply connect the ends of this cable to the two ends of the wiring. If the lamp consists of several parts and there are more wires, then it is correct to twist them in pairs, subsequently connecting them to the necessary residential electrical wiring in the apartment.
A three-core cable indicates the presence of two normal and one zero phases. Follow the scheme described above to find the zero phase. After that, connect the device to the house wiring.
Traditionally, the zero phase on the lamp has wires with blue insulation, the usual one is brown, black or red. If there are several blue wires, then they need to be connected in pairs, and then connected to the zero phase. Do the same with other colored parts.
Products with four cores are much less common. The latter is intended for grounding and is usually painted yellow-green. It should be screwed to the luminaire body with a conventional screw. Be sure to isolate all connections.
For the manufacture of ceiling lamps with your own hands, any materials can be used. The main thing is to choose the style and shape in advance and navigate the installation site. Also, before starting work, it is advisable to draw a sketch of the future product. Everything else is limited by your imagination.
Connecting homemade lighting fixtures is carried out in the same way as purchased ones. Using our instructions, you can easily connect ceiling chandeliers with two, three and even four cores. The main thing is not to forget about safety rules and ensure complete isolation wires, excluding short circuit.
The lighting system is an integral attribute of the design of any room. This is explained by the fact that chandeliers and lamps have an amazing ability to change the situation. Of course, the easiest way to buy lamps in the store. But it is much more pleasant to make them with your own hands.
What can a chandelier be made from? The answer to this question is: “Yes, from anything.” You can make a pendant lamp from:

Your imagination will help you choose the material. It will also help you choose the right model. To create a chandelier, you can use techniques such as origami, carving, embossing. In addition, the use of knitting and weaving techniques is appropriate.


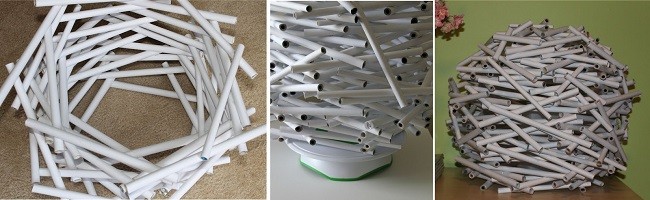
Consider step by step instructions how to make an original chandelier using ordinary barbecue sticks.
You will need:

It is quite easy to make such a design:
We lay out the sticks so that they form a square, and connect them with glue. The height of the chandelier depends on your preferences. But remember that you need to consider the total amount of material available and the height of the ceiling.

We glue the top of the lamp with cut sticks. They can be laid parallel to each other or crosswise. Do not forget to leave a hole of the appropriate diameter for the cartridge in the central part.
After the glue dries, we begin to decorate the chandelier. For this purpose, we tie colored organza ribbons at the protruding ends of the sticks. The more of them, the more beautiful the lamp will turn out.


We hang the resulting structure on a hook in the ceiling. This can be done using the same ribbons. Next, we fix the cartridge in it. The chandelier is ready!

One of the original homemade chandelier ideas is the bottle chandelier. You will need:

Creation instructions:
Cut bottles. Cut flowers, animals or geometric shapes out of them. Which one to choose depends on your desire.

Fasten the cut blanks to the frame of the old ceiling lamp and attach the steel wire. It is necessary to make a "hedgehog" out of it.


To do this, take a few wire rods, connect them in the middle using a small piece of wire. Next, you need to cut off the top rod, thereby creating a place for the light bulb.
The last step is to connect the chandelier to the ceiling. It's not that hard to do it yourself. Such a lamp would be appropriate in the hallway or in the kitchen.

To make beautiful led chandelier with your own hands made of wood, you need to prepare the following things:

Creating a wooden chandelier will require the following steps:

Very unusual decoration the interior can become a chandelier made of ordinary cardboard. Here's a little tutorial:


As a decoration, you can use a variety of things - glitter varnish, beads, sequins, lace, rhinestones, artificial flower arrangements, beads.

A plastic chandelier is made in the same way. Such a product will be more durable. But for its manufacture, scissors will not the best option. Instead, it is preferable to use a jigsaw.

Today, the popularity of hand-made interior details is only growing. A handmade chandelier is a reflection of your personality. It will give the whole atmosphere originality and uniqueness.


On the Internet, you can easily find not only many different variations homemade lamps, but also detailed instructions for the repair of handmade chandeliers.


Find out how to make a lamp out of wire, building mesh, so that flowers grow inside it. How to turn a snag into a lamp, and tree branches into a floor lamp?

You will also need water canisters. After a fun picnic, after arriving home, after some time, you can make original lamps from the containers left after the feast. Hand them to your friends, leave them for yourself to hang in the hallway, in the kitchen or in the country.
So, here's how such a chandelier is created with your own hands or with the help of your home. First put side by side:
So that such original lamps do not lead to a fire, take an LED, and not an ordinary Ilyich light bulb.


Ideas are in the air. If you are in the country and this piece of furniture is not there, it is easy to make it yourself from what is at hand. Take:
As a basis, you can use unexpected things: an old pot, a planter, an already unnecessary children's pot.
After that, make the contours more even with a knife, cutting off the excess. Paint in your favorite color, white looks airy and elegant. Such a lampshade, made by hand, will decorate country gazebo. You can make a few and hang them here. By avoiding big expenses, this way you decorate the space.

Now roll the large outer ring from the wire. We will fasten it. To do this, cut 4 identical pieces of wire with pliers, fasten the first end of each to the small, and the second edge to the large ring. Top part lamp is ready.
The size of the lampshade depends on whether it is made for hanging from the ceiling or for a table lamp. The first is greater than the second.

If you want to see for yourself modern ideas on this topic, please! AT skillful hands and building mesh turns into a stylish lampshade.

If you do not have coarse mesh, use pliers to cut off the excess sections so that the distance between the strips of wire becomes greater. Paint the lampshade, and its frame is ready.
And now the magic begins. You can make an original lamp, which will benefit not only people, but also plants. Attach a planter with a flower at the bottom of the lampshade. You can tie, woven using the macrame technique, for the lower turns of the wire with a thick rope. Check that the fastening is secure.
If there is a man in the house and welding machine, call on this tandem to make a metal ring with "beams" that need to be welded to the bottom of the lamp.

For such an original lamp, you needed:
You can well fix cups with seedlings on such a lampshade, thereby finding an additional place for growing it and conditions for lighting in the evening.
Walking in the forest, do not pass by a rolled ornate driftwood. Put it in a bag, take it with you. Wash at home, if there is bark, peel off with a knife. Go over the surface with fine sandpaper, if required. Finish with wood varnish.

It will also need to be sanded and varnished. When these wooden blanks dry, connect them with self-tapping screws of sufficient length, passing them first through an oak stand, and then, sticking them into a snag. You can also use nuts and bolts.
How to make a lampshade with your own hands, you already know. Therefore, make it and attach it to a snag, wrapping it with wire.
If the old floor lamp stand is no longer happy or you just want to decorate it, also use wood for this. See how good the birch racks look. Attach a branch of this tree to the lamp and see what kind of floor lamp you could make with your own hands.

If you are fed up with an old floor lamp, you can transform it with your own hands, giving it a "zest". Take the openwork braid, sew it on the top and bottom of the fabric lampshade. You can decorate with glitter by gluing them in the form of a pattern, evenly or randomly.
A floor lamp or a chandelier will turn out unique if you knit a lampshade for them with your own hands. This can be done with a crochet or thin knitting needles. For the first option, you will need:

With single crochets, tie the upper circle of the lamp and this trapezoidal or rectangular part.
Boil a glass of water, stirring, pour 200 ml here cold water, in which 1.5 tbsp. l starch. Boil for 1 minute, remove from heat, cool. Drop a knitted lampshade here, soak well, then wring out, let the water drain, and the fabric will dry, but remain slightly damp.
Put it on the plafond. In order for the knitted lampshade to hold well, you can skip several ribbons or ribbons between the loops and tie them.


A solution of starch or PVA will help shape the knitted lampshade. Put it on the frame, apply glue, let dry.


A very interesting version of the lamp from the disks:
INSTRUCTIONS AND PROPHECIES OF THE Blessed MOTHER ALIPIA GOLOSEEVSKY, Kyiv...

Eufillin dropper in ampoules is used to treat pathologies that ...

Among all ointments for the treatment and prevention of joint diseases, the most ...