Quite often, the population is interested in how to find out if an apartment has been privatized or ...


Why do children need a sandbox, there is no need to explain. There is hardly anyone who did not play in the sand as a child. You can make a good sandbox on your own in just half a day. This will not only save a certain amount, but, perhaps more importantly, will make my father's authority much more significant. A do-it-yourself sandbox is built for family use when the first-born is already stomping cheerfully, and a collective one is at the beginning of the arrangement of a children's town in the local area.
A sandbox for children's games is, as you know, low, 25-40 cm high above the ground, a fence or box, with or without a bottom, 1.2-3 m in diameter, into which sand is poured. He is the main thing in the sandbox, because. is most susceptible to pollution, and the children's sandbox must comply with sanitary and hygienic requirements for children's household items. For a relatively small, 2x2 m, sandbox, it requires approx. 1 cubic meter. To prepare such an amount of ordinary sand at home for a children's sandbox, you will need to set up a whole production. Purchased mixes are not cheap, and no one can give a reliable guarantee that they will retain their properties on the street. If they still correspond to the declared. However, a certain type of building sand (not at all the most expensive) may be suitable for a sandbox, provided it is replaced annually or prepared for refilling. Therefore, further a special section will be devoted to the choice of sand for the sandbox.
To properly make a sandbox, you must first choose a suitable place for it. Position the sandbox on the site, as shown in Fig; in general, in the sector from north to southeast. It's about ultraviolet (UV). In the morning, when the air is fresher and more transparent, its share in sunlight is greater, but the UV radiation itself is softer. Remember, doctors recommend sunbathing in the morning. Afternoon due to physical phenomena with dusty and more water vapor-saturated air, the share of UV decreases somewhat, but its spectrum becomes tougher. Therefore, in the afternoon, a shadow should fall on the sandbox.
However, building a sandbox under a tree is not recommended. You can not wait for leaf fall: in the summer, garbage will pour into the sandbox, bird droppings and insects will fall. Spiders are absolutely not needed in the sandbox: a cross that is safe for an adult can bite through children's skin, and spider venom does not cause immunity, but, on the contrary, sensitization, increased sensitivity to it. Most spiders cannot stand bright light and dryness, therefore the sandbox should be located no closer than 3-4 m from frequently watered beds, bushes, a pond, a fountain, etc. sources of moisture.
The next factor concerns not the sandbox itself, but the house and the equipped area near it. Sand is an excellent abrasive. The grains of sand carried on shoes can quickly spoil not only parquet or laminate flooring, but also a paved garden path. Therefore, it is highly desirable that around the sandbox there is at least 1.5-2 m of lawn or a blind area that removes sand from shoes. If the sandbox is not on the lawn, you can put cleaning mats for the hallway around it, but options from improvised materials are also possible, see below.
Anyway preparation of a place for a sandbox and its fixation on it is carried out in stages as follows:

Note: if the sandbox is seasonal, then it is better to poke the insulation. In autumn, her lapels are pulled out and straightened. The box is removed, and then it will be possible to take out the sand for winter storage. Or to a construction site, if the need for a sandbox has passed.
Why sand is attractive to cats and dogs and why their completely natural needs are incompatible with human hygiene is understandable. It is also highly undesirable for children to play on completely damp sand. It molds better, but not for long before a cold. You can, of course, when the sandbox is not in use, put pipes, boards, poles on it, cover it with foil and press it down with bricks. But in the adult summer, when there are so many worries on the site, it is troublesome and does not diminish the trash on the territory. Therefore, the cover of the sandbox is still needed.

Note: in purchased expensive mixtures for sandboxes, fragrances are introduced that repel animals. But, first of all, they “fizzle out” pretty soon. Second, independent medical statistics on the impact of these substances on human health is not available. Since we are talking about the health not just, but of children, then, as they say, it is better to stay away from sin.

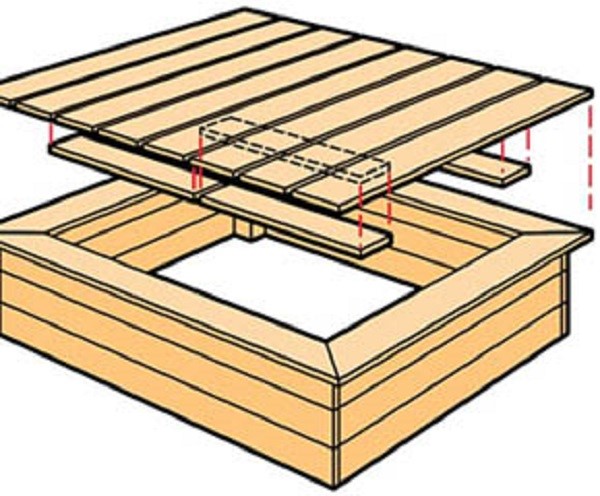
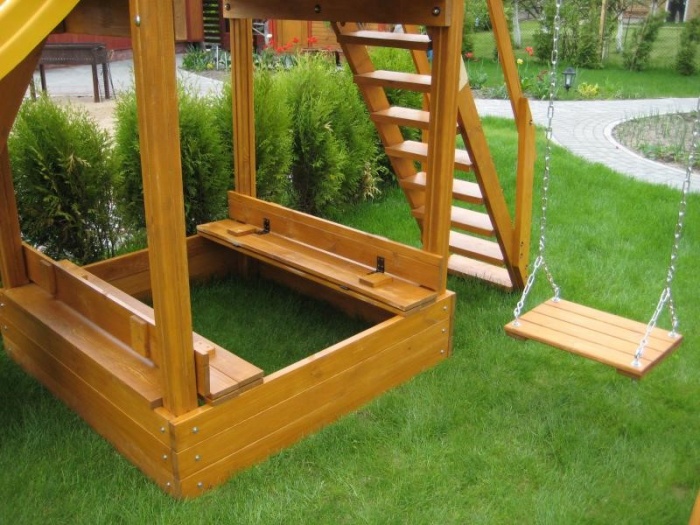
A sandbox with a lid, if we exclude the completely exotic variants of a fan lid, self-lifting with a mechanism, etc., is done in three ways, see fig. above. The simplest option is a regular shield made of boards or plywood, as in fig. left. But then, without the help of adults (perhaps, they are very busy right now), they cannot get into the sandbox. Secondly, because of such sandbox covers, injuries are possible. A neat, quick-witted and independent child, trying in an adult way to tidy up his workplace, pulls a shield that is too heavy for him, and he falls on the little master. Serious cases were not noted, not a roar and resentment is enough.
The second option is a folding lid, or a book that transforms into a convenient bench, on the left in fig. It's not hard to make one; the scheme of the transformer cover device for the sandbox is shown in fig. on right. Materials - boards (100-150) x (20-30) and bars 50x50. The bar (a) in the closed sandbox is under the lid, and the bar (b) is on it, so there is no need to calculate exactly the indents / gaps / offsets with this mechanism. The removal of the beam (b) adjusts the inclination of the backrest.

Loops 1 card with wings as wide as the thickness of the board; loop 2 is better to take barn. In the middle of the upper boards of the back, cut-outs are made (shown by the arrow on the left in the figure above). If the cover is needed deaf, then door handles are attached in the same places.
The second option is a sandbox with a hinged lid, on the right in fig. higher, more suitable for children of different ages, when the elder (eldest) may have already outgrown the sandbox, but takes care of the little brother (sister). Then the elder, who is already able to lift a fairly large sheet of plywood or painted chipboard, will have at his disposal a game / desktop table, well, and the little one will have his own.
Sandboxes are preferably made of wood; tree in this case the most environmentally friendly and least traumatic material. With a simple and completely harmless treatment, you can achieve its durability in the open air for more than 10 years, which is more than enough for a sandbox. Other options for building a sandbox will be discussed later, but for now let's take a look at the wooden ones.
The preparation of the material for the manufacture of a sandbox made of wood is reduced to a double impregnation of the parts ready for assembly with a water-polymer emulsion (WPE). There is no point in using expensive certified oil and silicone water repellents (water-repellent compounds) and antiseptics in this case: there are few cracks and nooks and crannies that retain moisture (this is the so-called capillary blockage) in the sandbox, they are all well ventilated and / or are in contact with greedily absorbent sand. Free development, in many other cases helping out home master, is not applicable in this case, because motor oils contain additives, the presence of which is unacceptable in children's household items.
Note: the underground parts of the permanent sandboxes are also treated before installation in place, see below, with bituminous mastic or doused with boiling bitumen.
For the same reasons, almost any tree will go to the sandbox, even alder and aspen unsuitable for buildings. Their low resistance to rot and mold is compensated by "roasting" in the sun and contact with sand, and low mechanical strength for a practically unloaded sandbox does not matter. For permanent sandboxes, it is better, of course, to take pine or other conifers. Birch is not suitable for any structures open to atmospheric influences; it molds very easily.

As for the choice of the type of lumber, it is best to use quarter or grooved boards, they will exclude the penetration of atmospheric moisture into the sand through the walls. The tongue-and-groove, in addition, will make it possible to arrange strong wide benches, see Fig., And the folding cover of the sandbox will be made reliable and durable. A perfectly solid sandbox is obtained from a grooved board with a thickness of 16-20 mm. Of course, when assembling the box, the tongue tongue comb of the top board will have to be removed.
Note: the crest of the tongue and groove of the sides of the box should always point upwards, and the crest of the bottom quarter, if quarter boards are used, outward. Otherwise, moisture will stagnate in the connection.
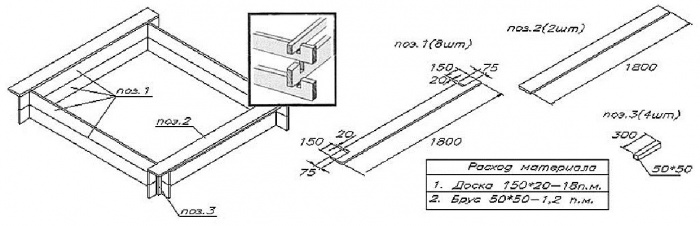
The sandbox box is made 2-3 boards high, depending on their width. They are assembled by attaching at the corners with self-tapping screws to pieces of timber 50x50 long in height of a box for a seasonal sandbox or with "legs" of 30-40 cm for a permanent one. A 100-mm board requires 2 attachment points, and a 150-mm board 3. If the walls are made of a simple edged or quarter board, and their length exceeds about 1.8 m, then in the middle of each wall another piece of the same beam is attached.

The corners of the seasonal sandbox must be additionally reinforced so that 1 person can tilt its box without risking breaking it. In this case, the corner posts are placed outside, and the intersecting boards crash into each other halfway through the tree. Blueprints country sandbox seasonal use are shown in fig. Of course, a constant made in this way will not be worse.

The board of a sandbox represents a frame from boards. It gives her box additional rigidity, serves as a seat and a shelf for toys. To make the board even, the ends of its boards are sawn at 45 degrees. Here, firstly, it is necessary to pay attention to the coincidence of the edges. The protrusion of the corner, see Fig., is traumatic, children scratch on such hooks, as if they are being pulled there by a magnet. Such flaws must be filed and the outer corners of the board should be sanded to roundness.
How the board is superimposed on the box can be seen in pos. 1 fig. Definitely attach it to the corner and intermediate racks. But if you leave it like that, the board will soon break off.

Fastening to the edge of the drawer board, pos. 2, not quite reliable, the kids are fickle people. Backing block B is also not an ideal way out, it prevents children from sticking toys into hiding places under the side, but what kind of game is this? The best way strengthening the side of the sandbox - segments of the plinth-fillet from 40x40 mm, pos. 3. For 1 m of the length of the side, a piece of 30 cm long, installed in the middle, is enough. Attachment points - 3, i.е. in increments of 10 cm. In addition, if the same supports are installed under the outer side extension, then its fastening can be made hidden.
Based on the conditions of the sandbox, it is clear that she needs a roof. The classic version is fungus. But adults who remember how they played in the sandbox also remember that he doesn’t really hide from anything, only he has to hit his forehead every now and then. In the center of the sandbox is the game, and there is a pillar sticking out. The fungus on the playground, of course, is needed for quiet and quiet games, but aside. And it makes sense to make a sandbox with a fungus only if there are wastes of building materials left and there is no money for new ones. In such a case, see the video on how to make a sandbox with a fungus from improvised materials.
The most durable and reliable option sandbox roofs - on 4 pillars, pos. 1 in fig. There is only one problem - with a nose-pocket, then the fidgets have the same problem as reckless drivers with a radiator: always in front of him is either a tree or a pole.

Much safer than a roof on 2 pillars, pos. 2 and 3. They are attached to the sides of the box at the location. Therefore, if the roof is heavy and/or with steep slopes, which gives better shelter, then the pillars must be reinforced with struts, pos. 2.
It is advisable to make the roof of a seasonal sandbox soft, cap, pos. 3, or tension, pos. 4. The latter allows you to minimize the cost of wood and gives a very good shelter. Roofing material for all roofs - any suitable. If polycarbonate remains from a greenhouse, porch, canopy or, say, a gazebo, this is the best option.
A special case is the sandbox-wigwam, pos. 5, or a sandbox-hut. Although there are more pillars in it, but the physiognomy of them falls much less often. The point here is in some features of the children's psychophysiology of vision and motor skills. In general, the highlight is that the pillars are tilted inwards.
This question only applies to permanent sandboxes. And the very question is how to assemble the product from parts: on the spot, similarly to "adult" buildings, or, for example, a dog house, entirely where it is more convenient, see the figure, and put it in place assembled. For a sandbox, the second option is definitely preferable, because. allows to significantly reduce the amount of excavation work. This is also significant because the sandbox is placed on a well-developed territory, and you don’t want to mutilate a lawn or playground, in which a lot of work has also been invested.

Another argument in favor of installing a finished box is that when assembling it on site, you will definitely need leveling, sizing and straightening the contour. country toilet oblique will not stand for a long time; sandbox in terms of more. And the finished box with sides is rather rigid, it is lightly loaded and will hold on even if the zero cycle is far from perfect.
The step-by-step instructions for installing the assembled sandbox in place are as follows:
Note: you can make a snow leopard with your own hands from a deck or trim a bar from 130x130 cm, mounted on a handle.
For fast self assembly sandboxes, plastic modules are produced, see fig., in trade practice for some reason referred to as linear polyethylene. Nothing bad is known about them, but if you equip a garden or break a flower bed, then they can be replaced with elements of a border for flower beds from a garden constructor; especially - elements for flower beds on the lawn. They are suitable in height, sand will not spill through the joints, they do not require earthworks, but they hold firmly in the ground. And spending the sandbox out garden border will go less.


A common version of the “sandbox hastily and for nothing” is from tires, see fig. on right. Free, but, firstly, not very hygienic: moisture stagnates in tire pockets, sand can rot. Secondly, steel cord. As the rubber dries out on the cuts, its ends slowly but surely stick out, the children prick and scratch about them. From tires, of course, you can build a lot useful crafts, but they are not suitable for the sandbox.

Sandbox-boat with a box - a compartment for toys
This is primarily a sandbox-boat. It is not much more difficult to make than usual, but in the bow compartment, which in real courts is called the forepeak, it is very convenient to store toys and even small gardening accessories. Romance in the game, that goes without saying. In this case, the forepeak is provided with a hatch cover and fenced off from the sandbox itself with a blank wall - a bulkhead, see fig. Since the boat is, then we will call its parts in the sea. If the forepeak is part of a sandbox, then it’s not worth making a deck over it, sand without sunlight may rot.

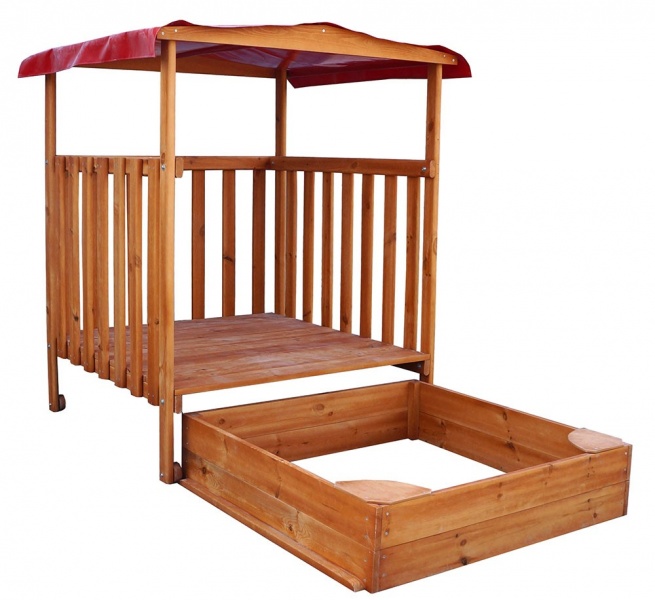
The next option will require more work; even more than a sandbox with a roof. This is a sandbox-house for growth. Its design is strong and durable enough that when a child outgrows sand play, it can be laid on the floor, sheathed walls and thus get playhouse. The diagram of the device of the sandbox-house is shown in fig. left.
If the dimensions of the sandbox in terms of plan do not exceed approximately 2x2 m, then it is possible to reduce the consumption of wood without losing the strength of the box by arranging corner seats, on the left in Fig. in the center above. Psychologically, this option is preferable for individualistic children.

Very beautiful and durable sandbox with corner seats obtained from stumps and logs, not necessarily of the same size. And if you lay out a blind area around the box with cuts from the same logs (in this case already a log house), then the removal of even very fine sand outside the playing area will be minimal, on the right in the same fig.
Now back to the question of which of the construction sands is suitable for the sandbox. Small, almost white, pos. 1 next. rice. – definitely not. He, from the point of view of the child, is badly molded. And in an adult way, it is very dusty, climbs into the eyes and everywhere, microscopically injuring the skin, which can contribute to allergies. Adult construction workers, healthy hardy uncles, work with such sand, wear protective clothing, respirators and goggles.

Also not suitable white or slightly grayish quartz sand, pos. 2. It does not generate dust, but almost does not mold at all, and injures the skin to visible scratches. Quartz is a very hard mineral and its grains are rarely rounded to full roundness.
Red sand, traded as ravine, pos. 3, molded perfectly, but also not suitable for the sandbox. There is a lot of clay in it, it gets very dirty. And to make matters worse, this clay is full of microscopic pores filled with nutrients. Malicious micro-life is just that and give it.
For a sandbox, moderately yellowish sand of medium size is best suited, pos. 4. There is enough clay in it for very thin modeling, but it wraps the grains in a thin dense layer, making them not traumatic and unsuitable for the settlement of microorganisms. Repeatedly, up to 3-4 times, such sand (it goes on sale most often as river sand) is used as follows:
There is also such a kind of sandbox as a desktop one. Generally speaking, children, playing in it, are much more likely to clog their eyes, nose, mouth, because. the head is kept straight, and not tilted face down. In addition, the construction of a desktop sandbox is a complicated matter, because. even a small amount of sand requires at least half a ton. And if the desktop sandbox is home, then you will need a separate room that does not communicate directly with others.

Your baby is growing up, and it's time to think about a children's cozy corner on personal plot. And what is your favorite pastime at this age? Of course, the games fresh air. One of the main attributes of the playground is a sandbox where children can play with sand from morning to evening. Installing such a structure in the yard is as easy as shelling pears, since they are sold in specialized stores already in ready-made. However, their price often does not please caring parents. The best solution in this situation, there will be a sandbox with a do-it-yourself lid. This does not require special skills, and as a material, you can take any improvised means.
If you decide to make a sandbox for your beloved child with your own hands, so that you are not ashamed to show your friends a photo of the structure, then before you start work, you must definitely figure out what types of these structures exist.
By design features, it is customary to distinguish between two types of sandboxes:
Perhaps the presented type can be called the most common and popular in playgrounds. It is made and installed quite simply. Although in a "pure" form they can rarely be found. Today, many craftsmen complement them with a variety of decorative elements, giving them original forms. Open sandboxes are often combined with houses, benches, slides and other elements. The most popular options are:
Advantages:
Flaws:
Despite the fact that the open sandbox has few drawbacks, its functionality is sharply reduced compared to the closed design, in particular due to the need for constant cleaning of debris.
Mushroom - a classic children's sandbox design  Sandbox-sailboat perfectly protects the baby from exposure to sunlight
  A folding sandbox is perfect for those who like to travel a lot with children.
  The open sandbox is the most popular option.
  A canopy can also be placed near the sandbox
This type of sandbox appeared relatively recently, but thanks to many advantages, it has already earned the sympathy of parents.
Closed sandboxes are divided into:
Advantages:
Flaws:
 Appearance closed sandbox can be absolutely anything
  Lid protects sand from moisture and debris
  The lid can be transformed into benches
Almost every parent has the opportunity to build a sandbox for their beloved baby on their backyard. However, in order for the structure to last for a long time and not pose a danger to the child, it is worth following a few recommendations when manufacturing and installing it:
There are three classic options that can also be combined with each other:
Each of them has its own advantages and disadvantages.
Wood designs are classic and popular.
Advantages:
Flaws:
Structures made of plastic and plastic can be safely called modern version sandboxes. Often they are purchased ready-made, because these materials are extremely inconvenient for do-it-yourself processing.
Advantages:
Flaws:
Metal structures, like wooden ones, are familiar to everyone since childhood. Quite often they could be found in the courtyards of the city. However, today they are acquired and built quite rarely, since they have several times more disadvantages than advantages.
Advantages:
Flaws:
Careful preparation will help facilitate the work of making a sandbox with a lid with your own hands.
Any construction is customary to begin with a design scheme. Having decided on the type of construction and material for manufacturing, you must consider whether you will have a regular cover or a transforming one. Also carefully plan all the stages of creating a sandbox.
Sandbox lid consists of:
This version of the lid is optimal, since it not only closes the sandbox from debris, but also transforms into benches.
Due to the fact that the structure has the shape of a square, we need boards of the same length and width. Materials you will need:
To cover the base, you will need a special waterproofing coating. An excellent option would be dense polyethylene. The area that it will occupy is easy to calculate: you need to multiply the width of the structure by its length (1.5 m * 1.5 m = 2.25 m²). Since it will also be necessary to cover the sides with polyethylene, it is recommended to leave a margin of 12 cm on each side.
For the construction, you will need a few more tools:
 The shovel will help to make indentations for the base
  A screwdriver will help speed up the process of tightening bolts
  Instead of a jigsaw, you can take a hacksaw
  The chisel will allow you to make recesses in the wood the right sizes
  You can take a square and professional
Having completed the construction of the sandbox, it is necessary to process it with special tools, thanks to which it will look beautiful. It is important to choose the right paint. Cheap options can evaporate in the hot sun and release harmful chemical substances that can get into the lungs of a child. Also some paint and varnish products after drying, they begin to stick to the hands, and this is highly undesirable. Therefore, you should contact a specialized store, where they will tell you the safest and most convenient option for a children's sandbox.
At first glance, a home children's sandbox is a simple and unpretentious structure. However, in order for the kids to be interested in playing, and for parents not to worry about their safety, it is worth taking the arrangement of the playground with all responsibility. Before you make a sandbox with a lid or an ordinary open one with your own hands, you need to carefully study all the recommendations for construction.
When landscaping a children's corner in the country, many questions arise - what type of sandbox is better, where to place it, what dimensions should the sides have. All sandboxes are divided into two types - open and closed. The latter, in turn, are divided into sandboxes with a canopy, with a lid, with temporary protection, such as a tarpaulin.
The sand under the lid always stays clean
The advantage of sandboxes with a tight lid is that they are not only protected from falling leaves from trees and debris, but also from the invasion of cats. Thanks to the lid, children will always play in clean sand. Such a structure can be closed for the winter, it will calmly survive the bad weather and remain unscathed.
When choosing a place for children's games, you need to consider the following points:

A place for children's games should be clearly visible
Traditionally, children's sandboxes are made of wood. Iron in this case is not too good option, because in summer it is hot in the sun, and in spring or autumn it is very cold to sit on it. However, you can make a combined sandbox with a metal lid and wooden benches with your own hands, combining comfort with reliability.

Wood - best material
For sides, smooth logs without bark, boards with a thickness of at least 2 cm and bars are used. The cover can be made from thinner boards, OSB sheet or roofing sheet. All wooden parts are carefully planed and checked for protruding chips. If the lid is iron, the sharp edges are protected with overlays of wooden slats or folded inwards.
The sides are made no more than 25-30 cm high, so that children can freely climb over them. High walls can become an insurmountable barrier for kids. The size of the sandbox can be any, depending on how many children will play in it. On average, a design of 1.8 by 1.8 meters is enough for 3-5 children preschool age.

Sandbox can be made from improvised materials
To make a children's sandbox with a lid measuring 1.8 by 1.8 m, you will need:
To make a children's sandbox with a lid and a bench with your own hands, it is advisable to first study the photo finished models and draw up your own drawing of the future creation. On the diagram, you must indicate the dimensions of all parts. This approach will greatly simplify the subsequent work.

Drawing of a sandbox with a lid
The entire installation process is divided into the following steps:

Stages of installation and installation:
A square or rectangular sand box is the most common place for children's games. But you can show your imagination and do something interesting and non-standard. A sandbox in the form of a pirate ship, a train or a car will undoubtedly cause great delight among the kids. All that is needed for this - skillful hands, a little material and time.

Idea for dads "with hands"
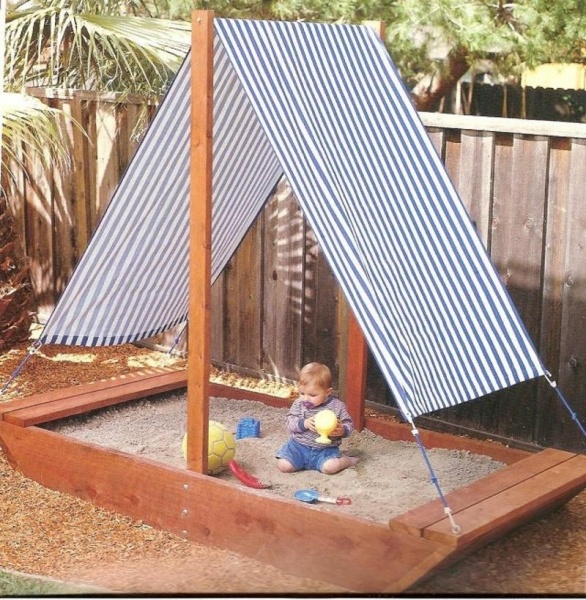
A do-it-yourself sandbox-boat will become not only a decoration for the playground, but also a favorite place for young sailors to play. Make it easy. The simplest option is a rectangular base with two posts 1.7 m high in the center, on which an awning sail is stretched.

It is very easy to make such a boat
To build a sandbox boat with an awning, you will need:
Work sequence:
The second option is designed for experienced craftsmen, because only real craftsmen can make a sandbox in the form of a real ship with their own hands. The basis of the design are boards and bars. However, you can build something similar using sheets of thick plywood or OSB, from which the outlines of the ship are cut out and mounted on a standard box.

The real ship

Decoration of the site and the joy of children
Making a sandbox in the form of a car with your own hands is not at all difficult. The main thing is that the structure has wheels and a steering wheel, and other details such as headlights and bumpers can simply be painted with paint. The machine is based on a traditional rectangular box. If the farm has unnecessary tires, this greatly simplifies the work. They are simply dug in a third on the sides of the box, imitating wheels. The steering wheel can also be taken real or cut from a piece of plywood.

If there are no old tires, cuts of thick logs, pieces of OSB, cut and painted under the wheels, will be used. As in the case of a boat, the structure can be completely cut out of plywood. For such a machine you will need:
Parts to be cut for assembly:

Stages of work:

A beautiful and solid sandbox will undoubtedly become the center of a children's corner in the country. Its installation does not require any special building skills and does not take much time.
The time of a happy childhood consists of many facets. Loving parents strive not only to provide the child with healthy food and beautiful clothes, but also worry about his development. This direction includes a physical and psychological component. Equipped playgrounds contribute to the pleasant pastime of the child, at the same time forming a lot of vital inclinations in him. The banal children's sandbox is no exception: patience, spatial thinking and the ability to communicate with peers are far from the whole list of character traits developed during the game. Often children's holidays in summer period passes outside the city limits, away from the prepared sites. Therefore, you will have to make a convenient sandbox yourself. On which version of the children's design scheme to stop and how to properly organize the whole process, we will tell in detail.
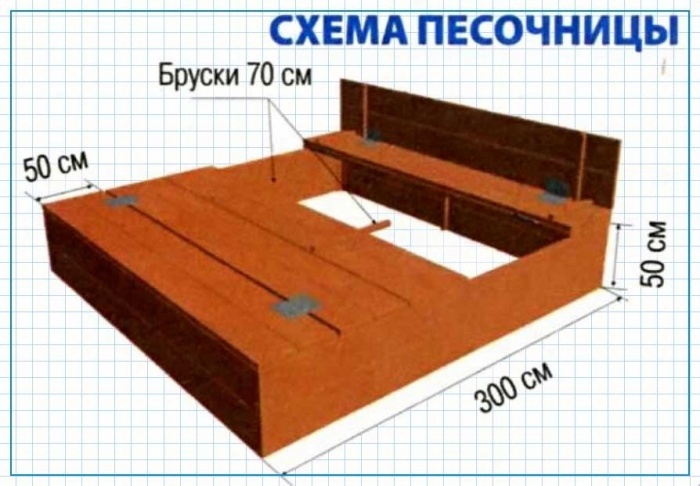
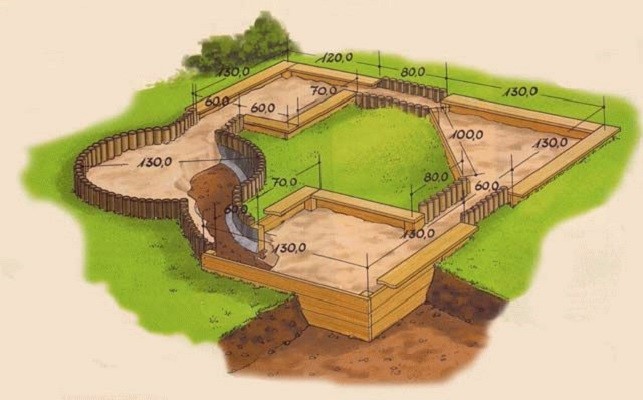
In addition to studying possible schemes and preparing your own drawing, you should correctly choose a place to install a children's sandbox. When considering this issue, many factors are taken into account. Priority placement of a children's sandbox - a sector between the northern and southeastern parts of the site. The logical explanation lies in the influence of ultraviolet rays. The first half of the day is characterized by clear air and soft UV radiation, after lunch the picture changes, the ultraviolet becomes harder, so the formation of a shadow over the children's sandbox is necessary. The diagram below illustrates this idea clearly.
In addition to the orientation to the sun, there are several other factors that determine the installation location of the children's sandbox:
Remark ! In addition to installing the structure itself, the scheme should provide for the arrangement of the area around it. To avoid the mass transfer of sand into the house or onto the garden path, there should be a lawn within a radius of one and a half meters. In its absence, it is recommended to make a blind area around the sandbox.
Having decided on the place, they go directly to drawing up the scheme of the children's sandbox.
The work on drawing up the diagram includes several stages: designing the box, starting from its shape, the drawing is supplemented with a cover and canopy design. What will be the basis of the children's sandbox depends on many factors:
The most common version of the scheme is a standard square shape, with a side size of 1.2 to 3.0 m. The height of the children's sandbox varies between 25-30 cm, it can be equipped with a bottom. To fill a structure with a size of 2x2 m, you will need about 1 m 3 of sand. Having finished the drawing of the base, proceed to the design of the cover.

It is foolish to doubt the need to install a protective element for a children's sandbox. The reasons why the diagram should contain the design of the cover are as follows:
Let's leave the options for drawings with complex structures in the form of a fan-opening lid or equipped with a lifting mechanism aside. The simplest option for a children's sandbox is an ordinary removable shield made of boards, shown in the drawing below:
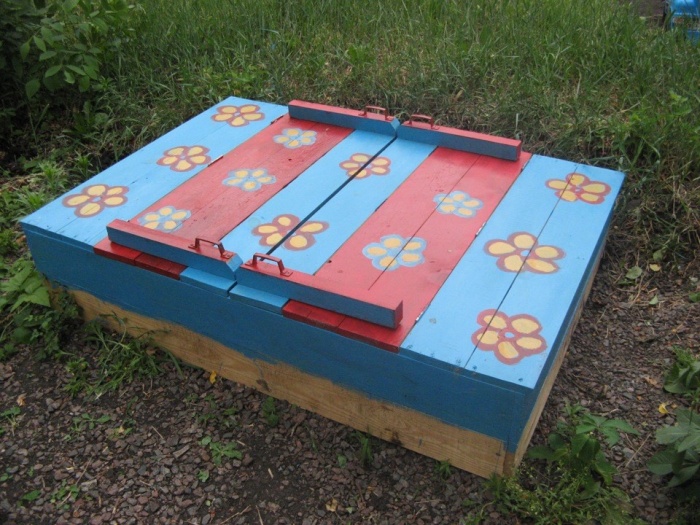
But it's not really good decision problems, due to the possible child injury if you want to remove it yourself. Recently, models of children's sandboxes equipped with a folding lid, which easily transforms into a bench, have been very popular. The design option is shown in the following diagram:
For ease of opening, it is equipped with handles, as in the photo below:
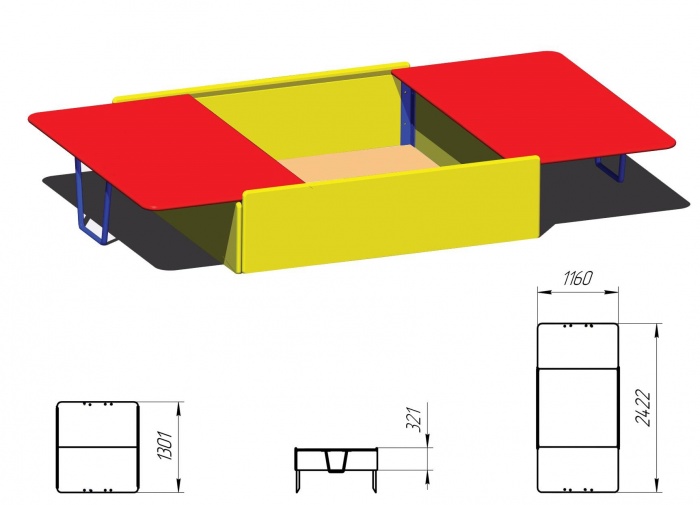
For a children's sandbox, you can use a scheme with a sliding lid, which later plays the role of a shelf or bench without a back. Convenient lower stands provide ease of opening and contribute to the stability of the structure.
The scheme of the canopy also has many variations. Depending on the planned life of the children's sandbox, thick fabric, plywood or thin boards can be used as a material. Mounting is selected based on the overall dimensions of the structure:
The drawings and photos below will help you decide on the shape of the canopy you need for your children's sandbox scheme.

It is extremely rare that structural schemes are used in the work, which are removed for the winter or equipped with rollers for moving around the site. In most cases, a children's sandbox is installed on an ongoing basis, so you should first take care of preparing the site. The process consists of the following steps:
See the photo below for an example workflow:

After carefully rechecking the drawing of the children's structure, according to the chosen scheme, they proceed to the purchase, cutting and preliminary preparation of the material.
Wood is the most commonly used material for the manufacture of children's structures. With proper processing and timely preventive care, a wooden sandbox will last more than 10 years. Details cut according to prepared drawings are coated twice with a water-polymer emulsion.
Remark ! The elements of the children's sandbox, which will be in the soil, are treated with bituminous mastic.
If the long-term operation of the children's sandbox is not planned, you can take aspen or alder for its manufacture. Will help to increase the period of service conifers trees. For construction, it is convenient to use quarter or tongue-and-groove boards. How to assemble a box from them is clearly shown in the following diagram:
Focusing on the drawing, the box of the children's sandbox is assembled together. The boards are attached to the pieces of timber 50x50 using self-tapping screws. If the side of the structure exceeds 1.8 m, it is necessary to provide for additional fastening of the beam in the middle of the wall in the scheme. The height of the beam for a permanent children's structure, according to the drawing, should be 30-40 cm. The corners of the children's sandbox need additional reinforcement. How to do it correctly, see the diagram below:

Advice ! All wooden parts should be carefully sanded to avoid injury to the child. Special attention give the corners that it is desirable to round off a little.
We have considered the simplest version of the sandbox box. The presence of experience and free time allows you to improve the design. After the base, they proceed to the equipment of the cover and canopy according to the prepared drawing. The scheme below will allow you to equip a miniature sandbox house that your child will like:


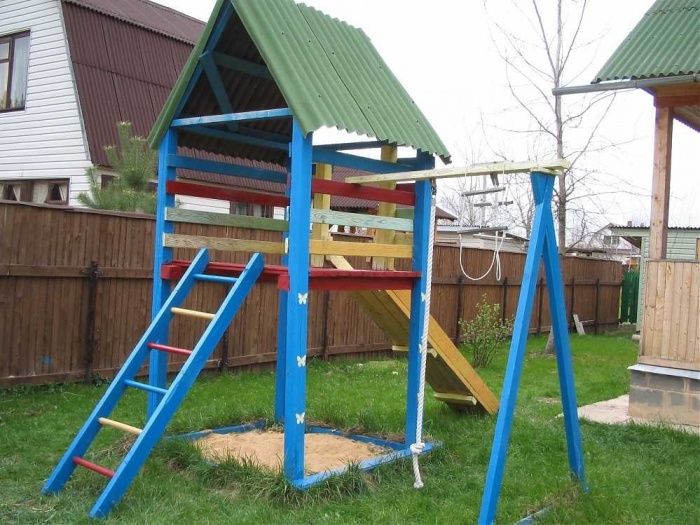
Also interesting is the children's building, where the sandbox is connected together with a slide:
And finally, a few more interesting ideas, which will be useful when creating your own drawing:


Good luck in your work and creative inspiration!
With the advent of spring, a hot time begins for arranging the territory in the country, near country house or a quiet city courtyard. Reasonable parents do not wait until the city authorities remember about the promises about the playground, but begin the independent construction of a children's sandbox. There are a lot of good ideas - from simple wooden boxes and bald tires with sand for children to real masterpieces in landscape design.
Sandbox in the form of a ship with an awning
The sandbox is the main attribute of children's games in the warm season.
Main advantages:

Sandbox frame
Attention parents! The main conditions for a long children's play under the summer sun are an awning or a canopy, children in light hats. The sandbox should be in an open area so that the kids do not fall out of sight, but where there are no drafts.
Not every filler is suitable for a children's sandbox. Ideally - coarse-grained quartz or river sand, devoid of inclusions. No matter how clean it may look, the sand is pre-sifted to remove glass fragments and fragments of river mollusk valves, the remains of rotting organic matter.
 Square wooden sandbox
 Suitable sand - clean and free-flowing in dry form, wet, which is well molded. Such a filler warms up well in the sun and is unsuitable for the development of small living creatures. Quarry sand with a large inclusion of soil or clay is less suitable for these purposes.
 Sandbox in the form of a boat with sun protection
 Over time, the wind brings street dust, construction debris, fallen leaves with insects, soil particles from vegetable gardens and orchards sprayed with chemicals into the sandboxes. The volume of the filler in the sandbox also decreases, usually the sand is carried by children outside the sides. Therefore, it is advisable to change it as it gets dirty and periodically refill it, and you can sprinkle garden paths with the old one.
 Do-it-yourself sandbox in the form of a truck
 Advice. During the absence of children in the country, make a hill of sand and cover it with a tarpaulin or thick film, securing it in the corners with something heavy.
 Children's sandbox with a roof
 The common yard is not a place for bright expensive objects that lovers of freebies can carry away. The city playground is usually equipped with the simplest square or rectangular shape made of wood with sides, painted with oil paint.
 Children's sandbox
 In the private sector, in the country or in any protected area, you can equip a whole children's town and afford expensive decor. If there is no one in the family to build even the simplest sand box, then they buy a container of a suitable size in a children's supermarket or order it via the Internet.
 Sandbox in the form of a truck
 Some construction firms, engaged in the construction of objects from rounded timber, at the request of the owners, they will make not only a house. You can order an original sandbox, a pirate town or a whole children's game complex with slides and houses. And you can make children's sandboxes with your own hands - photos and ideas will help bring an interesting project to life.
 Square red sandbox
 A do-it-yourself play place has the following advantages:
 Children's sandbox in the form of a boat
 Bright plastic container for sand from the store, one might say, a forced purchase, for example, when there are no male hands in the house.
The construction of a wooden rectangle is available even to a novice craftsman who does not have woodworking machines and tools. It is recommended to order parts for a home-made children's sandbox at the nearest carpentry workshop and assemble them in the country with a screwdriver or a universal tool. Finally, sand and paint with non-toxic paint.
 Sandbox with sun protection
 Another simplest way- dig wooden posts vertically in a circle from neatly sawn trunks of dry trees.
If the structure is made of stumps different heights, children are happy to use them for jogging around the sandbox.
 Sandbox in the form of a house
 Much less often they make a sandbox from solid logs connected around the perimeter. it a good option to attach a piece of dry fallen wood. Children will be much more comfortable if comfortable seats are fixed on top of the logs.
Worn-out tires are also widely used as sand containers. Rubber from a large diameter wheel - perfect option for giving, if the container is intended for playing in the sand of one child. From scraps of several tires in the form of a flower or a polygon, they make a sandbox for 2-3 kids with their own hands. Only it must be painted so that the rubber heated in the sun does not evaporate an unpleasant odor.
 Sandbox made of wood in the yard
 The choice of a place for children's classes is determined by several factors.

 Folding sandbox
 The design of the playing area with bulk material is often equipped not just in the form of a circle or square with triangular benches at the corners. If you apply a little imagination and skill, spend a little more time and building materials, the courtyard will decorate the original recognizable object.
 Design of a children's sandbox with an awning
 Sandboxes in the form of cars are very popular with boys. A box of sand is made in a rectangular shape, like the body of a truck. It is desirable to dig unnecessary tires on the sides. The cabin is attached to the end side of the tank, preferably on the south side - it also serves as protection from the sun.
 Small wooden sandbox with awning
 Inside the plywood cabin, a “dashboard” with a steering wheel and comfortable seats made of plastic or wood are installed. Outside, they paint, as fantasy suggests, not forgetting about the headlights. To make doors or not is at the discretion of the parents.
No less popular are "yachts" and "boats" with sand for children's games.
The options are varied:
 Children's sandbox
 Teremok is one of the most popular ideas, and each embodies it in his own way, depending on the skill and building materials at hand.
Miracle island with a palm tree and sides of plastic bottles- such a sandbox should be in the shade, since the "palm tree" itself is not enough.
 The design of a children's sandbox made of wood
 The fungus in the form of a canopy over the sandbox is the "classic" form, but the shadow from it usually falls outside the container.
A multi-level labyrinth of wooden blocks that combine several individual sand tanks is a convenient option for a family with several children. This will minimize the "possessive" ambitions of children.

Sandboxes of any arbitrary shape are also suitable for children's games if they are equipped with:
Paints and impregnations for wood processing are selected non-toxic and fast drying. It is advisable to build wooden sides from pre-prepared timber. Painting is also done at least a week before the baby and mother move to the country, so that the varnish or paint has time to dry by this time and does not stick to the child's hands.
 Small sandbox with a canopy
 Ideally, use eco-paint based on natural resins. facade paint and other outdoor suspensions resist rain and temperature changes well, but they are toxic, especially the first days after treatment. Nitro enamel is toxic, but dries quickly. Oil and acrylic paints most often used to decorate a children's sandbox.
The sides can be colored and plain, but funny stories can be drawn on the seats. It can be a fun zoo or hands, little people or a road for toy cars carrying sand to a construction site among the forest and houses.
 Small sandbox with sand protection and awning
 With any configuration of the playing place for sand, you need to prepare the bottom and remove the turf layer. Once upon a time, no one was engaged in arranging the lower level of the sandbox, but today sanitary standards dictate their conditions. In addition, from upper layers earthworms crawl out into the wet sand after a downpour. Various microorganisms and helminth eggs can get into the loose substrate.
 Sandbox in the form of a boat with an awning
 Therefore, it is desirable to make an intermediate layer along the bottom perimeter according to the following principle:
 Small sandbox with sand protection
 Common ways to make a sandbox with your own hands.
 Wooden sandbox with backs
 Additional equipment for the children's play area - benches or a table with a bench, wooden figurines or garden decor, a box for children's equipment and molds. The site can be improved by adding new elements. As the child grows up, something will have to be removed, new elements and accessories added.


Quite often, the population is interested in how to find out if an apartment has been privatized or ...

In all organizations, as a rule, sooner or later there is a change ...

A lot of people are thinking about how to find out whether an apartment has been privatized or not...