Hmm, yoda_daro claims that this is a test to determine their sexuality...


In most cases, curbs on garden paths perform a triune task: they protect the coating from destruction, prevent the components of the path from falling into the beds and lawn, and make both the path and the landscape of the site as a whole neat and organized. Depending on the type of track, soil composition and design requirements, the solution may be different.
Exist a large number of options and specific designs of borders for garden paths. When deciding what a border can be made of, it makes sense to get acquainted with the range of possible.
Some borders merge with the track, others protrude above the canvasConcrete fences are the most popular, due to a number of positive factors:
Pedestrian barriers made from natural stone, no less reliable than concrete ones, they are remarkably consistent with the landscape, but they have a considerable price. The stone is used to frame paths made of brick, stone, paving slabs and rubble. It can be laid at the level of the coating or above it.

As follows from the photo, a brick border can be installed on the border of the path in different ways. A clinker brick fence will last a long time. In the simplest case, the brick can simply be laid along the edges of the finished coating. When installing a path made of bricks or paving slabs, it is placed on the sand along with the laying of the main canvas.
To organize a major brick border, they dig a groove under it, lay rubble and sand, and then lay a brick on cement mortar. The structure can be strengthened by placing reinforcement under the brick.

The wood border matches well with the country style landscape, suitable for wood and bulk paths. You can use timber, board and log. The option of wood fencing can be budgetary. At the same time, the service life of a wooden curb is limited even with serious processing.

The metal corner and profile are successfully used in the arrangement of paths. It performs the functions of a curb, remaining almost invisible. Craftsmen managed to adapt even trimmings metal pipes for fencing the path.

Very easy to use plastic borders, border tape and a special plastic profile for tracks. The listed elements cannot perceive a large mechanical load, however, they perfectly perform decorative functions.

Fences for garden paths made of plastic have a number of positive properties:

As a "green" fence, small shrubs are successfully used: cotoneaster, boxwood and others. The roots of plants fasten the edge of the path, and the plants themselves serve as a wonderful decor.

As a curb for the path in the country, you can use a variety of improvised materials. Bottles, both glass and plastic, can serve as an unusual decor and fence for a long time. Old slate will perfectly fulfill the role of formwork and curb for a concrete path. A low wattle fence will enliven the woodchip path and prevent the latter from flying apart.
It is probably easier to purchase a ready-made curbstone. If you want to save or make non-standard option fences for concrete paths can be made by hand.
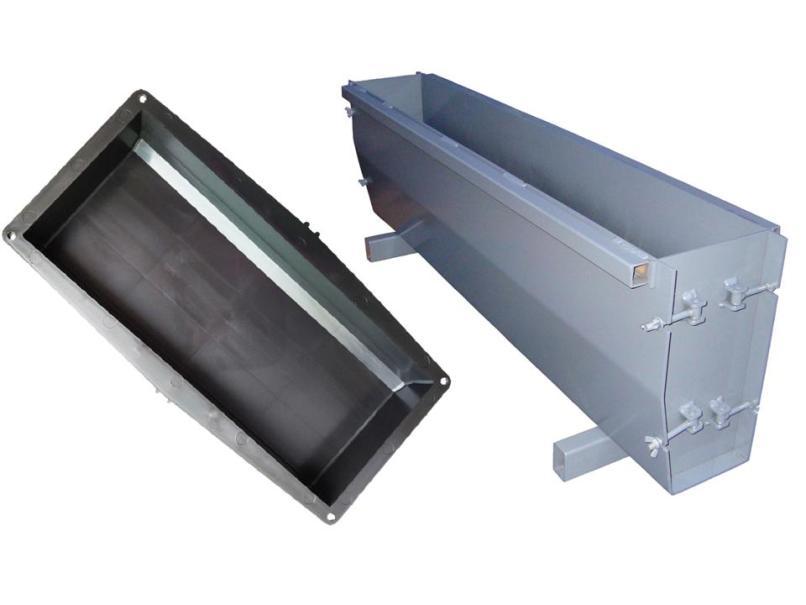 For the manufacture of curb stone, you can use purchased plastic or metal molds that can withstand a large number of cycles. You can make with your own hands wooden formwork for casting curbs. The material can be plywood, OSB, boards and timber. In this case, the internal surfaces of the structure must be smooth.
It is very convenient to use a steel channel as a form.
To do this, both profile shelves are cut with a grinder opposite each other and a metal plate is inserted into the resulting gaps.  A wonderful form for the curb is obtained from the channel
Two such jumpers form the ends of the mold. Making a border using a mold is carried out in the following order:
You can make a curb for the path with your own hands by pouring concrete directly into the formwork installed on the ground. For this kind of work, you will need the following tool:

This option is much simpler, but the quality of the fence may not be the best. Installation of a curb with formwork is carried out according to the following scheme:

A homemade border, cast on the spot on the spot, can be decorated in pieces ceramic tiles pressed into the concrete surface. The sides protruding above the surface of the fence track can be decorated by attaching corrugated material to the formwork walls: rubber, plastic or metal plates.

Concrete products have a significant weight, so it is difficult to work with a curb longer than 0.6 m. To install a concrete curb on your own, you may need the following tool.

Installation of the finished fence is carried out according to the following plan:
So we armed you with everything necessary tools knowledge for self-assembly border in the garden and in the country. I hope this video will answer any questions you might have.
Each owner country house, cottages or personal plot interested in giving his site individuality and originality. To this end, richer owners invite newfangled designers, buy expensive materials, as a result, expecting to see masterpieces on their site. modern design and . What should the more modest owners of private houses do? They also really, really want to express their site with the help of newfangled "tricks"! There is a way out for them - and what a way!
Taking the risk of personally arranging their personal plot, they kill several birds with one stone at once: they get an exclusively designed plot, save on labor force and designer services, as well as improving and acquiring new skills and abilities!
Let's say you are the proud owner country cottage, acquired, one might say, for the last pennies. You also really want to put your site in perfect order, break up flower beds, flower beds, a small vegetable garden, and also - a site for relaxation! Maybe you have already read several articles on our website on topics such as, or on other useful topics. It is even possible that you have already laid out your first garden paths and felt from this creative work such a buzz that they decided to turn to us again for help and learn how to make all kinds of borders for their paths and flower beds. Then let's not delay such an inquisitive and purposeful guest and go straight to our topic: how to make DIY borders for garden paths!

Human imagination and ingenuity have come up with a great variety of all kinds of borders - both purchased, manufactured at the factory, and home-made, available to everyone. We list some of the most common:
braided border– very beautiful, aesthetic and natural materials. Plus it is also that you do not need to buy anything - sharpened wooden pegs, treated with antiseptics, are driven into the ground (5-7 cm from one another), and thin willow twigs are twisted around the pegs;


Plastic- the plastic border is easy to install, strong and durable, installed with anchor pins. Does not require any preparatory ground work before installation. It is popular because of its affordable price;


Brick- is very popular, withstands any frost and humidity. Such a border lined with facing brick;


 flower bed with a brick border, photo
 stone border- the pleasure is somewhat expensive, but it looks fundamental, beautiful, very strong. When laying it, it is important to select stones of the same size;


– great idea for the use of old unnecessary tires! As a curb, you can use one tire, and also, by combining several tires at once - a large curb. It all depends on your imagination - put it on the ground and cover it with soil - once;

put and dig into the ground a whole chain of tires, you get a large and original barrier, on which it will be possible to sit down if necessary - two. And what can we say about all kinds of figurines-beds made of tires - a swan, an elephant, a zebra, heroes from Smeshariki, funny snails ....

- the simplest and most popular curb, consists of concrete blocks measuring 1000 × 200 × 80. It can be laid both on the edge and on its wide side. It is used in the fencing of paths and flower beds of rectangular and square shapes. Very durable and strong;


Borders for flower beds made of wood(many options) - very beautiful, natural. As a material, both planks and whole logs are suitable. Due to the fact that you can give any shape to the material - there is a great variety of models and shapes. Be sure to prepare the soil before installation and treat the material with antiseptic materials. Not durable - the service life is not more than 10 years;

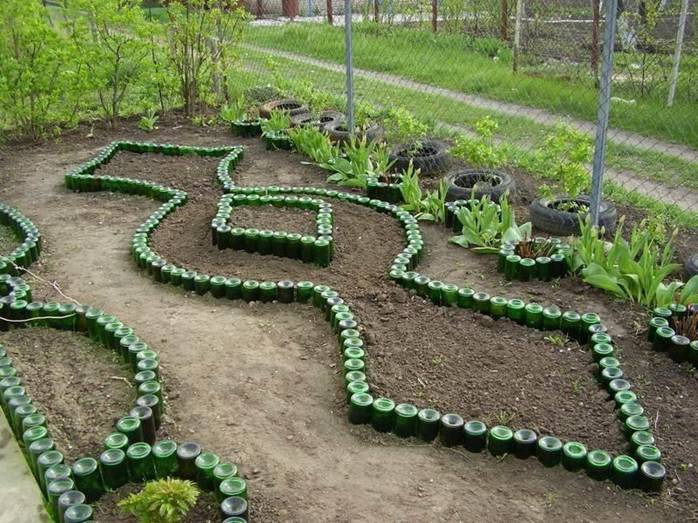
Border made of plastic or glass bottles - this is perhaps the cheapest and most common option for fencing! Such a fence can take any shape, it looks original, and if you paint the bottles in different colors, it will generally create a joyful spring mood. Bottle railing is made by digging in glass or plastic bottles one by one along a given contour. When used as building material plastic bottles - cut off the necks with a sharp knife;


green plant border- the most beautiful, but also requiring constant care for the plants that make up the border. Ideal plants for a living border are boxwood, cotoneaster, and some stunted shrubs. When forming such a fence, it is necessary to designate a clear contour and plant plants along it at a distance of 20 - 35 cm from one another;

metal border consists of copper or aluminum segments that are simply dug in along the contour of a flower bed or path. Easy to install, strong, durable;

mosaic border made from pebbles, pieces of tiles or broken porcelain (old cups, plates). Initially, such a border will require the installation of a frame made of wooden planks, and then it will be possible to start the artistic laying of a mosaic of pebbles or various pieces.

It is impossible to imagine without beautiful borders, today they are presented in a wide range of choices, both in form and materials of their execution vary, there are plastic, metal, concrete, wood and stone sidewalk framing. But not all of them can be done from start to finish with your own hands, in this article we will consider several options for how you can build curbs for tracks exclusively with your own hands.
Garden path borders different shapes designed to protect tiles or other elements of the path from dirt getting on it after rain or watering. They also allow you to give a finished look to the shape of the path; without this element, the sidewalk will look like an unfinished structure.
Here are some of the functions that borders perform:
The easiest way to make a do-it-yourself border around the perimeter of the track is to use a brick as a building form, you can do this as follows. Dig with your own hands using improvised means a small trench along the line of the edge of the passage, half a brick deep and lay it at an angle of 45 degrees on top of each other. It is important to rake up a little earth under the first brick so that the shape of the border is uniform and does not collapse. After laying out, sprinkle the brick around the edges with earth with your own hands and tamp it down. This can be done with something flat and heavy, if nothing suitable was found at hand, then you can press the soil with a garden shovel by stepping on it with your foot.

One more is enough in a simple way will use in making DIY garden borders wooden elements different shape. This can be done in such a way that it will look natural and tasteful, but it is worth remembering that it is not difficult to make such a fence, but it is short-lived, and a year later, after wintering, the color of the board will fade and be more gray. But if you decide to do just that, then here are a few simple tips. To begin with, it is worth digging a trench half the width of the board you have, inserting it inside and tamping it down as in the case of bricks, but rain and watering in this case will warp your wooden border over time. To avoid this, find long metal pins, rebar or thick wire, at least 8 mm in diameter, insert it at short intervals on both sides of your curb.
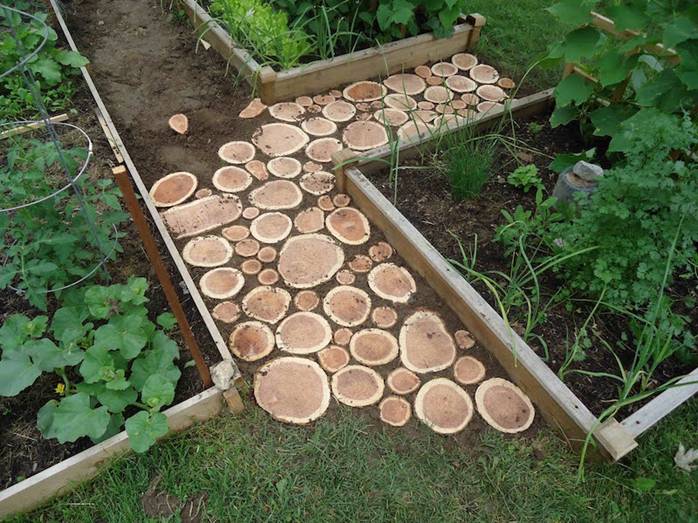
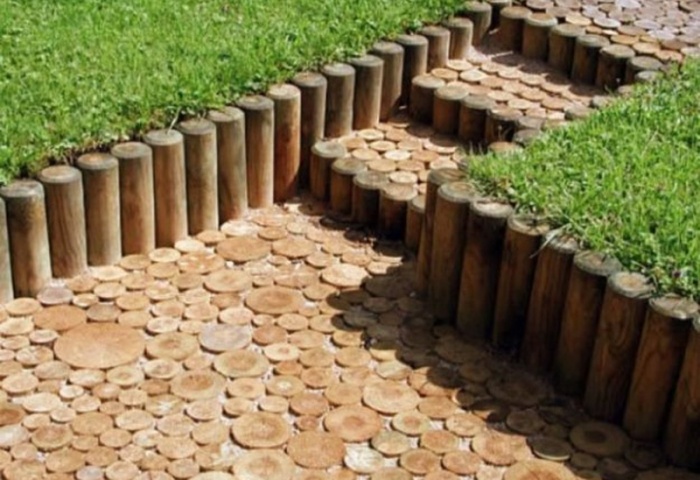
Favorably on the garden path, another option from a tree border will look, which is also easy to do with your own hands. If you have sawn trees, then logs of approximately the same length and shape can be cut from their branches. To do this better, of course, using . Having cut them into one shape, simply put these chumps into the trench and dig in, not forgetting to tamp. This budget way will allow you to make a truly unique design with your own hands, it will fit perfectly into the design garden plots.
A more capital option for resolving the issue with curbs would be to make them out of concrete slabs, they are already sold ready-made and their installation should be approached somewhat more seriously. For the garden area, they will not be some kind of universal solution, because the delivery and installation of such forms with your own hands is very complex process. But if you are still inclined towards this option, then we will give you some advice on this matter. First, decide on what basis they will be fixed with you, if they are simply buried in the ground, then proceed identically to the above methods of installing garden borders.

Only to go deeper into the ground in this case will have to be stronger. But if you want to make the curb more thorough, then you should install the cast molds on the cement mortar. With your own hands, dig a deep and wide trench, pour sand on the bottom of it and, using a special rammer, properly prepare the pillow for future filling. Next, install all the elements of the border along a cord stretched at the horizon level and proceed to pouring, making a solution with your own hands is quite simple, use a mixture of sand and cement in a ratio of 1 to 3 or 1 to 4, you can add granular slag to saturate the solution with a larger structure. To mix the solution, it is suitable (shovel, chopper), only after work, wash it under strong water pressure or with a rag.
Important! Concrete should be poured just below ground level, after hardening, you sprinkle it garden soil and it won't be visible.
It is worth noting that if you decide to do everything yourself, then the sidewalk is already laid after the installation of the curb forms.

Wicker structures should also be attributed to the original and natural design of the fences of garden plots. There is where to roam, a lover of doing everything with his own hands, you will need:
We soak the willow rods in advance, for convenience in work, we set the logs of the same shape at a distance slightly less than the length of our willow vines. We stick sticks between them, their shape should also be approximately uniform. Weaving is done in sections, a bundle of two or three twigs must be carried out behind the first stick, then after the next and further in this way, they should be fastened with soft garden wire in isolation so that over time it does not rust or oxidize, this will spoil the appearance.

The option to use plastic curbs for garden paths has a number of advantages, firstly, it is easy to install. The forms of such structures vary, but almost any can be used as garden fences. Convenient storage in the off-season is also a plus for garden plots where no one lives in winter. In addition, the forms that are used in the manufacture of such borders make it possible to make them indistinguishable at a glance from natural stones, tiles and others frequently used in garden solutions materials.

The most difficult thing to “manufacture” can be called a living border, it can only be done with the help of gardening skills, especially giving it the desired shape and a long time, but the reward for this will be magical beauty. design solution. So, what do you need in order to make it yourself, firstly, this right choice plants most often use boxwood or cotoneaster horizontal.
Important! The width of such a fence should not be more than 30 cm, otherwise it will not look organic.
These plants should be planted at a short distance from each other, when they grow up and take their final form, there will be no distance between them.
It is not enough just to make a living border, it requires careful care, it must be watered several times a season, but this can be included in the list of ordinary garden activities. But its shape also requires careful care, so you will have to cut the regrown leaves with your own hands.

The option of a metal border also has the right to life, if you correctly approach the choice of metal, then, made by yourself, it will last a very long time.
Important! Choose a metal that won't corrode or rust, aluminum, copper, bronze or brass will work just fine.
Please note that over time, each material acquires a characteristic shade only for it, this is due to the oxidation of the oxide film covering it, so copper will turn green and aluminum will become dull gray. If you are lucky enough to make the shape of the border quite large, then it makes sense to decorate it, for example, by embossing or carving patterns from soft metals. You can fix to the ground with your own hands, by analogy with the above methods (wooden border).
You can shape the garden path with glass bottles, as in the case of wooden logs, make a trench with your own hands, and insert the bottles into them, immersing about half, neck down, if left upside down, the water that enters them will leave a plaque, garden plot such bottles certainly do not decorate.
Important! Before using in the garden, rinse the bottles thoroughly, otherwise you will encounter a problem identical to the frozen plaque.
Here are a few of the many options on how you can decorate a garden plot with your own hands, the number of shapes and colors of those materials that are described here is enough to implement the most daring garden ideas!
In order to save money, the owners of summer cottages include their imagination and the knowledge of many specialists who perform land improvement.
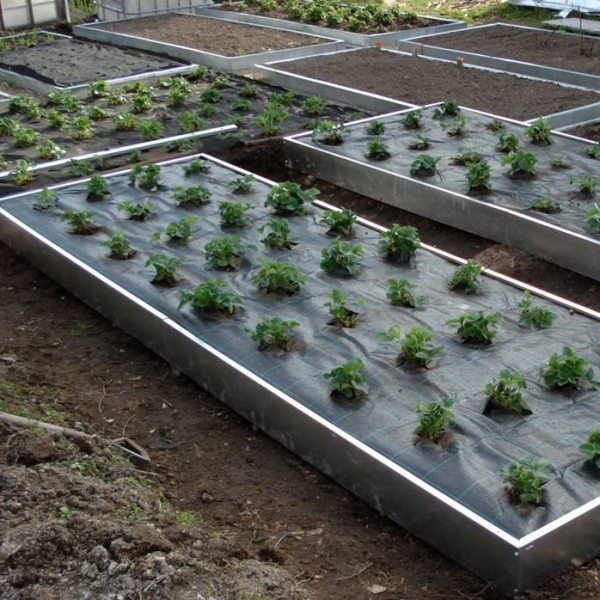
To make a cozy lawn, to walk comfortably along the path to the beds, special fences will help to prevent the growth of weeds, blocking the formation of mud puddles.
Having excluded the factory edging, the owners use the forms for the curbs made.
By constructing a form using a stencil or plate, you can protect the path to the garden by pouring concrete over its base.
This is the simplest process, the frame is installed along the perimeter of the future path, poured with cement mortar, trimmed, when the filling has hardened enough, the inserts are removed.
You can walk in a few days along such a walking line.
Similar forms for do-it-yourself borders for the path are used in the fences of entire concrete areas intended in yards for various household needs.
by the most available material to decorate are boards, plywood sheets.
Need to pick them up the right sizes, the file will always help to fit the part, and construct a container into which the cement mixture is poured with self-tapping screws.
To give edging strength characteristic, steel bars, corrugated reinforcement are inserted into it, creating home-grown reinforced concrete. The location of the iron parts is carried out carefully so that they do not protrude from the wall, they are laid in the middle of the mold, not reaching the wall 25 cm.
Having lubricated the frame, it can be easily separated by some kind of machine working out when the time comes for removal.
Ingredients are prepared from materials:

The solution is performed according to the recipe 3 to 1, where the larger value is sand, and the unit is.
Crushed stone and water are added to the mixture, mixing well, a thick “sour cream” is obtained.
You can mix both manually and with a concrete mixer.
The prepared “troughs” are filled with mixed ingredients, leveling with a construction shovel evenly throughout the structure.
To remove air pockets from filled forms, their walls are tapped with a rubber hammer.
In this form, the fillings are left for several days, when it completely hardens, you can release it from the shackles, removing the finished border.
Products differ in qualities:
Using a mold for a curbstone with your own hands allows you to make a barrier of a unique look, high strength. They are made in various configurations, using polypropylene material, the master needs to choose the most suitable product for the landscape.
You will need:
It will turn out a beautiful path of an unusual look. The resulting seams, at the request of the owner, can be further processed. Many give the right to the nature of further design, the gaps filled with germinating grass do not ruin its appearance.
A more time-consuming method of ennobling the contours of garden border areas are ornamental plants planted along marked lines. Careful care is required for seedlings, which required great effort from the inhabitants.
As a result, they get a decent design, consisting of horizontal cotoneaster or boxwood. These are low-growing plants, quite unpretentious and withstanding the rigors of changing weather conditions.

The fantasies of the owners of backyard plantings have found their application in the use of car tires, enclosing flower beds and flower beds with them.
They are cut, creating a bizarre shape of an animal, a bird.
Those who do not have time to portray something exquisite stop at a simple landing in a tire circle.
The use of bottles of all materials has found a wide response from consumers of various drinks.
With the help of such containers, figures are laid out, completing in shapes and colors, digging cut necks around the perimeter.
Mosaic drawings are laid in a pre-prepared frame structure made of wooden blocks, brick halves, laid to limit the edges of the path. colorful pebbles. Natures with artistic imagination are capable of such delights.
Like a do-it-yourself curved border - in the video:
Read also:
 What are the forms for concrete paths and how they...
 Types of flower beds and flower beds: small works ...
 Landscape design of a summer cottage: what are ...
Any self-respecting summer resident always makes paths on his site so that it is more convenient to walk, and with his own hands. And in order for such a garden design to look complete, it is necessary to lay a garden border. If we draw a parallel, then it can be compared with a frame for a picture, without which the latter is not fully perceived.
Framing flower beds or paths is not only aesthetic, but also functional. It divides the entire site into several zones, whether vegetable beds, paths or flower beds. The height of the border is usually 10-30 cm, if necessary, it can be more, depending on what height vegetable crop. The main thing is that the border frame does not cover the plants from the sun.
In addition, the curbs themselves must be dense enough to prevent soil from entering the paths. And do not forget about the appearance, after all, beauty should be in everything and the garden is no exception.
Almost any material can be used to make a border. That is, they can be:
Except natural material a garden border can be made from such improvised things as plastic bottles, car tires and other items. It is worth noting that plastic borders are inexpensive, and their shape can be very diverse. In addition, when installing a plastic curb, there is no need for preparatory work.
Consider some of the most common options for flowerbed or road fences that can be easily made by hand.
This is perfect option to spice up your country cottage area. Such a border is able to bring a special flavor when framing flower beds or fruit trees. For its manufacture, you can use the following types of natural stone:

stone border
Laying stones can be done "dry" or on a cement mortar. When using the first method, it is desirable to lay the stones on a sand cushion so that they can be leveled. But the second method is more reliable, because it allows you to get a strong and durable frame. In addition, you can thereby avoid the need to constantly get rid of weeds.
Before laying, it is worth deciding on the shape of the frame. Then dig a shallow trench, which will immediately mark the boundaries.
During the laying of the stone, the trench should be poured with cement, but not all at once, otherwise the concrete will seize and nothing good will come of it.
Stones should be placed as close to each other as possible, while forming gaps should also be filled with mortar or covered with small pebbles. The work takes effort, but the end result is worth it.
A border made of concrete, like stone, is durable and strong. It is possible to build such a border different ways. To begin with, you can pour ready-made sections, this will require molds for borders, and then assemble them together. Or make a formwork, which is then poured with concrete to obtain a solid structure.
To create a frame from ready-made concrete sections, you need a mold for casting them. It can be purchased at the store, or you can make it yourself. There is only one caveat. The finished form is solid, that is, non-separable, from which it is very difficult to remove the finished segment without damaging it. And if in production for this purpose are used special means, then in the country, except for oil, there is nothing. Since most often the form may lie unevenly, the oil will not be distributed over all surfaces. Then it makes no sense. Therefore, it is best to make the form with your own hands.

Great option for a concrete section for a curb
To ensure strength, the length of the segments should not exceed 2 meters. In this case, it is desirable to observe the ratio of height to length in the range from 1:2 to 1:4. Also, do not make the border too thin or thick. In the first case, the section will break, and in the second it will look like a beam, which is not aesthetically pleasing.
It is easier to make a one-piece edging with your own hands, since you do not need to separately pour sections from concrete. To do this, you need to dig a trench to a depth of 1/3 of the planned curb height. The bottom needs to be well leveled, then make a sand cushion or fill it with gravel. After that, you can start creating formwork. It can be built from wave slate, corrugated board, metal or plywood sheet. So that the formwork does not break and the concrete mixture does not leak out, it should be reinforced with reinforcing bars on both sides, distributing them at a certain distance from each other.

Stages of creating a monolithic garden border
The prepared cement mortar is poured into the formwork and leveled to its level. With the help of a metal rod or pipe, concrete should be compacted in order to exclude the formation of unwanted voids. To do this, every time, immersing a rod or pipe in a solution, swing them in different sides. Walk in this way along the entire length of the edging, slowly. After pouring, the mixture must be closed from sunlight and moisturize daily. The complete drying of the concrete mixture will take five days, no less, and only then the formwork can be dismantled.

In the end, a monolithic handmade border looks just fine!
hand made border brickwork will organically fit into any style of garden landscape. It will look especially good against the background of a brick country house. You can lay a brick both on the end and on the edge, it looks equally attractive. In some cases, the bricks are slightly deepened into the ground at an angle. In this case, such a decorative border for a flower bed will be in the form of teeth.

But not every brick is suitable for framing. Normal under the influence of severe frosts will quickly collapse. So it's better to take facing material, which has greater strength, resistance to low temperatures and humidity.
Almost everyone in the country can find almost a whole warehouse of plastic bottles. But you should not immediately get rid of such material, since it will also fit to create a border with your own hands.

White plastic bottles must be painted. This makes them look more attractive. For this, any waterproof paint. If necessary, you can show a little imagination and cover them different colors or even paint. After paint, plastic bottles need to be given time to dry well, preferably at least a day. But if you are too lazy to do this, then you should use dark plastic bottles.
First you need to mark the flower bed and dig a groove along its perimeter to a depth of half the height of the bottle. It is good to clear the bottom of debris and weeds, and also, if possible, remove all the roots so that the grass does not germinate later. In this groove and lay plastic bottles close to each other with the bottom up, at the same time filling them with earth and tamping well. The ground near the bottles can be sprinkled with a little sand or laid out with small pebbles. In this case, it will be more difficult for weeds to find their way out, and the flower bed itself will take on an interesting and complete look.
Beyond using plastic bottles decorative borders for lawns and flower beds, you can do it yourself from other improvised material - car tires. Moreover, depending on the fantasy, they can be in the form of different animals - a swan, a turtle, an elephant, a zebra and others.

Instruction The frames of the film merge for us into continuous movement due to ...

Pranayama is a breathing practice in yoga. Pranayama literally translates as...