Peeling skin can be caused by a variety of factors. To deal with ...


The owners of summer cottages have always had a tendency to approach the arrangement of their square meters with a special imagination. In the courtyards of the owners land plots you can see the incredible shape of the beds, and fabulous benches, and compositions of old, almost antiques. All this decorates the landscape and cheers up, if, of course, done with taste. In this article, we invite you to discuss one such interesting idea- arrangement of a pond from a bath in the country. The work plan will help to do this efficiently and quickly.
The pond in the country from the bath has a lot of advantages and advantages: firstly, it is the size cast iron baths- just enough to turn it into a mini-pond; secondly, the strength of the walls - no problems with waterproofing; thirdly, a drain hole - you can lay communications for a waterfall or fountain.
Before proceeding to the main work, let's decide where it is better for us to break the mini-pond. Take a walk around your property - there will surely be a suitable place for such an undertaking.
Our small pond should be in the sun for some time during the day, and for some time in the shade. Any tall tree that grows somewhere nearby, and on certain time from it a shadow will fall on the pond (but do not break the pond directly under the tree, so that the falling leaves do not spoil your idea).
Also pay attention to the relief - the place should not be very low, so that dirty melt and rainwater from the top of the pond does not fall. The most the best place there will be a flat, drained surface. Clay and sand are ideal substrates.
Second life to old things And, of course, place the mini-pond from the bath in sight or next to the relaxation area. What is the point of putting so much effort into making a bath pond with your own hands, and losing sight of it in the dense vegetation of the garden?
The location has been chosen, now let's get to work. You will need the following tools and materials:
Arranging a reservoir in the country with your own hands begins with the preparation of the most important participant in the program - with a bath. Cement the side drain. If desired, the surface of the bathtub can be made in a more natural color - paint it in any natural tone from a mixture of tile adhesive and pigment or, if you want to imitate the color sea water, install the film of the corresponding color.
 Stages of building a pond from a bath
 Now we are preparing a place for the foundation pit. Mark the ground and dig a hole 25 cm deeper than the height of the tub. Dig another hole under the place where the drain will be located. This pit should be 60x60 cm in size. Insert a rolled sheet of tin into it so that it is 25 cm higher than the level of the main pit. Cover a small hole with gravel to the edges of the sheet and remove it after covering the sand cushion. The sand layer should be 25 cm. It's time to install the bath. During installation, make sure that the place where the water is drained corresponds to the location of the small pit. Pour wet sand into the void between the walls of the bath and the pit bowl. At the same time, you can fill in water according to the level of the filled sand. The earth will settle down, and if you plan to settle plants in your mini-pond, drain the water through the drain hole and prepare everything for the future inhabitants of your reservoir.
If you do not have the opportunity or desire to make a mini pond from an old bathtub with your own hands and sink into the ground, then this paragraph of the article will show you how to make a pond on the surface of the earth. You will avoid serious earthworks, but you will have to spend money on additional material to refine the bath around the perimeter (brick or tiles for facing).
So that over time the mini-pond from the bath does not tilt and loosen, a solid cement foundation of 25 cm is needed, which will need to be given time to dry well (about two weeks). But first, clear the area and drain the sand and gravel.
 Pond on the surface
 If the bathtub will stand on its own legs, then it can be installed on the foundation immediately after drying and revetted as desired. If the bathtub has no legs, then it will be held by brickwork.
 For lovers non-standard solutions and original forms in landscaping should like the idea of a multi-level bath pond
 Just as in the previous version, make markings on the ground around the cast iron bath. Add about 50cm on each side, but make the lines jagged: increase or decrease the width to make it look more natural. Remove a 40cm layer of soil down to the outline of the bathtub itself. Dig a pit, considering that it should be lower by as much as you removed the earth from the first level. Install the bath. Dig in fiberglass slate along the outer contour, put a corrugated sleeve on it. Tamp this area with sand and cement. Now is the time to cover the entire structure with foil and fill it with water.
That's for sure where you can turn around and give space and freedom to your ideas, so this is when making an impromptu reservoir.
To make your ordinary old cast-iron bathtub look like a natural pond, with inside it can be faced with stones. To do this, use waterproof glue and rounded stones. Start work from the bottom and move to the sides. The gaps between the stones can be filled with sand by sprinkling it on the glue. Leave enough space between the stones if you want to place potted plants.
 Decorate the contours of the bath with stones of different shapes and sizes for the natural relief of the banks and in order to brighten the correct geometric lines of the bath
 You can decorate the reservoir, which you made in the country with your own hands, not only with stones, but also ornamental plants... Draw a sketch in advance, this will make it easier to complete the planned work. Plant plants both around the pond and in the pond itself... Plant coastal varieties to decorate the area around the water. perennial plants after filling in fertile loose soil. Among these - swimsuit, buttercup, fern and many others. Grow right in the water water lilies, marigold, duckweed... The roots of some plants need to be fixed in a layer of clay at the bottom of the reservoir. If you have the time and desire, then you can independently get hold of the plants you need in the nearest reservoir. Thus, together with the plant, you will add the necessary microflora. Plants are an essential element to make your pond look natural and complete. All this will change your old, long-needed bathtub beyond recognition.
 Plants add naturalness
 Although, in fairness, I must say that perennial shrubs around the pond has long ceased to inspire admiration for anyone. But life in a pond is another matter. It is definitely beautiful. For this to bring you joy, you need to familiarize yourself with certain rules for breeding livestock.
Snails are unpretentious creatures, but over time they will "eat" the surface of your bathtub. The fact is that snails are cleaners and sooner or later they will spoil the artificial surface of the pond.
You can put small frogs in the pond (although over time they themselves will find their way there). They hibernate in the coastal land of the reservoir and do an excellent job with insects.
Verkhovka fish (buntings) can also take care of insects. On average, they reach 6 cm and live up to five years. They live on the surface. They keep in flocks. Similar in lifestyle to Verkhovka - bleak (sylyavki). They grow slightly larger, but also feed on insects and swim in flocks in upper layers water.
 Verkhovka
 Over time, you will notice a characteristic natural bloom on the walls of the reservoir. The water will become less clear. This is all the work of microorganisms - fish and plants. But don't be discouraged by this. Thus, the man-made pond will look natural.
The experience of some summer residents shows that fish can survive the winter in a pond if they are covered, for example, with a thick layer of snow (make sure that in a winter with little snow, the snow layer is at least half a meter). Also, the fact that the bath is buried deep enough saves from freezing. It turns out that the ground heats from below, and a layer of ice and snow on top. But still, as a precaution, place empty plastic bottles in the pond from the bath - they will perform the task of homemade dampers so that the bath does not crack if the water gets too cold.
If you have drained the bathtub for the winter, cover it with a sheet of iron to avoid deformation. Rinse the walls of the reservoir, remove the plants.
 A small pond will delight not only adults, but also kids
 And at the end, some useful tips:
Experience shows that on summer cottage there are no unnecessary things. And in skillful hands even such a bulky structure as a cast-iron bathtub, which has long been supplanted by modern miniature shower trays, can turn into a cozy corner for the whole family to relax. And as you can see, it's not so difficult to figure out how to make a pond from a bath. This is a great opportunity to pamper yourself and your family. Quite a little cash and physical costs will give you a wonderful corner to relax in your yard.
Almost any person who has a personal plot dreams of a small body of water on it. But not many people manage to make their dreams come true. on their own... Unfortunately, today the professional services of landscape and hydrology designers are quite expensive, and construction materials are also quite expensive. But do not despair, in fact, there are several proven and not difficult ways, which will help you arrange a pond in the country. These methods do not require the participation of professionals and large financial investments.
Sometimes, before throwing away something old, you need to think about whether this thing can be used elsewhere, slightly changing its initial purpose. An old bathtub is a prime example of this. Basically, reservoirs in personal plots do not make large volumes - up to 2 cubic meters. m. Such mini ponds, including a pond from an old bathroom, will be an excellent addition to an existing rock garden or an artistically designed gazebo, intertwined with green climbing plants.
Small ponds are often not used for fish farming. But if you wish, in the summer, you can not run into the reservoir a large number of fish from the aquarium. With the arrival of winter, the fish will need to be moved to the aquarium and transferred to the house.
Also, for a living decor of the reservoir, you can breed frogs or snails in it. These animals will easily endure the winter cold, hiding in coastal zone reservoir.
You can decorate a small pond pool with various materials at hand: rubber tires from cars, old sinks and baths, and the like. There are no restrictions on the flight of fantasy. If you want to adhere to certain standards, you will need to purchase the required amount polyethylene and a kind of pallet.
It should be noted that when self-creation a small backyard pond you need to adhere to certain rules:

First of all, you need to choose right place... It should be located in the immediate vicinity of the veranda or gazebo, that is, the place where the rest is provided, the place from which the pond will be clearly visible. But it is worth considering that the location of the pond should not be near a well or well. It is also worth considering that leaves from nearby trees can get into the reservoir and cause certain inconveniences associated with rotting water. Therefore, a place for placement small pond must be at a certain distance from the garden or any other plantation of trees.
The next step is to directly search for the bathroom itself. You can buy it through a newspaper with ads, pick it up from neighbors or friends who have started repairs with a change of plumbing, or revise your old things in the country, among which you can find the necessary item. The bath is the most suitable item for creating a small pond. Its durable walls will be a reliable means of waterproofing, and the hole from the drain will be an excellent place for organizing the necessary communication systems, for example, the trouble-free operation of a fountain or waterfall.

To design such a pond, you will need the following building materials and tools:
When making a pond on a site from a bath, you can use several methods. You can dig a pit, the bottom of which will be well compacted and subsequently into which the bath will be placed. You can do it differently, without digging a pit.

After choosing the most suitable place, it is strengthened with natural small stones. They will reliably protect the soil from subsidence. Now the installation of the bathroom. Walls towering above the ground can be decorated with the same stones or bricks. For this option, they will also be successful: planted nearby flowering shrubs algae, fish, frogs, and so on, placed in a pond. Using this method of pond decoration will be indispensable for owners of plots located on a slope or with an uneven soil relief.

When decorating the decor of a small pond from an old bathtub on a personal plot on your own, it is worth considering some points: plants and animals must be of a suitable size, in a certain amount and coexist amicably. Provided that all the nuances and recommendations of specialists are taken into account, a small reservoir will completely replace a lake or stream, and will also add sophistication and originality personal plot... Often, after the creation of such a living corner, the place of its placement becomes the most comfortable for rest.

Most often, in the design of such ponds, experts use both artificial and natural stones:
Before choosing a certain type of algae for planting in a pond, you need to know exactly how deep they need to be planted. And based on this, we can conclude that plants intended for deep-sea planting are absolutely not suitable for a small pond from a bathroom. Ideal will be those algae that feel comfortable in the coastal area, such as swamp feces, buttercup, arrowhead, buttercup, and the like.
Plants planted in the immediate vicinity near a reservoir, which feel comfortable in a humid environment, will also look great. They will beautifully complement the created image.

When creating a unique decor for your own pond, namely when lining the bathtub with a stone, you can resort (for secure fixation) to help cement mortar... Masonry, fixed with mortar, should be done as carefully as possible. There should be no smudges, and the cement composition should not be visually visible. Practicing experts advise to finish the rim from the same material with which it is finished and vertical part structures. When performing such a finishing option, the naturalness will increase much and there will be no rough transition from one finishing material to another.

The capacity of the pond also does not hurt to lay out stones, only of a much smaller size. Directly on the very bottom of the reservoir, you can lay several stones from those that were the vertical part and the sides. After that, the bottom can be covered with a sufficient amount of clean sand. If desired and possible, flowerpots with live, moisture-loving, blooming or curly flowers can be "hidden" in vertical masonry. They will enliven and diversify the composition.

Those who want to be especially distinguished and show their imagination and skills, you can try to arrange a pond with two levels. To design it, you will need a large tire, for example, from a tractor. You can get it at the tire service. The first level will consist of it. An unnecessary sink is suitable for the second level. Ponds of this type look much more interesting and more impressive than single-level ponds.
The design of a two-level pond is much more complicated, but at the same time, the result will exceed all expectations. In addition to the slope and the sink, you will need black polyethylene, garden hose and a pump suitable for such work.
It is not at all difficult to make a small pond in your summer cottage from an old bath with your own hands. Many instructive articles have already been written about this. And of course, we will repeat in this note those simple steps to help create it.
But in order for the reservoir to please the eye and fit into environment as if he always existed here, the main thing is still to beat him correctly. This must be done in such a way that it would really look like a natural pond, which a person only gave shape, decorated, added a few strokes, and not dug into the ground old bath, which is often found on our sites.
Compare:
- these reservoirs:


Do you feel the difference? In the first photos, here and there, white or yellowish from time to time, the edges of the bath stick out and all the naturalness of the reservoir is immediately lost. 
We draw conclusions: the bath must be masked carefully, so that no one would guess that it is here.
The second thing to pay attention to is the form. Nature rarely creates reservoirs with a clear rectangular or oval outline. Therefore, it is worth either slightly changing (making it more asymmetric) the shape of the reservoir with the help of stones and plants, or, conversely, emphasizing the interference in natural affairs of man, creating a very clear outline, for example, with the help of plates, as in our master class below.
The first technique is used much more often. In our video, we have selected the most good examples how to beat a bath pond, making it a creation of nature:
But for the master class, we decided to choose a very unconventionally beaten reservoir in modern design... At the same time, we will repeat the steps of creating such raisins on our site.

Required Consumables:
Step 1.
Decide on the placement of the pond. Please note that if you plan to plant live plants next to it or directly into the water, you need to take care of their light preferences (most plants need a sufficient amount of sunlight). Also, make sure that the branches of nearby trees do not hang over the pond. They will not only create shade for the plants, but leaves will constantly fall into the water from them.
Prepare the bath itself. If there are drain holes in it (and they probably are), they must be pre-cemented and, after the solution has dried, treated with a sealant.
Step 2.
Place the bathtub in the chosen place, outline its outline. Put the tub aside and dig a hole required sizes and depth (it should be such that the edges of the bath are flush with the ground). Install the bath.


Step 3.
Place larger stones on the bottom of the tub and then smaller ones. Carefully place concrete slabs around the edges so that they hang a couple of centimeters over the edge of the bathtub. Fill in the corners formed by the slabs with flat sea pebbles.

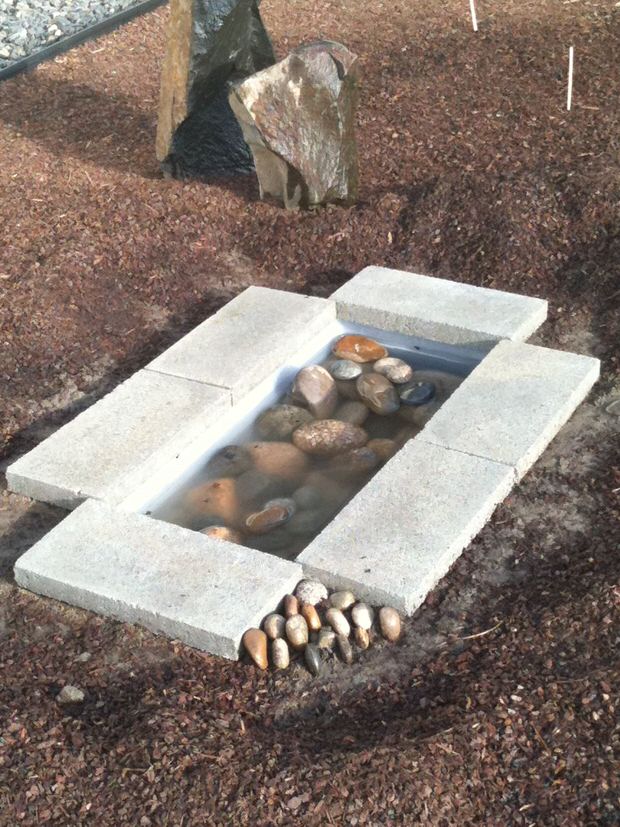
Step 4.
Set the pot with aquatic plant... fill the pond with water.

By the way, to create a reservoir in modern design, you can use not only concrete slabs, but, for example, wood (pre-processed).


If you have old things that are useless, do not rush to part with them. They can be used to create DIY crafts that will decorate the interior of the suburban area.
An old suitcase will make a wonderful table that can be placed next to the bed or sofa. You can also make an unusual chair from this item. To do this, you need to use two open suitcase halves. Only one piece of the item is needed for the ottoman.
We attach the seat frame to the surface of the suitcase, add foam rubber filler and decorate fabric upholstery... We make legs, and an unusual piece of furniture is ready for use.

An unnecessary suitcase can become a pet's favorite place in the form of a crib. Put a mattress in it, the cover should be removed from it.

From an old suitcase, you can make small cabinets for the kitchen or bathroom, as well as make shelves for dishes or books, and much more. country furniture do it yourself.
In order for a pond to appear on your site, an old bath or basin is useful for this. Prepare the chain-link, pebbles, cement, wire and crushed stone.
Dig a small hole, in depth it should be 40 cm higher than the edge of the bathtub.
Work the edges of the hole. Close the drain of the tub and place it in the pit.

Lay a reinforced netting over the entire surface near the bath. Apply cement mortar to it. Decorate with pebbles, tiles or gravel on top of the cement. Pour water into the bath, your pond is ready.
Old cutlery is perfect for decoration and makeover suburban interior... Forks and spoons will serve as hooks for bags, clothes.
Hangers forks at the dacha
Bend the items and attach them to wooden surface or against the wall.
Furniture handles can also be made from these old utensils.

forks and spoons as furniture handles
The bent ladle will become unusual candlestick for candles.

cutlery candlesticks
Spoons and forks are used to decorate a lamp, chandelier or lampshade.


Chandelier decor with forks and spoons
Wind chimes can be made from such unnecessary items.


do-it-yourself flower beds from old shoes
If you have old car tires, they are just suitable for creating a flower bed.

Place the tire in a convenient place for the flower bed, paint it with paints and sprinkle it in the middle of the ground, plant the plants.

Don't rush to throw away your old shoes. Boots and boots will act as a flower bed. Hang these objects on the fence, place them on the veranda and steps, plant plants in them.

A failed chair will turn out to be an original flower bed that can be moved from place to place.


old furniture as flower beds
An old chest of drawers or a curbstone can also come in handy under a flower bed.

Broken bike or old car – excellent frame for a flower bed.

Paint the bike's body with spray paint and hang baskets of flowers on it. It is better to plant climbing plantings on the car body so that they hide the frame.
People who have at least once made repairs in an apartment asked themselves the question: how to make a new one out of an old bathtub? Today on the market you can find a large number of different plumbing products.
True, financial opportunities do not allow everyone to purchase this product... In this case, you need to think about the options for converting the old bathtub into a new one.
Over the course of the service life, the plumbing fixture loses the appearance that it used to be.
The bath becomes rough, faded, cracks and spots appear on it. For an old enamelled bathtub, the acrylic liner method is possible.
And so, how to make a new one out of an old bathtub? First of all, a special powder is applied to the surface. After that, the cleaning itself from old enamel, scratches and splinters. This procedure takes place without rinsing off the powder.
For stripping, use a waterproof sandpaper or an abrasive stone. This process must be carried out with great care, given that the entire result of the restoration depends on it.
After removing the old coating and defects, it is necessary to wash off the resulting gruel and fill the bath for a while. hot water... Then it goes down, and the product is wiped dry and degreased.
When deep chips, they need to be restored. For such purposes, epoxy compositions or a mixture of Supercement glue and white nitro enamel are used.
At the end of the first stage of work, the surface should be flat, dry and matt.
It is produced with ordinary enamel with the addition of a hardener or aerosol primer. At the same time, the appearance of bubbles and chips should be avoided. Otherwise, the process of peeling off the new coating is possible.
After priming, the bath must be dried.
At this stage, the material is applied to the bath. This is done with a natural fiber brush or mohair roller. Usually, this procedure is performed in several stages.
Before applying the next layer, the previous one is dried. Their number directly depends on the condition of the plumbing and the instructions provided on the package.
After a few hours, the enamel will harden and the product will look new.
The optimum temperature for drying is 20-23 ˚С.
Fully enamelled finish, hardens in a week.
In addition, for the reconstruction of plumbing, glass-glass is used, which is a wear-resistant and shock-resistant material on liquid acrylic. According to the manufacturers, this type of enamel is not exposed to mechanical and chemical influences.
Stacker is not applied with a roller or brush. It is poured onto a previously cleaned surface. Approximately 3.5 liters of substance are used per bath. Restoration with glass is recommended to be carried out subject to certain safety rules. (See also: enamel bath restoration)
In no case should you wash the renewed bath with various powders that contain acid, as well as abrasive elements.
It is also forbidden to carry out washing in it, do not use bleaches. Adhering to such simple rules, you can achieve a considerable service life new surface which is over five years old.
The materials intended for the restoration of such devices have hygienic certificates, which speaks of their quality.
Optionally, you can change the color of the surface.
This process is called enamel tinting. It is worth noting that manufacturers of plumbing devices carry out thermal painting.
Therefore, it is very difficult to carry out such a procedure at home.
To restore the enameled surface, it is allowed to use not only domestic material, but also foreign paints, primers and putties.
Currently on the market you can purchase ready-made kits of tools used for these purposes.
Advantages:
The water is warm, a lot of hydromassages different types, cafe with adequate prices.
Disadvantages:
The smell of pigs from the surrounding area. Expensive for a child.
I have been going to Kazminskoye for many years, I live 70 km away. Of course it's beauty: warm mineral water and even with an air cushion, Sharko shower, hydromassage on the steps. Hold pools and hot ones with waterfalls, in a hot jacuzzi at different levels for the back. There is a swimming pool with normal chlorinated water, there are 29 and it's like the sea). There is also a "river" - a strong stream of water that instantly carries away. Some narrow-minded climb on it to be massaged.
Center for entertainment and health. Children can swim in a circle, jump into the water, dive. I didn't hear any shouts.
There is a cafe with quite reasonable prices. And delicious there. You can have lunch. Well, for example, tea 25 r, pancakes with cottage cheese 50 r 2 pcs. You can go there for 600 rubles at least for the whole day. Like the sea). There are sun loungers, a cafe, water. What else?) Children over 6 years old 450 rubles for the whole day. Yes, the price is considerable, and more expensive than that of the neighbors, but the range of services is greater, this is a fact.
Now, next to this complex, another hotel has been built, with 2 large swimming pools, by the way, the water there is cleaner. While the renovation is underway and the hotel has not opened, they are allowed to go there too.
I definitely recommend it. The whole day is better. Personally, I can't get out of there in less than 3 hours. At the same time, we constantly move from one pool to another or to a cafe.
The road was made good, to Kochubeevskaya 7 minutes.
There are also downsides. People are added for the holidays at times and the complex does not cope. There is also a pig farm nearby and in the evening it stinks of pigs ... it is indescribable. This is perhaps the only negative.
You don't have to throw away your old bathtub! It can be given a second life by making an elegant sofa, a bright flower garden or a picturesque pond out of it.
If you decide to change your bathtub, it is worth considering how to adapt the old design. It can become the basis for pleasant and useful things, as well as help you save a lot of money!
An original sofa - this is what can be made from an old bathtub! Think over the cut lines, outline them and check 10 times.
After all, when you cut it, it will no longer be possible to fix it! Wear a face shield and gloves, pick up a grinder and cut. Cut lines should be well sanded and polished.
Legs can be left or ordered new, more beautiful. Maybe the bath has already been bright color, then you're in luck, you don't need to paint it.
But more often than not, the paint on the outside of old bathtubs is peeling. Brighten up your bath with spray paint. Attach the mattress to the bottom, put a lot on the back soft pillows- and your sofa is ready.
What can be done from an old bathtub in the garden? Of course, a flower garden! Such a flower bed can be arranged both in the yard and in the summer cottage. Put the soil, sprinkle gravel on it, and put the bath on top, without covering the hole for the drain. Water will drain into the ground through this hole.
Now create a drainage layer. It is necessary to put the stones in the bath, but make sure that the hole remains open. Lay the branches on top. Now it is the turn of fertilization. You can harvest an excellent fertilizer in advance - fruit peels, weeds, eggshell... Now cover everything on top with leaves and water. It is important that the harvesting is done in the fall. That is, you pour a little earth on top, cover it, press it down, and in the spring you will plant your plants.
The design of the flower bed completely depends on your desire, but at the edges it is better to plant flowers that will go down, closing the bath itself, especially if it white... Do not forget to water your creation, and soon it will delight you with its aesthetic appearance!
What can be done from an old bath in the country if there are no bodies of water nearby? Make a pond, put a bench next to it - it will perfect place for relax. First, dig a hole, making it 30 cm deeper than the tub itself. Place a bathtub there and fill the cracks with sand. Now you can start transforming into a pond. Remember to close the drain holes tightly.
Paint the inside of the tub to keep the enamel from shining bright white. Although, after some time, she herself will darken from the water. Place stones around and plant plants. You can plant water lilies in a pond.
At first glance, an unnecessary object can be turned into a real work of art! Make a masterpiece out of an old bathtub with a little patience and imagination.
By purchasing the old Vacation home, do not rush to get rid of what you inherited from the previous tenants. Especially if it is made of cast iron. This archaic piece of Soviet plumbing will serve you well when decorating a site. For example, you can make a pond out of an old bathroom - so beautiful that all the neighbors will envy, and you will be proud of your man-made reservoir for many years.
The bath area is approximately 2 m2, which is ideal for setting up a mini pond. The bathtub has rigid, durable walls, which will be an excellent waterproofing agent that does not allow water to seep into the soil, especially for old cast-iron bathtubs. It has an opening for a weir, which can be used with a communications device for further functioning or.

In a word, for making a pond with your own hands, an old bathtub has a lot of advantages, and most importantly, it eliminates the need to buy a new container for a reservoir.

True, if a cast-iron bath is used, and it is very heavy, then a very strong and reliable foundation must be created for it.

Also, when making a pond from a bath with your own hands, keep in mind that the size of the container does not allow, if desired, to create a more voluminous water ensemble.

There are two options for how to make a pond from an old bathtub in the garden: buried in the ground and on the surface.
Look at the photo of the ponds from the bath and choose the option that is best for your site:
The work of installing a buried pond from a bathtub in the country with your own hands consists of several main stages and requires certain materials and tools.

For the construction of this mini-reservoir, the following materials will be required:
Since the pond is small in size, little space is needed for its devices.
Before making a pond out of the bath, make sure that there is a power supply nearby.


It is also advisable to have a pond with a house or a recreation area so that this miniature ensemble does not get lost in the wilds of the garden plot.


First, you need to make a marking of the pit: set the contours of the future reservoir according to the size of the bath, marking them with pegs and using twine for measurements. The pit must be bigger size than a bathtub, therefore a 10 cm allowance is required on each edge. This space is necessary for a drainage device, which will serve to quickly drain excess water. If you do not do it, the soil near the pond after each rain will soak, wash out and form a mud swamp.


In the depth of the pond pit in the country, from the old bathtub, you also need to dig 10 cm more than the height of the container.


At the bottom of the pit, you first need to pour about 3-5 cm of small river pebbles or rubble. River sand should be poured over the rubble (the layer thickness is 10 cm). Next, the bottom must be carefully leveled using a rake and a trowel, checking the evenness of the surface with a spirit level. Then the bottom needs to be filled with water so that the layers of the substrate are slightly obscured. After that, a cement screed should be made, which will not allow groundwater blur the foundation.


The thickness of the cement screed layer is 3-5 cm. When the screed is completely dry (after about 1 week), you need to pour a layer of gravel 20-30 cm thick on top. The drainage pad is ready, now you can lower the bath into the pit. If the soil on the site is mobile, then you will have to install additional reinforcement for the reservoir: first, dig a pit, 2 times the size of the bath; then build wooden box, inside which to spread waterproofing film, and then arrange drainage, etc.
As you can see in the photo, baths for a do-it-yourself pond should be installed exactly:
To check its position, you need to use a level. The edges of the bathtub should not protrude above the ground level, otherwise the pond will not look natural.

The empty space left between the walls of the pit and the bath must be filled with gravel or crushed stone to the middle, and then with sand, carefully tamped so that later this layer does not sag after the first rain and the bath does not begin to sway.

If it is not planned to do or a stream, then the lower drain hole must be sealed. You can use a regular bath plug and sealant to do this. After that, the bath must be filled with water and left for several days for the substrate to completely shrink.

In conclusion, you can proceed to the direct design of the bath itself and the surrounding area.

To make the bath look like a pond, the inner space needs to be decorated with stones. First, pour out all the water from the bath and dry the container.

Then it is necessary to stick on the enameled walls of the bath, hewn rounded river or sea stones, using waterproof glue. It is better to start glueing stones from the bottom, moving up the walls. The gaps between the stones should be smeared with glue with a brush and sprinkled with river sand.

At the bottom, you need to leave more gaps - for installing pots with aquatic vegetation in them.

The edges of the bath around the entire perimeter can be covered with pebbles, preferably flat, and the rest of the space can also be decorated with stones in a chaotic manner.

How to decorate a bath pond with plants? For a mini-reservoir, you need to use shallow plants that grow in their natural environment in the coastal zone.

These are calamus cereal, three-leafed watch, marsh feces, tabernamontana reeds, water buttercup, lagarosiphon, many types of cattail and arrowhead, marsh turkey, urut, marsh calamus, etc.

These plants grow at a depth of 10-50 cm, so they are ideal for a bath pond.
Pay attention to the photo of a do-it-yourself pond from an old bath: you can plant several plants around it, which feel great in soil with excess moisture:
These should be broad-leaved ornamental moisture-loving plants, such as aquatic zizania, ludwigia, auricular, butterbur, m and buzilnik.

Plants will help create a complete pond image and, in addition, they saturate the water with oxygen, which allows it to remain clean and transparent throughout the summer.

As the final touch you can put fish in the pond. Then they will have to arrange a water filtration system or install a fountain or a small waterfall. After all, fish need flowing, oxygenated water.

Since the reservoir is small, it will be possible to run several aquarium fish and on winter time they must be moved to your home aquarium.

If you don't want to mess with the fish, you can put less impressive, but more hardy animals - water snails and frogs - in the pond.

They winter well, burrowing into the soil around the reservoir. Frogs may not look very aesthetically pleasing, but they will perfectly complement the overall picture, and, in addition, they eat mosquitoes and their larvae.

If the relief of the site has a slope, then you can install the bathtub exactly here, strengthening it on one side with large stones (making a tunnel for one side and partial for the other, which will be free).

As a result, the outwardly free side of the pond will resemble that made of stone. Some suitable plants can also be planted here.
As you can see in the photo, if a pond from an old bathtub will be installed in a recreation area, then a pergola with a climbing plant can be installed near the bench - it will simultaneously complement general form mini-water areas and provide shade on hot summer days:
And how to make a pond from a bathtub with your own hands if it is not possible to install it buried in the ground (the site is located on a steep slope, there is no desire to carry out excavation work, a child or a dog may fall into the pit, etc.)?

In this case, you can make a body of water on the surface of the earth. True, this method will require some purchase costs. additional materials- bricks and tiles for the execution and facing of the external walls of the structure.
For work, you will need the following materials and tools:

It is necessary to clean the area under the pond, carefully tamp and level. Then you need to make a markup, taking into account the external brick walls.
For the installation of the bath, it is required to build a foundation based on cement mortar, you must first drain from gravel and sand (30 cm). A shallow hole should be dug under the drainage (to the height of the layer). It is advisable to drive several large stones into the sandy area, together with which you can use construction waste that is not washed out by water.
The thickness of the cement foundation is 25 cm. After the foundation has been built, it must be allowed to dry for 14 days, periodically pouring water over the cement for better adhesion.

If the bathtub is on its own legs, then you can immediately install it on the foundation and finish it with bricks. And if it is planned to hold it with the help brickwork, then first you need to make the walls of brick, and only then install the bath.
Watch the video "How to make a bath pond" to better understand the process technology:
A decorative pond from an old bathtub can be decorated with tiles, also decorating the sides to create a monolithic square niche.

Then proceed to the registration interior space baths: walls can be decorated with stones or painted water-based paint in any desired color.

In such a pond, plants with large leaves and flowers. Any plants can be planted around the pond, not only water plants, the main thing is that they are not too large and are at some distance from the pond so that leaves and flower petals do not fall into an artificial reservoir.

If you wish, you can make two such ponds on the site at once, setting them symmetrically, for example, on the sides of the recreation area or a large flower garden.
Peeling skin can be caused by a variety of factors. To deal with ...

Today, many people know what scoliosis is. This disease in the last ...

An even spine is not only a beautiful posture, but also the health of everything ...