
Proverbs and sayings about May HORIZONTALLY: 2. May will deceive - in ... will leave.4 ....


All photos from the article
A distinctive feature of the age of high technology is the ease with which beauty is replicated and originality is put on stream. But if not everyone can become an artist and paint great canvases, then many can create unique images using simple technologies.
The tree is one of suitable materials on which a photograph or favorite drawing will look great. In addition to the fact that the quality of the product will remain unchanged for many years, it will be a kind of masterpiece or piece goods, depending on how it is disposed of.

Don't let buzzwords like sublimation printing technology or graverton scare you, because they are one and the same, therefore, there is less incomprehensible. The technology is based on the principle of sublimation, when a substance under the influence of high temperature “jumps” from a gaseous state immediately to a solid one, bypassing the wet stage.
Graverton technology allows you to transfer a pattern to wood, metal, glass, fabric, and the process itself takes place in a certain order:
expose artistic processing can great amount things - from shoes, dishes, fabrics to corporate symbols, puzzles and all sorts of other unexpected things.
The main disadvantage of the graverton technology is the need for special equipment and its high price:

And since you want to transfer the drawing to the tree at home from time to time, purchase expensive equipment makes sense only if you put things on a grand scale.
With a minimum of tools, you can also figure out how to translate an image onto a tree no worse than using high-tech equipment. Perhaps the most important thing is to decide on the topic, because erasing "nonsense" will be, oh, how difficult.
There are several rules that will teach you how to transfer a drawing to a tree so that it looks right:
The first stage of work is to think about two questions - for what purpose and what you will "sketch". So, what happens can be presented, used for decoration, hung on the wall in the form of a funny maxim, used for practical purposes.
With an elegant vignette, composition or photograph, you can decorate not only a key chain, a small sheet of plywood / board, signs, but also doors, bed headboards, window sills, chairs - everything that makes sense to decorate. Here are some simple but effective ways how to transfer an image to a tree.

Free, because you can find it on a computer and make printouts on a laser printer at work or with friends. There you can also prepare the board by grinding it with fine-grained paper (P 220) or (there are always support staff in the staff - locksmiths and carpenters).
Let's start working:
You can moisten the sheet with acetone before transferring the picture to the tree so that the pigment comes off better, however, to the detriment of the homely atmosphere. It would be useful to cover the nose and mouth with a gauze bandage or scarf. Typically, this technology is suitable for the subsequent burning of the pattern with a special tool.

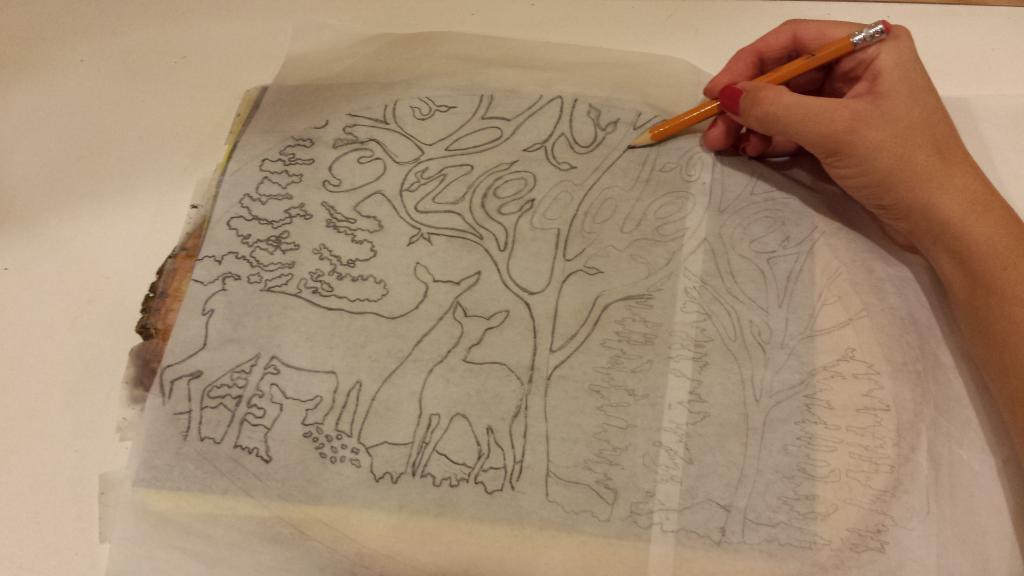
Note! Put the carbon paper on the board with the coloring side down, on top of the necessary drawing and circle it with a pencil. The main thing is not to move the paper and not carry it with your hand, otherwise the board will get dirty. It makes sense if the drawing is small.
In addition to high-precision technology, source code and wooden canvas, you will need:
Note! Experienced craftsmen it is advised to slightly brighten the image before transferring the photo to the tree, because in ready-made colors will be more saturated.

From it you will learn how to transfer a drawing to a tree using an acrylic gel medium. This modeling paste, used to create a relief surface, costs more than 500 rubles, but it’s not worth saving, just like using an expired one. According to the reviews of the masters, a good product is produced by the Rafael company.
Of the tools and supplies you will need:

The work instruction is in many ways similar to the previous one:
I wonder how to transfer a photo to a tree without gel and glue? An alternative would be a clean decoupage film on which the photo will be printed.
After getting wet, the substrate is pulled out from under the top film, leaving a juicy pattern in place.
To work, you will need a skin, white acrylic paint, a plate of water, cotton pads, paper napkins, brushes, a marker, patinating varnish.

Note! You can buy special napkins for decoupage. With them the question is how to transfer the drawing to the tree, special difficulties will not deliver.
The new possibilities of the wood surface used as the basis for a painting or photograph are unusual and evoke a lot of emotions. Familiar images look a little different than on paper - softer, more mysterious. branded Consumables help perpetuate your work, which may outlive the paper version.
The video in this article shows an example of transferring an image to a tree.
Any questions you have about translating an image into a tree, you can ask in the comments to this article.
If you do not know how to draw, but would like to learn, you should start with a simple one - copying drawings. To begin with, this can be done with the help of tracing paper. This method is the easiest to perform. Now let's learn more exactly how to transfer a drawing from
To transfer an image, follow the steps below:
This method is used for simple pictures that do not contain a large number intricate details. Now you know how to transfer a drawing from paper to paper. in a simple way. After trying it, you can proceed to others.

You can use the copy grid to transfer complex patterns. With its help, it is also possible to zoom in or out on the image itself.
To master this method, follow these steps:
Now you know how to transfer an image from paper to paper. Consider other surfaces.

A tattoo is a highlight of appearance, but not everyone decides to put a drawing on the skin, realizing that this decision is made for life. For people who are afraid of such an act, but want to decorate their body with a beautiful image, great solution are To learn how to transfer a design from paper to leather, you need to study the following information. The main stage is a clear drawing of the contours of the future image.
The picture can be applied to the body using:
For it you need to do the following:
It is based on the use of tracing paper. You need to take the following steps:
If you still decide to put a permanent drawing on your body, approach this very carefully. The main thing is to choose a good salon, take an allergy test and make sure that all the tools are disinfected.
To work, we take an image with good contours and a roll. To transfer, you need to purchase a felt-tip pen - a glass marker, it fits well and is easily washed off the surface.

Instruction:
In order to see your favorite image on a wooden base, you just need to follow the steps below.

For work you will need:
Instruction:
Metal is the basis, also suitable for such "tricks". For accurate and fairly accurate work, two center lines are drawn on it or the corners of the image are marked. Now let's take a closer look at how to transfer a drawing from paper to metal.
The most common is to use carbon paper for this. Since metal is a very hard material, it is coated with white or light paint. The transfer process begins after the varnish has completely dried, which is applied just before the start of the main work.

This method requires the following rules:
Now you know how to transfer a design from paper to paper, to leather, to glass, to wood, and to metal. Forward - for the tools, and good luck in your endeavors!
With a minimum amount of material and time spent, you can make a memorable gift or decoration in retro style for your interior with your own hands. The tree will give the shot a special inner glow, and you will also get beautiful matte shades on the transferred frame. This is a step-by-step illustrated master class on creating real works of art with your own hands.
You learn:
- Choose color images to transfer to the tree;
- Work with a gel medium (gel medium transfer - transfer gel, gel for transferring images; freely sold in Runet);
- Transfer any image to the surface;
- Competently complete the work of transferring the image to the surface.
1. Choose the right source materials.
The wooden base can be of any shape, but its surface must be perfectly smooth so that the image lies evenly and without breaks in every sense. It is also preferable to use a light wood, because it is it that gives the very “inner glow”. A light base is especially important for portraits so that the skin tone does not change for the worse.
As for the photograph, it must be a printout on a laser printer and from the very beginning of a size equal to the size of the wooden base for transfer. Therefore, after printing, it is good to cut off excess white paper from the frame, so that it would be more convenient to work with it later. The picture should be high-contrast as a standard (you can process the image in a graphics editor on a PC, if this is not the case). But a great retro effect is given on the tree and the pictures are almost out of focus and with very soft shades of colors. See below for examples of suitable shots - from bottom to top and from right to left: contrast shot, but out of focus; the picture is out of focus and with soft shades; contrast shot in perfect focus. The tree will enhance the color rendition in any case.

Any transfer medium can be used, but the best image is obtained by a gel with a matte effect (marked "matt" on the package) and the most dense / thick consistency (marked "heavy" on the package).
Also to you come in handy:
- unnecessary plastic roller,
- (or) a wide wooden stick (bought at a pharmacy),
- a pair of medium-sized flat brushes for applying the composition (glue brushes),
- non-rigid sponge or sponge for dishes (new),
- water in a small bowl or a low glass,
- paper towels/napkins/handkerchiefs/toilet paper or thin kitchen towels,
- a small amount of oil (any liquid from the kitchen).
2. Right before you start, wipe your wood base several times with a clean, dry towel to remove any crumbs and dust.
3. Apply the transfer gel to the surface of the wood good layer: definitely not thin (a lot of wood should not be visible through the gel), but not very thick either (the gel layer should not look like an impenetrable icing on the cake either). Just squeeze out of the tube or spoon the gel from the container onto the tree, and then spread it in a more or less even layer with a brush (or wooden stick, or a plastic card - whichever is more convenient for you). Do not forget to make sure that the layer on the edges of the wooden base is not thinner than in the middle.

4. While the gel is still damp, place the print side down on the gel. The photo can be cropped to a size slightly smaller (or much smaller) than the wooden base, then you end up with a thin or wide wooden frame around the image. Using your fingers gently (in order not to move the picture even a millimeter, hold it with one hand, gently smooth it in all directions with the other), smooth the superimposed photo, slightly pressing it to the surface and removing the air between the photo and the gel on the tree. It is important in no case to press so hard that the gel begins to squeeze out on the sides!

5. Smoothed out with your fingers, take a plastic card (it is more convenient than a stick, because the first edge gives more uniform pressure) and, again holding the picture with one hand, continue smoothing the white surface of the photo with the other side of the card.

6. After that, set your workpiece aside until the gel is COMPLETELY dry overnight. Resist the temptation to pick up the photo and see what happens: you will ruin your work for sure. If you work in the summer, you can also put the workpiece in the sun for a couple of hours (but not on the battery !!) and then check the degree of drying, and this may (!) be enough.
7. After the gel is COMPLETELY dry, take a sponge, moisten its edge a little in water (do not saturate it with water, just moisten it) and start applying water directly to the back white surface of the photo on the tree. Do this carefully in several passes (wetting the sponge several times), first blotting the picture with a sponge, and then, when there is already a lot of water on the paper, continuing to move in neat circular motions. That is why - so that the material does not immediately begin to be erased by pellets from water - it is necessary to print the picture initially on special paper for photographs, and not on ordinary office paper. Make sure to use the soft part of the sponge and not the hard part of the sponge. In the process, when squeezing the sponge, a whitish liquid will flow into the glass, and this is normal. The paper should be completely wet everywhere from the center to the edges without gaps.

8. Further, still continuing to moisten the sponge from time to time, begin to wipe the wet paper from the image with pellets. Make sure you work not only in one central area, but equally on the edges so that the paper does not rub off in one place, because you may start to delete your transferred image. Do not be especially afraid of this, rub with light pressure, and the paper will come off quickly, the main thing is not to rub one place with effort, as if you are rubbing a stain; in particular, do not rub where the paper is no longer there.


The paper should thus come off completely. If some areas do not want to rub off, use your own wet fingers, as they are smoother and they feel pressure and progress better.

Swipe without pressure with a sponge over the picture to remove all the pellets down to small ones, and then without pressing with wet fingers on the same surface to make sure by texture that there is no more paper left, even a thin layer.
Wipe the image with a clean, thin towel to remove paper dust and moisture.
At the end of this stage, moisten your fingers again and walk several times again, but almost completely without pressure, over the image, because the paper hairs probably still remain: while the paper is wet, it is not visible, but when it dries, it will become very noticeable if left on the image.
9. Dry the picture on the tree again with a thin towel. Set aside the tree with the image until completely dry from moisture.
10. As you can see in the picture below, even if you rub very carefully, after drying, some paper fibers still "appear" in the image. You can use the water again and then dry the picture again. But here is another, more efficient technique completion of work.
With one finger, pick up literally a couple of drops of oil and gently apply it to the picture in a circular motion. And as you work, you will see how these villi simply disappear. You have achieved the result you need - take a thin towel (paper or fabric) and start wiping the oil from the picture with the tip.


11. If during work, nevertheless, a small amount of gel has gone beyond the edges of the image on a wooden base, just gently pick up the frozen lumps of gel with your fingers.
12. By and large, the work is finished. But now you can decorate the frame, for example, using a special ornamental adhesive tape with a pattern - washi-tape (freely sold in Runet). Here the frame is presented as an abstraction, repeating and shading the colors of the image. It is also convenient to glue the side edges of the wooden base with it. You can also use acrylic paint instead of ribbons. It is also worth painting the back of the tree with one color.


Elements in the interior made of wood make it more elegant and attractive. This decor can be done by hand. by the most simple option will become wooden plank with a pattern that is applied to the surface in accordance with a certain technique. To make the product correctly and beautifully, you need to know exactly how to transfer the pattern to the tree in several ways.
There are several techniques in which a pattern can be projected onto a wooden surface. In each situation, you should know exactly how to transfer the drawing to the tree:
You can partially combine several techniques in one work. This is possible, provided that the person has artistic talent, which will help to abstractly present the result of the work.
Before transferring the drawing to the tree at home, it is worth preparing the surface correctly. Both the process of work and the result depend on the quality of the wooden base. The service life is also directly determined by the quality of the preparation of the tree.

Training wooden surface:
Thus, the preparation consists of three simple steps that even a child can do.
In order for the burning procedure to be carried out quickly and efficiently, it is necessary that the pattern on the surface of the wood be as accurate and of high quality as possible. To transfer the image to the surface, several methods are used. The most popular option is transfer by carbon copy.

How to transfer a drawing to a tree for burning using a carbon paper:
This method is very reliable, but requires special care in execution. During the translation process, traces of carbon paper may remain, which are almost impossible to clean from the surface of the tree.
In order to learn how to transfer a drawing to a tree without carbon paper, you can use several methods. Each differs in a set of tools and materials, but is simple in terms of implementation.

Image transfer methods:
There are other options, but the implementation principle is much more complicated and requires more time and money.
To form an image on a board or plywood, you need to know just a few basic rules. If the work is done incorrectly, the carving process can become much more complicated.
How to transfer a drawing to a tree for carving in order to comply with all the rules:
The method of transferring an ornament or image can be used from the options presented above. The main thing is to lay the sheet with the applied ornament so that the direction of the pattern coincides with the location of the fibers.
Often, not only the manufacture interesting jewelry for an interior with an image on a tree, but also a more practical application of technology. Knowing how to transfer a drawing to a tree, you can restore old furniture, do wooden element design.
To implement such ideas, decoupage technique is used. The principle of such work is simple and does not require special skills, availability unusual materials or tools.

How to transfer a drawing to a tree using PVA glue using the simplest algorithm:
Further processing is chosen according to the preferences of the "creator".
After you have transferred the drawing to the tree and completed the secondary surface treatment, it is worth considering the options. further processing surfaces.
There are several options:
Additional decoration includes the manufacture of stands, frames, pendants for finished product. Here you can show imagination and skills.
Proverbs and sayings about May HORIZONTALLY: 2. May will deceive - in ... will leave.4 ....

Popova V.N. primary school teacher MBOU "Kishertskaya secondary school" Rebus is ...

To learn how to compose and understand puzzles, you should figure out what they are from ...