"The woman is created for a man, not a man for a woman" - such a postulate ...


Decorative panel From plaster - it is enough original way change the interior of any room, while having struck friends and acquaintances interesting designMade with your own hands. Panel from texture or texture plaster allow you to create all kinds of visual effects, play with light and shadow. Relief drawing can be given the new kind Tedaring the walls to us. And how to do it, it is proposed to learn from the article.
The volumetric panel of plaster can make the interior stunning beauty and elegance of the image. It is difficult to imagine that this work of art is made of a simple building material, which is used when aligning the walls (see alignment of walls by plaster for all rules). Such panels usually has enough big sizes And in the interior of the room is a central element.
This requires when placed it, comply with some requirements:
The benefits of relief image from decorative plaster are:
Execution techniques determines the type of pattern made of decorative plaster.
It may be:
The application of plaster is performed through a special stencil, after which the drawing is laid out with the paints. This type of panel is used when decorating the walls with different images, the medallons of the surface of the ceilings. At the same time, it is enough to see once a master class of panels from plaster, and then reproduce it yourself.
Tip: Apply the drawing you need to have time for 20-30 minutes until the plaster hardened.
Tip: Panel can become a real decoration of the room, only taking into account the features of the interior of the room and its functional purpose.
Before making a panel from plaster, you need to purchase materials and tools. In addition to the decorative plaster and various colors, the image can be supplemented with the most unexpected elements.
It can be:

This will require a simple set of tools and devices:
From the option of choosing the technique of panels, you may need:
Applying decorative plaster on the wall, does not require special surface preparation:
While the surface smears:
When performing on the walls of plaster drawings, in addition to the motive and the color, the depth and type of relief is selected, which exerts appearance Special influence. The types of reliefs can be somewhat, and their price is the most different.
It:

Difference in application technology: use instead of writing stencils.

According to the technology of application, the solution can be coated with several thick layers due to a very large volume and a significant proportion of sculptural processing.
The image is made in a special deepening of the wall, plastering "flush" with a plane, and then the drawing is immediately made, cutting the recesses in the places of its contours.

This is the easiest to perform the type of relief.
Instructions for decorating the wall with drawing on it, Panel offers:

Several tips for applying a panel on the wall:
Tip: Each stage of material application must be performed by smooth, clean tools.
When creating volumetric images, you need to have the skills of the artist, feel the depth should be the relief and pattern proportion.
His house wants to make beautiful and original. Most reliable way - Unique homemade decorations. One of the very interesting ways - Bas-relief on the wall. This is a three-dimensional image of a plaster or any other similar material. Gypsum in pure form is used very rarely - it freezes too quickly without giving time to processing. Most often use gypsum plaster mixes. They go with additives that facilitate work. With them, you can make a bulk wall panel with your own hands even without experience.
To make a bas-relief on the wall, it is necessary to prepare it to start it: clean, align. Already on a flat and completely dry surface, you can start working. When you are going to make large bas-reliefs, it is advisable to climb the wall - for a better clutch of the composition with the wall.
Bas-relief on the wall can be of varying degrees of complexity. This is complicated. For beginners is clearly unasamed. But you know what can be done in perspective
For first experience, it is better to start with small products - type of medallions (round or square) with simple embossed images. As the basis for such products, it is best to take moisture-resistant. Under it can make a frame (from the profile, for example). In this form, the bulk composition can be outweigh from place to place. It is easier to master the basics of technology.

This is all the technology in general features. There are nuances on which it is worth stopping separately. The first concerns applying the starting layer of putty on the walls and transfer of the pattern. In more complex compositions, the bas-relief on the wall begins with the transfer of contours of the drawing. Do it with a pencil or chalk (if you know how to draw) or with the help of printed in necessary size Images and pop-up on it. Then those places on which we will apply putty are covered with soil (for better clutch), and then with the help of Mastekhins (small spatulas different shapes) Apply the first layer of material. Next, the sequence of actions is similar to the described.
The most common question among beginners: What putty is better to take for the manufacture of bas-relief? In principle, come on any finish gypsum putty. Each wizard has its favorite brands and compositions. Here are a few that can be recommended:
In addition, impregnation is needed. They are selected based on the starting characteristics of the material. There are compounds that strengthen the hearty materials, penetrating deep and binding particles of materials with each other. This is necessary, since the panel of gypsum weigh decently, create an additional load. Without prior preparation, they can fall off from fragile grounds. You can use the moisture-proof soil concentrate firm PUFAS. It is suitable for all mineral bases, including wood and wood slabs. Aquastop moisture protection is suitable for bulk grounds.

In addition, these compositions are used:
For layer-by-layer processing, primers are needed, which create an adhesive surface on the surface. In this case, you can put a new layer of putty even on the surface of the surface. For these purposes suited primer Ceresit deep penetration and impregnating PUFAS soil. They can be used for finish treatment Before painting.
The tools for creating a bas-relief are needed for two types of work - for applying putty and to remove / cut off the extension solution. Therefore, the set of tools and fixtures is quite extensive. For applying putty or decorative paints Use:

These are all tools that may be needed. From the necessary: \u200b\u200bKelma, spatula, chisels. Mastichens are very comfortable, it is difficult without scalpels and a confectionery syringe. But stacks are a tool for perfectionists - for accurate improvement of the relief.
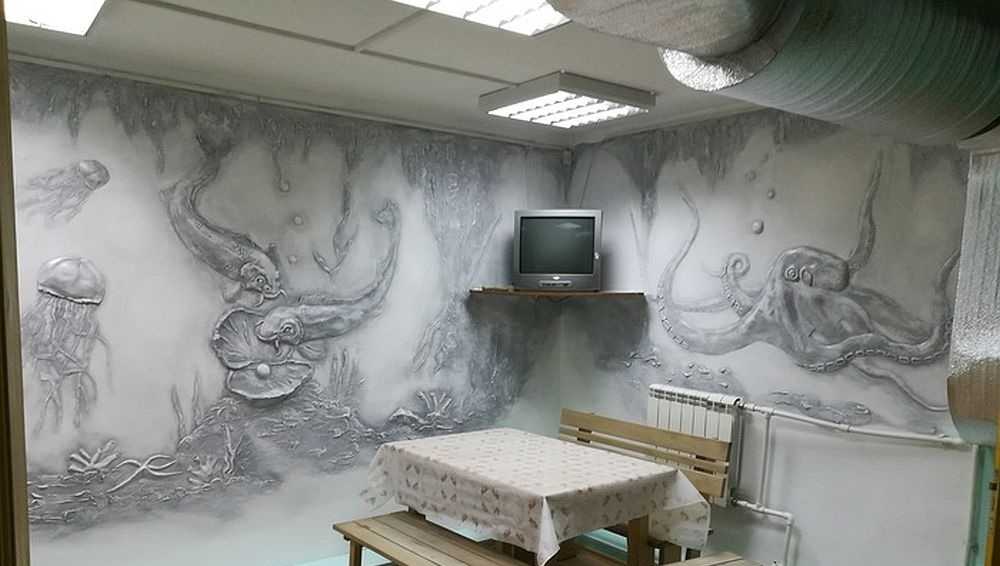
For the embossed picture on the wall, a maritime theme was chosen - with fish, octopus, algae. Great option for obtaining first experience! A light pattern that can be formulated gradually.

The drawing with a pencil is transferred to a pre-aligned and projected surface. For the manufacture of a bas-relief, a gypsum stucco stitching / Sheetrock (with a smaller stamp) is used. During the dilution of the solution, a smaller amount of water is added: to take 0.5 liters of water to a kilogram of the mixture (instead of 0.6 on the recommendation). With such a kneel, the composition is harsh, but it is so better for making a relief image on the wall.

Immediately knead a small amount of solution: the gypsum plaster quickly loses elasticity (15-17 minutes) and you need to have all the volume not only to lay out on the wall, but also align and give the desired outlines. For the first time, knead grams of 300-400, lay out, attach some form. If in the process you will feel that you can cope with a large volume, knead more.

Little way, masticine is laid out the solution, filling the contour of algae, cut off excess, as far as possible
With such tactics - small portions of the solution - most of Time takes exactly to knead the putty. Knead better in the dishes with high side - bucket or saucepan. However, of them, the frozen solution is hard to delete. If there is an old ball in the house, you can cut up the top and knead the putty in it. Even small particles are easily removed from such a container.
Put powder into the container, add clean cold water, quickly mix with a spatula, then bring the composition until uniformity, leave for 5 minutes, then mix again. There must be a homogeneous thick paste without lumps or inhomogeneities. Exposure time and "setting" is indicated on packing with putty, if you use another composition, follow the manufacturer's recommendations.
To begin with, it is easier to start with a shallow relief. When forming small parts, we take a small amount of solution on the celma, we apply to the desired place, trying to swing well to the clutch of the solution with the wall is good. If the wall is covered with a primer that improves the clutch (the surface is slightly rough and lipgy to the touch), there will be no problems. If the details are very small - such as the suckling of jellyfish - it is more convenient to put a masticine solution.

The bas-relief jellyfish from gypsum or acrylic putty make a slightly harder ...
Having a mixed portion of the solution on the wall, immediately proceed to equalizing and forming the relief. We work the edge of the Kelma, masticines, knives, rocks, scalpels - to all that is at hand and that can give the desired shape surface. If during the process it is already dried, but not yet modified, it can be mixed out of the sprayer and try to refine in a few minutes. When you achieve the desired degree of perfection, clean the tank for the knead from the residue and knead the new portion. Note: capacity should be absolutely clean. The slightest particles Will leave scratches.
In the manufacture of a bas-relief, which will be outside the wall will be no more than 2 cm, no reinforcing structures are required. With a greater thickness, in those places where the layer is planned 2 cm, screws are screwed. On them it will be possible to navigate when applying plaster, they will support the solution, without letting it crawl.

Fish and sink have a larger volume - in some places more than 2 cm. Here they screw the screws for reinforcement
In this bas-relief, the most speakers are fish and sink with pearls. In those places where a thick layer will be laid and screw the screws. Pearl roll separately, having blinded the ball and putting it on the self-tapping screw.

The thickest place is head
In places where the relief is assumed to be deep, it is possible to apply a solution at no one, but in several layers. At the same time, it is completely optional to smooth out. The more uneven the surface it turns out, the easier it will impose the following layer. When the required volume is achieved on a certain site (for example, a fish head), we begin work on small details - eyes, mustache, gills, etc.
When elapping small parts, not over 100-200 grams of solution - while cut, align, the solution is seized, therefore large portions are simply not needed.

After the drawing from the putty on the wall is ready, it is left for a couple of days until complete drying. Then you can start grinding - we take emery paper With an average grain, we proceed by achieving the necessary smoothness. When the relief is ready, it is re-made fine-grained emery.

Two days and more, may dry elements with deep relief. Smaller - algae, waves, jellyfish - dry faster. With them and you can start. While they will bring them to mind, dry and thicker details. After the grinding is completely over, we remove dust with a thick brush. If desired, you can spend pressure. Next, we cover the decorative panel from the plastering of the primer of deep penetration.
The last step of making a bas-relief on the wall - painting. The way of color everyone chooses himself. IN this case used ordinary water produce (the primer was under the paint on water based). This can be considered that you made a bas-relief on the wall with your own hands. In this case, it turned out big composition On two free adjacent walls.
One advice: the bas-relief on the wall looks better with specially designed illumination. So before leveling the wall, output the ends. After aligning and driving the surface, install those lamps with those lamps that will further highlight the embossed pattern. At the same time, the light should be grinding the volumetric panel made by you from the plaster mixture. Only in this case it will look good. Because if you work with a different lighting, when installing regular luminaires, you can detect a "nightmare and horror".
Without experience it is very difficult to understand what and how can I do with the help of ordinary gypsum plaster. In fact, the volumetric paintings from the gypsum can be the most different themes, but the most common - flowers, trees and landscapes (urban, country). In this section, we collected a certain amount of the most diverse bas-reliefs on the wall. With their help, you can imagine the topic for art Leping on the walls. In fact, the process is similar to work with plasticine. 


Recently, designers in the interior often use decorative ornaments In the form of a panel to emphasize the feature of the stylistics of the room. Separate elements located on the walls help visually expand the space and highlight certain zones. Decorative panels may be small in the form bright accent Or volumetric, filling the entire wall. When creating such decorations are used various materials and technologies allowing to highlight the contour of the image and put the relief.
IN modern interior It is impressive and interesting to the walls applied on the walls with a textural surface. When performing such work, decorative plaster is used, with which you can create an exclusive room decoration.
Before applying plaster, it is necessary to prepare the surface for decorative panels. The old coating should be removed from the wall, and the plane itself align and primed putty, eliminate defects and cracks. Next is the primer to increase the clutch of materials.
To create the main background, the Venetian plaster is used, which is formed by the desired color combined with panels. The mixture is applied to the wall with a special cell that creating the effect of the lunar surface. The method of coating can be different. Depending on the use on the wall surface, you can form tubercles, pits, roughness, smooth waves on the wall surface.

After drying the applied plaster, the surface under decorative panel can be decorated with gold, pearl, bronze or silver coating. After some time, the wall will be ready to apply the volumetric pattern.
To work, it will be necessary for the stencil of the desired image, preferably with a sticky basis. The drawing is applied by plaster containing a fractional sand, which will help visually create a volume. The template can be any, at your discretion. For example, figures of people or animals, as well as plants, flowers, trees. The stencil of the adhesive side is applied to the wall and filled with a spatula with decorative plaster. You can add an image additional details ( crispy curls, jewelry, straps, etc.). Elements are attached to the way dry.
Decorative panels can be decorated with glass, beads, small shells, pebbles and other details. It is also permissible to paint the drawing with paints, which are recommended in the characteristics of plaster. The main thing is that your panel is combined with the common style of the room.

Panel on the wall can be made in the form of a separate picture decorated. The basis can be cardboard, a small piece of plywood, jute, glass and other material. As a background, velvet fabric, decoupage napkins, corrugated or decorative paper can be used. When creating a panel for a kitchen, it is often laid out of croup, pasta, various grains, artificial berries and dried flowers.

Getting Started, take the basis and apply a pencil sketch of the future image. Small organic parts are pre-soaked in a saline solution. Then dispense the items on the panel, removing each of your place. Start laying from the largest details, gradually moving to smaller. Between large elements, the lumens remain in which the glue is poured, then filled with a small decor, for example, a militant or bark. It is important that your panels harmoniously fit into the interior.
Decoupage is a very interesting and original method for decorating all sorts of objects. It can also be used in the manufacture of panel on the wall. For the basics, the whole ceramic tilewhich will need to be pre-primed and painted in light tone. A layer of PVA glue is applied to the surface, then fragments are laid out. egg shell. Next, needle or toothpick should be pressed on the shell, so that it split and formed a crack. Thus, the entire tile area is filled. The next step is re-applying glue. To speed up the drying process, work can be seen with a hair dryer.
The picture is based on the use of napkins for decoupage or rice paper with any pattern applied to it. The image should be cut and apply to the database under the panel. Then gently apply glue to the surface, while moving the paper and kicking the air bubbles. After drying the adhesion, you can circuit contour to circulate with paints. At the end of the work, the composition is covered with special varnish.

As can be seen in order to create original panelno need to have great experience or production skills. It is enough to show fantasy and not be afraid to use various materials. Even the simplest panel of fabric can effectively decorate the wall of your room.

The main thing is to pick up beautiful material From cotton, cut an interesting coupon, corresponding to the interior, and arrange it in a monophonic frame.
Pull hood is located in the apartment in the kitchen. The photographs below show the post before and after applying the relief.  The topic for the plot was offered to me on the basis of the pictures of the apron of the kitchen, which were offered in the company catalog. These are silhouettes of Africa animals - elephants, giraffes.
 All the colors of the kitchen were planned in an epipped gama - these are black, brown, white colors of walls and furniture. Based on the probes and interior parts and details, I made exemplary sketches, in the photo four different options.
  After that, on the wall itself, changing the details in words, sketched an approximate location of the picture into the pencil. Further, work began with surface preparation and relief. Work is interesting but very tedious, because. Each next layer must be calculated in advance and wait for a complete drying. Before painting, all the details of the relief must be fully made, dried and sterling. At the request of the customer, for a small child I made a lower part of the embossed panels - these are different volumetric flowers, snails, grass ...
 The surface for all elements of decorative plaster is prepared in advance. Picture of plants is taken from different photos
Photo Relief, Detail - Snails
 Figures of volumetric snails are enclosed separately, after complete drying are ground and glued to the surface of the decorative panel
In work on relief texture there are many subtleties and nuances, which I later try to describe in the articles "how to make with your own hands." For similar relief workIn addition to the bulk decor itself, two things are very important - this is the subsequent painting of invoice and its lighting. Coloring and lighting can be easily reduced or strengthen the effect of visual perception of embossed patterns. Below under photos are shown changing pictures of the same part of the relief with different lighting.


Flowers imitation - minor details of the decorative panel of plaster ... Each flower, bladder is lying and attached separately. To give a different texture to details, you can apply any materials under hand.
Relief on the wall - Giraffes


With different lighting, the texture of plaster may be highlighted by contrasts of shadows. Volume figures The giraffes were laid out of textured plaster - two, three layers. The raw mass is modeled on the wall by Mastekhin or wet soft brushes.

The imitation of water can be conveyed by contrast of textures - rough coast and smooth water, as well as allocate color.
Monochrome pattern on the wall

For modeling textured plaster, you can apply any comfortable tools - Mastehechin, brushes, sponges, spatula, syringes, as well as conveniently use scotch and other stencils.
Textural thickness

Through. higher quantity located on construction market Decision materials can be created amazing design Rooms.
Today, a panel of decorative plaster is becoming increasingly popular.
All sorts of reliefs and visual techniques help to give the usual walls a special charm.
Even newcomers can create own forces True works of art.
As you know, all construction Materials possess our advantages and disadvantages. The following items include the advantages of such decoration for walls:
Environmental Safety. As part of decorative plaster there are only natural ingredients. It is not able to cause intoxication due to the lack of harmful impurities. 
Resistance to different external factors Impact. This decor element retains an impeccable look at the adverse effect of moisture and cold. Creates an excellent insulation from outsided sounds.
Universality of the material. Panno is suitable for any surface - metal, concrete, wood and others. It is used for finishing indoor spaceor the outside of the walls.
The ability to accommodate the surface defects favorably. Plaster hides the cracks and irregularities, especially if it includes cellulose.
Long service life and excellent strength. For proper application Decoration The coating will be performed simply magnificent, not having chips and not shuffling.
Positive characteristics contribute to the fact that this decor element is actively used for the decoration of the walls, although the material appeared not so long ago. 
If you wish, it can be perfectly combined with other types of finishes, embodying the most original ideas.
Despite the impressive number of advantages, Panly has substantial disadvantages. First, it is quite expensive.
Moreover, the solid price is not only from rates for materials, but also due to the complexity of work on applying. 
Secondly, to dismantle the old coating is very problematic. Removal is done slowly and difficult.
Thirdly, before installing this element of decor, it is necessary to clean the surface of the walls and treat them with primer.
In addition to the plaster and rollers to give a mixture of various shades, a number of instruments will need when installing panels, as well as a set of additional things. 
Specific items depend on the author's imagination:
Such tools and decorations during skillful use will allow you to make an excellent decor element, which will certainly become a key highlight of the interior.
Cleaning the walls and progressing them, you need to wait for a complete drying of the surface. At this time should be prepared required tools, sketches, materials.
After applying decorative plaster, it is important to immediately proceed to draw the planned pattern. When using molding equipment, the drawing makes various spatulas and cells. 
Since this material is very plastic, the composition can be adjusted with your fingers.
Create large depressions and bulges can be immediately impossible, so they are made in several stages. The resulting irregularities will need to be removed only after complete drying of the plaster.
It is worth considering that this period takes from 9 to 36 hours.
If the plaster is applied only on a certain section of the wall, it is recommended to limit the place of work with a sticky ribbon.
"The woman is created for a man, not a man for a woman" - such a postulate ...

How is HIV on different time segments manifest? The reasons for the development of AIDS is ...

Stomach Cancer: Symptoms, Causes, Treatment of Stomach Cancer is a change in cell type ...