


If you adhere to proper nutrition, then avocados are probably in ...


Every child has a desire to learn the world. An excellent tool for this is experiments. They will be of interest to both preschoolers and children of primary school age.
1. Cover the work surface with paper or polyethylene.
2. During the experiment, do not lean close to avoid damage to the eyes and skin.
3. Use gloves if necessary.
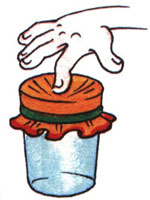
You will need: Raisins, corn kernels, soda, plastic bottle.
Course of the experiment: Soda is poured into the bottle. The raisins go down first, then the corn kernels.
Result: The raisins move up and down with the soda bubbles. But when they reach the surface, the bubbles burst and the grains fall to the bottom.
Let's talk? You can chat about what bubbles are and why they go up. Pay attention that the bubbles are small in size, and can carry along raisins and corn, which are several times larger.
You will need: glass rod, gas burner
The course of the experiment: the rod is heated in the middle. Then it is torn into two halves. A half of the rod is heated by a burner in two places, gently bent into a triangle shape. The second half also heats up, one third is bent, then a ready-made triangle is put on it and the half is bent completely.
Result: the glass rod turned into two triangles linked to each other.
Let's talk? As a result of thermal action, solid glass becomes plastic, viscous. And from it you can make different shapes. What causes glass to become soft? Why does the glass no longer bend after cooling?
You will need: a plastic cup, a napkin, water, felt-tip pens
The course of the experiment: the glass is filled with water by 1/3 part. The napkin is folded vertically several times to form a narrow rectangle. Then a piece of about 5 cm wide is cut off from it. This piece must be unfolded to make a long segment. Then step back from the bottom edge about 5-7 cm and start making large dots with each color of the felt-tip pen. A line of colored dots should form.
Then the napkin is placed in a glass of water so that the lower end with the colored line is about 1.5 cm in the water.
Result: water quickly rises up the napkin, painting the entire long piece of napkin with colored stripes.
Let's talk? Why isn't water colorless? How does she get up? The cellulose fibers that make up tissue paper are porous, and water uses them as a way up.
Liked the experience? Then you will also like our special material for children of different ages.
You will need: a container filled with water (bath, basin), a flashlight, a mirror, a sheet of white paper.
The course of the experiment: a mirror is placed at the bottom of the container. The light of the flashlight is directed to the mirror. The light from it must be caught on paper.
Result: A rainbow will be visible on paper.
Let's talk? Light is the source of color. There are no paints and felt-tip pens to color the water, a sheet or a flashlight, but suddenly a rainbow appears. This is the spectrum of colors. What colors do you know?
You will need: sugar, multi-colored food paints, 5 glass cups, a tablespoon.
The course of the experiment: a different number of tablespoons of sugar is added to each glass. One spoon in the first glass, two in the second, and so on. The fifth glass remains empty. In the glasses, put in order, pour 3 tablespoons of water and mix. Then a few drops of one paint are added to each glass and mixed. The first is red, the second is yellow, the third is green, and the fourth is blue. In a clean glass with clear water, we begin to add the contents of the glasses, starting with red, then yellow and in order. It must be added very carefully.
Result: 4 multi-colored layers are formed in the glass.
Let's talk? More sugar increases the density of water. Therefore, this layer will be the lowest in the glass. The least sugar is in the red liquid, so it will be on top.
You will need: a glass, a blotter, 10 grams of gelatin, water, animal molds, a plastic bag.
The course of the experiment: pour gelatin into 1/4 cup of water and let it swell. Heat it in a water bath and dissolve (about 50 degrees). Pour the resulting solution onto the bag in an even thin layer and dry. Then cut out animal shapes. Put on a blotter or napkin and breathe on the figures.
Result: The figures will begin to bend.
Let's talk? Breathing moisturizes the gelatin on one side, and because of this, it begins to increase in volume and bend. As an option: take 4-5 grams of gelatin, let it swell and then dissolve, then pour it onto glass and put it in freezer or take out to the balcony in winter. After a few days, remove the glass, remove the thawed gelatin. It will have a clear pattern of ice crystals.
You will need: an egg shell with a conical part, cotton wool, felt-tip pens, water, alfalfa seeds, an empty roll of toilet paper.
The course of the experiment: the shell is installed in the coil in such a way that the conical part is located down. Cotton wool is placed inside, on which alfalfa seeds are poured and watered abundantly. You can draw eyes, nose and mouth on the shell and put it on the sunny side.
Result: after 3 days, the little man will have “hairs”.
Let's talk? Soil is not required for grass to sprout. Sometimes even water is enough for sprouts to appear.
You will need: flat small objects (you can cut out figures from foam rubber), a sheet of black paper.
The course of the experiment: in a place where the sun shines brightly, put black paper. Place stencils, figurines, children's molds loosely on the sheets.
Result: When the sun sets, you can remove objects and see the prints of the sun.
Let's talk? Under influence sun rays black fades. Why is the paper dark in places of the figures?
You will need: milk, food coloring, cotton swab, dishwashing detergent.
The course of the experiment: a little food coloring is poured into milk. After a short wait, the milk begins to move. Patterns, stripes, swirling lines are obtained. You can add a different color, blow on milk. Then the cotton swab is dipped in dishwashing detergent and lowered into the center of the plate. Dyes begin to move more intensively, mix, forming circles.
Result: various patterns, spirals, circles, spots are formed in the plate.
Let's talk? Milk is made up of fat molecules. When the agent appears, the molecules are broken, which leads to their rapid movement. Therefore, dyes are mixed.
You will need: sunflower oil, water, bottle, food coloring.
The course of the experiment: water is poured into the bottle (a little more than half) and mixed with the dye. Then ¼ cup vegetable oil is added. The bottle is carefully twisted and placed on its side so that the oil rises to the surface. We begin to swing the bottle back and forth, thereby forming waves.
Result: waves form on an oily surface, like on the sea.
Let's talk? The density of oil is less than the density of water. Therefore, it is on the surface. Waves are the top layer of water moving due to the direction of the wind. The lower layers of water remain motionless.
You will need: a container of water, mixing containers, BF glue, toothpicks, acrylic paints.
The course of the experiment: BF glue is squeezed out into a container. A specific dye is added to each container. And then alternately placed in the water.
Result: Colored droplets are attracted to each other, forming multi-colored islands.
Let's talk? Liquids of the same density attract while liquids of different densities repel each other.
You will need: magnets different forms, iron filings, sheet of paper, paper cup.
The course of the experiment: place the sawdust in a glass. Put the magnets on the table and cover each with a sheet of paper. A thin layer of sawdust is poured onto the paper.
Result: Lines and patterns form around the magnets.
Let's talk? Every magnet has a magnetic field. This is a space in which metal objects move as the attraction of a magnet dictates. A circle is formed near a round magnet, since its field of attraction is the same everywhere. Why does a rectangular magnet have a different sawdust pattern?
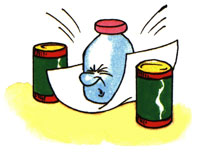
You will need: Two glasses, two effervescent aspirin tablets, sunflower oil, two types of juice.
The course of the experiment: glasses are filled with juice by about 2/3. Then sunflower oil is added so that three centimeters remain to the edge of the glass. An aspirin tablet is thrown into each glass.
Result: the contents of the glasses will begin to hiss, boil, foam will rise.
Let's talk? What reaction does aspirin cause? Why? Do layers of juice and oil mix? Why?
You will need: a shoe box, a ruler, 10 round felt-tip pens, scissors, a ruler, Balloon.
Experience: a square hole is cut in the smaller side of the box. The ball is placed in the box so that its hole can be pulled out of the square a little. You need to inflate the balloon and pinch the hole with your fingers. Then put all the markers under the box and release the ball.
Result: As long as the balloon is deflated, the box will move. When all the air is out, the box will drive a little more and stop.
Let's talk? Objects change the state of rest or, as in our case, uniform motion in a straight line, if a force begins to act on them. And the desire to preserve the previous state, before the impact of force, is inertia. What role does the ball play? What force prevents the box from moving forward? (friction force)
You will need: mirror, pencil, four books, paper.
The course of the experiment: books are stacked, and a mirror is leaning against them. Paper is placed under its edge. Left hand placed in front of a sheet of paper. The chin is placed on the hand so that one can only look in the mirror, but not at the sheet. Looking in the mirror, write your name on the paper. Now look at the paper.
Result: almost all letters are upside down, except for symmetrical ones.
Let's talk? The mirror changes the image. Therefore, they say "in mirror image". So you can come up with your own, unusual cipher.
You will need: a straight transparent glass, a small mirror, adhesive tape
The course of the experiment: the glass is attached to the mirror with adhesive tape. It is filled with water to the brim. You need to bring your face closer to the glass.
Result: The image is reduced. If you tilt your head to the right, you can see in the mirror how it leans to the left.
Let's talk? Water refracts the image, and the mirror slightly distorts.
You will need: tin can, candle, sheet of paper.
The course of the experiment: the jar must be tightly wrapped with a piece of paper and kept in a candle flame for several seconds.
Result: removing a sheet of paper, you can see an imprint on it in the form of a candle flame.
Let's talk? The paper is tightly pressed to the bank and does not have access to oxygen, which means it does not burn.
You will need: wire, a container of water, matches, a candle, a boiled egg.
The course of the experiment: a stand is created from the wire. boiled egg cleaned, mounted on a wire, a candle is placed under it. The egg is evenly turned until it is smoked. Then it is removed from the wire and lowered into the water.
Result: After a while, the top layer peels off and the egg becomes silvery.
Let's talk? What changed the color of the egg? What did it become? Let's cut it open and see what it's like inside.
You will need: Teaspoon, glass mug with handle, twine.
The course of the experiment: one end of the string is tied to a spoon, the other end to the handle of the mug. The twine is thrown over the index finger so that there is a spoon on one side and a mug on the other, and is released.
Result: The glass will not fall, the spoon, rising up, will remain near the finger.
Let's talk? The momentum of the teaspoon keeps the mug from falling.
You will need: flowers with white petals, water containers, a knife, water, food coloring.
The course of the experiment: you need to fill the containers with water and add a certain dye to each. One flower should be set aside, and the rest should be cut off the stems with a sharp knife. This should be done in warm water, obliquely at an angle of 45 degrees, by 2 cm. When moving flowers in containers with dyes, you need to pinch the cut with your finger so that air pockets do not form. After placing the flowers in containers with dyes, you need to take the postponed flowers. Cut its stem lengthwise into two parts to the center. Place one part of the stem in a red container, and the other in a blue or green container.
Result: water will rise up the stems and color the petals in different colors. This will happen in about a day.
Let's talk? Examine each part of the flower to see how the water rose. Are the stem and leaves painted? How long will the color last?
We wish you an exciting pastime and new knowledge while conducting experiments for children!
Experiments were collected by Tamara Gerasimovich
Entertaining experiences for preschoolers, experiments for kids at home, magic tricks for kids, entertaining science... How to curb the seething energy and indefatigable curiosity of the baby? How to make the most of the inquisitiveness of the child's mind and push the child to explore the world? How to promote the development of a child's creativity? These and other questions certainly arise before parents and educators. In this work, we have collected a large number of a variety of experiences and experiments that can be carried out with children to expand their understanding of the world, for intellectual and creative development child. The described experiments do not require any special preparation and almost no material costs.
How to pierce a balloon without harm to it?
The child knows that if the balloon is pierced, it will burst. Stick on the ball on both sides of a piece of adhesive tape. And now you can safely pierce the ball through the tape without any harm to it.
"Submarine" No. 1. Submarine from grapes
Grab a glass of fresh sparkling water or lemonade and toss a grape into it. It is slightly heavier than water and will sink to the bottom. But gas bubbles, similar to small balloons, will immediately begin to sit on it. Soon there will be so many of them that the grape will pop up.
But on the surface, the bubbles will burst and the gas will escape. The heavy grape will again sink to the bottom. Here it will again be covered with gas bubbles and rise again. This will continue several times until the water "exhales". According to this principle, a real boat floats up and rises. And the fish have swim bladder. When she needs to dive, the muscles contract, squeezing the bubble. Its volume decreases, the fish goes down. And you have to get up - the muscles relax, dissolve the bubble. It increases and the fish floats up.
"Submarine" No. 2. Egg submarine
Take 3 jars: two half-liter and one liter. Fill one jar with clean water and dip into it a raw egg. It will drown.
Pour a strong solution into the second jar table salt(2 tablespoons per 0.5 liters of water). Dip the second egg there - it will float. This is because salt water is heavier, so it is easier to swim in the sea than in a river.
Now put an egg on the bottom of a liter jar. Gradually adding water from both small jars in turn, you can get a solution in which the egg will neither float nor sink. It will be held, as if suspended, in the middle of the solution.
When the experiment is done, you can show the focus. By adding salt water, you will ensure that the egg will float. Adding fresh water - that the egg will sink. Externally salty and fresh water is not different from each other and it will look amazing.
How to get a coin out of the water without getting your hands wet? How to get out of the water dry?
Put the coin on the bottom of the plate and fill it with water. How to take it out without getting your hands wet? The plate must not be tilted. Fold a small piece of newspaper into a ball, set fire to it, throw it into a half-liter jar and immediately put it down with the hole in the water next to the coin. The fire will go out. The heated air will come out of the can, and due to the atmospheric pressure difference inside the can, the water will be drawn into the can. Now you can take the coin without getting your hands wet.
lotus flowers
Cut flowers with long petals from colored paper. Using a pencil, twist the petals towards the center. And now lower the multi-colored lotuses into the water poured into the basin. Literally before your eyes, the flower petals will begin to bloom. This is because the paper gets wet, becomes gradually heavier and the petals open.
natural magnifier
If you need to make out any small creature, such as a spider, a mosquito or a fly, it is very easy to do this.
Plant the insect in a three-liter jar. From above, tighten the neck with cling film, but do not pull it, but, on the contrary, push it so that a small container forms. Now tie the film with a rope or elastic band, and pour water into the recess. You will get a wonderful magnifying glass through which you can perfectly see the smallest details.
The same effect will be obtained if you look at an object through a jar of water, fixing it on the back of the jar with transparent tape.
water candlestick
Take a short stearin candle and a glass of water. Weight the lower end of the candle with a heated nail (if the nail is cold, the candle will crumble) so that only the wick and the very edge of the candle remain above the surface.
The glass of water in which this candle floats will be the candlestick. Light the wick and the candle will burn for quite some time. It seems that it is about to burn down to water and go out. But that won't happen. The candle will burn out almost to the very end. And besides, a candle in such a candlestick will never cause a fire. The wick will be extinguished with water.
How to get drinking water?
Dig a hole in the ground about 25 cm deep and 50 cm in diameter. Place an empty plastic container or wide bowl in the center of the hole, put fresh green grass and leaves around it. Cover the hole with clean plastic wrap and cover the edges with earth to prevent air from escaping from the hole. Place a stone in the center of the film and lightly press the film over the empty container. The device for collecting water is ready.
Leave your design until the evening. And now carefully shake the earth off the film so that it does not fall into the container (bowl), and look: there is clean water in the bowl.
Where did she come from? Explain to the child that under the influence of the sun's heat, the grass and leaves began to decompose, releasing heat. Warm air always rises. It settles in the form of evaporation on a cold film and condenses on it in the form of water droplets. This water flowed into your container; remember, you pushed the film a little and put a stone there.
Now you have to come up with interesting story about travelers who went to distant lands and forgot to take water with them, and start an exciting journey.
Miraculous matches
You will need 5 matches.
Break them in the middle, bend them at a right angle and put them on a saucer.
Put a few drops of water on the folds of the matches. Watch. Gradually, the matches will begin to straighten out and form a star.
The reason for this phenomenon, which is called capillarity, is that wood fibers absorb moisture. She crawls further and further along the capillaries. The tree swells, and its surviving fibers "get fat", and they can no longer bend much and begin to straighten out.
Washbasin chief. Making a washbasin is easy
Toddlers have one feature: they always get dirty when there is even the slightest opportunity for that. And the whole day to take a child home to wash is quite troublesome, besides, children do not always want to leave the street. Solving this issue is very simple. Make a simple washbasin with your child.
For this you need to take plastic bottle, on its side surface about 5 cm from the bottom, make a hole with an awl or nail. The work is finished, the washbasin is ready. Plug the hole made with your finger, pour water to the top and close the lid. Slightly unscrewing it, you get a trickle of water by screwing it - you will "close the tap" of your washbasin.
Where did the ink go? transformations
Drop ink or ink into a bottle of water to make the solution a pale blue. There also put a tablet of crushed activated carbon. Close the mouth with your finger and shake the mixture.
She brightens up before her eyes. The fact is that coal absorbs dye molecules with its surface and it is no longer visible.
Making a cloud
Pour hot water into a three-liter jar (about 2.5 cm). Place a few ice cubes on a baking sheet and place it on top of the jar. The air inside the jar, rising up, will cool. The water vapor it contains will condense to form a cloud.
This experiment simulates the formation of clouds during cooling warm air. And where does the rain come from? It turns out that the drops, heated up on the ground, rise up. It gets cold there, and they huddle together, forming clouds. When they meet together, they increase, become heavy and fall to the ground in the form of rain.
I don't believe my hands
Prepare three bowls of water: one with cold water, another with room water, and a third with hot water. Ask the child to put one hand into the bowl of cold water, the second - with hot water. After a few minutes, have him submerge both hands in water at room temperature. Ask if she seems hot or cold to him. Why is there a difference in hand feel? Can you always trust your hands?
water suction
Put the flower in water, tinted with any paint. Watch how the color of the flower changes. Explain that the stem has ducts that carry water up to the flower and color it. This phenomenon of water absorption is called osmosis.
Vaults and tunnels
Glue a thin paper tube slightly larger in diameter than a pencil. Insert a pencil into it. Then carefully fill the tube with the pencil with sand so that the ends of the tube come out. Pull out the pencil and you will see that the tube is not crumpled. Sand grains form protective vaults. Insects caught in the sand come out from under the thick layer unharmed.
All equally
Take an ordinary coat hanger, two identical containers (these can also be large or medium disposable cups and even aluminum cans for drinks, however, you need to cut off the cans upper part). In the upper part of the container on the side, opposite each other, make two holes, insert any rope into them and attach it to a hanger, which you hang, for example, on the back of a chair. Balance containers. And now, pour either berries, or sweets, or cookies into such impromptu scales, and then the children will not argue who got more goodies.
"Good boy and roly-poly". Obedient and naughty egg
First, try placing a whole raw egg on the blunt or pointed end. Then start experimenting.
Poke two holes the size of a match head at the ends of the egg and blow out the contents. Rinse the inside thoroughly. Let the shell dry well from the inside for one to two days. After that, close up the hole with plaster, glue with chalk or whitewash so that it becomes invisible.
Fill the shell with clean and dry sand about one quarter. Seal the second hole in the same way as the first. Obedient egg is ready. Now, in order to put it in any position, just shake the egg slightly, holding it in the position that it should take. The grains of sand will move and the placed egg will keep its balance.
To make a “roly-poly” (roly-poly), you need to throw 30-40 pieces of the smallest pellets and pieces of stearin from a candle into the egg instead of sand. Then put the egg on one end and heat it up. The stearin will melt, and when it hardens, it will stick the pellets together and stick them to the shell. Cover the holes in the shell.
The tumbler will be impossible to put down. An obedient egg will stand on the table, and on the edge of the glass, and on the knife handle.
If your child wants to, have them paint both eggs or make funny faces on them.
Boiled or raw?
If there are two eggs on the table, one of which is raw and the other is boiled, how can you determine this? Of course, every housewife will do this with ease, but show this experience to a child - he will be interested.
Of course, he is unlikely to connect this phenomenon with the center of gravity. Explain to him that in a boiled egg the center of gravity is constant, so it spins. And in a raw egg, the internal liquid mass is like a brake, so a raw egg cannot spin.
"Stop, hands up!"
Take a small plastic jar for medicines, vitamins, etc. Pour some water into it, put any effervescent tablet and close it with a lid (non-screw).
Put it on the table, turning it upside down, and wait. The gas released during the chemical reaction of the tablet and water will push the bottle out, there will be a “roar” and the bottle will be thrown up.
"Magic Mirrors" or 1? 3? 5?
Place two mirrors at an angle greater than 90°. Put one apple in the corner.
This is where it begins, but only begins, a real miracle. There are three apples. And if you gradually reduce the angle between the mirrors, then the number of apples begins to increase.
In other words, the smaller the angle of approach of the mirrors, the more objects will be reflected.
Ask your child if it is possible to make 3, 5, 7 from one apple without using cutting objects. What will he answer you? Now put the above experience.
How to wipe the knee green from the grass?
Take the fresh leaves of any green plant, be sure to put them in a thin-walled glass and pour over large quantity vodka. Place the glass in a pot of hot water water bath), but not directly to the bottom, but to some wooden circle. When the water in the saucepan has cooled, remove the leaves from the glass with tweezers. They will discolor, and the vodka will turn emerald green, as chlorophyll, the green dye of plants, has been released from the leaves. It helps plants "eat" solar energy.
This experience will be useful in life. For example, if a child accidentally stains his knees or hands with grass, then you can wipe them off with alcohol or cologne.
Where did the smell go?
Take corn sticks, put them in a jar that has been dripped with cologne, and close it with a tight lid. After 10 minutes, when you open the lid, you will not feel the smell: it was absorbed by the porous substance of the corn sticks. This absorption of color or odor is called adsorption.
What is elasticity?
Take in one hand a small rubber ball, and in the other - a plasticine ball of the same size. Drop them to the floor from the same height.
How did the ball and the ball behave, what changes happened to them after the fall? Why does the plasticine not bounce, but the ball bounces, perhaps because it is round, or because it is red, or because it is rubber?
Invite your child to be the ball. Touch the baby's head with your hand, and let him sit down a little, bending his knees, and when you remove your hand, let the child straighten his legs and jump. Let the baby jump like a ball. Then explain to the child that the same thing happens with the ball as with him: he bends his knees, and the ball is pressed a little when it hits the floor, he straightens his knees and bounces, and what is pressed in the ball straightens. The ball is elastic.
A plasticine or wooden ball is not elastic. Tell the child: “I will touch your head with my hand, but don’t bend your knees, don’t be elastic.”
Touch the child's head, and let him not bounce like a wooden ball. If you do not bend your knees, then it is impossible to jump. You can't straighten your knees that haven't been bent. A wooden ball, when it hits the floor, is not pressed in, which means it does not straighten out, so it does not bounce. He's not resilient.
The concept of electric charges
Blow up a small balloon. Rub the ball on wool or fur, and even better on your hair, and you will see how the ball will begin to stick to literally all objects in the room: to the closet, to the wall, and most importantly, to the child.
This is due to the fact that all objects have a certain electric charge. As a result of contact between two different materials, electrical discharges are separated.
dancing foil
Cut aluminum foil (shiny chocolate or candy wrappers) into very narrow, long strips. Run the comb through your hair, and then bring it close to the sections.
The stripes will begin to dance. This attracts to each other positive and negative electric charges.
Hanging on the head, or is it possible to hang on the head?
Make a light top out of cardboard by putting it on a thin stick. Sharpen the lower end of the stick, and stick a tailor's pin (with a metal, not a plastic head) deeper into the upper end so that only the head is visible.

Descendants of Sherlock Holmes, or In the Footsteps of Sherlock Holmes
Mix the soot from the stove with talc. Let the child breathe on a finger and press it against a sheet of white paper. Sprinkle this place with the prepared black mixture. Shake the sheet of paper so that the mixture covers well the area where the finger was applied. Pour the rest of the powder back into the jar. There will be a clear fingerprint on the sheet.
This is explained by the fact that we always have a little fat from the subcutaneous glands on our skin. Everything we touch leaves an indelible mark. And the mixture we made sticks well to fat. Thanks to the black soot, it makes the print visible.
Together is more fun
Cut out a circle from thick cardboard, circling the rim of the teacup. On one side, in the left half of the circle, draw a boy figure, and on the other side, a girl figure, which should be located upside down in relation to the boy. Make a small hole on the left and right of the cardboard, insert the elastic bands with loops.
Now stretch the elastic bands in different sides. The cardboard circle will spin quickly, the pictures from different sides will be combined, and you will see two figures standing side by side.
The secret thief of jam. Or maybe it's Carlson?
Grind the pencil lead with a knife. Let the child rub his finger with the prepared powder. Now you need to press your finger to a piece of tape, and stick the tape to white sheet paper - your baby's fingerprint pattern will be visible on it. Now we will find out whose prints were left on the jar of jam. Or maybe it was Carloson who flew in?
Unusual drawing
Give your child a piece of clean, light-colored cloth (white, blue, pink, light green).
Pick the petals off different colors: yellow, orange, red, blue, blue, as well as green leaves of different shades. Just remember that some plants are poisonous, such as aconite.
Spread this mixture on a cloth placed on cutting board. You can both involuntarily pour petals and leaves, and build a conceived composition. Cover it with plastic wrap, fasten it on the sides with buttons and roll it all out with a rolling pin or tap on the fabric with a hammer. Shake off the used "paints", stretch the fabric over thin plywood and insert it into the frame. The masterpiece of young talent is ready!
It made a great gift for mom and grandma.
Summary: Chemical experience - invisible ink. Experiments with citric acid and soda. Experiments with surface tension on water. Mighty shell. Teach an egg to swim. Animation. Experiments with optical illusions.
Does your kid love everything mysterious, mysterious and unusual? Then be sure to conduct with him the simple, but very interesting experiments described in this article. Most of them will surprise and even puzzle the child, give him the opportunity to see for himself in practice the unusual properties of ordinary objects, phenomena, their interaction with each other, understand the cause of what is happening and thereby gain practical experience.
Your son or daughter will certainly earn the respect of their peers by showing them experiences as tricks. For example, they can make "boil" cold water or use a lemon to launch a homemade rocket. Such entertainment can be included in the birthday program for children of preschool and primary school age.
|
|
|
|
|
|
|
|
|
|
|
|
|
|
|
|
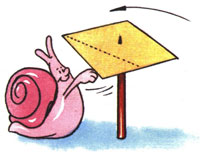
Paper, scissors, heat source.
This experiment always surprises kids, but to make it more interesting for two-year-olds, combine it with creativity. Cut out a spiral from paper, color it with your child so that it looks like a snake, and then proceed to “revive”. This is done very simply: place a heat source below, for example, a burning candle, electric stove(or hob), iron upside down, an incandescent lamp, a heated dry frying pan. Place a serpentine coil over a heat source on a string or wire. After a few seconds, it will “come to life”: it will begin to rotate under the influence of warm air.

Three-liter jar, hot water, plate, ice.
With the help of this experience, it is easy to explain to a three-year-old "scientist" the simplest phenomena of nature. Pour about 1/3 into a jar hot water hotter is better. Place a bowl of ice on the neck of the jar. And then - everything is like in nature - the water evaporates, rises up in the form of steam, at the top the water cools and a cloud forms, from which the real rain comes. AT three-liter jar it will rain for one and a half to two minutes.

alcohol, water, vegetable oil, syringe.
Four-year-old children are already thinking about how everything works in nature. Show them a beautiful and exciting weightlessness experiment. On the preparatory stage mix alcohol with water, you should not involve a child in this, it is enough to explain that this liquid is similar in weight to oil. After all, it is the oil that will be poured into the prepared mixture. You can take any vegetable oil, but pour it very carefully from a syringe. As a result, the oil appears as if in weightlessness and takes its natural shape - the shape of a ball. The child will be surprised to observe a round transparent ball in the water. With a four-year-old kid, you can already talk about gravity, which makes liquids spill and spread, and about weightlessness, because all liquids in space look like balls. As a bonus, show your child another trick: if you stick a rod into the ball and rotate it quickly, an oil ring will separate from the ball.

Milk or lemon juice, brush or pen, hot iron.
At the age of five, the baby probably already owns a brush. Even if he can't write yet, he can draw a secret letter. Then the message will also be encrypted. Modern children did not read the story about Lenin and the inkpot with milk at school, but it will be no less interesting for them to observe the properties of milk and lemon juice than for their parents in childhood. The experience is very simple. Dip the brush in milk or lemon juice (it is better to use both liquids, then the quality of the “ink” can be compared) and write something on a piece of paper. Then dry the writing so that the paper looks clean and heat the sheet. It is most convenient to develop notes with an iron. Onion or apple juice is suitable as ink.

Sugar, food coloring, a few clear glasses.
Perhaps the experience will seem too simple for a six-year-old, but in fact it is worthwhile painstaking work for a patient "scientist". It is good because the young scientist can do most of the manipulations himself. Three tablespoons of water and dyes are poured into four glasses: in different glasses - different colors. Then add a spoonful of sugar to the first glass, two spoons to the second, three to the third, and four to the fourth. The fifth glass remains empty. In glasses, put in order, pour 3 tablespoons of water and mix thoroughly. Then a few drops of one paint are added to each glass and mixed. The fifth glass contains pure water without sugar and dye. Carefully, along the blade of a knife, pour the contents of the “colored” glasses into a glass of clean water as the “sweetness” increases, that is, scientifically, the saturation of the solution. And if you did everything right, then there will be a small sweet rainbow in the glass. If you want scientific talk, tell your child about the difference in density of liquids, due to which the layers do not mix.

Chicken egg, bottle pomegranate juice, hot water or paper with matches.
The experiment is practically safe and very simple, but quite effective. The child will be able to do most of it by himself, the adult should only help with hot water or fire.
The first step is to boil the egg and peel it. And then there are two options. The first is to pour hot water into a bottle, put an egg on top, then put the bottle in cold water (into ice) or just wait until the water cools down. The second way is to throw burning paper into the bottle and put an egg on top. The result will not be long in coming: as soon as the air or water inside the bottle cools down, it will begin to shrink, and before the novice “physicist” has time to blink, the egg will be inside the bottle.
Be careful not to trust your child to pour hot water or work with fire.

Calcium gluconate, dry fuel, matches or lighter.
There are many ways to get Pharaoh Serpents. We will tell you about the one that an eight-year-old child can do. The smallest and safest, but rather spectacular "snakes" are obtained from ordinary calcium gluconate tablets, they are sold in a pharmacy. To make them turn into snakes, set fire to the pills. The simplest and safe way to do this is to put a few circles of calcium gluconate on a tablet of "dry fuel", which is sold in tourist shops. When burning, the tablets will begin to increase dramatically and move like living reptiles due to the release of carbon dioxide, so from the point of view of science, the experience is explained quite simply.
By the way, if the “snakes” of gluconate didn’t seem very scary to you, try making them out of sugar and soda. In this version, a hill of sifted river sand is impregnated with alcohol, and sugar and soda are placed in a depression at its top, then the sand is set on fire.
It would not be superfluous to recall that all manipulations with fire are carried out far from flammable objects, strictly under the supervision of an adult and very carefully.

Starch, water.
This is an amazing experiment that is easy to do, especially if the scientist is already 9. The study is serious. The goal is to obtain and study a non-Newtonian fluid. This is a substance that behaves like a liquid with a mild impact, and exhibits properties with a strong impact. solid body. In nature, quicksand behaves in a similar way. At home - a mixture of water and starch. In a bowl, combine water with corn or potato starch in a ratio of 1: 2 and mix well. You will see how the mixture resists when stirred quickly and mixes when gently stirred. Throw a ball into the bowl with the mixture, lower the toy into it, and then try to pull it out sharply, take the mixture in your hands and let it flow calmly back into the bowl. You yourself can come up with a lot of games with this amazing composition. And this is an excellent opportunity to figure out together with the child how the molecules in different substances are interconnected.

Salt, water, plastic wrap, glass, pebbles, basin.
This exploration is best for those who love travel and adventure books and movies. Indeed, on a journey, a situation may occur when the hero finds himself on the high seas without drinking water. If the traveler is already 10 and he learns to do this trick, he will not be lost. For the experiment, first prepare salt water, that is, simply pour water into a deep basin and salt it “by eye” (the salt should completely dissolve). Now put a glass in our “sea”, so that the edges of the glass are slightly above the surface of salt water, but lower than the edges of the basin, and put a clean pebble or a glass ball in the glass, which will not allow the glass to float. Cover the basin with cling film or greenhouse film and tie the edges around the basin. It should not be pulled too tight so that it is possible to make a recess (this recess is also fixed with a stone or a glass ball). It should be just above the glass. Now it remains to put the basin in the sun. The water will evaporate, settle on the film and drain down the slope into a glass - this will be the usual drinking water, all the salt will remain in the basin. The beauty of this experience is that the child can do it completely on their own.

Red cabbage, filter paper, vinegar, lemon, soda, cola, ammonia, etc.
Here the child will have the opportunity to get acquainted with real chemical terms. Any parent remembers such a thing as a litmus test from a chemistry course, and will be able to explain that this is an indicator - a substance that reacts differently to the level of acidity in other substances. A child can easily make such indicator papers at home and, of course, test them by checking the acidity in various household liquids.
The easiest way is to make an indicator from the usual red cabbage. Grate the cabbage and squeeze out the juice, then saturate filter paper (available at drugstores or wine shops) with it. The cabbage indicator is ready. Now cut the pieces of paper into smaller pieces and place them in different liquids that you can find at home. It remains only to remember which color corresponds to which level of acidity. In an acidic environment, the paper will turn red, in a neutral environment it will turn green, and in an alkaline environment it will turn blue or purple. As a bonus, try making "alien" scrambled eggs by adding red cabbage juice to the egg white before frying. At the same time, you will find out what level of acidity is in a chicken egg.
Experiments at home are great way introduce children to the basics of physics and chemistry, and facilitate the understanding of complex abstract laws and terms through visual demonstration. Moreover, for their implementation it is not necessary to acquire expensive reagents or special equipment. After all, without hesitation, we conduct experiments every day at home - from adding slaked soda to the dough to connecting batteries to a flashlight. Read on to find out how easy, simple and safe it is to conduct interesting experiments.
Does the image of a professor with a glass flask and scorched eyebrows immediately appear in your head? Don't worry, our chemical experiments at home are completely safe, interesting and useful. Thanks to them, the child will easily remember what exo- and endothermic reactions are and what is the difference between them.
So, let's make hatching dinosaur eggs that can be successfully used as bath bombs.
For experience you need:

Please note that the bathroom may become slippery due to the addition of oil.
Experiments at home, the result of which can be felt and touched, are very popular with children. These include this fun project that ends up with lots of thick, fluffy colored foam.
To carry it out you will need:

The experiment itself is extremely simple:
The yeast acts as a catalyst and accelerates the release of hydrogen by the peroxide, and when the gas interacts with the soap, it creates great amount foam. This is an exothermic reaction, with the release of heat, so if you touch the bottle after the "eruption" stops, it will be warm. Since the hydrogen immediately escapes, it's just soap suds to play with.
Did you know that lemon can be used as a battery? True, very weak. Experiments at home with citrus fruits will demonstrate to children the operation of a battery and a closed electrical circuit.
For the experiment you will need:

Here's how to do the experience:
To repeat such experiments at home, potatoes, especially green ones, are also suitable.
How it works? Lemon acid, contained in a lemon, reacts with two different metals, which causes the ions to move in one direction, creating electricity. All chemical sources of electricity work on this principle.
You don't have to stay indoors to do some experiments. Some experiments are best done outdoors, and you don't have to clean anything up after they're done. These include interesting experiences at home with air bubbles, and not simple, but huge.

To make them you will need:
Here's how to conduct spectacular experiments for children at home:

What is the scientific component of this experience? Explain to the children that bubbles are held together by surface tension, the attractive force that holds the molecules of any liquid together. Its action is manifested in the fact that spilled water collects in drops that tend to acquire a spherical shape, as the most compact of all that exists in nature, or that water, when poured, collects in cylindrical streams. At the bubble, a layer of liquid molecules is clamped on both sides by soap molecules, which increase its surface tension when distributed over the surface of the bubble, and prevent it from quickly evaporating. As long as the sticks are kept open, the water is held in the form of a cylinder; as soon as they are closed, it tends to a spherical shape.
Here are some experiments at home you can do with children.
If you adhere to proper nutrition, then avocados are probably in ...


Pizza can be cooked not only with meat products - sausage, sausages and ...