Once upon a time there was an old man and an old woman, they had a daughter, Alyonushka, and a son, Ivanushka. An old man...


Portrait photography is carried out by specialists from Moscow, registered in Yuda. Yudu performers set affordable prices for photo services and guarantee high-quality work. To find a photographer with extensive experience and order his help, just fill out a special form on this page. After the application is placed on Yuda, free specialists who are satisfied with cooperation on your terms will contact you at short time to discuss order details.
Yudu performers use professional equipment and high-quality expendable materials for a photo shoot. To get high-quality portrait and subject shots, the photomaster:
Yuda-registered professional photographers with many years of experience are responsible for shooting and processing portraits. The list of their services includes:
Yudu performers guarantee that they will professionally conduct a photo shoot, regardless of its complexity. They use lenses with the right settings so that they can capture close-ups without distorting facial features.
In Yuda, photo session services are offered great amount event agencies and private masters from Moscow. Before ordering their help, you can look at the price list and portfolio with examples of the work of a particular specialist to determine how it meets your requirements.
You can choose a photographer for Yuda based on:
Yudu performers are ready to offer the best ideas for organizing and conducting filming with a field trip and photo shoots in the studio. Experienced specialists will professionally process photos, turning each of them into a real work of art.
The price for creating portraits, high-quality pictures of objects and food depends on the experience, professionalism and relevance of the master, as well as the total number of hours of the photo shoot and the quality of image processing. Experienced photographers registered on Yuda set low prices for portrait photography and related services, which include:
Tariffs for Yudu performers are not fixed, you can always agree on the cost of the service with the master personally. Yudu specialists value their reputation and are interested in getting positive feedback, so they do their job not only professionally, but also inexpensively. Approximate prices for photography in Moscow are available in the price list on the Yudu website.
On YouDo, you can order the services of photographers with experience without overpayments, at an affordable price list. The benefits of working with Yudu masters include:
You can order shooting of any subject and complexity for a couple of hours or all day, followed by professional processing of photographs. Artist Yudu is always ready to answer all your questions, choose the right image, determine the best location for the photoset and calculate the final cost of the service. Portrait photography done by a professional registered with Yudu will allow you to get high-quality pictures at an affordable price.
Portrait photography, like no other photography, is full of all sorts of rules and conventions. And while so many principles are already being violated by photographers, there are still a few fundamental postulates that should be taken into account in order to avoid obviously ridiculous images. Let's go over the basics in this photography tutorial and learn how to properly photograph portraits for beginners.
Portrait mistake number 1. The awkwardness of the situation, the absurdity of the poses
If your model is in an uncomfortable position, it is unlikely that you will get decent photos. Your model should feel relaxed, relaxed and completely trust the photographer. Before you start shooting, especially if you are working with a model for the first time, you need to without fail Discuss the types of photographs you would like to take. To do this, each photographer should have two collections: successful and unsuccessful photographs. Show some examples good photos, explain why these images "work", due to which this or that photo card looks advantageous in comparison with others.
Explain to the model what you want her to do, how to stand or sit, tell how it looks from the outside. Your task is to create the maximum comfortable conditions in which you do not feel stiffness and awkwardness from communication.
Even if the model insists on some things, it's easier to agree with her, and then say something like: "this is great, now let's try ..." It often happens that models say that it's uncomfortable to hold hands in a certain way, they feel unnatural and the pose seems uncomfortable.However, in the pictures it is often the poses dictated by you that look more advantageous.Do not forget - the photographer controls everything that happens on his creative platform.
Portrait bug number 2. Clumsy hands
Inexperienced models often don't know what to do with their hands. The photographer may encounter the fact that the model simply lowers her arms, and they dangle lifelessly along her body. The position of the hands will look much more advantageous when they seem to slide along the upper thighs. This approach works well in many cases.
Arms crossed over the chest can also look very impressive, just beware of creating a visual barrier for the viewer.
If you do not want the image to convey anxiety or tension, make sure that the model's hands are relaxed, not clenched into fists. It will help to get the desired effect if you ask the model to take something in her hands or touch the support nearby.
If the model is behind someone who is sitting, for example, you can place your hands on the back of a chair or put on the shoulders of another person.
Experience shows that the most a big problem for beginner models correct location hands At the same time, after all, the hands in the portrait are the second center of attention after the eyes and are often even more expressive than the eyes. That is why the photographer should prepare very carefully in this area - consider examples and options, think about what he wants to express in the picture, and what gestures will emphasize it in the photo.
Portrait mistake number 3. No - oblique fathoms in the shoulders!
Generally, the shoulders are the widest part of the human body. Even in women. When shooting, when the model is located strictly frontally, the shoulders are visually wide, which cannot make a woman more beautiful, which means that the image of the model will lose.

Turn the model at a slight angle in relation to the camera and you will get neat shoulders and thin waist, all lines will be gracefully curved, which cannot but please the viewer and the most portrayed.
In general, a frontal portrait without bends and movement most often looks like a passport photo.
Portrait mistake number 4. The neck should be beautiful and smooth!
If your subject's body is designed to be turned away from the camera at such an angle that physiological wrinkles form on the neck, you need to make sure that they are not visible in the photograph.
Ask the model, for example, to turn up the collar of a jacket or shirt, or drape a scarf or handkerchief around the neck. Alternatively, use a different angle for shooting. Ask the person to turn to the camera not by turning their head, but by more sharp turn body at the waist.
Andrey Belkin
Bends, like any lines, will attract the attention of the viewer. They can be "draped" not only with things, but even with hands, covering the place where folds form.
Portrait mistake number 5. Traces from clothes.
Skin marks from a belt, bra, waistband, other supportive accessories, or sock with tights are classic mistakes that tend to be overlooked or simply overlooked.
NW Model Photographer
You should make sure that if you are planning a photo shoot with jewelry or an open neck of the model, you must first remove all clothing that leaves marks on the skin. The skin needs to fully heal before you start the photo session. Allow about 30 minutes for this process. And it is better to ask the model to come in advance in loose clothing that does not leave marks.
Portrait mistake number 6. Avoid constriction
As a rule, portrait photography requires a minimum of space around the model. However, pay attention to the fact that the person in the frame was not completely squeezed, especially if the model is looking to the side. Her gaze should not rest on the edge of the frame; there should always be enough air in the photo.
Pay attention to how much free space you have around the model, especially if the person is moving or the camera is on . This state of affairs creates additional difficulties for the photographer, so you should consider how harmonious the location of the person being portrayed is in the viewfinder and how much free area is around him.
Theoretically, the clamping or cutting of the limb by the border of the frame leads to discomfort for the viewer. The image has a certain tension, the viewer has a feeling of inconvenience. Therefore, in the general case, you should not pinch and cut off the limbs at the joints, but if the photographer's task is to show tension, then the method of pinching the image can be a good additional touch.
Portrait bug number 7.Heads in a row
When you have several people in the frame at the same time, you should not place them exactly along the ruler, or so that all heads are at the same height. The layout "strictly in a row" makes the picture primitive and ordinary.
You can avoid this quite simply if you place the models on different height relative to each other. Someone can be seated in a chair, another can be placed on the armrest, and a third person can easily and comfortably sit on the floor.

Such a distribution can also help to solve another problem - to create the very "triangle dynamics", according to which the viewer's gaze will move between objects and around the photograph. The picture will be dynamic and harmonious in composition.
Portrait bug number 8. Unwanted "headwear"
While the photographer monitors the posture of the model, it is quite possible to forget and not pay attention to what is in the background. Do not forget to check to avoid completely unnecessary things "growing" out of a person's head: poles, lamps, supports, plants and trees.

Only if something in the background serves additional element to create the intended image, it can be there. In all other options, you will get a critical error that must be avoided so as not to be considered a beginner or layman in photography.
Portrait bug number 9. Don't look up
And while in some cases shooting from the bottom up will make your photos look better and look like a visual compliment to the model (for example, it will visually lengthen the legs), the lower shooting point will most often show the subject's many chins, increase the size of the legs and disproportionately reduce the head.

You should carefully monitor how much you need to sit down so that the photo is as effective as possible without unpleasant distortions of the human body.
Portrait mistake number 10. Do not rely on children's consciousness

Sometimes photographers are lucky and children can even pose for a few minutes in front of the camera, especially if they have been photographed before or are at an age when you can distract little models from important big children's affairs and interest them for a moment in the process of photography.
You need to prepare separately. The photographer must remember that shooting adult models and children's models is not the same thing. Photo shoots are not even close to each other. You must be prepared for the fact that you will have to meet the shortest possible time so that you will move around the models to find correct angle, you'll be moving the props around instead of asking the kids to move around to get the best angle. Patience will be rewarded when done right.
There are many photographers who specialize exclusively in portrait photography. And their predilection is quite understandable: portrait photography is one of the most complex and interesting genres in photography, which reveals the character of a person.
Exciting? Then you just need to learn all about the technique of shooting a portrait.
If you are on a budget and do not have serious lighting equipment, and neither you nor your model can afford to rent a studio, just use the light from the window. Shooting a portrait at home can be very successful if you shoot in a room with one window and slightly highlight parts of the face that are in the shadows using a reflective screen. Position the screen about a meter or two from the model.
If you decide to shoot on a sunny, bright day, when direct light mercilessly illuminates your face, we advise you to lightly cover the window with a white light cloth. This way you will be able to avoid unpleasant shadows on the face of the model (unless, of course, you wanted to turn this trouble into a highlight of the photo).
Shooting portraitsat home: practical advice
Below we have provided a description of some of the classic lighting schemes used to shoot a portrait in a studio.

1. Take two additional lights and place them at a slight angle to the model. This will help you add extra volume to the picture.
2. Direct one source parallel to the camera, place the other under acute angle in relation to the model, fixing it at a height of about three meters. With the third from behind and slightly from the side, highlight the head of the model - this will allow you to create volume in the frame. Illuminate the background with the fourth light source.
3. In order to soften the picture a little, use the reflected light, which can be obtained by directing lighting fixture on walls and ceilings.
4. The simplest method of lighting is carried out with the help of a single source - a reflective screen. The method is as simple as three pennies, but despite this, it can be used to create unusual lighting effects.
Portraits on a black background with bright color spots usually look very unusual and contrast. True, such conditions require a good external flash and the absence of too slow shutter speeds. For example, you can’t set a shutter speed of thirty seconds. For even the most powerful flash will not give the object clarity in such conditions, only if the model freezes in one position for a long time.

And now we will try to describe the technique of shooting portraits at night against the backdrop of the colorful lights of the night city.


If you are interested in photographing portraits, training is simply necessary for you. Our can offer a large number of various courses taught by professional photographers. We are glad to everyone!
There are rules and regulations for portrait photography developed over the years, but after looking at numerous works, one can make a bold conclusion - the best portraits are those made with violations of certain rules and laws!
You have probably come across a situation where the studio seems to be good, both the camera and the light, but you don’t like the person looking at you from the picture, he doesn’t look like the original ... What is the reason and how to achieve exactly the perfect shot when shooting a portrait. It happens that a person does not recognize himself in the picture, he imagined himself completely different, and the photographer showed him an unusual side, noticed something. And it is this “something” that can become a highlight.
A real photographer, a specialist in portraits, will try to learn about a person during the time that they are together, understand him and "open". After an hour of a photo session, the photographer knows more about the client than he does about his sister. Then the picture will be unforgettable!
Using a series of shots, at least 50, you have the opportunity to choose one, the most successful. Therefore, the main thing is to shoot in series. Artistic success is possible when you understand that the most important thing in portrait photography is the client. If you are so busy that you are not able to think about others, then do not count on a good result.
There are two things you need to remember when working on a portrait. The first is the background. Of course, it is necessary to focus on the main thing, and this is the object itself. But a gray nondescript background will not decorate your picture. So try to find a compromise here. It is necessary to ensure that photography is a work of art in itself. A low ISO setting, lenses, tripods, and at least a mid-range digital camera will help you with this.
Second important element portrait shooting - lighting. It is necessary to achieve shadows on the parts of the face that need to be hidden and vice versa, using reflectors (umbrellas), diffusers to illuminate the right places. In case it is not possible to use special devices, and there is no finance for their acquisition, you can cheat. The object can be placed in a lighted park, next to a large window, on which a white reflective sheet of paper is placed.
Don't forget a tripod because you'll have to use slow shutter speeds. The best light for portraits is soft and off-screen. Big window, facing north - that's it. In this case, almost no shadows can be observed. If you shoot outdoors on a cloudy day, even better. But if the day is sunny, you need to make sure that the use of a reflector and a flash will remove the shadows under the eyes.

Have you ever wondered, “Why are some people considered photogenic and others not?” And of course, every photographer asks a different question - how to use the photogenic character when shooting and how to compensate for its absence? This will help portrait photography rules Every Portrait Photographer Should Know
To immediately answer these difficult questions, you do not need to convene a council and spend hours on endless discussions. Photogenic is not so much appearance a person, how much his sense of self and behavior in front of the camera lens. Most often, people who do not like themselves or are accustomed to consider themselves non-photogenic are pinched on the set, because they are afraid of a poor-quality result in advance. All this, of course, is reflected in the photograph. The task of the photographer in this case is to break down the wall between himself and the model, help the person on the other side of the lens feel comfortable, and then find positions, angles and lighting that will emphasize his best and unique features. And it's great when the result brings satisfaction to both the photographer and the model.
 Keep in touch with the model during the shooting
As we have just noted, the secret good photo is more than technical aspects, light and camera. It all starts with the interaction between the model and the photographer to create a comfortable atmosphere for both. Typically, this involves some kind of exploration of your character, their interests and personality. You should know everything from hobbies that can be a great conversation starter to specific factors like favorite music that can make a person relax, sing along or dance.
If you're shooting a person you don't know yet, look at the rest of the portraits you can find and be careful - everyone has favorite things, colors in clothes, poses, facial expressions, and even good location when shooting. And these are the things that you, as a photographer, definitely need to consider.
If you know the character or he trusts you, everything is also not so simple - after all, even the most open people sometimes clamped and shy of the camera. Therefore, do not neglect the opportunity to create a pleasant environment in which the model will be easier.

When the day of shooting arrives, you need to be prepared and have a clear plan - both for the environment and setting in which the portrait will be shot, and for the settings with which you are going to shoot.
If you are shooting indoors or in a studio, check out the available options for backgrounds and indoor lighting. Will it be possible to use natural light in the frame, or will you have to rely entirely on lamps and softboxes? Will clean walls be available, or draperies that can be used as a backdrop, or will the interior become the environment.
If the shooting is carried out outside, using natural light, consider the time of day, the direction of the sun, and how and where you plan to place the model. Always remember that early morning and mid-afternoon (2-3 hours) - best time for portraits with natural light. But filming at noon, with the most harsh light and shadows, on the contrary, is better to avoid. It's a good rule of thumb to check weather forecasts - cloudiness, for example, can help create a portrait with soft shadows, like a natural reflector.
Ideally, the model should be facing the sun, or at such an angle that the lighting accentuates the features, but, on the contrary, smooths out unpleasant shadows. When composing a portrait, it is essential to look behind the model and note details such as distracting backgrounds, objects that break the composition, and so on. While on the camera display or in the viewfinder, such things are easy to miss, so you just need to learn and get used to.

So that these words do not sound lengthy, we will explain them in more detail. When we take a picture, we transfer a three-dimensional, 3d image into a flat 2d space. Therefore, depending on the focal length and the position of the camera and lens, you can either emphasize or hide imperfections. And of course, this will be reflected in the final picture. The number of individual characteristics of each of the millions of faces is limitless: it can be bright eyebrows, specific noses, double chins and much more. From this it may seem that to make an ideal or even good shot almost impossible, but not at all. It is with the help of the location of the camera relative to the model that you can choose the most successful angle.
Depending on whether you want to shoot a portrait from a closer distance, you want to create a beauty shot, or you want to capture a character in natural environment for your favorite pastime, you will have to choose the approach to filming. Especially when shooting portraits, it must be taken into account that the object or part of the face that is closest to the lens will appear larger than the rest. This effect is even more pronounced when using a wide-angle lens. Therefore, when shooting portraits, wide angles are not recommended.
Again, this characteristic needs attention when shooting characters with specific large noses. The longer the focus of the lens, the flatter and more compressed the elements will appear. The face, in this case, will be rounder, and the nose - shorter and more harmonious. That is, a telephoto lens with a focal length of 200mm, located a little further, but aimed directly at the face of the model, will create a more pleasant effect than a regular 85mm portrait lens.

The eyes are not without reason called the mirror of the soul, in portrait photography a lot can be conveyed through the look of the character, so when shooting, often attention and emphasis is placed on the eyes. Similarly, focus is important - if the image is sharp and bright, but the eyes are out of focus, the essence of the picture is lost.
With the help of a glance, you can convey both the mood and the idea of the frame, thanks to its direction, you can build a composition. In short, the possibilities are only limited by the imagination of the photographer.
AT Sony cameras there is a very handy feature - -Eye AF, which allows you to focus on the character's eyes. In addition, flexible focus points can be used to position the focus on the eye. Thus, regardless of the depth of field, the eyes are always in focus.
Photos can tell a story, and even if you like classic portraits, sometimes you can push the boundaries. There is always an environment around the subject of photography that can also be used. Thus, by zooming in and out, moving further and moving closer, you can change the mood and atmosphere of the frame.
If you are photographing children, for example, you should not do this from the height of your own height. On the contrary, by shooting them from their level, you can achieve a greater effect of realism, convey their personality and make the photo more personal. The same thing works with adults - looking at a person at their own height is one of the tricks that will help you anchor your own psychological connection with the character in the frame and reflect his personality.
If you want to achieve special effect, you can shoot from below, and from above, and from the side - everything will depend only on what kind of story you are trying to tell.
The tone and appearance of your subject's skin plays a very important role when creating a portrait. Appearances are deceiving to the untrained eye, so a camera's white balance can easily be deceived by the surroundings. Reflection from walls, clothing or greenery, even daylight can play a crucial role in balancing the frame. Therefore, you should not completely rely on automatic cameras - a mistake can cost time and productivity.
You should always have white balance cards, filters, and calibration tools in your arsenal. They will help to build the right balance in any situation.
If you're working in low light conditions but still want your character to stand out, the available light can be realigned to match them with a collapsible reflector. The reflectors are available in white, silver, gold or black, and we have already written about their specifics in more detail.
Feel free to use their capabilities when shooting portraits.

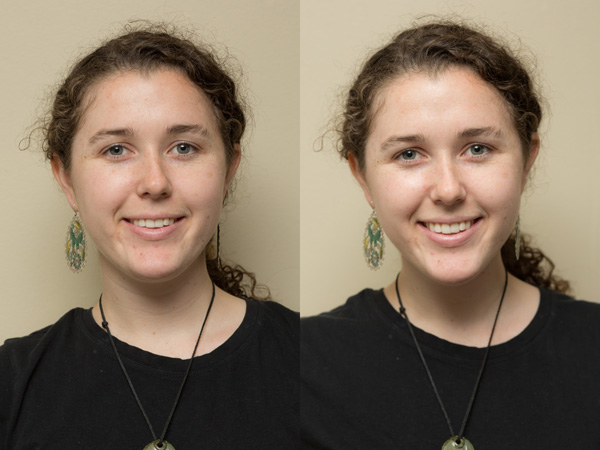
In situations where the available lighting does not allow for an eye-pleasing white balance, a quite affordable shooting setting is to convert the image to black and white. It also adds a vintage effect to the portrait. In addition, in a black and white frame, the background colors will not distract attention from the emphasized outline of the character at all. That is, all attention will be focused on it. You can shoot a portrait in color in, and convert it to black and white after, this will make it possible to additionally twist the settings and achieve the desired effect. In this case, you can connect creativity and emphasize everything that will give the character character.
We often say that RAW is the most profitable format for shooting. No matter what type of footage you're aiming to capture, this format will deliver best quality and great opportunities during post processing. They weigh more than others and will require more free space on the memory card, but the benefits in this case greatly outweigh.
In essence, RAW files can be described as a kind of negatives of film photographs. Once you download them directly from your camera, you can edit them to add contrast, pull colors, tone, and more without affecting the original. The JPEG format that all cameras shoot is a compressed format in which the quality is reduced. And quality is lost important information. For tasks such as social networks, for example, JPEG photos are more than enough, although it is worth remembering that every time we reduce and change such a frame, we lose data. So, if we are talking about serious photography, about albums, printing, and so on, we mean that the work will begin with a RAW photo.
And in the end it is worth mentioning that it is always useful and always worth looking for additional inspiration. You can find it both in the works of famous photo artists, cinema, literature, and simply in your own mood, surrounding objects and people.
Not all photographers work with models. The job of many photographers is to shoot ordinary people and our task is to make them look like models in the pictures. How to do this if our clients have no experience in posing or controlling their face in front of the camera? Here are seven tips to help your subjects feel like they're models.
We often don't think of hair as a part of the body that can be controlled, but it is possible! If you are filming a person long hair- then ill-lying hair will be the first thing that catches your eye in the photo. Not general rule to make the hair in the frame look "super". To different people fit different variants hair arrangement.
Let's say you're doing a simple portrait shoot without a makeup artist or hairdresser. The first thing to remember is that shoulder-length hair looks terrible. They give the model a wild look and something needs to be done about it. Here are six options for working with long hair.
Option #1 should be avoided at all costs. All other options are applicable depending on the model and the effect you want to achieve. The existence of options 4 and 5 is explained by the fact that in life hair can look better on one side than on the other.
Usually you want people to look at the camera and most of faces were visible. For this article, I chose option number 6 with collected hair, so that you can better see how the girl follows my instructions and nothing distracts. For many women, the "tail" - home version hairstyles, but she looks very nice in portraits, revealing her face.
When a person is standing normally and relaxed, or even standing nicely and posing, a slight crease can be seen under the chin. This manifests itself almost regardless of thinness. If you tell people to tilt their chin forward, which sounds obvious to you, they are more likely to point their chins at you, which looks like a nostril shot (not very attractive). So instead, ask your model to move their ears forward.
"Before" and "after" the proposal to move the ears forward.

Same thing from the side. I sometimes call it "turtle" because it's like a turtle pulling its head out of its shell. It may be a little uncomfortable or unnatural, but the result always justifies these inconveniences.

The same technique performed by a man. He's fit and athletic, but his chin isn't photogenic enough in a natural pose.
When people are just standing as usual, they often have their arms pressed to either side. This causes several problems. Firstly, they look awkward and uncomfortable in photographs. Secondly, the arms pressed against the body look thicker than they really are.

This can be corrected by simply raising your arms a few centimeters so that they do not press against the body. Or you can put your hands in some position, for example, resting on your thigh. In the figure above, the red line indicates the apparent size of the arm before the reposition. A line of the same length in the second figure shows how much thinner the arm looks when it is not pressed against the body.
Everyone likes to look slimmer. One of simple ways The way you can make your client slimmer is to show their "natural" waistline without any additions. I mean visually isolating the waist so that it looks no wider than it is. My model is standing with her hands on her hips. The first photo shows not the best position. The arm behind the body is not visually separated from it and adds width to the waist. But if you move your arm a little forward, there will be space, so nothing will be added to the waist size.

The red line shows the apparent width of the hull in the first photo. It has been moved to the second photo to show how much the hand added. This rule doesn't just apply to hands. Anything in the background behind the model can create this effect. It can be, for example, other people, tree trunks, lampposts.
It's very simple but important advice. If a person stands exactly in front of the camera, he looks bigger. This is good if you are shooting a football player or a director of a large company, but not very suitable for shooting model portraits. Turning the model shows a more beautiful profile and looks slimmer.

The red line shows the width of the model standing straight in front of the camera. A slight twist results in a photo of the model still facing the camera, but with a slimmer profile.
If you want to capture a distant, dreamy look away from the camera, don't ask the model to look into the distance. Point to a specific object behind you so you can control the direction of your gaze.

In the first shot, I invited the model to look towards the door next to us. You see mostly the whites of her eyes, that's not good. You want to see the iris, the colored part. I suggested she look out the window. A slight change in the direction of the gaze brought her eyes back to us and a more attractive portrait turned out.
This rule is a little more complicated, but also important. If you do not want to take a frontal shot, you ask the model to turn slightly to the side. Let's say you don't want to withdraw classic profile, in which only one side of the face is visible, and the model will turn about a quarter so that both eyes are visible. If you mentally draw a line along the side of the face, then this line should not be crossed by the nose.

If she turns too much, the nose will cross this line, ruining the natural contour of the face. This creates the effect of "Pinocchio" and visually increases the length of the nose. To avoid this, you should ask the model to turn slightly back to the camera so that there is some space between the tip of the nose and the edge of the face. You must not cross this line or the facial features will look disproportionate.

Here is an example list that you can follow on your next shoot.
And what do you do to make ordinary people look like models in photographs? Share your thoughts on the tips you read or your own tricks in the comments.
About the author: Ben Lucas is a Seattle-based portrait and wedding photographer. He strives to keep the best emotions of his clients whether they are brides, actors, chefs or even lawyers. You can follow his news at
Once upon a time there was an old man and an old woman, they had a daughter, Alyonushka, and a son, Ivanushka. An old man...

Gods - Olympians (myth of ancient Greece) The most powerful of all sons ...

To see torn shoes on their feet in a dream can be people who have a big ...