


Once upon a time there was an old man and an old woman, they had a daughter, Alyonushka, and a son, Ivanushka. An old man...


AT small spaces every meter usable area on account. That is why many homeowners are replacing swing doors with sliding ones. Installing sliding doors with your own hands is quite simple. However, the mechanism for such a design costs almost as much as the canvas. Such expenses are justified if it takes up too much space, in other cases it is better to install a swing model.
Sliding compartment doors have very low sound insulation, as they do not fit snugly against the wall. Much better hide the noise of the structure, installed in the pencil case. However, they do not reach the soundproofing of the swing door.
Retractable structures differ in the type of movable mechanism. On this basis, they are divided into rail and suspended. Each model has its pros and cons.
The suspension mechanism consists of a square profile with a groove inside which there are two curved bars. The rollers attached to the product ride along these slats. The guide is made of metal, like the rollers. But they have rubber or plastic pads that provide a soft and quiet ride.
When mounting a sliding interior door on a rail, no fixtures and mechanisms are installed on the floor. All fasteners that are on the canvas are two rollers on top. They move along the groove due to special wheels. Such doors are considered one of the easiest to install. Installing a sliding door includes the following steps:
The door fastener itself is very simple, in addition to the rollers themselves and the rails, the kit includes plugs and fasteners. The product with the top rail has extremely low sound insulation performance. Therefore, it is not recommended to use such structures in living rooms.
There are two mounting rails on the sliding doors. Movable rollers are mounted from above and below. This method of fastening makes the product very stable, so it can be shaken.
Note! Dust and debris are constantly clogged into the metal profile of the fastener, which complicates cleaning in the house.
Regardless of the type of fastener, the installation of sliding interior doors happens:

If you plan to install sliding doors with your own hands - choose a compartment design. Models have easy assembly and high maintainability. The main feature that is necessary for the installation of an interior door with your own hands is a smooth opening.
You can’t put anything near the wall to which the base of the sliding door is retracted, otherwise the movement of the canvas will be disturbed. A significant disadvantage of the models is their low sound insulation. This is due to the fact that sliding doors are installed with a gap. Without it, the canvas will scratch against the wall.

Cassette structures provide the best access to the space of the room. Inside the niche, you can install soundproof materials that will hide the noise. However, the installation of such a model is possible only at the stage of repair or construction. In addition, a decorative wall is assembled for the rail, and this deprives the rooms of useful space.

Cascading products are a modification of compartment structures. The main difference is the greater number of guide rails. Installing such products is the most difficult, as it requires high accuracy. Cascading structures are categorized as premium for their complexity and aesthetics.
You can install sliding interior doors with your own hands even in the absence of specific skills. Installation instructions are included with each product. Following it, you can do all the work yourself. Below, the assembly process is described in more detail than in the standard instructions.
The opening, regardless of the fastener design, the place for the structure must comply with the following characteristics:

After leveling the opening, you can proceed with the installation. The first step is to attach the rollers. Depending on the manufacturer and model, fasteners may have their own characteristics. To assemble some products, you need to step back 15-20 cm from the edge, but most often the rollers are mounted right at the edge.
To begin with, markings are made on the canvas for fasteners.
Important! Make sure that the distance from the edge to the roller is the same on both sides.
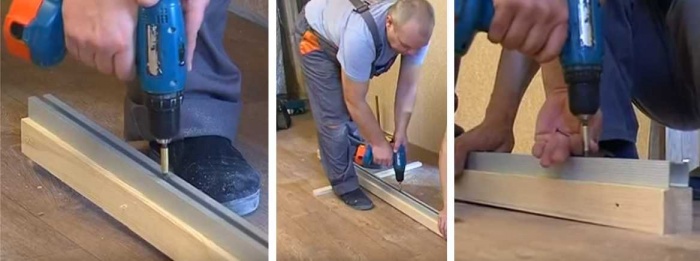
At the marking site with a drill, holes are drilled 1 mm smaller than the diameter of the fastener. After the grooves are ready, fix the plates. Self-tapping screws are used as fasteners, their length must be at least 75 mm. The greater the weight of the canvas - the longer the fasteners. Special support holders are mounted in the plates, into which the rollers are inserted. On the sides of the canvas, fasteners must be fixed with plugs.

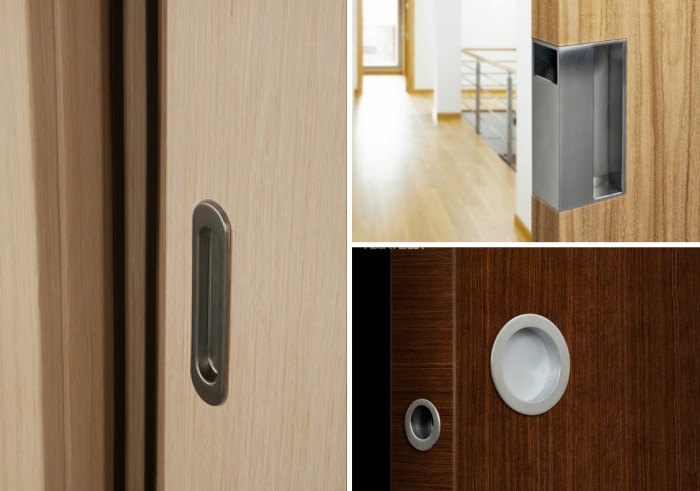
Pins are included with the rollers. The movable elements themselves are wound on them. If the model is not equipped with handles, they are purchased separately. It is recommended to mount the handles before installing the product in the opening. In a model without a groove, markup is made with a pencil and a carpentry tool removes material along the contour. Fittings are attached to the hole formed.
Note! For sliding doors, only immersion fittings are suitable.
When the canvas is ready, the rail is fixed. The easiest way is to screw the guide to the bar, and not directly into the opening. To do this, take a wooden plank of square or rectangular section with a side of 60 cm. The length of the bar should be twice the length of the door itself and a margin of 5-10 cm. A rail is cut along the length of the bar.
The guide is screwed to the bar with self-tapping screws from 85 mm. Minimum number fasteners - 4, the more often - the better. The recommended step between the screws is 10 cm, the same distance is made from the edge of the canvas to the first fastener.

Next, you need to measure the height of the bar. The rail is strung on the canvas rollers and the height is measured. According to this value, holes are made on the wall for mounting the guide rail. The canvas should not stand on the floor. From the floor to the structure itself, a distance of 8-10 mm is left. If there are no coatings on the floor, the thickness of the floor finish is added to the value.
The level adjusts the mark for mounting the bar. For this, fasteners from 12 cm are used, but anchor bolts are more reliable fasteners. Dowels are used in concrete walls.
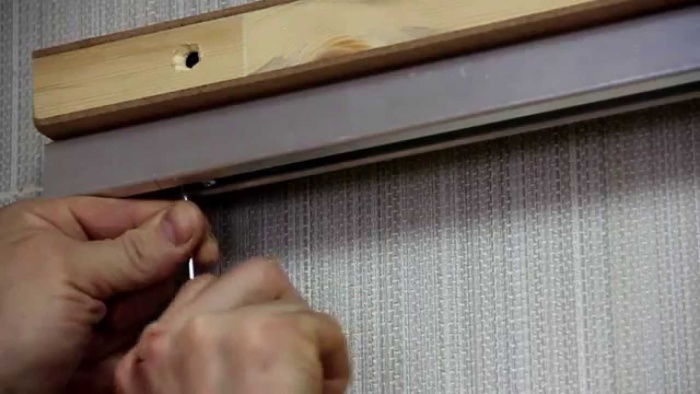
The marking under the guide is made with a thin drill or a nail. After that, holes are drilled for dowels or self-tapping screws and the timber is mounted. The final stage is the insertion of the sliding doors into the rail. After rolling up the structure, plugs are placed on the sides of the fittings, they protect the structure from slipping.
In the open state of the door, a flag roller is screwed onto the floor. It regulates the movement of the web along the vertical axis.
To give the structure an aesthetic appearance will allow the installation of a decorative overlay on the mounting profile. It is placed on finishing nails or self-tapping screws with decorative caps. Screw the overlay directly into the bar.

To install a sliding structure, more materials and tools will be required. If you want to learn how to install sliding cassette doors, watch the detailed video instruction:
Almost any canvas can be attached to a rail, and a sliding door can be designed. But in order for the system to function without failures, it is necessary to install high-quality fittings. Durable fasteners and rollers ensure a long service life of the door. Therefore, saving on accessories is not worth it.

The canvas itself can be made independently. The cheapest option is a bar frame with a plywood or chipboard body. The most aesthetically pleasing look in the interior is a solid product made of solid wood or glued wood. However, the assembly of such a product will cost more. Products from chipboard panels are pasted over with a film or a laminating surface. Wooden canvases can be simply sanded and covered with protective compounds.
It is very difficult to design a roller mechanism on your own. If you do not have a special tool, including cutters, then you will not be able to make accessories with your own hands. It is much easier and cheaper to buy a finished product.
In an effort to make the house more comfortable and cozy, the idea often comes up to replace ordinary swing doors with sliding ones (they are also called retractable, sliding, hanging). The good news is that you can install sliding doors with your own hands without any problems. The bad news is that a normal mechanism costs about the same as a quality canvas. Bribes in them is the moment that in the open state they almost do not “eat up” space. They either hide in the wall (the best, but more difficult option to implement), or move along it.
All this is true, but there is a significant disadvantage - a very low degree of sound insulation, especially in the variant of the compartment door. When the canvas just covers the opening. When installed in a pencil case (into a wall), the situation is slightly better, but the degree of sound insulation of a hinged door cannot be achieved even with this installation method. If all this does not scare you, you can study the systems, choose, and then install.
There are two types of mechanisms: suspended and rail. Both are not ideal. Briefly about their advantages and disadvantages - below.
The suspension mechanism is a carrier beam, to which a guide is attached in the form of the letter "P" with "legs" bent inward. The rollers to which the door leaf is attached move along this guide. In technical terms, this is a hanging door on the top rail.

When installing such a door, the floor under the door remains smooth, only the lower roller is installed on the right and / or left in the doorway. It slides along the groove made in the bottom end of the canvas. It is necessary so that when moving it does not deviate vertically. This design is the easiest to install. Installation is very simple and consists of several steps:

That's all. Roller doors installed. But this system, in this form, as in the photo, has very low noise isolation characteristics. They are practically zero: the passage is simply blocked.
This type of door has two rails: top and bottom. The rollers are also installed at the top and bottom. Thanks to this design, the system has a high degree of rigidity: it can be shaken, and this will not cause much damage.

Minus the rails in the floor is known: the complexity of cleaning. Debris and dust constantly gets into the grooves, you have to monitor their cleanliness. This type of door is most often used in cabinets,. They are installed as interior doors if mobile children grow up in the family. Then safety is more important than the difficulties with cleaning.
Regardless of the sliding door system, installation methods can be:

The easiest installation option is compartment doors. They can be installed independently, and not only at the stage of repair, but also after it. It is only important that the opening is even, and the wall has a normal bearing capacity. The disadvantage of such a system is that you can’t put anything close to the wall in the place where the door rolls back. There is one more thing: very low sound insulation. It's easy to explain: if you look from the end, there is a gap of several millimeters on the sides. It is necessary so that the canvas does not “shuffle” along the wall. And all sounds perfectly penetrate through it, becoming only a little quieter.
Cassette doors are good because in the open state the leaf is in the niche of the wall and does not interfere. The second plus is that seals can be installed around the perimeter of the opening, which give much higher sound insulation performance. The disadvantage of installing a sliding door in a niche is that it can only be done at the repair stage. The second drawback: to make a pencil case for sliding doors, they usually put a false wall, and this is stolen centimeters of area.
Cascading - one of the varieties of compartment doors. Just has large quantity guides: according to the number of movable door panels. Installation is perhaps the most difficult: a lot of details and high accuracy of installation is required. The systems are classified as elite, and they rarely save on installation: repairs will cost more.
You can install sliding doors with your own hands even without much experience. It is quite possible to do without installers. It will take a little time, and also - installation instructions. We will try to give detailed description process with photo and video materials.
Systems may vary slightly, but general rules remain the same. There are several requirements that must be met prior to installation:
Next, let's start assembling. You can attach videos first. Different manufacturers have their own recommendations. Some recommend retreating from the edge 1/6 of the width of the door leaf, in other systems they are attached immediately from the edge, and the mounting plates provide the indent. We install such a system: in it, roller platforms are installed immediately from the corner.

Marking the location of the rollers
We center them, measuring so that the distances are the same. Having exposed the plate, with a pencil or marker we outline the places for the fasteners. We drill holes in the marked places. The diameter of the drill is 1 mm smaller than the diameter of the self-tapping screw.

We expose the plates, screw in the screws. The length of the fastener depends on the weight of the canvas, but not less than 70 mm. We twist them exactly perpendicularly, otherwise unnecessary stresses will arise.

Installing rollers
Supports for rollers are inserted into the installed plates. They are fixed with a cover on the side surface. Next, roller platforms are screwed onto the threaded pins.

It is also convenient to install handles and locks before hanging. They need special, mortise. If you bought a ready-made kit, the required holes are available. If you have adapted an ordinary canvas, you will have to trace the outline with a pencil, and remove the excess with a chisel. After the handle or lock enters the recess, the attachment points are marked, holes are drilled under them and fittings are installed.

Most convenient way— hang sliding doors on a dry wooden beam. Its cross section is less than 50 * 70 mm, its length is twice the width of the door leaf + 5 cm. We cut off the guide of the same length.

Having placed the guide along the bar, it is attached to the bar with self-tapping screws at least 8 cm long. The number of fasteners - at least three - departing 10 cm from the edges and in the middle (more often, less often - no).

Now you can measure at what height to mount the beam. A guide with a bar is “rolled” on the door with installed rollers. So you can accurately note how high the doors turned out. We drill at least four holes in the side face of the beam for fastening to the wall.

The guide with a bar "rolls" on the rollers on the door
7-10 mm are added to the mark obtained - the doors should hang, and not shuffle on the floor. 7 mm is the minimum gap that is sufficient if there are no floor coverings. If they are supposed (later lay laminate, carpet, linoleum, etc.), then the thickness of these coatings must also be taken into account.

So that the canvas does not “walk” during installation, it is jammed with small wooden wedges. You need at least two stops - near both rollers.

Having attached the beam to the wall and correcting its position with the help of a level, we mark its position with a pencil. If the wall allows, you can fasten it to the wall through, but take self-tapping screws with a length of at least 120 mm for this, or better, put it on anchor bolts.
If the wall, for example, is concrete, the installation of dowels is required. To do this, you need to transfer the marks under the fasteners to the wall. This can be done using a thin and long drill, the diameter of which is smaller than the drilled hole.

An even simpler option: a long thin nail. It is inserted into the hole and a mark is made on the wall with a couple of blows. Further, the procedure is known: we drill holes for the plugs of the dowels, insert the plugs, if necessary, hammering them. Then we install the doors.

Attaching sliding doors to the wall
Stoppers must be fixed along the edges of the guide. They are brought in from the sides, the required location is established empirically (so that the canvas covers the opening completely in the closed state, and rolls back sufficiently when opened. They are fixed with clamping screws.

Having opened the doors, we install a flag roller on the floor. It goes into a groove sawn at the bottom of the canvas. It is necessary so that the doors do not deviate vertically.

First, we insert it into the groove, mark the holes for fasteners, drill, then fix it with short self-tapping screws (length about 15-20 mm).

On this we can assume that the sliding doors have been installed. They are already fully functional. Stayed Finishing work. Mounting bar with guide close decorative overlay matched to the tone of the door leaf. She can be nailed finishing nails straight to the bar.

Only when you expose it, make sure that the wheels are closed. So much more beautiful)) Now - that's it, you installed the sliding doors with your own hands.
See below for a video tutorial on installing such a door. There are several installation options.
The process of mounting the guide, hanging the door leaf almost one to one repeats those described above. There is no need only for finishing, and all other steps are necessary. Instead of mounting a decorative strip, a false wall is mounted at a distance of at least 10 cm from the wall. It is usually made from drywall profiles, which are sheathed with wall plasterboard. But this is not important - you can use GVL or plywood, any other suitable material.
Where does the distance of 10 cm come from? The thickness of the door leaf and the gaps on both sides are 5 cm. A minimum of 5 cm is added to them for installing the profile. So it turns out 10 cm.
Since the main load will fall on the wall, the profile frame can not be reinforced. If such a wall seems to you not very reliable, you can insert inside wooden blocks which are screwed with self-tapping screws. This will make the structure very rigid.
The basic principles for calculating the case for a sliding door, as well as the marking features, the principles of preparing a doorway for installation, see the video.
Any door leaf can be mounted on rollers and will work as a sliding door. The guide and all other components - rollers (carrier and flag), stoppers, stops - can be bought. Hang on them at least a piece of plywood or a door assembled from several boards. This is the easiest and cheapest option. But to make a mechanism on your own is already a more difficult task. One of the options for a mechanism made from improvised materials sliding door(from round pipes different diameter) in the video. The system was supposed to be installed in a closet, but judging by designs, easy can withstand even an oak door from an array.
Reading time ≈ 3 minutes
Recently, the trend of installing sliding doors at home has become increasingly popular. Prefer them ordinary doors not just like that. In fact sliding structures have a number of advantages, some of them: conveniently open without creaking and other noise, not traumatic, simple and inexpensive.
Sometimes the main advantages include the fact that they allow you to save precious space in the room - well, one cannot but agree with this. Next, we will talk about how to install sliding doors with your own hands, the material will be built as step-by-step instruction to installation.

One should be noted important point. If you have irrevocably decided to install sliding doors with your own hands (video and photos of an auxiliary nature can be found right on this page), then remember that it is best to entrust such work professional staff, since only a masterful approach can provide highest level installation, and therefore guarantee a long and trouble-free operation of door components. Talking about how to make a sliding door with your own hands is very complicated, therefore it is highly recommended to buy a ready-made kit.

You have to imagine the moment door block delivered to the apartment, where it will be further installed, disassembled. He's going to the place. The door leaf, frame and casing are packed to avoid damage during transportation.

Consider the installation method when the door leaf has freedom of movement along doorway. Here it is necessary to note the main possible options doorway finishes: these are tiles, a decorative false box and, at its simplest, ordinary wallpaper. We will not dwell on tiling or wallpaper, but we will Special attention on how a sliding door is installed with your own hands using a false box.

The false box is installed in a pre-prepared doorway and fixed with special wedges. In order to competently control the current installation, it is necessary to use a level and a plumb line.


An important point: rollers, which are the main components, are attached to the upper end of the door leaf sliding system. For this, a screwdriver is used. Holes are marked with a pencil.


There are special mounts for the rollers, which, like the first ones, come with the entire structure. Most often, a mortise handle is installed - so it will be more convenient to open the door.


The most important moment can be called the one when the rollers with the canvas are mounted in the guide. The canvas is adjusted according to the level using all the same pegs.


We must not forget that a special groove for the flag roller must be cut in the lower end of the door leaf, which, in turn, is designed to protect the door from transverse vibrations.


This roller is attached, of course, directly to the floor. To fill the resulting gaps, mounting foam is used, which serves as a good fixative.


It can be concluded that assembling sliding doors with your own hands is a difficult undertaking that requires certain skills and availability. necessary tools. It is recommended to entrust the assembly to professional workers.
Increasingly, buyers of new plastic windows began to refuse to install the product and prefer to do it themselves. This trend is due to the fact that in most cases installation services are paid separately and can be a significant cost item.
In addition, there is no guarantee that the installation by the company will be carried out in accordance with all requirements. So how to properly install plastic (PVC) windows?
What needs to be done so that a quality product does not lose its properties due to improper installation and lasts as long as the manufacturers promise?
- First of all, you need, of course, to dismantle the old window. If the window block is old wooden beams, then they are easy enough to break.
- It will take much more time and effort to dismantle plastic windows, which can still be useful for summer cottages or for other purposes.
To begin, remove plastic slopes, if they are.
After that, you need to remove all visible fittings, remove the sash and dismantle the double-glazed window. Then you can simply remove the window unit from the opening.
After delivery, the window product must be checked for compliance with preliminary measurements, and before that the window must stand for about 20-30 minutes at room temperature. This part is especially important when installing windows in winter.
- After the PVC profile has adapted to room temperature, you can proceed to its direct preparation.
First you need to determine what type of window opening you have: with or without a quarter. A quarter is a small protrusion in the opening, which serves to fit the profile more snugly against the wall and prevent blowing. This detail was called a quarter due to the fact that it occupies ¼ of the entire opening.
— Great importance has a building material. The choice of fasteners depends on it. If the house is made of concrete blocks or bricks, opt for expansion dowels and screws.
For older houses or buildings made of wood, anchor plates are used.
- Expanding dowels.  — Self-tapping screws different lengths.
- Anchor plates.
- PSUL (vapor barrier self-expanding tape).
- Diffusion tape.
- Vapor barrier tape.
- Mounting foam.
- A simple pencil.
- Perforator.
- Drill or screwdriver.
- Pulverizer.
- Foam gun.
- Level.
- Wooden or plastic blocks.
— Sealant.
- If you are fixing the window unit with expansion dowels, you need to make two holes on each side of the box.
Each of them should move away from the corner by 18 cm.
In the case of using anchor plates, one of its sides must be attached to the profile using self-tapping screws.

- For installation in a quarter, place a window frame (without double-glazed windows and shutters) in the opening.
With a simple pencil, mark the junction of the box and the quarter. It is also worth noting the location of the holes. Then the box can be removed.
- Departing from the 2 cm mark, glue the PSUL tape around the entire perimeter of the window. It is necessary for a tighter fit of the window to the opening and to prevent blowing. Subsequently, the tape expands and completely covers all possible gaps.
Please note that the tape cannot be bent; a separate segment of the required length must be made on each side. If there is no quarter in the window, the PSUL tape is optional.
— A vapor barrier tape is glued around the entire perimeter of the box. It is a metallized strip 15-20 cm wide and protects the assembly seam from moisture ingress.
There is an adhesive layer and protective paper on both edges of the tape. Only one side of the tape is glued to the window, the second should move away from the profile edges. At the last assembly, the edge of the vapor barrier tape must be inside the room.

- Before you properly install plastic (PVC) windows, you should install an additional profile.
Most often, it is mounted at the bottom of the profile and serves to install the ebb and the window sill. Before installing the additional profile, it is necessary to glue the PSUL tape around its entire perimeter.
- At this stage, it is desirable to install handles on all doors.
- After dismantling the old window, a lot of construction dirt may remain on the opening.
It needs to be removed.
- Check slopes for visible defects. If the protrusion or depression exceeds 5 mm, it must be leveled. Subsequently, such, albeit small, irregularities can greatly interfere with the installation.
- It is desirable to process the opening antiseptic to prevent fungal growth plastic windows.
- In those places where we previously made marks, drill a few holes with a puncher.
Be sure to hold the tool as perpendicular to the wall as possible.

- If the building is old enough or made of wood, the opening should be covered with several layers of rubber mastic.
It covers the surface with a dense waterproofing layer and does not allow moisture to enter the wall.
- The window is installed in the opening. At this stage, you will need to level, and you need to check the evenness of each side. If necessary, use wooden or plastic pads.
- The expansion dowels are inserted into the holes and carefully twisted and hammered.
Anchor plates must also be attached to the wall.
- After fixing, check the evenness of the window in the opening again. When installing a plastic (PVC) window with your own hands, it is very important to check the correctness of all work at each stage.
- The ebb is a metal plate with curved edges.
One edge serves to fix the part to the additional profile, the second one performs a drainage function. First you need to bring the ebb to the place of its attachment and mark the places where the screws will pass. It uses three self-tapping screws - 2 on the sides and one in the middle. Remove the flashing and drill holes in the right places with a drill with a drill bit for metal.
 - From the outside of the house, the lower edge of the opening is glued with diffusion tape.
It is especially important if an additional profile is not used during installation. Diffusion tape is a relief strip of membrane type. It does not let moisture into the installation seam, but at the same time lets water through to the street. If the width of the tape is not enough, you can glue it in several layers.
- FROM inside ebb, the PSUL tape is glued. One stripe in the middle will suffice.
- The ebb is fixed to the window opening with self-tapping screws.
- Mounting foam is necessary in order to protect the seam from moisture.
It also greatly affects thermal insulation. When choosing a foam, the only thing to pay attention to is the expansion temperature. If you install windows in winter, it is better to choose a foam that hardens at low temperatures, if in summer it is vice versa. Everything else foam different brands little different from each other.
- Moisten the entire surface with a slope with a spray gun. In a humid environment, the mounting foam hardens much faster.
- Shake the foam can upside down and place it in the gun.
- Fill about one-third of the gap between the window and the wall with foam.
Then moisten the opening again and fill another third of the opening.
- If using leveling pads, foam those as well.
 — At this stage, we again need the previously glued vapor barrier tape. The second edge, which remained unused, is glued to the wall and thus covers the mounting foam.
The vapor barrier tape will protect the mounting seam from moisture ingress from the room.
- In the process of expanding the foam, it is necessary to go over the vapor barrier tape several times with a roller or a dry cloth. Otherwise, the tape may come off.
- The window sill board is placed under the lower edge of the profile.
One of its sides should go inside the profile a little. Pads are laid under the windowsill. The window sill itself is leveled with a level.
- The place where the window sill crosses the lower edge of the window opening is marked with a pencil.
- Anchor plates are fixed in places of marks.
- The window sill is again put in its rightful place. Now we need long screws.
They fasten the profile and the window sill. Place the self-tapping screws in the place where the spades should be, carefully drill.
The seam between the window sill and the wall is covered with mounting foam in the same way as in the previous instructions.
 - Anchor plates are fixed to the wall.
- It is necessary to install a double-glazed window and a sash, they will give the window frame a significant weight, will put pressure on the window sill and will not allow mounting foam move him.
- All cracks on the sides of the window sill are filled with liquid sealant.
- At this stage, you can decorate the slopes.
- Equipment is tested for functionality.
The sash needs to be opened and closed several times. During this, watch out for the sounds that the hinges and handles make, there should be no creaking.
- A4 sheet is placed between window block and sash. The sash closes.
Now try to pull out a sheet of paper. If it breaks, then the sash is installed correctly.
Don't forget to peel off the protective film. This must be done no later than 2 days after installation. Pecking layer when interacting with sunlight may move away from the film. The frame will get very dirty and attract dust.
Sliding doors are very useful if you want to store useful square meters of space. Just install the sliding door, you can also install the door yourself!
Let's start with the steps:
the first First, you need to decide how to install the sliding doors along the wall (1 and 3) or into the hole (2 and 4) in the wall, find out the number of sliding doors you want to install:

When installing a door in a hole on BKA sliding mechanisms, it does not matter that when installing a door, additional cassettes are not required, as European manufacturers of sliding systems offer, the system is mounted on rails and rollers in the doors.
As a result, you can get sliding doors, there are already many cost-saving square meters, no worse than rocking, namely - that it will isolate, odor impermeability and the ability to install the lock back.
Sliding doors can be installed along the wall.
second Any door leaf is suitable for the installation of sliding doors, and suitable BKE sliding mechanisms are suitable for any fabric.
third For the convenience of all users, consider installing sliding doors.
So you should have a door leaf, a set of cylinders, top and bottom rails, and a set of handles.
3.1. Determine the length of the top and bottom rails:
Lop.nap = door wing width X2 + 10cm
Lnn.napr. = door width
3.2. Take the rod to this shape (fig. 1) and pull it into the upper guide and place the plug next to the edge of the top guide (fig. 2 and fig. 2.1)
|
|
 |
| Picture 1 | Figure 2 |
 |
|
| Figure 2.1. |
You can see this route on both sides of the guide:

fourth PIN bus (with predefined interior of wagons and plugs) against a wall or door; It should be noted that when defining a door (or ceiling) - Figure 3 - the top rail is mounted on a screw, and if the installation is on a wall - Figure 4 - you will need to install a console (Figure 5 and.
5.1), the carrier is set at 2-3 angles per meter of the meter.
| Figure 3 Figure 4 | |
|
|
Figure 5
Figure 5.1. |
Get the next image. The top wire with fixed and fixed plugs and rollers is attached in the opening or along the opening of the door.
fifthThen you'll have to work with the door leaf- namely, to connect the lower conductor (Fig. 6) to the lower part of the door leaf.
It can be fixed in two ways - by grinding the door (Fig. 7) and without grinding (Fig. 8). Attach the bottom conductor to the bottom of the door leaf and then to the bottom (fig.9) that is included in the cylinder kit.
5.1 Install the mounting plate on the top of the door leaf (together with the rollers) on both sides (Fig. 10)

sixth Now you need to attach the installed top conductor (with cylinders and plugs) to the door leaf (with bottom plate and fixing plates).
 |
|
Install the mounting plate with the opposite nut

seventh Locate the bottom slider (Figure 9) and attach it to the ground.
It will work on the bottom rail which prevents the sliding doors from sliding.
eighths Install the required plates and accessories on the sliding door.
9. Enjoy!
After making a decision and fixing the goal, you want to install a sliding door at home without calling the master.
We will try to help you with this. It is important that in addition to the renovation, still decorated and internal sliding doors create a pleasant interior and shape of your apartment. They are not difficult to install, it is enough to have certain skills, the ability to use tools and knowledge in the workplace.
At the moment, there are many types and different models of sliding interior doors, all of which differ in appearance and design from each other, as well as in color.


The door leaf contains a roller mechanism that represents this design and guides.
The roller mechanism on the rails is attached to the door, so the inner door must move back and forth safely. Before installing the door, we must choose a special type of interior door.
There are such types: cascading sliding doors, radial, coupe, sliding accordion, one and up to four doors. Sliding doors have various modifications and options. Door and doorknobs sliding internal doors different in appearance, not simple, simple doors. The peculiarity of these handles is that they are fixed inside the door. The accessory will usually come with a wing door, but it's important to choose the right handles and locks for anything sold separately, so check with experts in the field.


Installation requires installation with internal sliding doors.
To do this, you need to have the following set of tools and materials: cylinder mechanism, rails, frames, special handles and locks, saw, piece of wood, drill, screws, mill, bolts, door frame, door leaf, screwdriver, key, in addition, the foam must contain cracks, CE pencil, glue. Once you have purchased and purchased everything you need for the installation, you can safely proceed with the installation of interior doors.


Consider the advantages and disadvantages of interior sliding doors.
Firstly, it should be noted that such doors save a lot of space where they are installed. Unlike other types of doors, they do not close when exposed to drafts. Sliding doors simply transfer the automation to another door, which is a big advantage. They can close and open easily if you keep an eye on the roller mechanism and take care of it.
Internal sliding doors may not have thresholds, although there are other models of such doors that are installed in the ground. The disadvantages of such doors are: the lack of the possibility of installation for the front door. The doors have low noise insulation, locks and handles are much more expensive than ordinary doors.
There will also be no space for household appliances and furniture next to the door. If you want to build your apartment or house, balcony or balcony, it is better to use glass sliding doors, which will serve as a beautiful version of the passage.


Instructions can give helpful tips, which play an important role in the installation and use of internal sliding doors.
When choosing a roller mechanism, pay attention to the quality of the door, as it plays an important role in sliding doors. If the door is very heavy, buy three-wheel rollers so they can support the weight of the inner door. Make the door better with someone so that it is clearly visible from the side. If it is difficult enough to install, contact the craftsmen who will quickly and quickly build the door.
Maintain the correct distance at all stages of work.


The initial step in installing sliding interior doors is removing the old doors, clearing out the space, and making room for new doors to be installed.
Dismantling is the removal of hinges, door leaf, handles and locks.
Sliding interior doors can be installed in two ways: as a door leaf, when the door opens and hides in the wall, and when the door goes out. A more acceptable first option would make significant use of the room in which the door will be installed. But the second option is cheaper and saves you time.


To install sliding interior doors, follow the detailed instructions.
First we prepare the door leaf, we take all measurements of the door on the canvas. If necessary, straighten the walls so that there are no curves or bulges. Then place the box in the hole. The door is connected to the corresponding screws and inserted into the hole. Once the box is fully installed, blow up the foams we designed and move on to the next level. Then attach the top conductor and pencil to the door leaf, its position.


Install with screws or dowels, depending on the type of wall, brick or concrete.
After installing the rails, continue to install the roller mechanism. When aligning the edges of the door, place a mark and use the screws to secure the mechanism to the door leaf. We also repeat on the tailgate. Then adjust the height so that the edges of the door do not touch the ground, the doors can be free, open and closed, and the door can move freely.


Before use, carefully check the roller mechanism and, if necessary, lubricate it with engine oil or special fluid.
Then place the guide on the floor, making an appropriate groove if necessary. The final phase is the installation of the piston, which will be attached to the door by inserting the lock and installing the handle if it was not installed at the time of purchase. Install the door leaf at all stages. The door needs to be free to travel and open, then you can assume that you have handled it yourself and installed everything correctly.
Installing the door itself is not that difficult if you have all the nuances, reflect logically and have all the necessary tools.


Yes I can. For this you need:
In order not to damage the ceiling, the self-tapping screws must pass through the plugs.
Illustrations can be found in the Technical Support section under Installing a Mortgage Under an Expandable Ceiling.
Our sliding doors are made from lightweight modern materials, so there are no problems with installing drywall on the wall.
When installing, try to use all the metal profiles that are inside the wall. The fastening rod is attached to the wall with screws every 10 cm. Use self-tapping screws with a large inclination and diameter (4.2 x 75 mm are recommended).
What should I do?
You can change the switch and socket. Thin models less than 1 cm thick are sold on sale. The door can also be moved away from the wall with the required distance due to the mounting rail on which the track is installed.
Instead of a conductor, we use a conductor on the ground.
It has a cylinder shape of 15 mm and a diameter of 10 mm. The guide is inserted into the cutout at the bottom of the door or on the bulkhead.
For this reason, the doors do not move and do not move to the right and left.
To do this, you must decide where and how your door will move, and how to accurately measure the height and width of the machined aperture.
It will be easier for us to suggest doors that are optimal for you if you send us a photo of the hole or the place where you will install the partition on [email protected] This is desirable, but you don't need to have a plan for the room or a designer's blueprint.
Where to begin?
First you have to decide how the door will move and make sure there is enough space. If there is an outlet or switch on the wall, it may need to be replaced with thinner ones.
Then choose a door from the Smart Smart series: they are almost available and you won't have to wait long. Delete old door and prepare the door. Follow our sliding door installation instructions.
Sliding doors provide space savings, which is especially important for narrow corridors and small spaces.
They are lightweight and fit into non-standard wide openings, they fit well and do not overlap, they look into every room and separate space in zones.
Just like any other product, a sliding door has many features that you need to be aware of.
Firstly, it is much more difficult to provide heat and sound insulation. Secondly, in the case of a pencil in which the door is removed, dust can accumulate, which is almost impossible to remove. Finally, they are a little more expensive.
Most models of sliding doors and partitions are from the top to the railcars. The cylinders are in strong aluminum rails, stand out or fall, which they simply cannot.
Each trolley is securely attached to the door, with virtually no vertical load on the structure. Therefore, we are confident in the reliability of the sliding mechanism, which we have been providing for 10 years.
In terms of their acoustic insulation properties, a sliding door is slightly worse than a normal interior door.
At the same time, they have many advantages, of which space saving is the most important. When choosing a sliding door, you must decide what is important to you. In addition, you can improve noise and thermal insulation by connecting special buffer strips to the case.
Use sliding doors in the bathroom if they don't get water.
PVC film reliably protects the door leaf from moisture. However, if you cannot avoid direct exposure of the door to liquid, aluminum doors are recommended.
Installing a sliding door is a quick procedure that does not harm the interior. Therefore, we advise you to install them at the final stage, after finishing the ceiling, walls and floor.
But if the room has a stretched ceiling, the panel must be installed before you pull it out.
Probably, maybe, but we do not know of such cases. The door fastening system is very reliable and durable.
And with the help of our sliding partitions you can give your children space in a holiday home.
After paying for the order for the manufacture of most doors and partitions, it takes no more than two weeks.
Door doors "Smart" are most often available from stock. Delivery time depends on the region where you live. With experience, we can say that most customers outside the city receive their doors in a month.
To install prestigious sliding interior modern doors with your own hands is to save money for the family budget.
What's more, it's pretty easy. First of all, you need to decide - you will mount doors from components that can be found in stores or from improvised units, you will buy a door leaf - or do it yourself, or maybe use an old door.
Deciding to do it yourself, try to follow some rules:
Sliding doors can double as a door on one side and a retractable mirror on the other.
Recently, there are more and more people who do not want to scatter money.
You can not buy a lot, but it's great to do it yourself.
At the same time: - if you have children, you will have a wonderful time together, teach the “descendant” something useful, appear in his eyes as a Master worthy of respect.
All this leads to the fact that campaigns that provide various services begin to lose revenue. Naturally, they are trying to fight falling profits by spreading various myths about the complexity of a particular job. For example, there is an opinion that self-installation of sliding doors will require you to give up switches, hanging pictures and functionals on the wall along which the door leaf goes.
But this problem is solved simply - install a false wall and place anything on it, except for pood weights.
The installation process of sliding doors begins with the selection the right tools- hammer, electric drill, screwdriver, Phillips screwdriver, level, various fasteners.
All sliding doors, despite differences in appearance, are structurally mounted from similar elements, the sequence of their installation is the same.
The standard set of parts required for the manufacture of sliding parts includes:
Do not forget about the wealth of choice among sliding doors - you can install sliding doors, cassette doors, folding like "accordion", radius or cascading sliding doors.
Everything needed has been purchased.
We start installation. It should be noted that the installation of sliding interior doors with your own hands includes several stages.
Preparing the doorway:
Using a level, you need to align the opposite sides of the opening, as well as prepare the surface of the wall along which the door itself will move away.
This work must be done especially carefully, otherwise you will encounter problems in the movement of the doors.

Using a chisel or an electric mill, we select a groove in the lower end of the door.
The quality of work must satisfy the requirement of free and without deviations of the movement of the roller in this groove;
Making such a groove at home ideal is quite problematic.
Therefore, it is better to install a profile or 2 rails.

We mount top part hanging system. Having attached the canvas to the opening, we mark its upper end on the wall.
This line must be strictly horizontal. Up from it by 7 cm we draw another line. We attach a wooden beam to it. If it is strictly horizontal, we attach it to the wall.
We attach the guide rail to the bottom surface of the installed beam.
Regardless of the curvature of the surfaces of the wall or timber, it must be straight, without bends.
You can accurately determine the location of the self-tapping screw as follows: the thickness of the door is divided in half and 5 mm is added for the free movement of the door - this is the distance to the wall
The marking is made and the lower guide bar is located strictly under the upper one.
Among the negative reviews about sliding doors, the most common complaints are that a lot of dust often accumulates in the details.
This disadvantage is easily eliminated if, during the cleaning of the apartment, do not forget to vacuum the parts of the sliding doors.
The rollers are attached to the sash. As a rule, the instructions supplied with the sliding door hardware kits describe this process in detail.
If there are no relevant instructions in it, the brackets of the roller carriages are mounted at a distance of one centimeter from the edge of the upper end. On the floor we set a flag or threshold.
We start stoppers and carriages with unscrewed screws into the guide.
We install the door leaf on the threshold or flag, hang it with brackets on the supporting screws and hang the sash. The distance between the lower end of the door and the floor is usually 8 mm. We block the sash on the rollers, loosen the screws of the stoppers and setting a suitable position - the door should stop not on the stop post, but by entering the carriage into the stopper - we fix them.

We install the lower guide into the cutout of the lower end, move the door to the “open” position and mark the largest opening length.
We remove the nuts from the carriages and the door. Install the bottom rail. We combine the groove with it and hang the door leaf again. We install bolts on carriages desired distance between sash and floor.
We decorate with platbands, install door handles, a reciprocal lock.
If the installation was done correctly, sliding doors will serve you for years.
To do this, you just need to make sure that dust does not accumulate in the upper guide and periodically check whether the fastenings of the roller carriages and stoppers have loosened.
The popularity of sliding doors is due to numerous factors. Their installation can be carried out both by specialized companies and independently. The first method is more reliable. This is the simplest option, which is resorted to by many residents of our country. However, if you study the rules for installing sliding doors, then you can do all the work yourself. There is nothing difficult in this. How to install a sliding interior door yourself and will be discussed Further.
The interior sliding door looks very impressive and at the same time significantly saves space, which is very important for small spaces.

It also carries negative aspects that you have to put up with:
A sliding interior door should not encounter any obstacles in its path. It should be easy to open, because this allows you to reduce the process to the application of minimal effort. No switches or sockets should be installed on the wall. They can be a big problem when opening an interior sliding door.
Now you can talk directly about the installation, but before that you should think about buying all the necessary tools and materials.
Installation of sliding interior doors involves the purchase of the following:

This is quite enough to carry out the installation of sliding interior doors with your own hands.
To begin with, it is worth attaching the door leaf to the wall where the interior door is supposed to be installed. A mark should be made on the wall, which will indicate the height of the future structure. If the floor is uneven, then the same operation must be done on the opening.
The next step is to use a pencil and a ruler. At a distance of 70 mm from the line that was drawn earlier, one more should be noted. This is where the guide bar will be installed. At the same time, do not forget about additional verification horizontal with building level. This tool should always be at hand during construction and repair work.

Now you can move on to attaching the beam at the very place where the line was previously drawn. This refers to the upper bar under the guide. The length of the bar should be 2 times the width of the opening. It must be fixed in a strict horizontal position. In this case, self-tapping screws are necessarily used. they must be long enough to make the mount really high quality. The distance between them in each case is selected individually. The most important thing is that the beam sits perfectly in its rightful place.
Now you can proceed to install the guide bar. It is attached from the lower end of the beam, which was screwed earlier. It is worth determining the location of the mounting hole. For this, the length recedes, half door leaf. Approximately 3-5 mm is added to this value, and then fastened with a self-tapping screw. To begin with, it must be loose. Next, the same measurements are made, and fastening is carried out with opposite side. Before finally putting it on self-tapping screws, it is necessary to check that there is a sufficient distance between the door leaf and the wall, which will allow it to move easily and simply.

Next, you can move on to the carriages. First you need to collect them and test their progress. They are assembled quite easily by means of a bolted connection. Then they must be brought into the guide bar to make sure that the movement is smooth. In this case, it is not necessary to lubricate the bar.
Now it's time for travel limiters. They are installed with rubber shock absorbers inside.
At the bottom end of the door leaf without fail you need to make a groove. To do this, an indent is made from 2 edges of the door leaf by 15 mm. Next, 2 holes are drilled in the middle. This can be done with a drill or with a conventional screwdriver. Then a groove of a certain depth is made in the middle of the sash. It is necessary so that the interior door can easily move along the bottom bar, made like a knife. You can make a groove with manual router or Bulgarians. However, it is not always possible to achieve high-quality hole making at home. In this regard, many prefer not to cut anything, but simply use 2 rails, connecting them into a single whole. They will form a groove.
Carriage mounts are installed on the wall. They must be mounted in such a way that the nuts look inward, that is, towards the wall.
Now you can move on to hanging the door leaf itself. For this, the efforts of one person will not be enough. It is better to invite an assistant. First you need to aim correctly. The bolt of the right carriage is connected to the cutout on the right bracket. Further, the brackets on the edges of the carriages are fixed with a bolted connection. You don't have to tighten them all the way. Next, while holding the door, it is necessary to place the lower part so that it coincides with the cutout of the door leaf and the guide.

Next, you need to determine the distance that will determine the location of the door leaf relative to the opening. Here you should bend the canvas from below. Then it must be removed, and after that, the lower guide, made in the form of a knife, is fastened. It will be easier to select the distance if the mounting holes for the knives are oval. This will help to correctly orient the door in space.
The bolts of the carriages are brought into the target.
However, they do not twist completely. When a gap of approximately 3-5 mm is reached, the bolts can be finally fastened with nuts. In this case, it is very important to hold the bottom of the fastener in order to get a really high-quality connection. If the floor in the place where the installation is made is uneven, then it is necessary to adjust the position of the canvas. Otherwise, unpleasant distortions of the structure may occur, which will be very problematic to eliminate.
The final stage of work related to the installation of sliding interior doors will be the installation of a decorative trim. In this case, the distance from its lower edge to the door leaf must be at least 5 mm. Its design should be such that, if necessary, it can be removed without any problems.
Access to the carriages must always be open. It needs to be adjusted to the overall interior of the room. For this, the platband is stained or wallpapered.
Now we can state the fact that the installation process is almost completed. It remains only to install the handles on the door, and it can be safely operated.
Once upon a time there was an old man and an old woman, they had a daughter, Alyonushka, and a son, Ivanushka. An old man...

Gods - Olympians (myth of ancient Greece) The most powerful of all sons ...

To see torn shoes on their feet in a dream can be people who have a big ...