If you adhere to proper nutrition, then avocados are probably in ...


Cast iron bathroom paint is designed for the restoration of old products. She saves her from disposal, because the bathroom is necessary premises in a house or apartment. Many residents have apartment buildings there are products made of cast iron, as they are convenient, practical to use. Cast iron bathtubs - a design in which you can swim, wash clothes. They have a long service life.
But after mechanical and chemical influences (chips, scratches, detergents), the coating inside eventually becomes unusable. Acquires a gray tint, cracks, yellowness. You can correct deficiencies without calling a specialist, with self-painting products. Painting a cast iron bath at home with your own hands is the perfect solution.
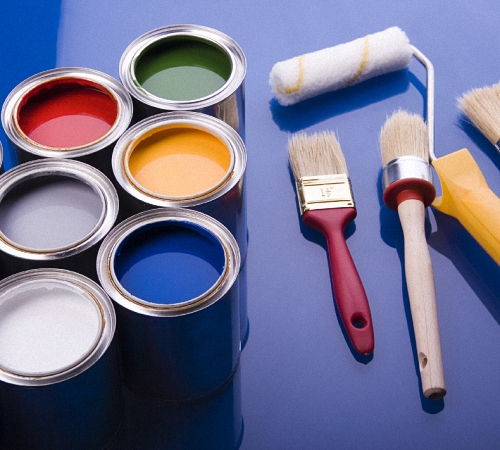
For painting, it is necessary to choose only a dye for metal structures.
This method has a number of advantages:
However, this method of updating the surface has disadvantages:
What can be painted cast iron bath? First you need to find the appropriate paint, only then begin work on the surface treatment of cast iron.
The dye is divided into four types:
For painting cast iron baths with severe surface corrosion (chips, deep cracks). Epoxy enamel is applied in a thick layer, even without preliminary ground surface treatment.

The resin is diluted with solvents to a thick consistency, applied to the chips, and then to the entire surface.
How to paint, process a cast-iron bath inside at home? Acrylic. Do-it-yourself resurfacing of cast iron is a simple, easy method of resurfacing.

Acrylic is liquid in consistency, which makes it easier to work with its distribution over the coating. After drying acrylic composition becomes glossy, which is why this paintwork is popular today. The service life of acrylic film is from 7 to 20 years with proper care, therefore, it will be beneficial to paint the product with such a composition.
Epoxy paint is resistant to mechanical influences. It is a synthetic resin-based oligomer. durable, durable coating for metal and industrial equipment. Paint with a glossy effect, hydrophobic in nature. You can paint with any handy tool: roller, brush, spray gun.
Cast iron bath paint is an aerosol, namely a dye for cast iron products.

It is applied after surface treatment with grinding equipment and a primer. This is a topcoat with a large assortment - from a bright varied palette to the manufacturer. The paint is quick-drying, it can be processed in hard-to-reach places.
How to paint a cast iron bath at home without knowing which paint to choose? From dyes and enamels, it is possible to distinguish compositions that are in great demand for painting a cast-iron bath:
According to the manufacturer (Russia), products with enamel will last about 9-10 years;
This is a kit that includes a hardener and the enamel itself. The service life of the processed product with acrylic is 15 years with proper care;
With all the variety of what you can paint or update a cast-iron bath at home or in the country, you can look on the Internet or in a hardware store.
What to look for when choosing bath paint? Restoring the surface of the bath is best done with high-quality materials and paintwork.
When choosing a paintwork (this is what can be painted), the characteristics of each product are taken into account. How to choose paint:
Do-it-yourself spray painting of a cast-iron bathtub will not work, as the coating will not form a dense layer.
There are many types of paint and varnish coatings (LKM) on the market and there is something you can paint a bathtub with. There are restrictions that prohibit painting the bath:
Paintwork - that's what you can paint the bath. But you need to test in advance for color. To do this, it is worth applying one coat of paint before painting the cast-iron bowl, on clear glass and let dry. You can evaluate the quality of the tone like this: look from the back of the glass.
How to paint a bathtub inside? In addition to paint and acrylic, the construction market that sells bathtubs should be consulted for enamel.
There are two types of composition:
Enamel is divided into three main categories:
You can paint the bathtub with enamel after holding the acrylic for at least a day at room temperature, and then mix it with a hardener.
Restoring the surface of a cast-iron bath with your own hands using enamel has some advantages:

Of the disadvantages of painting a cast-iron bath with acrylic, the following can be distinguished:
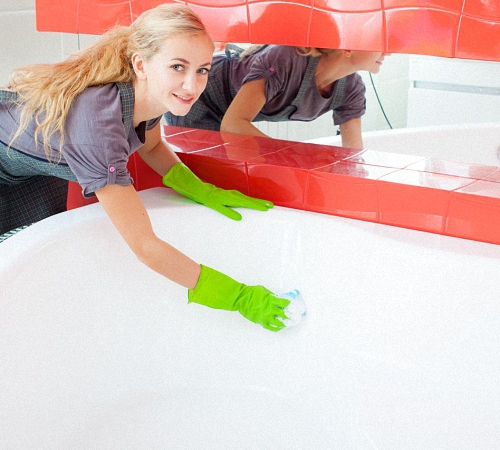
The cast-iron bathtub inside at home can only be cleaned with mild detergents without the inclusion of abrasives. Too hot water can also destroy the surface of such a bath.
The bath inside at home needs to be restored:
Apply the enamel composition to the surface of the bath, preferably with a roller or brush.
How can you paint a bath? This question may not be asked, because this restoration method is called “bath to bath”. In an old cast-iron bathtub, an insert is placed on the glue, which completely repeats the shape of the bathtub.

This method has the following advantages:
However, there are a couple of nuances when installing the liner in the bathroom. If the bathroom is made of thin cast iron, then in the future the deflection of the structure cannot be avoided, as a result of which the liner is deformed. Also before lining acrylic surface, the siphon is dismantled.
From the foregoing, we can conclude how and how to properly paint a cast-iron bathtub inside and out.
Painting an old cast-iron bath in an apartment by a specialist or with your own hands will not be effective without the following tools:
Separately, purchase protective gloves, eye goggles and a respirator.
After the question of what paint to paint the bathtub has been sorted out and the final conclusion has been made, it is necessary to begin work on preparing the surface of the cast iron for applying the coloring composition.
Replacing a "killed" bathtub is an expensive business. It is wiser and more economical in terms of total costs to combine it with a bathroom renovation, but this is a long process. What if nice bath Do you need it now but don't have the money? Let's say you bought a second-hand apartment and went all out. Or there was a child. Or there are some other everyday circumstances that make you postpone the replacement of the bath for a long time. For example: the bathroom is well decorated, the bathtub is made of cast iron, capital, only there are rust stains in it and the enamel has peeled off in some places. In this case best option- painting the bath with your own hands.
In the case of a cast-iron bathtub in a decent bathroom, an alternative option is to install an acrylic liner in the bathtub (“bath within a bath”). This method has proven itself well and is widely used throughout the world.
But first, the liner ( acrylic insert) is not much cheaper than a new bath, but you cannot insert it yourself. The installation of bathtubs in bathtubs is carried out by companies that have necessary equipment and a staff of specialists.
Secondly, the acrylic insert is not painting, and therefore is not the subject of this article. Therefore, if you are in need of a deep renovation of an old bathroom,.
Can I paint my own bathroom? There are so many frightening warnings!
You can paint the bath yourself if you have some skills painting works and know the basics of safety when working with volatile corrosive substances. If you had to repair a yacht or a boat, then you will not find anything new for yourself in the technology of painting a bathtub. You just need to stock up on protective equipment, tools and accessories. In addition, it is desirable to have the simplest plumbing skills.

What color to paint the bath? There are only two options: enamel based on epoxy or acrylic resin.
In general, if you are a fairly experienced painter or yachtsman, you are better off working with epoxy. If you are just a neat person without solid working skills, then it is better to use acrylic.
A common case in life: a tin bath, and even lost weight, but still no money. How to be here? You will need a piece of fiberglass satin weave or old wife's tights. The piece should be large enough to close the fistula three or four times with a grip of 5-7 cm on the sides. Still need the most common epoxy glue.
First, the fiberglass is put to boil, and the tights are given to a thorough wash. It is necessary to boil the fiberglass to remove the paraffin residues that coat the fiberglass before weaving. Boil for an hour and a half, after 10-15 minutes carefully drain upper layer a third of water.

There is a lot in common in the specifics of repairing bathtubs and yachts: from the features of painting to methods of sealing holes
Meanwhile, a fistula with a chipped enamel and a space of 10-15 cm around them are treated with Durex until a shiny metal and a smooth run of the enamel to the metal. Then the dust is collected with a vacuum cleaner without a nozzle, and the treated area is degreased several times with acetone or a solvent until the rags no longer get dirty during degreasing. Then a piece of plastic film is applied outside and fixed crosswise with several tapes of adhesive tape.
Now we prepare epoxy glue, spread a fat-free area, apply a patch of fabric, 2-3 cm in size to the side of the chip, and pierce with an end brush until there are no bubbles. When the epoxy sets to a jelly-like state, apply a second layer of it and apply the next patch, larger than the first one (again with a grip of 2-3 cm to the sides). So you need to impose 2-5 patches. After the epoxy has completely cured, we remove the edges of the patches with the sandpaper flush; then - paint the bath.
Note: in addition to several bathtubs repaired in this way, which have been regularly serving for more than 10 years, the author of these lines knows a yacht that has been sailing safely for 8 years with a hole repaired in the same way, and for repairs it was necessary to run the ship aground, and use ... panties of passengers as the basis of the patches.
Preparing the bath for painting comes down to careful degreasing and creating a solid rough surface. Adhesion (sticking) of the repair compound significantly depends on the size of microroughnesses, and its resistance in the future depends on plasticity. Already from the pictures of the baths, on which the new enamel “climbed”, it is clear that thermal deformations were the root cause of the cracking. Therefore, we immediately give two pieces of advice:
Tip 1: for abrasive treatment of the bath, use emery No. 1. It will take longer to work, but if you first remove the streaks with a coarse sandpaper, and then smooth it to a dull finish with a fine one, there will be "micro-cavities" invisible to the eye, into which the enamel will not penetrate, but which will become places of accumulation of residual stresses and cracking centers.
Tip 2: when working with epoxy, in addition to the diluent (acetone or solvent), add 5% by volume of the plasticizer, dibutyl phthalate, to the ready-to-use compound; It is used as a mosquito repellent. This "secret" has long been well known to builders. small boats and other manufacturers of fiberglass products.
Substances used for bath restoration contain volatile aggressive components. Therefore, before starting work, everything must be taken out of the bathroom, except for the bath itself and faience products (washbasin sinks, bidets, etc.). washing machine, it must be carefully wrapped plastic film, and seal the cracks in the wrapper with tape or masking tape. It is also necessary to protect nickel-plated taps; shower with hose - remove.
Preparation for painting a cast-iron bath begins with cleaning from surface contaminants. To do this, oxalic acid, pemolux, or another active detergent is poured onto the bottom of the bath in a path.
We slightly moisten the detergent track with water to make a slurry, and ordinary household sponge(new) smear it from the bottom along the walls to the top. This work, like all subsequent ones, must be done with open door bath, the windows of the apartment, in gloves and an apron. If used oxalic acid- also in a respirator (gas mask).
Keep the detergent slurry in the bath for 10-15 minutes, then rinse and fill the bath to the brim. Hold for another 15-20 minutes, drain the water. Now you can start sanding.

As mentioned above, the purpose of abrasive processing is to create the desired microrelief on a clean surface. Therefore, it is impossible to leave rust stains: particles of iron oxide will later become centers of enamel cracking. If rust and dirt have eaten in so that you have to remove the factory enamel to the metal, it's okay, just not to wipe it through if the bath is tin.
First, remove the strapping of the drain and overflow holes. Then, with an electric drill with Durex or a cord brush, we smooth the surface to a matte finish and the absence of visible contamination. We check the roughness “on the nail”: the nail on a properly treated surface should “stretch” and not slide. Additionally, we check in the sliding light of an LED flashlight: there should be no glare spots
Unlike previous operations, when dedusting, degreasing and painting, climb into the bath, and you can’t even touch its inner surface with your hands. The most difficult thing to do is when installing / dismantling the drain trim, so take a closer look in advance how you will be able to work bending over, with tweezers, pliers and platypus pliers.
Before degreasing, we collect dust with a vacuum cleaner; with a rag moistened with a solvent, we wipe the places around the drain holes “to a clean rag”, see above, and put the drain straps again.
Then, wearing gloves and an apron, pour 0.5 - 1 l of Sanoks or Adrilan into the bath (these are acid-based active detergents; pemolux is alkaline) and rub with a household sponge (again a new one) from the bottom to the edges in an even layer. A bath with acid grout should stand for an hour and a half.

For degreasing, only acid-based products are suitable. Alkaline "Pemolux" and other powders are not suitable for the described method.
Next, we fill the bath to the brim and also hold for an hour and a half. The bath gets quite hot. If it warms up a little, add another half-bottle-bottle of acid detergent. When the liquid in the bath cools noticeably, drain. To the drain plug, if there is no chain, for this you need to tie a fishing line in advance. After draining, we fill the bath again, hold it for an hour and a half, and drain it again, at least once again. If time endures (say, the family left for a week or two), we do washing “after sour” 3-5 times.
After washing, dry the bath with a household hair dryer. It is impossible to delay drying: after all, dust falls from the ceiling. We check the absence of fat with a shower, temporarily screwing the hose to the mixer: the water should envelop the surface in an even layer, without rolling in drops. Cleanliness is checked with a rag with a solvent, as described above. If the bathtub is clean “on a rag” and completely dry, we again disassemble the plumbing and you can paint.
Painting the bath with enamel begins with the preparation of the compound according to the instructions on the package. Enamels from different manufacturers differ in composition, so universal recipe not here. If according to the instructions it is required to heat the base before adding the hardener, heat it in a water bath; The temperature is controlled by the temperature of the water in the bath.
Important: Do not try to immediately "thump" the entire hardener into the base! Even if you have time to finish painting, a durable layer will still not work. Measure the base in portions of 250 ml, and divide the hardener into portions accordingly, preferably in advance. If, say, 1.5 liters of base is used, then the hardener must be divided into 6 parts. After adding the hardener, mix each portion thoroughly.
Important: Do not forget to add 12-14 ml of dibutyl phthalate to each portion of the finished enamel and, again, mix thoroughly.

Paint with a flute brush. Having abundantly moistened the brush, we carry out vertical stripe from the bottom to the edge, then rub, as far as possible, to the sides. We carry out the next strip in such a way that the horizontal grinding overlaps by 50%. We remove the bristles that have come out of the brush with a paint knife or tweezers. Never touch the painted surface with your hands!
After applying the first (primer) layer, wait 15-20 minutes, again, according to the manufacturer's instructions, and apply the second layer of enamel, STARTING FROM THE SAME PLACE AS THE FIRST, AND IN THE SAME DIRECTION. With this method of painting, the covering layer will lie on the primer in the same stage of gelatinization, and the coating will turn out to be uniform in structure.
At the end of the painting, we lock the bathroom for 3-7 days. The longer the period of time from complete hardening of the enamel to the first wash, the less likely it is to peel off in the future.
With both methods of painting, especially with epoxy enamel, streaks and sagging are formed. Their formation must be controlled after 10-15 minutes for epoxy enamel and after 3-5 minutes for acrylic. The streaks are removed with a brush stroke UP until smearing. After the enamel has hardened, the sags on the edges of the drain holes are cut off with a painting or mounting knife. It may be necessary to install new cuffs or gaskets in order to install the drain piping after restoration - after all, the drain holes will become narrower, and their wall thickness will increase.

Painting a bathtub with acrylic is easier than epoxy enamel. Can be painted with both brush and roller. The best way is in a tapering elongated spiral from the edges to the drain. Just make sure there are no bubbles. If the bubble does not collapse within 1-2 minutes, it is pierced with a brush. If desired, a second layer can be applied after the first one has dried.

But, as mentioned above, portions of the acrylic compound after adding the hardener must be stirred very carefully. And keep in mind - dibutyl phthalate as a plasticizer is only suitable for epoxy. You can't add it to acrylic.

Note: acrylic compound for painting bathtubs goes on sale under the name "stakryl".
They are afraid of one thing - enamel damage. How to paint a cast-iron bathtub and what is the best way to do it if you have damaged its inner coating? In this article you will find 3 possible options With step by step instructions and all their pluses and minuses, as well as a description of the "bath to bath" method.
Painting a cast-iron bathtub is needed in two cases:

A cast iron bath can be restored in 4 ways:
We will consider all these methods in more detail below.
The most logical method of restoration to the layman seems to be painting the bathroom.
Pros of this method:
Not any paint is suitable for restoring a bathroom by painting, as there will be constant contact with water, temperature changes and mechanical friction of the surface. You will need a special paint and you can find it among such manufacturers:

You can, of course, paint regular paint, but such a coating will last from the strength of one to two weeks. It is unlikely that you are counting on such a short effect from the restoration, so it is better not to save on paint and buy high-quality one right away.
To paint a bath you will need:

The staining process can be divided into 3 stages:
Preparatory work for the restoration of the bath is to remove dirt from the surface. This is best done with alkaline household chemicals. After using it, the bath should be rinsed well and wiped dry.
alkaline household chemicals burns the skin, so you should work with it in rubber gloves.

Next, degreasing is carried out with a special chemical composition. You can take a car. Alternatively, you can use regular Fairy dishwashing detergent, but it will need to be left for some time (20-30 minutes) on the surface of the bathtub and then washed. The procedure will need to be repeated 2-3 times.
You can check whether you have degreased well with a jet of water. If when pouring water on the walls from the shower, you do not see drops or streaks, then the fight against fat on the surface can be considered complete.
On this preparatory work do not end. You need to remove the layer of enamel or paint that is currently covering your bathtub. This is done using an electric drill with a special grinding nozzle. It is allowed to remove the entire enamel or only the top layer - your choice.

Before applying paint to the surface, it must be cleaned of dust and dried. Drying can be done with a hair dryer or by waiting - the bath will dry itself in a few hours. After that, a primer is applied. It can be applied with a brush, roller or flexible spatula.
The process of painting the bath should begin after the final drying of the primer. First you need to paint the sides. The paint is applied in a thick layer and gradually flows down the sides. The sides of the bathroom are painted in the same way, but taking into account the paint already on its surface. Try to make the layer after "draining" as even as possible. Painting the bottom of the bathroom consists in distributing the paint that has dripped from the top.
The whole process of staining will take you quite a lot of time and effort, so start it at a time when you have the greatest efficiency.

You can paint the bathroom with paint using a roller - it will be faster and more convenient.
After painting the bathroom, it is necessary to close it for 10-12 hours, and preferably for a day. This is necessary to prevent dust from entering the painted and still wet surface. The process of final drying of the paint takes 2-5 days. It is highly undesirable to use the bathroom until this moment.
Most old way restoration of cast-iron bathtubs is the application of new enamel. It has been widely used for over 20 years. The process of applying enamel is somewhat reminiscent of the painting we examined, but the composition is completely different. There are only 2 categories of compositions: professional and for self-restoration.

Professional epoxy enamel formulations are more liquid. They are applied in several layers, so the process is quite long and laborious. Do-it-yourself formulations are thicker and easier to work with.
Bath enamel, which is sold in aerosol cans, is easy to apply, but it will last a maximum of a year.
Advantages of bathtub restoration with epoxy enamel:
The disadvantages of this method:
To restore a bathtub with epoxy enamel, you will need:
The process of applying enamel to the surface of the bathroom can be divided into the following stages:
The preparatory work is the same as when painting with bathroom paint, so we will not repeat them. You can read above.
Enamel before application should be prepared according to the instructions on the package. You do not need to immediately mix the entire composition, do it in batches, as it starts to set quite quickly (40-45 minutes), and applying in 2 layers takes quite a long time.
If you apply a professional composition, then you can use the spray gun. But for home application, it is still better to choose special mixtures that are thicker and suitable for application with a regular flute brush.

To apply enamel to the surface of the bath, moisten the brush with plenty of water and draw a vertical strip from the bottom to the edge. After that, rub the enamel on the sides as hard as you can. The next strip should be drawn side by side so that its “rubbing” is enough to reach the already treated area, and by repeated rubbing you cover about half of the previous strip. So, with an overlap, the first layer is applied. Wait 15-20 minutes and apply the next one.

The second layer is applied from the same place as the first. The direction of application must exactly match the first layer. Only in this way the coating will turn out beautiful and uniform.
During the application of enamel on the walls of the bathroom, streaks and sagging of the material often form. Their appearance should be controlled. Usually they become noticeable 10-15 minutes after application, so keep an eye on the areas covered while working.
To remove streaks, it is necessary to make a brush stroke without material up to the place of smearing. The sags that form on the edges of the drain holes must be removed after the enamel has hardened. For this, a painting or mounting knife is used.
After applying the enamel, it is necessary to close the bathroom for 3-7 days, until the new coating is completely dry. The longer you pause before the first use, the less likely the enamel will peel off.
One of the most modern ways to restore the enamel of the bath - restoration with acrylic. On sale you can find it under the name "Stakril".
Advantages of the method:
Disadvantages of the method:
To restore a bathtub with acrylic you will need:
The process of applying acrylic can be divided into 3 stages:
Preparatory work is similar to the methods described above. Read more about this in the section on painting with paint.
Acrylic is more liquid than homemade enamel, so it is most convenient to apply it using the pouring method in a tapering spiral from the edges of the tub to the drain. Be very careful! Unfilled fragments can be filled with material using a flexible spatula. With its help, the edges of the bath and its bottom are leveled.


If during the application process bubbles appeared that did not burst themselves, then they must be pierced gently with a brush.
The second method of applying acrylic is similar to painting. For application, a brush or roller is used.
After applying acrylic, it is necessary to close the bathroom for 2-3 days so that dust and other dirt do not get on the surface before drying.
The “bath-to-bath” restoration method consists in installing a new acrylic liner inside the old cast-iron bath, which completely repeats its shape.

Advantages of the method:
Disadvantages of the method:
Whether it is worth restoring the bath and how exactly to do it - the owner of the bathroom and the plumbing item decides. Of course, no restoration lasts forever, but if there is no money to buy a new one, and you want to take hygiene procedures in comfort, then you definitely should do it!
A bath is an essential item in every home. However, in the process of its operation, it loses its pervoz. this species. In this case, the bath needs either replacement or restoration. The second option is less expensive, but for its implementation, it is necessary to study the technology of painting the bath. We will consider how to paint a bathtub with enamel further.
There are several ways that you can use to restore an old bath. Before proceeding to study them, we suggest that you familiarize yourself with the types of bathtubs that are most popular among buyers:
1. A cast iron bath is a traditional option. Among their advantages are:

2. A bathtub made of steel has its own advantages. Among them are:

Among the disadvantages of steel baths note:
There are several ways to apply enamel to the surface of the bathroom. The choice of one or another staining method depends on the type and characteristics of the materials used in the process of work.
We suggest that you familiarize yourself with the first option for restoring a bathroom, which is called ordinary enamelling. After ten or twelve years from the date of purchase of an enamel bath, they need additional enamel coating.
The factory conditions in which an enameled bathtub is made simplify the process of applying enamel to a bathtub made of steel or cast iron. First, heating outer surface until the bath turns red. Next, enamel-based powder is sieved on the inner surface, after a certain time the powder is combined with metal surface. Thus, the factory coating is distinguished by evenness, uniformity, the presence of a glossy sheen and an attractive appearance. However, for home conditions, this method is unacceptable.
Damage to the enamel layer occurs for the following reasons:

Thus, if these two factors constantly, over the course of many years, affect the bath, its enamel gradually loses its strength and begins to flake off, crack and become dirty.
In order to restore the enamel coating of the bathroom, you must first prepare the surface for applying enamel, and then paint it.
To perform these steps, you will need:
The first stage of work on the bathroom involves preparing its surface for work. The final result of the work and the duration of its further operation depend on the thoroughness of cleaning the bathroom. In order to prepare the bath for staining, follow the following steps:
1. Sprinkle the surface of the bath with an abrasive powder. After a certain time, use sandpaper and a grinding wheel to remove old enamel.
2. Treat rusty spots on the bathroom with transforming agents. Wait about 30 minutes and continue working.
4. Then the enamel layer and all the crumbs are washed off.
5. Using a fat splitter and a napkin, it is necessary to clean the bathroom from foreign particles.
6. Run into the bath hot water and heat it up for 15 minutes.
7. Drain the water and wait for the bath to dry, to speed up the process, use all the same lint-free wipes.
8. The surface must be perfectly clean without foreign inclusions or enamel residue.

Enameling bathtubs is the next stage of work. For correct application enamel, use the instructions below:
1. If you plan to use enamel, which contains two components, then first they are connected, and then the bath is covered with enamel.
2. To apply the first coat of paint, use a brush or sprayer.
4. Then the bath is covered with another layer of enamel.

This method of restoring the bath is not as popular as the previous one. This is due to the fact that the material used in its implementation appeared on the market several years ago. This substance is called staracryl. It appears as a two-component substance used exclusively for the purpose of restoring bathtubs.
The material consists of the acrylic itself and the component that cures it. In the process of combining these two components, polymerization occurs, after covering the bath with it, it acquires a uniform texture in the form of a film, with a thickness of 0.4 to 0.6 cm.
Among the advantages of painting with enamel in the form of staracryl, it should be noted:
How to enamel a bath with staracryl:
1. The first stage also involves preparing the bathroom for applying the composition. It consists in the same actions as in the previous version. However, after heating the bathroom and drying it, it is necessary to disconnect the siphon, and instead of the stack, some kind of reservoir should be installed into which excess enamel will fall.
2. The second stage is the direct application of paint to the surface of the bathroom. To begin with, you should study the instructions from the manufacturer, in it you will find detailed description enamel preparation process. Next you have to color. However, its implementation is very different from the previous version. This method is also called bulk, as the paint is gradually poured onto the surface, starting from the edge and moving towards the middle.
3. After closing the circle, you should once again repeat the process of pouring enamel. Please note that the whole process must be continuous, so when preparing the paint, use a container large enough to cover the entire bathtub.
4. Don't skimp on paint, it's better to throw out a little more material than undercoat the surface. If the bath is not covered with a uniform and monolithic layer, then the process of its operation will be significantly reduced.
5. For acrylic curing, wait 3 to 5 days. The longer it takes for the acrylic to dry, the longer your bath will last. It is on this basis that you should choose paint in the store.
After painting the bath using this method, it will last you at least 15 years.

To perform this method, use the instructions:
1. Use pemolux, wash the bath well with it. Replace given substance can any composition that has aggressive properties. First of all, after completing this process, the bath must be absolutely fat-free.
2. Next, the surface is polished using a grinder. Please note that in the absence of experience with this tool, it is better to give preference sandpaper as there is a risk of damage to the surface of the tub.
4. Using a regular hair dryer, dry the bath. Please note that its drain part needs additional drying. Do not use a heat gun on the bathtub, as it works at a high enough temperature that can also damage the surface.
5. Remove the drain from the bath, place any container under it. Completely clean the bath of dust with a vacuum cleaner.

The next step involves the implementation of enameling. Divide the paint into two parts. The first part will be used to apply the base coat, using a stiff bristle brush, start work. Please note that Special attention it is necessary to give the bottom of the bath, as it is most susceptible to mechanical stress.
Immediately after applying the first layer, start applying the second. This technology called "wet on wet". After that, the surface is left alone for 10 minutes. If there are smudges on the bath, you should get rid of them; for these purposes, use a brush. After the bath dries, it is connected to the sewerage system and its operation begins.
The process of painting the bathtub is preceded by the procedure for selecting materials for the work. We propose to dwell on expensive compositions, as they have higher performance characteristics.
In addition, you should pay attention to the drying time of the composition, the higher it is, the stronger the acrylic layer will be on the surface. Acrylic-based compositions do not differ in a variety of colors, in this matter one should be guided by individual preferences. Try not to choose bathroom enamel that differs from the old layer by more than one shade. Otherwise, there is a risk of transillumination old surface and the appearance of heterogeneous inclusions on the surface of the bathroom.
If, nevertheless, you decide to repaint the yellow bathtub in a snow-white color, then we recommend buying a little more paint and applying it in several layers. Also, when choosing enamel, be sure to read the instruction manual and compare it with your capabilities.

Tip: Prepare the two-component composition for work only after the bath has been cleaned of old enamel, washed and dried.
It is possible to use bath aerosols, but the duration of operation of such a coating does not exceed five years. Therefore, it is better to spend a little more money and effort so that the enameled bathtub will serve you for at least 10 years.
Paint the bath with enamel with your own hands video:
If you adhere to proper nutrition, then avocados are probably in ...


Pizza can be cooked not only with meat products - sausage, sausages and ...