Individual entrepreneur details in the contract include mandatory and additional information....

MSK-Teply Dom has been installing turnkey water heated floors for more than 10 years. During this time we have formed a team experienced craftsmen capable of performing a whole range of works on installation and configuration of the system. In addition, we are engaged in the development of heating projects and the transportation of equipment.
Our distinguishing feature is the provision of services without any prepayment, as well as guarantees for the heating systems of warm water floors installed by us. We are always ready to offer our clients a two-year Maintenance underfloor heating.
Such a space heating system is suitable for owners of large houses with independent boilers. Most often these are private cottages, wooden houses, but we can also install a water heated floor in an apartment in Moscow, if this is not prohibited by the safety rules of the citywide heating system.
Water floor heating can be operated from different heating systems: solar-type collector, heat pump, gas boiler. We offer underfloor heating in a private house from famous brands, therefore, even in the absence of electricity in the frosty season, each room will have optimum temperature. For the winter, you can combine thermal insulation and a heating system so that you do not need to install radiators or piping in the walls. Refusal of radiators when ordering a water heated floor helps to increase the life of the boiler and make home interior with any design project.
A heated water floor, on average, saves up to 15% of electricity. It is protected from fire, evenly distributes air flows and establishes an individual microclimate in the house. Thanks to such a system, possible creation effective heating and solving the problem of frozen and wet floors in country cottages.
The placement of a water-type thermal system takes place in several stages:
If you are planning a water heated floor in your house, the installation of the system may involve preliminary alignment and hardening the surface with a screed. It is able to extend the life of both the heating system, and floor covering(for example, when installing a warm floor under a tile). So, the cement screed will protect the pipes from mechanical stress.
The most important issue is the thickness of the screed. To determine it, it is necessary to take into account the specifics of the heating system, the density of the floor and Decoration Materials. A thick screed complicates the adjustment of a warm floor, and a thin screed quickly cracks and does not perform the function of proper protection. The average thickness of the screed is from 4.5 to 6.5 cm, but the solution itself must also be taken into account, where special additives and plasticizers are often placed.
For us, the volume of ordered services and the area of work is completely unimportant. Therefore, when contacting MSK-Teply Dom, you can get warm water floors just in time, both in private cottages and in industrial complexes.
The heating system "warm floor" is no longer a curiosity and is becoming increasingly popular. It is used both simultaneously with a radiator heating system, and separately. The question of how to make a warm floor sounds quite often and this is no coincidence. Let's take a look at the advantages and disadvantages of each system.
Unlike traditional options, underfloor heating has a number of advantages that have made it popular:
The absence of traditional bulky radiators allows more efficient use of space and positively affects appearance inner space premises
The most popular today are underfloor heating, made using a heating system coolant (most often water), a special electrical cable or infrared film elements.
The essence of the design of water-heated floors is that pipes are placed between the base and the floor covering with a coolant circulating through them, which, most often, is water. Since such a system does not overheat, it is installed under almost any floor covering, including parquet.
The system of water heating of floors can be installed only in private houses, or in apartments located on the ground floor
The disadvantages include the relatively low temperature of the system, and therefore, as the main method of heating in cold climates, it is not suitable, and the complexity of installation. They are used most often in private homes.
The heating element in such warm floors serve special cables with multi-layer insulation. When passing through them electric current they heat up and then give off heat to the floor covering.
Resistive and self-regulating cables are used for the installation of a warm floor. Among the resistive ones, two-core ones are preferred, since single-core ones, according to the results of some studies, are the cause of electromagnetic radiation, which does not have the best effect on human health. Self-regulating wires are deprived of such shortcomings, which, moreover, are more reliable, since they are insured against overheating due to design features.

Most often, cable underfloor heating is mounted under tile and linoleum
Can't choose the right type of underfloor heating? Let us help you decide on our comparative review various options: .
Infrared thermal floors are an affordable novelty in the heating systems market in all respects. Their main element is a thin flexible film with a special graphite coating and heating elements(electrodes). When an electric current interacts with the coating, infrared waves are emitted. This type of heating is much cheaper than the previous ones, much easier to install and more economical, although the heating area is approaching the maximum.

The main element of the infrared floor heating is a thin flexible film with a special coating.
The indisputable conveniences include the fact that installation can be carried out on its own and under any floor covering: linoleum, laminate, carpet, etc. In addition, a number of studies have shown the benefit infrared radiation for the human body.
Having learned how much it will cost to make a warm floor, many people think about how to do this work on their own. There is a rational grain in this desire, but in reality you will have to face quite difficult tasks technical nature, which will require both knowledge and practical skills. Due to technological differences various kinds warm floors, their installation is also different. We offer to understand the features of arranging a warm floor in each case.
Any of the above systems will consist of heating elements, temperature sensors and thermostats. Installation is more convenient to perform either immediately during the construction of the house, or during major repairs.
As mentioned above, cables serve as a heating element in this system. different kind. They are laid either in a screed or in a layer of tile adhesive if a cable fastened with a special mesh is used. Installation is carried out in the following sequence:

Cable underfloor heating is laid either in a screed or in a layer of tile adhesive
Installation of this system is perhaps the best option for those who do not know how to make a wooden floor warm, although it is also a great solution for concrete floors. It is also captivating that you can lay on top of it those types of floor coverings that you like, without limiting your imagination. And the best part is that even a person who is not very experienced in repair matters will cope with the installation.
Main stages of work:
It's just short description process, a specialist’s consultation will give much more information, but if this is not possible, then it will be useful to watch the video below:
Electric underfloor heating can be done not only in the apartment, but also on the balcony or loggia. Learn about the options for such systems from the article:.
This version of the warm floor, although captivating with its practicality and efficiency, is not very common in apartments, since the coolant ( hot water), is taken from the central water heating pipes, which can negatively affect the temperature of the radiators. In addition, this type of underfloor heating is quite laborious in terms of installation, requires professional skills and serious material costs. Another small minus, which can also play a role - when performing a screed, up to 10 cm of the height of the room is hidden.

Installation of a water heated floor is quite laborious, requires professional skills and serious material costs
If you are still interested in how to carry out all the work, then we will list the main stages:
We conducted a short review of the most popular options for underfloor heating, their principles of operation, advantages and disadvantages. Figured out how to installation work correctly, observing the necessary technology.
Most homeowners choose underfloor heating as an addition to the radiator circuit. In this case, various mounting schemes for water-heated floors in a private house are used. Such a heating system is effective in rooms where children live, as well as for the bathroom. Schemes are selected at individual design at home or during renovation work.
A variant of the project scheme in a private house
Installation of underfloor heating is carried out using a cement screed. It is performed to protect the structure from various loads. Warm pipes should not come into contact with air, but with screed elements, transferring heat to the surface.

Mounting schemes for water-heated floors used in a private house are planned and designed in accordance with the calculations of heat consumption and heat loss and have the following features:
Related article:
Without a competent project, it is almost impossible to get a high-quality heating system. After studying this publication, you can easily calculate the required power, diameter and pitch of the pipes. Good luck!

The main schemes of mounting floors include: spiral, snake and zigzag. The choice depends on the specifics of the room, types of pipes and other features. For example, for large rooms, the use of a simple snake is not entirely correct, since the water in the circuit cools down, “cold” zones will form. While in spiral laying, supply and return pipes alternate, which will ensure more uniform heating.

Useful information! The pipe diameter must be no more than 20 mm. If the section bigger size, then the volume of water and heating costs increase.
The underfloor heating system consists of laid pipes in which heated water circulates. They are installed on concrete or wooden surfaces, and on top are covered with the selected topcoat.

Hot water is transported through pipes. Submission is carried out using the main. The temperature of the air under the floor rises, transferring heat to the outer surface of the floor covering. This heats up the entire room.

Design features depending on the material of the finish coating
Technology wiring diagrams water heated floors in a private house is determined by the features of a particular heating circuit.

Installation works of the structure have the following distinctive features:

1 - floor beam; 2 - longitudinal beam; 3 - logs; 4 - mortgages for pipes; 5 - pipe; 6 - top coat


For underfloor heating, special seamless pipes are used. The circuit is mounted from a solid line. The pipe material must be corrosion resistant and resistant to high temperatures.

Useful information! Profile mats made of extruded polystyrene foam can be used as a frame and insulation. Then the canvases are covered with a layer of waterproofing.
In the floor circuit most often average temperature equals 35-40 degrees. Wiring diagrams for water in a private house function with the help of forced admixture of flows. Part of the coolant from the return flow goes into the supply circuit.

Gas boilers are equipped with special automation. Solid fuel units require a more complex device. They are equipped with circulation pumps and a special buffer tank. In this case, a more complex combustion control is used.

The best option for a floor heating system are electric boilers. Special automation allows you to maintain the desired temperature without loss of thermal power.

Useful information! For heating houses small area direct connection to electric boiler. in cottages with large area a special distribution comb is used.
Installation schemes for water-heated floors in a private house, compared to others, have the following advantages:

The disadvantages include a large number of time to install the system. If there are leaks, you will have to remove most flooring, including screed.
Designing wiring diagrams for underfloor heating in a private house differs from an apartment project. After installation, no changes can be made to the layout of the radiators. Installation of floor structures powered by centralized heating is carried out at the construction stage by special organizations.

In apartments, the coolant flows through pipes through a separate riser, and not from a radiator heating riser. Water is heated in a special heat exchanger. If initially there is no data on the underfloor heating device in the project, then the connection of a new circuit must be agreed with the management company.

Useful information! After agreeing on the project and obtaining permission, a heat exchanger is installed, and also mounted, circulation pump and the security team. With several circuits, a collector assembly is used.
Wiring diagrams for underfloor heating made in a private house can have a different cost. It will include materials, preparatory and installation work, as well as connection and strength testing of circuits. Cost of work for square meter varies from 1500 to 3000 rubles. Also, the price is affected by the type of base and the quality of the equipment.

Useful advice! It is recommended to purchase ready-made kits floor heating equipment. Many manufacturers at the same time offer a free calculation of the entire system.
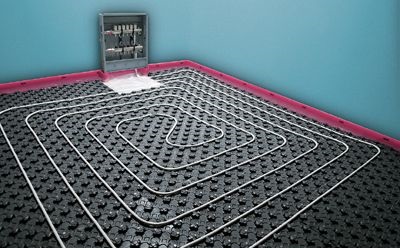
The density of laying the pipeline is determined by the required level of heating of the room. near the walls and entrance doors a tighter fit is performed. In this case, the distance from the highway to the wall should be more than 12 cm. The length of one circuit should not be more than 100 meters. In addition, the joints of the highways are made using metal sleeves. The collector with are placed in a special distribution cabinet, for which you need to select a place in advance.

Full-fledged heating of the room and the creation of a favorable microclimate in the house depend on the quality of the wiring diagrams. Good luck with the repair!
Various tips on how to properly arrange underfloor heating give quite a lot. useful information, however, carry out own calculations in a single example with their help will not work. Therefore, the effectiveness of the functioning of the structure will depend on the hands of the master.
To get started on installing underfloor heating, you will need:
Draw a plan of the room on graph paper, taking a scale of 1 cm = 0.5 m. It is also important here to indicate the locations of doors and windows as accurately as possible. Apply a project for the placement of pipes through which hot water will be supplied, clearly plan the location of the circuit. It is important to take into account certain points.
The designed drawing will serve as a basis for selecting the required number of pipes and their length. On graph paper, you need to select the length of the contour and, according to the scale, translate the values into the real size. It will take another 2 m to bring the system to the riser. They should also be taken into account. Thus, you will get required number for installation in a warm water floor system.
For water "carpets" you need a quality hose
Determine the correct hose diameter. Usually it ranges from 16 to 20 mm. Sometimes 25 mm pipes are used. The permissible bending angle and the thickness of the future floor depend on the diameter of the pipe.
Based on the indicator of the thickness of the screed, performed after laying the heating system, you will need a specific volume of mortar, which also needs to be calculated. The volume of water is determined by the method of samples. It is important to get a non-spreadable mixture. However, the solution should not be very thick, as this may affect the difficulty of finishing and polishing the surface. Sand and cement are taken in a ratio of 3/1. H You don’t always need to make the composition of the screed yourself - you can buy a special dry mix for the self-leveling floor.
For the purpose of thermal insulation, they take the material (aluminum foil) in the amount that is needed for a specific area of \u200b\u200bthe room. To do this, you need to multiply the width of the room by its length - the value comes out in square meters. Then you should take into account the commodity formation of the material and carry out the subsequent calculation. Laminated canvases are considered optimal here. Aluminum-based foil makes it possible to distribute heat evenly and prevent its loss. The foil is a substrate for the main insulation.
All elements for the implementation of the heating system should be taken with a margin. You will need:
According to the diagram, a hose is placed under the flooring in the room. Hot water or another liquid flows through the system, which transfers heat to the surface being used. Ethylene glycol or antifreeze is also used as a heating component. Until the moment when the floor heats up, the carrier of thermal energy distributes and gives off thermal energy to the adjacent material and elements.
Now it is possible to perform three types of flooring: based on wooden canvases, from concrete structure and polystyrene.
In most cases, concrete coatings are used in the construction of a house, less often - wooden blocks, which include a heating circuit. Consider a concrete self-leveling floor.
Such a system is installed on reinforced concrete capital floors with the future creation of a cement-sand screed. Among the masters, this option is called "jellied" or "wet". The reliability and efficiency of the method in practice is manifested in a high heat input and excellent strength characteristics.
The traditional warm water floor combines the following components:
In its total thickness, this device is from 7 to 15 cm. Experts recommend laying a damper tape around the entire perimeter of the room, which will prevent heat loss and strengthen the screed at the junction with the walls. On floors with uneven surfaces or in rooms that have an oblong shape, it makes sense to do expansion joint compensating for the expansion of the screed with increasing and decreasing temperatures. For private houses, it is usually performed along the line of the doorway, right under the threshold.
For the device of thermal insulation, you can take the following materials:
In most cases, profile material is now used with vapor barrier film, which includes special "bosses" made to secure pipes 18, 17 and 16 mm. The plates include side locks that make it easier to connect the panels. The material itself is expensive, but at the same time it is very convenient to work with.
Pipes are the main component of the entire heating system. The duration of service and the quality of functioning of the whole water structure depend on them.
Laying the heat transfer pipe is carried out in two ways: serpentine or spiral. According to the installation technology, the second method is simpler and requires less pump work. In houses where there is a linear slope, it is better to use the first option, since this will make it easier to remove air from the hose.
During the preparation of a mixture based on cement and sand for a screed device, it is recommended to use plasticizing agents. If they are not used, then it will be necessary to lay a layer of at least 5 cm in thickness, and if used, then this value can be reduced to 3 cm. In order for the structure to serve for a long time and reliably, you need to use a reinforcing mesh. In the case when the area of \u200b\u200bthe room is more than 40 sq.m, it is advised to take polypropylene fiber as a reinforcing layer.
If we talk about decorative flooring, then the most efficient return of thermal energy is provided by ceramics and stone. The top element of the entire “pie” can be polymeric and textile materials, the thickness of which does not exceed 10 mm. The use of parquet is also allowed, however, here it is worth taking into account the humidity standards, since you may encounter swelling and drying out of the tree.
In all options, it is important to consider the coverage value - it should not be higher than 0.15 m²K / W.
Before performing work, you need to know that the device of such a system will take a space of about 8 cm from the floor from the room. The phased arrangement of a warm floor consists of the following points:
Initially, all dirt, debris, grease and oil stains are removed from the surface of the subfloor, and then they begin to arrange the first layer. As a rule, a screed based on a mixture of sand and cement is used in the house. It is laid in strict accordance with horizontality - along the lighthouses. It is allowed to install self-leveling floors using modern self-leveling mixtures. In order for the heat to be distributed evenly, you need to make the surface perfectly flat.
Scheme-example of connecting a water-heated floor
The allocated space for the docking components that connect the heating pipes and the house's heat supply system should be hidden in a special cabinet. It is best to make a niche in order to save space. Approximate cabinet dimensions: 600x400x120 mm. These are standard commercially available manifold cabinets. Both joints and certain regulatory systems can be placed in them.
Make access to the return hose and the boiler feed pipe in the cabinet. Attach shut-off valves to them. Connect the manifold and put a plug on its end. A great option would be to install a splitter.
An air vent should be screwed in at one end, and a drain cock at the other. Thus, you will be able to turn off the heated system in one or another room if necessary to carry out emergency repairs.
It is important to check the functionality of the system before performing the screed. Only after verification correct operation of the entire system, you can lay a self-leveling floor or cement mortar, making a perfectly flat surface on the installed beacons. After the mixture has hardened, one more check of the operation of the system must be done and only then take up the flooring device.
Underfloor heating of hydraulic type is a worthy alternative to traditional radiator heating in private houses. The costs and labor costs for its installation, relative to other options for underfloor heating, are higher, but the initial investment is fully justified. In operation, the "water circuit" is much cheaper. To cut heating costs, some homeowners are considering self installation warm floors. For high-quality performance of work, it is not enough to purchase materials and prepare a tool, the main thing is to understand the essence of the technology, understand the calculations, the basics of designing and organizing the system, and determine a clear action plan.
A water heated floor is a complex multi-component system, where each element performs a clearly defined function. In general, this is a complex of pipes with a heat carrier laid under the finishing floor covering. Heated water is supplied to the pipeline, which transfers heat to the floor and air in the room.
The general principle of organizing water floors is shown in the diagram.

Explanations for notation:
The essence of the functioning of the heating system is as follows. The heating medium is supplied from the boiler to the thermostatic valve. The element responds to temperature changes - when the value increases, a chilled water mixture from the return pipeline opens.
The circulation pump sends the flow to the thermostat, which is responsible for regulating the heating of the water. Further, the liquid enters the distribution manifold and loops of the circuit. To redirect the coolant through different chains of the heating system, a collector assembly (comb) is used.
Like any engineering system, installation and operation of the underfloor heating circuit has pros and cons. At the planning stage, it is necessary to weigh all the disadvantages and advantages of a warm water floor.

Main advantages:

We should also mention the disadvantages of the "water system":
Important! Water floor cannot be done in high-rise building with centralized heating system. Technically, the system can be implemented, but this will disrupt the heat balance between the apartments. At neighbors, the pressure in the pipeline will decrease, and the heating temperature of the batteries will decrease
There are three main options for installing a warm water floor with your own hands:
The selected technology determines the composition and sequence of layers of laying the floor.
"Wet" method. It implies pouring the heating circuit with a concrete screed. The technology is most common due to relative availability and good heat capacity. Minus the way - big weight systems, increasing the load on the foundation and floors.
The concrete system pie includes:

The decking and wood system are mainly used in the construction wooden houses. Their advantage is the possibility of operation immediately after installation, the disadvantage is increased heat loss.
Scheme of organization of a floor water floor:

Installation of the water circuit in wooden system performed in different ways:
Before proceeding with the selection of heating equipment and related elements, it is necessary to perform a system calculation. Responsible work is best left to a specialist. Ultimately, the results of the calculations should answer the following questions:

A heating engineer takes into account a number of factors when calculating:
When calculating, the following rules and norms are adhered to:
An important point in the design is the choice of the layout of the heat main. There are three options: snake, snail, combined.
snake. The easiest way to implement. The pipeline is laid in successive loops running from one wall to another and returning to the collector. The disadvantage is uneven heating.
Snail. The forward and reverse line of the highway run next to each other, a loop is formed in the center of the room. Most warm floors are equipped according to this scheme, as it provides the same intensity of floor heating.

Combined. The method is relevant for rooms of complex configuration and rooms with external walls. The marginal zones are formed by a snake, and the remaining area is formed by a snail.
Features of distribution along the contours:
Having calculated the system, you can proceed to the selection of components. The main attention should be paid to such elements:
Collector node. The distribution element is one of the most important components of the heating system. In addition to redirecting the coolant, the equipment regulates the temperature, balances the loops, and removes air.
In a primitive version, the collector is equipped shut-off valves- such an assembly reduces the cost of the system, but limits the possibility of adjustment. Optimally, if the distribution unit is equipped with:

In the absence of a separate riser for underfloor heating, a mixing unit is required - a set of equipment is responsible for preparing the coolant. The design of the assembly includes: a pump, a bypass, a thermostatic valve.
Type of pipeline. The main choice lies between the following types of pipe products:

Substrate. The bedding material must have low thermal conductivity, be resilient, durable, resistant to temperature fluctuations and waterproof. These criteria are best met by:
Let's designate the basic requirements for the placement of structural elements of a warm floor:

Main preparatory work before starting work on installing a warm water floor with your own hands, include:
The first three points are discussed above. The next step is selection. necessary materials for a warm water floor. To equip the system according to the method wet screed will need:
Preparing the premises is reduced to the following steps:
At the end of the dusty work, you can proceed with the installation of the "pie" of the warm floor. Further sequence of actions includes the following steps.
Laying a heat-insulating layer. The heater is placed on a flat base. Thermal insulation boards they are tightly joined, the joints are glued with adhesive tape, dish-shaped dowels are fixed at the corners.

Pipe installation and connection to the manifold. Mark the traces of the contours on the base, glue the perimeter of the room with damper tape. Lay pipes along the lines, securing them with brackets. Lead the loops to the collector and record the length of each loop.
Placement of reinforcing mesh. It is enough to place a wire mesh with a cross section of 3 mm over the main line, the dimensions of the cells are 10 * 10 cm. Metal reinforcement can be replaced with plastic. The main task of the grid is to prevent cracking of the screed.

Pressurization and system check. The stage is necessary to eliminate possible malfunctions and leaks before pouring the screed. Procedure:
Screed filling. Install beacons, prepare a solution, the ratio of components: 1:3 (cement:sand), water - a third of the mass of cement. Thoroughly mix the mixture with a mixer and pour the floor, starting from the far corner.

Finishing adjustment. After 3 weeks, the loops of the "water" line are balanced. When the circulation in the circuits is established, they begin to start the heated coolant.
Commissioning. At the final stage, the system is filled with warm water, starting from 23-24°C and increasing the temperature by 3-5°C daily.
Do-it-yourself media temperature adjustment:

You have to wait a couple of hours to feel the heating of the floor. Final adjustment temperature regime and the pump takes time.
The choice of high-quality components and compliance with the installation technology is a guarantee of durability and uninterrupted operation of a warm water floor. A well-functioning heating system will create a comfortable microclimate in the room.
Do-it-yourself warm water floor: video
Individual entrepreneur details in the contract include mandatory and additional information....

Storage of cash in institutions and at individual entrepreneurs is carried out at the cash desk. For analysis...

The problem that users of 1C: Pіdpriёmstvo encounter is “Error: Field ...