


Once upon a time there was an old man and an old woman, they had a daughter, Alyonushka, and a son, Ivanushka. An old man...


Underfloor heating has long been used in Western countries Unfortunately, this method of space heating is still rarely used in our country. The reason is the inability to save energy and unwillingness to introduce modern technologies.
Why is the use of underfloor heating welcomed in developed countries?
Currently, in some European countries, at the legislative level, requirements are prescribed for the mandatory installation of underfloor heating in all new buildings. In order to better understand the criteria for choosing a warm floor for tiles, you need to know their types and brief specifications. Taking into account the design and principle of operation, warm floors are of two types:

Due to the complexity of installation and the high cost of the elements, the first ones are rarely used, most often floors with electric heating are installed. Depending on the design features electrically heated floors can be of these types.
| Type of electric heating | Technical specifications |
|---|---|
| It can be unshielded or shielded, only shielded is used for residential premises. The diameter of the conductive core can reach 5 mm, due to this, the service life is significantly increased, it can be poured with a concrete screed. The large thickness of the cable eliminates burnout as a result of sudden voltage surges. Shielding increases the safety of operation, excludes mechanical damage during construction work. The cable can be laid on concrete base or immediately on thermal insulation, for fixing, depending on the base, special additional elements are used. Recently, cables with a diameter of 3 mm have begun to be produced; ceramic tiles can be laid directly on them. But professionals do not recommend using this technology under the tile. Why? We will talk about this in the article below. |
| Commercial name infrared, it is recommended to use as a means of additional floor heating in apartments with an existing heating system. Depending on the materials and manufacturing technology, film heating can be used for heating residential and commercial premises with heavy floor loads. Not recommended for use under tiles. cement mortar may damage conductive parts. Such heaters can be mounted under linoleum, carpet and other soft surfaces that do not require cement glue. |
| The most modern innovative method of floor heating, universal use, best option under the tiles. Carbon conductors are connected in mats various sizes. The main advantage of such a heating system is automatic temperature control. This allows you to mount heating under the entire floor area, regardless of the placement of furniture. Only such a system has this advantage, all the others require taking into account the furniture layout plan. In addition, on floors with ordinary heating can not be installed new furniture, and this creates great inconvenience for residents. How carbon elements work, we will tell a little below. |
There are several physical and technological reasons, taking into account which builders do not recommend installing this type of underfloor heating under tiles.

First. The diameter of hoses or pipelines is at least one centimeter. If we add to this parameter the minimum thickness of thermal insulation, the base, the thickness of the tile adhesive and the thickness of the tile itself, then the floor rises above the floor slab by at least 10 cm. This is a lot for residential premises, in addition, in some cases, the floor level in bathrooms becomes higher than the floor level in adjacent. As a result, after the occurrence of emergency water breakthroughs, not only the bathroom is flooded, but the entire apartment, regardless of the reliability of its waterproofing.

Second. To control the parameters of operation, water supply and temperature control, expensive and complex special equipment is required. In addition, the number of pipe connections is significantly increased, resulting in an even greater risk of leaks.

Third. Such a floor heating system can only function during the heating season, it is completely tied to the general system, numerous permits are required for connection in apartment buildings. And installing a separate heating boiler for the floor is not economically feasible.

All materials tend to change linear dimensions when the temperature changes. Ceramic tiles are fixed to the base with special glue.

It has excellent performance, but cannot form a single whole with the base. With the expansion of the base, the strength of the connection weakens slightly; with repeated temperature changes, the tile can completely peel off. Tearing will not occur after several years of operation, but water heating is used for decades, during which time microcracks reach critical sizes.

The negative phenomenon is enhanced by the fact that the hoses must not be bent under small radii, minimum distance between the lines is 15 cm. As a result, the base warms up unevenly, especially during the turn-on period. And this further increases the risk of tearing tiles.

In connection with such features of water heating, it is currently used very rarely, preference is deservedly given electrical way. As an example of a warm floor for ceramic tiles, we will consider the option with carbon mats.
First you need to learn about the physical features of carbon mats, this will help you choose the right technology tile installation.

In ordinary current conductors, the resistance increases as the temperature rises, the higher it is, the more energy is used and the more heat is released. When the consumption reaches its maximum, further regulation is carried out by lowering the current strength by the regulator. Such physical phenomena occur simultaneously along the entire length of the conductors.
Innovative carbon heaters have unique property- as the temperature rises, the power decreases, respectively, the heating temperature decreases. Each carbon element in one place can have a different temperature. This feature makes it possible to place furniture on the floor with electric heating without any restrictions. During the installation of mats, there is no need to take into account the location of objects on the floor, heating is provided throughout the entire area.

The characteristics of the mats vary slightly depending on their technical parameters, in the table we will give the average values.
| Parameter name | Indicators |
|---|---|
| The maximum power consumption of the carbon rod at a temperature of not more than 20 ° C | 110-120W per running meter. Based on these data, a heat engineering calculation of space heating is performed. |
| The maximum power consumption of the carbon rod at a temperature of + 60°C | 70–80 W per linear meter. general power is reduced by about 40%, due to this the heating temperature is automatically lowered. The phenomenon may be oscillatory after the power is turned on, but over time, the height of the sinusoid decreases, the heating temperature and power consumption stabilize. |
| Average consumption of electrical energy of a carbon rod, taking into account its diameter | 20–30 Ah |
| Length of one mat | 20–25 m |

The change in power depending on temperature occurs due to complex physical phenomena, there is no need to describe them.
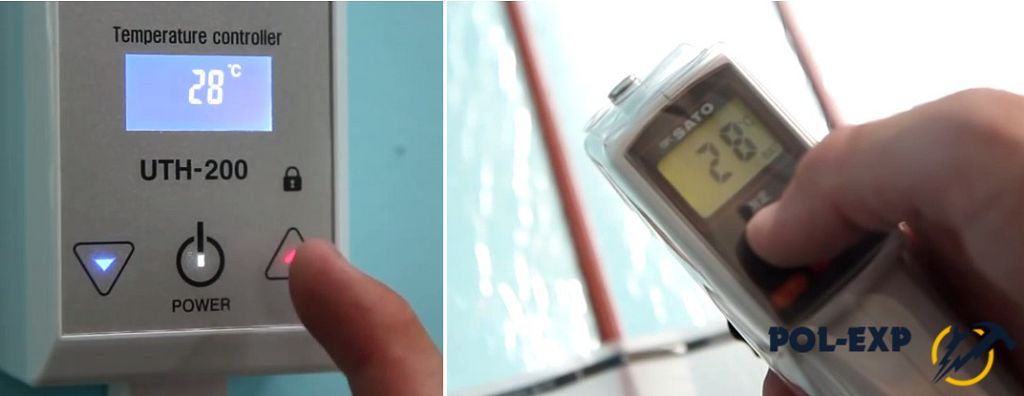
underfloor heating TeploTex
The kit includes a carbon mat, VVGng-type wires for connecting several mats, connecting and end kits, a corrugated tube for a temperature sensor, a temperature sensor and a control panel.


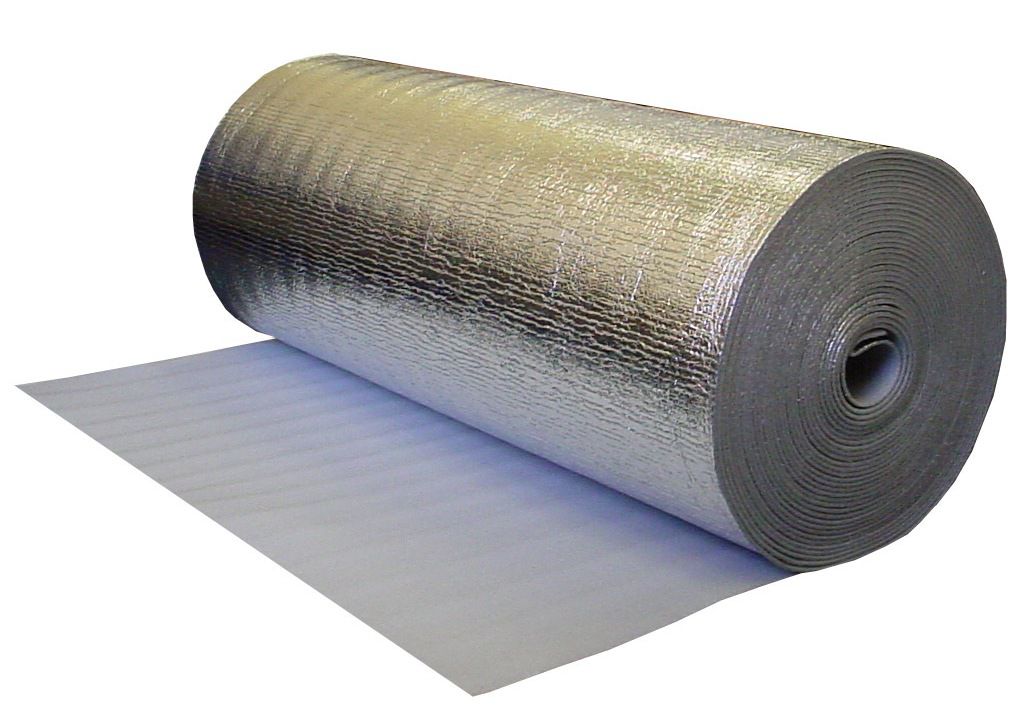
To carry out the work, you will need pliers, scissors, a mounting knife, a tape measure, a wire stripper, crimping pliers, a screwdriver, adhesive tape, and a technical hair dryer. The kit includes heat-reflecting material penofol or isolon, manufacturers recommend using them, but below we will dwell on the advisability of using heat-reflecting material.

The floor must be laid on a prepared and high-quality insulated surface, before starting work, remove construction and other debris from it.
We will give a typical step by step instructions installation of a carbon mat, and at the end we will talk about the comments of professionals. Decide for yourself how to proceed.
Step 1. Take the dimensions of the room. We have already mentioned that carbon mats can be laid over the entire surface, the dimensions, type and location of the furniture do not play any role. According to the data obtained, determine the number of mats.

Step 2 Decide on the location of the control panel. It is best to place it next to the light switch.

Make grooves in the walls and floor base for mounting the floor temperature sensor and conductive cables. If necessary, make a hole for the switch box.


Step 3 Lay the heat-insulating material, seal the joints with adhesive tape. Make sure that it lies flat without kinks and convolutions. Attach it to the base with glue, a stapler, or double-sided tape. Choose the fixing method taking into account the characteristics of the base.

Step 4 Proceed with laying out and fixing the carbon mat. Start spreading from the side of the installed thermostat. At the turn point, you need to cut the connecting wire. It should be cut only in the middle, then the ends are cleaned and connected to each other with the electrical fittings supplied in the kit.


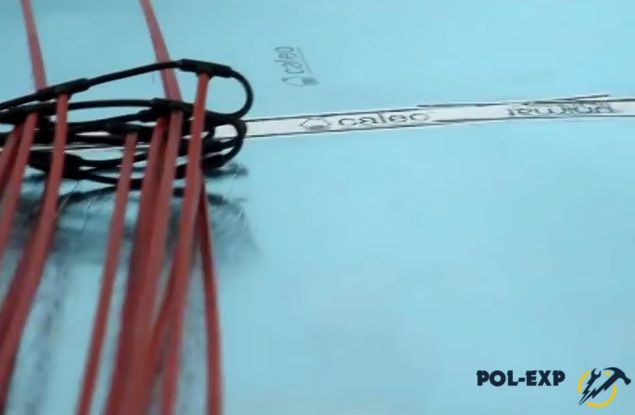
Important. total length mat strips cannot exceed 25 m. If more elements are required for the room, then the subsequent ones will be connected separately.
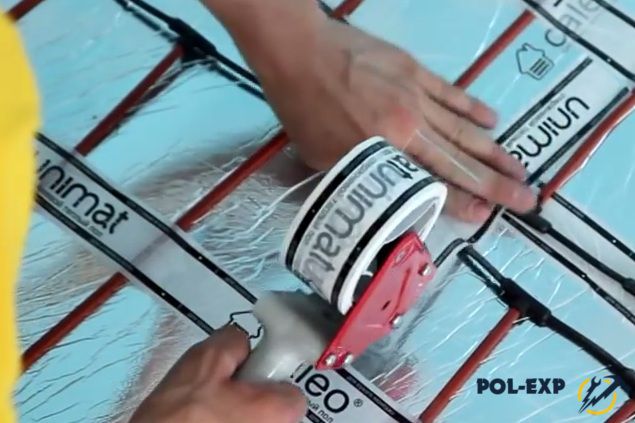
Step 5 To exclude the possibility of shifting carbon mats during further work, you need to fix them to the surface with adhesive tape. Make sure that the carbon rods do not intersect, this rule applies to the installation of any type of underfloor heating.
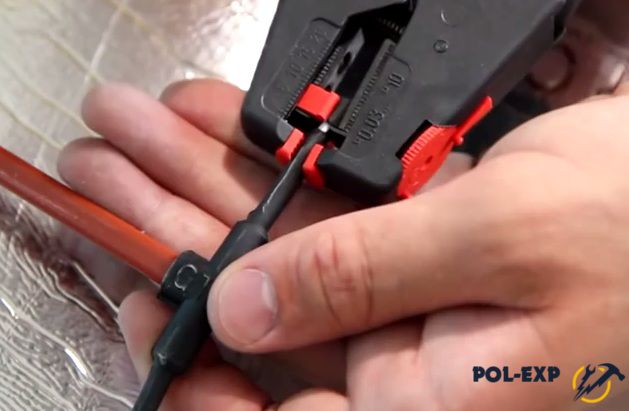
Step 6 Proceed with connecting and insulating carbon mats. For connection, you need to use VVGng wires, while using special device for stripping the ends of the insulation. It is not recommended to remove with a knife; during inept actions, you can cut the wire a little. Over time, it will burn out at the site of damage, you will have to remove the tile to eliminate the malfunction.
On the stripped ends, put on a special sleeve in a heat-shrinkable tube.


Using crimping pliers, firmly squeeze the sleeve, check the strength of the connection by pulling out the wires. They should sit firmly without any wobble.


Using a heat gun, heat the tube, it will tightly compress the cable insulation. Do not overheat it, work carefully. Move the second heat-shrinkable tube to the junction and also heat. As a result, each connection is double insulated and reliable protection from moisture ingress.

Warming up the sleeve with a hair dryer

A tube that is heated with a hair dryer in the same way as a sleeve
Step 7 Connecting a thermostat. Connect according to the instructions supplied with the device. Tighten the contacts tightly. After the first tightening, repeat the operation, this will ensure the tightest contact of the elements.


Step 8 With the sharp end of the mounting knife, make holes in the heat-reflecting material, they are needed to improve the contact of the leveling screed with the base. Holes should be made between the carbon conductors. Be careful not to damage the insulation. Holes should be in checkerboard pattern at a distance of about 30 cm from each other.


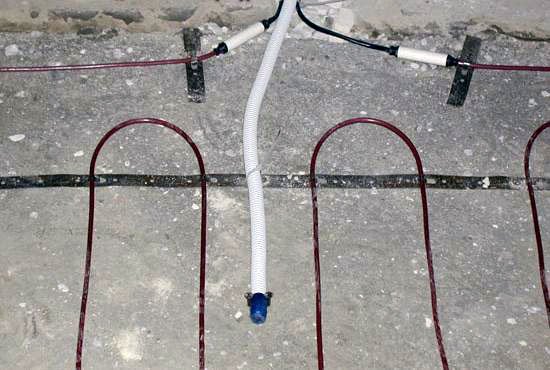
Step 9 Install a floor sensor. To do this, thread it into a corrugated tube, close the open end of the tube with a special plug. The tube is needed so that, if necessary, the sensor can be changed without problems. Lay the tube in the previously prepared groove in the base of the floor. The sensor should be located approximately in the middle between the carbon rods.
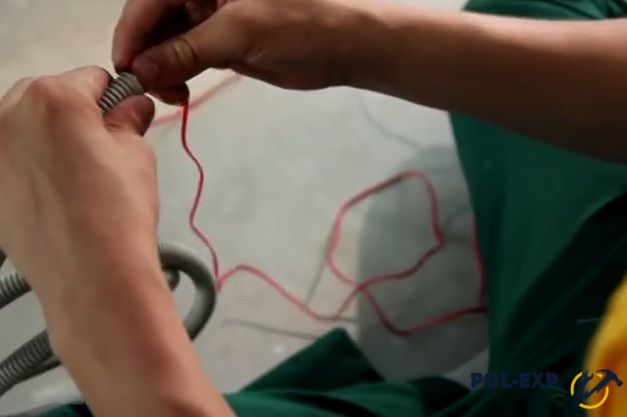

Practical advice. The sensor is much easier to install with soft metal wire. First, insert it into the hose, then tie the sensor wires to one end and pull the wire until it takes its place.
If the groove in the base is not prepared, then the sensor can be installed without a tube, fix its position with adhesive tape.

Step 10 Connect the sensor wires to the appropriate thermostat terminals. Use a tester to check that all connections are correct.
Step 11 Turn on the systems for 5-10 minutes, check the serviceability.
If everything is in order, then you can proceed to further work.
The tiles should be laid on a cement screed 2–3 cm thick. The greater the thickness, the greater the heat capacity of the floor, but at the same time the heating time increases. Before laying the tiles, you need to prepare the screed. It can be done using the bulk method or the traditional one using cement-sand mortar, beacons and rules. There is no need to talk in detail about the technology, it is widely known, but to give professional advice according to the features of underfloor heating technology, there is a need.
It is not clear to professional builders why a thin foil heat-insulating material such as penofol is needed. Manufacturers justify its use by the fact that it additionally insulates the base and reflects infrared rays. This is a very dubious argument. Why?
Heat transfer occurs due to three phenomena: thermal conductivity, convection and thermal radiation. The first method is carried out with direct contact of bodies with different temperature, the second due to the movement of hot and cold air currents and the third due to the emission of infrared rays. If the effectiveness of the first two methods does not depend on body temperature, then the number of infrared rays, taking into account temperature, increases exponentially. A body with a temperature of 20–30°C emits a meager amount of infrared rays, respectively, and there is nothing to reflect. Electric wires they are in close contact with the screed and transfer maximum heat to it, and a small amount of infrared rays is absorbed by the same solution. The effectiveness of the foil in the case of underfloor heating is close to zero, an extra waste of time and money.
But that's not all. Penofol is a very soft material with a thickness of insulation up to 5 mm. Such a thickness does not give any noticeable effect of heat saving, you should know this. In addition to inefficiency, penofol brings direct harm. During the manufacture of the base, it bends unevenly, voids appear between the thin screed and the floor slabs. As a result, the screed cracks and the tile peels off.


Laying an electric underfloor heating under such flooring like tiles, it takes a lot of effort and time. But with strict adherence to the technology of laying a warm floor under a tile, even a novice performer will be able to cope with the installation process.
When choosing floor heating from the network, you should decide which option to choose:
To calculate the required number of thermomat for work, it is enough to set the area of the entire room. As a result, it remains only to choose exactly the roll of material that will correspond to the calculated size.
Only from this it is already clear that the electric mat has a significant advantage over a conventional cable. Also, more about him. positive feedback online from users.
Video: All about underfloor heating Answers to many questions, part 1. Comparison and selection of heating cable and mat.
If you need to have at least basic knowledge in the field of electrics.  Particular attention should be paid to the base where the heating mat will be laid in the future.
All furniture and household appliances are removed from the floor surface. The old base is brought into proper form and, if necessary. If there is an old floor covering, it is better to remove it along with the flooded old one. This will allow you to leave the distance from the ceiling to the floor unchanged when creating new design indoor heating systems.
As for the rough screed, it is performed to create a flat surface. The thickness of the solution is usually selected in the range from 30 to 70 mm. In the end, it remains only to remove all debris from the base and, if necessary, vacuum.
Before starting installation, it is very important to calculate everything correctly. For this, a connection diagram is drawn up. Here, in without fail the step of laying the electrical wiring or the heating mat must be marked. In any case, you should follow certain recommendations in order to get a really high-quality scheme:

Competent for installing a warm floor under an electric tile will allow you to get the desired result without wasting money. Every meter square square rooms will need to be purchased heating element with power from 140 to 180 watts.
There may be cases when the room is very carefully insulated. Here the heating system will act as an auxiliary element and then the power can be chosen less than the permissible norm - approximately 80 W / m 2.
For the calculation, the area of \u200b\u200bthe room is measured (the length is multiplied by the width), and then subtract from the result the area of \u200b\u200bthe furniture and equipment under which the heating cable will not be laid under the tile. What happens and will be considered a usable area for heating.
A similar principle is characteristic of a thermomat. Calculated effective area and the power of the heating elements is selected. This is the amount you should buy.
To ensure that the heater can be securely fastened to the poured screed, a mounting tape is used.
During installation, special attention should be paid to the old wiring so that it can withstand the load of a powerful one. If you do not have your own knowledge in determining the current cross section of the cable, then it is best to seek help from specialists. But this item must be fulfilled without fail without exception.
Under the laying of a warm floor under the tile, bases are made. This is done in order to eliminate heat loss in the room.  Not only the efficiency of heating will increase, but also its efficiency during operation.
One of the best options for warming -. It is presented in the form of a rolled material having a layer for attaching to the base. In addition, it has a foil coating to reflect heat towards the room. Sheets of insulation material are laid out on the surface of the concrete floor butt-to-butt and the joints are glued with foil tape. For thermal insulation to be more effective, the material should overlap the walls in the room somewhat.
There are other alternatives for thermal insulation that have the effect of reducing the floor-to-ceiling distance. Here you can call polystyrene foam or polypropylene.
At the end of this stage, a damper tape is attached to the wall above the located insulation, designed to compensate for the thermal expansion of the entire structure during operation. It will not be superfluous to lay a metal mesh on the surface, which acts as a reinforcement and makes it possible to exclude direct contact between the heating elements and the insulation. In the future, this will somewhat reduce the amount of work when laying an electric underfloor heating under the tile.
Designed to independently control the entire system. In addition to the sensor itself, a thermostat is installed, which can be not only mechanical, but also electronic. All this will allow you to set the temperature level that will be necessary for a comfortable stay in the room. 
Installation of these elements is carried out on the wall, near the location of the sockets. But the temperature sensor is mounted directly in the floor. From the thermostat, a strobe is made along the wall (only vertically in level), as well as a strobe at the base of the floor. It is important to first place it in a corrugated pipe. The place where it is attached is the middle part between the existing two turns of the heating element. In this case, any intersections should be excluded.
So that in the process of pouring the screed along the elements of the warm floor under the tile, the corrugated pipe with the sensor is not filled with a solution, one of the ends is filled with a sealant.
Laying of heating mats is carried out strictly according to the scheme that was previously created before the start of installation. At the same time, special markings are made on the basis of the floor, corresponding to the parameters of the drawing. When cutting fiberglass, care must be taken not to damage the wire itself. All this will lead to the failure of the entire structure.
Cable resistance should not differ by more than 10 percent from the data specified in the passport for the material. The phase of the cable is also determined here. To facilitate this process, wires can be color-coded. Everything is determined by them. 
For fastening, a mounting tape is used on or plastic clamps on a metal mesh. Over the entire area of \u200b\u200bthe room, the same distance between adjacent turns should be selected. Otherwise, there will be no uniform heating of the floor base in the room.
After that, you should check the operation of the system and the presence of errors in operation.  To this end, the resistance is initially checked, which must correspond to the parameters that were previously determined, before the start. The next step is to connect the system to the network. If the work is normal and there are no deviations, you can proceed to the next step.
The health check is essential. If installation errors are revealed in the future, it will be necessary to dismantle the flooded screed. This will spend not only personal time, but also a sufficient amount of money.
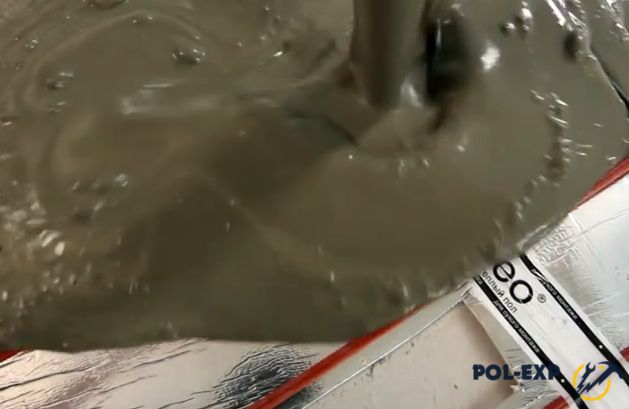
A warm floor can be placed in a screed or under a tile immediately. Everything will depend on the heating element used. For you need to prepare a solution. It must combine the following components:
To prevent cracks from appearing on the surface and to minimize the shrinkage of the solution, water must be added in the right amount, without exaggeration. It is strictly forbidden to add perlite or expanded clay to the solution. They will only disrupt heat transfer and can lead to overheating of the entire system, putting it out of action.
 1. Metal mesh, 2. Heating cable, 3. Screed, 4. Tiles.
 The thickness of the underfloor heating screed on average varies from 40 to 60 mm. Everything will depend on its purpose and foundation. A large thickness will lead to unstable operation of the heating system, as well as inefficiency. After the pouring is completed, wait until the solution is completely dry. This will take about a month. During this period it is forbidden to carry out connection to the network. If an electric underfloor heating is installed under a tile without a screed, then you do not have to wait for this period.
It should be noted that concrete under the tile is used only when a heating cable is used. Thermomats can also serve as the basis for subsequent installation ceramic tiles with special glue. That is, a warm floor is produced without a screed under the tile.
When the screed has set (after 3 days), you can start laying tiles on a warm floor. In the absence of experience, it is better to wait for the fill to dry completely. After all, the tile should lie exclusively on a horizontal surface. Used should be laid on the surface with a layer of no more than 7 mm. 
The start of electric work - after the tile adhesive has completely dried. Usually it takes about 20 days. In more detail, everything is written in the instructions from the manufacturer. During operation, it is necessary to control the maximum temperature parameters that will be transmitted to the room. This will allow you to use the floor covering for a long time.
The tile can lay down at once on a surface of heating mats. This design has many more positive aspects than a conventional cable. But the installation process is always observed, performing each of its points. Do-it-yourself laying of a warm floor under a tile is carried out very quickly. But in the absence of experience and understanding of the whole process, it is better to entrust the laying of a warm floor under the tiles to specialists. 
At the moment of seams between tiles on thermomats, it is important not to damage the insulation of the contacts. It is best to use only flexible mixtures intended for the electric floor heating system. Herself
Tiles and porcelain tiles are very practical for use in the kitchen, bathroom, toilet and even in the bedroom. But their main disadvantage is that their surface is cold at any time of the year. You can fix this easily by installing a floor heating system. The simplest and fast way installation is an electric underfloor heating under the tile, which we will talk about in this lesson.
Quick article navigation
There are several types of electric underfloor heating:

For installation in tile adhesive, heating mats and underfloor heating are best suited. In this lesson, we will only talk about laying heating mats, since the rod system is a topic for a separate article.
In practice, everything that is less than 150 W / m2 practically does not heat. The power of 150-165 W allows you to heat the temperature to a comfortable one, but it takes time. Mats with a power of 180 W / m2 allow you to quickly heat up the floor surface and mount them not in tile adhesive, but in upper layer screeds.
Heating the surface takes half an hour or more, and after turning it off, it cools down in a couple of minutes. If you look at those passport to some manufacturers, then you can generally see heating to a predetermined temperature up to 24 hours.
In fact, people rarely use heating. Usually it is turned on in two cases: to show off when guests come and in the off-season, when the heating is turned off.

To calculate the electricity consumption, you need to find out the total power of the mat over the entire area, multiply it by the percentage of active daily operation of the system and then calculate the monthly consumption by multiplying by 24 (hours) and 30 (days).
Consumption can be reduced if expensive programmable thermostats are used, due to effective management food.
If you want to put an electric underfloor heating on large area, you need to take into account the maximum load on the wiring. The load limit may be different, but the estimated value according to SNiP 31-02 "Power supply of residential buildings" is 8.8 kW per apartment with an electric stove.
The standard heating mat kit consists of two elements:

Connection must be made through a thermostat to maintain the set temperature.
According to the Electrical Installation Rules (PUE), it is mandatory to install an RCD (residual current device) with a trip current of 30 mA, 100 ms and an auto switch max 10 A (type C). Systems more powerful than 2 kW are recommended to be connected through a separate wiring with a machine.
If you are installing in a bathroom or other damp room, the thermostat must be located in an adjacent dry room.
The cable must not be shortened or cut! If necessary, only the power wire can be cut off.


Determine the location of the thermostat on the wall and the area where the thermostat will lie. Above the warm floor there should not be furniture without high legs, plumbing or household appliances. If the screed has damper seams, the mat must not pass through them. A separate thermostat and mats are used for each room. If it is planned to do several finishes in the room with different properties, you need to put a separate thermostat under each of them.
A standard temperature sensor is installed inside the corrugated tube. So that it does not create additional unevenness, a strobe is made for it in the floor and wall. The end of the corrugation is closed with a plug so that the solution does not get inside. The end of the sensor should be installed with a distance of 50-100 cm from the wall, slightly below the mat, in the center between two turns of the cable. Do not bend the corrugation with a radius of less than 5 cm to allow the sensor to be replaced.
Before laying the heating mat, it is necessary to cover the concrete floor with a primer to remove dust from the surface and increase the adhesion of the tile adhesive.
Lay heating mats on the chosen heating zone. To obtain the desired shape, you can cut the mesh and wrap the cable, but you cannot cut it. The mesh is attached to the floor with adhesive tape or staples, cable up.

After laying the cable, you need to measure the ohmic resistance with a multimeter. It should be within the limits (plus or minus 10%) that are written in the instructions or the manufacturer's warranty card.

Strip the insulation at the output of the mounting wires from the mat and the power wire from 220V by 5-7 mm.
Connect the wires to the terminals of the thermostat, according to its connection diagram, which is indicated in the instructions.
The shielding of the cable must be connected directly to ground.
Laying can be done immediately on tile adhesive, or pre-fill the mats with a screed (at least 2 cm thick). It is forbidden to lay tiles on a substrate made of chipboard, plywood or other material.
You can turn on the warm floor only after the glue or screed has completely dried, which is at least 28 days after installation. It is forbidden to set the thermostat to a temperature above 30 degrees. To prevent damage to the cable when repair work, draw and save the scheme of its laying.
It is advisable to use electric underfloor heating in rooms with a small area (up to 10 m2), in other cases, in terms of the total cost of installation and payment for energy, it will be more profitable to install water heating. But it cannot be installed in tile adhesive; an additional screed will be required.
comments powered by HyperCommentsTiles and porcelain tiles are the most practical finishing materials for special-purpose premises: kitchens, balconies, bathrooms and toilets, loggias. They belong to the category of cold flooring, which is unpleasant to walk on barefoot (especially in winter cold). In order to heat such a surface and create optimally comfortable conditions in a room with a tiled or porcelain stoneware flooring, systems for heating air masses from below are used. The least time-consuming installation will be electric heating.
A heated floor connected to the electrical network under a tile happens:
How to choose the most effective type of email for your home. underfloor heating under tiles, how to do it yourself installation, and what is important to consider when carrying out work - these and others important points worth considering.
The main requirement for laying water floor systems is to fill a thick layer of screed - from 15 cm. To this figure, you need to add, albeit a small, layer of finishing material. Organizing floor heating in apartment building, these centimeters are important to accurately calculate and take into account, because they can significantly raise the level of the floor. But laying an electric underfloor heating under the tiles does not require pouring a thick concrete layer - up to 5 cm. Variants of film systems and heating strips are mounted in adhesive composition when installing flooring. But saving usable space and a minimum of operations - these are just some of the advantages of installing warm electric floors under tile in the bathroom and / or dining room. There are others:
After making sure that electrical auxiliary heating systems are preferable, you should not rush to find out the question of how to make a warm floor under the tiles in the house. Now you need to choose the type of electric heating, since it is he who will determine the installation technology and its complexity, nuances. And also buy the right heating elements. Experts advise buying ready-made products, since they always have instructions for laying a warm floor under a tile or other coating.
Under tiles or porcelain tiles can be laid:

Do-it-yourself laying of cable underfloor heating under tiles without inviting professionals to the house is quite realistic. The main thing is to properly purchase materials and prepare essential tool. From many manufacturers, you can buy a ready-made cable underfloor heating for tiles of a specific capacity with a full or partial installation kit. 


In view of the fact that 73% of contemporaries install a warm floor under a tile with their own hands, IR film and mats are very popular. Cable systems are rarely used, since their installation requires specific knowledge. Buy certified and tested operating conditions thin underfloor heating for tiles is recommended by the companies National Comfort, Teplolux, Thermo Industri AB and other manufacturers. Having chosen the type of system, we will decide how to make an electric underfloor heating under the tiles in a cottage or apartment building with our own hands.
From project development. It will facilitate the process of calculating the necessary building materials and heating cable for tiles with laying without a screed or in a screed, as well as preparing for work. When designing, consider:

The drafted project will help to calculate the area useful for heating required amount electric floors for tiles, as well as determine the volume of insulating materials. Everything you need to install the system must be purchased in advance. If the laying of the air mass heating system from the bottom of the room is performed for the first time, it is worth paying attention to the choice of its power. Especially if the heated floors under the tiles will be the only heating equipment in the room. The power table below will help you decide. 
To properly lay a warm floor under an electric tile with your own hands, you need to prepare:
In order for the installation of a warm floor under the tile to go without a hitch, you need to take care of the tools. You will need: building level, tape measure, grinder, notched trowel, crosses, knife. At the time of buying ready kit an auxiliary system for heating air masses from below the room, additional devices do not need to be purchased. But if everything was bought separately, then it is worth making sure that all elements of the system are available. To install a warm electric floor under the tile, you need a temperature sensor, connecting elements and fasteners, and a thermostat.

Having found out which is better - a warm floor in a screed or under a tile, and having decided on the type of system, we will proceed to the preparatory procedures. The most responsible is the preparation of the site for installation work. The base should be as smooth and even as possible without height differences and defects. If you are wondering how to lay an electric underfloor heating under the tiles with minimal labor, then take care of chasing the wall at the place of installation of functional units. All dirty and wet work should be done before laying the cable or film underfloor heating under the tiles in the bathroom, dining room or bathroom.
Experts recommend dismantling old coupler and coverage. If the foundation was poured more than 10 years ago, then a new layer of concrete must be poured. If you do not level the surface, then you should not be interested in how to properly lay a warm floor under the tile. Height differences will cause wire strands to break or damage to mats (impact of loads). The service life will be no more than 2-3 years. By the way, if laying a warm floor under a tile is timed to overhaul, then you should start pouring the screed only after leveling the walls. Once the concrete has gained its strength (usually 17-28 days), all debris and dust must be removed from the installation base. It can be vacuumed.

Manufacturers produce special thermal insulation materials with a metallized (good heat reflecting) front surface. If the heating cable under the tile will be laid using just such thermal insulation, then the two previous stages of work can be easily combined.

At this stage, do-it-yourself installation of an electric underfloor heating under a tile can be considered complete. It remains to wait until the tile adhesive dries and put the system into operation. If the technology required you to perform a concrete screed, you must wait 28 days before turning on the auxiliary heating. Otherwise, the screed will crack and deform, which will lead to damage to the system.
In studying the question of how to install an electric underfloor heating under the tile with your own hands, you need to pay attention to the control check of the system. It is carried out immediately after laying out the cable or mats before connecting them to the mains. Testing is carried out using a multimeter. Check the electrical resistance. underfloor heating until its installation under the tile has begun. The measured number must match the data in the technical data sheet for the system.
We figured out how to properly lay a warm floor under the tiles, it remains to find out which finishing material better to buy. In principle, any porcelain stoneware or ceramic plate will do. Both finishes are compatible with electric floors- perfectly accumulate and conduct heat, safe and unpretentious to high temperatures. But if we come close to considering the question of how to properly lay an electric underfloor heating under the tiles, then it is worthwhile to deal with the classes of flooring.
There are the following groups:
On sale are also finishing materials of class PEI IV and V with increased operational characteristics surfaces. But they are expensive, and they are designed for places with high traffic. If you are interested in the question of how to make an electric underfloor heating under tiles as durable as possible in a corridor or hall, then experts recommend choosing this particular class of coverage.
When choosing ceramic tiles, pay attention to the porosity of its structure. For those who find out the question of how to install underfloor heating under the tile maximum efficiency, we can recommend choosing a very dense finish. The fewer air bubbles will be in the thickness of the material, the better it will conduct heat.
We found out how it is more profitable to lay a warm floor - under a screed or under a tile, what is better to choose for installing the system - mats, cable or film, and also how to carry out competent installation. But if you still have questions about how the underfloor heating is laid under the tiles, then it is better to entrust this procedure to specialists. Despite the safety of all the heating elements described above, problems can still arise.
If you want coziness and comfort in the house, then even at the stage of planning repairs, you should consider all possible options for improving the atmosphere in the room. For example, in a cool apartment or in a house on the ground floors, in order to feel comfortable and not freeze, it is often equipped. It is especially important to make a warm floor under the tile, since it is the tile that is the material that keeps the heat quite poorly, and it is not always comfortable to walk barefoot on it. Consider what are the systems of underfloor heating and how to mount them under the tile finishing coating gender.
It was and remains one of the most popular coatings used for flooring. This material is distinguished by the presence of a mass of advantages, namely:


However, the tile has its drawbacks, because nothing is perfect. So, this material has a rather high price. But its main drawback is its poor ability to retain heat. AT autumn-winter period When far from summer weather prevails on the street, the tile cools down rather quickly, and it is very uncomfortable to stand on it with bare feet - the material will tactilely feel as unpleasantly cold.

It is in connection with the last drawback that an underfloor heating system is increasingly being installed under a tile floor. It is designed to heat the base under your feet due to the coolant, which can be water or other systems that work on electricity.
There are several types of underfloor heating, and each of them has its own characteristics, advantages and disadvantages. These are electric floors, and, and even water ones. It is necessary to choose which option to equip in the repaired premises based on knowledge about the systems and their operating conditions. Let us consider in more detail when, how and what kind of heating is better to choose for installation under a tiled base.


This floor option works due to electric current. The system is connected to the power supply of the premises and can operate throughout the year, regardless of the heating period. These floors are easy to adjust the temperature.
On a note! In apartment buildings, it is recommended to equip exactly electrical systems floor heating, since although they consume electricity, they do not pose a threat of flooding to rooms located below a particular apartment.

In turn, electrical heating systems can be divided into several types:

In this case, a sufficiently thick cable is used as a heating circuit, laid under the screed and tiles. Such heating can be both the main and additional source of heat.

As a rule, cable floors in apartments under tiles are used extremely rarely. The reasons are simple - in order to make cable heating, after laying the circuit, it is necessary to fill in the screed, which dries for a long time (28 days), and only then can the tile itself be laid directly as a finishing material. It is also important to remember that due to the additional screed, the height of the floors in the room will increase slightly, which sometimes will prevent the doors from functioning normally. Yes, and the extra weight that will give the floors cement mixture, also not the best best condition for an apartment building. But in a private house, such floors can be equipped.
On a note! It is also possible to equip cable floors in an apartment building, but it is better if the room has not yet been finished - in this case, the likelihood that the screed is already flooded is minimal. So, it can be done independently, after laying the heating wires.

The cable system can be made of a single-core or two-core cable. You can use heating only after the cement screed has dried, but before pouring it, the system must be checked for operability. The disadvantages of cable heating include the fact that in the event of a failure of the heating system, it will be extremely difficult to repair it - you will have to disassemble the entire screed.
Table. The power of the heating mats.
| Room type | Average power (required, W/m2) | Maximum power (required, W/m2) | Linear power of cable, W/m |
|---|---|---|---|
| Bathroom, toilet, bathroom | 130-150 | 200 | 10-18 |
| Rooms on the first floors | 130-180 | 200 | 10-18 |
| Thin floors (using IR floors) | 100-120 | 150 | 8-10 |
| Balconies or loggias | 130-180 | 200 | 10-18 |
| Floors as primary heating | 150-200 | 200 | 18-20 |
| Heating of wooden floors on the log system | 60-80 | 80 | 8-10 |
| Kitchen, hallway, bedroom, nursery | 100-150 | 170 | 10-18 |

Heating mats, which were also invented for underfloor heating, are a variation on electric underfloor heating. They are much more often used for installing heating in an apartment, since they do not require pouring the screed. Heating mats are a grid on which pieces of a heating cable are fixed. Power is supplied by electricity.
Installation of such a system is carried out under tile adhesive, and tiles are laid on top. Thus, work on the arrangement of heating can be done very, very quickly - the floors can be used as soon as the tile adhesive dries. And the height of the floors will increase by a maximum of 1.5 cm.

Important! Before laying the heating mats on the base, you need to think about where and how the interior items will stand. The fact is that in those places where such a mat will lie, no objects can be placed. Otherwise, you can provoke overheating of the system and its failure.
Installation of the system is simple, the main thing is to know the basics of physics and carefully study the instructions for connecting to the mains. Everything else is extremely simple and clear.
Step 1. Before you start installing the underfloor heating system, it is important to prepare a rough base for subsequent work. So, the floors should be cleaned of debris, leveled as much as possible and treated with waterproofing. To even out small differences and defects in the base, it is recommended to use self-leveling compounds. If the floor screed is in perfect condition, then it can simply be cleaned of debris and waterproofing work can be carried out.


Step 2 When the floors are prepared, you need to mark the places for laying the tiles. It is important to estimate that all the whole ceramic elements are in open spaces, and those that have to be cut are not conspicuous. For the convenience of marking, the tile can be laid out on the floor as it should lie after completion of work.


Step 4 Markings must be applied on the floor and walls, along which a strobe will be made for laying the temperature sensor and wires. The temperature sensor is placed in a strobe in a corrugated pipe. After laying the sensor and bringing the wires out, the strobe must be sealed with a solution.

By the way! It's best to ditch the walls and make these preparatory work before applying waterproofing to the base. And mats are best checked for performance before the final installation.
Step 5 Now you can prepare and tile adhesive. It must be mixed according to the instructions on the package.


Step 7 Then the tile adhesive should be leveled with a spatula-comb, spreading evenly over the surface.

Step 8 After that, a little tile glue should be applied to the first tile from the wrong side.


Step 10 Thus, you need to lay out the first row of tiles. Don't forget to use delimiters appearance resemble crosses and are installed between the tiles. They will help maintain the same distance between the ceramic elements and make neat seams.

Step 11 Now you need to apply tile adhesive to the base in those places where the heating system will be installed.

Step 12 Separate heating mats must be connected to the temperature sensor and temperature controller using wires. The connection of cables of individual mats is made by means of heat-shrinkable sleeves, which are enough to be heated with a building hair dryer, and they will be fixed. If more mats are used, then they also need to be connected to each other.

Step 13 Now you can lay the heating mats themselves on top of the glue.

Attention! During the installation of heating mats, it must be ensured that it is between two adjacent heating strips, and not under one of them, otherwise it will show incorrect data.
Step 14 After the heating system has been laid and connected, you can continue to lay the tiles in the same way as before: apply glue to its wrong side and lay it on top of the heating mat, pressing. Thus, the installation of the tiles is completed. After the glue dries, the seams between the individual elements can be sealed with a special tile grout.

It is important to remember that heating mats cannot be cut. So when calculating their number, it is worth rounding it down.
Once upon a time there was an old man and an old woman, they had a daughter, Alyonushka, and a son, Ivanushka. An old man...

Gods - Olympians (myth of ancient Greece) The most powerful of all sons ...

To see torn shoes on their feet in a dream can be people who have a big ...