"The woman is created for a man, not a man for a woman" - such a postulate ...


The bathroom is usually supplied complete with legs or framework, which is based on this plumbing product. In the manufacture of foaders, manufacturers are repelled from the fact that the floor distance to its side should be about 60-65 cm.
However, sometimes there are situations where the standard height of the bath is uncomfortable for use or water is poorly out of it. In this case, there is only one way out - lift it. In this article we will tell how to raise a bath over the floor level 3 by the most popular ways, as well as what the advantages of each of them.
Generally standard bath height over the floor construction Rules And the standards should be 60-65 cm. This standard was calculated in accordance with the average height of a person and not yet been tested by one generation.
If the font is installed at this height, it is convenient and safe to use it. However, the crust occurs situations when you have to lift the bath above the floor. Most often this procedure is performed to solve the following problems:
Remember that the standard height is calculated and fixed in slips and gtales, as it is suitable for most people. However, if there is a need to lift outdoor fonts, then this can be done by lengthening the legs, facing the podium from foam blocks or bricks or with a frame.
Before raising the bath to work well, it is necessary to calculate everything well. Ogrechi in the montage can lead to discomfort during washing due to instability of the font, strain walls or bottom of the bowl, the crown of enamel.
When choosing a way of raising the bath over the floor level, the following nuances should be taken into account:

Note! When choosing a way to lift the bath, you need to take into account the 3 most important factor: the material from which the font is made, the height to which the rise will be carried out, as well as the weight of the model.
The most common way to install baths is the use of supports or simply legs. With this installation option, you can install models from cast iron, steel and even acrylic. Delivery legs usually have standard height.
If the legs are made in the form of a screw, then they can be adjusted. If the height of the standard legs is not enough or using them you need to give a bath bias towards the plum for better water removal, then they can be lengthened.

For this act as follows:
Important! This method of elongation of the legs has several flaws. Firstly, such a method cannot be increased the distance between the floor and the side of the focus was larger than 5-7 cm. Secondly, the load on the legs significantly increases, because of which they can deform. Therefore, when buying screws to lengthen the legs, you need to pay attention to the material from which they are made and the diameter of the section.
As we have already figured out that the elongation of the legs to increase the height of the bath is not best way. The main drawback is the small area of \u200b\u200bthe support, which leads to an increase in the load on the legs, as well as the deformation of the walls and the chips on the enamel of the bowl.
To increase the area on which a sufficiently massive plumbing device relies, it is possible to use supports from bricks instead of the legs, foamlocks or paving tile. The advantages of this method are considered:

Important! With heavy baths from easily deformable baths from acrylic and heavy cast iron models, it is necessary to act this way - to install on the columns. This is one of the most good ways Installation of foaders on non-standard height. When the bowl is raised on the bricks, it stands steadily, does not stick, not deformed under load.
If you raise the bath from acrylic on legs, under load it can be deformed or even burst. To evenly distribute the load and increase the area of \u200b\u200bthe supports, thin-walled fonts are installed on the frame.
The frame can be made of metal corners from of stainless steel. It can be a team or welded, and the second option is characterized by increased strength.

Before installation on the installation of a frame, you need to make sure that you have everything you need:

Consider when we raise the bath above the floor level using a frame, it is quite difficult for her to give a slope. Therefore, this method is suitable in cases where the bottom of the container has a natural bias in the direction of the drain hole, and the water is dried well.
Often in the production process repair work There is a question with the device of the bodybuzzle in the bathroom. After all, after completing the repair on an apartment to check compliance with all construction standards and the rules, the Housing Inspector is published, and one of the first moments to which he pays attention is the presence of a hole between the bathroom / bathroom and the corridor in the apartment.
If you rely on documents, it requires the SP "Floors. Actualized edition SNiP 2.03.13-88".
In terms of paragraph 4.8, it is said that the floor level in these rooms should be 15-20 mm lower than in the rooms, or separated by a spawning.
Subject to its presence and waterproofing devices With a 15-20 cm plant, a sufficient amount of time can be passed to detect leakage and its elimination.
There are four possible types of device loads or compliance with the rules of this SP:
The most common option: in this case Everything is simple - floor of the bathroom and the corridor of one level, but they are separated by the thresholds with a height of 15-20 mm. It should start waterproofing during repair work.

A slightly less common option, since not many owners want to make a step, even small, inside the bathroom. Such a bathroom is called a bark or bathroom-bucket.
Quite often the option, especially when re-please panel houses Series II-49, II-57, P3, P44, P44T etc. The feature of the data of the houses is that the walls of the sanitary cabin are demolished quite easily, but the pallet is very solid and dismantle it is difficult.
Therefore, many owners dismantle the walls, and the pallet leaves. The disadvantage of this option is that the level of the bathroom is higher than the floor level, and it is still necessary to do the threshold. And as a result, it turns out a practically a full-fledged step.

But this is a rare case, because few of the owners implements a similar option. It is not described anywhere, but theoretically suitable for the requirements of the joint venture. There is a requirement - the presence of the thoring, but the configuration of the clad is not prescribed. And if the requirement is complied with the fact that the floor of the floor bath and the bathroom is lower than general level Floors in the apartment, then theoretically, the flames can be smooth.


It should be noted that the concept of "threshing" means the real threshold. Below are a photo "Decorative" thresholds that do not replace Real.
"Decorative" threshings:
Additional information on the topic
Frequently, the owners do not want to make the flames in the bathroom and install quite useful systems From the leaks of water, which during leakage blocks the entire removal of water to the apartment. This system, as it were, they want to "parry" the absence of thresholds. They say why it is needed if the system will work from leaks, and the flood will not.
But the objectively the situation looks like that all the coordinent organs work on documents of those years, in which there are no fact that there is no mention of the protection of protection against leakage systems, and the person has not been born that this system came up with.
But about the thresholds there everything is written in detail, so even when installing this system, the threshings will be required.
And in each redevelopment project there is a section where this threshold is clearly reflected:


There were often different opinions about the height of the thresholds, and in order to exclude them, we wrote a request to the housing inspection, and an exhaustive and unambiguous answer came to our request, which you can see below:

Why do you need the bridges in the bathroom? This question often arises from users who make repair and smoothing floors under the same height. However, the Code of Rules SNiP emphasizes the need for a hole between the bathroom and the corridor and no false thresholds and other tricks do not save if your neighbors turned out to be harmful and caused inspection. Moreover, any repairs with redevelopment automatically entails a visit to the housing inspector for the inspection of the housing, and the representative of the authorities will definitely pay attention to the presence of a spill. The requirement is enshrined in SNiP 2.03.13-88, SNiP 3.04.01-87.
The documents say that the floor level in the premises of the bath and bathroom must be 15-20 mm lower than the base in other rooms or be separated by the spawning. Subject to the presence of this separator between the rooms of the apartment and the determined amount of waterproofing material, the leakage will not harm the neighbors. On SNiP there are 4 allowed type of arrangement of the thresholds:
 With apartment arrangement, owners are trying to solve the problem in many ways
 With apartment arrangement, the owners are trying to solve the problem in many ways by establishing useful protection systems for water leaks. In this case, it may be blocking the entire water supply. Such an option would have to become a replacement of the clad, but the relevant authorities still work on documents, where they did not know about such measures. And so it's not always possible to legitimize this alteration.
Construction standards and rules SNOP on bathrooms are characterized by rigidity:
Attention! The inhabitants of the first floors are not terrible guidelines, since the premises are considered to be non-residential, and redevelopment is allowed almost any nature. But compliance with the level of the drop (at least 20 mm and no more than 7 cm) is required!
Attention! For the owners of the apartments, where the water supply blocking systems are installed, a temporary imposition version is proposed, that is, the installation is carried out at the commissioning of the commission. This false threshing will quite satisfy the authorities, but subsequently it can be removed.
Perhaps the requirements of SNiP are outdated, but they have to be observed, and only residents apartment houses. Owners of private property are permissible any design frills and eccentrics.
 Often there is a need to raise the bath at the level higher than it is
 As for the arrangement of the thresholds and the requirements for slopes, everything is clear. But often there is a need to raise the bath at the level higher than it costs. This may be associated with drain problems when the slope is small or the height difference is negative. And maybe the legs of the product are short and use the bowl is inconvenient. The most popular are 4 ways to raise the level of baths that do not require large financial and labor investments.
There are some difficulties in solving the problem because the weight fastened is great. This is the bathroom, the water and the human body, therefore, even the most approximate calculation shows that the mass of the bath reaches 400-450 kg, while the load is distributed to 4 risers, the total area of \u200b\u200bthe tension to the semi of which does not exceed 20 cm. Here it is necessary to think about choosing a way to raise a bath over the floor, while complying with the requirements of SNiP, make a good bias and ensure a comfortable adoption of evening relaxing procedures.
 It is worth considering in detail every method and choose the appropriate, depending on the possibility of self-execution
 Proposed options:
It is worth considering in detail every method and choose suitable, depending on the possibility of self-performance, bath material, room area.
 The magnitude of the legs does not always sue users, so you can buy new supports
 Standard supports are also attached to a set of standard baths, directly attached to the font. The magnitude of the legs does not always suit users, so you can buy new supports, the length of which will be greater or less. The process is simple:
Masses the quality of studs, they must withstand serious masses. The method is simple but allowing minimizing costs and employment.
 The base is performed from solid materials: bricks, wood, paving slabs
 This is the second option to raise the bath in the apartment. The base is carried out of solid materials: bricks, wood, paving slabs. The plates of steel will be required, to rest them under support, since none this material It will not stand the point load of 350-400 kg. The thickness of the plates is not less than 0.3 cm, the area is from 100 cm2.
The wooden stand must be soaked with water-repellent composition warning rotting. Waterproofing is required for all types of material, and a binder solution is useful for tiles and bricks. Bricks and tiles are better to take one-piece, without chips. Installation of the design must prevent the desired slope to drain, so it is worth lining one edge by 20 mm, but only if the design of the font is not equipped with a slope.
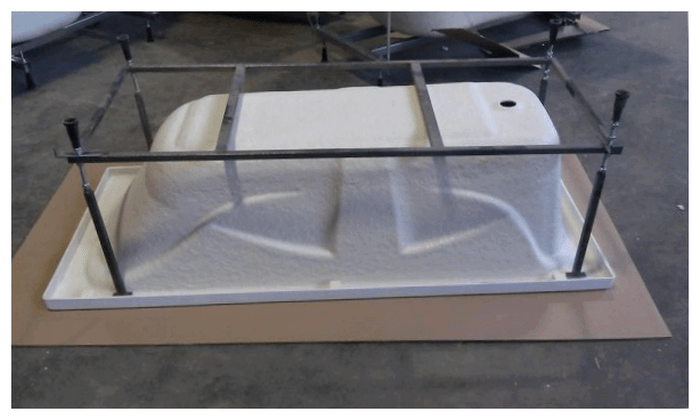 This is a laborious process involving the manufacture of metallic (less often wooden) frame
 This is a time-consuming process involving the manufacture of metallic (less than a wooden) frame. To work with the metal, welding equipment, bulgaria, steel corner and pipes will be required. The cross section of steel elements should be sufficient for maintaining the mass of the font, and the frame itself should be durable and stable.
The frame is performed by such a size so that the bathhouse rests on it with all the edges, but did not fall inside. For hardening fastening, as well as minimizing heat loss, it is worth useful mounting foamBy filling it with all the gaps between the frame and the bowl of the font. Mounting the frame also cannot forget about the slope of water. The design decorates any convenient material: Tile, panels and looks quite aesthetic.
Important! The installation of the structure allows you to raise the font to a height of up to 20 cm, with necessarily arrangement of steps, as well as cladding them with non-slip materials.
 As a rule, the pedestal is needed in large rooms
 As a rule, the pedestal is needed in the premises of the large size, but beautiful fonts are put on it, the forms and bends of which do not want to hide. By the way, often manufacturers are equipped with such a cup with short legs. Bribe the long bases, how to make a stand or frame - spoil all the beauty, so if it is not possible to raise the bath, it is worth raising the entire floor under it.
The task is complicated, but done. And the result will delight the inhabitants of the house with their unusualness, while the difference between heights is decorated with a step, the staircase - it all depends on the area of \u200b\u200bthe room. Of course, you need an accurate calculation, especially if you live in a high-rise building - the weight of the podium is large enough, and it is necessary to ensure that the bathroom does not collapse on the heads along with the floor.
Easy the mass will allow the framework of the design. For example, you can take a wooden frame, but to strengthen it with racks. For the manufacture of frames from plywood and bars, it will be necessary:
After determining the place of the podium (at the wall or in the middle of the room), it is necessary to thoroughly hydroize the base of suitable material. Waterproofing thickness of at least 20 mm. Fits good cork coating. Now the basis of plywood is fitted. It is fixed with dowels and is assembled by a barrier durable frame, also covered by plywood sheets 20 mm. To fasten the details will help the corner, and metal supports will allow you to withstand any weight fastened. And do not forget about the slope! Otherwise it will not be a bath, but a swimming pool that will have to trap.
Of course, such a pedestal can be made of bricks with cement or foam blocks. But it is hardly possible to raise a cast-iron font to the podium, it is better to apply this method with bowls from acrylic.
 There are a lot of options, how to equip the flames in the bathroom and at the same time not to break the rules, as well as ways to raise the bath over the floor
 There are a lot of options, how to equip the flags in the bathroom and at the same time not to break the rules, as well as ways to raise the bath over the floor. In the latter case, some nuances must be taken into account:
All other moments will prompt your fantasy. Aligning the floor in the bathroom and the corridor, raise the bowl on the height or omit just below - the solution remains for the user. Remember only the requirements of the rules and do not harm the neighbors to accept water procedures did not cover a lot of trouble.
As a rule, a bath is sold complete with legs or a special framework to which its installation is performed. When creating mounting elements, manufacturers pay attention to the fact that according to the standards, the installation level of the plumbing unit should be about 60 cm. But, sometimes there is a need to change this parameter. The only way out is to lift it above the floor.
As we already know, the bath is mounted at an altitude of 60 cm. This is enough for the convenient and safe use of plumbing. In some cases, the need to raise it above the floor level. This allows you to solve some problems:
Note! Bath and other plumbing are mounted for construction standards. But you need to consider that they are provided for people with average growth. Thus, in some cases it is possible to change these standards.

Before deciding how to raise the bath higher above the floor, you need to take into account some difficulties that may arise during the work. Installation is complicated by such factors:
Before lining the bath above the floor, take into account its weight, material and the estimated montage height.

Often the baths are installed on legs or special supports. This method is used with cast iron, steel and acrylic structures. Support elements have a standard height. Also there are screws in which the length can be adjusted. Thanks to this, it is possible to solve not only such a question as higher to raise, but also give it a bias.
Installing new adjusting legs is carried out in such a sequence:
This method has some disadvantages. Thus, the lift of the bath over the floor is carried out by no more than 7 cm. The load on the support increases significantly, which leads to their deformation. Therefore, it is better to choose legs that have sufficient diameter and strength.

If you need to raise on significant heightthen the appropriate version will be installed on solid materials. The advantages of this method include:
Basically, this method involves the construction of supports from bricks and other materials that have sufficient strength. Brick stands are constructed using a solution. This allows them to give them stability and strength.
As a supplement, the walls that surround the plumbing around the perimeter are used. This method makes it possible to perform reliable mounting Baths, regardless of its weight. At the same time it looks quite aesthetic. The space under the plumbing is completely hidden behind the brick wall.
Important! If the installation use materials with low moisture resistance, then you need to perform additional insulation work. This will protect the reference elements from negative impact high humidity.

Installing an acrylic bath, especially at considerable height, has some difficulties. This is due to the fact that the product has low strength. To perform safe and reliable installation, it is recommended to use frame method. This allows you to evenly distribute the load on the bath area.
You can make a frame design with your own hands from steel corners. For large recommended use of a welded frame, as it possesses high strength. To make it, you must have such materials and tools at hand:
Manufacture frame design It is carried out in such a sequence:
To give aesthetics, the frame is hidden for decorative panels. Feature frame mounting It is that with it can be installed any bath. The frame is often used in cases with acrylic products.
It is clear that water goes bad, because there is no point in to break against physics ... (((((((They tried to solve the problem of replacing the syphon of the maximum smooth configuration, without sudden drops. Clean there, but not enough. There is an option to replace the siphon for a bath on a siphon for shower Cabin, which produces water from the bath immediately horizontally. But siphon is not cheap, and the confidence that it will help, no. The sewer pipe is drowning into the wall and closed with a tile, it takes place from left to right over the entire width of the bathroom by almost 2 meters, it is possible to raise a bath Maximum on the height of one brick (the restriction by the crane mixer from the wall, it will not work above) ...
Dear masters and specialists, please tell me, please, what can be done in this situation without removing all the tile on the wall? If you shoot under the bathroom and somehow lower the sewage pipe can be - it would be perfect option. But and lift to one brick bath, we are not against - if only water went better. But only completely redo everything? I really hope for useful tips.
Thank you.
tell friends
", then the water is not" bad goes out", but does not leave at all
18 Replies
Something you did not write. If a " drain of sewage above the outlet bath cm at 10", then the water is not" bad goes out", but does not leave at all, and the water level in the bathroom with an open plum would always be no lower than those of 10 cm. And even in addition, you would periodically get drained into reverse direction - From the sewage to the bathroom. And with the wrong diagnosis, you can hardly get a faithful recipe, how to correct the situation. So specify that you: water is bad, but ultimately goes out, or does not go out at all (and its level does not fall below 10 or another CM)?
Useful answer? Yes 2 / Not
Water goes bad, slowly ... as if waving. The apartment is new, do not yet live there, but the furniture is already in the bathroom, so I can not bring out there with a centimeter or a ruler, only visually assessed the number of cm ... maybe it was wrong. But it turns out: the bottom of the bath is below the lower edge of the sewer tube. When installing a siphon of any configuration, this difference is still increasing, because The siphon under the bottom becomes ... it can be so - maybe it will be more correct: the sewer tube sticks out of the wall at a height of about 25-30 cm from the floor. And the bottom of the bath is located approximately 15, a maximum of 20 cm from the floor. When they screwed the most ordinary siphon, it was almost lay down on the floor, the water left at all barely. Bought another, as the seller said - the most smooth output of the siphon on the sewer ... It from the floor is about 10 cm. The water began to leave a little better, but still slowly very much. Soap window, there was a little sand in a bucket, poured into the bath - barely washed off the sand ... ((((
"Sand" in the bath is not needed to merge better in the toilet. In general, the siphon (hydraulic vehicle) without a difference on which height he simply should be below the drain hole of the sewage and bath. Can you have a bad bath?
Useful answer? Well no
The sand was quite a bit - not the floors of the soap, the windowsill ...) he was surprised himself when the sand saw ... And the slope should be an acrylic bath? She was put up at the level ... ((((As far as I can judge the tile lines - it stands perfectly smoothly ... ((((
Useful answer? Well no
Well, perhaps your bath has a bias at the bottom. Try to apply the bottom of the bath.
Useful answer? Well no
Again, you are not those numbers in centimeters. You can't accurately measure - do not guess. And it is necessary to compare the level of the bottom of the bath is not with the upper line of the sewer pipe, but with the lower level of the joint drain pipe Bathroom and sewer pipe. This point is definitely below the bottom of the bathroom if the water goes completely (although clear confirmation full care Water from the bath you did not give). If the positive difference of heights is observed, then the water treatment rate from the bath depends in direct proportions from the area of \u200b\u200bthe drain pipe cross section. I advise you to consider the option of installing a drain pipe of a larger diameter (and siphon of the corresponding diameter, by itself). But before you need to make sure that the existing pipe with the siphon does not have "narrow" places caused by a blockage or ingress into a pipe or siphon of foreign objects. And the diameter of the inlet in the sewer tube should not be less than the diameter of the drain pipe.
Useful answer? Yes 1 / Not 1
From the bottom of the bottom of the bathroom the speed of water from the bathroom does not depend. With a negative slope, it is simply from the bathroom not all of water: part of it will remain on that part of the bottom area, which will be below the level of the drain hole.
Useful answer? Yes 1 / Not
Caroch let's videos like water leaves)
Useful answer? Well no
I have never seen this? So you can get up the same. Or have you to offer options, depending on what seen?
Useful answer? Well no
Thank you, check tomorrow.
Useful answer? Well no
Thank you for trying to help. There can be no blockages by definition - 10 liters are poured into the bathroom flowing waterAnd she looked bad. A half liter of a small garbage bucket did not contain, the water went bad. This concerns the level of the ratio of water and sewerage - tomorrow I will climb, measure exactly, but I repeat: the lower edge of the sewer pipe is significantly higher than the lower edge of the transition pipe from the siphon to sewage, and even The bottom of the bath is below the lower edge of the sewer hole. Nevertheless, I will not argue, tomorrow I will make a photo, if it does not work out to get there with a ruler. Thank you.
Useful answer? Well no
Raise the bath at the maximum so that the center of the siphon of the bath was at least tween with the center of the receiving sewer pipe from the wall. Highness of the mixer as far as possible to fit the eccentrics in "Vodozhkah" (if possible), and so you have a typical container. Cleaner preliminary at 10-11cm .Then order.!
Useful answer? Well no
Now the ways to eliminate the causes of the defect are specifically indicated. 1. To ensure the slope of the entire highway of the drain from the bathroom to sewage pipe. Without compliance with this condition, no other measures will help - it will not work normally. 2. Increase the diameter of the drain pipe. For example, if the diameter is increased by 40%, the plum speed is twice. But it will work only under the condition of claim 1. 3. Changing the linker of the bottom of the bath at the plum speed will not affect - this is a false path of finding a defect. But, of course, this slope should be in the direction of the plum to provide full removal Water from a bath.
Useful answer? Yes 1 / Not
"The woman is created for a man, not a man for a woman" - such a postulate ...

How is HIV on different time segments manifest? The reasons for the development of AIDS is ...

Stomach Cancer: Symptoms, Causes, Treatment of Stomach Cancer is a change in cell type ...