If you adhere to proper nutrition, then avocados are probably in ...


Laminate has long won the minds of consumers. This is a very profitable replacement for expensive parquet, moreover, its range is constantly expanding, thanks to new developments and designs. Today, many are interested in the laying order this material, especially those who wish to master this technology and put it into practice. The installation of laminate floors is a fairly simple process and involves a number of simple but important operations.
At the first stage, it is necessary to correctly calculate the optimal amount of material. To do this, you need to know the dimensions of the room, overall and determine the method of installation. Along with the traditional in-line, with each next one shifted by ½ boards, diagonal mounting is often used.
First you need to draw a plan of the room with dimensions. It is important to take into account all the corners and the mandatory laying on the threshold. Knowing the dimensions of the rooms, you can easily calculate its area by multiplying the width by the length.
By dividing the quadrature of the room by this value, you can get the optimal number of packages. The value should be rounded up.
However, in practice it is quite difficult to take into account non-business waste and possible defects during the installation process. Therefore, experts recommend increasing the volume, depending on which laminate laying scheme was chosen.
By purchasing right amount decorative flooring, care should be taken for other consumables and tools.
Laying laminate without a pre-prepared set of tools is almost impossible. Despite the fact that the connecting elements of the panels are easily assembled into a homogeneous layer, before this it is necessary to cut some of them not only in width, but also in length. It is also important to leave a gap between the decorative layer and the wall (10-15 mm), which is necessary to compensate for thermal expansion.
AT minimum set for laying laminate flooring, the following components must be included.
It is understood that before starting the laying process, the floor screed was prepared. It must be perfectly even. No level drops. Even a small depression can cause a characteristic creak, and in the future - deformation of the panel below it.
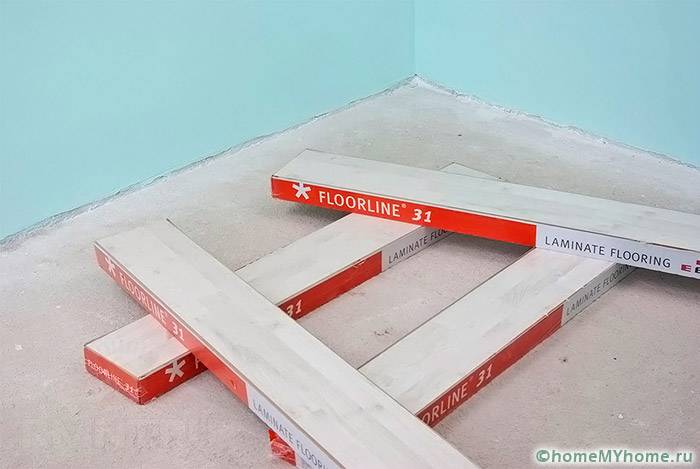
Note that it is not recommended to violate the order of laying the laminate. It all starts with the fact that, according to the technology, the newly acquired material is allowed to lie down for several days in the room where it is supposed to be laid, take the proper dimensions, and get used to the temperature and humidity.

The base under the laminate should be as flat as possible. If it is placed on a wooden floor, all loosely fixed elements should be strengthened, and, if necessary, replaced with new ones. With a concrete base, check it for horizontalness. On discovered uneven areas apply self-leveling screed. The concrete surface can be covered with sheets of 10 mm plywood, this allows you to increase heat saving.
A layer of waterproofing made of polyethylene film is laid on the leveled surface at a right angle to the direction of the material laying (it is also necessary in the case of a base made of ceramic tiles). The minimum overlap of adjacent panels in this case should be 20 cm. So that the film does not move, it can be fixed pointwise with adhesive tape. Next, the substrate is laid. Note that some modern substrates already include a waterproofing layer.
This intermediate layer should perform the following functions.
If the old floor is made of linoleum, you should not remove it. It is enough to check its evenness and rigidity. Since linoleum itself already plays the role of waterproofing, it remains in this case to lay only a substrate.
Such a device of laminate floors will make it possible to independently perform correct installation. In order to avoid the expansion of the panels, they must be placed in the room for 5-6 hours so that their temperature matches the operating temperature.

Today, however, laying without thresholds has become more popular. Of course, the absence of thresholds makes the transition between rooms much more aesthetic, but there are also probable disadvantages in this method of placement. Firstly, it is much more difficult to perform it, and secondly, it is necessary to carefully calculate the geometry of the room beforehand. Optimal area, on which seamless laying is acceptable, is 45–50 m 2, and the larger the area to be laid, the greater the likelihood of technical complications.
Let's see why it is still recommended to leave a technical gap between rooms in any instruction. First of all, there is always the possibility of parquet swelling in the area of the doorway of one of the rooms. Next, ensure the perfect evenness of the base on larger areas succeeds not always. And this is a prerequisite for a seamless version of the work. And yet, if during operation it becomes necessary to replace a damaged lamella, you may have to disassemble almost the entire coating in order to get to the damaged one.

When performing work, it often becomes necessary to measure the length of the last incomplete strip of a row. In order not to measure its length each time, the whole board is applied to the previous one and a cut line is drawn on its reverse side.


Today, the interlock is replacing the adhesive, leaving it for the most part for cheap low-density material. Laying laminate flooring is very fast. The laid floor can be used literally immediately. A damaged panel can be replaced. To do this, it is necessary to disassemble a part of the floor from the final fragment of the assembly to the location of the damaged one. By design, the locking system is more elastic. Compared with adhesive bonding the adhesion of one board to another is not so rigid.

In addition to this method, there is another mounting scheme - diagonal. It is more time-consuming, but for some types of interior it remains the only possible one. How to lay the laminate diagonally so that its surface is even with no gaps between the panels? Laying starts in this case from the corner of the room. In this case, the long joints of the planks are best placed in the direction of the light. Just as in the case of the direct method, expansion wedges are installed to form a technical gap.
When assembling the corners, as a rule, it is found that the rest of the panel does not fit the wall, located at an angle of 90⁰, and a considerable piece will have to be cut off from it. Take your time, put this panel aside for a while, it is more suitable for the opposite wall.

1. measure the distance to the wall, including the temperature gap;
2. the size is transferred to the whole material;
3. in the same way, the distance is measured on the other side. The size is transferred to the panel.
3. Having connected the obtained points, cut the board from the wrong side.
This order of laying the laminate can be used for installation in an apartment or a private house. It is important to choose the right model technical specifications which will meet the performance requirements.
Starting a major overhaul in the house, everyone wants to achieve maximum comfort and coziness as a result. All work first of all begins with the floor. There are various floor coverings, and one of the most fashionable and widespread now is the laminate. In order for the repair to be easy and not be spoiled already at the first stage, you need to get to know the laminate and the rules for its installation better.
Laminate is a multi-layer panel consisting of chipboard or fiberboard. Also with a plate in several layers pressed at high temperature and pressure paper, which is pre-impregnated with melamine resins.

The quality of the laminate, its durability and under what conditions it can be used depends on thickness of the first layer, consumption of melamine and other various specifications which you should also know.
 Despite the multi-layer laminate, the thickness of the panel is 6 - 12 mm, its width is 20 cm, and its length is 1.2 - 1.7 meters. You should be aware that the thicker the panel, the easier it will be to assemble and sound absorbing properties much more coverage than thinner panels. The thinnest laminate panel is used in rooms with an ideal floor surface. But with an uneven base, you must use thicker panel.
Laminate flooring is categorized into commercial and residential grades. They are denoted by a two-digit number. If the first digit is 2, then this laminate is intended for residential premises. And if it is 3, then this laminate is designed for commercial premises. The second digit of the class, in ascending order, indicates the permitted degree of exploitation. For residential premises, classes 21, 22, 23 are intended, and for commercial premises, these are 31, 32, 33, 34. For domestic use can apply all commercial classes, at the same time, their service life will be doubled. They differ from each other in terms of cost. The price depends on the class, the higher it is, the more expensive the laminate.
In the table you can see in more detail and visually the load classes of the laminating coating.
| Load class | Permissible load level | Where would you like to apply | Lifetime |
| For residential premises | |||
| 21 | Low permeability | Bedroom, closet | 5 to 6 years old |
| 22 | Average passability | Children's room, bedroom | 5 to 6 years old |
| 23 | High level patency | Corridor, kitchen, dining room | 5 to 6 years old |
| For commercial premises | |||
| 31 | Low permeability | Offices, reception rooms, meeting rooms | 3 to 5 years |
| 32 | Average passability | Hairdresser, hotel, small shop | 3 to 5 years |
| 33 | High level of permeability | Restaurant, shopping center | 5 to 6 |
| 34 | High level of permeability | Dance floor, train station | Over 20 years |
Laminating coating can be divided into two main types:
The laminate has its positive and negative properties, which are also desirable to keep in mind. before making a choice floor covering.
The advantages of laminating coating include the following:

The disadvantages of laminate include:
As you can see, the advantages of the laminate is still more than the minuses. And if the choice of flooring has already been made in favor of the laminate, then before laying it, you need to carefully prepare the base.
After acquiring a laminating coating, it needs lie down for a couple of days at home to adapt to humidity and take the appropriate size. And during this time you need to spend everything preparatory work:

If the room is new and there is no floor in it, then the following must be done:
While the prepared surface will dry up it is recommended to start preparing the tools for laying the laminating coating.
In order not to be distracted while laying the laminate, you should take care of the necessary tools in advance:
 If the surface and tools are ready, then you can already begin to determine the direction in which the laminate will be laid. If the windows in the room are located on the same wall, then it is better to lay towards sun rays,
thus, the shadows from the joints will be almost imperceptible. And it is desirable to start work from the farthest left corner in the room.
If the surface and tools are ready, then you can already begin to determine the direction in which the laminate will be laid. If the windows in the room are located on the same wall, then it is better to lay towards sun rays,
thus, the shadows from the joints will be almost imperceptible. And it is desirable to start work from the farthest left corner in the room.
Then calculate how much solid strips, so that at the end of the laying, an unnecessary thin strip does not suddenly form at one of the walls. If laying only in one piece does not work, then you need to start with a half. Consider when calculating what is needed between the laminate and the wall leave gaps a distance of about 1 cm. To make it more convenient, you need to use plastic or wooden wedges.
Do not hit the laminate with a hammer. You need to knock down the panel wooden block and avoid hitting the lock connection, otherwise there will be poor-quality styling. In places where it is impossible to knock out a bar, you need to use a special curved metal plate. To do not damage the substrate it is recommended to wrap the edge of the plate with adhesive tape. To connect the laminate to each other as follows: insert the comb of the panel into the groove at an angle 20 - 30 degrees and align with the substrate. You can use a piece of panel with a length of at least 20 - 30 cm in laying. The main thing when laying is to look at the joining of the seams and not leave gaps.
If an adhesive laminate is laid, then it is necessary to glue only seams, and not the entire panel to the floor, otherwise it will swell. After laying this type of laminate, it is recommended to walk on it only after 24 hours. But on the national team you can immediately after laying.
The laminate is cold and it is better to use a warm floor under it, when buying, you need to clarify whether it can be used for this flooring.
To ensure that the laminate lasts as long as possible more years and its appearance has always been like new, you need to follow the basic simple rules for care.
Now that all the information about the laminate has been studied, you can safely go shopping. The store will no longer surprise different cost, it would seem, on a completely identical laminate. Still, it is not worth saving on this flooring, because the quality of the laminate corresponds to its price. And with proper styling and further proper care, he will last for many years and will always delight with its stunning appearance.
We will send the material to you by e-mail
The housing issue remains relevant for many. Home repairs and related problems worry everyone who plans to spend construction works on one's own. Today we will discuss some of the subtleties of laying laminate flooring, answer the question “how to lay laminate flooring correctly”, show you how to avoid the most common mistakes and reveal little professional secrets.
Coverage happens different types and flowers
Laminate board is a very popular and common flooring material today. The collective name "laminate" (derived from the Latin "layered") combines the types of fiberboard used for finishing floors.
Today, the industry produces a wide variety of flooring. The right choice of material will allow you to forget about the floors for a long time and not worry about their condition. Let us briefly dwell on the layered structure of the floor in order to competently choose the most suitable material for us. The laminate has several layers, the top is a protective film that simultaneously carries a decorative function.

In addition, this film has different wear resistance. It is this characteristic that parquet is divided into classes. And, when we mentioned the right choice, it was the wear of the coating that was meant. Surely, every person who has begun repairs wants to do the job efficiently and for a long time. To do this, you need to use high-quality material, and not Chinese fakes. Good stuff must have certain characteristics corresponding to its class.

Floor classification is carried out in accordance with the European standard EN13329. He distinguishes two groups of use:
a. wear class 1
b. wear class 2
in. wear class 3
wear class 4
a. wear class 1 up to 4th
This is reflected in the coding of the material, the 1st digit is the area of application, and the 2nd is the abrasion class. Thus, a board marked 21 or 22 is perfect for residential apartments, and class 33-34 is needed for public spaces. It is important to know this so that freshly laid floors do not turn into a worn board in six months.
Useful advice! Before laying, it is not recommended to unpack the material for about 2-3 days, let the material rest at room temperature and humidity. Packs should not be opened, let them be in their original packaging. This will give good adaptation to local conditions.

Which one is better is hard to say. It depends on the conditions in which the coating is laid: humidity, subfloor (concrete or board), floor horizontalness, etc. It is considered optimal to listen to the recommendations of the seller of the original floor material, because a substrate with a specific set of properties is selected for a specific laminated board. It is important that the substrate perform the main functions:

Related article:
When laying the underlay, it is important that its seams do not coincide with the seams of the board. It is better to lay the substrate sheet material in checkerboard pattern and secure with masking tape. The substrate in the roll must be rolled out with an overlap on the walls, and the joints of the canvas must also be fastened with adhesive tape.
Important! Overlapped seams will create an uneven surface that will damage the finish.
In order not to make mistakes, watch the do-it-yourself laminate installation video below.
You can start laying laminated panels from any corner of the room, and preferably continue from the window to the door. First you need to calculate the required number of boards, for this you need to calculate the size of the extreme slats at opposite ends of the room, with a slat width of at least 50 mm. Start laying with a gap between the wall and the first plank of 10 mm, so that the indent does not “leave”, it is necessary to install a spacer. Below is a handy laminate calculator, which will allow you to calculate the required amount of this material for different laying methods:
Laminate is one of those materials that are often used as flooring. beautiful appearance, additional insulation, pleasant to the touch texture and these are not all the qualities that cause love for this coating. However, the coating can please the owner of the house for a long time, only if it is laid correctly. To do this, you need to properly prepare the base.
A lot of hard work needs to be done before laying the laminate flooring. It all starts with checking the evenness of the floor, it must meet certain standards. For 2 m² of floor, the height should not change by more than 2 mm. Otherwise, the panels on four sides equipped with special locks will loosen over time, which will lead to their breakage. There will be ever-growing gaps clogged with debris and dust. The floor will start to creak.
Conditions for founding
If the base has a slope, it must be uniform and not exceed 4 mm per 2 m². It is better not to place furniture resting on 4 legs on these areas, it will lose stability, and the doors, if any, will stop closing. The temperature and humidity of the substrate should also be checked. Wood must have a moisture content of less than 12%, concrete 4%, floor temperature over 15°.
Having dealt with the size of the permissible distortions of the "relief" of the floor, we proceed to the types of bases and their preparation.
A concrete floor, old or new, absorbs moisture and transfers it to the floor covering. To avoid such problems, an insulating layer of diffusion membrane or polyethylene 200 microns thick. It should be laid on the entire floor area and not fixed to the base in any way. To do this, pieces of polyethylene must be glued with an overlap using adhesive tape. Excess insulation, stepping on the walls, is hidden with the help of a plinth.
 Rules for laying insulation
 Laminate flooring requires an underlayment that acts as a sound insulator and additionally protects against moisture. It is also designed to protect the bottom surface, the laminate will avoid abrasion when in contact with fine abrasive crumbs and ensure the immobility of the floating floor covering. So, what can be used as a substrate.
The thickness of the underlay must be calculated depending on the laminate. Usually, when buying this flooring, a brochure is included with it, which contains the manufacturer's recommendations regarding the underlay. As a rule, a 3 mm insulator should be placed under a 9 mm laminate.
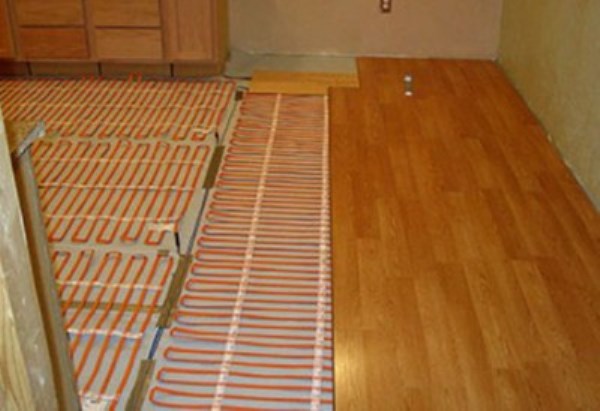
In some way, they are also related to what is placed under the laminate. Their use promises the use of only certain types of substrate. Foil and other insulators based on it, for example, penofol, are suitable. What are the underfloor heating, their pros and cons.
In rooms that require additional heating, electric underfloor heating shows good results when laying under a laminate. Depending on the size of the room and the required temperature, you can choose a floor of different power. 150 W is enough to create comfort in the kitchen and in the living room. 220 W is able to completely heat a balcony or a room where there is a large heat leakage.
 Underfloor heating, electrical system
 The disadvantages include only the high cost of electricity with its constant use. Also, in the event of a wire break or burnout, the entire system will cease to be operational.
Among the residents of houses with laminate flooring, film infrared heating is the most used. This happens because such floors provide optimal mode temperature that prevents overheating of the floor covering.
 infrared heating
 There is only one downside to this system. Significant costs will have to be spent compared to water and wired systems.
This type of heating is less popular. However, it has positive properties that are not inherent in other types of warm floors. Also, preparatory work should be carried out before laying. First, turn on the system, drying the base. Secondly, before laying the laminate, it is recommended to cover the warm floor with a sound insulator about 3 mm thick. This will allow the laminated coating to deteriorate less when in contact with the screed.
 Heating with water
 After studying the content of the article, each House master able to independently choose the optimal type of substrate and base. Also, qualitatively carry out preparatory work and calculate the approximate cost of future repairs. Or at least not allow yourself to be deceived by negligent hired workers with the choice of material and, if necessary, make changes to their work.
Wooden materials retain their leading positions in sales rankings floor coverings. At the same time, the competition between classic parquet and ordinary boards has not been relevant for a long time - multilayer laminated panels (lamellas), which are distinguished by practicality and versatility, have come to the fore. Proper installation contributes to the durability of the flooring, which also does not lose its aesthetic properties during operation. How to lay laminate flooring without the help of specialists? There is nothing complicated in this, but it is important to understand that there are many small technological nuances and tricks that will have a significant impact after laying the coating.
If we compare the lamellas with a solid board or typesetting elements for laying parquet, then two shortcomings of this material will immediately come to light. Firstly, this is an obvious loss in environmental cleanliness. In the manufacturing process of almost all types of multilayer panels, chemical binders are used, although they do not cause serious harm to human health. Secondly, many refuse laminate due to the loss of natural wood texture during processing - at least it is distorted due to the application of protective films to the surface of the panels. What justifies the use of laminate?
Installation is one of the strengths of this coating. How to properly and independently lay the laminate for many years? To do this, it is necessary to observe the geometry of the joints, correctly fitting the elements to each other - this is the basic law of the installation of lamellas, which does not require the connection of complex equipment. Another advantage is versatility in terms of protection. Of course, like any wood material, lamellas have their limitations, but they are much less than in the case of the same parquet or board. The presence of multilayer protective coatings initially minimizes the harmful effects of external negative factors. With design properties, too, not everything is clear. Indeed, the laminate cannot fully boast of natural wood patterns, but it opens up endless possibilities for imitating the texture of any exotic species.
For a number of floor coverings, the technology of the so-called floating laying is used. This means that the flooring is formed without a tight binding to the rough surface. That is, the use of hardware, adhesives and other methods of rigid fastening is excluded. On what does the coating rest if there is no direct connection with the floor?
The very configuration of modern lamellas provides for the presence lock mechanisms mounts. The system of grooves and ridges ensures the stability of the coating. But you should immediately prepare for one unpleasant operational effect. Walking on a floating floor is accompanied by knocks, so a special underlay or base with a damping coating is required - for example, in the form of linoleum. But even in this case there are some nuances of the laminate device. How to properly lay multilayer panels on linoleum so that they do not deform on a soft base? Such installation is, in principle, allowed only if the rough flooring has no more than 2% moisture content, and the height differences are less than 3 mm. Then you can use the substrate, but necessarily made of hard materials. However, there will be a separate discussion about the rules for choosing a damping base.
The coverage is designed for home use. This is not porcelain stoneware, so laminate is not recommended for high traffic areas. The boundary zone in terms of laying tolerance usually runs through rooms with a high humidity coefficient - bathrooms, laundries, kitchens, etc. How to properly install laminate flooring in such conditions? To begin with, you should focus on lamella models that are characterized by resistance to biological pollution and the presence of water-repellent properties. It is in the bathrooms that it is desirable to use panels with oil protective coatings, and not with varnished ones - this will provide an anti-slip effect. As for the installation itself, this is just the case when it makes sense to abandon the floating floor system and apply the adhesive fixation method. At the same time, seams and gaps are minimized by sealing mass based on sealing polymers.

Laminate is very demanding on the state of the rough base, so you should prepare for a thorough preparation of the surface for laying. It should be free from irregularities, significant height differences, cracks, flimsy areas and other defects. The best option for the base - a new screed with a hard self-levelling coating. But what is the right way to install laminate and underlay on old decorative flooring? We can talk about tiles, the already mentioned linoleum or wooden surfaces. Theoretically, any of these coatings as such does not prohibit laying a laminate on top. However, this can be done only if there are no serious damages, faults and signs of destruction. For example, weak or rotting boards need to be replaced, gaps in concrete base are carefully primed and puttied, and fragments of the chipped tiles are completely removed, followed by grouting with cement mortar.
Even if the preparation of the floor does not bring it to an optimal state, it does not matter. Minor flaws are eliminated by the substrate layer, which is also intended for leveling, sound absorption and imparting insulating properties to the carrier base. So, for a laminate, you should choose the following types of floor substrate:

Substrate mounting technologies vary depending on the material. Approaches to the device of film, roll and panel rigid products are fundamentally different. For example, polyethylene is laid in strips with 20 cm overlaps, and the edges are glued with special tapes. A separate question concerns how to properly stack corrugated substrate under the laminate? Rough surfaces with shock-absorbing and ribbed coatings always face the rough substrate. If the film has a foil protection (for example, made of aluminum), then this side should be directed upwards to the lamellas.
Roll materials also overlap and are fixed adhesive compositions. But in this case it is important to correctly fold along the edges. Approximately 5-10 cm of material should go to the wall, where the fastening will be provided with self-adhesive tapes.
Solid substrates are laid in a joint. It is advisable to place the panels at a 45-degree angle towards the future laying of the lamellas. This discrepancy in positions will have a positive effect on the stability and strength of the coating. But how to put cork backing under the laminate, so that it does not deform during operation? To do this, it is necessary to maintain small gaps of 2-3 mm along the edges of the laying. This is a mandatory margin in case of “spreading” of the cork structure, which compensates for the internal stress of the substrate and prevents the laminate from swelling.

On the market you can find special series of lamellas, in the structure of which there is already a noise-absorbing layer. Such models can be laid without insulating substrates. But this only applies to cases where draft base has no physical defects in the form of irregularities. Still, to smooth surfaces, it is worth using hard materials and not necessarily in the form of a cork. If the tasks of increasing noise reduction and, in principle, isolation are absent, then ordinary chipboards can be used. For example, how to properly lay plywood for laying laminate flooring?
Optimal - create a crate under the carrier base from wooden slats and metal profiles. Since the crate raises the floor height by 5-10 cm, many refuse this option. An alternative way of laying plywood is gluing. But not on ordinary building glue, but on a bitumen-polymer solution. It is prepared using special mixtures, after which it is heated gas burner and lay the slabs, previously sawn into squares.
Before installation work it is advisable to keep the panels for two days at room temperature in a dry room. This will allow the structure to better adapt to operating conditions. How to lay the laminate in the first rows? The most important stage, at which the configuration of the location of the lamellae is set. First, the panels should be laid parallel to the rays of light falling from the window. This will make the seams and joints visually less noticeable. Secondly, small indents from walls, structures and all kinds of fixed objects with a size of about 5-7 mm are immediately provided. Temporary wedges are driven into these gaps in order to save expansion joints in case of expansion of the material.

Starting from the first row, each subsequent laminate board is attached to the previous one through a butt-groove key joint. Metal clamps are nailed along the perimeter of the free edges, which will not allow the flooring to disperse. Special attention is given to complex areas with transitions in the layout. For example, how to do it right In such areas, removable or stationary elements in the form of thresholds and skirting boards are used. They share the laminate and finishing material another room. There are leveling, single-level, corner and edge sills, which are selected for a specific configuration of panel placement.
A feature of vinyl coatings is elasticity, water resistance and ease of processing. Unlike conventional panels, this laminate can be cut construction knives, adjusting the pieces to any shape of the work site. As for installation, glue is used instead of a key connection. Moreover, it is not necessary to use separate compositions - you can limit yourself to self-adhesive surfaces. But how to lay the laminate in the room yourself if the rough flooring is represented by an uneven rigid base? Would a backing help in this case? The disadvantages of the base surface are eliminated in the same way as in the case of wood laminate. However, the substrate is selected medium hardness. It could be either roll material, or soft cork with increased damping effect.

The idea of combining an underfloor heating system and laminated panels is increasingly being implemented in private homes. Moreover, it is desirable to use infrared film rather than water systems with electric mats. This choice is associated with low heat transfer rates, which does not harmful influence to woody decorative material. How to lay the infrared film under the laminate? For IR coating as such, a strong base and double-sided isolation is essential. In the lower part, for example, on a flat screed, you can lay a foil substrate facing the heating elements. A heat-resistant thin substrate is laid on top. The most important thing is not to forget about the output of the terminals for switching the IR film with a thermal sensor. To do this, a groove and a channel for cable entry are cut in the substrate.
The service life of the coating will be affected not only by the quality of installation, but also external factors impact with the nature of the service. Initially, direct thermal effects on the material from climate equipment, various humidifiers and heaters should be prevented. But how to lay the laminate correctly if there is no way to eliminate the impact from radiators, for example? In this case, either reliable rear thermal insulation will help, or the initial choice of a lamella model that is not sensitive to temperature fluctuations. With regard to care measures, it is recommended to wash the coating with a cloth soaked in clean water with a small amount of cleaning agent. Today, special detergent compositions for laminate with an antistatic effect are produced. For the restoration of lamellas, it is better to use acrylic lubricants. They carefully eliminate small cuts and crevices, preventing further destruction of the structure.

The range of laminated panels is quite wide and even the process of formation of individual groups of this material is observed. Accordingly, the rules of laying also change. certain categories lamellas. As universal rules for the installation of such coatings, recommendations from major manufacturers can be used. For example, how to properly lay Tarkett laminate? This manufacturer sets standards both for the choice of substrate and for microclimatic conditions for installation. In the first case, Tarkoflex branded soundproof underlay is recommended, and the temperature and humidity parameters should correspond to the range of 18-24 ºС with a moisture coefficient of 40-70%. This recommendation applies to most household models laminate with strength class 32 and thickness up to 10 mm.
If you adhere to proper nutrition, then avocados are probably in ...


Pizza can be cooked not only with meat products - sausage, sausages and ...