(1908-1954) - Soviet statesman and military figure, Colonel General,...


Tsugunov Anton Valerievich
Reading time: 4 minutes
In the process of repairing an apartment, it is imperative to level the walls so that the surface is perfect. In some cases, plaster is suitable for this. It is used in cases of large curvature of the surface, when other methods are not suitable.
Installing drywall on walls is a simple process that even a novice in repair can handle. It does not require special knowledge, it is enough to study the instructions and follow all the steps in sequence. In addition, with drywall you can create designer designs that will decorate your interior.
There are several types of drywall, which differ in physical characteristics:
Sheets are available in various widths and lengths. Their thickness depends on the type. For wall decoration in apartments, the most commonly used size is 120 × 250 cm with a thickness of 9–12.5 mm.
How to level the walls with drywall? There are two methods, both of them are simple, and are suitable even for those masters who make repairs with their own hands for the first time. It is necessary to study the information about the pros and cons of both methods in order to choose the right one.
In this case, drywall is attached to metal frame. This is the most common method, as it has its advantages:
Cons of this method:
The frame method is more difficult to install than the frameless method, but most often it is chosen for a room with curved walls.
If you carefully study the instructions below, then such a structure can be built independently without involving workers.
First of all, to align the walls with drywall with a frame, you need a plasterboard. It must be chosen depending on the purpose of the repaired premises. It is necessary to calculate the area of \u200b\u200bthe walls and buy material 15% more.
The following materials will be required for work:
If soundproofing is planned, then you need to select and purchase insulating material.
Required tools:
If you want to level the wall using the frame method, you must first prime it. This is necessary to prevent the formation of mold and fungus, as well as the reproduction of insects in the empty space.
When the wall has been processed and all measurements have been taken, you can start. Stages of work:
The frame work has been completed. Before fixing drywall, it is better to watch a video about frame structures to make sure you are doing the right thing.
After the frame is assembled, you can proceed with the installation of the GKL.
HELPFUL INFORMATION: Do I need to prime the walls before painting: do I need a primer
There is usually a chamfer on the edges of factory sheets. If you cut the GKL yourself, then with a knife you need to make such a chamfer so that later you have the opportunity to carefully
Surface after leveling with drywall
Aligning the walls with drywall with a frame allows you to eliminate all existing defects and make the surface suitable not only for wallpapering, but also for applying layers textured plaster or painting. You can perform all the work related to the installation of the structure and the assembly of the frame yourself, without using the services of professionals. The main requirement is the implementation of all manipulations (especially when assembling the frame) under the control of the building level.
First of all, it must be said that there are several types of GCR. Before you purchase material for leveling walls with drywall, you should pay attention to the features of a particular type of sheet. Today on construction market plasterboard sheets are offered:
They differ not only in thickness, but also in the most significant characteristics. Starting to level the walls with drywall, it is important to do right choice and for each a separate room purchase specially created sheets:
Already by the name you can understand that some of them are intended for use on walls in rooms where the humidity level is much higher than the norm. Others can be used to level walls in the kitchen, especially around the stove, while others are successfully used as a tool with which you can easily level the walls in the kitchen, balcony or apartment.
The alignment process itself is quite simple, but it is necessary to build a frame in strict accordance with the instructions, the material for which will also have to be chosen.
This design can be metal or wooden, depending on the thickness of the selected GKL and the place of work.
If you have to fasten moisture resistant drywall on the bathroom wall or not glazed balcony, then for the construction of the frame you will need a metal profile, guides and fasteners. As for the alignment of the walls in living rooms, then here it is possible to use wooden bars and slats for the construction of the crate, which are securely attached to the walls with dowels with nails and self-drilling bolts.
The advantage of this method of attaching drywall to the wall is a high degree of reliability, and the disadvantage is a significant reduction in the surrounding space due to the distance between the old walls and the drywall sheets that sheath the frame.
This distance corresponds to the thickness of the profile or bar plus the thickness of the plasterboard.
Among the recommendations on how to correctly level the walls with drywall, the most important guide is the instructions for building a frame for future construction. Like any other manipulation carried out during construction or repair work, wall alignment wireframe requires careful preparation. This preparation includes the following activities:
Despite the fact that the surface of the walls, prepared for the frame for plasterboard sheathing, does not require preliminary alignment, her in without fail treated with a primer mixture, which includes antiseptic additives.
It is this treatment that will make it possible to avoid the appearance of mold and fungus on the walls hidden behind the plasterboard in the future. Determining at different points the slope of the walls using a plumb line or a building level will help to clarify in advance the very distance by which the surrounding space will be reduced. All further manipulations are performed under constant supervision. laser level.
The distance between vertically installed profiles does not exceed 60 cm. The next stage is the layout of the future design. First of all, it is done on the ceiling, and then it is necessary to create a projection on the floor. To do this, you need to lower a plumb line from each corner indicated on the ceiling and mark the resulting point on the floor. By connecting all the transferred points, a mirror image of the drawing made on the ceiling is obtained.
You can do it a little differently and simplify the task. For this:
To fix the profile to the wall, special fasteners can be used.
All subsequent vertical racks, placing them at a distance of at least 60 cm from each other. The installation of vertical bars or profiles starts from the far corner and is carried out strictly observing the distance between them.
Before leveling the wall with drywall, it is necessary to prepare a high-quality crate, to which the plasterboard will be attached. It will be necessary, maintaining a certain distance between the guides, to install transverse jumpers. As in the previous case, all work is carried out under strict constant control of the building level. We'll have to correctly bring out the plane and install wooden slats or metal rails so that the drywall sheet does not warp after fixing.
The first horizontal parts are rails attached to the ceiling and floor. The place of fixation is determined depending on the point of the greatest obstruction. Having marked the fastening line of the horizontal guide on the ceiling with the help of a plumb or building level, its projection on the floor is obtained and the second part is fixed.
In the grooves with which they are equipped, insert the vertical parts of the crate, made of galvanized metal profile.
It is not difficult to align the walls with drywall with your own hands, it is necessary to maintain the required distance between the guides in order to ensure reliable and high-quality fixation of the plasterboard.
The standard width of the drywall sheet is 120 cm, and the width of the profile face is 6 cm. This means that when vertical profiles are placed at a distance of 60 cm, the solid sheet of drywall will be securely fixed using self-tapping screws located along the center line and both sides. The width of the profile allows you to fix the combined edges of 2 sheets.
However, the fastening will not be of really high quality and durable if transverse jumpers are not installed in the structure. The distance between them is from 50 to 70 cm, but 600 mm is recognized as optimal. Fixing the GKL in this case is characterized by increased rigidity and guarantees the durability and reliability of the structure.
When creating drywall walls with your own hands, you need to carefully prepare not only the crate, creating a high-quality structure frame. You need to take care of the preparation of the GCRs themselves. Knowing standard sizes sheets, you can pre-calculate the number of solid components and structural elements that require trimming in accordance with the features of the drawing and the finished frame.
Creating a quality surface requires:
The joint between the sheets must pass strictly in the middle of a vertically located metal profile.
Such fastening guarantees the strength, reliability and durability of the entire structure. To cut the sheet, giving it the desired shape and size, it is enough to hold it with strong pressure on one side of it with a sharp wallpaper knife, then lightly tap along the notch line and bend it sharply.
The core splits strictly along the cut line, and the second side, more precisely the cardboard cover, can be easily cut with an ordinary knife. If necessary, you can use a special file designed to work on drywall, and a grater to process the edge of the cut. The detailed procedure for performing work is shown in the video:
After completing the work on the sheathing of the frame, it is necessary to take care of the correct sealing of seams and joints. Excess putty can spoil the impression of the work done. Therefore, first all the seams are filled with a special compound, then, holding the spatula at an angle of 90˚, remove excess solution. After solidification, all seams are glued with reinforcing tape and putty is applied to the entire surface of the aligned walls.
Now drywall is the magic wand that helps to easily bring uneven walls into a decent look. It is used in many different repairs, and this is not only leveling the surface, but also creating niches, decorating, dividing the room into zones, and many others. Due to this wide range of uses and its unique properties, drywall got a lot positive feedback from professionals in construction and from beginners who will also be able to handle this material.
Almost in all apartments there is a problem of uneven walls. It is faced when it comes time to carry out repairs. Since no coating will look advantageous on uneven wall surface must be prepared in advance.
There are several ways to level walls indoors:
This article will discuss in detail the latest option, since drywall is a coating that is very convenient to use and gives excellent result. By leveling the walls in this way, you can hide all the imperfections of the walls, as well as remove unnecessary communications in the space between the wall and drywall.
This option is very simple and does not require much effort in installation, as the sheets are attached to a specially designed adhesive. This is a very common adhesive, so you can find it in any store that sells construction products.
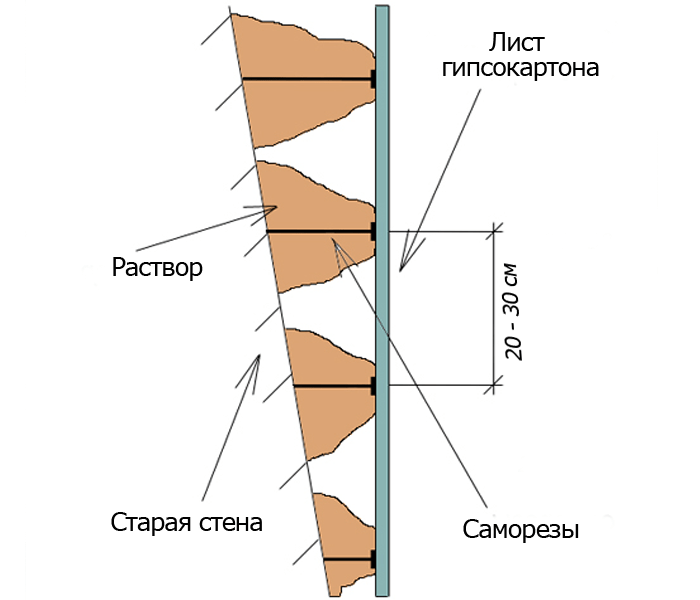
First of all, before leveling the walls with drywall without a frame, you need to clean the wall of the old coating, dirt and dust, and also clearly measure its evenness. If the wall curvature index is within 4 - 7 mm, then the adhesive is applied to the sheets over the entire surface, smeared with a notched trowel, and then the sheet is glued. If the curvature reaches 20 mm, then the glue is applied in places in the form of thick cakes with a small interval. If the curvature of the wall is greater than 20 mm, then you must first level the surface with plaster, and then glue the drywall sheets. In order not to create unnecessary difficulties for yourself, you can immediately use wireframe method drywall fixings.

After being removed excess dirt walls need to be well primed.
It is worth remembering that when combining wet and dry surface plastering, a wet finish is first carried out, and after complete drying, a dry finish is carried out.
Important! Before installing drywall, you need to make sure that the primer mixture is completely dry.
Immediately before starting to process the walls with plasterboard sheets, you need to prepare the glue. How to breed it, you can read on the package. Glue must be prepared in accordance with the instructions on the package, otherwise its setting properties may become worse. The finished adhesive mass should resemble thick cottage cheese. It is not necessary to knead a large volume at once, since after half an hour the glue will completely harden and it will be impossible to use it.
Important! Before pasting, you need to put beacons on the wall that will help the drywall sheets to be evenly positioned vertically. To do this, holes are drilled in the wall, dowels are inserted into them, into which self-tapping screws are screwed.
It is also possible to level the walls without beacons, but this process is more laborious and the result is more difficult to achieve.
The algorithm by which the walls are aligned with drywall without a frame:

Aligning the walls with your own hands using the frameless installation method is possible only in those rooms in which the ceiling height does not exceed the sheet height, since horizontal joints with this installation option are unacceptable.
Installing drywall without a frame is more difficult than with a frame, but it will help save room space, which is very valuable for small spaces.
This method consists in the fact that drywall sheets are attached to a metal or wooden profile pre-mounted to the wall. If the frame is made of wood, then be sure to make sure that it is well dried. Otherwise, when moisture leaves the tree, the whole structure will lose its appearance. Sheets of drywall can form gaps between each other. To avoid such a problem, professionals advise using a metal profile, which certainly will not let you down.

In order to make a frame, you need to use rack and guide profiles. Guide profiles are needed in order to determine the contour of the frame. To do this, they are attached to the ceiling and floor with exact parallelism to each other. For starters, fasten ceiling profile, and only then measure the place of attachment of the floor profile with a plumb line. The guide profiles are fastened together by rack-mounted ones, which are fixed with self-tapping screws. Between them you need to maintain a distance of approximately 40 - 60 centimeters.
For greater structural strength, suspensions are also installed on which the rack profiles are attached. Between them you need to maintain a step equal to 30 - 50 cm. Also milestone is that you need to determine what load the coating is designed for. Places where the load will be significant must be strengthened with boards or plywood mounted between the drywall and the wall.
Important! Places where drywall intersects with pipes of steam or thermal heating must be provided with special sleeves.
For more information about installing the frame, see here:
Installing sheets on a finished frame is very simple, this stage usually does not cause any particular difficulties. Be sure to fasten with black self-tapping screws, as they are made of oxidized metal.
The number of fasteners is calculated based on the size of the sheet. For a standard drywall sheet measuring 2.5 * 1.2 m, as a rule, the number of self-tapping screws is used, equal to 100 pieces.
Important! Self-tapping screws are screwed in carefully, without sudden movements, so as not to spoil the material. The hat is slightly recessed into the coating.

The frame method of installing drywall helps to insulate those rooms where additional thermal insulation is needed. After installing one sheet, you can put glass wool or other heat-insulating material in the distance between the wall and the new coating. But this must be done very close to each other so that there are no gaps between the mats of the material. In addition to thermal insulation, this method also soundproofs the room.
After the drywall coating is installed, you need to check it for the absence of various kinds of flaws. These can be protruding caps of self-tapping screws or other oversights made during work.

The last stage of leveling the walls with drywall is puttying. If the installation of drywall was carried out on the frame, then it is necessary to putty the locations of the screws and the joints themselves between the sheets. If do-it-yourself alignment was carried out without a frame, then only the joints of the sheets are processed. Before puttying, a sickle is glued to the joints - a special tape with a mesh structure for better adhesion of the putty to the drywall surface. After its gluing, the surface of the plasterboard sheets is primed and putty is applied. The tape, as it were, is pressed into the first layer of putty, and then the second layer of this material is applied.

Important! If tiles will be mounted on the finished wall, then you can not putty it. Putty is needed for further decorative finishes wallpaper and paint.
Leveling walls with drywall has a lot of advantages that are valued in modern conditions:
It is not at all difficult to align the walls with drywall at home, however, it is imperative to adhere to the algorithm of work and not deviate one step from it. Any wrong action can lead to damage to the material and the fact that the leveled surface will no longer be. It is enough to watch the video below, and all questions related to the installation of drywall will disappear by themselves.
Self-alignment of walls with drywall is no more difficult than assembling a LEGO constructor. Subject to scrupulous attention to each stage, the lack of professional skills only slows down the process, but does not affect the quality.
There are two ways to level the walls with drywall:
The first of them is used if the wall has a slight slope from the vertical axis, no more than 3-4 cm, or, if necessary, to form it perfectly smooth surface. As a clear example, you can consider the decoration of walls made of cinder blocks or bricks. Although concrete surfaces are also displayed in this way. Especially if it is a house built using flood technology, and there are depressions or small height differences on the wall.
The second option is more versatile. Assembling the frame, a new plane is formed. The wall is used only as a support. This method has its drawback - it hides from overall dimensions rooms at least 4 cm.
The tool kit is the most common, and most items are in every home:
Of all the items listed, we will separately say only about laser level. The device is not expensive, its cost is in the range of 1-1.5 tons. But its use greatly facilitates many processes of frame formation. For even cheap models are equipped with a self-leveling head and are able to form an image of a plane, both in horizontal and vertical projection.
Trimming sheets is always more profitable than building up.
This is noticeable on simple example. Let's say the height of the room is 2.2 m. When working with sheets of 2.5 m, you will have to cut 30 cm. And using GKL 2 m long, you need to build up only 20 cm. But at the same time, when building up, you will have to form another horizontal mortgage from the metal profile and then close another seam.
Keep this in mind when choosing a GKL.

The middle of the profile should fall on the indicated places! With this arrangement, two adjacent sheets of drywall can be fixed in one profile. This explains such a strict step - 60 cm.
The horizontal elements of the frame do not have a strict reference to the step, so they are installed in 3-4 rows.
The footage of the rack profile is calculated individually. Add 10% to the result.
Having little experience with a metal profile, you can do without them, but they are not expensive, so do not save on trifles. 
Purchase a metal profile with a thickness of 0.8 mm. It holds fasteners much more reliably.
The slats must be free from corrosion, burrs or a large number lubricants.
Pay attention to the twist. The profile must be perfectly straight.
CHECK EVERY DETAILS!
To accurately calculate the amount of material, be sure to draw a schematic plan for the future design. Mark where the vertical and horizontal profiles will be located, then it will be clear how many additional elements will be required.
With the help of a plumb line, the boundary of the future wall is determined. In order not to be mistaken in the markup, it is best to mark two points (on the floor and on the ceiling) from different ends of the wall, and then connect them with a straight line.
Find the minimum indent from the littered wall. On it will be located inner side guide profile.
On the back of all guide profiles, stick a 3 mm thick sealing tape. This will significantly increase the sound insulation against impact noise and greatly protect against the appearance of cracks.
For fastening the guides, use self-tapping screws with plugs, 55 mm long. The step between each fastener element is 40-50 cm.
The next set rack profile. Try to use only solid planks. The trimmings will be used for the installation of horizontal frame elements. For convenience, cut the rack profile 5-7 mm less than the height of the room. REMEMBER: 60 cm is in the middle of the profile! For fixing, use self-tapping screws with a piercing head and a flat head, 16 mm long, one at the top and bottom.
To strengthen the frame, strapping is performed with rack profiles, placing them horizontally in 3-4 rows. 
This is how you can use the laser level to determine the depth of the collapse of the wall. The assembly of the frame from the metal profile is shown in detail.
1 - at the level of the knee;
2 - at the level of the buttocks;
3 - at shoulder level;
4 - at an equal distance between the ceiling and 3 horizontal bars.
Crabs are used to fix them. Although they are inserted into the crab with a snap, they are still fixed with self-tapping screws through the standard holes.
The last step is to tie the frame to the wall using hangers. There is no strict norm, according to the frequency of their bookmarks. Try to place them in the middle of the structure. 
To increase heat and sound insulation, the space between the plasterboard and the wall is filled with insulation. It is highly undesirable to use mineral wool materials in residential premises, due to the high probability of microscopic fibers appearing in the air. 
Opt for low-density sheet foam. It is inserted sideways. The cracks are sealed with tape.
In length, the gypsum plasterboard is cut in such a way that a gap of 1 cm remains between the wall and the floor. This gap serves as a compensator for thermal deformation. Cut drywall construction knife. At the same time, do not try to cut through it. It is enough to make a groove with a depth of 3-4 mm. After that, the cut off part breaks off. 
To maintain a centimeter gap, pieces of plasterboard are placed under the sheet.
They are screwed with self-tapping screws 25 mm long, in increments of 25-30 cm. First, screw the fasteners in the middle of the sheet, then, alternating, reach the edges. The head of the screw should be slightly recessed.
Leave a gap of 1-2 mm between the sheets. It is claimed that the wall "did not play". When puttying, these cracks are sealed with mortar.
A sickle is glued along all joints of the GKL. This is a self-adhesive strip of fiberglass, which increases the crack resistance of the structure by an order of magnitude. Slots and heads of self-tapping screws are covered with gypsum finishing putty. It grabs within 30 minutes, so the work is carried out at a fast pace. 
Foundation preparation required condition to achieve a good result. It is required to remove mortar patches protruding by islands from the wall. Perfect smoothness is not required, but it is necessary to trim the surface.
It is most convenient to control this operation with a long rule. 
The highest strength adhesive bond. At the same time, the GKL was glued onto several strips. But it's impossible to tear it off.
This method is suitable if the surface has practically no vertical deviation, for example, a flood wall or cinder block masonry.
A low expansion foam (PENOSIL or TYTAN) will be required.
The sheet cut to length is laid on the floor, opposite the wall. The foam is applied along the perimeter of the sheet, and then one vertical and 3 horizontal stripes are “drawn” inside this rectangle. As a result, 6 identical squares should be “drawn” on the GKL with mounting foam. 
Give an exposure for a minute, and then glue the sheet to the allotted place. Deviation from the vertical check long rule. If required, press it with light taps.
Do the same with all other elements.
At the end of the work, the cracks are sealed with putty, according to the method described above.
The advantage of gluing GKL on mounting foam, is caused by the almost complete absence of dirt, and the high speed of finishing work.
The strength of the adhesive bond is much higher than after working with gypsum or cement-based compositions.
The process of gluing drywall sheets with glue. Instead of a beacon limiter, only self-tapping screws were used.
This option is used when the wall deviates from the vertical by no more than 4-5 cm.
On the prepared wall, it is required to designate a limiting level so that the drywall sheet cannot lie closer to the surface. For this operation you will need:
We set the laser level as close to the wall as possible, and by turning on the projection of the vertical beam, we determine the plane on which the GCR should be located. Consider the example when the top of the wall "falls out of the room" by 3 cm, relative to the bottom.
In this case, the laser level must be adjusted in such a way that near the floor its beam falls on the very corner, along the entire length of the wall.
At the top, approximately 20-25 cm below the ceiling, a beacon is screwed with self-tapping screws. But they do not press it against the wall, but achieve such a landing depth that the edge of the beacon is in the plane of light that the laser beam forms.
Self-tapping screws are screwed after 25-30 cm. Pieces of drywall can be placed under the profile.
After the formation of such a limiter, you can knead the glue for the GKL.
The mixture is kneaded according to the recipe on the package. But its consistency is thicker than putty, and roughly resembles a “dessert curd”. It seizes quite quickly, and after about 30-40 minutes it becomes unusable. Therefore, control the diluted volume.
A sheet of drywall is placed against the wall. Spatula applied to the wall adhesive mixture small "buns". But their height should be 1-1.5 cm higher than the laser beam shows. 
A sheet of drywall is applied to seat, and slightly tap the rule. With its help, it is determined whether there is a deviation from the vertical. For temporary fixation, you can screw a self-tapping screw into the beacon directly through the GKL.
All other sheets are glued in the same way.
At the end of the work, the seams between the sheets of drywall are putty as described above technology.
The quickest and cleanest way to level a wall is to stick it on a mounting foam. If you use foam with a moderate coefficient of secondary expansion, you can try to equalize small vertical deviations.
But with large blockages, you can only cope by sewing the gypsum board on the frame of the metal profile.
Drywall today has found itself wide application v finishing work. With it, you can radically transform the room. With significant irregularities and differences in the level of the walls, it will serve ideal option for alignment. It has a lot of advantages compared to other materials, and today it is the most popular repair product. Leveling the walls with drywall, thanks to its properties, will provide fire resistance, durability, thermal insulation, as well as excellent moisture absorption. The most pleasant qualities are the speed of finishing, which will save time for your repairs, as well as the relative cleanliness during the work. Don't bother about huge amount metal profiles and plasters - in the process with GKL you will manage mounting adhesive and actually sheets of drywall, which will significantly reduce the concern for the location of building materials.
What is this article about
First of all, you need to choose the type of plasterboard, which will be the most suitable for the type of room.
There are four types of GKL sheets:
When choosing GKL sheets according to the thickness parameter, keep in mind that thicker sheets are superimposed for a flat wall surface, and thicker sheets are superimposed on curved surface- thinner.
In the table below, you can see optimal parameters and ratios of GKL sheets.

Alignment of walls with gypsum board can occur in two ways:
- frame (a frame is mounted from a metal profile, or from wooden beams, by the way, the metal profile is easier to assemble, and also moisture resistant, when choosing wooden beams, it is worth considering that they must be perfectly dried before the assembly process, in order to avoid cracks in the future. When the frame is assembled, drywall sheets are fixed on it)
- frameless (takes much less time and cost than framed due to the fact that GKL sheets are attached to glue)
The frameless method is good because even not the most experienced person in this area will be able to do the work himself and understand how to level the walls with drywall without using a profile. But there are several rules and inconveniences for this method - the protrusions and irregularities on the wall should be less than five centimeters, if there are more irregularities, then you first need to plaster the wall (it is better to take a dry mix for plaster base, due to the content of special additives, it has increased adhesive properties, but with such material it is necessary to work quickly, since the solution also dries quickly, avoid lime plaster, otherwise all work will be useless) and after drying, proceed to the process. The disadvantages include the fact that it is impossible to insulate the wall with this method, as well as to hide communications behind the plasterboard.
Before proceeding with the frameless alignment process, you need to prepare the necessary materials:
The room temperature should be above 10 ° C, and the material itself should lie down in the room itself for two, three days in order to adapt to its climate. Make sure that the electrical wiring, junction boxes, installation of communications and "glasses" for installing switches and sockets - all these processes are completed, only then proceed.
Before starting the process, the wall is intensively cleaned of dust and contaminants, the walls are washed down to a brick, then proceed to the primer.

The surface must be firm and dry. When everything is ready, screw self-tapping screws around the entire perimeter of the wall, take strong threads, better bright, so that they stand out, and stretch them between the screws.

Cover the entire wall with marks - on a horizontal line every 65 cm, install under the ceiling screw, determine the points for vertical beacons, using a water level and a plumb line.

With a tape measure and a clerical knife, we adjust the sheet to the size of the wall.
To effectively bond the sheet to the wall, treat the sheet itself with a primer. For the adhesive solution, mix water with mounting adhesive following package instructions. Using a drill nozzle, mix the composition until a homogeneous mass, for the calculation - 10 kg. Glue on 1 sheet. Focusing on the size of the sheet - for a small sheet, the glue is applied directly to the sheet itself, if the sheet is large, the glue is applied to the wall. It can be applied pointwise or in large strokes. 
The sheet itself is pressed very tightly against the wall.

To check for evenness, setting the sheet by level, there should be a zero mark.
After the glue has completely dried, the glued sheet can be fixed with dowel-nails, this will increase the service life and strength of the GKL. This is done by drilling a hole every 40 cm around the perimeter, a dowel is inserted into the hole, and a nail is hammered into it. The nail head should sink into the drywall, but at the same time, without damaging it.
At the end, puttying is carried out, flaws are checked, all caps of self-tapping screws must be twisted, and not protrude beyond the level, puttied places for installing screws. It will not do without a reinforcing tape, it is pressed with a spatula for the first time layers of putty onto the prepared joint, and then again puttied. Further puttied seams between sheets. After drying, putty is applied to the sheets themselves.

The end result should be a smooth, even surface without roughness and flaws.
The whole process is the same as in frameless way begins with cleaning the surface of the wall from excesses. And by the way, the dismantling of an unnecessary coating adds spare centimeters, which will later be sheathed. If we prepare outer wall, then it is desirable to treat it with an antiseptic. The boundary line of the plasterboard wall being erected is marked on the ceiling and on the floor (near the wall).
Necessary materials:
Calculate wall materials using the calculator:
*Attention! All results are approximate - the accuracy depends on the material of the walls, the condition and shape of the room
For the frame, two types of galvanized profile are used. UD profiles are mounted on the floor, ceiling and adjacent walls, centered on the surface and fastened with dowels. Then the vertical jumpers from the CD profile are installed in this frame, the ribs are pre-cut, the wings are fastened with the edges along the wall surface, and with the edge into the room.

For coupling the profiles, specially designed screws with a drill at the end are used, they twist the parts of the frame, making holes for themselves. The first profile is attached to the side wall. Further, the distance between the profiles is 60 cm and is measured from the center to the center of the profiles.
Under another wall, the profiles are fastened tightly, regardless of the reduction in distance.
Perforated suspensions are more reliable, they are galvanized strips, stiffeners in the center, perforated at the ends. Their edges are attached to the profile. Pieces of drywall are added if the sheet is 250 cm below the level of the wall.
To do this, an additional sheet lies in the middle of the vertical profile.

The frame is ready, which means you can mount drywall. For ease of action, using a screwdriver, screw the screws into the sheet so that the caps do not go beyond the borders of the sheet. Screw in every 15 cm in the center and around the perimeter.

After screwing over the entire surface, you can start puttying. Using a self-adhesive mesh that can be attached to the edge of any sheet, apply putty on its surface, smoothing and filling up all the depressions and irregularities.
Joints are also covered with putty. If tiles are laid later, this is enough if painting or wallpaper is planned - the entire wall is covered with putty, with a layer of no more than 2 mm. The surface is then sanded and primed. This completes the wireframe method.

After studying some material, you will be able to understand that the technology of leveling plasterboard walls can occur in more than one way, which is more convenient, you decide. And also it is not necessary to turn to specialists, because it is not difficult to do it yourself.
(1908-1954) - Soviet statesman and military figure, Colonel General,...

General information: Approximate trophy difficulty: 7/10 Offline: 34 (20 , 7 , 6 ,...

Hide and seek is one of the most popular games for children. Kids of all ages love this...