To conceive a child, the maturation of the follicle in the ovary is necessary. If this one...


Many summer residents resort to installing a well on a personal suburban area. This is a great opportunity to have clean water on hand. In addition, it greatly simplifies the care of plants that need constant watering. But the installation of such equipment can be difficult, it is impossible to perform work without certain knowledge and skills.
It should be noted that the installation of a caisson is not always a mandatory event. If the cottage has a heated room, then this process can be omitted. So you can save time, effort and money that will be spent on arranging the pit and installing the caisson.
The material for the manufacture of the caisson may vary. Plastic, metal or reinforced concrete rings will serve them well. It is important that the metal is treated on both sides with an anti-corrosion coating.
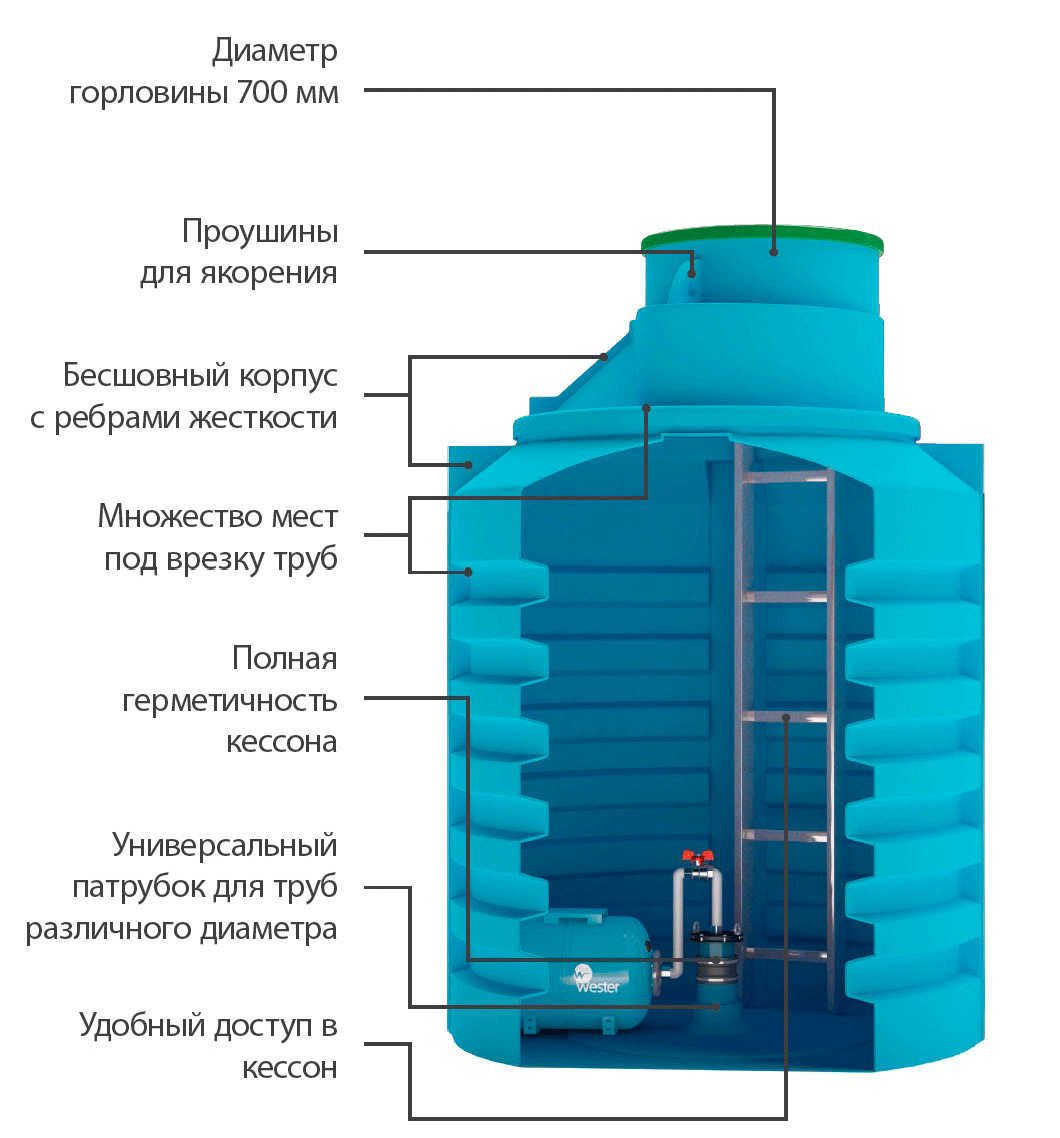
The scheme of the device of the caisson consists of a lightweight body in the form of a cylinder, a cover with an installed lock, additional system heating. It is also worth noting the voluminous metal-plastic ribs and hermetic docking with the casing. For convenience, a staircase is provided.
Caisson installation technology:
When using a metal caisson, the joints are sealed. After the tank is covered with earth. For better density, you can make a concrete screed.
Water supply wiring diagrams with a pump or pumping station:
To equip a well in without fail mount the pump. The best option for the well will be a pump submersible type. This choice is due to the volume of water consumption and the depth of the tank.
The installation process involves lowering the pump on a cable to a depth. They also lower the cable that feeds the engine, and the pipe that will supply water. All elements should be tied. The functions of the cable are fixing the pump and coupling with the head.

The nuances of installing the pump:
After installing the pump, it is necessary to ennoble the well. To do this, make a headband. However, it performs other functions as well.
How to assemble a caisson for a well with your own hands is described in this material:
The head arrangement scheme includes a flange, a carabiner, a rubber ring, fittings and a protective cover. The outer side includes 2 eyebolts. One of them is mounted on the inside.
Head landscaping:

The headpiece performs a number of important functions. These include protection against melt water, foreign objects, theft, which is especially important in a summer cottage.
The plastic head is able to withstand weight up to 200 kg. And its metal counterpart is up to 500 kg.
Do not forget about the aesthetic function. The cap makes the well more attractive. It also simplifies the submersion of the pump, since the bolts of the cover are used for this with a winch.
To properly equip the accumulator, you must follow some rules. First you need to understand the device itself. He is storage tank.
The principle of operation of the hydraulic accumulator:

The minimum volume of the accumulator is 10 liters. Right choice largely depends on the needs of the owners in the water.
You can control the water supply system by turning the pump off and on. Also, the tank has protection against possible power surges. It is worth noting the “dry” running sensor, which works when the water level in the well drops.
Well construction is a responsible process. It's not easy to do the work yourself. After all, you will need to properly mount the caisson (although its installation is not mandatory), install a pump and a hydraulic accumulator. You also need to make a headband.


The lack of a centralized water supply is not a reason to forget about quality water supply And comfortable living in a private house. This is an occasion to think about your own well. An autonomous source of water can become your reality even without the involvement of a professional team and fabulous costs, because practice proves that if you take each stage of well construction seriously, you can do all the work yourself. So, if you want to make your home independent in terms of water supply, then we offer to understand in detail with the video the main stages of organizing a well for water: from drilling to connecting automation.
The first step is to create a well. Best for drilling shock-rope method A: It's simple but effective.
First, prepare the main working mechanism - a support tripod with a driving glass: weld from metal pipes tripod structure and use a winch with a special cable to fix the glass on it. The height of the support is determined by the length of the driving device used: the tripod should be 1.5-2 m higher than the glass.

Shock-rope well drilling technology
When the mechanism is assembled, start drilling:
Advice. When determining the depth of the well, consider two factors: the level of occurrence of the aquifer on adjoining area and your household and household water needs.
After drilling, place the casing in the well. It can be either made of steel or plastic, but always with a threaded connection. It is also important to fix the pipe well - it should fit as tightly as possible to the ground.
In order for the well to successfully cope with its tasks, its contents must be protected from a number of negative external factors: siltation, freezing, penetration of groundwater. It is for this purpose that a caisson is used - a cylindrical product made of durable plastic or steel. The diameter and length of the device are selected individually for the dimensions of a particular well. But the thickness of the walls of the cylinder in any case should be no less than 5 mm.
Before installing the caisson, it is recommended to insulate it - the material used must be non-combustible. Additionally, it is desirable to protect the cylinder with bricks or plastic panels. These two measures will make the caisson more resistant to external influences and thereby increase its service life.

Metal caissons
The caisson is installed according to a simple scheme:
Important! The caisson must have a sealed cover with prepared holes for pipes and other working equipment.
The next mandatory step is the installation of the pump. Its role for an autonomous water supply system is extremely important - the device directly makes it possible to supply water from a well. When choosing a pump, focus on four factors:
Do not use pumping equipment whose power is higher than the productivity level of the well, otherwise, during the operation of the water supply system, you will encounter such an extremely negative phenomenon as the “dry” running of the pump.
Advice. Choose a pump with a diameter 15% smaller than the diameter of the installed casing - this way you will keep the possibility of convenient maintenance of the device.
Direct installation of the pump includes the following steps:

Well construction
After arranging the pump, install coarse and fine filters. If necessary, they can be supplemented with softeners or carbon filters. These devices are mounted in a pipe, which will be responsible for the supply of water from the pumping equipment to the accumulator.
Not a single individual water supply system can do without a whole range of auxiliary automatic devices that are designed to maintain its uninterrupted functioning. These include: a pressure gauge, a pressure level sensor, a relay - thanks to them, the system is started and the main indicators of its operation are regulated. All these devices are connected to a hydraulic accumulator, which, in fact, occupies a central place in the entire complex of auxiliary equipment.
The hydraulic accumulator is designed to provide constant water pressure, protection pumping device from water hammer, as well as the creation of a water reserve. Outwardly, it is a standard storage tank - it is regularly filled with water under pressure provoked by a pump.
To connect automatic devices to the accumulator, a fitting is used that has five outlets - one each for: a pressure gauge, a pressure level sensor, a relay, water pipe and pipes from the pump.

Autonomous water supply scheme
For management automatic devices already in the process of subsequent operation of the plumbing system, a remote control can be used - it must be included with the accumulator and connected devices.
So, before you are the main stages of arranging a well for water: drilling, installing a caisson and a pump with filters, as well as connecting automation. After carefully understanding each step and following all the procedures according to the instructions, you will receive an absolutely functional autonomous source that will provide you with water no worse than a centralized water supply system.


The lack of a centralized water supply is not a reason to forget about high-quality water supply and comfortable living in a private house. This is an occasion to think about your own. An autonomous source of water can become your reality even without the involvement of a professional team and fabulous costs, because practice proves that if you take each stage of well construction seriously, you can do all the work yourself. So, if you want to make your home independent in terms of water supply, then we offer to understand in detail with the video the main stages of organizing a well for water: from drilling to connecting automation.
The first step is to create a well. For drilling, it is best to use the shock-rope method: it is simple but effective.
First, prepare the main working mechanism - a support tripod with a driving glass: weld a tripod structure from metal pipes and fix the glass on it using a winch with a special cable. The height of the support is determined by the length of the driving device used: the tripod should be 1.5-2 m higher than the glass.
Shock-rope well drilling technology
When the mechanism is assembled, start drilling:
Advice. When determining the depth of the well, consider two factors: the level of occurrence of the aquifer in the adjacent area and your economic and domestic water needs.
After drilling, place the casing in the well. It can be either made of steel or plastic, but always with a threaded connection. It is also important to fix the pipe well - it should fit as tightly as possible to the ground.
In order for the well to successfully cope with its tasks, its contents must be protected from a number of negative external factors: siltation, freezing, and groundwater penetration. It is for this purpose that a caisson is used - a cylindrical product made of durable plastic or steel. The diameter and length of the device are selected individually for the dimensions of a particular well. But the thickness of the walls of the cylinder in any case should be no less than 5 mm.
Before installing the caisson, it is recommended to insulate it - the material used must be non-combustible. Additionally, it is desirable to protect the cylinder with bricks or plastic panels. These two measures will make the caisson more resistant to external influences and thereby increase its service life.
Metal caissons
The caisson is installed according to a simple scheme:
Important! The caisson must have a sealed cover with prepared holes for pipes and other working equipment.
The next mandatory step is the installation of the pump. Its role for an autonomous water supply system is extremely important - the device directly makes it possible to supply water from a well. When choosing a pump, focus on four factors:
Do not use pumping equipment whose power is higher than the productivity level of the well, otherwise, during the operation of the water supply system, you will encounter such an extremely negative phenomenon as the “dry” running of the pump.
Advice. Choose a pump with a diameter 15% smaller than the diameter of the installed casing - this way you will keep the possibility of convenient maintenance of the device.
Direct installation of the pump includes the following steps:
Well construction
After arranging the pump, install coarse and fine cleaning. If necessary, they can be supplemented with softeners or carbon filters. These devices are mounted in a pipe, which will be responsible for the supply of water from the pumping equipment to the accumulator.
Not a single individual water supply system can do without a whole range of auxiliary automatic devices that are designed to maintain its uninterrupted functioning. These include: a pressure gauge, a pressure level sensor, a relay - thanks to them, the system is started and the main indicators of its operation are regulated. All these devices are connected to a hydraulic accumulator, which, in fact, occupies a central place in the entire complex of auxiliary equipment.
The hydraulic accumulator is designed to provide a constant water pressure, protect the pumping device from water hammer, and also create a water reserve. Outwardly, it is a standard storage tank - it is regularly filled with water under pressure provoked by a pump.
To connect automatic devices to the accumulator, a fitting is used that has five outlets - one each for: a pressure gauge, a pressure level sensor, a relay, a water pipe and a pipe from the pump.
Autonomous water supply scheme
To control automatic devices, a remote control can be used already during the subsequent operation of the plumbing system - it must be included with the accumulator and connected devices.
So, before you are the main stages of arranging a well for water: drilling, installing a caisson and a pump with filters, as well as connecting automation. After carefully understanding each step and following all the procedures according to the instructions, you will receive an absolutely functional autonomous source that will provide you with water no worse than a centralized water supply system.
On the personal plot country house Water is needed constantly - both for water supply to housing and for technical needs. But central water supply it doesn’t always pass near the site, street wells are not a way out, and then the only way to provide yourself with water is to drill a well, equip it according to all the rules, stretch a main from it to the house, and also dilute water around the site. You can drill a hole, carry out a qualified arrangement of a well with your own hands without a caisson, and this will not require too much labor, time and financial costs.
The mine must be equipped with all necessary appliances and mechanisms to work correctly and reliably. Technological equipment wells for water implies the presence of such structures, assemblies, elements, mechanisms and devices:
Before you independently equip the well with a caisson, you should check whether it is needed in a particular case. If the well is drilled near a warm extension, a heated building or a room with heating, then all the accompanying mechanisms can be installed there, the caisson is not needed in this case. This solution will save you money and time.
Otherwise, a caisson for a well with an adapter will still have to be dug and equipped. You can concrete the pit or lay it out with bricks, or you can purchase a ready-made tank of a suitable size (about 1.5 meters for each side, or a round container) and dig a pit along it. Such containers are made of thick-walled plastic or metal.
steel container after welding work must be coated with anti-corrosion compounds.
The technical arrangement of the caisson is carried out in almost the same way for tanks made of any materials. The operational arrangement for each design will be different.
Subsequence assembly operations next:
When installing a steel tank, all inlet and outlet connections on pipes and the caisson are made by welding.
After all installation work to install a caisson in a country house or in a private house, you need to equip, decorate or ennoble the well with your own hands.
For a deep well, a deep water pump is needed. The pump power is calculated based on daily consumption water occupants and the depth of the mine for water. Installing such a pump is simple - a cable or cord is tied to the lugs on the body, the equipment is lowered into the water, but not to the very bottom, and not bringing one meter to the bottom so that silt is not captured.

The installation of a submersible pump is accompanied by certain mandatory conditions, namely:
After lowering the pump into the shaft, the hole of the well is covered with a head, the end of the cable or cord is attached to the head.
A hydraulic accumulator is a storage tank that creates pressure in the water supply system:
The maximum volume of the storage tank is from 10 liters to one ton. It all depends on the amount of water consumed by the consumer. In addition, the arrangement of the battery is also the equipment of the protection system, which is mounted last.

ASUP ( automatic system instrument control) turns the pump on and off depending on the mode of its operation and the water level in the accumulator, it is equipped with protection against pressure and voltage drops, from surges in the water level in the casing. All commissioning work associated with the installation and testing of equipment should be carried out on an experimental pump in order to subsequently ensure that the well works correctly.
Finishing work:
In conclusion, about how to equip a well for water after drilling. Most often, ennoblement consists in planting flowers around the caisson. Also planted around the well undersized shrub or make a gazebo right above the caisson.
A well and a well are considered one of the most widely used options for providing a country house with water for household and household purposes. Having figured out how to equip the well and, if desired, do everything with your own hands, the owner of the site will be able to use clean water in any season.
Before you equip a well for water, you will need to use some special devices. They certainly include such elements of the system:
Therefore, before starting the well construction process, it is necessary to select the appropriate structural elements. Follow our advice and if you really want to save money, then do not get carried away very much. Better buy reliable equipment and save yourself from unnecessary worries and further costs for its repair.
One of the main elements for the construction of a water well is a caisson. It looks like a waterproof container that resembles a barrel. The caisson is necessary so that the water in the system does not freeze and is not polluted. If desired, in this sealed container you can install different additional elements , namely:
It's quite practical and convenient option, which will relieve you of the need to install these units and appliances in the house. As a rule, caissons are equipped with a neck with a hermetically sealed lid. In most cases, caissons with a height of 250 cm and a diameter of one meter are used.
In order for a water well to regularly perform all the duties assigned to it for many years, it is necessary to choose a good one. submersible pump. To do this, you need to perform a small calculation, after which you will find out optimal parameters products, taking into account the diameter and depth of the future water well. Very it is important to consider the maximum use of water for all connected points. In order for the water supply system to be high level, the working pressure should be in the range of 2-3.5 atm.
An integral attribute of a well for water will also be a hydraulic accumulator. Its main purpose is to smoothly change and support normal pressure water in the system. All in production today devices have the same set of characteristics and functions, differing only in how much water they can hold. You can purchase a hydraulic accumulator with a volume of 20 to 1500 liters.
The cap protects your well from various kinds of debris and melt water. In addition, this design simplifies some of the operations that are associated with the operation of the technical well, especially in the suspension of the pump.
Before starting work, you need to prepare the following:
 A well for water can be equipped almost anywhere in your area. But it is advisable to spend a little time and choose the most suitable place. In this case, the most suitable is the one that is located at the shortest distance from the living quarters. It is imperative to take into account the fact that for the arrangement of the caisson it is necessary to allocate from 4 sq.m. total area.
A short distance from the house will make it possible to significantly reduce the amount of earthwork and save on consumables. In addition, in this case it will be possible to build a well using a cheaper pump. In the case when a long line is made, the pump will not only need to take water from the well, but also transport it further through the system. This requires the installation of a more powerful and, of course, expensive pump model.
Drilling can be done different ways. Some find it easier to do this with hand drill, some prefer to use impact method or electric motor mounted on a tripod.
When choosing the type of tool, you need to take into account the characteristics of the soil. With a strong desire, with the help of a hand drill, it will be possible to “overcome” up to 20 m of land. But this is a rather long and laborious work.
 At the bottom of the well, it is necessary to pour fine gravel (crushed stone) or coarse sand. This will protect the pipeline from silting. Before filling the bottom of the well must be cleaned with a bailer. It is necessary to pre-prepare the first pipe in order to lower it into the well immediately after drilling is completed. Thus, you will not allow the walls to crumble.
Along the perimeter of the pipe, at a distance of approximately 29 cm from its bottom, holes must be made. Due to them, the pipe will "collect" a larger volume of water.
At the end it is necessary to establish a filter mesh. If possible, buy anti-corrosion pipes.
Due to the fact that it is best to lay pipes 220-260 cm long for the construction of a well, most often one elbow is not enough. Longer pipes are not so easy to maintain and install. Together pipes are fastened by "screwing" along the thread. The first pipe must be lowered so that it rests on the bottom of the pit. After installing the pipes, you can begin the device of the caisson and the installation of the pump.
 During the arrangement of a water well with your own hands, you will need to take several steps step by step. First, you need to make a hole for the caisson near the well, approximately two meters deep. The diameter will depend on the diameter of the container. As a rule, the width of the pit is chosen to be approximately 180 cm. You must have a pit with a protruding casing pipe in the middle. If the pit is filled with groundwater, then dig an extra hole, due to which their timely pumping out will be possible.
In the bottom of the caisson, make a hole according to the size of the casing. Lower the caisson into the pit, placing it in the center of the well bore.
Cut the casing pipe and weld it to the bottom of the tank using electric welding. Connect the water outlet pipe and the pump electrical wire to the resulting structure. Fill the container with earth in such a way that only the entrance cover is above the surface of the earth.
Installation of this element will not require any special skills from you and will not cause any difficulties. Most importantly, you need to take into account such nuances.
Then, when the pump is delivered, you can move on to attaching the head. Due to it, the mouth of the well will be protected from various contaminants.
Header will be able to provide:
The heading consists of several elements, namely:
 The inside side of the cover is equipped with one eyebolt, the outer side with two. metal product can withstand a mass of up to 0.5 tons, and plastic - no more than 250 kg.
During the installation of the head, it will be necessary to cut the casing pipe, clean it and treat it with an anti-corrosion solution. Pass the water pipe and pump cable through the head cover. Connect the pump and pipe together. Fasten the free end of the rope to the carabiner. This must be done using the eyebolt on the back of the protective cover. Push the rubber ring and flange onto the casing.
Position the pump in the well and fit the head cover. This can be done quite simply: all you need to do is lift the rubber ring for the cover and the flange and compress all these elements with bolts. On this, the installation of the head is completely finished.
In order for water to be supplied without interruption, it is imperative to install a hydraulic accumulator. Its installation can be done in the basement of the house or directly in the caisson. The system works quite simply:

The tank must be built into the system so that in the future nothing interferes with its replacement or repair. The system implies mandatory installation check valve . It is mounted at the place of installation of the tank, in the direction of water movement. After and before the tank, a drain valve is placed. It is advisable to mount the accumulator with rubber seal. Due to this, the vibration will not be so pronounced.
Thus, you have an idea about how to make a water well on your site. You can do the arrangement of the well with your own hands, but even when you decide to use the services of specialists, due to this information, you will be able to competently control them.
To conceive a child, the maturation of the follicle in the ovary is necessary. If this one...

Work on oneself is a difficult process, therefore it requires balance from a person, ...

PUBLIC OFFER - on the conclusion of a contract of sale This document...