


Hmm, yoda_daro claims that this is a test to determine their sexuality...


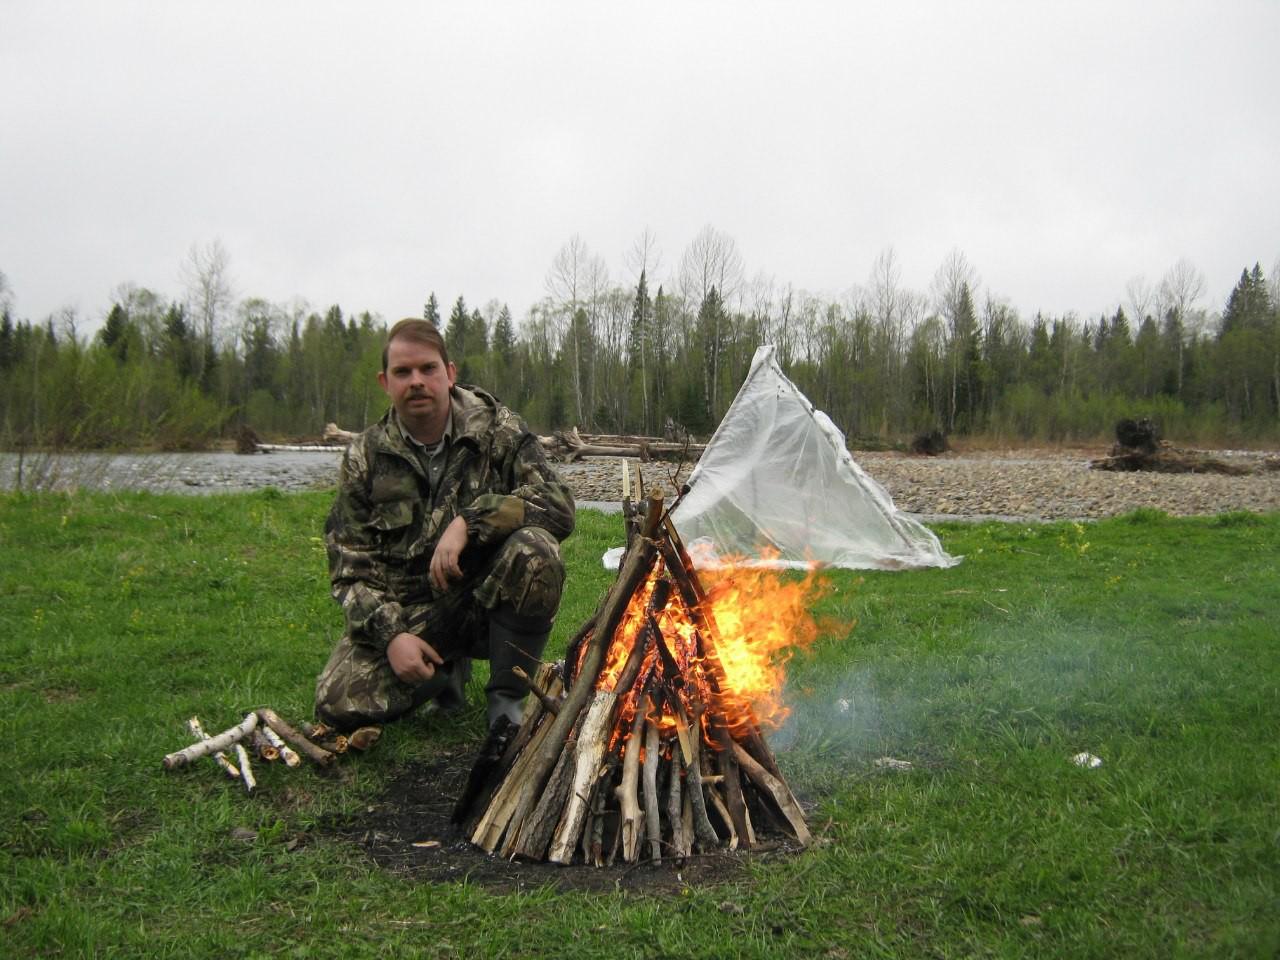
A do-it-yourself camping bath is one of the easiest options to perform. Having built a small sauna-tent, you can take a steam bath while hunting or fishing, as well as on a hike. If desired, such a structure can be built even on suburban area if the traditional option is still at the design or construction stage.
Do-it-yourself camping bath - photo
There are many manufacturing options. You can purchase a ready-made portable tent - in whole or in parts (oven, awning, frame).
 Mobile bath
  Mobile portable bath Mobiba
  Mobile bath Mobiba
There is also an alternative option - to make a bath from a tourist tent, but exclusively of the Soviet type, that is, made of tarpaulin. This is explained by the fact that modern tents are made from fabrics that are not only not designed for high temperatures, but are also capable of releasing when heated. harmful substances. As for the old canvas models, they are quite suitable for this: there are no harmful fumes and the thermal insulation is good.

If we talk about creating a camping bath from scratch, then this will require a frame, thermal insulation material and oven.
| Design features of a camping bath | Description |
|---|---|
| It is better to make it from aluminum racks (for example, from a stall), since this material is safer than wood. In the absence of such, supports can be made from young trees, in which case you will have to carefully monitor that the wood does not ignite. To fix the frame elements, you can use both a rope and a soft wire. |
| The simplest option is a dense polyethylene film, but due to its disadvantages - low thermal insulation qualities and density - it is preferable to use a tarpaulin. It is important that it be a large and solid piece of material. The dimensions of the covering material depend on how many people will steam at the same time, but if it is no more than four or five people, then a piece of 6x6 m will be enough. |
| Here the choice is also quite wide: you can put a factory stove-heater, you can make it yourself in the form of a mesh metal box made of metal rods or thick wire, or you can simply fold a well of rounded stones and overlay it with firewood. |
Note! A camping bath can be made “in white” (that is, the heater is built separately, and hot stones are transferred to the tent) or “in black” (the stove is set up directly in the steam room). Let's take a look at each option today.
A camping bath can only be crafted under certain conditions. The resting place must meet the requirements below.
| A photo | Conditions | Description |
|---|---|---|
| First of all, there must be water. | The ideal option is to choose a place on the banks of a river or other body of water. |
| Still there must be stones. | Do not use layered cobblestones, because when heated, they can shatter into pieces, causing serious injury to those soaring. The stones should not be too small or too large, the optimal size is 100-120 mm, the shape is somewhat elongated. If the stones are smaller, they will not be able to accumulate the required amount of heat and will cool down very quickly; large specimens will heat up for a very long time. Although, if you have time, you can build a kind of foundation for a future fire from large stones. If there are no boulders, then it is quite possible to use pebbles. As for quantity, for each person who will bathe, 1 bucket of stones will be required. Therefore, each participant is obliged to collect a bucket of boulders for himself. |
| Near the resting place there should be thin young trees (or even better, dead wood) that will be used to build the frame (if the aluminum posts were not prepared in advance). | From these trees, you need to make poles with a diameter of about 30-40 mm, you should also think in advance how to attach them. |
| Firewood will be required for a fire, and in large quantities, because it will burn for at least 3-4 hours. | Logs that are too thick are not suitable for this, as they do not burn well. The maximum diameter of firewood should be 100-150 mm - so they quickly burn out and transfer all the heat to the stones. |
Will be considered first the simplest option, for which special materials require only adhesive tape and film (still, perhaps, clothespins). We are talking about a white-bath-tent here, that is, the stove will be located separately from the steam room.

We start with the manufacture of a camping bathhouse.
There are several ways to make a frame, consider them.
For work you will need:
After preparing everything you need, we proceed to create the frame.
Step 1. First, we prepare 8 poles with a length of at least 100 cm (more is possible, but warming up the steam room will take longer). From the poles we build a parallelepiped or a cube, depending on the number of people who will bathe. If there are a lot of people, then it is preferable to bathe in four people - this is the best option.

We connect the poles with tape. A lot of adhesive tape will be required - it is intended not only for fastening, but also for protecting the film from the sharp ends of the frame.

Step 2 Having finished with the frame, we build a place for stones on the side, using 3 more poles 300 mm or 500 mm long each.
The result should be something similar to the design shown in the image below. The base of the stove is lined with stones.
It is worth noting that much here is optional. So, the design of the frame can be significantly simplified and made in the form of a wigwam. The frame in this case will consist of 3 poles connected at an angle.

Step 3 Next, the frame must be covered with a film. The width of a standard film sleeve is 1.5 m. We cut it and get 10 m or 15 m of a film 3 m wide. We wrap the finished frame with a film, we do this very carefully so that sharp ends or knots do not pierce it.
Note! The dimensions of the frame can be made such that the width of the covering material (3 m) is enough not only for the walls, but also for the roof. In this case, the tightening procedure will be noticeably simplified, there will be no need to cut the film and make additional seams.
There will be no problems at all with fitting a wigwam.

 Tree trunks were used as racks. The film is fixed between them
  Variant of a camping bath in the form of a hut
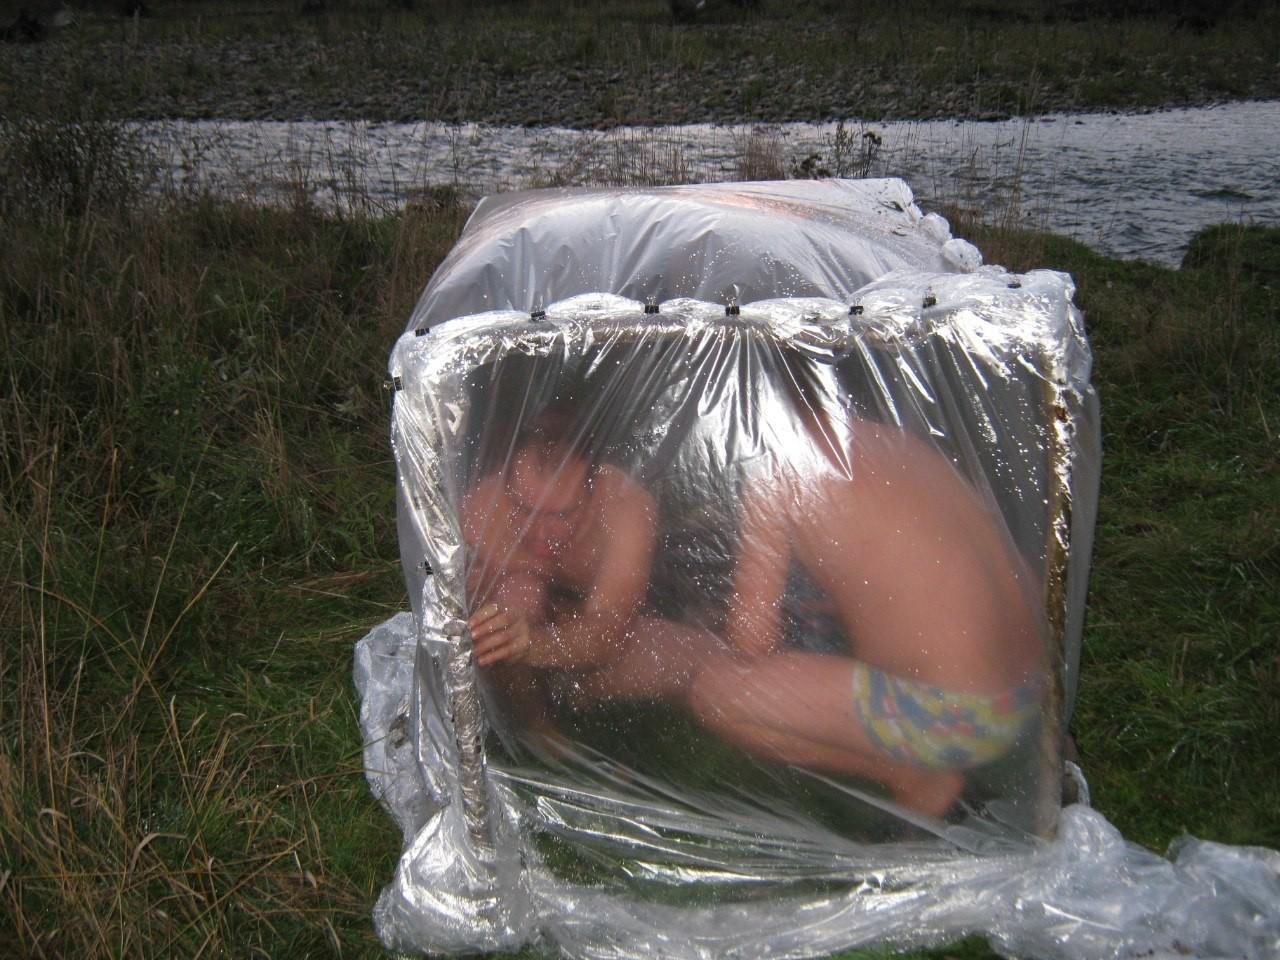
  Bath from the inside
Step 4 We fasten the film to the frame using clothespins or ordinary tape.

Step 5 On the entrance side, we leave enough film for the “door”. The entrance must be securely closed so that the steam from the tent does not come out. This can be done in one of two ways:

Almost finished bath
Step 6 Using heavy stones, we press the film to the ground around the perimeter.

Step 7 To cover the floor, you can use spruce branches, which not only smells good, but is also good for health. You can sit directly on the spruce branches, although there are other options: lay a small tourist rug, bring folding chairs or hemp.
We use improvised materials - for example, four willow branches 1.4-1.5 m long. Using adhesive tape, we tie two branches in length and set them crosswise. Of course, you can try to find a couple of long branches to cross them, but it will be quite difficult to find those that would have right size. You can also build a square structure, as described above, but this will require more time and effort.


If the bath is large, and the standard 3 m width is not enough for this, you can connect two pieces together using stationery clothespins.


From profile pipes you can weld a prefabricated frame. It only takes a few minutes to assemble it at the resting place. The image below shows that for the manufacture of such a frame, metal tubes 60-70 cm long were used (a total of 16 pieces will be required).
Table. Elements for connecting the frame
For this, pipes of a larger diameter were used.
The heat-insulating material in this case is an awning, pre-sewn in accordance with the dimensions of the structure.

 Awning, sewn to the size of the frame

An easier way is as follows: you need to purchase an ordinary double tent, cut off the tarpaulin, and use the tent arches as a frame.
Often, tents are set up entirely, but for the reasons described at the beginning of the article ( bad smell, possible release of toxic substances) it is still better to use a film.


Having finished with the frame, we proceed to the manufacture of the stove.
To create a stove you will need:
Note! Once again, we remind you that fragile stones (such as sandstone) should not be used, because at high temperatures they can crack.
Step 1. From the collected stones we build a well about 10 m from the bath. It is important that the well is stable, so it is better to take flat stones for it. It may not work the first time, so be patient.


Step 2 After that, we cover the stones with firewood so as to completely hide them. We burn wood.
By the way, the film on the frame can be additionally covered with the same spruce branches or branches (as shown in the images below) so that the steam room retains heat longer.

Step 3 While the stones are warming up, we prepare a sapper shovel or slingshot. In order for the stones to heat up to the required temperature, it will take about 1 hour. Throughout this time, the firewood should burn intensively. After heating, the stones are transferred to the bath.


Note! It is advisable to carry the stones together, so as not to let them cool down. Also inside the tent should be placed in advance a few plastic bottles with warm water, which will be poured over red-hot cobblestones.

The main difference of this option is that the heated stones will not need to be transferred from the fire to the steam room. A large frame in this case will be placed directly on top of the red-hot cobblestones after cleaning the coals. The manufacturing procedure begins with the construction of the furnace.

There are two options here, let's get acquainted with each of them.
We add a bunch of stones and make a hole in it for loading firewood (in the image, the hole is on the reverse side - where the smoke comes from). Stones will be required much more than for a white bath, but neither the shape nor the size play a special role.
It is worth noting that this option is rather complicated in execution, so you should be prepared for the fact that the heap will constantly collapse.

Via welding machine in advance we make a small frame (40-50 cm high, the width is similar) from reinforcement rods with a diameter of 5 mm or more. Already in place, the finished frame is covered with stones. The main advantage of this design is that the stones will rest on the frame, so they will not fall apart. At the same time, they will take more time to heat up than in the variant described above.


Note! In addition to its direct purpose, such a frame can serve as a kitchen stove, and if you put a sheet of plywood on top, then also as a table.


Here, on a pre-selected site, it is necessary to lay out the foundation of the heater with sides of 100 cm, after digging a small hole under it with a depth of 50-60 cm. -30 cm.

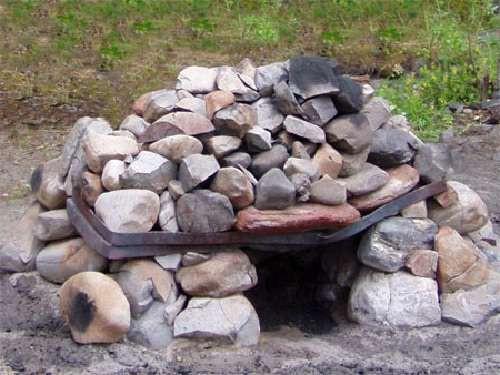

We install on top of the boulders stone slabs so that there is a small through hole in the center of the structure, through which the fire will reach the top of the heater. At the end, we lay another plate (it can even be a mesh or a sheet of thick metal), which will close the central hole.
Having finished the construction of the furnace, we load firewood and set it on fire. Stones, as noted above, will warm up for a long time. We maintain an intense fire all this time, periodically we put firewood. While the cobblestones are heating up, we proceed to the construction of the frame.
Making the frame one of possible ways(in the images below - a design of 4 poles). When the stones are heated to the required temperature, remove the coals and cover the frame with a film. Along the perimeter we press down the film with large cobblestones, if possible we cover the floor with spruce branches. Everything, you can proceed directly to the bath procedures!
Today camping baths produced by both Russian and foreign companies. Price finished model fluctuates between 25000-30000 r. (the set consists of a heater, a hood and a thermal tent). The amount is considerable, but you can save money: build a frame with your own hands and buy only a small metal heater. In this case, the costs will be about 9000-10000 rubles.


A mobile (camping) bath is an excellent invention that will be useful in a variety of circumstances. Outdoor recreation, a long hike or simply a weekend outside the city - all these leisure activities will become much more enjoyable and interesting if you can combine unity with nature and such a benefit of the civilized world as a bath. There is absolutely nothing complicated in creating a mobile bath. The frame is assembled from available materials, and an impromptu oven is laid out right on the spot.
If desired, such a bath can be assembled even on your own suburban area by placing it in a secluded corner own garden and bringing to the traditional country rest new sensations.


On the modern market presented big choice mobile baths of factory production. A full-fledged factory kit will include a tent, a stove and even benches with a variety of accessories - the manufacturers have done their best.

However, these kits are quite expensive. And why spend big money on buying something that you can do yourself? Moreover, a home-made camping bath will in no way be inferior to its factory-made counterpart.
The stove for the bath option under consideration can be made from a segment old pipe. But this version of the stove will be acceptable only if you go hiking not on foot, but by personal transport. Carrying even the smallest metal stove in a backpack is not a pleasant undertaking, especially in the case of a long trip, when every centimeter of space in the bag counts.

Therefore, in order for the bath to actually be called mobile, traditional stove structures should be abandoned. For heating, an impromptu heater will be used, assembled directly at the halt.
The advantage of such a furnace is the absolute absence of financial costs for its arrangement - you simply collect right amount firewood and stones, lay them out in layers and kindle.
Have you decided that you won’t pay money for a ready-made mobile bath, and you’ll assemble it with your own hands? Correct solution!
A camping bath consists of several basic elements. Study the information about each of them, so that in the future it will be easier for you to navigate the process of assembling the structure.
In addition to the already mentioned polyethylene or "tent" fabric, assembling the frame will require the use of special racks. The best way- racks made of aluminum or carbon fiber. If available, you can use racks from a tent for 4 people.
Practice has shown that aluminum and carbon fiber perfectly tolerate the "bath" temperature, while maintaining their original performance characteristics.
You can also make racks out of wooden poles. However, wood breaks down much faster than metal.


In addition, wood is a combustible material, and instead of relaxing and fully enjoying the bath procedures, you will have to constantly watch if the counters catch fire. Yes, and wood weighs significantly more than the same aluminum.
Pay attention to the material for making the awning. For example, polyethylene was often used in the past. The material, of course, is well suited for assembling a steam room, however, when folded, the film takes up quite a lot of weight, and you can hardly call it light.
Therefore, it is better to immediately buy a special fabric for making tents or simply a ready-made tent - all this will weigh much less than the same plastic film.

If you have already decided on the type of material for constructing an awning, then the definition optimal size should be given special attention. Practice shows that for a comfortable pastime in a mobile bath, one person needs at least 1 m2 of space.
Rely on this value in the calculation process. That is, for example, if you are making a bath for 6 people, you will need to buy at least 6 m2 of material with a mandatory additional stock.
An awning can be made from an old tent. The only important note: standard awnings of modern-style tents are not suitable for the implementation of such tasks, because. they deteriorate very quickly under the influence of high temperatures. A great option is Soviet canvas tents.
For the successful use of such a bath, you will need 3 main components: firewood, stones and water. Install a mobile steam room where you have access to a large amount of firewood. For kindling, you will use dry firewood up to 10 cm in diameter. Thicker logs will not work - they take too long to flare up.

Stones should also be prepared before the start of the arrangement of the frame. Minimum - a bucket of stones. Try to collect large stones with a neat rounded shape. Refrain from using boulders with chips, inclusions of third-party rocks, as well as layered stones. If you cannot find the required number of suitable large boulders, replace them with pebbles.
The best place to build a mobile bath is near a body of water. Pre-prepare the dam for swimming after the steam room.

To assemble the stove, you will not need any special tools and materials. The only caveat: you need to collect a large number of boulders and firewood. In general, be guided by how long you plan to bathe.
An impromptu heater is laid out in one simple step.

Lay a layer of firewood on the ground and cover it with a layer of stones. Lay another layer of firewood on the stones, on top of them - again stones. Alternate layers until you run out of stones. Prepare firewood in such quantity that the stones in the process of heating the bath heat up to red. After that, you will only need to maintain the fire so that the stones do not cool down.

Assemble the stove near the frame so that hot stones can be quickly transferred to double room. Fans of the bath "in a black way" can fold such a heater directly in the bath.
In the steam room itself, hot stones should be placed in a small depression. Stones can be carried with a shovel or by hand, after putting on thick gloves to protect hands from burns.
The frame of the bath in question is assembled in a few simple steps.

First stage. Fasten the prepared support posts crosswise. Install the frame next to the fire. When using wooden poles to assemble the frame, keep in mind that these elements must have a thickness of at least 30-40 mm.
Connect the frame elements together with electrical tape, a strong rope or adhesive tape. As a result, you will get a nice hut.
If you are making a tarp out of polyethylene, cover the ends of the support posts with some cloth, otherwise the polyethylene may tear.
Second phase. Start setting up the tent. This can be done immediately after the stones in the fire are red-hot. In the middle of the "floor" of the resulting room, dig a small hole for hot stones. For more convenient transportation of stones, you can also prepare a small hollow from the fire to the center of the steam room.
Third stage. Pull up the awning. Sprinkle the edges of the material with sand or press logs to the ground.
If you have nothing against a black bath, the frame, as already noted, can be installed directly above the fire. This saves you the hassle of transporting hot rocks.
However, in this case the stove will have a slightly different design. You need to assemble a structure in the form of a pyramid with a huge boulder in the middle.

Steam room "in black" is less safe and convenient. You will have to watch all the time so that the frame materials and the stretched awning do not start to burn and melt.
In the process of heating, the stones begin to noticeably crack, so it is better to keep a distance from the fire. But when you already carry the stones and pour water on them, they will not scatter into pieces.
Monitor the temperature in the bath. If the hot wave of steam rises to the "ceiling", the temperature in the steam room is high, and you can enjoy the procedure for a long time. In the event that the steam begins to creep along the bath in a thick fog, it's time to round off.
Additionally, you can make a convenient bag-case for the awning.
Thus, your own mobile bath is not the ultimate dream, but simplest design, with the assembly of which anyone can handle. It is enough to simply follow the instructions and do not forget about safety precautions.

Successful work!
Many compatriots have acquired a traditional Russian bath at their summer cottage or near country house. Such a construction requires a thorough approach to construction and arrangement. But a home-made traditional bath is a structure that takes from several months to a year to build.
The question is whether everything can be done faster so that the bath is ready now, and tomorrow it can be dismantled? It turns out that nothing is impossible and washing department for temporary use, assemble with your own hands according to the strength of everyone. Mobile quick-assembly structure can be used on a hike, in the country, during field work, etc.

Despite the fact that the instructions for assembling a temporary structure are simple, you need to approach its implementation responsibly..
The construction of a prefabricated bath is a multi-stage process, the input of which:
Despite the fact that the construction of a temporary bath takes place in unsuitable conditions for this, it is advisable to find the most suitable site.
First, there must be a body of water in the immediate vicinity of the construction site. It doesn't matter if it's a lake or a river, but natural reservoir will serve you as a good impromptu font. In addition, a reservoir is necessary in order to provide.
Secondly, the site for the assembly of the structure should be as flat as possible. Therefore, before installing the frame, we level all the reliefs and remove large vegetation around the perimeter of the square with a side of 3-3.5 m.
In fact, a temporary bath that you can collect in nature is a canopy covered on all sides with a film or a denser cloth. building material young trees with straight thin trunks will serve to assemble the frame. In order not to bring excessive harm to nature, you can use willow branches, connected in several pieces into a single pole.

The construction of the frame is carried out as follows:
Important: Given the temporary nature operation of the facility, as fasteners for tying branches into a frame, you can use any means at hand, starting with pieces of wire and ending with shoelaces.

Unfortunately, the materials needed to cover the frame on a hike cannot be found just like that, so you will have to bring plastic wrap and a cloth with you from home. For construction small bath a piece of dense plastic film with a size of 3x5 meters will suffice. In addition, from a dense fabric, it will be necessary to cut a panel with a size of 1.5 x 3 m in advance.
To attach the film and fabric to the frame, you will need a rope, a thick twine is quite suitable. Fasten materials to the frame with small ties. To do this, the rope is cut into fragments of 10-15 cm and with these pieces the film is tied, and the cloth is tied every 20 cm. Polyethylene film fastened along the walls, while the cloth spreads on the walls with inside in the part of the bath where the stove will be located.

Given that a temporary bath away from home is built purely from improvised means, the stove will also be assembled from what can be found on site. The stove is laid out of stone rectangular shape. The best choice will become large-sized pebbles or granite.
To begin with, on the site allotted for the oven, a square base with a side of 1 meter is laid out. The largest rectangular stones you can find are laid out in two parallel rows. The distance between the rows of stone should be at least 30 cm. The height of the stone laying should be 30-40 cm.
From above, across the direction of the masonry, flat stones are laid out, which will serve as a slab. We lay out the stones in such a way that a hole is formed closer to the back, which is necessary for the removal of smoke. Next, we lay a couple of rows of small stones on the flat ones.
In the very center of the oven, it will be possible to install dishes for heating water. As such dishes, it will be possible to use a camping pot. Of course, water will have to be used sparingly, but given that the bath is camping, such inconveniences can be put up with.

You can make brooms from bath accessories right on the spot. To do this, it is enough to find branches of birch, oak or linden. These trees remain green throughout the summer until mid-September. Therefore, we collect branches up to 50 cm long. From collected branches we form handles no more than 5 cm.
Immediately before use, the broom must be kept in a container with hot water in order to steam the leaves.
Important: For maximum comfort, a temporary bath must be equipped with shelves.
Furniture in an impromptu steam room can be assembled locally.
For these purposes, bundles of branches are used, on which it will be possible to get comfortable.
The price of building a stationary bath is high, while the assembly of a camping bath will cost you absolutely nothing. On average, it will be possible to assemble a steam room away from home within half an hour, which will not take long. You can build such a structure with equal success on a hike, during field work, in a country house, etc.
When assembling temporary dacha it is not necessary to literally follow the above recommendations; it is enough to reproduce the concept of construction in in general terms. So that the assembly of the bath in field conditions does not raise questions, watch the video in this article.
Such a structure or its components can be purchased, but at the same time it is not difficult to build it yourself. It consists of the following elements:
Important! It is necessary to choose all the materials correctly so that the construction comes out practical and at the same time safe!
First of all, you need to choose a place to place the future building. It is best to put it near a pond, because after visiting the steam room, everyone has a desire to cool off and wash off the sweat. Right choice places will save time and effort without building.
Advice! People with weak cardiovascular system sudden changes in temperature are not recommended. Therefore, if the temperature environment, including water, low enough, can not be taken water procedures immediately after visiting steam rooms .
Advice! First of all, pay attention to the density of the soil. Soft and loose will not make it possible to hold the frame, especially if it is driven into the ground.
Getting directly to the construction, we start with stoves. She represents main feature any bath. The whole further process of using the steam room depends on its quality.
The bookmark consists of several stages. Unlike permanent structures, this does not require high costs forces:
On a note! If possible, under the fire and cobblestones on the ground, you can lay a sheet of iron. This will save heat, and also bring less harm to nature, since soil fertility is lost from high temperatures. The higher the fire is from the ground, the safer it is for it..
Next, we start building the foundation. We choose the shape - it can be a cube or a parallelepiped surrounding the hearth. You can also build a rectangular trapezoid, in sharp corner which will oven placed.
Depending on this, stakes are hammered and crossbars are laid. They need to be fastened in such a way that the building is stable, for which without fail the crossbars must be placed at the top, tying the stakes crosswise.
Advice! Usually the stove is heated up to 4 hours, so immediately after the completion of laying the hearth, you can make a fire, and then proceed to the construction of the foundation.
The finished base is covered with the material from which the walls will be made. For reliability, it can be fixed from below with stones or dug into the ground.
Particular care must be taken in the choice of material. Get it ready before you start building. Each element has its own characteristics. The main principles to be followed are practicality and safety.
Firewood and cobblestones are used for the hearth. Both of these, if used incorrectly, can lead to injury. These materials must be natural.
Important! Under no circumstances should you use bricks, cinder blocks and so on. They should not be layered, and this is very important, since such material can burst when heated, injuring others with fragments..
Note! Depending on the type of stones, they must be heated to white or red-hot. This will indicate that you can start directly bathing procedures.
Important! If your steam room is located on the site of a work site, then improvised means, for example, cuttings of construction wood or sleepers saturated with creolin, may be used by mistake. It is unacceptable! Such substances are dangerous for the body due to their toxicity and, if evaporated, can cause poisoning..
The safety rules are so simple that it would seem that even children should know them. But as practice shows, the self-confidence of most people leads to inattention and an increased risk of accidents. Remember some of the rules indicated in the paragraph above, which are important to follow. It is also worth paying attention to the following.
For a complete arrangement of comfort it is worth it. To do this, you can use the available maples, rags, towels. But it can be done much easier. It is best to lay branches on the floor.
Advice! The most suitable would be spruce needles. It has small soft needles that do not prick at all when fresh. If on deciduous trees there are still landscaping, then you can use them. In this case, it would be great to choose a birch or oak .
Also in the steam room along the joints of the tent with the ground, logs can be placed, covering possible gaps with them. In turn, they can serve as impromptu sunbeds that you can sit on. Do not make the structure too large, so it will better retain heat. But at the same time, you should feel comfortable in it.
A temporary steam room differs from the usual one not only in its design, but also in the rules of operation. Let's consider them in more detail:
Advice! To make bath procedures more pleasant and useful, you can add fragrant herbs to the water from which steam will be generated -, lemon balm, linden and others, as well as branches
A camping bath is an excellent way to relax the body, especially if it is tired after a long physical activity. But such a bath is useful not only in this case. It will be appreciated by lovers of hunting / fishing, recreation in the country. There are many models of ready-made "mobile" baths. But also, having studied the photos and videos, you can make a mini-bath with your own hands using polyethylene or a tent. We are offering to you detailed instructions, which will help to build in field conditions, ideally suited to your needs.
Camping baths - perfect way“take a steam bath” in conditions when there is no access to a full-fledged bath / sauna. Fans of long hikes especially appreciate the opportunity not only to wash themselves after have a hard day on the way (if you're lucky), and relax your tired body in the bathhouse and feel refreshed.
Summer residents who do not have baths, as well as builders who have to work for a long time far from civilization, but next to forests and reservoirs, will not remain indifferent to this type of relaxation and purification.

Camping bath on the basis of a tent
So what is it, a mobile bath? In simple words, this is a small isolated structure (akin to a steam room in a real bath), inside or outside of which there is a stove. Furnaces can be either ready-to-use or made from improvised materials, usually stones. With the former, everything is simple, but with the latter option it is somewhat more complicated, but more on that later.
And of course, fuel is firewood (nowhere without them). They will help maintain a consistently high temperature in an impromptu steam room.
There are several options for the construction of camping baths:
Advice. If you plan to use a tourist scarf as a bath facility, then by no means a modern sample. The fact is that such tents are not designed for high temperatures, moreover, when heated, they can emit toxic substances. But the tent "originally from the USSR" will perfectly cope with such conditions.
In order to build a reliable and convenient structure, we need the following elements:

Simple frame for a camping bath
Advice. Harvest for the sauna stove stones are rounded, slightly elongated shape, without any delamination (other stones may simply break under the influence of high temperature). River / lake boulders with a diameter of about 20 centimeters are ideal (too small in size they “give” very little heat, too large - they simply do not have time to heat up).
Consider the installation process step by step baths "in white"(the stove is located outside the steam room):

Camping bath in white
It remains only to transfer the red-hot stones to the heater with the help of a sapper shovel, for example. And the bath is ready!
Main difference "black" bath from "white" in the location of the stove. In this case, it is located directly inside the steam room. The process of installing a bath in black is somewhat different from the previous one:
Taking a bath is great. And even better, when she is always "at hand". Now you can feel the heat of the steam room when you go on vacation, because it's easy and simple to build a camp sauna. Steam with pleasure!


Instruction The frames of the film merge for us into continuous movement due to ...

Pranayama is a breathing practice in yoga. Pranayama literally translates as...