"A woman was created for a man, not a man for a woman" - such a postulate ...


For wall decoration, there are many interesting decorative materials... Among the many types of familiar wallpaper, you can now choose a plastic material for original design- liquid wallpaper. It is about liquid wallpaper and the technology of applying liquid wallpaper that our article will tell you.
In packaging, liquid wallpaper looks like small white sawdust, however, in fact, it is a dry mixture of wallpaper material impregnated with glue. Once applied and dried, liquid wallpaper can resemble fine, very hard foam.
Today there are several types of liquid wallpaper, they differ in the structure of the fibers and the thickness of the finished layer. A thin layer is formed by liquid wallpaper 2-3 mm. The thickness of the "volumetric" version, slightly similar in the end to the fabric, is usually 4-5 mm.
The porous structure of liquid wallpaper retains heat well and has sound insulating properties. The coating "breathes" and has a fairly high degree of environmental friendliness. In addition, if your house is new enough, then when the walls "shrink", liquid wallpaper will not deform or tear.
However, liquid wallpaper also has a significant drawback - such wallpapers are very quickly washed off with water. It is convenient to remove them from the wall, but not very practical in day-to-day use. To make the liquid wallpaper resistant to wet cleaning, for example in the kitchen or bathroom, it is necessary to cover the wallpaper with a protective colorless varnish. The beauty of the walls will be preserved, and they can be wiped with a wet cloth without damaging the coating, but the effect of the "breathing" material will disappear irrevocably.
Recently in stores building materials liquid wallpaper appeared. By the method of application, they resemble decorative plaster, and in terms of strength they are not inferior to thick tiles. In the article, we will get acquainted with the advantages of the material, the subtleties of wall covering and learn how to dismantle liquid wallpaper.
The finishing material is supplied dry, the packing of one package is 1 kg. Liquid wallpapers differ in color, texture and prevalence decorative elements... Thanks to such a variety of walls, you can give the desired pattern, combine color palette from several series. The composition of liquid wallpaper includes:
The cellulose component gives the surface hardness, the silk component ensures the smoothness of the coating, and in combination with glitters, granules and dyes, the desired gloss, matte, roughness is created. The familiar glue fixer for roll wallpaper KMTs is responsible for fastening all the components. It also provides reliable adhesion of liquid wallpaper to the surface. After mixing with water, the dry mixture becomes plastic, is easily applied to a trowel or trowel like a plaster and is leveled with a velor roller.
The main advantage of liquid wallpaper is its versatility. Regardless design features your walls, application will not cause problems. In addition, the material can be used practically on all types of coatings (concrete, cement-sand mixture, wood, drywall, metal). The desired pattern is created anywhere in the room. In comparison with rolled liquid wallpaper, it provides:

The only drawback of such wallpapers is the high price. Depending on the manufacturer and the quality of the filler, the cost of one package can vary from 500 to 15,000 rubles. A kilogram of the mixture is enough for an average of 4–5 m 2. You yourself can calculate how many packages you need, taking into account the area of your room and the stock of material. The following foreign manufacturers are popular on the liquid wallpaper market: Silk, Bayramix, Silkcoat, Cotex, Plaster, Senideco.
The preparatory stage for liquid wallpaper is not much different from the stage of preparation for the classic one on a paper or non-woven base. However, there is no need to achieve ideal surface smoothness and level it. A layer of wallpaper will hide any irregularities. The first step is to remove the old finish, peeled plaster. We dismantle screws, nails, screws. We prime and putty the walls, and this applies not only to the concrete, but also to the plasterboard surface. After drying, we go through a finishing primer, preferably acrylic, to ensure maximum adhesion of the material. When using finishes on metal or wooden surfaces pre-coat them with PF-115 alkyd enamel to create a protective waterproof layer.
Attention, the primer for liquid wallpaper must be transparent or white. The presence of other coloring pigments (colors) can change the color of the finish.

Preparing liquid wallpaper for work. Pour the dry mixture into a clean container and add the right amount water according to the manufacturer's instructions. There are several important considerations to keep in mind. We heat the water for kneading to 40-50 ° C so that the glue reacts, the composition does not form lumps. Applying cold liquid will keep the glue from dissolving completely, while hot liquid can ruin the finish. We mix the contents of each package separately. We carry out the kneading by hand, without using additional devices. A construction mixer cannot be used, it will destroy the granules, fibers, and with it the color pattern. So that the mass is well saturated, we leave it for 6-12 hours, as written in the instructions. We transfer the contents back to the bag or cover with polyethylene, so the moisture will not evaporate.
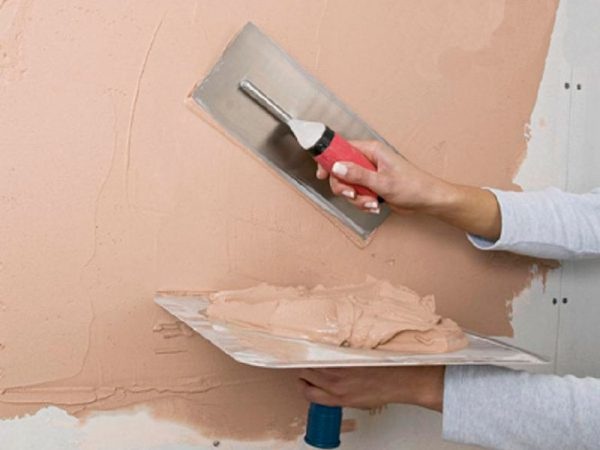
For wall mounting, you will need a trowel or wide spatula. Professionals often use a special construction trowel with a handle, which has a narrowed blade and transparent plastic to control the uniformity of the layer thickness. Liquid wallpaper is unpretentious, does not require professional skills, especially the technology of their application will seem simple to those who at least once worked with ordinary putty. We apply the composition in small portions on a spatula, apply it to the wall and distribute it over the surface. You can use a velor roller to keep the thickness consistent. We do not recommend making a layer more than 2–3 mm, unless other recommendations are provided by the manufacturer. This increases the consumption of the material, as well as the time of its hardening. Before applying the next layer, moisten the float in water, getting rid of excess glue.
Manufacturers claim that a kilogram portion is enough for 5-6 m 2, but in practice the consumption increases. Therefore, when calculating the amount of the composition, it is worth sticking to the figure of 1 kg per 3-4 m 2.
The tool should alternately move in different directions, as well as with a rounding around the circle, forming the most even surface. By applying the composition to separate sections of the walls at different angles, you can create a background image. In the corners, we level the finish first from the edge, and then along the sides. After the end of the work, we do not throw out the remains of the finishing material. You may need them after the surface has hardened to correct unevenness. To do this, it is enough to abundantly moisten the area, remove the layer and mix it with a margin, distribute it evenly over the surface. Wet wallpaper can be stored in a plastic bag for up to 14 days. If the composition is stored for a longer time, then it must be dried and transferred to a bag, immediately before use, mixed with water.

To give the liquid wallpaper strength, you can apply a layer of acrylic clear varnish on top. As a result, you will also get a washing wallpaper. However, this technique may not save the finish from moisture in damp, unheated rooms. In these cases, we recommend purchasing moisture-resistant liquid wallpaper. In addition to increased resistance to moisture, such wet wallpapers are no different from the classic series, the technology for their application is the same.
If you are tired of liquid wallpaper and you want to remove it, the first thing to do is to protect furniture and other interior items from dust and moisture. We glue the skirting board and the baguette with masking tape, remove the sockets and switches, cover them with a plank, cover the furniture with foil. The method will depend on their characteristics. If the material contains viscose fibers, it can be removed by wetting and reused to decorate other walls in the house. Liquid wallpaper coated with varnish or paint on top cannot be removed. You will have to use mechanical cleaning methods, and the material itself must be disposed of after dismantling, it is unsuitable for re-finishing.

To remove liquid wallpaper from the wall using wetting, you will need a sharp spatula, a metal scraper, and a spray bottle with water. Add any softener to the liquid: 2 tbsp. l. detergent, powder or fabric softener per liter of water. You can also use a special wallpaper remover that is sold at a hardware store.
The manual removal method is performed in the following sequence:
A hairdryer and a sanding drill will help to remove painted wallpaper from large areas. To speed up the process, you can use a grinder. A lot of dust will be generated, so we protect the mucous membrane of the nose and eyes by wearing a respirator and goggles. Having prepared necessary tools, we proceed to dismantle the finish using the mechanical method:
Liquid wallpaper is an excellent and easy-to-use wall covering. Decorating can be done by an inexperienced craftsman, but to obtain good effect, it is better to adhere to certain rules.
Often our readers ask the question: is it possible to apply liquid wallpaper to whitewash or paint. The answer is yes, but only if a number of conditions are met, which we decided to describe in detail.
When they talk about the possibility of applying material to any surface, experienced master the question immediately arises of the characteristics of the base and the coating itself. This applies to liquid wallpaper.
It is a new structural finishing material based on wallpaper glue, quartz chips, silk and cotton fibers. Coating is applied to a previously prepared wall with an ordinary spatula. Depending on the degree of pressure during application, a layer of different thickness is obtained that covers the wall.

Before applying liquid wallpaper, you need to prepare the area to be covered. Masters recommend cleaning, sanding, leveling, removing all elements that may be a source of damage to the final coating. IN this case interested in those places that may cause the wallpaper to turn yellow or change its color.
As for the question: is it possible to apply modern liquid wallpaper to paint and whitewash? It is recommended to remove the coating or prepare the surface for application in advance.
Voids and poorly adhering areas of plaster, irregularities that will be clearly visible on the final coating must be eliminated.
The base for liquid wallpaper can cause streaks and yellowing, therefore it must be prepared very carefully for covering.
Here are some basic rules:
Tips for cleaning and preparing walls:
The described steps for preparing walls for coating liquid wallpaper quite enough as an economy option. In this case, there is another method that significantly increases the service life.
When applying liquid wallpaper, it is worth worrying about the service life. This can be done with modern materials, in particular, when using quartz-soils.
They emphasize the flaws of the walls and are demanding on the characteristics of the base. To extend the service life of the coating, regardless of the type of repair - budget or luxury class - it is recommended to do additional processing.
Liquid wallpaper can come off smooth, non-absorbent surfaces. Even if a layer of primer acted as a binder immediately after application, this does not mean that they will last the entire service life.
A painted or very smooth plastered wall is not suitable for liquid wallpaper. As a result, the glue that is part of the wallpaper is poorly absorbed and cannot "catch" well on the base.

If your surface is too smooth and does not absorb well, roughness is created to improve adhesion. The soil plays the same role.
To improve the adhesion of the wallpaper to the wall, paints with quartz sand e.g. Ceresit CT 16, Dufa Storm Schield D691 or ScanMix quartz primer. Especially in cases where the coating layer will be thick enough.
To improve the effect, a dye is added to the paint to match the selected wallpaper. This approach conceptually allows you to improve the result even on low-quality walls with a thick lime coating and not be afraid of gaps.

When performing the above work, quality must be emphasized. Please note that defects can be corrected by stripping and re-coating the damaged area. To do this, you do not have to redo the walls throughout the room.
The main advantage of this material is the ability to perform the coating by a master without experience. That allows you to update your interior on your own and at any time in accordance with fashion trends.
Liquid wallpaper is a universal material. Easy to apply, long lasting and incredible decorative characteristics... To give aesthetic properties appearance fillers in the form of granules, glitters and dyes are added to the wallpaper. Ready mix- These are dry small flakes, soluble in water, which form a relief or smooth coating on the surface. The main advantage of liquid wallpaper is that it can be applied to any surface, it is important that it is well prepared.
The walls must be made as even as possible, they are heterogeneous in their composition, and on the surface there may be remnants of the old coating, glue, putty, screws and screws. Application of liquid wallpaper to uncleaned, wet or uneven wall will lead to the fact that over time it will appear rust, stains and yellow spots.
Important! It is possible to level the surface with liquid wallpaper in layers no more than 3 mm thick, otherwise pits will form and all flaws will appear.

Before working with the material, the wall is painted with a substrate (primer-concentrate) in 2-3 layers to protect the wallpaper from everything on the wall and inside it. It is better to choose a substrate that is odorless and quick-drying. The first layer is strongly absorbed into the wall and has no effect, so the painting should be uniform, without "bald spots".
Liquid wallpaper can be applied to painted walls. If you take into account some rules, the result will be quite good. The first is to remove rust on the wall water-based paint does not fit, since through it the yellowness will appear again over time. Oil or nitro paint for walls is not the most good decision, they will not "breathe". For better adhesion to liquid wallpaper, a small amount of PVA glue is added to the paint.

Without preliminary preparation, liquid wallpaper will not stick to the painted wall. Before applying, you need to check how firmly the paint sits - whether it is peeling. If there is plaster under it, tap the wall and check if it is lagging behind. A booming sound will be heard in the problem area when tapped. Identified defects must be repaired immediately in order to avoid problems in the future.
If the paint and plaster hold up well, you will need a quartz primer to treat the surface before applying the liquid wallpaper. Such a primer increases the adhesion of the finishing material and helps to distribute it more easily. The wallpaper adheres to a highly absorbent wall, so the painted surface needs to be roughened. To do this, use a primer paint with quartz sand. Processing is better wide brush, not a roller.

If the wall is covered oil paint or another glossy layer, which means that it is as smooth as possible. Sandpaper will help to roughen it for better grip.
Advice! The thickness of the layer to be applied must be adjusted by using the inclination of the trowel. The more the blade is pressed against the plane, the sharper and thicker the layer will be. facing material and vice versa. At a steeper angle, the mixture will be cut more.
What surface can liquid wallpaper be applied to:
Important! The color of the walls painted different colors, it is necessary to equalize. Liquid wallpaper over white paint will be lighter and brighter, and on dark one - dimmer and darker.
It is impossible to apply liquid wallpaper to whitewash. It is not enough, as many believe, to cover such walls with a primer. Lime surfaces are highly saturated with moisture and begin to crumble, yellow spots appear. Therefore, the coating is sanded completely to the base material, then oil-phthalic paint or waterproof primer is applied to the wall.

Many people wonder whether it is possible to apply liquid wallpaper to plaster - not only is it possible, but this is the most suitable medium for intermolecular action. Plaster is a mineral surface and finishing material adheres very well to it. However, the coating must also be leveled with a special mortar consisting of cement with sand, rotband and putty.
Depending on the composition of the plaster itself, it can absorb a lot of moisture, therefore, for a start, it is treated with 3-5 layers of primer in order to surely close all the pores. The crumbling plaster must be removed to a solid base.
Concrete walls are puttyed with a gypsum binder before priming. A water-soluble primer lays on them quite well.
Can liquid wallpaper be applied to plywood? The answer will be unequivocally "no" if nothing has been processed. Plywood is wood material, for which excess contact with moisture is extremely undesirable, and the composition of liquid wallpaper contains a lot of water. Otherwise, the finishing material will simply exfoliate and peel off, and the wood will begin to swell. Therefore, applying it to an unprepared surface may result in flaking, a change in the structure of the plywood itself.

Laminated sheets are coated with a primer paint with abrasive grit before the liquid wallpaper is applied. This will help to achieve, if not perfect adhesion to the surface, then very high quality. On non-laminated boards, apply alkyd enamel followed by a primer coat.
Interesting! According to some experts, plywood in direct contact with liquid wallpaper will greatly decrease in area. From the side of the wallpaper, the sheet bends inward.

The easiest way to be convinced of all that has been said is to conduct an experiment on a thin sheet of plywood and see what will happen to it and how the finish itself will look.
Liquid wallpaper can be applied to almost any surface, including deformable (chipboard, plasterboard, plywood, fiberboard), but not on peeling paint, lime, greasy or oil stains. Defective areas are treated with scrapers, special washes for paints and varnishes... The main requirement for the surface is the interchangeability of the product, that is, good adhesion, and this will require comparing the main components.

The video shows how to prepare the walls before applying liquid wallpaper:
Liquid wallpaper covers small irregularities well. They fit perfectly on carefully trowelled plaster. The plane to be machined must be free of waves; small cracks and scratches are allowed. In rooms with high humidity work with such finishing material not very comfortable. The room temperature should not exceed + 40 ° C.
Liquid wallpaper - very unusual material, with which you can create grooved, stone-like or fleecy surfaces. But it is necessary to adapt to such a composition - there are some subtleties in its application.
This material contains gelatin, pieces of oak bark, mica crumbs, cotton, seaweed and silk. Metallic gold or silver threads are often included in it. They can decorate both walls and ceilings. There are ready-made liquid mixtures or powdery materials on the market that require dilution with water. If desired, you can apply an ornament or patterns to liquid wallpaper, mix the material with colored pigments and decorate with stucco decorations on top.
The surface of liquid wallpaper is grainy, resembling stone or felt
By composition, liquid wallpaper is divided into:
Silk: the most expensive, with a large amount of pieces of silk threads;
Cotton: can contain up to 98% natural cotton;
Pulp: they are much cheaper than silk and cotton, and consist of wood products.
No seams: the wall looks complete, without joints typical for classic wallpapers;
Soft wallpaper has excellent sound-absorbing and heat-insulating effect;
Since they hold very firmly, are not afraid of drafts and do not move away from the wall, they can cover any curved surfaces;
Dust does not stick to a material with a minimum electric charge; during long-term operation, walls and ceilings can be easily
vacuum clean;
It can be used even in unheated rooms: it is absolutely not afraid of temperature changes;
Since liquid wallpaper does not shrink, it is quite suitable for finishing new buildings;
You can stick them on any surface: concrete, plaster, drywall, metal, wood, paint and even plywood;
High aesthetics: using this material, you can create interiors in a variety of styles;
If stains become dirty, they can be quickly removed with a stain remover;
Maintainability: in case of damage to a separate area, it is only necessary to dilute the composition in water and seal the separated pieces with a solution; after drying, this place will be completely invisible.

Repairing a damaged surface is very easy
To the minus of liquid wallpaper low moisture resistance can be attributed - they are not intended for a bathroom, sauna or bath. However, to reduce moisture absorption, they can be additionally covered with acrylic. The second disadvantage is the high price. The cost of packaging, which is enough for 3-7 sq. m, can be, depending on the composition, 400-2000 rubles. But if desired, liquid wallpaper can be made yourself from finely chopped paper with the addition of pieces of thread.
2. If the walls were painted with acrylic with the addition of colored pigments, they must be treated with a primer so that the dye does not come through. Prime porous surfaces that can absorb moisture from the solution are also necessary - concrete, wood, plaster, etc.
3. The dry mixture looks like colored sawdust. Before you start mixing it with water, you should carefully study the instructions. Each manufacturer may have its own nuances in the preparation of the solution.
4. The composition is mixed with warm water, its temperature should not exceed 40С. You will have to mix large particles with liquid only with your hands - it will not be possible to do this ideally with any tool. And the fragile particles that make up the wallpaper can be damaged.
5. The resulting mortar should be such that when the trowel is tilted, it does not run down the wall.

Manual stirring
6. If necessary, gradually add to the solution dye. Since the mixture brightens when it dries, it is worth experimenting, choosing a shade for small area walls.
7. The resulting solution must be infused for 12 hours.
8. When applying it to the wall, the trowel or float should be placed under small (15 ° С) angle to the surface.

Spatula at an angle
9. After applying the mixture, it can be rolled with a roller to better adhere to the wall.
10. It is very convenient to work as a hopper - a special pistol in the form of a bucket, designed for applying plaster or liquid wallpaper, or a spray gun. To obtain a grooved surface, use a brush or roller.

Depending on the tool used, you can get different types surface
11. The mixture is applied from the corners from top to bottom soft circular motions. You should not hesitate - with prolonged smoothing, the underlying surface will become uneven.

Wallpaper is applied in a circular motion
12. To master the technique, you have to practice. But after drying, the solution can be scraped off the wall and soaked again, so you will not spoil too much material in the process of mastering the application methods.

Working with a spatula
13. The surface dries up, depending on the composition of the mixture and the temperature in the room about 48-72 hours... If ordinary wallpapers are afraid of drafts, then liquid wallpapers dry out better precisely with good air exchange. Therefore, in the room where they were glued, at this time it is necessary to open all the vents or even windows.
14. The liquid wallpaper remaining in the package will be useful for restoring damage (if, of course, this becomes necessary).

Volumetric image created using liquid wallpaper
Advice! When applying liquid wallpaper to the ceiling, the mixture is prepared a little thicker than recommended by the manufacturer. Otherwise, the solution will drain.
PVC glue (you can replace it with busylate or CMC - cellulose glue);
Gypsum or acrylic-based plaster - they will act as a binder;
Antiseptic to protect the moisture-absorbing material from fungus;
Colored pigment (tint), it can be on any basis;
Finely shredded cardboard, paper or newspaper;
To enhance the effect, you can add glitters and cut threads of silk, lavsan, polyester or cotton to the composition - almost any fabric will do; the length of bright threads is 5-7 cm - in this case, they will look more impressive; the optimal amount of tissue in the composition of 10%;
When mineral chips are added to the mixture, the surface will turn out to be corrugated.
So, let's move on to creating the mixture:
We remove metal clips and staples from the waste paper, otherwise rusty spots will appear on the walls;
The paper is finely chopped with a knife or scissors, and then filled with water (1 kg of waste paper will need 5 liters of water);
After it is soaked (this will take 3-5 hours), thoroughly grind the mass with a drill with a mixer; outwardly, it should look like a cooked semolina without lumps;
Add glue (for 1 kg 200 ml) and plaster or gypsum (10 tablespoons will be needed per kilogram);
When adding color, it is pre-diluted with water.
Advice! If you want to create colored "streaks", add a thick paint; it is not necessary to mix it too much in this case.

Admiring the result
"A woman was created for a man, not a man for a woman" - such a postulate ...

How does HIV manifest itself at different time intervals? The reasons for the development of AIDS are ...

Stomach cancer: symptoms, causes, treatment Stomach cancer is a change in the type of cells ...