Proverbs and sayings about May HORIZONTALLY: 2. May will deceive - in ... will leave.4 ....


The surface of the walls, finished to look like brickwork, or the masonry itself is a combination of the incongruous in interior design, that is, the combination of strict lines of rows of bricks and individual texture patterns of each masonry square. Such an imitation of brick for interior decoration, which is used more often than natural masonry, belongs to the loft architectural style. Since the natural surface of brickwork is rarely used in design due to its rough surface, many people use such a simple technique as imitation of a brick wall with their own hands when finishing the interior surfaces of rooms.
A surface that imitates brickwork does not have to extend to the entire room - it is often enough to finish just one wall or even a small section of it to give the room originality and originality. In interior design, several brick-like plastering technologies have been developed: gypsum tiles, drawing on a fresh layer of plaster, drawing with masking tape, stencil, tile glue.
The common disadvantage of all options is the need large room, since there is an approximation effect: the closer to imitation of a brick with your own hands, the rougher and more unnatural the surface looks. And vice versa - when moving away from the wall, the effect of an absolutely natural brick wall is created. One of common solutions for all finishes - painting brick rectangles light, and seams - dark color. Do-it-yourself imitation of a brick wall with your own hands is a technique not only for walls. In this way, you can decorate the doorways in the apartment, the kitchen work surface (apron) or the corners of the rooms.
Preparatory work- the main condition for making a decorative brick with your own hands turned out to be of high quality and beautiful. The second condition is compliance with the thickness of the decorative layer. This is especially true for plaster - the layer should not be thicker than 0.5-1.5 cm. To achieve this thickness, the wall should be leveled, and for deep depressions, beacons can be used, on which rough plaster is applied. Decorative wall decoration for brickwork is carried out only after this layer has completely dried. To keep this puff cake on the wall firmly and for a long time, its surface is primed with deep penetration compounds. Do-it-yourself brick wall plastering is done in two ways: seams imitating masonry are cut with a scraper, or they are formed with masking tape.
Before making an imitation of a brick wall, prepare the tools. First of all, it is a spatula with a blade width of 20-30 cm and a narrower one - with a blade width of 4-12 cm. A narrow spatula is used to apply a solution to a wide blade, and also work in hard-to-reach places of the wall, for example, in the corners. The application of the solution is carried out with grabs, which correspond to the volume of one portion of the solution - 10-12 liters. Gypsum plaster is applied first over the primer. 
On a still wet surface, mark the seams under a brick with help long rule and drawing, which can be replaced by any metal plate that would ensure the width of the joints in the range of 0.5-1.0 cm. The main recommendation is to observe the brick dimensions of 250 x 65 x 120 mm and the dressing pattern.
After drawing the contours of the seams, the wall under the brick is processed with a scraper with your own hands. The role of a scraper can be an ordinary carpentry chisel of the appropriate width, or homemade tool. The mortar is removed with a scraper along the contour of the seam to a depth of 3-6 mm. Ragged excess mortar will remain along the edges of the groove, which are best removed sandpaper after they are completely dry. 
A scraper-like joint forming tool is steel jointing, which is used to clean joints when laying bricks. The difference between jointing and a scraper is that with its help the seams can be made convex or concave. Seams are cut on the plaster, first horizontally, then - along short verticals. After the decorative surface has completely dried and the seams have been cleaned with sanding paper, the wall must be cleaned of dust with a dry cloth, and then wiped with a damp sponge.
The last step in this technology: a brick wall made of plaster with your own hands must be painted. Painting is carried out in two stages - painting the entire surface and painting the seams. It is easiest to paint the entire area of \u200b\u200bthe wall with a spray gun - the paint layer will lie evenly and without streaks. Also a good result will give painting with a roller. Paint with a brush for a long time, while it is necessary to constantly and efficiently stretch the paint along the wall so that it does not flow. The brush in painting is used mainly only for highlighting decorative seams. 
Before you make an imitation of brickwork, you need to choose gypsum plaster, and the Volma brand is best suited for this purpose - the solution from it does not shrink, is applied easily and quickly, and does not require rough plastering of the surface. Using gypsum plasters other types of solutions cannot be used - separation of mixtures and swelling of imitation is possible.
The consumption of gypsum plaster mixture with a thickness of 10 mm will be 8-9 kg per 1 m 2 of the wall surface. So, plaster "" is packaged in paper bags of 5 kg, 15 kg, 25 kg and 30 kg, so it is easy to calculate how many bags are needed to decorate a certain area. In addition, gypsum mortar is the cheapest of all plaster options - the difference in price with gypsum or adhesive tiles can be 2-3 times.
When using this simple technology, the bricks on the wall are drawn with masking tape, namely: after applying the primer, the contours of the seams are marked with a pencil, and a narrow tape of adhesive tape is glued over them.
The edges of the adhesive tape should protrude beyond the edges of the plaster, and the gypsum mortar itself is applied with a spatula on top of the masking tape. After leveling and drying the layer, you need to easily pull on the free edges of the tape, which, peeling off, will leave an even, shallow seam. 
Imitation made with adhesive tape is a more complex and time-consuming operation than highlighting seams with stitching or a scraper. In addition to painstaking work with adhesive tape, after its removal, it will be necessary to additionally clean the edges of the brick partitions. The adhesive tape should be removed from the wall very carefully, as it carries the adhesive solution along with it.
You can make a stencil yourself, but it is much easier to buy one. Stencils are rubber or plastic, and the solution does not adhere well to them. A homemade stencil is made from wooden slats.
Benefits of using a stencil:

Another way to make a brick wall with improvised materials is fake foam bricks. For their self-production, you need a smooth styrofoam tile. Drawing in the form of a brick can be done on any side, observing the dimensions of a natural brick plus 0.5-1 cm for the seams. When increasing or decreasing the size of the form, the overall pattern on the wall will not look like brickwork.
The drawing is done as follows: the foam is marked out taking into account the seams, along which the shape is cut. For cutting, it is best to use a carpenter's cutter. You can draw a picture on one large area foam sheet, but you can cut each brick separately, imitating natural products. The blanks are glued to the wall using plaster gypsum mixture or adhesive solution for ceramic tiles– any synthetic glue does not give desired thickness adhesive layer and dissolves the surface of the foam. The seams between the individual decorative elements can not be filled with mortar, since their width should not exceed 1-1.5 mm. After gluing the foam, it must be painted in suitable for the interior color. Several layers of paint can also fill the gaps between brick partitions. 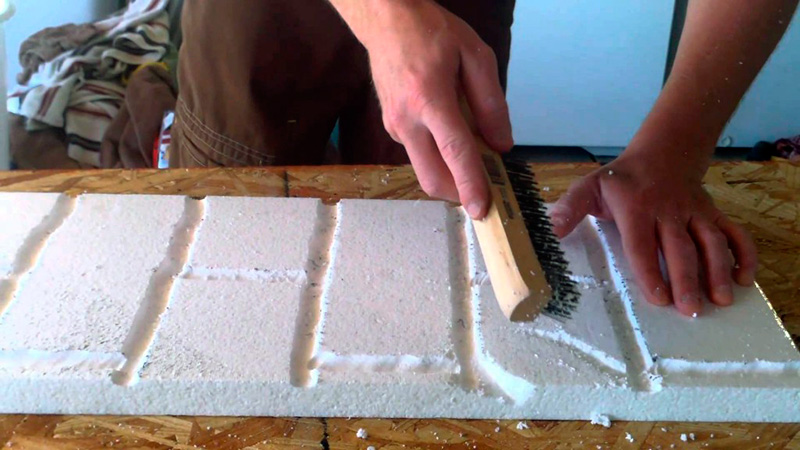
Elements of such tiles are made from tile adhesive of any brand in dry form. Dry mixtures of light shades must be mixed with water to the consistency of sour cream. A further feature of the preparation is that the solution is divided into three equal parts, each of which is painted with the same paint, but with a different color intensity. Liquid color is added so that the mixture becomes dough-like in consistency. This density gives visually beautiful stains of color.
The mass is rolled out in a thin layer (0.5-1 cm), and cut into shapes of the same size, corresponding to the size of the brick. Parts must be dry. The number of such elements is determined by the area of decoration. That surface of the bricks is glued with glue of the same composition. The seams between the forms are filled with tile adhesive, which is pre-washed in darker shades. The final stage is the coating of the decor with a transparent varnish. 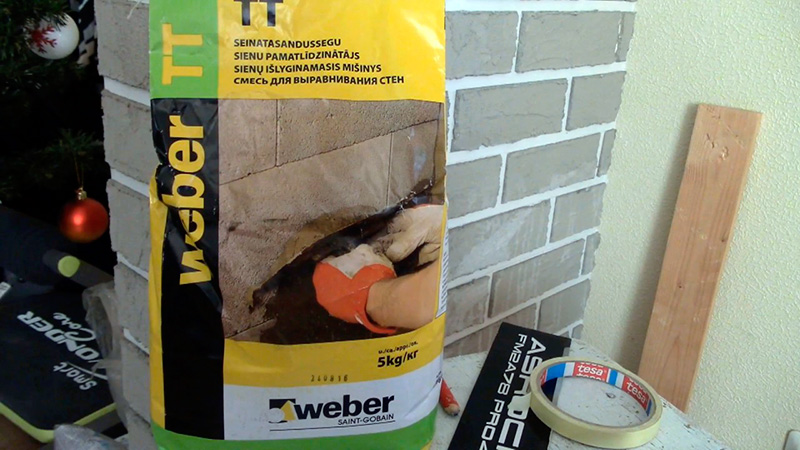
The natural texture of a brick surface can be obtained by staining it with light and red ocher, mixed in different proportions. White is added to the ocher. Coloring is not done with a brush, but with a foam swab. This technique will make the surface more rough and brick-like. 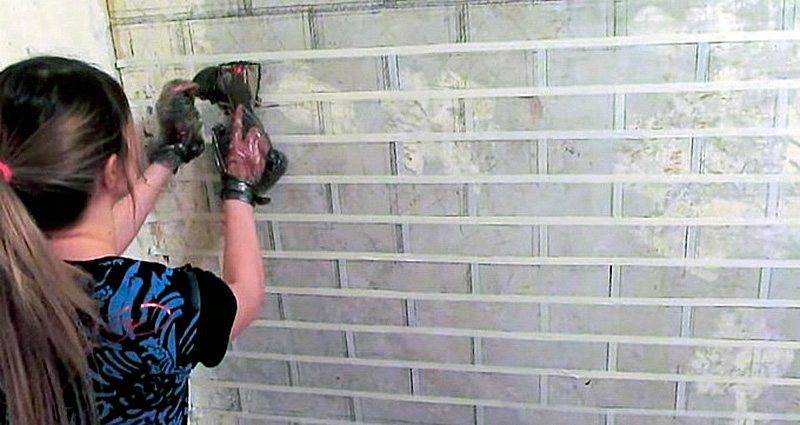
First, the mixture is applied with a sponge on the wall, then distributed with a swab. Next, you will need to work with a liquid dye of the color "burnt bone". A lot of paint is not needed - it is sprayed on the wall with an ordinary toothbrush or a small flute brush. For more natural look walls each row is painted with its own shade. This can be achieved not only by adding white, but also by adding sienna or mars. All rows are painted only with a swab, with alternating shades. A layer of varnish is the finishing operation of painting, and a matte surface can be achieved by grinding with fine sandpaper.
Brick is a strong, durable material used primarily for the construction of walls, interior, exterior finish. But it is not always possible to apply it - voluminous, thick bricks will make small room quite tight. Therefore, high-quality imitation of brickwork is used for finishing work in residential and office premises. There are a great many options for its execution, they differ in the degree of complexity, similarity with natural brick.
Execution of building facades, interior spaces brick is always beautiful. But real bricks cannot be used everywhere - they significantly increase the weight of the floors, and not everyone has the skills of a bricklayer to make high-quality masonry.
Decor that imitates masonry of red, white, any other brick looks good in almost any room. For spacious rooms, dark, cold, saturated colors are suitable, for cramped, dimly lit rooms - lighter, warmer ones.
This design is most often used in loft, industrial, art-believe interiors, less often in classic, modern, minimalism, Provence. Fake masonry indoors can cover all the walls of the room, frame window openings, door frames, have the form of narrow, wide, medium dividing strips. Also, with its help, separate logical zones are distinguished, a fireplace, arched structures are made out.
The more spacious the room being designed, the larger images of bricks are used for it and vice versa.
The front or hall is a kind of “face” of the apartment, all interior design “dances” from it. Here brick finish admissible on all walls, with rare intersperses of a suitable decor - painted ivy branches, decorative cracks, etc. An excessively long corridor is zoned with vertical brick lines, arches located at the same distance from each other - this is how its shape, size, height are adjusted.
In the hall, most often, not the entire room is decorated with brick props, but only one of its walls. A fireplace or a false fireplace looks organic here, looking as if it was made of real brick, several zoning partitions. If the living room is completely combined with the kitchen, then only the kitchen or living room is finished with bricks. Suppose the option of creating a brick dividing strip between separate zones. Will organically complement big picture bottles, boxes, with colored bricks painted with acrylic, pictures applied using the decoupage technique, made using ordinary putty.
In the bedroom, not only the walls are finished with brick decor, but also the podium (if any), on which the sleeping place. The same design will allow you to beautifully zone big room, having finished with brick only a mini-study or dressing area. Wall murals are best suited, ceramic tiles are not recommended - they are too cold.
Even a minimally embossed imitation of a brick becomes voluminous with the right arrangement of the backlight.
Special requirements are imposed on the imitation of brick in the bathroom - it must be moisture resistant, not collapse, not deform in direct contact with water. Ceramic or flexible tile rectangular shape, foam plastic, painted with moisture-resistant paint. The color depends on the size of the room - the tighter it is, the lighter the coating is chosen.
During installation, waterproofing materials, silicone sealants, etc. are used.
An imitation of a brick for this room is made out a kitchen apron made of plastic, glass, with a pattern applied to it. All materials must be waterproof, which is especially important for the area near the sink, gas stove, easy to clean from grease without the use of harsh abrasives, aggressive detergents.
Insulated, glazed balcony, spacious loggia can be combined with any room - bedroom, kitchen, living room through the same coverage with the main room. As an option: the room is finished with white or yellow painted bricks, the balcony - with a darker imitation of plaster. Here the most commonly used plastic panels together with a foam insulation, polyurethane, mineral wool and etc.
For children, brick decor is rarely used, it looks no less organic than in other rooms. This design often used in teen rooms- industrial, loft, pop art and similar styles almost in their pure form look most organically there. You can decorate the room in this way with the children, simply by depicting the bricks with the help of acrylic paints, watercolors, gouache, markers. The effect of an old brick will turn out if you draw small cracks in some places with a gel pen.
Soft tiles are one of the most “believable” variations in creating realistic masonry. The flexible option is water-resistant, which is important when used in wet areas of the bathroom or toilet, home pool, greenhouse. This material has significant impact resistance, durability, it is vapor permeable, resistant to mold, fungus, easy to process, does not change color from exposure to the sun, and has a beautiful appearance. Also, the positive properties of flexible tiles include the fact that it will be mounted not only on perfectly flat walls, but also on convex, concave interior elements - arches, internal, external corners, window slopes, brackets, fireplaces, round columns, small architectural forms, having a complex configuration.
To finish the interior with “soft bricks”, you will need some tools that are available in almost every home:
From the materials you need:
Step by step process:
Rigid tiles are made of gypsum, ceramics, cement, mounted on a concrete, plasterboard wall, or other suitable structure. As part of this decor, various pigments, fiber fibers, and plasticizers are often present. The elements are mounted on an adhesive composition suitable for one or another option. The finished finish looks as close as possible to real bricks, especially if they are painted in the right color.
Before starting finishing work, it should be noted that solid tiles have a fairly large weight, creating an additional load on the foundation, the walls of the room.
Gypsum decor has a very diverse design. This material is light, parts can be cast independently using silicone, plastic molds. Gypsum is not recommended for use in damp areas, as it is excessively hygroscopic. In the living room or bedroom they are often decorated with fireplaces - the microclimate in such a room will be as favorable as possible. Low price plaster allows you to create a noble finish at the lowest cost.
Gypsum elements are allowed to decorate internal and external walls. Curly details are taken to process the corners, giving the finish a neat appearance, protecting the walls from chips and mechanical damage.
Gypsum-based glue is used for installation, for
sealing seams using a special grout.
Cement decor also has a low price, it is available in a variety of colors - gray, red-brown, white, black, etc. artificial brick it is used even in winter in unheated rooms, as it consists of one part of high-grade Portland cement, two to three parts of sand. It is cast in silicone molds - it is permissible to paint the solution at this stage, or with a roller, sponge, brush, decorate a finished product, which is a wall masonry element, under a brick or stone detail. Artificial bricks are textured, feel like real ones.
Clinker is relatively expensive, so it is rarely used for interior decoration. It is very durable - it is this option that is recommended for lining stoves, fireplaces, external walls building. Clinker tiles contain highly plastic clay, pressed, fired at high temperatures - 1100-1300 degrees. Artificial pigments, plasticizers are not added - this material is the most environmentally friendly, reliable, will last a long time without losing its performance, attractive appearance. Clinker is wear-resistant, has high frost resistance, practically does not absorb water, it is not afraid of sudden temperature changes, strong chemicals, detergents.
Clinker tiles are very decorative - they are available glossy and matte, covered with transparent glaze or with a natural rough surface. The variety of shapes, colors, sizes, textures will allow you to choose it for almost any interior style.
Glue hard tiles various materials can be almost the same. In addition to tools for marking, applying adhesive, you will need a circular saw for cutting tiles Sander with stone discs. The process of laying rigid tiles is more laborious than flexible, due to its heavy weight, the need for careful sealing of seams between individual tiles.
Progress:
Panels for original design brick-like interiors are made of a variety of materials:
They differ in the degree of similarity to real bricks, size, color, thickness, durability. The installation of most types is very simple - the wall is literally assembled like a puzzle or the parts are stacked end-to-end.
Panels can be wall, ceiling.
Parts made of polyvinyl chloride are the most popular in modern times, because of their environmental friendliness, safety, relatively affordable cost. In second place are panels made of modified fiber boards. Shops offer the widest range of such “antique” decor, “wild stone”, etc. MDF is cut with an electric jigsaw, a hand saw, PVC with sharp scissors, a paper knife.
The main advantage of the materials described above is that it is easy to finish even the most uneven walls with them, which do not need to be pre-prepared, leveled, putty. In cases where it is necessary to hide engineering communications in spacious rooms, panels are mounted on a frame made of metal, wood. PVC panels are used in rooms with different temperature, degree of humidity. For sound and heat insulation, a layer of insulation is used in parallel with the panels. MDF is not used in wet rooms - it is suitable for living rooms, the range also includes corner pieces.
Embossed panels made of hardboard, fiberglass, fiberboard, gypsum, etc. are mounted in approximately the same way.
Glass fiber cement parts are durable and beautiful. The composition of the material includes high-quality cement, fiberglass (including non-ferrous), many times increasing the strength of products, in the production of outdoor work, reinforcement with metal structures is often used, which increase the total mass of the structure, increasing its mechanical resistance to any influences. The material is environmentally friendly, they protect the house from radio emission, but its cost is high, therefore it is not available to everyone.
Interior panels are attached to a flat wall with any polymer adhesive, for example, “liquid nails”. For curved, “humpbacked” surfaces, a metal frame with a special hinged system will be required. Heavy MDF panels are additionally mounted with dowels in three to five places. Fiberglass structures are attached to a flat surface using cement tile adhesive.
Brick-like wallpaper is the cheapest, most economical, but not very durable option. Their main advantage is that special skills, tools for installation are not required, as well as invitations of highly qualified specialists. The usable area of the rooms does not decrease at all, after the completion of the work there is practically no garbage left. Paper, vinyl wallpapers do not make the structure heavier, even thin drywall can withstand them. Liquid wallpaper is easily applied to the wall of any curvature, their implementation resembles the installation of cement mortar tiles.
There can be several ways to decorate a homemade "brick" wall:
Styrofoam is a cheap, easily processed material. You can get ordinary foam from cardboard boxes from under furniture, household appliances. Blocks of dense polystyrene foam are purchased at construction markets. The work process is simple: bricks of a suitable size are cut from this material, irregularities are polished with sandpaper. Details are glued to the wall, ceiling with tile adhesive, " liquid nails”, with PVA glue, painted with acrylic, other water-based paint. Irregularities are pre-created with a soldering iron, a clerical knife.
Tip: the preferred size of the bricks is 250 by 120 mm, the distance between them is one to two mm.
The stencil is cut out of a thick sheet of cardboard, rubber, linoleum, bought ready-made in the store. Applying paint, plaster is carried out using a smooth spatula, spray can, brush, sponge, fabric roller. The wall is marked out, retreating from the floor three to seven centimeters, leaving room for seams of 10-15 mm. The most common size of a purchased template is 6.5 cm by 20 cm, almost any can be made at home.
If not a solid, but a partial imitation of a brick is planned, the layout is graphically depicted on paper.
One of the options for finishing an old or fresh “brick-like” wall is concrete. For work you will need:
The wall is pre-cleaned of the previous decor - wallpaper, paint, plaster, etc., if necessary, it is leveled, and then primed. On the initial stage marking is very important - a marking cord or an iron tape measure is used for it. It is desirable to mark with respect to pre-filled strictly horizontal profiles under the ceiling.
Next, a narrow adhesive tape is glued onto the wall so that something similar to bricks is obtained. Plaster, tile adhesive, rotband are applied over the tape and the entire wall with a layer of five to eight millimeters. After the solution has slightly set, the adhesive tape is carefully peeled off, the gaps are leveled with a wooden stack, a hard brush.
Instead of plaster, ordinary tile adhesive is often used; it is recommended that all work be carried out with gloves.
Decorating an apartment with fake, painted, pasted bricks is a very popular type of decoration. Most simple options easy to reproduce with your own hands, for more complex ones you will need not only the advice of specialists, but also their direct participation. Various variations of fake brickwork are selected for almost any popular interior style - from classic to loft. It will be possible to decorate with bricks both the entire house and a small area in the room.
Interior design is done in a variety of ways. If we consider the cheapest and most affordable technologies in terms of independent implementation, then one of the simplest and cheapest is imitation of brickwork.
This design option is applicable to almost any building, regardless of the material of the walls. How to do it yourself, without the involvement of assistants, and even more so specialists, we will figure it out in this article.
The easiest way is along a long rail. Naturally, with exact observance of the distances between the horizontals (the bricks have the same dimensions). You can refer to the standard. The thickness of a single one is 6.5, one and a half - 8.8, double - 13.8 (cm).
There are many techniques, so we will limit ourselves to only the most common, based on the fact that the work is done independently.

Before starting work, the wall must be painted in the color that should be at the seams. Usually gray or white (or something in between). The fact is that, depending on the components, their ratio in the mixture, the dried solution acquires different shade. Further, horizontal seams are indicated (tape sticker). After that, it is easy to select individual bricks, simulating laying with a shift of products in adjacent rows (pieces of adhesive tape are attached vertically).
Peculiarity: since the tape will then have to be removed, there should be free ends, sufficient to grab them with your fingers. After that, the prepared mixture is applied to the wall.
Important: the consistency of the solution should be such that it does not flow down the wall. And the layer should be applied minimal, no more than 2 - 3 mm.
Option number 1- based on gypsum. But this material quickly hardens. Therefore, it is necessary to introduce the so-called "retarder" into the composition of the mixture. Its application leads to the fact that the layer of gypsum mortar does not harden for 20 to 40 minutes. Otherwise, it simply will not work to remove the tape to indicate the masonry seams.

Option number 2- a mixture of plaster + tile adhesive (1 to 1). In this case, only the smallest fractions of sand are used in the preparation process. This means that you will have to specially purchase it, since the usual one (from the river or from the quarry), even well-sifted, will not work.
Flaws: With a large object, pasting the wall with adhesive tape will take a lot of time and the material itself. Too fast curing of the solution can lead to problems removing the adhesive tape from it in order to preserve the appearance of the picture.
The method is more complicated, since you have to prepare the grate. It is made from a sheet of plastic or rubber, knocking out rectangles in it.

In addition, it is advisable to create a template from thin rails, undeniable advantages which are:
Flaws: a stencil needs to be made or money spent on the purchase of a finished product.

For false bricks, a flat polystyrene foam tile without a pattern is suitable. For our purposes, you can use any of its sides. Optimal size“stone” - 7/15 cm. If you increase the proportions, the wall will look unnatural. The process of making “stones” is simple: we squeeze them out of the ceiling tiles.
First, we will mark the polystyrene foam with allowances for the seams. Next, we push straight lines, after which we cut out the “bricks” with a paint knife. Finished goods stick with your own hands on the desired part of the wall. We use ceramic tile adhesive as a binder. There is no need to fill the seams with plaster. The gaps between the “stones” must be made quite small: 1-1.5 mm. After finishing the work on the sticker, the bricks need to be painted. We try to apply as large a layer of paint as possible into the gaps, thereby creating an imitation of brickwork.

For the manufacture of parts, any tile adhesive is used, which is sold in the form of a dry mix. It must be diluted with water to a state of very thick sour cream. It is best to use the composition of white. Then we divide the whole mass into 3 parts, in each of which we add a little paint.
It is important that the paint differs in shade in each part.
Mix the mass in each pile like dough. We will get a mass with beautiful divorces. We roll out a “pancake” from it and cut bricks of the same size. Lay them out to dry. We do this until we get right amount"stones".
We stick them on the wall using the same tile adhesive. We will fill the seams with a composition painted in more dark color. At the end, the surface of the wall can be covered with several layers of varnish.

To get a more natural shade, you should mix two types of ocher: light and red. Then add a small amount of white to them. To make the texture of the brickwork look like a real one, we use the tamping technique for applying paints.
We take a sponge and begin to apply a pre-prepared thick mixture to the wall. After that, you need liquid paint of a “burnt bone” shade. We spray it on the bricks with a regular toothbrush.

To make the decor look even more natural, we color each row in a special way.
The second can be tinted with Mars diluted with water. For the third - use sienna and white. All paints are applied using the same tamping method. Then continue to alternate shades in the same order. Upon completion of the work, it is recommended to varnish the wall in two layers. If there is a desire to get a matte surface, then lightly walk with fine sandpaper.

This type of decoration has several subtleties, because, due to its features, it can both create a special atmosphere and clutter it up.
It is worth remembering that it is not at all necessary to imitate masonry in the area of \u200b\u200ball walls, it will be enough for one surface out of four, decorated in this way. When planning actions, it is important that you imagine a complete image of your own room - and then everything will work out.

Imitation of brick in the interior of the living room

Fake brick wall in the bathroom

imitation brick wall
do-it-yourself cardboard in the bedroom

Fake brick accent wall in the hall

Imitation of aged brick
in the interior of the living room

Styrofoam false brick in the hallway

Brick loft in the interior of the living room

Imitation brick on the kitchen work wall

Figured masonry from false bricks
in the interior of the living room

Stencil false brick in the dining room

Tricolor brick wall imitation
do it yourself

Living room interior
with false brick trim: fusion of a loft with neomodern

flight of stairs,
clad in gypsum bricks

Imitation brick wall in the hallway

Fake brick accent wall in the living room

Textured decorative brick
from tile adhesive

imitation brick wall
do it yourself in the interior of the bedroom

Combination of natural and fake bricks
in the interior of the fireplace room

Do-it-yourself white false brick
in the office interior

Imitation of cardboard brick
on the accent wall attic

Ceiling tile brick
in the interior of the living room

big brick,
stencilled

Fake brick accent wall
in a minimalist room

DIY brick imitation
in the interior of a private house

Very...
A lot of fake bricks in the interior. Clear overkill!

Imitation of brick walls
do it yourself in the interior of the hallway

Painted Styrofoam Brick
In bathroom

Stencil brick fake arch
in the interior of the living room
Brick is one of the most traditional building materials for our country. Therefore, such an element of decoration as brickwork is widely used for decorating the walls of rooms. Designers have long appreciated the wide creative possibilities of brick wall decoration: a variety of shapes and colors of such decor help to create a very interesting and original interior.
Naturally, such ideas are implemented in different ways, taking into account all the possibilities of the owner, as well as the features of the decorated room.
Instead of real brick for interior decoration in modern decor, other materials are often used, the structure of which strongly resembles a brick surface in appearance.
Brick walls can be finished using materials and technologies such as:

The advantage of such materials over real brickwork is that they are much lighter than brick and take up much less volume.

What kind of decor is better to choose to reproduce a brick wall? Let's take a closer look at the most popular brick wall finishes. Knowing the features of each of them, you can easily create a unique wall decor at home.
Building panels are a real leader among the "bricks", famous for their strength and water resistance. This finishing material conquered the market exterior finish, and now has found its application in the interior.

Such imitation panels are made of plastic. And this means that they are not afraid of dust, moisture, or mold with rust. In addition, such brick panels are highly resistant to alkalis and acids, they are not at all afraid of hot fat droplets, so they are often used in the kitchen.

Advantages:

Flaws:
Brick panels are mounted both horizontally and vertically, so the pattern on them depends on the location method. They are mounted on nails, screws or self-tapping screws. Most of these are mounted directly on the wall.

At decorative panels under a brick, each element has its own independent fixation, so an accidentally damaged part of the “bricks” can be replaced in half an hour.
Important: Brick panels are perfect option balcony decor, kitchen apron or a crowded corridor.
An excellent alternative to brick for wall cladding is clinker tiles. This is an inexpensive and very beautiful analogue made from raw clay. According to its characteristics, the method of laying and the thickness of the tile under the brick is no different from a simple tile.

Imitation of stone brickwork made of plaster looks very impressive and unusual. In addition, it is very easy to do it yourself.

Advantages:

Flaws:

Decorative plaster under a brick make out:

Important: This type of imitation is very popular with creative people, as it provides great opportunities for the flight of fancy.
A great way to decorate brick walls is painting. The color for the bricks is selected depending on the style of the room, your mood and individual taste.

Modern interior solutions that use such a "brick wall" most often belong to one of two styles:

A great option for "brick" is elastomeric paint. It fills all the cracks formed due to the shrinkage of the walls, protects the surface from moisture and strengthens it. For bright and colorful decoration, acrylic and water-based paints. They are applied with brushes of different thicknesses, and if you want to create an additional dust-repellent or water-repellent coating, you can take a wide roller of fur.
Flaws:Advice: to add realism to a drawing made under a brick, you can subtract or add a few millimeters from each brick.
A special cosiness can be created indoors, if you play with the design of the walls, and imitation brick wall is the best approach in this regard. After all, the comfort attached to the home depends on the beauty and quality of their design. An important role is given to the choice of the appropriate material from which masonry and imitation will be carried out.
Owners of houses, apartments, studio apartments and commercial establishments that decide to install just such a wall in their home, it is recommended to pay attention to several parameters - the aesthetics of materials, the price category of their formation, effective area separated room. You can imitate a brick wall in any room on your own, there are many methods for this, so the average user often does not know where to start.
Consider various techniques that allow you to achieve a colossal result, during which you will be able to choose the best option. The essence of any of them is to use a special template used during applying plaster. To make the result as strong and reliable as possible, there is a recommendation to add binding elements to the facing compositions, in particular, tile adhesive. Thanks to this approach, it is possible to ensure the setting of the material.
Anything can act as this element, but traditionally all the above objects are divided into two main classes.
Practice shows that hybrid variants can often be used, in which both types of template take place. In such a situation, the manufacture of the outer frame is carried out from special wood. The size of the template is small, otherwise it will be difficult for builders to move it from one place to another, and difficulties may arise during the passage of jagged areas of the wall.
How to get out of this situation? Everything is quite simple!
Thus, a brick wall is a great option to emphasize the necessary features of your interior and focus on the most important details.
In the photo you can see the main options and see for yourself that the imitation of brickwork made on the wall of your apartment, house, office is an opportunity to fly your imagination and implement numerous creative ideas.
There are several basic techniques by which you can achieve high-quality imitation. The options envisaged in practice can be implemented by you personally, because the technique for their implementation is extremely simple and convenient.
Wallpaper with imitation brickwork have always been of interest to designers, and this is not surprising. Modern technologies used in the field of printing, allow you to make a high-quality "optical illusion". Using typical paper wallpaper or vinyl wallpaper has certain advantages:
If you decide to decorate your interior using this technique, be sure to pay attention to the so-called innovative wallpapers that are made of paper, since traditional wallpapers look less realistic compared to them.
At this point we will talk O plastic panels, which already in principle repeat the brickwork. With the use of such panels, along with glue, you can quickly decorate the wall with bricks, literally dressing it. Moreover, this option is suitable for use both indoors and in the case of finishing of building facades. If there is a need for additional wall insulation, then it is necessary to mount the panels on the crate.
Advice! In order to be able to glue these panels in the interior of the room with high quality, preliminary preparation of the walls will certainly be required.
In general, it will not be difficult to achieve a high-quality result by making decoration with your own hands.

Creating a new living room interior with a brick wall
Decoration works wall surfaces in this situation are carried out on plaster. In this case, a ready-made rubber stencil is used, a pattern imitating masonry is applied to it. To perform the work, you do not need any special knowledge: you need to moisten the working side of the stencil with water, and then dip it into the bath against the wall. Further, it is taken away from the wall, and traces of seams between bricks will certainly remain on the surface.
The cycle of actions of such a plan is repeated until the end of the result, the stencil gradually moves to a new place. The layer of plaster, which has already hardened, is primed and then covered with a special building material - wax. After that, the final stage starts - the coloring of bricks and seams. You can use a special plastering solution, which will avoid the need for coloring.
It's important to know! In the course of choosing the coloring composition used to decorate the room, it is worth remembering that after drying there will be a significant darkening.
This option will become truly relevant for people who prefer to bring the simulation closer to the most realistic option. For this, tiles are used, which are glued to previously prepared surfaces. In principle, the option is similar to the process of wall cladding with tiles. Natural tiles for cladding, in which case, can be made independently - from wood, gypsum, polystyrene.
Imitation tiles from plaster - one of the most popular options used in modern interiors. The method is carried out in reality in a similar way to the stencil technique, and here you will need fresh plastering.
So, imitation of brickwork on the wall is relatively simple work if you learn some basic techniques and technologies for its implementation.
This method is suitable if you already have a finished wall - a plastered surface. A putty is applied to this face, previously painted in the color of a stone brick. Next, you need to make contours and relief on putty, which is slightly frozen.
Often you can find an imitation of foam. This approach, when done correctly, has many advantages:
In general, this approach has many positive aspects, so you can “turn a blind eye” to some defects and disadvantages. You can entrust the execution of work to an experienced master or take it on yourself, it all depends on your desire to bring comfort and the desire to take on painstaking work. In general, the foam is attached to the surface and painted easier than other materials.
Advice! In order for the work to turn out to be of high quality, it is necessary to choose only durable napkins, otherwise they will roll in the glue. Before proceeding with gluing them, it is advisable to crumple a little in your hands so that good folds form, allowing you to fully imitate the required surface.
Such an imitation of a brick wall in the interior is a reliable and proven way to decorate surfaces in the kitchen, in small living room and even in bedroom. The main thing is to choose a creative approach and have a desire to create real beauty.
Proverbs and sayings about May HORIZONTALLY: 2. May will deceive - in ... will leave.4 ....

Popova V.N. primary school teacher MBOU "Kishertskaya secondary school" Rebus is ...

To learn how to compose and understand puzzles, you should figure out what they are from ...