So I bring to your attention a simple, but very long recipe for cooking ...


Have you ever wondered how to make an ottoman with your own hands? Actually, it's easy. The main thing is to choose necessary materials and tools, and then proceed according to the instructions. The ottoman is a very comfortable thing in the interior. It doesn't take up much space. You can choose from many design options depending on the style of the room. In addition, making it yourself is a pleasant thing that allows you to embody the most interesting ideas.
The frame pouffe is very easy to make yourself. Such a piece of furniture will decorate the room and will serve as a chair (and very comfortable and soft). In addition, you can also store any small items in it.
It is necessary to prepare in advance a ruler, glue (carpentry type), a pencil, a stapler (construction), a hacksaw, wood screws, a screwdriver and a hammer. Of the materials you will need a special fabric with which we sheathe the frame. It is necessary to choose exactly the one that is intended just for decorative upholstery upholstered furniture. In addition, we need 1 more timber with dimensions of 15 * 4 * 4 cm, a pair of piano hinges, 4 rollers for furniture, chipboard with dimensions of 175 * 240 * 0.16 cm. All this is taken based on a standard ottoman with dimensions of approximately 40 *40*50 cm.
Before starting work, you need to study step by step instructions. It is as follows:
Now the ottoman is completely ready. And this is not just a beautiful item - it can replace a chair and a small bedside table for small things.
At home, you can make an ottoman from the most unusual items. For example, you can use plastic bottles. There are already many crafts from this available material. A pouf from it will not only differ in its decorative properties but also very practical.

It is necessary to prepare 40 plastic bottles in advance. And don't throw away the lids. In addition, you also need adhesive tape - choose only a wide tape. For filling, a synthetic winterizer or foam rubber is needed - the material will be used for lining. Additionally, you need scissors, knitting threads, a stapler, a hook or knitting needles that are used for knitting. And of course, you need to choose a decorative fabric for upholstery.
Do-it-yourself ottoman step by step looks like this:
Now the pouffe from ordinary plastic bottles is ready. By the way, it can be done with a back. In this case, it is still necessary to make a blank of such a shape that the pouffe should have. The back of the product must also be sheathed with foam rubber and decorative fabric.
Do-it-yourself round ottoman can be made from a coil. If the interior of the room is made in a rustic or classical style, then you can decorate it with a pouf, which is made from a coil. The result is a durable and reliable product that can be decorated according to own will. The pouf will turn out original and interesting.
You need to find a wooden coil. It can be made not from wood, but from chipboard - this option is also suitable. Cardboard, upholstery, batting or foam rubber, polystyrene and adhesive mass are also needed. From the tools you need to prepare in advance a drill, a stapler and sewing machine.
Instructions for creating a pouffe are as follows:
At the end, it remains only to attach the legs to the structure.
From the fabric you can make a multi-colored pouffe. The original product comes out. For it, you will need various pieces of fabric, but they must all be combined with each other in shades. In addition, fillers and lining material are needed. Still need big buttons.

The algorithm of actions is quite simple:
You can also make an interesting and simple pouffe from an ordinary sweater. Such an item will fit into any interior, and everyone will cope with its creation. You need to find a suitable sweater - you can even take a worn one, but it is recommended to choose a product made of wool.
Another interesting option is a pouf that looks like a ball. To create it, you only need polyethylene, fillers, graph paper (to make a pattern) and various fabrics in two shades. This ottoman is very simple, but at the same time comfortable and will definitely fit into any room.
Among all the options listed, everyone will be able to find the one that is most suitable for him. All the instructions described are very simple, so that even a beginner can cope with such a task and make a pouffe with his own hands. This piece of furniture is very convenient and practical. In addition, it will also decorate the room.
A pouf is a soft low stool. But in the lexicon, a diminutive form of this word has taken root - an ottoman. Who decided to try to make upholstered furniture on their own, an ottoman is the easiest option. In this article you will receive step by step instructions how to make an ottoman.
Pouffes are made various forms and materials exterior finish. For a small hallway, you can make a pouffe with a built-in cupboard for storing shoes, for a nursery - a soft ottoman.

The pouffe looks very respectable as part of a furniture set made of leather. Photos of various ottomans, including self made presented on this page.

The idea of how to make an ottoman without spending a lot of money can be realized by making it from improvised materials. For example, a soft frameless fabric ottoman.


For manufacturing you will need:

First, we make a pattern for the top and bottom of the pouffe. We draw a circle with a diameter of 35-40 cm on whatman paper. Do not forget about seam allowances. We transfer to the fabric, cut.

Next, we cut out a rectangle from the fabric equal to the circumference of the seat of the ottoman. For a diameter of 40 cm, the circumference is 126 cm. The width of the rectangle will be equal to the height of the finished ottoman. Don't forget about seam allowances.

We sew a rectangular pattern first to one circle, then to the second. We sew a zipper. We stuff it tightly - the ottoman is ready.

The sizes given in the description are not dogma, choose them according to your taste. If there are no solid cuts of matter, sew the necessary parts from various pieces of fabric. The best option DIY patchwork style ottoman will collect a lot of likes on social networks.

"Pear" is another version of a frameless pouffe. It uses polystyrene as a filler. Basically, it's a bag with styrofoam inside. It is very comfortable to sit on such a chair because it takes the shape of the body. Our site will tell you how to sew an ottoman bag from improvised materials with your own hands and what you need for this.

Unlike the previous version, the pear ottoman is made from two bags. They are inserted into each other, and the filler is poured. If necessary, the top cover can be removed and washed.


The filler bag is made of dense fabric, such as jacquard. The outer cover is made from a variety of fabrics - fantasize about it.

For each cover you will need a fabric 1.5 m wide and 2.2-2.5 m long. You will need two zippers. For the inner bag - from 40 cm, for the outer one - 1 m.

The filler is polystyrene. It is a harmless, hypoallergenic filler. Polystyrene is sold in stores for frameless furniture.

If you make an ottoman-pear to the maximum budget option, then packaging foam can be used as a filler. Pieces of foam crumble into small balls, but this is a troublesome task.

Styrofoam balls stick to everything, scatter at the slightest flutter of air. To clean up the room where the foam was crumbled, only a vacuum cleaner will help. One ottoman needs 120-140 liters of polystyrene.

Note! 
We make blanks of parts according to a paper pattern, we sew bags. Then, pour the filler into the inner case. We put on the top cover, we fasten it. Ready.

Another way to do new item upholstered furniture, is to update the old upholstery. The choice of fabrics in stores selling furniture components big. You will find information on how to beautifully sheathe an ottoman with your own hands on our website.

You will need the following materials and tools for bracing:

We disassemble the old ottoman, remove the staples securing the fabric. We carefully unpick the old upholstery, it will serve as a template for a new pattern. In addition, according to the old upholstery, you can calculate required amount new fabric. Assess the condition of the foam.

You can sew a new upholstery according to the standards of the old upholstery and just fit the ottoman. And you can give a ottoman new design, add folds, stitches, ties to the upholstery. This will require a little more fabric.


If the old foam began to collapse, then it is easy to replace it. This requires foam rubber of appropriate thickness. Better fit foam rubber with a density of 25-30 kg / m3.
Note! 

We draw the outline of the ottoman seat on the foam rubber and cut it out with a sharp knife. In the production of furniture, foam rubber is glued to a specialized glue. At home, you can use any glue that does not contain toluene.

A pouffe with a lid is very convenient for storing things. For his self-manufacturing you will need simple tools that are available in the arsenal of any home master: jigsaw, drill, stapler. You can find diagrams and drawings of how to make an ottoman with a lid on our website.

Making a soft ottoman at home is very simple. This does not require production facilities and expensive equipment. And the master classes of our site will help you with this.


Note! 


Photo: apairandasparediy.com
You will need:
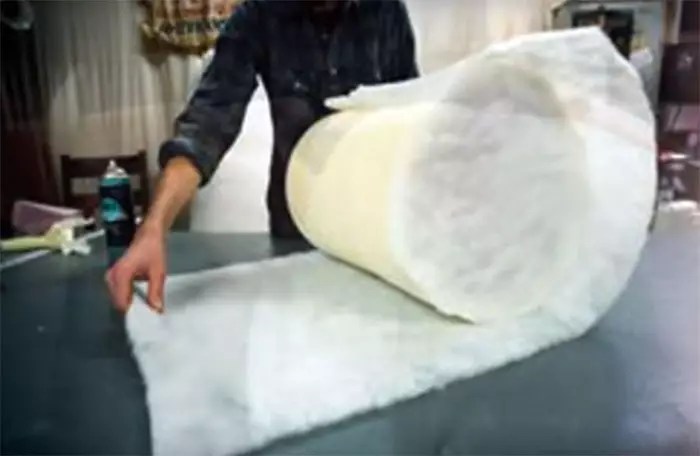
- thick fabric this case a textile mat about 2 m long was used);
- burlap;
- a pillow of the appropriate size with a "ball" filler (made of polystyrene balls);
- pins, scissors, sewing machine and threads.

Photo: apairandasparediy.com
1. Guided by the size of the pillow, draw 5 parts on a dense fabric: 1 square for the top and 4 rectangular side ones.

Photo: apairandasparediy.com
2. Cut out the details.

Photo: apairandasparediy.com
3. Cut out another square piece from the burlap fabric.

Photo: apairandasparediy.com
4. Pin the pieces together.


Photo: apairandasparediy.com
5. Sew the details from the inside out, leaving one side free. Unscrew the product.


Photo: apairandasparediy.com
6. Place the pillow inside and sew up the pouffe by hand.

Photo: apairandasparediy.com


Photo: nomadicdecorator.com
You will need:
- dense fabric for a pouffe;
- a pillow of the appropriate size and shape with a "ball" filler (you can also use a pillow with foam rubber or other dense filler);
- stencil, acrylic fabric paint, wide flat brush or sponge for applying paint;
- scissors, sewing machine, threads.
1. Prepare a pattern: two circles for the base and top of the pouf, plus a rectangular canvas with a length equal to the circumference of the base of the circle and a width corresponding to the desired height of the future pouf. Open the fabric, not forgetting the seam allowances.

Photo: nomadicdecorator.com
2. While attaching the stencil to the fabric, use a brush or sponge to apply the pattern acrylic paint.

Photo: nomadicdecorator.com
3. Sew the rectangle piece with one of the circle pieces, sew up the side seam, turn inside out. Place a pillow inside and sew the second round.

Photo: nomadicdecorator.com


Photo: creativeoutpour.com
You will need:
- dense fabric;
- Velcro tape;
- sewing machine, threads;
- material for stuffing the pouffe - unnecessary padding polyester pillows, old clothes cut into ribbons or patches, and so on, plus plastic bags.
1. Make a pattern: 2 large square for the top and bottom of the pouffe and 4 rectangles for the sides. Cut out the fabric, remembering the seam allowances.

Photo: creativeoutpour.com
2. Pin the parts together and sew them on the machine, leaving a hole of about 20 cm.


Photo: creativeoutpour.com
3. Turn the pouffe inside out. Turn the edges of the fabric holes inside, pin and sew Velcro.


Photo: creativeoutpour.com
4. Do not fill plastic bags very tightly with filler. Then place them in the pouf - just enough so that it retains its shape but is not too hard.


Photo: creativeoutpour.com


Quite often, our favorite items that we use for a relatively long time lose their original appearance or simply get bored. Sometimes it happens that there is a desire to make repairs and update the interior of the room, but at the same time not to part with your favorite piece of furniture, which, in its style or color, does not fit into the new design. And if we are talking about such items as soft pouffes, it is enough to change their lining, and they will be able to please you for many years to come, making life more comfortable and cozy. Covering the pouffe with new fabric and soft lining, you will get a completely new piece of furniture that will fully match its style and your taste. If you still do not know how to sheathe a pouffe yourself, then this article is for you.
Our story will also be useful for those home craftsmen who are going to sew an ottoman from burlap, leather, old jeans with their own hands or make it from plywood and cover it with upholstery fabric. After reading the article, you will be convinced that these processes do not require special knowledge and experience in furniture upholstery. Possessing elementary cutting skills and knowing how to sew fabric parts together, you can easily cope with the task.
For execution finishing works You will need the following tools and materials:
First you need to choose which stylistic decision your new one will have easy chair. Depending on the style, I cover the ottomans with various fabrics of dense texture - tapestry, suede, velor, velvet, eco leather, eco fur and other materials.

Furniture velor
So, for example, for classic design a pouffe covered with satin or brocade-like fabric is perfect.

Satin for padded poufs
If you are planning to decorate a room in ethnic style, then a matting pouffe will look very good in it.

Modern interior styles are perfectly complemented by original pieces of furniture made in the patchwork style.

Patchwork furniture
To make such a cover, you will need several patches of dense fabric in contrasting colors, from which identical wedges should be cut and sewn together. It will turn out a very bright and stylish seat for an ottoman. The sides of the chair cover can be cut out of a plain fabric that matches the color tone of one of the patches.
Take your old ottoman or make a ottoman frame out of chipboard sheets or plywood. In accordance with its size, make patterns from the prepared fabric.

We make patterns
According to the size of the seat, we cut out a blank from foam rubber.

Fitting the lid
Next, you need to measure and sum up the width of all the sides of the pouffe. According to the measurements obtained, taking into account the height of the product, we cut out a piece of synthetic winterizer and sheathe the side parts with it. We fix the synthetic winterizer with a furniture stapler.

We fit the sides
For the convenience of performing these works, you can first apply special glue to the walls of the pouffe frame. In the same way, fix the foam blank on the seat of the chair. Carved from upholstery fabric attach the patterns with a stapler to a soft base, tucking the edges.

We apply a decorative pattern
At the joints of the parts, glue a suitable decorative cord or apply a decorative pattern on the sides.

The pouf is ready
Another way to update the ottoman with your own hands is to sew a cover from the selected material. This option will be more practical, since if necessary, it can be removed, washed and pulled over the pouffe again.

Case update
To do this, fabric patterns must be tacked together and stitched on a sewing machine.

We make patterns

We sew all the details
After we sew all the details together, it is necessary to cut off the excess fabric and smooth out the seams with an iron.

Trim excess seam allowances for a snug fit
The bottom edge must be hemmed on a typewriter or manually and also ironed. We turn the cover inside out and put it on the pouffe, straightening the folds.

We put on a cover
On this, work on the updated pouf is not completely finished - if desired, it can be decorated. For example, in the middle of the patchwork seat, you can sew a large button, having previously fitted it decorative material in the color of the sides.
An ottoman trimmed with ruffles or lace is perfect for a bedroom or a children's room for a girl.

Pouffe decor option for the bedroom
The fringe sewn on the bottom will look good on a product designed for a baroque or classic interior.

Baroque fringed pouffe

Pouf pear
If your favorite bag chair has lost its former beauty due to the wear of the fabric on the outer shell, then you will have to restore the ottoman. Of course, you can throw it away and buy a new one, but believe me, repairing it will be more pleasant and less expensive than buying a new bag.
If the inner burlap is in good condition, and the filler has not shrunk and still holds the shape of the chair, then you will be able to quickly update the product.
The simplest option is to remove the old cover from the bag and, in accordance with the shapes and sizes of its wedges, cut out new blanks from the fabric. To do this, we choose dense and strong material for the new outer shell of the bag, we make a pattern and sew all the details together from the wrong side. Then we cut off all the excess fabric, steam the seams with an iron and turn the product inside out. We sew in a zipper and update our old pear ottoman by putting a new and beautiful outer cover on it.
By the same principle, you can sew a stylish and fashionable ottoman from old jeans. It will look pretty good in a children's room or a youth apartment. To do this, you will need several pairs of unnecessary jeans and a great desire to sew an ottoman out of them.
We cut the legs lengthwise, cutting off the seams We sort the patches by color We sew the whole fabric The finished jeans chair
If you already have filled burlap, you just have to make a pattern on paper, examples of which can be easily found on the net, and transfer it to pieces of jeans that were previously ripped at the seams.
When choosing a pattern, keep in mind that the width of the wedges for the bag chair should be no more than the width of the legs.
Now you know how to sheathe an ottoman at home with your own hands and you can easily give new life to their old, but very beloved, soft and cozy pieces of furniture.
As with minimum investment? You can make a designer ottoman with your own hands, which, in addition to the decorative function, also solves several practical problems. This is a rather unusual accessory that immediately attracts attention. Having shown a little creative imagination, you can make a completely unique product from old tires or suitcases, and the addition of wheels will make the design more mobile. Today, the editors of the online magazine site will hold several workshops on making an ottoman from unusual things, with the help of which you can first make simple, and then more complex and unusual interior items.
The ottoman came to us from the East, they do not use it so often, preferring to sit on small structures. It quickly gained its popularity due to its mobility and versatility. The main advantage of the design is that it is easy to make it yourself from old things that you decide to dispose of. Today you can buy an ottoman bag or on a rigid frame of any design and finish. But why shell out money for something that is easy to do with your own hands in just 1-2 hours?

Manufacturers produce a wide variety of ottomans: for a children's room, hallway, bedroom, and even for country rest. They are offered at a fairly high price, but why spend personal finances on something that is quite within the power to do it yourself? And for this you absolutely do not need to be a professional, just show a little imagination and follow our instructions.
The easiest way to make an ottoman is from plastic bottles. You must first prepare the following materials:
Advice! First you need to unscrew all the lids and put them in the cold overnight or put them in the freezer plastic bottles. In the morning, immediately screw the caps on and put them under the battery. In such a simple way, the strength of the bottles increases.
A step-by-step photo description of making a pouffe with your own hands from plastic bottles.
| Illustration | Action Description |
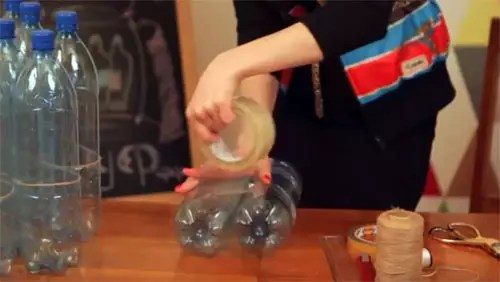 | Connect with an elastic band 2 times 2 bottles, 2 times 3 bottles and 1 time - 4 plastic. Then secure with adhesive tape. |
 | Connect the entire structure together and fasten. |
 | Cut out 2 ovals from plywood according to the size of the bottom of the ottoman, make small notches on them from the outside. Glue a dense fabric onto one oval - this will be the bottom of the structure. |
 | Glue plywood to the structure from above and below with double-sided tape. |
 | For greater strength, tie the ovals with twine along the notches. |
 | Wrap an ottoman with thin foam rubber and sew with a dense thread. |
 | Cut out the top of the structure from wide foam rubber. |
 | Sew the seat to the foam sides. |
 | Sew a cover of bright fabric, pull the cord along the bottom base and put it on the workpiece. |
 | The finished product weighs no more than a kilogram. |
For more details of the master class, you can watch the video.
Related article:
Photo examples, drawings, schemes, materials; features of the manufacture of furniture for the garden, nursery, baths, gazebos, advice and recommendations of the masters - read in our publication.
If you have a 20-liter bottle left, you can make it for the smallest children. For this you will need:
The work is carried out as follows;

A creative ottoman can be made with your own hands from an old wheel. It is quite heavy, so either is more suitable. In addition, this is a great option for or. The production order is as follows:

In more detail, a master class for making an ottoman from old tire you can watch the video.
If you have an old plastic bucket, you can also convert it into an upholstered seat. For work you will need:
Before sheathing the ottoman with your own hands, you need to measure the diameter of the lower and upper parts of the bucket. Further, the algorithm of work is as follows:
Ready ottoman will be a real decoration of any interior.

In more detail, the process of making an ottoman from an old bucket can be viewed on the video.
Related article:
: what is it, advantages and disadvantages; step by step manufacturing coffee table, armchairs, sofas, benches, shelving; features of the decor with a photo - read in the publication.
A comfortable child seat can be made from an old coil of electrical cable. For work you will need:
Progress:

For the bedroom, soft frameless pouffes are perfect, which, in addition to the functional load, also act bright accent in the interior, photo examples are proof of this. And if you take expensive fabric for decoration, the soft design will emphasize the wealth of the owner and taste.
Needlewomen can please their families with their creativity and knit a cover on a bag with filler. This is a great addition to stylish interior, formatted in . First, you should sew the bag, fill it with foam rubber, and then proceed to the main work. Master class on making a knitted ottoman with your own hands:

Another interesting master class on making a knitted ottoman can be viewed on the video.
The order of work is practically no different from the manufacture of a round pouffe, only the templates should be prepared in a square shape. Each part must be knitted separately, the inner cover is sewn, into which the filler is then poured. Can be done and wireframe model, for example, from which are covered with foam rubber and decorative fabric. In more detail, a master class on making a pouffe from pallets can be viewed on the video.
A modern accessory that many families love so much is the pear bag. To make a soft ottoman with your own hands, you need to master the sewing technique. Before work, prepare the following materials:
The production order is as follows:


From beautiful matter, you can sew a bag of any shape. For work, you should prepare a flowing fabric for the inner cover and beautiful material for outer surface. Before you sew an ottoman bag with your own hands, you need to make patterns for 4 sidewalls, the lower and upper parts, photo ready-made solutions will help you choose an interesting design.
Then transfer them to the fabric and cut out taking into account the allowances for the seams. After that, sew all the fragments of the inner cover, leaving a small hole into which to pour the filler. All manipulations should be carried out with decorative fabric, the patterns of which can be made according to the same patterns.

For more complex work need a little more time and skills carpentry. But there is nothing difficult in such work, just look at a few of our step-by-step instructions, and you can do everything yourself.
With a little work, you can make a more solid design - a square ottoman with a removable lid on wheels. It is also an additional toy, and you can also store slippers for guests in it. For work you will need the following materials:
An ottoman up to 40 cm in height is suitable for children, up to 55 cm for adults. In the table, we have prepared the dimensions of details for an ottoman intended for children and adults.
| Detail | Quantity, pcs. | Dimensions for children, mm | Dimensions for adults, mm |
| Front and back panel | 2 | 350×250 | 400×370 |
| Side panels | 2 | 326×250 | 368×370 |
| Bottom and top | 2 | 350×350 | 400×400 |
| Wooden blocks for sidewalls | 4 | 40×40×250 | 40×40×370 |
| Bars for the top | 2 | 350×1450 | 550×1650 |
| Upholstery fabric for sidewalls | 1 | 350×1450 | 550×1650 |
| Sintepon | 1 | 300×1410 | 450×1610 |
| Foam rubber | 1 | 350×350×50 | 400×400×100 |
| Lid material | 1 | 500×500 | 650×650 |


Do not rush to throw away the old, but still strong stool. Just a couple of hours, and you will add an interesting designer piece of furniture to your interior. The manufacturing process is as follows:


So I bring to your attention a simple, but very long recipe for cooking ...

Trout in cream - general principles of preparationBefore cooking trout ...

Alexander Gushchin I can't vouch for the taste, but it will be hot :) Contents The usual...